headlamp GMC TERRAIN 2015 User Guide
[x] Cancel search | Manufacturer: GMC, Model Year: 2015, Model line: TERRAIN, Model: GMC TERRAIN 2015Pages: 357, PDF Size: 4.04 MB
Page 150 of 357

Black plate (5,1)GMC Terrain/Terrain Denali Owner Manual (GMNA-Localizing-U.S./Canada/
Mexico-7707484) - 2015 - crc - 10/1/14
Lighting 6-5
1(Door):The lamps come on
automatically when a door is
opened.
+(On): Turns the dome
lamps on.
The dome lamps can also be turned
on and off by pressing the buttons
next to the lamps.
Reading Lamps
The reading lamps are located on
the overhead console. These lamps
come on automatically when any
door is opened.
For manual operation, press the
button next to each lamp to turn it
on or off.
Lighting Features
Entry Lighting
The dome lamp, cargo lamp, and
foot lamp inside the vehicle come
on when any door is opened, if the
dome lamp is in the door position. In
addition, these lamps come on
when the Remote Keyless Entry
(RKE) unlock button is pressed.
They stay on for 20 seconds or until
a door is opened. After the door is
opened and then closed, the light
remains on for 20 seconds, or until
the ignition is turned to ON/RUN.
Battery Load
Management
The vehicle has Electric Power
Management (EPM) that estimates
the battery's temperature and state
of charge. It then adjusts the voltage
for best performance and extended
life of the battery. When the battery's state of charge
is low, the voltage is raised slightly
to quickly bring the charge back up.
When the state of charge is high,
the voltage is lowered slightly to
prevent overcharging. If the vehicle
has a voltmeter gauge or a voltage
display on the Driver Information
Center (DIC), you may see the
voltage move up or down. This is
normal. If there is a problem, an
alert will be displayed.
The battery can be discharged at
idle if the electrical loads are very
high. This is true for all vehicles.
This is because the generator
(alternator) may not be spinning fast
enough at idle to produce all of the
power needed for very high
electrical loads.
A high electrical load occurs when
several of the following are on, such
as: headlamps, high beams, fog
lamps, rear window defogger,
climate control fan at high speed,
heated seats, engine cooling fans,
trailer loads, and loads plugged into
accessory power outlets.
Page 169 of 357

Black plate (8,1)GMC Terrain/Terrain Denali Owner Manual (GMNA-Localizing-U.S./Canada/
Mexico-7707484) - 2015 - crc - 10/1/14
9-8 Driving and Operating
.Use headlamps even during the
day to make the vehicle more
visible.
{Warning
Driving to the top of a hill at high
speed can cause an accident.
There could be a drop-off,
embankment, cliff, or even
another vehicle. You could be
seriously injured or killed. As you
near the top of a hill, slow down
and stay alert.
.Never go downhill forward or
backward with the transmission
in N (Neutral). The brakes could
overheat and you could lose
control.
.When driving down a hill, keep
the vehicle headed straight
down. Use a low gear because
the engine will work with the
brakes to slow the vehicle and
help keep the vehicle under
control.
{Warning
Heavy braking when going down
a hill can cause your brakes to
overheat and fade. This could
cause loss of control and you or
others could be injured or killed.
Apply the brakes lightly when
descending a hill and use a low
gear to keep vehicle speed under
control.
If the vehicle stalls on a hill:
1. Apply the brakes to stop the vehicle, and then apply the
parking brake.
2. Shift into P (Park) and then restart the engine.
.If driving uphill when the
vehicle stalls, shift to
R (Reverse), release the
parking brake, and back
straight down.
.Never try to turn the vehicle
around. If the hill is steep
enough to stall the vehicle,
it is steep enough to cause
it to roll over.
.If you cannot make it up the
hill, back straight down
the hill.
.Never back down a hill in
N (Neutral) using only the
brake.
.The vehicle can roll
backward quickly and you
could lose control.
.If driving downhill when the
vehicle stalls, shift to a
lower gear, release the
parking brake, and drive
straight down the hill.
3. If the vehicle cannot be restarted after stalling, set the parking
brake, shift an automatic
transmission into P (Park), and
turn the vehicle off.
3.1. Leave the vehicle and seek help.
Page 174 of 357

Black plate (13,1)GMC Terrain/Terrain Denali Owner Manual (GMNA-Localizing-U.S./Canada/
Mexico-7707484) - 2015 - crc - 10/1/14
Driving and Operating 9-13
{Warning
Snow can trap engine exhaust
under the vehicle. This may
cause exhaust gases to get
inside. Engine exhaust contains
carbon monoxide (CO) which
cannot be seen or smelled. It can
cause unconsciousness and even
death.
If the vehicle is stuck in the snow:
.Clear away snow from around
the base of your vehicle,
especially any that is blocking
the exhaust pipe.
.Check again from time to
time to be sure snow does
not collect there.
.Open a window about 5 cm
(2 in) on the side of the
vehicle that is away from the
wind to bring in fresh air.(Continued)
Warning (Continued)
.Fully open the air outlets on
or under the instrument
panel.
.Adjust the climate control
system to a setting that
circulates the air inside the
vehicle and set the fan speed
to the highest setting. See
“Climate Control Systems.”
For more information about
carbon monoxide, see Engine
Exhaust on page 9-25.
To save fuel, run the engine for only
short periods as needed to warm
the vehicle and then shut the engine
off and close the window most of
the way to save heat. Repeat this
until help arrives but only when you
feel really uncomfortable from the
cold. Moving about to keep warm
also helps. If it takes some time for help to
arrive, now and then when you run
the engine, push the accelerator
pedal slightly so the engine runs
faster than the idle speed. This
keeps the battery charged to restart
the vehicle and to signal for help
with the headlamps. Do this as little
as possible to save fuel.
If the Vehicle Is Stuck
Slowly and cautiously spin the
wheels to free the vehicle when
stuck in sand, mud, ice, or snow.
If stuck too severely for the traction
system to free the vehicle, turn the
traction system off and use the
rocking method. See
Traction
Control/Electronic Stability Control
on page 9-32.
Page 199 of 357

Black plate (38,1)GMC Terrain/Terrain Denali Owner Manual (GMNA-Localizing-U.S./Canada/
Mexico-7707484) - 2015 - crc - 10/1/14
9-38 Driving and Operating
the vehicle-ahead indicator will
display green. Vehicles may not be
detected on curves, highway exit
ramps, or hills; or due to poor
visibility. FCA will not detect another
vehicle ahead until it is completely
in the driving lane.
{Warning
FCA does not provide a warning
to help avoid a crash, unless it
detects a vehicle. FCA may not
detect a vehicle ahead if the FCA
sensor is blocked by dirt, snow,
or ice, or if the windshield is
damaged. It may also not detect a
vehicle on winding or hilly roads,
or in conditions that can limit
visibility such as fog, rain,
or snow, or if the headlamps or
windshield are not cleaned or in
proper condition. Keep the
windshield, headlamps, and FCA
sensors clean and in good repair.Collision Alert
When your vehicle approaches
another detected vehicle too rapidly,
the red FCA display will flash and
sound several high-pitched beeps
from the front. When this Collision
Alert occurs, the brake system may
prepare for driver braking to occur
more rapidly which can cause a
brief, mild deceleration. Continue to
apply the brake pedal as needed.
Cruise control may be disengaged
when the Collision Alert occurs.
Tailgating Alert
The red Collision Alert display will
stay continuously illuminated when
following a detected vehicle ahead
much too closely.
Selecting the Alert Timing
The Collision Alert control is on the
steering wheel. Press COLLISION
ALERT to set the FCA timing to far,
medium, near, or off. The first button
press shows the current control
setting on the DIC. Additional button
presses will change this setting. The
chosen setting will remain until it is
changed and will affect both the
Collision Alert and the Tailgating
Alert features. The timing of both
alerts will vary based on vehicle
speed. The faster the vehicle speed,
the farther away the alert will occur.
Page 206 of 357

Black plate (45,1)GMC Terrain/Terrain Denali Owner Manual (GMNA-Localizing-U.S./Canada/
Mexico-7707484) - 2015 - crc - 10/1/14
Driving and Operating 9-45
Lane Departure
Warning (LDW)
If equipped, LDW may help avoid
crashes due to unintentional lane
departures. It may provide an alert if
the vehicle is crossing a lane
without using a turn signal in that
direction. LDW uses a camera
sensor to detect the lane markings
at speeds of 56 km/h (35 mph) or
greater.
{Warning
The LDW system does not steer
the vehicle. The LDW system
may not:
.Provide enough time to avoid
a crash.
.Detect lane markings under
poor weather or visibility
conditions. This can occur if
the windshield or headlamps
are blocked by dirt, snow,
or ice; if they are not in(Continued)
Warning (Continued)
proper condition; or if the sun
shines directly into the
camera.
.Detect road edges.
.Detect lanes on winding or
hilly roads.
If LDW only detects lane
markings on one side of the road,
it will only warn you when
departing the lane on the side
where it has detected a lane
marking. Always keep your
attention on the road and
maintain proper vehicle position
within the lane, or vehicle
damage, injury, or death could
occur. Always keep the
windshield, headlamps, and
camera sensors clean and in
good repair. Do not use LDW in
bad weather conditions.
How the System Works
The LDW camera sensor is on the
windshield ahead of the rearview
mirror.
To turn LDW on and off, press the
LANE DEPART button on the
steering wheel. The control indicator
will light when LDW is on.
Page 220 of 357

Black plate (1,1)GMC Terrain/Terrain Denali Owner Manual (GMNA-Localizing-U.S./Canada/
Mexico-7707484) - 2015 - crc - 10/1/14
Vehicle Care 10-1
Vehicle Care
General Information
General Information . . . . . . . . . . 10-2
California Proposition65 Warning . . . . . . . . . . . . . . . . . 10-2
California Perchlorate Materials Requirements . . . . 10-2
Accessories and Modifications . . . . . . . . . . . . . . . 10-2
Vehicle Checks
Doing Your OwnService Work . . . . . . . . . . . . . . . 10-3
Hood . . . . . . . . . . . . . . . . . . . . . . . . 10-4
Engine Compartment Overview . . . . . . . . . . . . . . . . . . . 10-5
Engine Cover . . . . . . . . . . . . . . . . 10-8
Engine Oil . . . . . . . . . . . . . . . . . . . 10-8
Engine Oil Life System . . . . . 10-11
Automatic Transmission Fluid . . . . . . . . . . . . . . . . . . . . . . 10-12
Engine Air Cleaner/Filter . . . . 10-12
Cooling System . . . . . . . . . . . . 10-14
Engine Coolant . . . . . . . . . . . . . 10-15
Engine Overheating . . . . . . . . 10-18
Power Steering Fluid (2.4L L4 Engine) . . . . . . . . . . . . . . . . 10-20 Power Steering Fluid (3.6L
V6 Engine) . . . . . . . . . . . . . . . . 10-20
Washer Fluid . . . . . . . . . . . . . . . 10-20
Brakes . . . . . . . . . . . . . . . . . . . . . 10-21
Brake Fluid . . . . . . . . . . . . . . . . . 10-22
Battery . . . . . . . . . . . . . . . . . . . . . 10-23
All-Wheel Drive . . . . . . . . . . . . . 10-24
Starter Switch Check . . . . . . . 10-24
Automatic Transmission Shift Lock Control Function
Check . . . . . . . . . . . . . . . . . . . . . 10-24
Ignition Transmission Lock Check . . . . . . . . . . . . . . . . . . . . . 10-25
Park Brake and P (Park) Mechanism Check . . . . . . . . 10-25
Wiper Blade Replacement . . . . . . . . . . . . . . 10-25
Headlamp Aiming
Headlamp Aiming . . . . . . . . . . 10-27
Bulb Replacement
Bulb Replacement . . . . . . . . . . 10-27
Halogen Bulbs . . . . . . . . . . . . . . 10-27
Fog Lamps . . . . . . . . . . . . . . . . . 10-28 Taillamps, Turn Signal,
Sidemarker, Stoplamps,
and Back-Up Lamps . . . . . . 10-28
License Plate Lamp . . . . . . . . 10-31
Replacement Bulbs . . . . . . . . . 10-31
Electrical System
Fuses . . . . . . . . . . . . . . . . . . . . . . 10-32
Engine Compartment Fuse Block . . . . . . . . . . . . . . . . . . . . . 10-32
Instrument Panel Fuse Block . . . . . . . . . . . . . . . . . . . . . 10-35
Wheels and Tires
Tires . . . . . . . . . . . . . . . . . . . . . . . . 10-38
All-Season Tires . . . . . . . . . . . . 10-39
Winter Tires . . . . . . . . . . . . . . . . 10-39
Summer Tires . . . . . . . . . . . . . . 10-39
Tire Sidewall Labeling . . . . . . 10-40
Tire Designations . . . . . . . . . . . 10-42
Tire Terminology andDefinitions . . . . . . . . . . . . . . . . 10-42
Tire Pressure . . . . . . . . . . . . . . . 10-45
Tire Pressure Monitor System . . . . . . . . . . . . . . . . . . . 10-46
Tire Pressure Monitor Operation . . . . . . . . . . . . . . . . . 10-47
Tire Inspection . . . . . . . . . . . . . . 10-51
Tire Rotation . . . . . . . . . . . . . . . 10-51
Page 246 of 357

Black plate (27,1)GMC Terrain/Terrain Denali Owner Manual (GMNA-Localizing-U.S./Canada/
Mexico-7707484) - 2015 - crc - 10/1/14
Vehicle Care 10-27
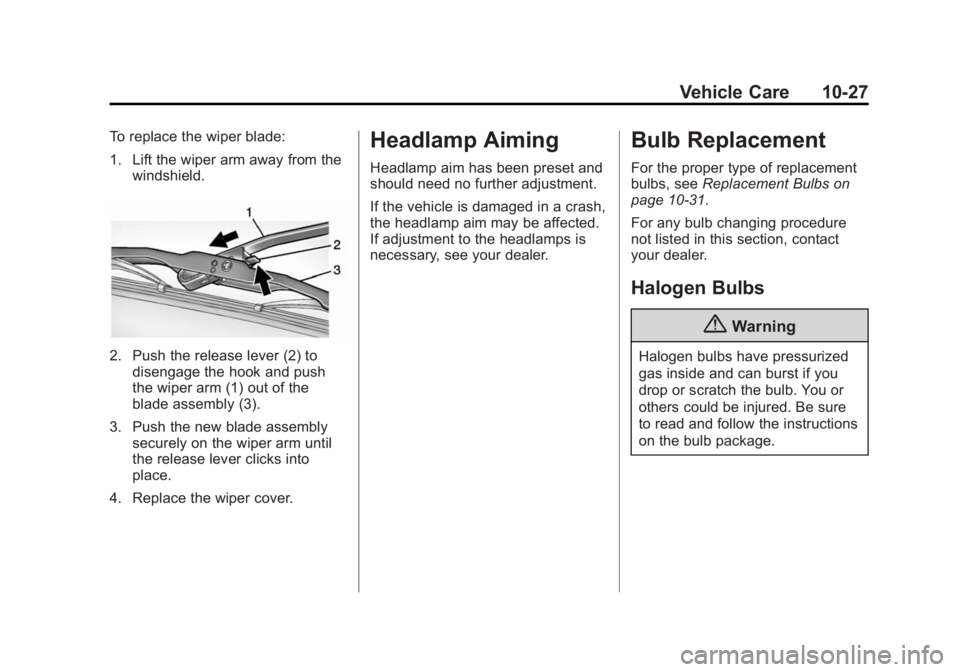
To replace the wiper blade:
1. Lift the wiper arm away from thewindshield.
2. Push the release lever (2) todisengage the hook and push
the wiper arm (1) out of the
blade assembly (3).
3. Push the new blade assembly securely on the wiper arm until
the release lever clicks into
place.
4. Replace the wiper cover.
Headlamp Aiming
Headlamp aim has been preset and
should need no further adjustment.
If the vehicle is damaged in a crash,
the headlamp aim may be affected.
If adjustment to the headlamps is
necessary, see your dealer.
Bulb Replacement
For the proper type of replacement
bulbs, see Replacement Bulbs on
page 10-31.
For any bulb changing procedure
not listed in this section, contact
your dealer.
Halogen Bulbs
{Warning
Halogen bulbs have pressurized
gas inside and can burst if you
drop or scratch the bulb. You or
others could be injured. Be sure
to read and follow the instructions
on the bulb package.
Page 253 of 357

Black plate (34,1)GMC Terrain/Terrain Denali Owner Manual (GMNA-Localizing-U.S./Canada/
Mexico-7707484) - 2015 - crc - 10/1/14
10-34 Vehicle Care
Mini Fuses Usage17 Transmission Control Module
Battery
18 Trailer Parking Light
19 AIR Pump Solenoid
20 Engine Control Module Battery
21 Canister Vent
22 Trailer Left Side (If Equipped)
23 Lift Gate Module
24 Power Lumbar
25 Trailer Right Side (If Equipped)
26 Rear Accessory Power Outlet
27 Memory Mirror Module
28 Regulated Voltage Control Battery
Sensor Mini Fuses Usage
29 Front Wiper
30 Rear Wiper
31 Air Conditioning Compressor
32 Rear Latch
33 Heated Mirrors
34 Horn
35 Right High-Beam Headlamp
36 Left High-Beam Headlamp
37 Ignition Even Coil
38 Ignition Odd Coil
39 Windshield Washer
40 Front Fog Lamps
41 Post Catalytic Converter Oxygen
Sensor
42 Engine Control Module Mini Fuses Usage
43 Pre–Catalytic Converter Oxygen
Sensor
44 Transmission Control Module
45 Mirror
46 Fuel System Control Module Ignition
47 Spare
48 Rear Drive Module
49 Lift Gate Module Logic
50 Instrument Panel Fuse Block Ignition
51 Heated Seat– Front
52 Fuel System Control Module
53 Engine Control Module
54 Rear Vision Camera
Page 254 of 357

Black plate (35,1)GMC Terrain/Terrain Denali Owner Manual (GMNA-Localizing-U.S./Canada/
Mexico-7707484) - 2015 - crc - 10/1/14
Vehicle Care 10-35
Mini Fuses Usage78 Passenger Power Lumber
Midi Fuse Usage 55 Electric Power Steering
Micro
Relays Usage
56 AIR Pump Solenoid
57 Brake Booster
58 Cooling Fan Low
59 Headlamp High Beam
60 Cooling Fan Control
61 Wiper On/Off Control
62 Air Conditioning Compressor
63 Rear Defogger
64 Wiper Speed Micro
Relays Usage
65 Fog Lamp
66 Engine Control
67 Starter
68 Run/Crank
Mini Relays Usage 69 Cooling Fan High
70 AIR Pump MotorInstrument Panel Fuse
Block
The instrument panel fuse block is
located on the passenger side panel
of the center console. To access the
fuses, open the fuse panel door
from the passenger side by pulling
it out.
Page 276 of 357

Black plate (57,1)GMC Terrain/Terrain Denali Owner Manual (GMNA-Localizing-U.S./Canada/
Mexico-7707484) - 2015 - crc - 10/1/14
Vehicle Care 10-57
vibrating when driving on a smooth
road, the tires and wheels may need
to be rebalanced. See your dealer
for proper diagnosis.
Wheel Replacement
Replace any wheel that is bent,
cracked, or badly rusted or
corroded. If wheel nuts keep coming
loose, the wheel, wheel bolts, and
wheel nuts should be replaced.
If the wheel leaks air, replace it.
Some aluminum wheels can be
repaired. See your dealer if any of
these conditions exist.
Your dealer will know the kind of
wheel that is needed.
Each new wheel should have the
same load-carrying capacity,
diameter, width, offset, and be
mounted the same way as the one it
replaces.
Replace wheels, wheel bolts, wheel
nuts, or Tire Pressure Monitor
System (TPMS) sensors with new
GM original equipment parts.
{Warning
Using the wrong replacement
wheels, wheel bolts, or wheel
nuts can be dangerous. It could
affect the braking and handling of
the vehicle. Tires can lose air,
and cause loss of control, causing
a crash. Always use the correct
wheel, wheel bolts, and wheel
nuts for replacement.
{Caution
The wrong wheel can also cause
problems with bearing life, brake
cooling, speedometer or
odometer calibration, headlamp
aim, bumper height, vehicle
ground clearance, and tire or tire
chain clearance to the body and
chassis.
Used Replacement Wheels
{Warning
Replacing a wheel with a used
one is dangerous. How it has
been used or how far it has been
driven may be unknown. It could
fail suddenly and cause a crash.
When replacing wheels, use a
new GM original equipment
wheel.
Tire Chains
{Warning
Do not use tire chains. There is
not enough clearance. Tire chains
used on a vehicle without the
proper amount of clearance can
cause damage to the brakes,
suspension or other vehicle parts.
The area damaged by the tire(Continued)