air filter GMC TERRAIN 2019 Owner's Manual
[x] Cancel search | Manufacturer: GMC, Model Year: 2019, Model line: TERRAIN, Model: GMC TERRAIN 2019Pages: 434, PDF Size: 6.38 MB
Page 171 of 434
GMC Terrain/Terrain Denali Owner Manual (GMNA-Localizing-U.S./Canada/
Mexico-12146071) - 2019 - crc - 7/27/18
170 Climate Controls
Climate Controls
Climate Control Systems
Climate Control Systems . . . . . 170
Dual Automatic ClimateControl System . . . . . . . . . . . . . 172
Air Vents
Air Vents . . . . . . . . . . . . . . . . . . . . . 175
Maintenance
Passenger Compartment AirFilter . . . . . . . . . . . . . . . . . . . . . . . . 175
Service . . . . . . . . . . . . . . . . . . . . . . . 176
Climate Control Systems
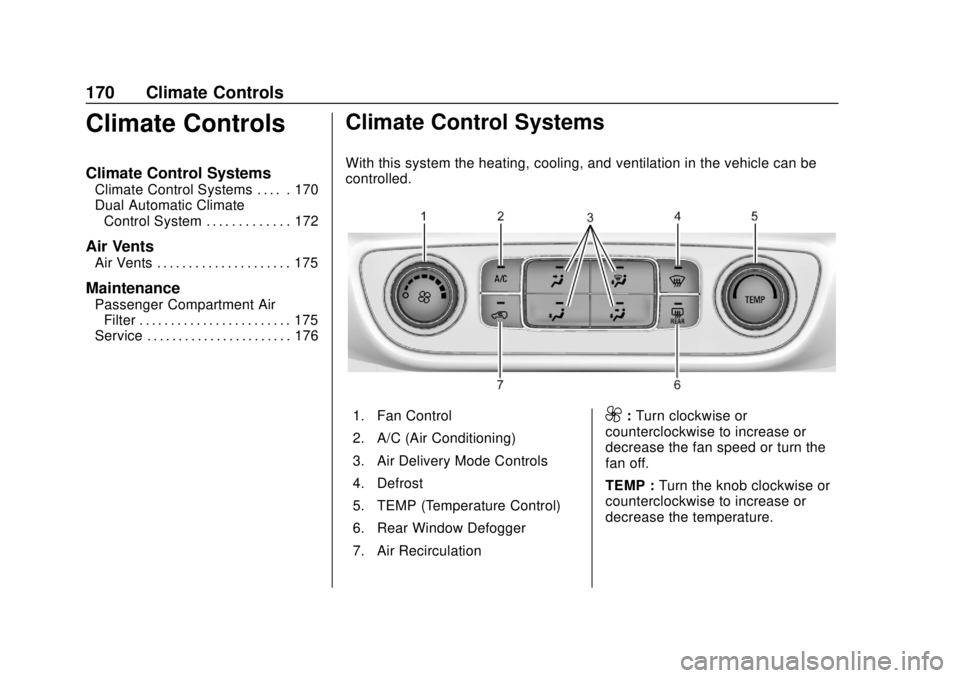
With this system the heating, cooling, and ventilation in the vehicle can be
controlled.
1. Fan Control
2. A/C (Air Conditioning)
3. Air Delivery Mode Controls
4. Defrost
5. TEMP (Temperature Control)
6. Rear Window Defogger
7. Air Recirculation9: Turn clockwise or
counterclockwise to increase or
decrease the fan speed or turn the
fan off.
TEMP : Turn the knob clockwise or
counterclockwise to increase or
decrease the temperature.
Page 176 of 434
GMC Terrain/Terrain Denali Owner Manual (GMNA-Localizing-U.S./Canada/
Mexico-12146071) - 2019 - crc - 7/27/18
Climate Controls 175
Air Vents
Use the louvers located on the air
vents to change the direction of the
airflow.
To open or close off the airflow:
.On the center air vents, move
the slider knobs up or down.
. On the outer and rear air vents,
move the slider knobs right
or left.
Operation Tips
. Clear away any ice, snow,
or leaves from air inlets at the
base of the windshield that could
block the flow of air into the
vehicle.
. Clear snow off the hood to
improve visibility and help
decrease moisture drawn into
the vehicle, which may improve
long term system performance.
. Keep the path under the front
seats clear of objects to help
circulate the air inside of the
vehicle more effectively. .
Use of non-GM approved hood
deflectors can adversely affect
the performance of the system.
Check with your dealer before
adding equipment to the outside
of the vehicle.
. Do not attach any devices to the
air vent slats. This restricts
airflow and may cause damage
to the air vents.
Maintenance
Passenger Compartment
Air Filter
The filter removes dust, pollen, and
other airborne irritants from outside
air that is pulled into the vehicle.
The filter should be replaced as part
of routine scheduled maintenance.
See Maintenance Schedule 0378.
To find out what type of filter to use,
see Maintenance Replacement
Parts 0388.
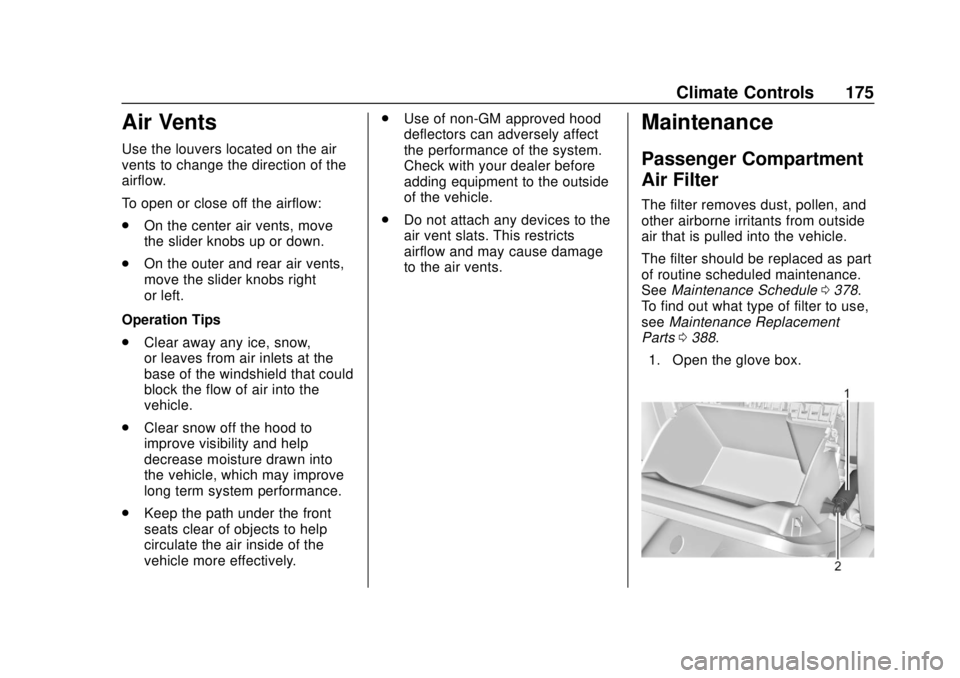
1. Open the glove box.
Page 177 of 434
GMC Terrain/Terrain Denali Owner Manual (GMNA-Localizing-U.S./Canada/
Mexico-12146071) - 2019 - crc - 7/27/18
176 Climate Controls
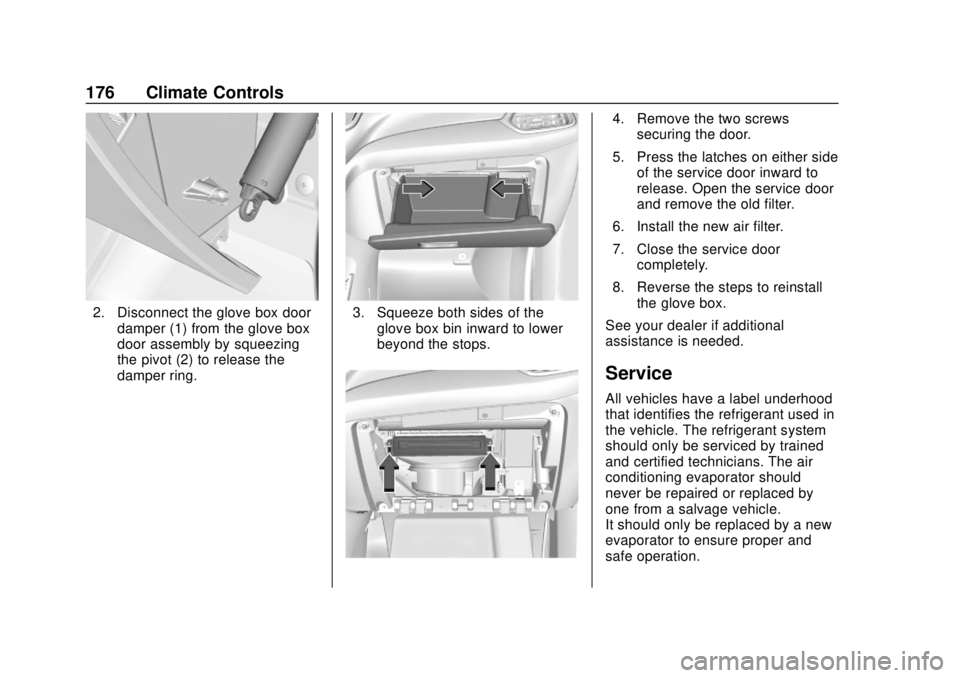
2. Disconnect the glove box doordamper (1) from the glove box
door assembly by squeezing
the pivot (2) to release the
damper ring.3. Squeeze both sides of theglove box bin inward to lower
beyond the stops.
4. Remove the two screwssecuring the door.
5. Press the latches on either side of the service door inward to
release. Open the service door
and remove the old filter.
6. Install the new air filter.
7. Close the service door completely.
8. Reverse the steps to reinstall the glove box.
See your dealer if additional
assistance is needed.
Service
All vehicles have a label underhood
that identifies the refrigerant used in
the vehicle. The refrigerant system
should only be serviced by trained
and certified technicians. The air
conditioning evaporator should
never be repaired or replaced by
one from a salvage vehicle.
It should only be replaced by a new
evaporator to ensure proper and
safe operation.
Page 268 of 434
GMC Terrain/Terrain Denali Owner Manual (GMNA-Localizing-U.S./Canada/
Mexico-12146071) - 2019 - crc - 7/27/18
Driving and Operating 267
filter is drained as soon as
diesel fuel emerges from
the port.
5. Retighten the drain plug by turning it clockwise.
6. Properly dispose of the water contaminated fuel.
7. Start the engine and let it run for a few minutes. During the
draining process, air may have
entered the fuel system. If the
engine stalls, the fuel system
may need to be primed. See
“Fuel Priming” following.
Fuel Priming
For the fuel system to work properly,
air cannot be in the fuel lines. If air
gets in, the engine may not start
and the fuel lines will need to be
primed before operating the vehicle.
If air is present, the following may
have happened:
. The vehicle ran out of fuel.
. The fuel filter was removed.
. The fuel lines were removed or
disconnected. .
The fuel filter water drain valve
was opened while the engine
was running.
To prime the fuel lines: 1. With the engine off, press and hold ENGINE START/STOP
without applying the brake for
five seconds to place the
vehicle in Service Mode. See
Ignition Positions 0195. Wait
approximately five seconds
and press ENGINE START/
STOP again to turn it off. Do
this step three times or more
while the engine is off.
2. Press and hold ENGINE START/STOP while applying
the brake for a maximum of
40 seconds at a time, with
five seconds between attempts,
until the engine starts. If the
engine tries to run, but does
not run smoothly, increase the
rpm’s slightly by using the
accelerator pedal. This will help
force air through the system.
3. Repeat Step 2 if the engine stalls and will not restart. 4. After a few attempts, if the
engine still does not start, see
your dealer.
Running Out of Fuel
(Diesel)
{Warning
Diesel fuel is flammable. It could
start a fire if something ignites it,
and people could be burned. Do
not let it get on hot engine parts,
and keep matches or other
ignition sources away.
If the engine has stalled due to
running out of fuel, add at least
7.6 L (2 gal) of fuel if parked on a
level surface, or up to 18.9 L (5 gal)
of fuel if parked on a slope, and
perform the procedure under “Fuel
Priming” previously in this section.
Page 269 of 434
GMC Terrain/Terrain Denali Owner Manual (GMNA-Localizing-U.S./Canada/
Mexico-12146071) - 2019 - crc - 7/27/18
268 Driving and Operating
Fuel Filter Replacement
(Diesel)
{Warning
Diesel fuel is flammable. It could
start a fire if something ignites it,
and people could be burned. Do
not let it get on hot engine parts,
and keep matches or other
ignition sources away.
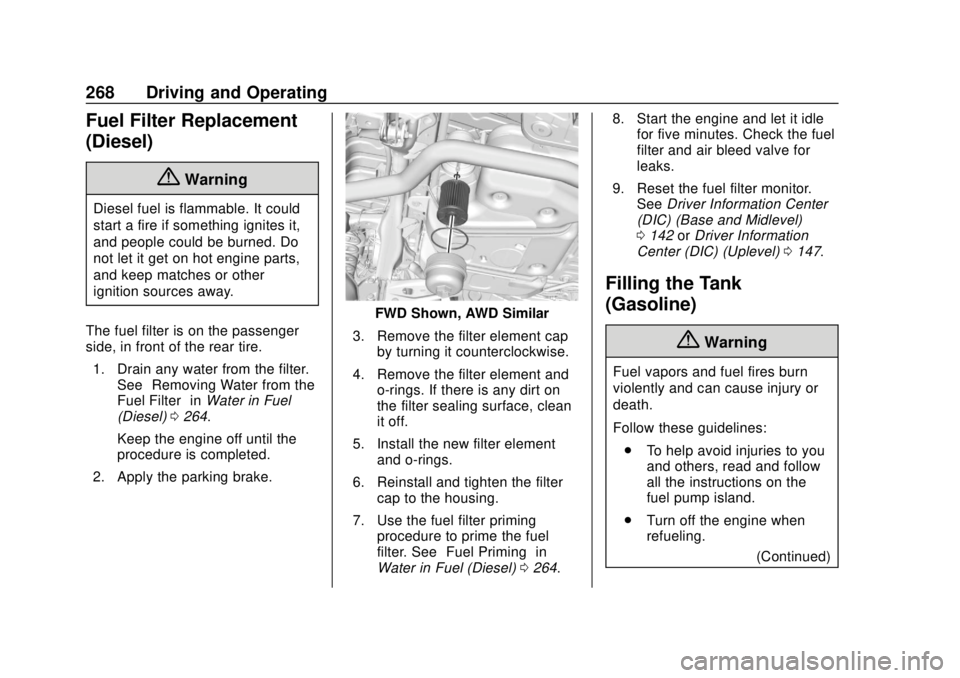
The fuel filter is on the passenger
side, in front of the rear tire. 1. Drain any water from the filter. See “Removing Water from the
Fuel Filter” inWater in Fuel
(Diesel) 0264.
Keep the engine off until the
procedure is completed.
2. Apply the parking brake.
FWD Shown, AWD Similar
3. Remove the filter element cap by turning it counterclockwise.
4. Remove the filter element and o-rings. If there is any dirt on
the filter sealing surface, clean
it off.
5. Install the new filter element and o-rings.
6. Reinstall and tighten the filter cap to the housing.
7. Use the fuel filter priming procedure to prime the fuel
filter. See “Fuel Priming” in
Water in Fuel (Diesel) 0264. 8. Start the engine and let it idle
for five minutes. Check the fuel
filter and air bleed valve for
leaks.
9. Reset the fuel filter monitor. See Driver Information Center
(DIC) (Base and Midlevel)
0 142 orDriver Information
Center (DIC) (Uplevel) 0147.
Filling the Tank
(Gasoline)
{Warning
Fuel vapors and fuel fires burn
violently and can cause injury or
death.
Follow these guidelines:
. To help avoid injuries to you
and others, read and follow
all the instructions on the
fuel pump island.
. Turn off the engine when
refueling.
(Continued)
Page 285 of 434
GMC Terrain/Terrain Denali Owner Manual (GMNA-Localizing-U.S./Canada/
Mexico-12146071) - 2019 - crc - 7/27/18
284 Vehicle Care
Vehicle Care
General Information
General Information . . . . . . . . . . 285
California Proposition65 Warning . . . . . . . . . . . . . . . . . 285
California Perchlorate Materials Requirements . . . . . 286
Accessories and Modifications . . . . . . . . . . . . . . . . 286
Vehicle Checks
Doing Your OwnService Work . . . . . . . . . . . . . . . 286
Hood . . . . . . . . . . . . . . . . . . . . . . . . . 287
Engine Compartment Overview . . . . . . . . . . . . . . . . . . . . 289
Engine Oil . . . . . . . . . . . . . . . . . . . . 294
Engine Oil Life System . . . . . . . 298
Automatic Transmission Fluid . . . . . . . . . . . . . . . . . . . . . . . . 299
Engine Air Cleaner/Filter . . . . . . 299
Cooling System . . . . . . . . . . . . . . 301
Engine Overheating . . . . . . . . . . 305
Washer Fluid . . . . . . . . . . . . . . . . . 307
Brakes . . . . . . . . . . . . . . . . . . . . . . . 307
Brake Fluid . . . . . . . . . . . . . . . . . . . 308
Battery - North America . . . . . . 309
All-Wheel Drive . . . . . . . . . . . . . . . 310 Starter Switch Check . . . . . . . . . 310
Park Brake and P (Park)
Mechanism Check . . . . . . . . . . 311
Wiper Blade Replacement . . . . 311
Windshield Replacement . . . . . 313
Gas Strut(s) . . . . . . . . . . . . . . . . . . 313
Headlamp Aiming
Headlamp Aiming . . . . . . . . . . . . 314
Bulb Replacement
Bulb Replacement . . . . . . . . . . . . 314
Halogen Bulbs . . . . . . . . . . . . . . . . 314
High Intensity Discharge (HID) Lighting . . . . . . . . . . . . . . . . . . . . . 315
LED Lighting . . . . . . . . . . . . . . . . . 315
Front Turn Signal Lamps . . . . . 315
Taillamps . . . . . . . . . . . . . . . . . . . . . 316
License Plate Lamp . . . . . . . . . . 316
Electrical System
Electrical System Overload . . . 317
Fuses and Circuit Breakers . . . 318
Engine Compartment Fuse Block . . . . . . . . . . . . . . . . . . . . . . . . 318
Instrument Panel Fuse Block . . . . . . . . . . . . . . . . . . . . . . . . 321
Rear Compartment Fuse Block . . . . . . . . . . . . . . . . . . . . . . . . 323
Wheels and Tires
Tires . . . . . . . . . . . . . . . . . . . . . . . . . . 325
All-Season Tires . . . . . . . . . . . . . . 326
Winter Tires . . . . . . . . . . . . . . . . . . 326
Summer Tires . . . . . . . . . . . . . . . . 327
Tire Sidewall Labeling . . . . . . . . 327
Tire Designations . . . . . . . . . . . . . 329
Tire Terminology andDefinitions . . . . . . . . . . . . . . . . . . 330
Tire Pressure . . . . . . . . . . . . . . . . . 332
Tire Pressure Monitor System . . . . . . . . . . . . . . . . . . . . . . 334
Tire Pressure Monitor Operation . . . . . . . . . . . . . . . . . . . 335
Tire Inspection . . . . . . . . . . . . . . . . 339
Tire Rotation . . . . . . . . . . . . . . . . . 339
When It Is Time for New Tires . . . . . . . . . . . . . . . . . . . . . . . . 340
Buying New Tires . . . . . . . . . . . . . 341
Different Size Tires and Wheels . . . . . . . . . . . . . . . . . . . . . . 342
Uniform Tire Quality Grading . . . . . . . . . . . . . . . . . . . . . 342
Wheel Alignment and Tire Balance . . . . . . . . . . . . . . . . . . . . . 344
Wheel Replacement . . . . . . . . . . 344
Tire Chains . . . . . . . . . . . . . . . . . . . 345
If a Tire Goes Flat . . . . . . . . . . . . 345
Tire Sealant and Compressor Kit . . . . . . . . . . . . . 347
Page 291 of 434

GMC Terrain/Terrain Denali Owner Manual (GMNA-Localizing-U.S./Canada/
Mexico-12146071) - 2019 - crc - 7/27/18
290 Vehicle Care
1.Engine Air Cleaner/Filter 0299.
2. Engine Oil Fill Cap. See Engine Oil 0294.
3. Engine Oil Dipstick. See Engine Oil 0294.
4. Engine Cooling Fan. See Cooling System 0301.
5. Brake Fluid Reservoir. See Brake Fluid 0308.
6. Engine Compartment Fuse
Block 0318.
7. Remote Positive (+) Terminal (Under Cover). See Jump
Starting - North America 0360.
8. Engine Coolant Surge Tank and Pressure Cap. See
Cooling System 0301.
9. Battery - North America 0309.
10. Remote Negative (−) Terminal. SeeJump Starting - North
America 0360.
11. Windshield Washer Fluid Reservoir. See Washer Fluid
0 307.
Page 293 of 434

GMC Terrain/Terrain Denali Owner Manual (GMNA-Localizing-U.S./Canada/
Mexico-12146071) - 2019 - crc - 7/27/18
292 Vehicle Care
1.Engine Air Cleaner/Filter 0299.
2. Engine Cooling Fan. See Cooling System 0301.
3. Engine Oil Dipstick. See Engine Oil 0294.
4. Engine Oil Fill Cap. See Engine Oil 0294.
5. Brake Fluid Reservoir. See Brake Fluid 0308.
6. Engine Compartment Fuse
Block 0318.
7. Remote Positive (+) Terminal (Under Cover). See Jump
Starting - North America 0360.
8. Engine Coolant Surge Tank and Pressure Cap. See
Cooling System 0301.
9. Battery - North America 0309.
10. Remote Negative (−) Terminal. SeeJump Starting - North
America 0360.
11. Windshield Washer Fluid Reservoir. See Washer Fluid
0 307.
Page 295 of 434
GMC Terrain/Terrain Denali Owner Manual (GMNA-Localizing-U.S./Canada/
Mexico-12146071) - 2019 - crc - 7/27/18
294 Vehicle Care
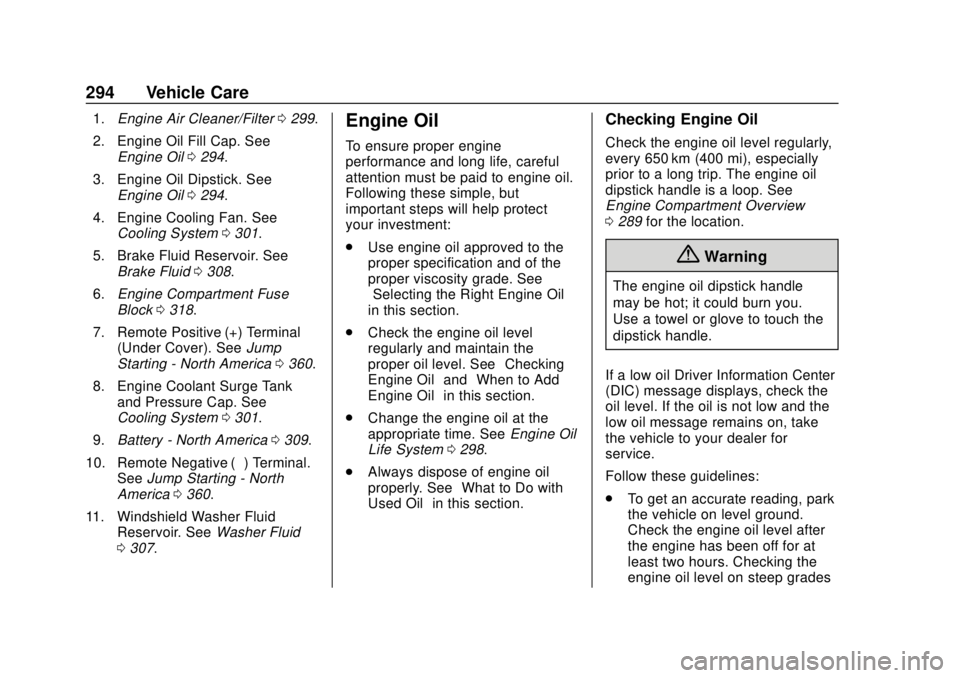
1.Engine Air Cleaner/Filter 0299.
2. Engine Oil Fill Cap. See Engine Oil 0294.
3. Engine Oil Dipstick. See Engine Oil 0294.
4. Engine Cooling Fan. See Cooling System 0301.
5. Brake Fluid Reservoir. See Brake Fluid 0308.
6. Engine Compartment Fuse
Block 0318.
7. Remote Positive (+) Terminal (Under Cover). See Jump
Starting - North America 0360.
8. Engine Coolant Surge Tank and Pressure Cap. See
Cooling System 0301.
9. Battery - North America 0309.
10. Remote Negative (−) Terminal. SeeJump Starting - North
America 0360.
11. Windshield Washer Fluid Reservoir. See Washer Fluid
0 307.Engine Oil
To ensure proper engine
performance and long life, careful
attention must be paid to engine oil.
Following these simple, but
important steps will help protect
your investment:
.
Use engine oil approved to the
proper specification and of the
proper viscosity grade. See
“Selecting the Right Engine Oil”
in this section.
. Check the engine oil level
regularly and maintain the
proper oil level. See “Checking
Engine Oil” and“When to Add
Engine Oil” in this section.
. Change the engine oil at the
appropriate time. See Engine Oil
Life System 0298.
. Always dispose of engine oil
properly. See “What to Do with
Used Oil” in this section.
Checking Engine Oil
Check the engine oil level regularly,
every 650 km (400 mi), especially
prior to a long trip. The engine oil
dipstick handle is a loop. See
Engine Compartment Overview
0289 for the location.
{Warning
The engine oil dipstick handle
may be hot; it could burn you.
Use a towel or glove to touch the
dipstick handle.
If a low oil Driver Information Center
(DIC) message displays, check the
oil level. If the oil is not low and the
low oil message remains on, take
the vehicle to your dealer for
service.
Follow these guidelines:
. To get an accurate reading, park
the vehicle on level ground.
Check the engine oil level after
the engine has been off for at
least two hours. Checking the
engine oil level on steep grades
Page 300 of 434
GMC Terrain/Terrain Denali Owner Manual (GMNA-Localizing-U.S./Canada/
Mexico-12146071) - 2019 - crc - 7/27/18
Vehicle Care 299
2. Display REMAINING OIL LIFEon the DIC menu.
See Driver Information Center
(DIC) (Base and Midlevel)
0 142 orDriver Information
Center (DIC) (Uplevel) 0147.
3. Fully press and release the accelerator pedal three times
within five seconds.
4. If the display changes to 100%, the system is reset.
If the CHANGE ENGINE OIL SOON
message comes back on when the
vehicle is started, the engine oil life
system has not reset. Repeat the
procedure.
Automatic Transmission
Fluid
It is not necessary to check the
transmission fluid level.
A transmission fluid leak is the only
reason for fluid loss. If a leak
occurs, take the vehicle to your
dealer and have it repaired as soon
as possible. Change the fluid at the intervals
listed in
Maintenance Schedule
0 378, and be sure to use the
transmission fluid listed in
Recommended Fluids and
Lubricants 0387.
Caution
Use of the incorrect automatic
transmission fluid may damage
the vehicle, and the damage may
not be covered by the vehicle
warranty. Always use the correct
automatic transmission fluid. See
Recommended Fluids and
Lubricants 0387.
There is a special procedure for
checking and changing the
transmission fluid. Because this
procedure is difficult, this should be
done by your dealer.
Engine Air Cleaner/Filter
The engine air cleaner/filter is in the
engine compartment on the
passenger side of the vehicle. See
Engine Compartment Overview
0 289.
When to Inspect the Engine Air
Cleaner/Filter
For intervals on changing and
inspecting the engine air cleaner/
filter, see Maintenance Schedule
0 378.
How to Inspect the Engine Air
Cleaner/Filter
Do not start the engine or have the
engine running with the engine air
cleaner/filter housing open. Before
removing the engine air cleaner/
filter, make sure that the engine air
cleaner/filter housing and nearby
components are free of dirt and
debris. Remove the engine air
cleaner/filter. Lightly tap and shake
the engine air cleaner/filter (away
from the vehicle), to release loose
dust and dirt. Inspect the engine air
cleaner/filter for damage, and