Driver mode GMC TERRAIN 2020 Owner's Guide
[x] Cancel search | Manufacturer: GMC, Model Year: 2020, Model line: TERRAIN, Model: GMC TERRAIN 2020Pages: 425, PDF Size: 6.59 MB
Page 217 of 425

GMC Terrain/Terrain Denali Owner Manual (GMNA-Localizing-U.S./Canada/
Mexico-13556230) - 2020 - CRC - 9/4/19
214 Driving and Operating
HDC light indicates the system is
actively applying the brakes to
maintain vehicle speed.
When HDC is activated, the initial
HDC speed is set to the current
driving speed. It can be increased or
decreased by pressing +RES or–
SET on the steering wheel or by
applying the accelerator or brake
pedal. This adjusted speed
becomes the new set speed.
HDC will remain enabled between
22 and 60 km/h (14 and 37 mph);
however vehicle speed cannot be
set or maintained in this range.
It will automatically disable if the
vehicle speed is above 80 km/h
(50 mph) or above 60 km/h
(37 mph) for at least 30 seconds.
Press
5again to re-enable HDC.
Driver Mode Control
Depending on the option package
and available features, the Driver
Mode Control can have the
following modes: Tour (Front-Wheel
Drive (FWD)), All-Wheel Drive
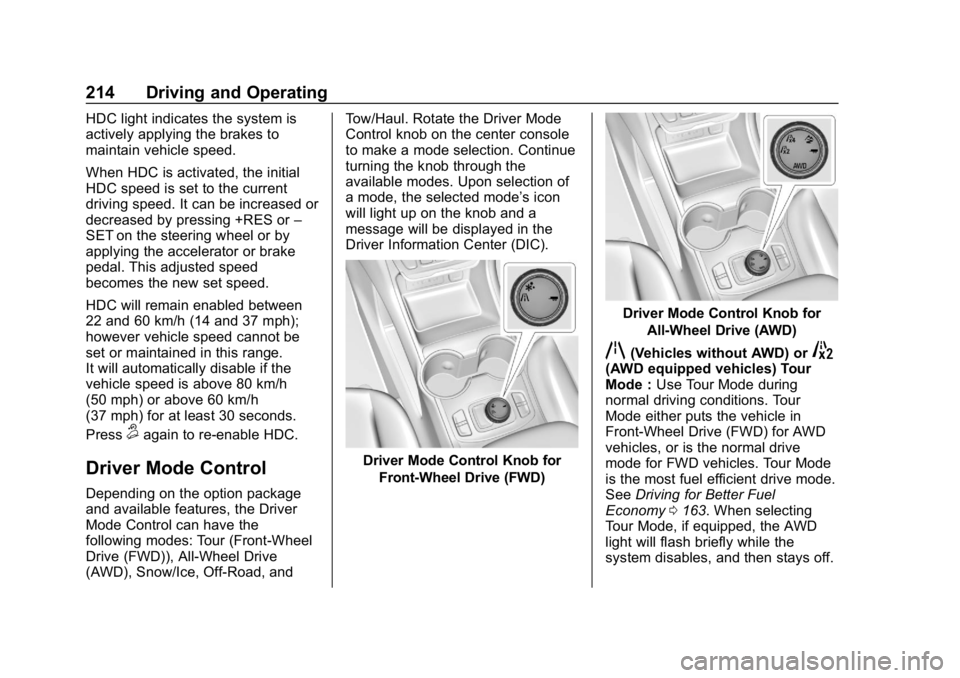
(AWD), Snow/Ice, Off-Road, and Tow/Haul. Rotate the Driver Mode
Control knob on the center console
to make a mode selection. Continue
turning the knob through the
available modes. Upon selection of
a mode, the selected mode’s icon
will light up on the knob and a
message will be displayed in the
Driver Information Center (DIC).
Driver Mode Control Knob for
Front-Wheel Drive (FWD)
Driver Mode Control Knob for All-Wheel Drive (AWD)
q(Vehicles without AWD) or5(AWD equipped vehicles) Tour
Mode : Use Tour Mode during
normal driving conditions. Tour
Mode either puts the vehicle in
Front-Wheel Drive (FWD) for AWD
vehicles, or is the normal drive
mode for FWD vehicles. Tour Mode
is the most fuel efficient drive mode.
See Driving for Better Fuel
Economy 0163. When selecting
Tour Mode, if equipped, the AWD
light will flash briefly while the
system disables, and then stays off.
Page 224 of 425

GMC Terrain/Terrain Denali Owner Manual (GMNA-Localizing-U.S./Canada/
Mexico-13556230) - 2020 - CRC - 9/4/19
Driving and Operating 221
J:Press to turn the system on or
off. The indicator turns white on the
instrument cluster when ACC is
turned on.
RES+ : Press briefly to resume the
previous set speed or to increase
vehicle speed if ACC is already
activated. To increase speed by
about 1 km/h (1 mph), press RES+
briefly. To increase speed to the
next 5 km/h (5 mph) mark on the
speedometer, hold RES+.
SET– :Press briefly to set the
speed and activate ACC or to
decrease vehicle speed if ACC is
already activated. To decrease
speed by about 1 km/h (1 mph),
press SET– briefly. To decrease
speed to the next 5 km/h (5 mph)
mark on the speedometer,
hold SET–.
*: Press to disengage ACC
without erasing the selected set
speed.
[: Press to select a following gap
setting for ACC of Far, Medium,
or Near. The speedometer reading can be
displayed in either English or metric
units. See
Instrument Cluster (Base
and Midlevel) 0103 or
Instrument Cluster (Uplevel) 0107.
The increment value used depends
on the units displayed.
Switching Between ACC and
Regular Cruise Control
To switch between ACC and regular
cruise control, press and hold
*.
A Driver Information Display (DIC)
message displays. See Vehicle
Messages 0134.
ACC IndicatorRegular Cruise
Control Indicator When ACC is engaged, a green
o
indicator will be lit on the instrument
cluster and the following gap will be
displayed. When the regular cruise
control is engaged, a green
J
indicator will be lit on the instrument
cluster; the following gap will not
display.
When the vehicle is turned on, the
cruise control mode will be set to
the last mode used before the
vehicle was turned off.
{Warning
Always check the cruise control
indicator on the instrument cluster
to determine which mode cruise
control is in before using the
feature. If ACC is not active, the
vehicle will not automatically
brake for other vehicles, which
could cause a crash if the brakes
are not applied manually. You and
others could be seriously injured
or killed.
Page 245 of 425

GMC Terrain/Terrain Denali Owner Manual (GMNA-Localizing-U.S./Canada/
Mexico-13556230) - 2020 - CRC - 9/4/19
242 Driving and Operating
Warning (Continued)
.Due to poor visibility,
including nighttime
conditions, fog, rain,
or snow.
. If the FPB sensor is blocked
by dirt, snow, or ice.
. If the headlamps or
windshield are not cleaned
or in proper condition.
Be ready to take action and apply
the brakes. For more information,
see Defensive Driving 0164.
Keep the windshield, headlamps,
and FPB sensor clean and in
good repair.
FPB can be set to Off, Alert, or Alert
and Brake through vehicle
personalization. See “Collision/
Detection Systems” underVehicle
Personalization 0135.
Detecting the Pedestrian
Ahead
FPB alerts and automatic braking
will not occur unless the FPB
system detects a pedestrian. When
a nearby pedestrian is detected in
front of the vehicle, the pedestrian
ahead indicator will display amber.
Front Pedestrian Alert
When the vehicle approaches a
pedestrian ahead too rapidly, the
red FPB alert display will flash on
the windshield. Eight rapid
high-pitched beeps will sound from the front. When this Pedestrian Alert
occurs, the brake system may
prepare for driver braking to occur
more rapidly which can cause a
brief, mild deceleration. Continue to
apply the brake pedal as needed.
Cruise control may be disengaged
when the Front Pedestrian Alert
occurs.
Automatic Braking
If FPB detects it is about to crash
into a pedestrian ahead, and the
brakes have not been applied, FPB
may automatically brake moderately
or brake hard. This can help to
avoid some very low speed
pedestrian crashes or reduce
pedestrian injury. FPB can
automatically brake to detected
pedestrians between 8 km/h (5 mph)
and 80 km/h (50 mph). Automatic
braking levels may be reduced
under certain conditions, such as
higher speeds.
If this happens, Automatic Braking
may engage the Electric Parking
Brake (EPB) to hold the vehicle at a
stop. Release the EPB. A firm press
Page 266 of 425

GMC Terrain/Terrain Denali Owner Manual (GMNA-Localizing-U.S./Canada/
Mexico-13556230) - 2020 - CRC - 9/4/19
Driving and Operating 263
.It is recommended to perform
the first oil change before heavy
towing.
. During the first 800 km (500 mi)
of trailer towing, do not drive
over 80 km/h (50 mph) and do
not make starts at full throttle.
. Vehicles can tow in D (Drive).
If the transmission downshifts
too often, a lower gear may be
selected using Manual Mode
See Manual Mode 0205.
If equipped, the following driver
assistance features should be
turned off when towing a trailer:
. Adaptive Cruise Control (ACC)
. Super Cruise Control
. Lane Keep Assist (LKA)
. Park Assist
. Automatic Parking Assist (APA)
. Reverse Automatic
Braking (RAB) If equipped, the following driver
assistance features should be
turned to alert or off when towing a
trailer:
.
Automatic Emergency
Braking (AEB)
. Intelligent Brake Assist (IBA)
. Front Pedestrian Braking (FPB)
If equipped with Lane Change Alert
(LCA), the LCA detection zones that
extend back from the side of the
vehicle do not move further back
when a trailer is towed. Use caution
while changing lanes when towing a
trailer.
If equipped with Rear Cross Traffic
Alert (RCTA), use caution while
backing up when towing a trailer, as
the RCTA detection zones that
extend out from the back of the
vehicle do not move further back
when a trailer is towed.{Warning
To prevent serious injury or death
from carbon monoxide (CO),
when towing a trailer: . Do not drive with the
liftgate, trunk/hatch,
or rear-most window open.
. Fully open the air outlets on
or under the instrument
panel.
. Adjust the climate control
system to a setting that
brings in only outside air.
See “Climate Control
Systems” in the Index.
For more information about
carbon monoxide, see Engine
Exhaust 0191.
Towing a trailer requires experience.
The combination of the vehicle and
trailer is longer and not as
responsive as the vehicle itself. Get
used to the handling and braking of
Page 270 of 425

GMC Terrain/Terrain Denali Owner Manual (GMNA-Localizing-U.S./Canada/
Mexico-13556230) - 2020 - CRC - 9/4/19
Driving and Operating 267
Gross Vehicle Weight
Rating (GVWR)
For information about the vehicle's
maximum load capacity, seeVehicle
Load Limits 0175. When calculating
the GVWR with a trailer attached,
the trailer tongue weight must be
included as part of the weight the
vehicle is carrying.
Maximum Trailer Weight
The maximum trailer weight rating is
calculated assuming the tow vehicle
has a driver, a front seat passenger,
and all required trailering
equipment. This value represents
the heaviest trailer the vehicle can
tow, but it may be necessary to
reduce the trailer weight to stay
within the GCW, GVWR, maximum
trailer tongue load, or GAWR-RR for
the vehicle.
Use the tow rating chart to
determine how much the trailer can
weigh, based on the vehicle model
and options.
Page 290 of 425

GMC Terrain/Terrain Denali Owner Manual (GMNA-Localizing-U.S./Canada/
Mexico-13556230) - 2020 - CRC - 9/5/19
Vehicle Care 287
containing used engine oil. See the
manufacturer's warnings about the
use and disposal of oil products.
Used oil can be a threat to the
environment. If you change your
own oil, be sure to drain all the oil
from the filter before disposal. Never
dispose of oil by putting it in the
trash or pouring it on the ground,
into sewers, or into streams or
bodies of water. Recycle it by taking
it to a place that collects used oil.
Engine Oil Life System
When to Change Engine Oil
This vehicle has a computer system
that indicates when to change the
engine oil and filter. This is based
on a combination of factors which
include engine revolutions, engine
temperature, and miles driven.
Based on driving conditions, the
mileage at which an oil change is
indicated can vary considerably. For
the oil life system to work properly,
the system must be reset every time
the oil is changed.When the system has calculated
that oil life has been diminished, it
indicates that an oil change is
necessary. A CHANGE ENGINE
OIL SOON message comes on.
Change the oil as soon as possible
within the next 1 000 km (600 mi).
It is possible that, if driving under
the best conditions, the oil life
system may indicate that an oil
change is not necessary for up to a
year. The engine oil and filter must
be changed at least once a year
and, at this time, the system must
be reset. Your dealer has trained
service people who will perform this
work and reset the system. It is also
important to check the oil regularly
over the course of an oil drain
interval and keep it at the proper
level.
If the system is ever reset
accidentally, the oil must be
changed at 5 000 km (3,000 mi)
since the last oil change.
Remember to reset the oil life
system whenever the oil is changed.
How to Reset the Engine Oil
Life System
Reset the system whenever the
engine oil is changed so that the
system can calculate the next
engine oil change. To reset the
system:
1. Display REMAINING OIL LIFE on the DIC menu. See Driver
Information Center (DIC) (Base
and Midlevel) 0124 or
Driver Information Center (DIC)
(Uplevel) 0130.
2. Press and hold
Vfor several
seconds while the Oil Life
display is active to reset the Oil
Life system.
3. REMAINING OIL LIFE 100% will be displayed when the oil
life system is successfully
reset.
The oil life system can also be reset
as follows: 1. Place the ignition in Service Mode. See Ignition Positions
0 179.
Page 330 of 425

GMC Terrain/Terrain Denali Owner Manual (GMNA-Localizing-U.S./Canada/
Mexico-13556230) - 2020 - CRC - 9/5/19
Vehicle Care 327
TPMS Sensor Matching
Process
Each TPMS sensor has a unique
identification code. The identification
code needs to be matched to a new
tire/wheel position after rotating the
vehicle’s tires or replacing one or
more of the TPMS sensors. The
TPMS sensor matching process
should also be performed after
replacing a spare tire with a road
tire containing the TPMS sensor.
The malfunction light and the DIC
message should go off at the next
ignition cycle. The sensors are
matched to the tire/wheel positions,
using a TPMS relearn tool, in the
following order: driver side front tire,
passenger side front tire, passenger
side rear tire, and driver side rear
tire. See your dealer for service or
to purchase a relearn tool. A TPMS
relearn tool can also be purchased.
See Tire Pressure Monitor Sensor
Activation Tool at
www.gmtoolsandequipment.com or
call 1-800-GM TOOLS
(1-800-468-6657).There are two minutes to match the
first tire/wheel position, and
five minutes overall to match all four
tire/wheel positions. If it takes
longer, the matching process stops
and must be restarted.
The TPMS sensor matching
process is:
1. Set the parking brake.
2. Place the vehicle in Service Mode. See Ignition Positions
0 179.
3. Make sure the Tire Pressure info page option is turned on.
The info pages on the DIC can
be turned on and off through
the Options menu. See Driver
Information Center (DIC) (Base
and Midlevel) 0124 or
Driver Information Center (DIC)
(Uplevel) 0130.
4. Use the DIC controls on the right side of the steering wheel
to scroll to the Tire Pressure
screen under the DIC
info page. 5. Press and hold
Vin the center
of the DIC controls.
The horn sounds twice to
signal the receiver is in relearn
mode and the TIRE
LEARNING ACTIVE message
displays on the DIC display.
6. Start with the driver side front tire.
7. Place the relearn tool against the tire sidewall, near the valve
stem. Then press the button to
activate the TPMS sensor.
A horn chirp confirms that the
sensor identification code has
been matched to this tire and
wheel position.
8. Proceed to the passenger side front tire, and repeat the
procedure in Step 7.
9. Proceed to the passenger side rear tire, and repeat the
procedure in Step 7.
10. Proceed to the driver side rear tire, and repeat the procedure
in Step 7. The horn sounds two
times to indicate the sensor
Page 384 of 425

GMC Terrain/Terrain Denali Owner Manual (GMNA-Localizing-U.S./Canada/
Mexico-13556230) - 2020 - CRC - 9/4/19
Technical Data 381
Technical Data
Vehicle Identification
Vehicle IdentificationNumber (VIN) . . . . . . . . . . . . . . . 381
Service Parts Identification . . . 381
Vehicle Data
Capacities and Specifications . . . . . . . . . . . . . . . 382
Engine Drive Belt Routing . . . . 384
Vehicle Identification
Vehicle Identification
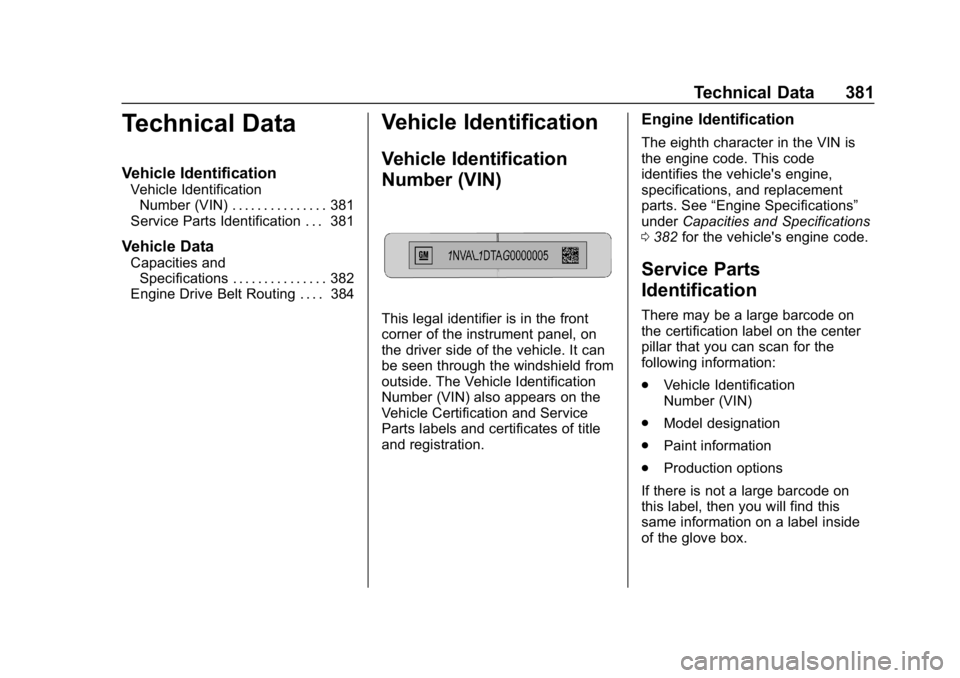
Number (VIN)
This legal identifier is in the front
corner of the instrument panel, on
the driver side of the vehicle. It can
be seen through the windshield from
outside. The Vehicle Identification
Number (VIN) also appears on the
Vehicle Certification and Service
Parts labels and certificates of title
and registration.
Engine Identification
The eighth character in the VIN is
the engine code. This code
identifies the vehicle's engine,
specifications, and replacement
parts. See “Engine Specifications”
under Capacities and Specifications
0 382 for the vehicle's engine code.
Service Parts
Identification
There may be a large barcode on
the certification label on the center
pillar that you can scan for the
following information:
.
Vehicle Identification
Number (VIN)
. Model designation
. Paint information
. Production options
If there is not a large barcode on
this label, then you will find this
same information on a label inside
of the glove box.
Page 392 of 425

GMC Terrain/Terrain Denali Owner Manual (GMNA-Localizing-U.S./Canada/
Mexico-13556230) - 2020 - CRC - 9/4/19
Customer Information 389
To learn about the GM Mobility
program, see www.gmmobility.com
or call the GM Mobility Assistance
Center at 1-800-323-9935. Text
Telephone (TTY) users, call
1-800-833-9935.
General Motors of Canada also has
a Mobility program. See www.gm.ca
or call 1-800-GM-DRIVE
(800-463-7483) for details. TTY
users call 1-800-263-3830.
Roadside Assistance
Program
For U.S.-purchased vehicles, call
1-888-881-3302; (Text Telephone
(TTY): 1-888-889-2438).
For Canadian-purchased vehicles,
call 1-800-268-6800.
Service is available 24 hours a day,
365 days a year.
Calling for Assistance
When calling Roadside Assistance,
have the following information
ready:
.Your name, home address, and
home telephone number
. Telephone number of your
location
. Location of the vehicle
. Model, year, color, and license
plate number of the vehicle
. Odometer reading, Vehicle
Identification Number (VIN), and
delivery date of the vehicle
. Description of the problem
Coverage
Services are provided for the
duration of the vehicle's powertrain
warranty.
In the U.S., anyone driving the
vehicle is covered. In Canada, a
person driving the vehicle without
permission from the owner is not
covered. Roadside Assistance is not a part of
the New Vehicle Limited Warranty.
General Motors North America and
GMC reserve the right to make any
changes or discontinue the
Roadside Assistance program at
any time without notification.
General Motors North America and
GMC reserve the right to limit
services or payment to an owner or
driver if they decide the claims are
made too often, or the same type of
claim is made many times.
Services Provided
.
Emergency Fuel Delivery:
Delivery of enough fuel for the
vehicle to get to the nearest
service station.
. Lock-Out Service: Service to
unlock the vehicle if you are
locked out. A remote unlock may
be available if you have OnStar.
For security reasons, the driver
must present identification
before this service is given.
Page 396 of 425

GMC Terrain/Terrain Denali Owner Manual (GMNA-Localizing-U.S./Canada/
Mexico-13556230) - 2020 - CRC - 9/4/19
Customer Information 393
collisions. Aftermarket parts are not
covered by the GM New Vehicle
Limited Warranty, and any vehicle
failure related to such parts is not
covered by that warranty.
Repair Facility
GM also recommends that you
choose a collision repair facility that
meets your needs before you ever
need collision repairs. Your dealer
may have a collision repair center
with GM-trained technicians and
state-of-the-art equipment, or be
able to recommend a collision repair
center that has GM-trained
technicians and comparable
equipment.
Insuring the Vehicle
Protect your investment in the GM
vehicle with comprehensive and
collision insurance coverage. There
are significant differences in the
quality of coverage afforded by
various insurance policy terms.
Many insurance policies provide
reduced protection to the GM
vehicle by limiting compensation for
damage repairs through the use ofaftermarket collision parts. Some
insurance companies will not
specify aftermarket collision parts.
When purchasing insurance, we
recommend that you ensure that the
vehicle will be repaired with GM
original equipment collision parts.
If such insurance coverage is not
available from your current
insurance carrier, consider switching
to another insurance carrier.
If the vehicle is leased, the leasing
company may require you to have
insurance that ensures repairs with
Genuine GM Original Equipment
Manufacturer (OEM) parts or
Genuine Manufacturer replacement
parts. Read the lease carefully, as
you may be charged at the end of
the lease for poor quality repairs.If a Crash Occurs
If there has been an injury, call
emergency services for help. Do not
leave the scene of a crash until all
matters have been taken care of.
Move the vehicle only if its position
puts you in danger, or you are
instructed to move it by a police
officer.
Give only the necessary information
to police and other parties involved
in the crash.
For emergency towing see
Roadside Assistance Program
0
389.
Gather the following information:
. Driver name, address, and
telephone number
. Driver license number
. Owner name, address, and
telephone number
. Vehicle license plate number
. Vehicle make, model, and
model year
. Vehicle Identification
Number (VIN)
. Insurance company and policy
number
. General description of the
damage to the other vehicle