tow GMC TERRAIN 2021 Repair Manual
[x] Cancel search | Manufacturer: GMC, Model Year: 2021, Model line: TERRAIN, Model: GMC TERRAIN 2021Pages: 377, PDF Size: 9.13 MB
Page 263 of 377
GMC Terrain/Terrain Denali Owner Manual(GMNA-Localizing-U.S./Canada/
Mexico-14420055) - 2021 - CRC - 11/13/20
262 Vehicle Care
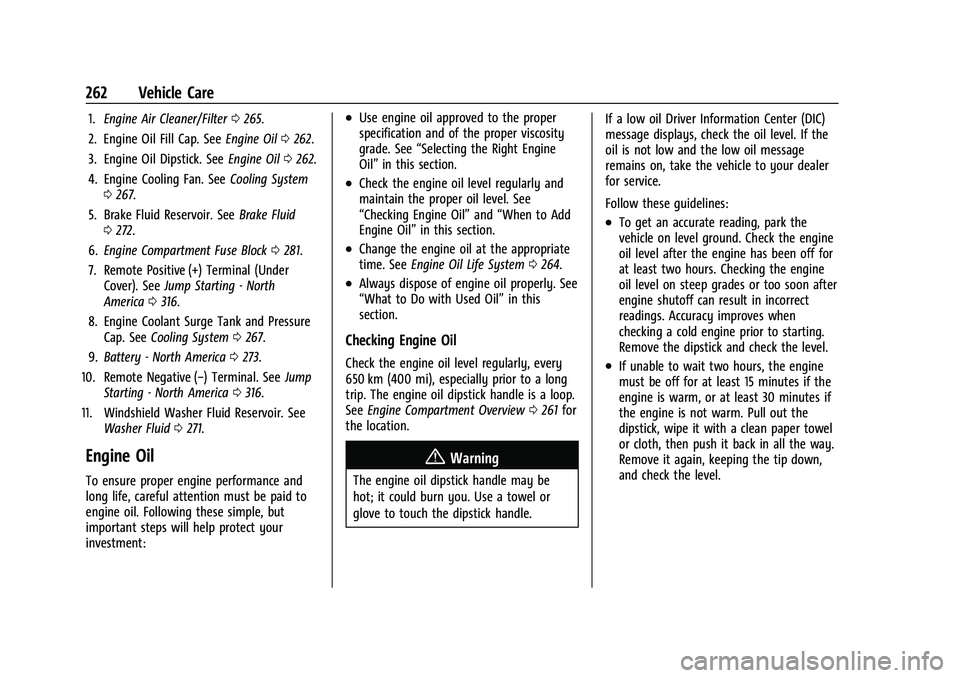
1.Engine Air Cleaner/Filter 0265.
2. Engine Oil Fill Cap. See Engine Oil0262.
3. Engine Oil Dipstick. See Engine Oil0262.
4. Engine Cooling Fan. See Cooling System
0 267.
5. Brake Fluid Reservoir. See Brake Fluid
0 272.
6. Engine Compartment Fuse Block 0281.
7. Remote Positive (+) Terminal (Under Cover). See Jump Starting - North
America 0316.
8. Engine Coolant Surge Tank and Pressure Cap. See Cooling System 0267.
9. Battery - North America 0273.
10. Remote Negative (−) Terminal. See Jump
Starting - North America 0316.
11. Windshield Washer Fluid Reservoir. See Washer Fluid 0271.
Engine Oil
To ensure proper engine performance and
long life, careful attention must be paid to
engine oil. Following these simple, but
important steps will help protect your
investment:
.Use engine oil approved to the proper
specification and of the proper viscosity
grade. See “Selecting the Right Engine
Oil” in this section.
.Check the engine oil level regularly and
maintain the proper oil level. See
“Checking Engine Oil” and“When to Add
Engine Oil” in this section.
.Change the engine oil at the appropriate
time. SeeEngine Oil Life System 0264.
.Always dispose of engine oil properly. See
“What to Do with Used Oil” in this
section.
Checking Engine Oil
Check the engine oil level regularly, every
650 km (400 mi), especially prior to a long
trip. The engine oil dipstick handle is a loop.
See Engine Compartment Overview 0261 for
the location.
{Warning
The engine oil dipstick handle may be
hot; it could burn you. Use a towel or
glove to touch the dipstick handle. If a low oil Driver Information Center (DIC)
message displays, check the oil level. If the
oil is not low and the low oil message
remains on, take the vehicle to your dealer
for service.
Follow these guidelines:
.To get an accurate reading, park the
vehicle on level ground. Check the engine
oil level after the engine has been off for
at least two hours. Checking the engine
oil level on steep grades or too soon after
engine shutoff can result in incorrect
readings. Accuracy improves when
checking a cold engine prior to starting.
Remove the dipstick and check the level.
.If unable to wait two hours, the engine
must be off for at least 15 minutes if the
engine is warm, or at least 30 minutes if
the engine is not warm. Pull out the
dipstick, wipe it with a clean paper towel
or cloth, then push it back in all the way.
Remove it again, keeping the tip down,
and check the level.
Page 271 of 377

GMC Terrain/Terrain Denali Owner Manual(GMNA-Localizing-U.S./Canada/
Mexico-14420055) - 2021 - CRC - 11/13/20
270 Vehicle Care
By this time, the coolant level inside the
coolant surge tank may be lower. If the
level is lower, add more of the proper
mixture to the coolant surge tank until
the level reaches the indicated
level mark.
5. Replace the pressure cap tightly.
6. Verify coolant level after the engine is shut off and the coolant is cold.
If necessary, repeat coolant fill procedure
Steps 1–6.
If the coolant still is not at the proper
level when the system cools down again,
see your dealer.
Caution
If the pressure cap is not tightly installed,
coolant loss and engine damage may
occur. Be sure the cap is properly and
tightly secured.
Engine Overheating
The vehicle has an engine coolant
temperature gauge on the instrument
cluster and overheat messages in the Driver
Information Center (DIC) to warn of engine
overheating. See Engine Coolant
Temperature Gauge 091. The decision may be made not to lift the
hood when the engine coolant temperature
gauge is in the overheat zone or an engine
overheat DIC message displays, but instead
to get service help right away. See
Roadside
Assistance Program 0349.
If the decision to lift the hood is made,
make sure the vehicle is parked on a level
surface. Then check to see if the engine
cooling fan(s) are running. If the engine is
overheating, the fan(s) should be running.
If they are not, do not continue to run the
engine, and have the vehicle serviced.
Caution
Do not run the engine if there is a leak
in the engine cooling system. This can
cause a loss of all coolant and can
damage the system and vehicle. Have
any leaks fixed right away.
If Steam Is Coming from the Engine
Compartment
{Warning
Steam and scalding liquids from a hot
cooling system are under pressure.
Turning the pressure cap, even a little,
can cause them to come out at high
speed and you could be burned. Never
turn the cap when the cooling system,
including the pressure cap, is hot. Wait
for the cooling system and pressure cap
to cool.
If No Steam Is Coming from the Engine
Compartment
If the engine coolant temperature gauge is
in the overheat zone or an engine overheat
DIC message is displayed but no steam can
be seen or heard, the problem may not be
too serious. Sometimes the engine can get a
little too hot when the vehicle:
.Climbs a long hill on a hot day
.Stops after high-speed driving
.Idles for long periods in traffic
.Tows a trailer
Page 276 of 377
GMC Terrain/Terrain Denali Owner Manual(GMNA-Localizing-U.S./Canada/
Mexico-14420055) - 2021 - CRC - 11/13/20
Vehicle Care 275
Wiper Blade Replacement
Windshield wiper blades should be replaced
periodically. SeeMaintenance Schedule
0 331.
Replacement blades come in different types
and are removed in different ways. For
proper type and length, see Maintenance
Replacement Parts 0340.
Caution
Allowing the wiper arm to touch the
windshield when no wiper blade is
installed could damage the windshield.
Any damage that occurs would not be
covered by the vehicle warranty. Do not
allow the wiper arm to touch the
windshield.
Front Wiper Blade Replacement
To replace the wiper blade:
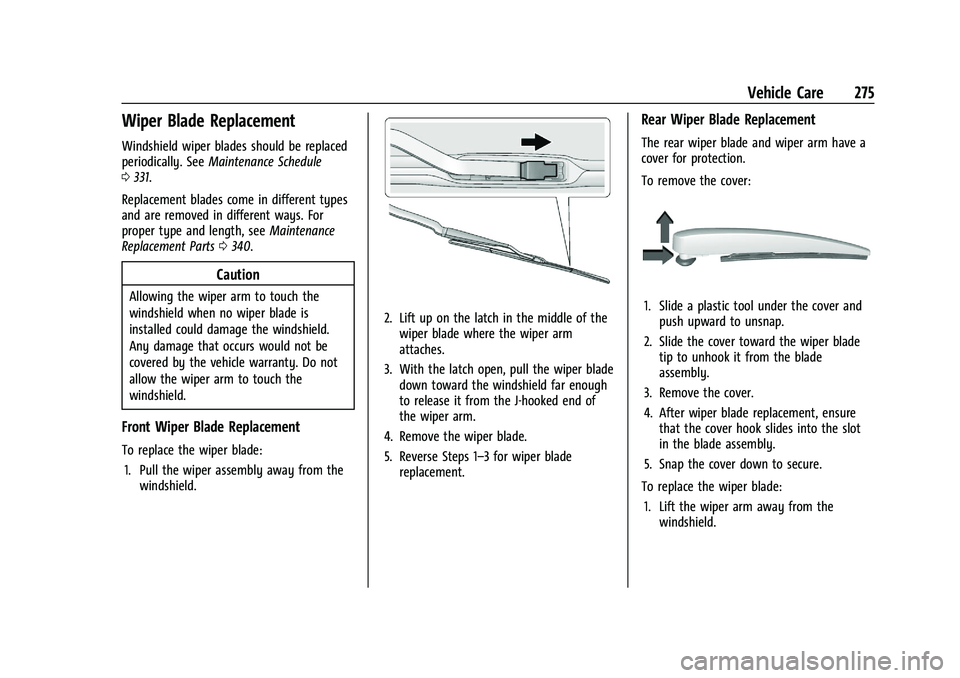
1. Pull the wiper assembly away from the windshield.
2. Lift up on the latch in the middle of the
wiper blade where the wiper arm
attaches.
3. With the latch open, pull the wiper blade down toward the windshield far enough
to release it from the J-hooked end of
the wiper arm.
4. Remove the wiper blade.
5. Reverse Steps 1–3 for wiper blade replacement.
Rear Wiper Blade Replacement
The rear wiper blade and wiper arm have a
cover for protection.
To remove the cover:
1. Slide a plastic tool under the cover andpush upward to unsnap.
2. Slide the cover toward the wiper blade tip to unhook it from the blade
assembly.
3. Remove the cover.
4. After wiper blade replacement, ensure that the cover hook slides into the slot
in the blade assembly.
5. Snap the cover down to secure.
To replace the wiper blade: 1. Lift the wiper arm away from the windshield.
Page 300 of 377
GMC Terrain/Terrain Denali Owner Manual(GMNA-Localizing-U.S./Canada/
Mexico-14420055) - 2021 - CRC - 11/13/20
Vehicle Care 299
Check that all wheel nuts are properly
tightened. See“Wheel Nut Torque”
under Capacities and Specifications
0 343, and “Removing the Flat Tire and
Installing the Spare Tire” underTire
Changing 0310.
{Warning
Rust or dirt on a wheel, or on the
parts to which it is fastened, can
cause wheel nuts to become loose
over time. The wheel could come off
and cause a crash. When changing a
wheel, remove any rust or dirt from
places where the wheel attaches to
the vehicle. In an emergency, a cloth
or paper towel can be used; however,
use a scraper or wire brush later to
remove all rust or dirt.
Lightly coat the inner diameter of the
wheel hub opening with wheel bearing
grease after a wheel change or tire
rotation to prevent corrosion or rust
buildup.
{Warning
Do not apply grease to the wheel
mounting surface, wheel conical
seats, or the wheel nuts or bolts.
Grease applied to these areas could
cause a wheel to become loose or
come off, resulting in a crash.
When It Is Time for New Tires
Factors, such as maintenance, temperatures,
driving speeds, vehicle loading, and road
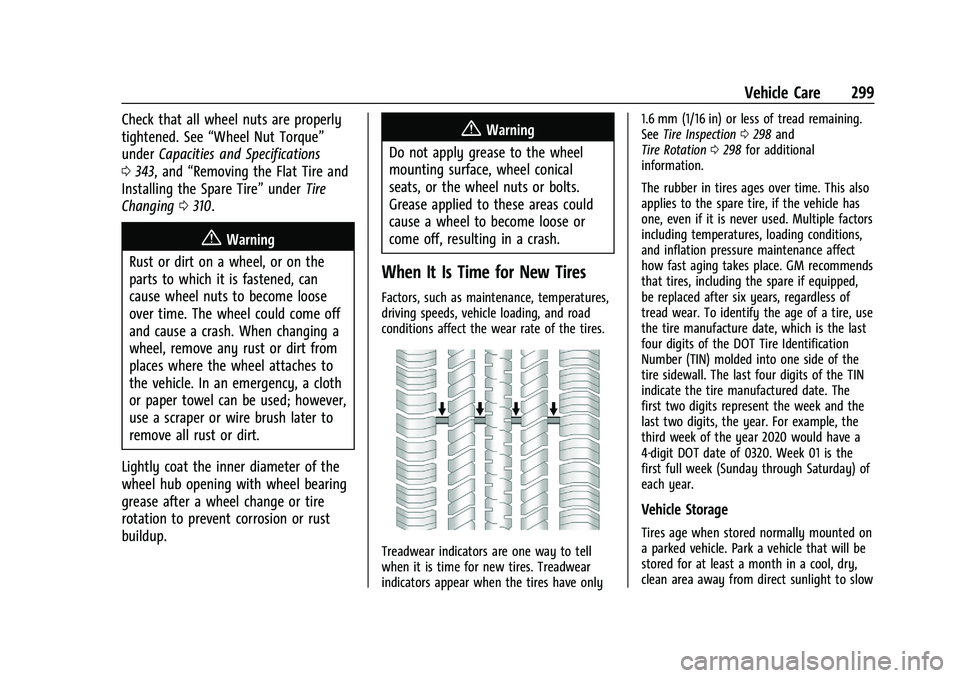
conditions affect the wear rate of the tires.
Treadwear indicators are one way to tell
when it is time for new tires. Treadwear
indicators appear when the tires have only 1.6 mm (1/16 in) or less of tread remaining.
See
Tire Inspection 0298 and
Tire Rotation 0298 for additional
information.
The rubber in tires ages over time. This also
applies to the spare tire, if the vehicle has
one, even if it is never used. Multiple factors
including temperatures, loading conditions,
and inflation pressure maintenance affect
how fast aging takes place. GM recommends
that tires, including the spare if equipped,
be replaced after six years, regardless of
tread wear. To identify the age of a tire, use
the tire manufacture date, which is the last
four digits of the DOT Tire Identification
Number (TIN) molded into one side of the
tire sidewall. The last four digits of the TIN
indicate the tire manufactured date. The
first two digits represent the week and the
last two digits, the year. For example, the
third week of the year 2020 would have a
4-digit DOT date of 0320. Week 01 is the
first full week (Sunday through Saturday) of
each year.
Vehicle Storage
Tires age when stored normally mounted on
a parked vehicle. Park a vehicle that will be
stored for at least a month in a cool, dry,
clean area away from direct sunlight to slow
Page 304 of 377
GMC Terrain/Terrain Denali Owner Manual(GMNA-Localizing-U.S./Canada/
Mexico-14420055) - 2021 - CRC - 11/13/20
Vehicle Care 303
Your dealer will know the kind of wheel that
is needed.
Each new wheel should have the same
load-carrying capacity, diameter, width,
offset, and be mounted the same way as
the one it replaces.
Replace wheels, wheel bolts, wheel nuts,
or Tire Pressure Monitor System (TPMS)
sensors with new GM original equipment
parts.
{Warning
Using the wrong replacement wheels,
wheel bolts, or wheel nuts can be
dangerous. It could affect the braking and
handling of the vehicle. Tires can lose air
and cause loss of control, resulting in a
crash. Always use the correct wheel,
wheel bolts, and wheel nuts for
replacement.
Caution
The wrong wheel can also cause
problems with bearing life, brake cooling,
speedometer or odometer calibration,
(Continued)
Caution (Continued)
headlamp aim, bumper height, vehicle
ground clearance, and tire or tire chain
clearance to the body and chassis.
Used Replacement Wheels
{Warning
Replacing a wheel with a used one is
dangerous. How it has been used or how
far it has been driven may be unknown.
It could fail suddenly and cause a crash.
When replacing wheels, use a new GM
original equipment wheel.
Tire Chains
{Warning
Do not use tire chains. There is not
enough clearance. Tire chains used on a
vehicle without the proper amount of
clearance can cause damage to the
brakes, suspension, or other vehicle parts.
The area damaged by the tire chains
could cause loss of control and a crash.(Continued)
Warning (Continued)
Use another type of traction device only
if its manufacturer recommends it for the
vehicle's tire size combination and road
conditions. Follow that manufacturer's
instructions. To avoid vehicle damage,
drive slow and readjust or remove the
traction device if it contacts the vehicle.
Do not spin the wheels. If traction
devices are used, install them on the
front tires.
If a Tire Goes Flat
It is unusual for a tire to blow out while
driving, especially if the tires are maintained
properly. SeeTires0287. If air goes out of a
tire, it is much more likely to leak out
slowly. But if there is ever a blowout, here
are a few tips about what to expect and
what to do:
If a front tire fails, the flat tire creates a
drag that pulls the vehicle toward that side.
Take your foot off the accelerator pedal and
grip the steering wheel firmly. Steer to
maintain lane position, and then gently
brake to a stop, well off the road,
if possible.
Page 311 of 377
GMC Terrain/Terrain Denali Owner Manual(GMNA-Localizing-U.S./Canada/
Mexico-14420055) - 2021 - CRC - 11/13/20
310 Vehicle Care
Caution (Continued)
unscrew the inflating hose from the tire
valve. SeeRoadside Assistance Program
0 349.
10. Press the on/off button (5) to turn the tire sealant and compressor kit off.
Be careful while handling the compressor
as it could be warm after usage.
11. Unplug the power plug (9) from the accessory power outlet in the vehicle.
12. Turn the air only hose (10) counterclockwise to remove it from the
tire valve stem.
13. Replace the tire valve stem cap.
14. Return the air only hose (10) and power plug (9) back to their original storage
location.
15. Return the equipment to its original storage location in the vehicle.
The tire sealant and compressor kit has
accessory adapters located in a
compartment on the bottom of its housing
that can be used to inflate air mattresses,
balls, etc.
Storing the Tire Sealant and
Compressor Kit
To access the tire sealant and
compressor kit: 1. Open the liftgate. See Liftgate017.
2. Fold the rear part of the load floor to the front.
3. Turn the retainer nut counterclockwise toremove the tire sealant and compressor
kit bag.
4. Remove the tire sealant and compressor kit from the bag.
To store the tire sealant and compressor kit,
reverse the steps.
Tire Changing
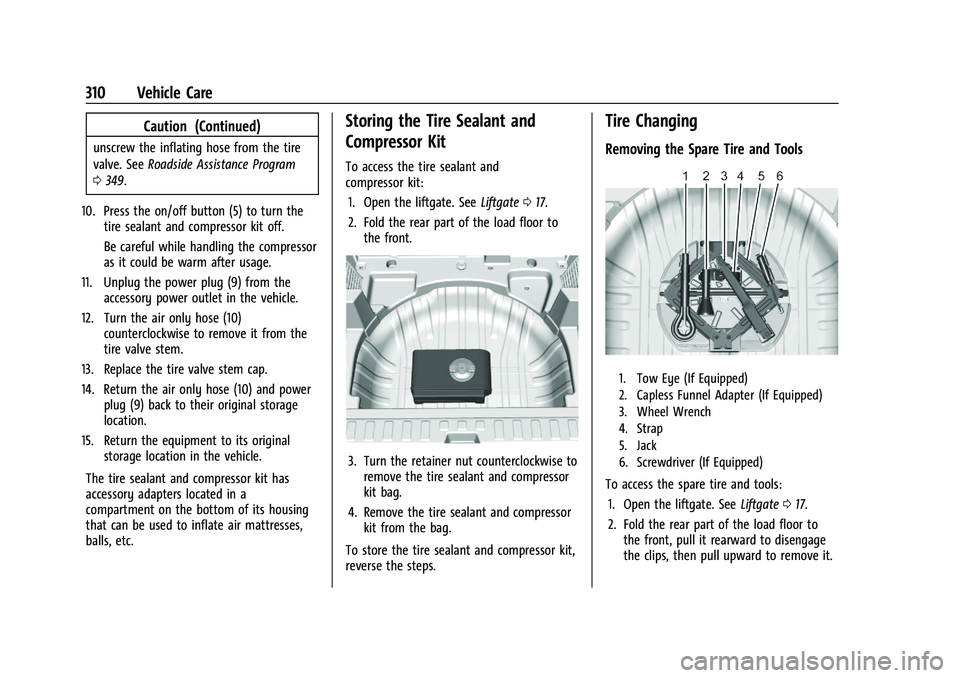
Removing the Spare Tire and Tools
1. Tow Eye (If Equipped)
2. Capless Funnel Adapter (If Equipped)
3. Wheel Wrench
4. Strap
5. Jack
6. Screwdriver (If Equipped)
To access the spare tire and tools: 1. Open the liftgate. See Liftgate017.
2. Fold the rear part of the load floor to the front, pull it rearward to disengage
the clips, then pull upward to remove it.
Page 314 of 377
GMC Terrain/Terrain Denali Owner Manual(GMNA-Localizing-U.S./Canada/
Mexico-14420055) - 2021 - CRC - 11/13/20
Vehicle Care 313
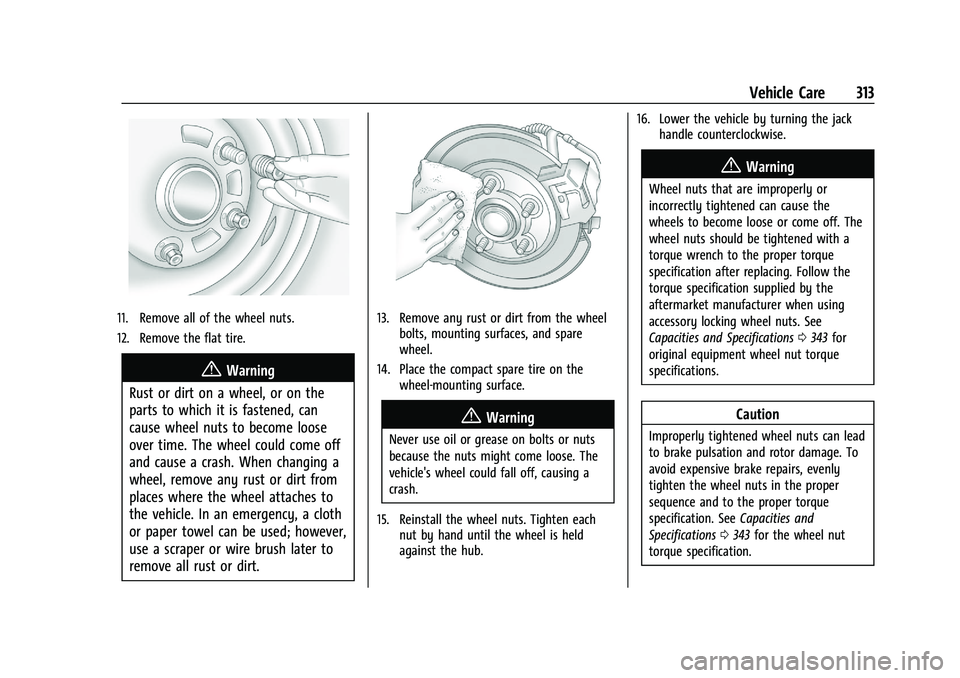
11. Remove all of the wheel nuts.
12. Remove the flat tire.
{Warning
Rust or dirt on a wheel, or on the
parts to which it is fastened, can
cause wheel nuts to become loose
over time. The wheel could come off
and cause a crash. When changing a
wheel, remove any rust or dirt from
places where the wheel attaches to
the vehicle. In an emergency, a cloth
or paper towel can be used; however,
use a scraper or wire brush later to
remove all rust or dirt.
13. Remove any rust or dirt from the wheel bolts, mounting surfaces, and spare
wheel.
14. Place the compact spare tire on the wheel-mounting surface.
{Warning
Never use oil or grease on bolts or nuts
because the nuts might come loose. The
vehicle's wheel could fall off, causing a
crash.
15. Reinstall the wheel nuts. Tighten each nut by hand until the wheel is held
against the hub. 16. Lower the vehicle by turning the jack
handle counterclockwise.
{Warning
Wheel nuts that are improperly or
incorrectly tightened can cause the
wheels to become loose or come off. The
wheel nuts should be tightened with a
torque wrench to the proper torque
specification after replacing. Follow the
torque specification supplied by the
aftermarket manufacturer when using
accessory locking wheel nuts. See
Capacities and Specifications 0343 for
original equipment wheel nut torque
specifications.
Caution
Improperly tightened wheel nuts can lead
to brake pulsation and rotor damage. To
avoid expensive brake repairs, evenly
tighten the wheel nuts in the proper
sequence and to the proper torque
specification. See Capacities and
Specifications 0343 for the wheel nut
torque specification.
Page 319 of 377
GMC Terrain/Terrain Denali Owner Manual(GMNA-Localizing-U.S./Canada/
Mexico-14420055) - 2021 - CRC - 11/13/20
318 Vehicle Care
{Warning
Fans or other moving engine parts can
injure you badly. Keep your hands away
from moving parts once the engine is
running.
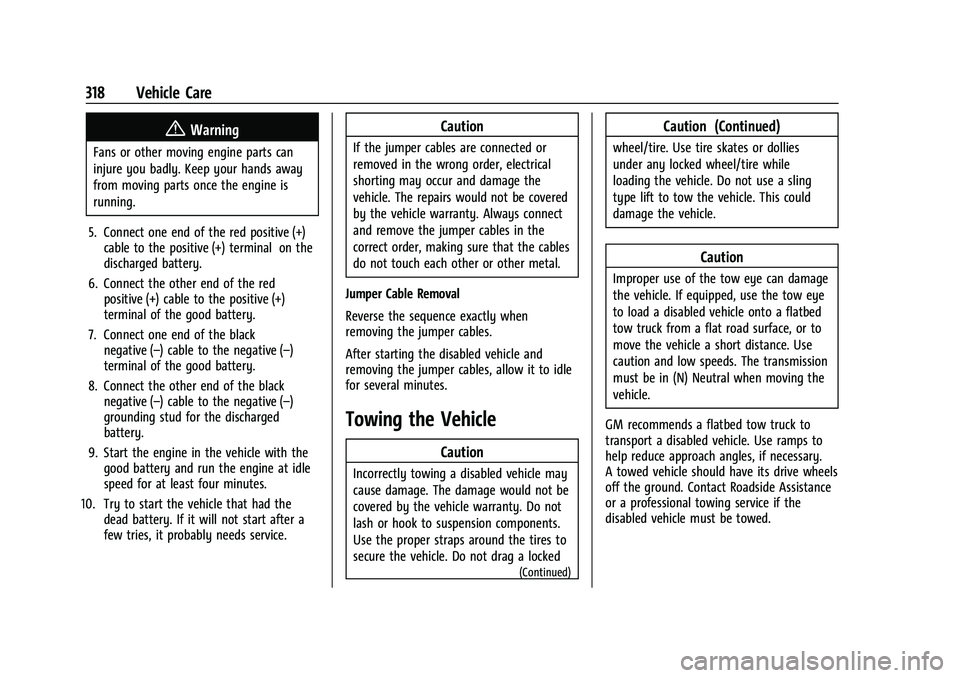
5. Connect one end of the red positive (+) cable to the positive (+) terminal on the
discharged battery.
6. Connect the other end of the red positive (+) cable to the positive (+)
terminal of the good battery.
7. Connect one end of the black negative (–) cable to the negative (–)
terminal of the good battery.
8. Connect the other end of the black negative (–) cable to the negative (–)
grounding stud for the discharged
battery.
9. Start the engine in the vehicle with the good battery and run the engine at idle
speed for at least four minutes.
10. Try to start the vehicle that had the dead battery. If it will not start after a
few tries, it probably needs service.
Caution
If the jumper cables are connected or
removed in the wrong order, electrical
shorting may occur and damage the
vehicle. The repairs would not be covered
by the vehicle warranty. Always connect
and remove the jumper cables in the
correct order, making sure that the cables
do not touch each other or other metal.
Jumper Cable Removal
Reverse the sequence exactly when
removing the jumper cables.
After starting the disabled vehicle and
removing the jumper cables, allow it to idle
for several minutes.
Towing the Vehicle
Caution
Incorrectly towing a disabled vehicle may
cause damage. The damage would not be
covered by the vehicle warranty. Do not
lash or hook to suspension components.
Use the proper straps around the tires to
secure the vehicle. Do not drag a locked
(Continued)
Caution (Continued)
wheel/tire. Use tire skates or dollies
under any locked wheel/tire while
loading the vehicle. Do not use a sling
type lift to tow the vehicle. This could
damage the vehicle.
Caution
Improper use of the tow eye can damage
the vehicle. If equipped, use the tow eye
to load a disabled vehicle onto a flatbed
tow truck from a flat road surface, or to
move the vehicle a short distance. Use
caution and low speeds. The transmission
must be in (N) Neutral when moving the
vehicle.
GM recommends a flatbed tow truck to
transport a disabled vehicle. Use ramps to
help reduce approach angles, if necessary.
A towed vehicle should have its drive wheels
off the ground. Contact Roadside Assistance
or a professional towing service if the
disabled vehicle must be towed.
Page 320 of 377

GMC Terrain/Terrain Denali Owner Manual(GMNA-Localizing-U.S./Canada/
Mexico-14420055) - 2021 - CRC - 11/13/20
Vehicle Care 319
The vehicle is equipped with a tow eye.
Only use the tow eye to pull the vehicle
onto a flatbed car carrier from a flat road
surface. Do not use the tow eye to pull the
vehicle from snow, mud, or sand.
The tow eye is stored underneath the load
floor, near the spare tire or the compressor
kit, if equipped.
Front Tow Eye
Carefully open the cover by using the small
notch that conceals the front tow eye
socket.
Install the tow eye into the socket and turn
it until it is fully tightened.
When the tow eye is removed, reinstall the
cover with the notch in the original position.
Rear Tow Eye
If the vehicle is equipped with a hitch, there
is no provision to use the tow eye in the
rear of the vehicle. The hitch may be used
to load the vehicle onto a flatbed tow truck.
If equipped, carefully open the cover by
using the small notch that conceals the rear
tow eye socket.
Page 321 of 377

GMC Terrain/Terrain Denali Owner Manual(GMNA-Localizing-U.S./Canada/
Mexico-14420055) - 2021 - CRC - 11/13/20
320 Vehicle Care
Install the tow eye into the socket and turn
it until it is fully tightened.
When the tow eye is removed, reinstall the
cover with the notch in the original position.
To tow the vehicle behind another vehicle
for recreational purposes, such as behind a
motor home, seeRecreational Vehicle
Towing 0320.
Recreational Vehicle Towing
Recreational vehicle towing means towing
the vehicle behind another vehicle –such as
behind a motor home. The two most
common types of recreational vehicle
towing are known as dinghy towing and
dolly towing. Dinghy towing is towing the
vehicle with all four wheels on the ground.
Dolly towing is towing the vehicle with two
wheels on the ground and two wheels up
on a device known as a dolly.
Here are some important things to consider
before recreational vehicle towing:
.Before towing the vehicle, become
familiar with the local laws that apply to
recreational vehicle towing. These laws
may vary by region.
.The towing capacity of the towing
vehicle. Be sure to read the tow vehicle
manufacturer's recommendations.
.How far the vehicle will be towed. Some
vehicles have restrictions on how far and
how long they can tow.
.The proper towing equipment. See your
dealer or trailering professional for
additional advice and equipment
recommendations.
.If the vehicle is ready to be towed. Just
as preparing the vehicle for a long trip,
make sure the vehicle is prepared to be
towed.
Dinghy Towing
Caution
If the vehicle is towed with all four
wheels on the ground, the drivetrain
components could be damaged. The
repairs would not be covered by the
vehicle warranty. Do not tow the vehicle
with all four wheels on the ground.
The vehicle was not designed to be towed
with all four wheels on the ground. The
vehicle may be towed using a platform
trailer with all four wheels off the ground.
Some vehicles may be dolly towed. See the
following information on dolly towing.
Dolly Towing (All-Wheel-Drive Vehicles)
All-wheel-drive vehicles cannot be towed
with two wheels on the ground. To properly
tow these vehicles, they should be placed on
a platform trailer with all four wheels off of
the ground.