fog light GMC TERRAIN 2021 Owner's Manual
[x] Cancel search | Manufacturer: GMC, Model Year: 2021, Model line: TERRAIN, Model: GMC TERRAIN 2021Pages: 377, PDF Size: 9.13 MB
Page 6 of 377
GMC Terrain/Terrain Denali Owner Manual(GMNA-Localizing-U.S./Canada/
Mexico-14420055) - 2021 - CRC - 11/13/20
Introduction 5
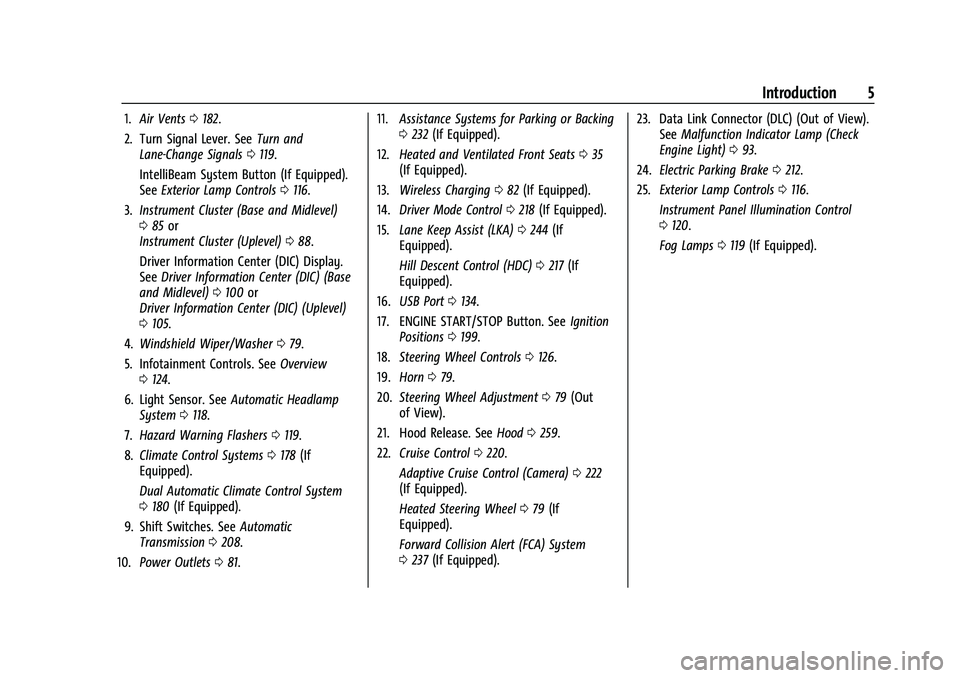
1.Air Vents 0182.
2. Turn Signal Lever. See Turn and
Lane-Change Signals 0119.
IntelliBeam System Button (If Equipped).
See Exterior Lamp Controls 0116.
3. Instrument Cluster (Base and Midlevel)
085 or
Instrument Cluster (Uplevel) 088.
Driver Information Center (DIC) Display.
See Driver Information Center (DIC) (Base
and Midlevel) 0100 or
Driver Information Center (DIC) (Uplevel)
0 105.
4. Windshield Wiper/Washer 079.
5. Infotainment Controls. See Overview
0 124.
6. Light Sensor. See Automatic Headlamp
System 0118.
7. Hazard Warning Flashers 0119.
8. Climate Control Systems 0178 (If
Equipped).
Dual Automatic Climate Control System
0 180 (If Equipped).
9. Shift Switches. See Automatic
Transmission 0208.
10. Power Outlets 081. 11.
Assistance Systems for Parking or Backing
0232 (If Equipped).
12. Heated and Ventilated Front Seats 035
(If Equipped).
13. Wireless Charging 082 (If Equipped).
14. Driver Mode Control 0218 (If Equipped).
15. Lane Keep Assist (LKA) 0244 (If
Equipped).
Hill Descent Control (HDC) 0217 (If
Equipped).
16. USB Port 0134.
17. ENGINE START/STOP Button. See Ignition
Positions 0199.
18. Steering Wheel Controls 0126.
19. Horn 079.
20. Steering Wheel Adjustment 079 (Out
of View).
21. Hood Release. See Hood0259.
22. Cruise Control 0220.
Adaptive Cruise Control (Camera) 0222
(If Equipped).
Heated Steering Wheel 079 (If
Equipped).
Forward Collision Alert (FCA) System
0 237 (If Equipped). 23. Data Link Connector (DLC) (Out of View).
SeeMalfunction Indicator Lamp (Check
Engine Light) 093.
24. Electric Parking Brake 0212.
25. Exterior Lamp Controls 0116.
Instrument Panel Illumination Control
0 120.
Fog Lamps 0119 (If Equipped).
Page 9 of 377
GMC Terrain/Terrain Denali Owner Manual(GMNA-Localizing-U.S./Canada/
Mexico-14420055) - 2021 - CRC - 11/13/20
8 Keys, Doors, and Windows
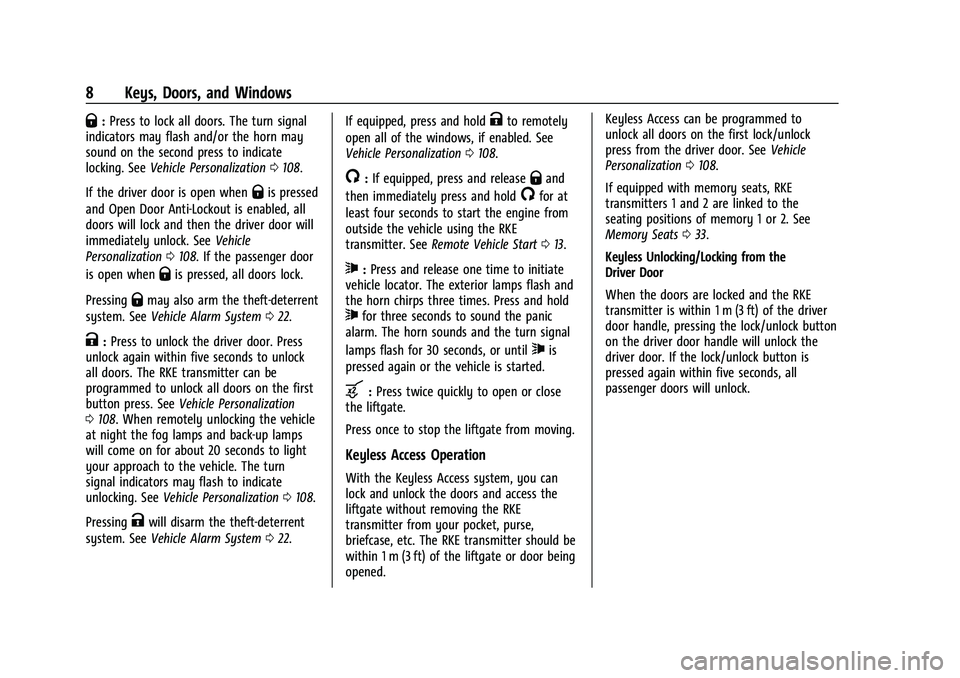
Q:Press to lock all doors. The turn signal
indicators may flash and/or the horn may
sound on the second press to indicate
locking. See Vehicle Personalization 0108.
If the driver door is open when
Qis pressed
and Open Door Anti-Lockout is enabled, all
doors will lock and then the driver door will
immediately unlock. See Vehicle
Personalization 0108. If the passenger door
is open when
Qis pressed, all doors lock.
Pressing
Qmay also arm the theft-deterrent
system. See Vehicle Alarm System 022.
K:Press to unlock the driver door. Press
unlock again within five seconds to unlock
all doors. The RKE transmitter can be
programmed to unlock all doors on the first
button press. See Vehicle Personalization
0 108. When remotely unlocking the vehicle
at night the fog lamps and back-up lamps
will come on for about 20 seconds to light
your approach to the vehicle. The turn
signal indicators may flash to indicate
unlocking. See Vehicle Personalization 0108.
Pressing
Kwill disarm the theft-deterrent
system. See Vehicle Alarm System 022. If equipped, press and hold
Kto remotely
open all of the windows, if enabled. See
Vehicle Personalization 0108.
/:If equipped, press and releaseQand
then immediately press and hold
/for at
least four seconds to start the engine from
outside the vehicle using the RKE
transmitter. See Remote Vehicle Start 013.
7:Press and release one time to initiate
vehicle locator. The exterior lamps flash and
the horn chirps three times. Press and hold
7for three seconds to sound the panic
alarm. The horn sounds and the turn signal
lamps flash for 30 seconds, or until
7is
pressed again or the vehicle is started.
b: Press twice quickly to open or close
the liftgate.
Press once to stop the liftgate from moving.
Keyless Access Operation
With the Keyless Access system, you can
lock and unlock the doors and access the
liftgate without removing the RKE
transmitter from your pocket, purse,
briefcase, etc. The RKE transmitter should be
within 1 m (3 ft) of the liftgate or door being
opened. Keyless Access can be programmed to
unlock all doors on the first lock/unlock
press from the driver door. See
Vehicle
Personalization 0108.
If equipped with memory seats, RKE
transmitters 1 and 2 are linked to the
seating positions of memory 1 or 2. See
Memory Seats 033.
Keyless Unlocking/Locking from the
Driver Door
When the doors are locked and the RKE
transmitter is within 1 m (3 ft) of the driver
door handle, pressing the lock/unlock button
on the driver door handle will unlock the
driver door. If the lock/unlock button is
pressed again within five seconds, all
passenger doors will unlock.
Page 14 of 377
GMC Terrain/Terrain Denali Owner Manual(GMNA-Localizing-U.S./Canada/
Mexico-14420055) - 2021 - CRC - 11/13/20
Keys, Doors, and Windows 13
4. Remove the battery.
5. Insert the new battery, positive sidetoward the back cover. Replace with a
CR2032 or equivalent battery.
6. Push together the transmitter.
7. Reinsert the key.
Remote Vehicle Start
If equipped, this feature allows you to start
the engine from outside the vehicle.
/: This button will be on the RKE
transmitter if the vehicle has remote start.
The climate control system will use the
previous settings during a remote start. The
rear defog may come on during remote
start based on cold ambient conditions. The
rear defog indicator light does not come on
during remote start.
If equipped with heated and ventilated front
seats, they may come on during a remote
start. See Heated and Ventilated Front Seats
0 35.
If equipped with a heated steering wheel, it
may come on during a remote start. See
Heated Steering Wheel 079. Laws in some local communities may restrict
the use of remote starters. For example,
some laws require a person using remote
start to have the vehicle in view. Check local
regulations for any requirements.
Do not use the remote start feature if the
vehicle is low on fuel. The vehicle could run
out of fuel.
Other conditions can affect the performance
of the transmitter. See
Remote Keyless Entry
(RKE) System 07.
Starting the Engine Using Remote Start
1. Press and release
Qon the RKE
transmitter.
2. Immediately press and hold
/for at
least four seconds or until the turn
signal lamps flash. The turn signal lamps
flashing confirms the request to remote
start the vehicle has been received.
The parking lamps will turn on and
remain on as long as the engine is
running. The vehicle's doors will be
locked.
3. Turn the ignition on before driving. The engine will shut off after 15 minutes
unless a time extension is done or the
ignition is turned on. Extending Engine Run Time
For a 15-minute extension, after 30 seconds
repeat Steps 1 and 2 while the engine is still
running. The remote start can be
extended once.
When the remote start is extended, the
second 15 minutes will be added for a total
of 30 minutes.
A maximum of two remote starts or a start
with an extension are allowed between
ignition cycles.
The ignition must be turned on and then
back off to use remote start again.
Canceling a Remote Start
To shut off the engine:
.Press and hold/until the parking lamps
turn off.
.Turn on the hazard warning flashers.
.Turn the ignition on and then off.
Conditions in Which Remote Start Will
Not Work
The remote vehicle start feature will not
operate if:
.A transmitter is in the vehicle.
.The vehicle is on.
Page 79 of 377
GMC Terrain/Terrain Denali Owner Manual(GMNA-Localizing-U.S./Canada/
Mexico-14420055) - 2021 - CRC - 11/13/20
78 Instruments and Controls
Instruments and Controls
Controls
Steering Wheel Adjustment . . . . . . . . . . . . 79
Steering Wheel Controls . . . . . . . . . . . . . . . . 79
Heated Steering Wheel . . . . . . . . . . . . . . . . . 79
Horn . . . . . . . . . . . . . . . . . . . . . . . . . . . . . . . . . . . 79
Windshield Wiper/Washer . . . . . . . . . . . . . . 79
Rear Window Wiper/Washer . . . . . . . . . . . 80
Compass . . . . . . . . . . . . . . . . . . . . . . . . . . . . . . . . 81
Clock . . . . . . . . . . . . . . . . . . . . . . . . . . . . . . . . . . . 81
Power Outlets . . . . . . . . . . . . . . . . . . . . . . . . . . 81
Wireless Charging . . . . . . . . . . . . . . . . . . . . . . 82
Warning Lights, Gauges, and Indicators
Warning Lights, Gauges, andIndicators . . . . . . . . . . . . . . . . . . . . . . . . . . . . . 84
Instrument Cluster (Base and Midlevel) . . . . . . . . . . . . . . . . . . . . . . . . . . . . . 85
Instrument Cluster (Uplevel) . . . . . . . . . . . . 88
Speedometer . . . . . . . . . . . . . . . . . . . . . . . . . . . 89
Odometer . . . . . . . . . . . . . . . . . . . . . . . . . . . . . . 90
Trip Odometer . . . . . . . . . . . . . . . . . . . . . . . . . 90
Tachometer . . . . . . . . . . . . . . . . . . . . . . . . . . . . 90
Fuel Gauge . . . . . . . . . . . . . . . . . . . . . . . . . . . . . 90
Engine Coolant Temperature Gauge . . . . 91
Seat Belt Reminders . . . . . . . . . . . . . . . . . . . . 91
Airbag Readiness Light . . . . . . . . . . . . . . . . . 92
Passenger Airbag Status Indicator . . . . . . 92
Charging System Light . . . . . . . . . . . . . . . . . 93 Malfunction Indicator Lamp (Check
Engine Light) . . . . . . . . . . . . . . . . . . . . . . . . . 93
Brake System Warning Light . . . . . . . . . . . 95
Electric Parking Brake Light . . . . . . . . . . . . . 95
Service Electric Parking Brake Light . . . . . 95
Antilock Brake System (ABS) Warning Light . . . . . . . . . . . . . . . . . . . . . . . . . . . . . . . . . 96
Tow/Haul Mode Light . . . . . . . . . . . . . . . . . . 96
Hill Descent Control Light . . . . . . . . . . . . . . 96
Lane Keep Assist (LKA) Light . . . . . . . . . . . 96
Vehicle Ahead Indicator . . . . . . . . . . . . . . . . 97
Pedestrian Ahead Indicator . . . . . . . . . . . . . 97
Traction Off Light . . . . . . . . . . . . . . . . . . . . . . 97
StabiliTrak OFF Light . . . . . . . . . . . . . . . . . . . . 97
Traction Control System (TCS)/StabiliTrak Light . . . . . . . . . . . . . . . . . . . . . . . . . . . . . . . . . 98
Tire Pressure Light . . . . . . . . . . . . . . . . . . . . . 98
Engine Oil Pressure Light . . . . . . . . . . . . . . . 98
Low Fuel Warning Light . . . . . . . . . . . . . . . . 99
Security Light . . . . . . . . . . . . . . . . . . . . . . . . . . 99
High-Beam On Light . . . . . . . . . . . . . . . . . . . . 99
Front Fog Lamp Light . . . . . . . . . . . . . . . . . 100
Lamps On Reminder . . . . . . . . . . . . . . . . . . . 100
Cruise Control Light . . . . . . . . . . . . . . . . . . . 100
Door Ajar Light . . . . . . . . . . . . . . . . . . . . . . . . 100
Information Displays
Driver Information Center (DIC) (Base and Midlevel) . . . . . . . . . . . . . . . . . . . . . . . . 100
Driver Information Center (DIC) (Uplevel) . . . . . . . . . . . . . . . . . . . . . . . . . . . . . 105
Vehicle Messages
Vehicle Messages . . . . . . . . . . . . . . . . . . . . . . 108
Engine Power Messages . . . . . . . . . . . . . . . 108
Vehicle Speed Messages . . . . . . . . . . . . . . . 108
Vehicle Personalization
Vehicle Personalization . . . . . . . . . . . . . . . . 108
Universal Remote System
Universal Remote System . . . . . . . . . . . . . . 112
Universal Remote SystemProgramming . . . . . . . . . . . . . . . . . . . . . . . . . 113
Universal Remote System Operation . . . 115
Page 101 of 377
GMC Terrain/Terrain Denali Owner Manual(GMNA-Localizing-U.S./Canada/
Mexico-14420055) - 2021 - CRC - 11/13/20
100 Instruments and Controls
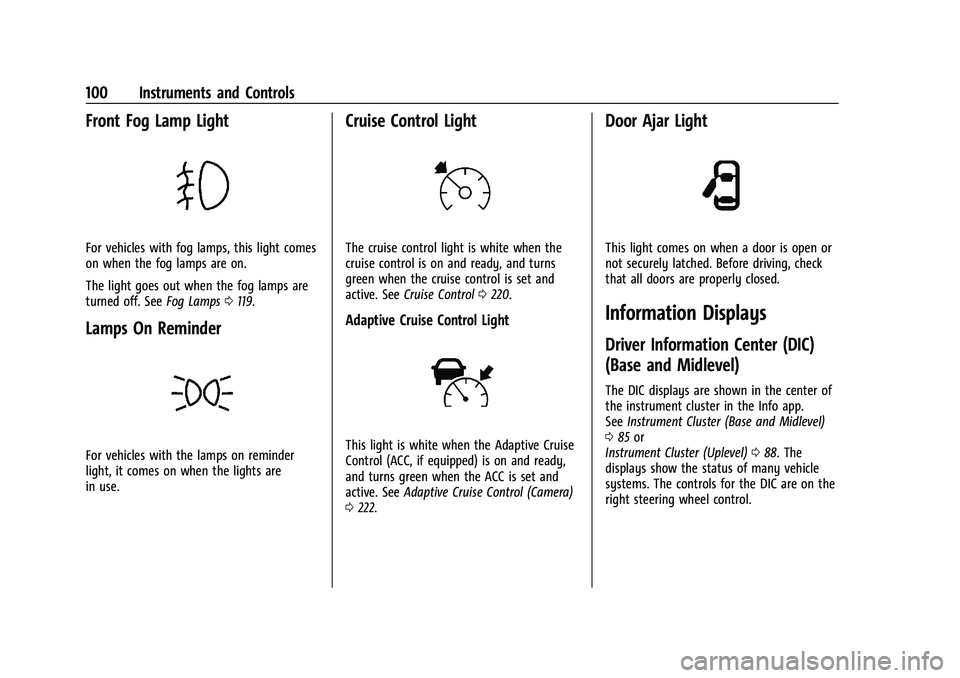
Front Fog Lamp Light
For vehicles with fog lamps, this light comes
on when the fog lamps are on.
The light goes out when the fog lamps are
turned off. SeeFog Lamps0119.
Lamps On Reminder
For vehicles with the lamps on reminder
light, it comes on when the lights are
in use.
Cruise Control Light
The cruise control light is white when the
cruise control is on and ready, and turns
green when the cruise control is set and
active. See Cruise Control 0220.
Adaptive Cruise Control Light
This light is white when the Adaptive Cruise
Control (ACC, if equipped) is on and ready,
and turns green when the ACC is set and
active. See Adaptive Cruise Control (Camera)
0 222.
Door Ajar Light
This light comes on when a door is open or
not securely latched. Before driving, check
that all doors are properly closed.
Information Displays
Driver Information Center (DIC)
(Base and Midlevel)
The DIC displays are shown in the center of
the instrument cluster in the Info app.
See Instrument Cluster (Base and Midlevel)
0 85 or
Instrument Cluster (Uplevel) 088. The
displays show the status of many vehicle
systems. The controls for the DIC are on the
right steering wheel control.
Page 117 of 377
GMC Terrain/Terrain Denali Owner Manual(GMNA-Localizing-U.S./Canada/
Mexico-14420055) - 2021 - CRC - 11/13/20
116 Lighting
Lighting
Exterior Lighting
Exterior Lamp Controls . . . . . . . . . . . . . . . . . 116
Headlamp High/Low-Beam Changer . . . . 117
Flash-to-Pass . . . . . . . . . . . . . . . . . . . . . . . . . . . 118
Daytime Running Lamps (DRL) . . . . . . . . . 118
Automatic Headlamp System . . . . . . . . . . 118
Hazard Warning Flashers . . . . . . . . . . . . . . 119
Turn and Lane-Change Signals . . . . . . . . . 119
Fog Lamps . . . . . . . . . . . . . . . . . . . . . . . . . . . . . 119
Interior Lighting
Instrument Panel IlluminationControl . . . . . . . . . . . . . . . . . . . . . . . . . . . . . . 120
Courtesy Lamps . . . . . . . . . . . . . . . . . . . . . . . 120
Dome Lamps . . . . . . . . . . . . . . . . . . . . . . . . . . 120
Reading Lamps . . . . . . . . . . . . . . . . . . . . . . . . 120
Lighting Features
Entry Lighting . . . . . . . . . . . . . . . . . . . . . . . . . . 121
Exit Lighting . . . . . . . . . . . . . . . . . . . . . . . . . . . 121
Battery Load Management . . . . . . . . . . . . . 121
Battery Power Protection . . . . . . . . . . . . . . 122
Exterior Lighting Battery Saver . . . . . . . . . 122
Exterior Lighting
Exterior Lamp Controls
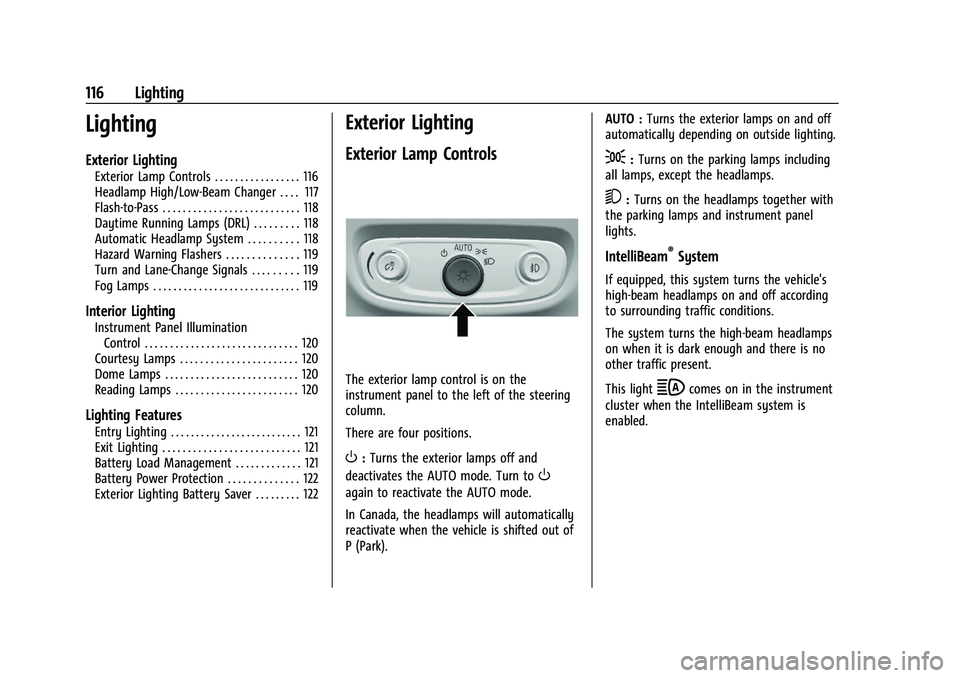
The exterior lamp control is on the
instrument panel to the left of the steering
column.
There are four positions.
O: Turns the exterior lamps off and
deactivates the AUTO mode. Turn to
O
again to reactivate the AUTO mode.
In Canada, the headlamps will automatically
reactivate when the vehicle is shifted out of
P (Park). AUTO :
Turns the exterior lamps on and off
automatically depending on outside lighting.
;: Turns on the parking lamps including
all lamps, except the headlamps.
5: Turns on the headlamps together with
the parking lamps and instrument panel
lights.
IntelliBeam®System
If equipped, this system turns the vehicle's
high-beam headlamps on and off according
to surrounding traffic conditions.
The system turns the high-beam headlamps
on when it is dark enough and there is no
other traffic present.
This light
bcomes on in the instrument
cluster when the IntelliBeam system is
enabled.
Page 118 of 377

GMC Terrain/Terrain Denali Owner Manual(GMNA-Localizing-U.S./Canada/
Mexico-14420055) - 2021 - CRC - 11/13/20
Lighting 117
Turning On and Enabling IntelliBeam
To enable the IntelliBeam system, press
bon the turn signal lever when it is
dark outside and the exterior lamp control is
in AUTO or
5.
Driving with IntelliBeam
The system only activates the high beams
when driving over 40 km/h (25 mph).
The blue high-beam on light appears on the
instrument cluster when the high beams
are on.
There is a sensor near the top center of the
windshield that automatically controls the
system. Keep this area of the windshield
clear of debris to allow for best system
performance. The high-beam headlamps remain on, under
the automatic control, until one of the
following situations occurs:
.The system detects an approaching
vehicle's headlamps.
.The system detects a preceding vehicle's
taillamps.
.The outside light is bright enough that
high-beam headlamps are not required.
.The vehicle's speed drops below 20 km/h
(12 mph).
.The IntelliBeam system is disabled by the
button on the turn signal lever. If this
happens, press
bon the turn signal
lever when the exterior lamp control is in
the AUTO or
5position to reactivate the
IntelliBeam system. The instrument
cluster light will come on to indicate the
IntelliBeam system is reactivated.
.The IntelliBeam system will turn off if the
fog lamps are turned on.
The high beams may not turn off
automatically if the system cannot detect
another vehicle's lamps because of any of
the following:
.The other vehicle's lamps are missing,
damaged, obstructed from view,
or otherwise undetected.
.The other vehicle's lamps are covered
with dirt, snow, and/or road spray.
.The other vehicle's lamps cannot be
detected due to dense exhaust, smoke,
fog, snow, road spray, mist, or other
airborne obstructions.
.The vehicle's windshield is dirty, cracked,
or obstructed by something that blocks
the view of the light sensor.
.The vehicle is loaded such that the front
end points upward, causing the light
sensor to aim high and not detect
headlamps and taillamps.
.The vehicle is being driven on winding or
hilly roads.
The automatic high-beam headlamps may
need to be disabled if any of the above
conditions exist.
Headlamp High/Low-Beam
Changer
Push the turn signal lever away from you
and release, to turn the high beams on. To
return to low beams, push the lever again
or pull it toward you and release.
Page 120 of 377
GMC Terrain/Terrain Denali Owner Manual(GMNA-Localizing-U.S./Canada/
Mexico-14420055) - 2021 - CRC - 11/13/20
Lighting 119
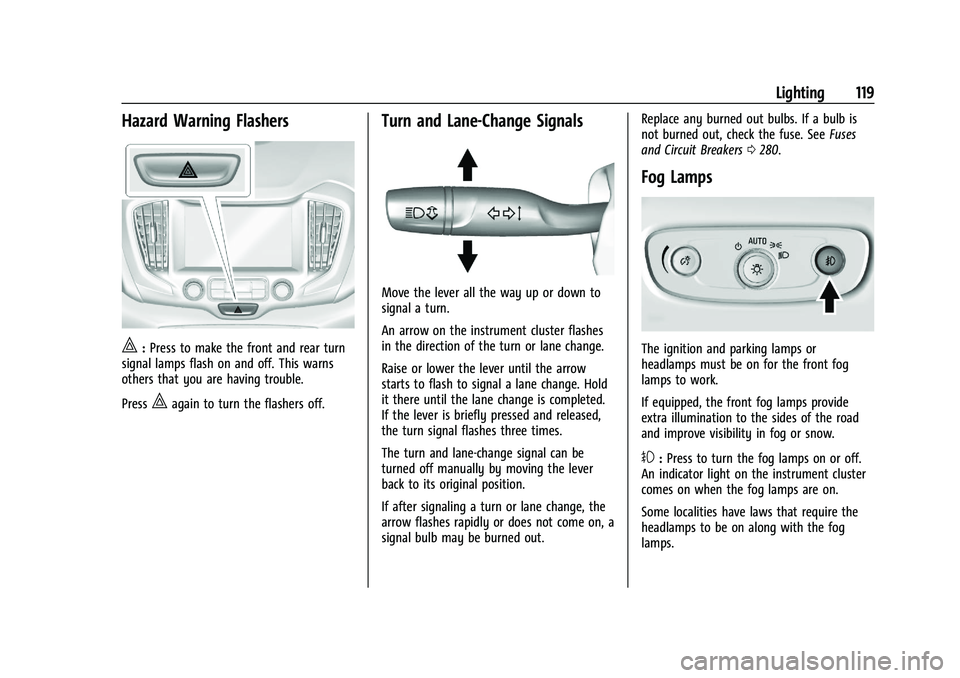
Hazard Warning Flashers
|:Press to make the front and rear turn
signal lamps flash on and off. This warns
others that you are having trouble.
Press
|again to turn the flashers off.
Turn and Lane-Change Signals
Move the lever all the way up or down to
signal a turn.
An arrow on the instrument cluster flashes
in the direction of the turn or lane change.
Raise or lower the lever until the arrow
starts to flash to signal a lane change. Hold
it there until the lane change is completed.
If the lever is briefly pressed and released,
the turn signal flashes three times.
The turn and lane-change signal can be
turned off manually by moving the lever
back to its original position.
If after signaling a turn or lane change, the
arrow flashes rapidly or does not come on, a
signal bulb may be burned out. Replace any burned out bulbs. If a bulb is
not burned out, check the fuse. See
Fuses
and Circuit Breakers 0280.
Fog Lamps
The ignition and parking lamps or
headlamps must be on for the front fog
lamps to work.
If equipped, the front fog lamps provide
extra illumination to the sides of the road
and improve visibility in fog or snow.
#:Press to turn the fog lamps on or off.
An indicator light on the instrument cluster
comes on when the fog lamps are on.
Some localities have laws that require the
headlamps to be on along with the fog
lamps.
Page 121 of 377
GMC Terrain/Terrain Denali Owner Manual(GMNA-Localizing-U.S./Canada/
Mexico-14420055) - 2021 - CRC - 11/13/20
120 Lighting
Some localities have laws that require the
high beams to be off when the fog lamps
are on.
Interior Lighting
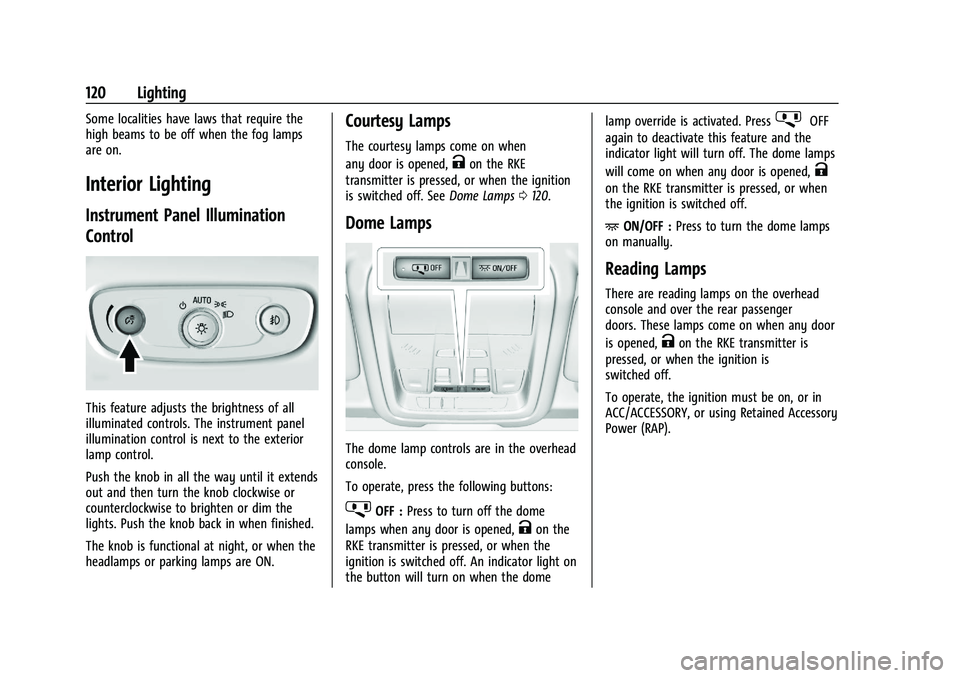
Instrument Panel Illumination
Control
This feature adjusts the brightness of all
illuminated controls. The instrument panel
illumination control is next to the exterior
lamp control.
Push the knob in all the way until it extends
out and then turn the knob clockwise or
counterclockwise to brighten or dim the
lights. Push the knob back in when finished.
The knob is functional at night, or when the
headlamps or parking lamps are ON.
Courtesy Lamps
The courtesy lamps come on when
any door is opened,
Kon the RKE
transmitter is pressed, or when the ignition
is switched off. See Dome Lamps0120.
Dome Lamps
The dome lamp controls are in the overhead
console.
To operate, press the following buttons:
jOFF : Press to turn off the dome
lamps when any door is opened,
Kon the
RKE transmitter is pressed, or when the
ignition is switched off. An indicator light on
the button will turn on when the dome lamp override is activated. Press
jOFF
again to deactivate this feature and the
indicator light will turn off. The dome lamps
will come on when any door is opened,
K
on the RKE transmitter is pressed, or when
the ignition is switched off.
+ ON/OFF : Press to turn the dome lamps
on manually.
Reading Lamps
There are reading lamps on the overhead
console and over the rear passenger
doors. These lamps come on when any door
is opened,
Kon the RKE transmitter is
pressed, or when the ignition is
switched off.
To operate, the ignition must be on, or in
ACC/ACCESSORY, or using Retained Accessory
Power (RAP).
Page 123 of 377
GMC Terrain/Terrain Denali Owner Manual(GMNA-Localizing-U.S./Canada/
Mexico-14420055) - 2021 - CRC - 11/13/20
122 Lighting
(DIC), you may see the voltage move up or
down. This is normal. If there is a problem,
an alert will be displayed.
The battery can be discharged at idle if the
electrical loads are very high. This is true for
all vehicles. This is because the generator
(alternator) may not be spinning fast
enough at idle to produce all of the power
needed for very high electrical loads.
A high electrical load occurs when several of
the following are on, such as: headlamps,
high beams, rear window defogger, climate
control fan at high speed, heated seats,
engine cooling fans, trailer loads, and loads
plugged into accessory power outlets.
EPM works to prevent excessive discharge of
the battery. It does this by balancing the
generator's output and the vehicle's
electrical needs. It can increase engine idle
speed to generate more power whenever
needed. It can temporarily reduce the power
demands of some accessories.
Normally, these actions occur in steps or
levels, without being noticeable. In rare
cases at the highest levels of corrective
action, this action may be noticeable to the
driver. If so, a DIC message might bedisplayed and it is recommended that the
driver reduce the electrical loads as much as
possible.
Battery Power Protection
This feature shuts off the interior lamps if
they are left on for more than 10 minutes
when the ignition is off. This helps to
prevent the battery from running down.
Exterior Lighting Battery Saver
The exterior lamps turn off about 10 minutes
after the ignition is turned off, if the parking
lamps or headlamps have been manually
left on. This protects against draining the
battery. To restart the 10-minute timer, turn
the exterior lamp control to the off position
and then back to the parking lamp or
headlamp position.
To keep the lamps on for more than
10 minutes, the ignition must be on or in
ACC/ACCESSORY.