length GMC TERRAIN 2021 Owner's Manual
[x] Cancel search | Manufacturer: GMC, Model Year: 2021, Model line: TERRAIN, Model: GMC TERRAIN 2021Pages: 377, PDF Size: 9.13 MB
Page 22 of 377
GMC Terrain/Terrain Denali Owner Manual(GMNA-Localizing-U.S./Canada/
Mexico-14420055) - 2021 - CRC - 11/13/20
Keys, Doors, and Windows 21
Use the pull cup to lower and close the
liftgate. Do not press the touch pad while
closing the liftgate. This will cause the
liftgate to be unlatched.
The liftgate can be opened when locked if
the RKE transmitter is within 1 m (3 ft) of
the liftgate. SeeRemote Keyless Entry (RKE)
System Operation 07.
The liftgate has an electric latch. If the
battery is disconnected or has low voltage,
the liftgate will not open. The liftgate will
resume operation when the battery is
reconnected and charged.
Hands-Free Operation
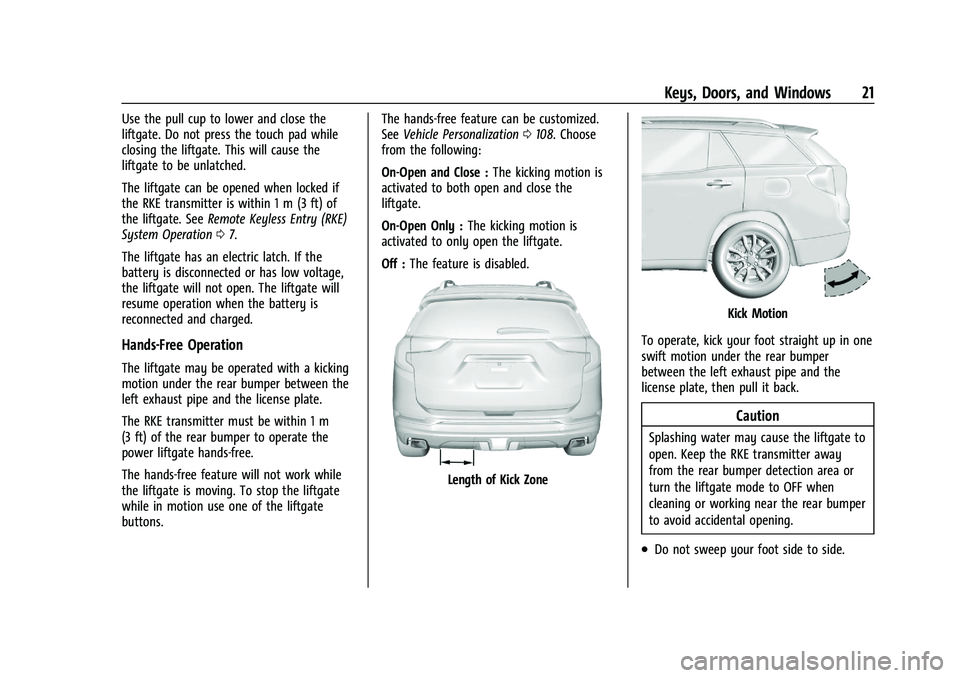
The liftgate may be operated with a kicking
motion under the rear bumper between the
left exhaust pipe and the license plate.
The RKE transmitter must be within 1 m
(3 ft) of the rear bumper to operate the
power liftgate hands-free.
The hands-free feature will not work while
the liftgate is moving. To stop the liftgate
while in motion use one of the liftgate
buttons. The hands-free feature can be customized.
See
Vehicle Personalization 0108. Choose
from the following:
On-Open and Close : The kicking motion is
activated to both open and close the
liftgate.
On-Open Only : The kicking motion is
activated to only open the liftgate.
Off : The feature is disabled.
Length of Kick Zone
Kick Motion
To operate, kick your foot straight up in one
swift motion under the rear bumper
between the left exhaust pipe and the
license plate, then pull it back.
Caution
Splashing water may cause the liftgate to
open. Keep the RKE transmitter away
from the rear bumper detection area or
turn the liftgate mode to OFF when
cleaning or working near the rear bumper
to avoid accidental opening.
.Do not sweep your foot side to side.
Page 58 of 377
GMC Terrain/Terrain Denali Owner Manual(GMNA-Localizing-U.S./Canada/
Mexico-14420055) - 2021 - CRC - 11/13/20
Seats and Restraints 57
Replacing Airbag System Parts
after a Crash
{Warning
A crash can damage the airbag systems
in the vehicle. A damaged airbag system
may not properly protect you and your
passenger(s) in a crash, resulting in
serious injury or even death. To help
make sure the airbag systems are
working properly after a crash, have
them inspected and any necessary
replacements made as soon as possible.
If an airbag inflates, you will need to
replace airbag system parts. See your dealer
for service.
If the airbag readiness light stays on after
the vehicle is started or comes on when you
are driving, the airbag system may not work
properly. Have the vehicle serviced right
away. See Airbag Readiness Light 092.
Child Restraints
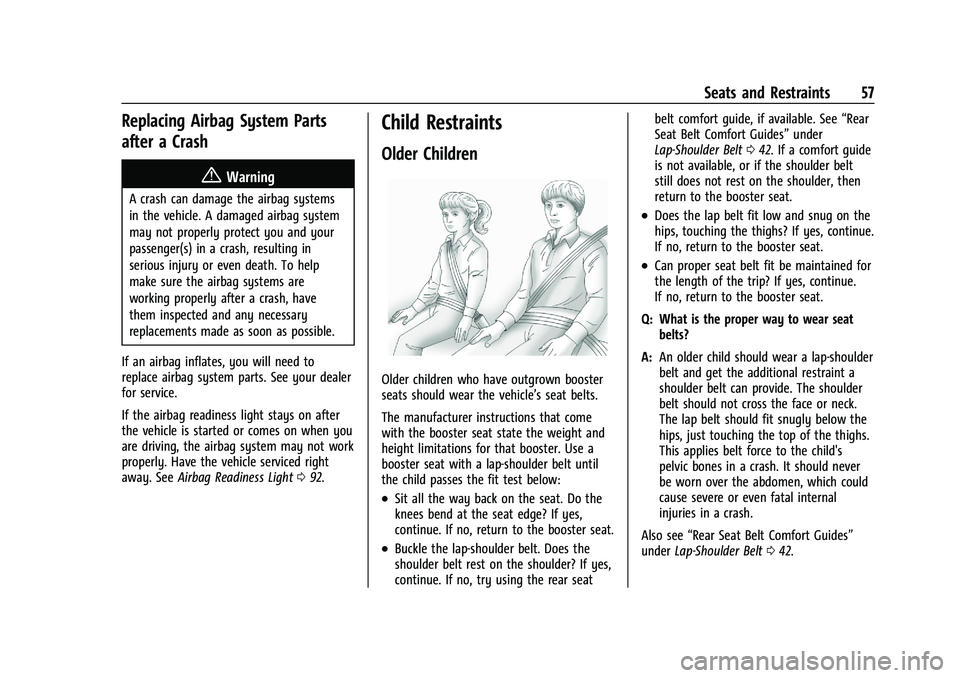
Older Children
Older children who have outgrown booster
seats should wear the vehicle’s seat belts.
The manufacturer instructions that come
with the booster seat state the weight and
height limitations for that booster. Use a
booster seat with a lap-shoulder belt until
the child passes the fit test below:
.Sit all the way back on the seat. Do the
knees bend at the seat edge? If yes,
continue. If no, return to the booster seat.
.Buckle the lap-shoulder belt. Does the
shoulder belt rest on the shoulder? If yes,
continue. If no, try using the rear seat belt comfort guide, if available. See
“Rear
Seat Belt Comfort Guides” under
Lap-Shoulder Belt 042. If a comfort guide
is not available, or if the shoulder belt
still does not rest on the shoulder, then
return to the booster seat.
.Does the lap belt fit low and snug on the
hips, touching the thighs? If yes, continue.
If no, return to the booster seat.
.Can proper seat belt fit be maintained for
the length of the trip? If yes, continue.
If no, return to the booster seat.
Q: What is the proper way to wear seat belts?
A: An older child should wear a lap-shoulder
belt and get the additional restraint a
shoulder belt can provide. The shoulder
belt should not cross the face or neck.
The lap belt should fit snugly below the
hips, just touching the top of the thighs.
This applies belt force to the child's
pelvic bones in a crash. It should never
be worn over the abdomen, which could
cause severe or even fatal internal
injuries in a crash.
Also see “Rear Seat Belt Comfort Guides”
under Lap-Shoulder Belt 042.
Page 164 of 377
GMC Terrain/Terrain Denali Owner Manual(GMNA-Localizing-U.S./Canada/
Mexico-14420055) - 2021 - CRC - 11/13/20
Infotainment System 163
Voice
Touch and the following may display:
.Confirm More/Less: This setting specifies
how often the voice recognition system
confirms commands. Touch Confirm More
to have the system check with you more
often before acting on your commands.
.Prompt Length: This setting specifies the
amount of detail the voice recognition
system provides when giving you
feedback. Touch Auto to have the system
automatically adjust to your speech
habits. Touch Informative, Short, or Auto.
.Audio Feedback Speed: Touch Slow,
Medium, or Fast to adjust how quickly
the voice recognition system speaks.
.Friendly Prompts: This setting adjusts the
formality of voice prompts. Touch Off for
shorter prompts. Touch On to hear
prompts with more personality. Touch
Auto to have the prompt match your
command style.
.Tutorial Mode: Touch Off or On to
provide tutorial feedback on the display.
.Allow Prompt Interruptions: This setting
controls whether voice commands can be
spoken before voice prompts finish. Turn
this on to speak commands without
hearing the full prompt. Speaking whilethe prompt is still playing will
immediately stop playing the current
prompt and recognize your command.
Background noise may cause accidental
interruptions. Touch Off or On.
Favorites
Touch and the following may display:
.Manage Favorites: Touch to display a list
of Audio, Phone, and Navigation favorites.
Favorites can be moved, renamed,
or deleted.
To move, touch and hold the favorite, and
then drag up or down to rearrange the
position.
.Set Number of Audio Favorites: Touch to
select how many favorites pages can be
viewed from the audio application. The
Auto setting will automatically adjust this
number based on the number of favorites
you have saved. Touch Auto, 5, 10, 15, 20,
25, 30, 35, or 40.
Updates
If equipped, the vehicle can download and
install select software updates over a
wireless connection. The system will prompt
for certain updates to be downloaded and
installed. There is also an option to check
for updates manually. To manually check for updates, touch
Settings on the Home Page and select the
System tab. Go to the Vehicle Software
section and touch Updates. Follow the
on-screen prompts. The steps to check for,
download, and install updates may vary by
vehicle.
The vehicle can be used normally during the
software download. Once the download is
complete, there may be a prompt to accept
the installation of the update upon the next
ignition cycle or the next time the vehicle is
shifted into P (Park). For most updates, the
vehicle will be disabled and cannot be driven
during the installation. The system will
deliver messages indicating success or error
during and after the download and
installation processes.
Downloading Over-the-Air vehicle software
updates requires Internet connectivity, which
can be accessed through the vehicle’s
built-in 4G LTE connection, if equipped and
active. If required, data plans are provided
by a third party. Optionally, a secure Wi-Fi
hotspot such as a compatible mobile device
hotspot, home hotspot, or public hotspot
can be used. Applicable data rates may
apply.
Page 205 of 377
GMC Terrain/Terrain Denali Owner Manual(GMNA-Localizing-U.S./Canada/
Mexico-14420055) - 2021 - CRC - 11/13/20
204 Driving and Operating
5. Plug the other end of the cord into anormal, grounded 110-volt AC outlet.
{Warning
Improper use of the heater cord or an
extension cord can damage the cord and
may result in overheating and fire.
.Plug the cord into a three-prong
electrical utility receptacle that is
protected by a ground fault detection
function. An ungrounded outlet could
cause an electric shock.
.Use a weatherproof, heavy-duty,
15 amp-rated extension cord if needed.
Failure to use the recommended
extension cord in good operating
condition, or using a damaged heater
or extension cord, could make it
overheat and cause a fire, property
damage, electric shock, and injury.
.Do not operate the vehicle with the
heater cord permanently attached to
the vehicle. Possible heater cord and
thermostat damage could occur.
(Continued)
Warning (Continued)
.While in use, do not let the heater
cord touch vehicle parts or sharp
edges. Never close the hood on the
heater cord.
.Before starting the vehicle, unplug the
cord, reattach the cover to the plug,
and securely fasten the cord. Keep the
cord away from any moving parts.
The length of time the heater should remain
plugged in depends on several factors. Ask a
dealer in the area where you will be parking
the vehicle for the best advice on this.
Retained Accessory Power (RAP)
When the ignition is turned from on to off,
the following features (if equipped) will
continue to function for up to 10 minutes,
or until the driver door is opened. These
features will also work when the ignition is
in RUN or ACC/ACCESSORY:
.Infotainment System
.Power Windows (during RAP this
functionality will be lost when any door
is opened)
.Sunroof (during RAP this functionality will
be lost when any door is opened)
.Auxiliary Power Outlet
.Audio System
.OnStar System
Shifting Into Park
{Warning
It can be dangerous to get out of the
vehicle if the vehicle is not in P (Park)
with the parking brake set. The vehicle
can roll. If you have left the engine
running, the vehicle can move suddenly.
You or others could be injured. To be
sure the vehicle will not move, even
when you are on fairly level ground, use
the steps that follow. If you are pulling a
trailer, see Driving Characteristics and
Towing Tips 0249.
To shift into P (Park): 1. Hold the brake pedal down and set the parking brake. See Electric Parking Brake
0 212.
2. Press P (Park).
3. Turn the ignition off.
Page 276 of 377
GMC Terrain/Terrain Denali Owner Manual(GMNA-Localizing-U.S./Canada/
Mexico-14420055) - 2021 - CRC - 11/13/20
Vehicle Care 275
Wiper Blade Replacement
Windshield wiper blades should be replaced
periodically. SeeMaintenance Schedule
0 331.
Replacement blades come in different types
and are removed in different ways. For
proper type and length, see Maintenance
Replacement Parts 0340.
Caution
Allowing the wiper arm to touch the
windshield when no wiper blade is
installed could damage the windshield.
Any damage that occurs would not be
covered by the vehicle warranty. Do not
allow the wiper arm to touch the
windshield.
Front Wiper Blade Replacement
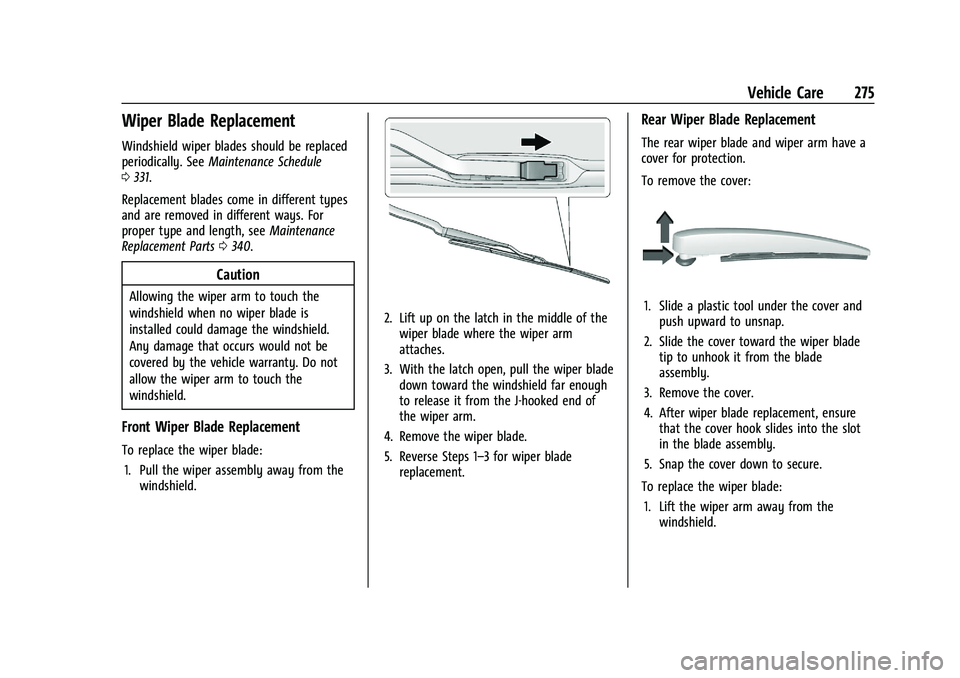
To replace the wiper blade:
1. Pull the wiper assembly away from the windshield.
2. Lift up on the latch in the middle of the
wiper blade where the wiper arm
attaches.
3. With the latch open, pull the wiper blade down toward the windshield far enough
to release it from the J-hooked end of
the wiper arm.
4. Remove the wiper blade.
5. Reverse Steps 1–3 for wiper blade replacement.
Rear Wiper Blade Replacement
The rear wiper blade and wiper arm have a
cover for protection.
To remove the cover:
1. Slide a plastic tool under the cover andpush upward to unsnap.
2. Slide the cover toward the wiper blade tip to unhook it from the blade
assembly.
3. Remove the cover.
4. After wiper blade replacement, ensure that the cover hook slides into the slot
in the blade assembly.
5. Snap the cover down to secure.
To replace the wiper blade: 1. Lift the wiper arm away from the windshield.