check engine light GMC YUKON 2009 Get To Know Guide
[x] Cancel search | Manufacturer: GMC, Model Year: 2009, Model line: YUKON, Model: GMC YUKON 2009Pages: 24, PDF Size: 1.31 MB
Page 3 of 24

3
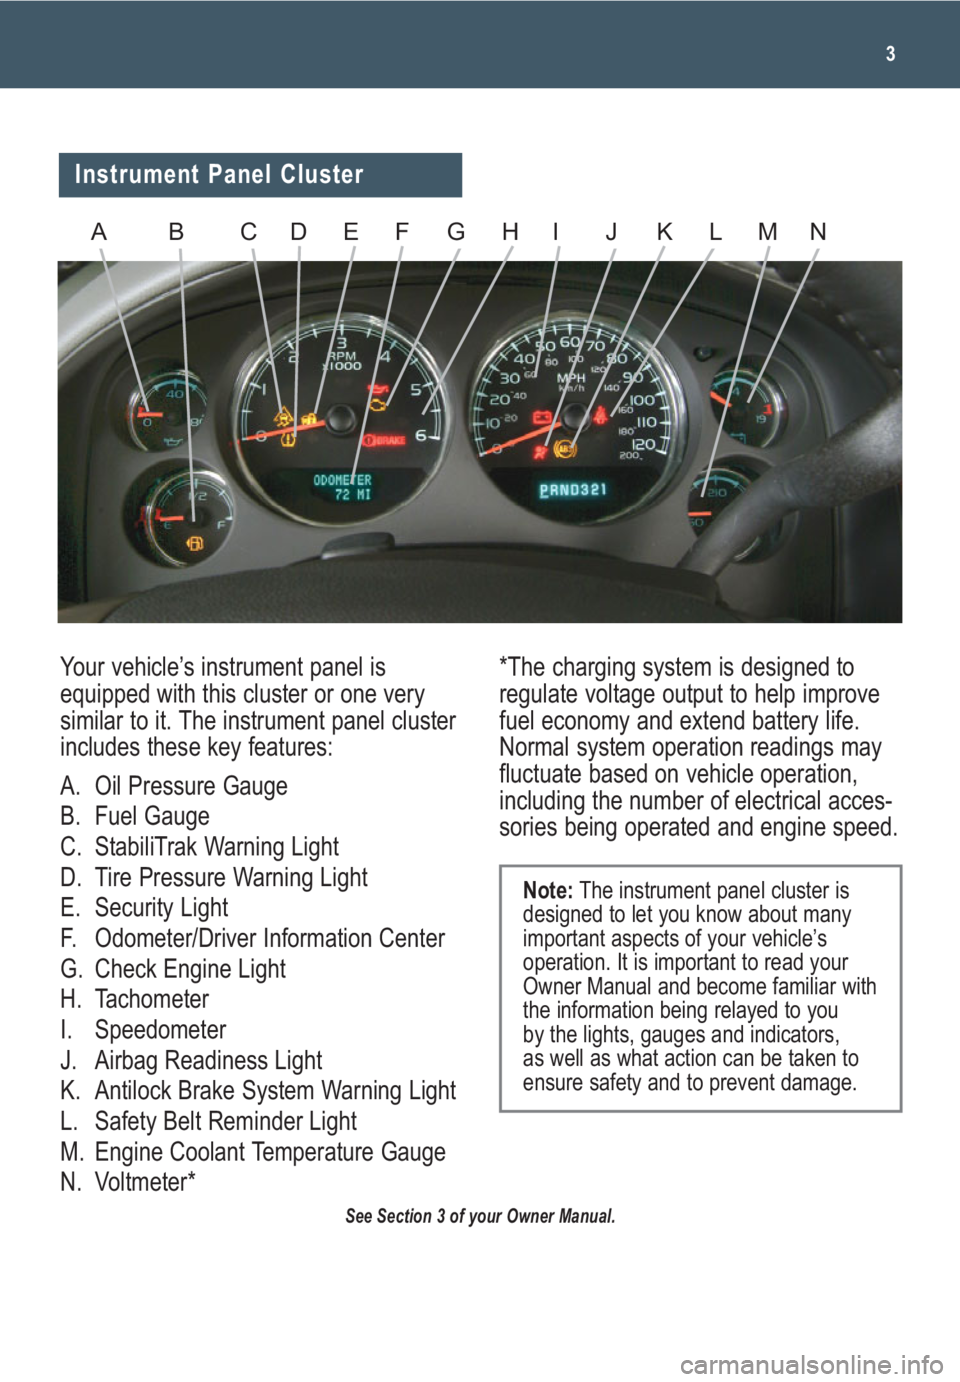
Your vehicle’s instrument panel is
equipped with this cluster or one very
similar to it. The instrument panel cluster
includes these key features:
A. Oil Pressure Gauge
B. Fuel Gauge
C. StabiliTrak Warning Light
D. Tire Pressure Warning Light
E. Security Light
F. Odometer/Driver Information Center
G. Check Engine Light
H. Tachometer
I. Speedometer
J. Airbag Readiness Light
K. Antilock Brake System Warning Light
L. Safety Belt Reminder Light
M. Engine Coolant Temperature Gauge
N. Voltmeter**The charging system is designed to
regulate voltage output to help improve
fuel economy and extend battery life.
Normal system operation readings may
fluctuate based on vehicle operation,
including the number of electrical acces-
sories being operated and engine speed.
See Section 3 of your Owner Manual.
Note:The instrument panel cluster is
designed to let you know about many
important aspects of your vehicle’s
operation. It is important to read your
Owner Manual and become familiar with
the information being relayed to you
by the lights, gauges and indicators,
as well as what action can be taken to
ensure safety and to prevent damage.
Instrument Panel Cluster
ABCDEFGHIJKLMN
Page 16 of 24

Getting to Know Your Yukon/Yukon Denali16
This feature allows you to start the
engine from outside the vehicle by using
the Remote Keyless Entry (RKE) trans-
mitter. The remote start capability must
be turned on using the Driver
Information Center.
The vehicle’s automatic climate control
system (if equipped) will default to a
heating or cooling mode based on
outside temperature, and the manual
climate control system will turn on at
the same setting as when the vehicle
was last turned off.
Starting the Vehicle
To remote-start the vehicle:
1.
Aim the RKE transmitter at the vehicle.
(Transmitter range is within approxi-
mately 200 feet of the vehicle.)
2. Press and release the (Lock)
button on the transmitter.
3. Immediately press and hold the
(Remote Start) button for about four
seconds.When the parking lamps
flash, release the button. The engine
will start and the parking lamps will
remain on.
The engine will continue
running for 10 minutes.
4. Repeat these steps for a 10-minute
time extension. Only two consecutive
remote starts are allowed.
When you enter the vehicle after a
remote start, the key must be inserted
in the ignition and turned to the Run
position before driving.
Remote Vehicle Start
(if equipped)
Ultrasonic Rear Parking Assist
(if equipped)
This feature uses ultrasonic sensors on
the rear bumper to help you avoid collid-
ing with objects when parking the vehi-
cle. It operates only at speeds less than
5 mph.
The rear parking assist display is locat-
ed near the rear window. The lights on
the display provide distance information.
Low-toned continuous beeps play out of
the speakers when objects are within 23
inches (0.6 m) of the rear bumper.
To turn off the system, press the
(Rear Parking Assist) disable
button located below the climate
controls on the instrument panel. The
indicator light will illuminate when the
system is off.
See Section 2 of your Owner Manual.
Canceling a Remote Start
To turn off the engine instead of driving
after a remote start:
• Press and release the Hazard
Warning Flashers button. Press it
again to turn off the flashers.
• Turn the key in the ignition switch to
the Run position and then off.
See Section 2 of your Owner Manual.
Note: Remote Vehicle Start will not
operate if the key is in the ignition, the
hood or liftgate is open, or the Check
Engine light is illuminated on the instru-
ment cluster.
Note: The Ultrasonic Rear Parking Assist
(URPA) system will not activate if you
have a trailer hitch or trailer attached to
your vehicle, or a bicycle or other object
is hanging out of your vehicle. The sys-
tem may also be disabled if dirt, snow or
ice builds up on the sensors.
Page 23 of 24

23
The Oil Life System calculates engine oil
life based on vehicle use and displays
CHANGE ENGINE OIL in the Driver
Information Center (DIC) when it’s nec-
essary to change your engine oil and
filter. The Oil Life System should be reset
to 100% only following an oil change.
Reset the Oil Life System using the DIC:
1. Turn on the ignition.
2. Press the (Vehicle Information)
button until the DIC displays OIL LIFE
REMAINING.
3. Press and hold the (Set/Reset)
button until 100% is displayed.
4. Turn off the ignition.
Reset the Oil Life System without the DIC:
1. Turn on the ignition, with the engine off.
2. Fully press and release the accelera-
tor pedal slowly three times within
five seconds.
3. If the CHANGE ENGINE OIL mes-
sage flashes, the system is reset;
otherwise, repeat the procedure.
4. Turn off the ignition.
See Section 5 of your Owner Manual.
Reset the Engine Oil Life
System
Refueling the Vehicle
To open the fuel door, press the center-
rear edge of the door and it will pop
open slightly. Pull the door to open it
fully.
When closing the fuel door, press the
rear edge of the door until it latches and
is flush with the side of the vehicle.
See Section 5 of your Owner Manual.
Maximizing Fuel Economy
Your driving behavior is a big contributor
to your vehicle’s fuel economy.
Modifying your driving habits will
improve your fuel mileage. Here are
several fuel-saving tips:
• Combine short trips to minimize cold
engine starts, which reduce fuel
economy.
• Avoid quick starts and stops.
Accelerate moderately and drive at a
steady speed.
• Anticipate traffic flow and brake mod-
erately or coast.
• Use the air conditioning and defrost
modes only when necessary.
• Minimize electrical accessory opera-
tion by turning off items such as the
rear defogger and heated seats when
they are not needed.
• Use the remote start feature sparing-
ly. This feature turns the engine on,
consuming fuel at idle.
• Do not warm up the engine by idling.
Even on the coldest days, driving will
help the engine warm up faster.
• Selecting the AUTO feature on 4WD
models will be less economical than
2WD.
• Unload unnecessary cargo to reduce
the amount of weight in the vehicle.
• Regularly check and maintain proper
tire pressure.
• Maintain your vehicle. Regular main-
tenance will keep your vehicle run-
ning cleaner and more efficiently.