remote start GMC YUKON 2009 User Guide
[x] Cancel search | Manufacturer: GMC, Model Year: 2009, Model line: YUKON, Model: GMC YUKON 2009Pages: 576, PDF Size: 3.06 MB
Page 175 of 576
Do not use this system with any garage door opener
that does not have the stop and reverse feature.
This includes any garage door opener model
manufactured before April 1, 1982.
Read the instructions completely before attempting to
program the transmitter. Because of the steps involved,
it may be helpful to have another person assist with
programming the transmitter.
Be sure to keep the original remote control transmitter for
use in other vehicles, as well as, for future programming.
Only the original remote control transmitter is needed for
Fixed Code programming. The programmed buttons
should be erased when the vehicle is sold or the lease
ends. See “Erasing Universal Home Remote Buttons”
later in this section.
Park the vehicle outside of the garage when
programming a garage door. Be sure that people
and objects are clear of the garage door or gate that
is being programmed.Programming Universal Home
Remote — Rolling Code
For questions or help programming the Universal Home
Remote System, call 1-866-572-2728 or go to
learcar2u.com.
Most garage door openers sold after 1996 are Rolling
Code units.
Programming a garage door opener involves
time-sensitive actions, so read the entire procedure
before starting. Otherwise, the device will time out and
the procedure will have to be repeated.
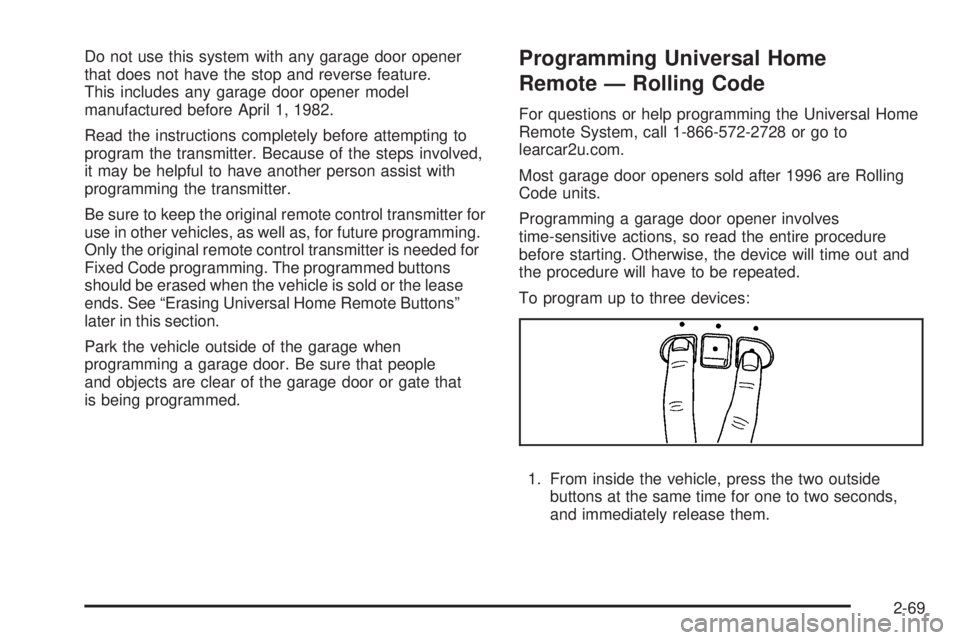
To program up to three devices:
1. From inside the vehicle, press the two outside
buttons at the same time for one to two seconds,
and immediately release them.
2-69
Page 176 of 576
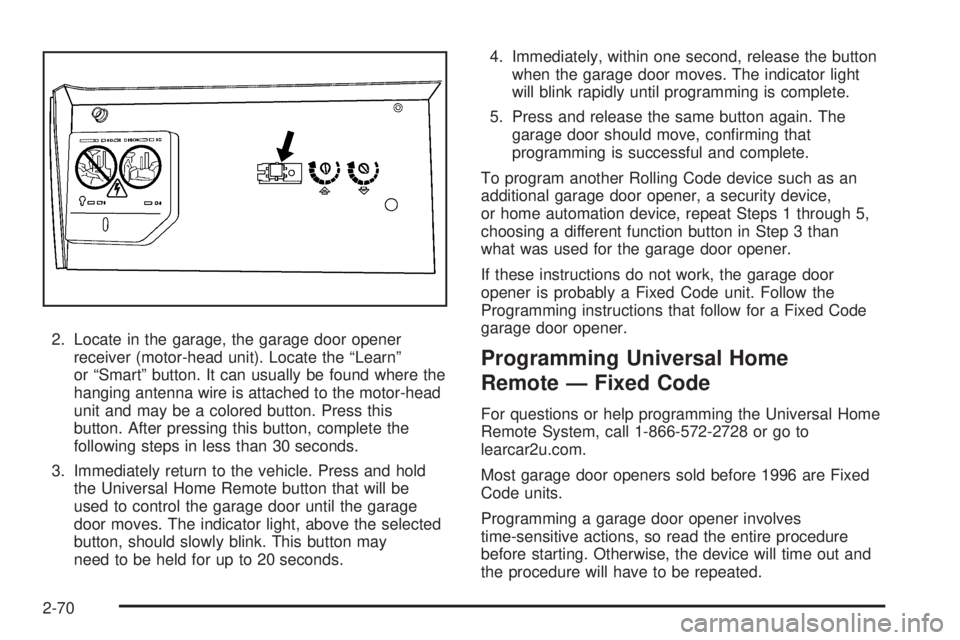
2. Locate in the garage, the garage door opener
receiver (motor-head unit). Locate the “Learn”
or “Smart” button. It can usually be found where the
hanging antenna wire is attached to the motor-head
unit and may be a colored button. Press this
button. After pressing this button, complete the
following steps in less than 30 seconds.
3. Immediately return to the vehicle. Press and hold
the Universal Home Remote button that will be
used to control the garage door until the garage
door moves. The indicator light, above the selected
button, should slowly blink. This button may
need to be held for up to 20 seconds.4. Immediately, within one second, release the button
when the garage door moves. The indicator light
will blink rapidly until programming is complete.
5. Press and release the same button again. The
garage door should move, con�rming that
programming is successful and complete.
To program another Rolling Code device such as an
additional garage door opener, a security device,
or home automation device, repeat Steps 1 through 5,
choosing a different function button in Step 3 than
what was used for the garage door opener.
If these instructions do not work, the garage door
opener is probably a Fixed Code unit. Follow the
Programming instructions that follow for a Fixed Code
garage door opener.
Programming Universal Home
Remote — Fixed Code
For questions or help programming the Universal Home
Remote System, call 1-866-572-2728 or go to
learcar2u.com.
Most garage door openers sold before 1996 are Fixed
Code units.
Programming a garage door opener involves
time-sensitive actions, so read the entire procedure
before starting. Otherwise, the device will time out and
the procedure will have to be repeated.
2-70
Page 224 of 576
Passenger Airbag Status Indicator
The vehicle has the passenger sensing system.
SeePassenger Sensing System on page 1-90for
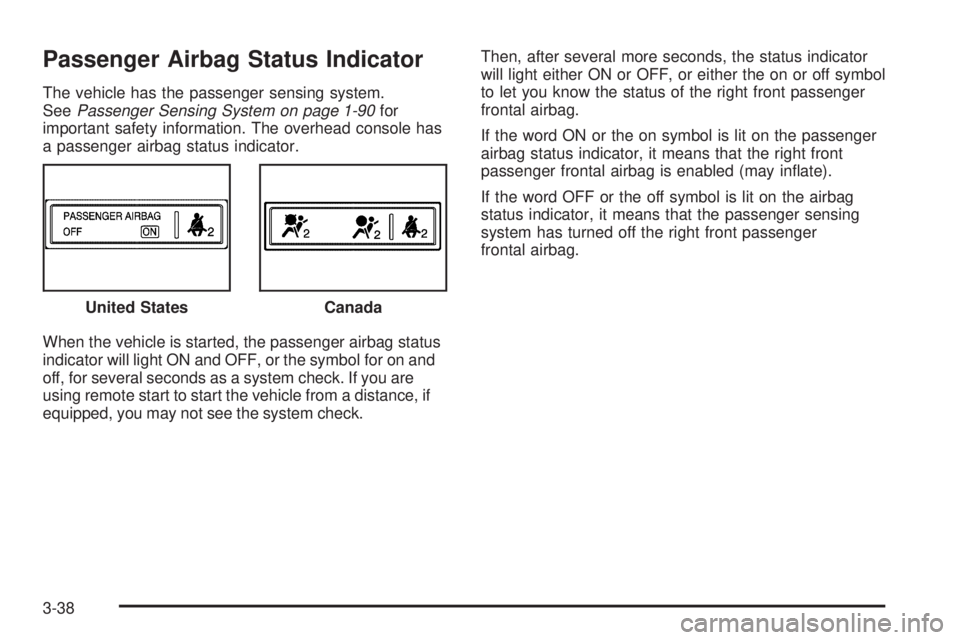
important safety information. The overhead console has
a passenger airbag status indicator.
When the vehicle is started, the passenger airbag status
indicator will light ON and OFF, or the symbol for on and
off, for several seconds as a system check. If you are
using remote start to start the vehicle from a distance, if
equipped, you may not see the system check.Then, after several more seconds, the status indicator
will light either ON or OFF, or either the on or off symbol
to let you know the status of the right front passenger
frontal airbag.
If the word ON or the on symbol is lit on the passenger
airbag status indicator, it means that the right front
passenger frontal airbag is enabled (may in�ate).
If the word OFF or the off symbol is lit on the airbag
status indicator, it means that the passenger sensing
system has turned off the right front passenger
frontal airbag.
United States
Canada
3-38
Page 244 of 576
If your vehicle does not have DIC buttons, you can use
the trip odometer reset stem to view the following
displays: odometer, engine hours, trip odometer,
compass zone setting, compass recalibration, oil life,
Remote Keyless Entry (RKE) transmitter programming,
and display language.
If your vehicle has DIC buttons, you can use the trip
odometer reset stem to view the following displays:
odometer, engine hours, trip odometer, and display
language.
Trip Odometer Reset Stem Menu Items
Odometer
Press the trip odometer reset stem until ODOMETER
displays. This display shows the distance the vehicle
has been driven in either miles (mi) or kilometers (km).
Engine Hours
To display the ENGINE HOURS, place the ignition in
LOCK/OFF or ACC/ACCESSORY, then press and hold
the trip odometer reset stem for four seconds while
viewing the ODOMETER. This display shows the total
number of hours the engine has run.
Trip Odometer
Press the trip odometer reset stem until TRIP displays.
This display shows the current distance traveled in
either miles (mi) or kilometers (km) since the last reset
for the trip odometer.
The trip odometer can be reset to zero by pressing and
holding the trip odometer reset stem while the trip
odometer is displayed.
The trip odometer has a feature called the retro-active
reset. This can be used to set the trip odometer to
the number of miles (kilometers) driven since the ignition
was last turned on. This can be used if the trip
odometer is not reset at the beginning of the trip.
To use the retro-active reset feature, press and hold the
trip odometer reset stem for at least four seconds. The
trip odometer will display the number of miles (mi) or
kilometers (km) driven since the ignition was last turned
on and the vehicle was moving. Once the vehicle begins
moving, the trip odometer will accumulate mileage. For
example, if the vehicle was driven 5 miles (8 km) before it
is started again, and then the retro-active reset feature is
activated, the display will show 5 miles (8 km). As the
vehicle begins moving, the display will then increase to
5.1 miles (8.2 km), 5.2 miles (8.4 km), etc.
3-58
Page 254 of 576
PASSENGER DOOR OPEN
This message displays and a chime sounds if the front
passenger door is not fully closed and the vehicle is
shifted out of P (Park). Stop and turn off the vehicle,
check the door for obstructions, and close the door again.
Check to see if the message still appears on the DIC.
REAR ACCESS OPEN
This message displays and a chime sounds if the liftgate
or liftglass is open while the ignition is in ON/RUN. Turn
off the vehicle and check the liftgate and liftglass. Restart
the vehicle and check for the message on the DIC
display.
REMOTE KEY LEARNING ACTIVE
This message displays while you are matching a Remote
Keyless Entry (RKE) transmitter to your vehicle. See
“Matching Transmitter(s) to Your Vehicle” underRemote
Keyless Entry (RKE) System Operation on page 2-5and
DIC Operation and Displays (With DIC Buttons) on
page 3-52orDIC Operation and Displays (Without DIC
Buttons) on page 3-57for more information.
REPLACE BATTERY IN REMOTE KEY
This message displays if a Remote Keyless Entry (RKE)
transmitter battery is low. The battery needs to be
replaced in the transmitter. See “Battery Replacement”
underRemote Keyless Entry (RKE) System Operation
on page 2-5.
RIGHT REAR DOOR OPEN
This message displays and a chime sounds if the
passenger side rear door is not fully closed and the
vehicle is shifted out of P (Park). Stop and turn off the
vehicle, check the door for obstructions, and close
the door again. Check to see if the message still
appears on the DIC.
SERVICE 4 WHEEL DRIVE
This message displays if a problem occurs with the
four-wheel-drive system. If this message appears, stop
as soon as possible and turn off the vehicle. Make
sure the key is in the LOCK/OFF position for at least
one minute and then restart the vehicle and check
for the message on the DIC display. If the message is
still displayed or appears again when you begin
driving, the four-wheel-drive system needs service.
See your dealer/retailer.
3-68
Page 267 of 576
MEMORY SEAT RECALL
If your vehicle has this feature, it allows you to select
your preference for the remote memory seat recall
feature. SeeMemory Seat, Mirrors, and Pedals
on page 1-8for more information.
Press the customization button until MEMORY SEAT
RECALL appears on the DIC display. Press the set/reset
button once to access the settings for this feature.
Then press the customization button to scroll through
the following settings:
OFF (default):No remote memory seat recall will occur.
ON:The driver’s seat and, on some vehicles, the
outside mirrors will automatically move to the stored
driving position when the unlock button on the Remote
Keyless Entry (RKE) transmitter is pressed. On
some vehicles with the adjustable throttle and brake
pedal feature, the pedals will also automatically move.
See “Relearn Remote Key” underDIC Operation
and Displays (With DIC Buttons) on page 3-52orDIC
Operation and Displays (Without DIC Buttons) on
page 3-57for more information on matching transmitters
to driver ID numbers.
NO CHANGE:No change will be made to this feature.
The current setting will remain.
To select a setting, press the set/reset button while the
desired setting is displayed on the DIC.
REMOTE START
If your vehicle has this feature, it allows you to turn the
remote start off or on. The remote start feature allows
you to start the engine from outside of the vehicle using
the Remote Keyless Entry (RKE) transmitter. See
Remote Vehicle Start on page 2-7for more information.
Press the customization button until REMOTE START
appears on the DIC display. Press the set/reset
button once to access the settings for this feature. Then
press the customization button to scroll through the
following settings:
OFF:The remote start feature will be disabled.
ON (default):The remote start feature will be enabled.
NO CHANGE:No change will be made to this
feature. The current setting will remain.
To select a setting, press the set/reset button while the
desired setting is displayed on the DIC.
3-81
Page 283 of 576
Using the DVD Player
The DVD player is controlled by the buttons on the
remote control, or by the RSA system, or by the buttons
on the radio faceplate. See “Remote Control”, under
Rear Seat Entertainment (RSE) System on page 3-125
andRear Seat Audio (RSA) on page 3-134for more
information.
The DVD player is only compatible with DVDs of the
appropriate region code that is printed on the jacket of
most DVDs.
The DVD slot of the radio is compatible with most
audio CDs, CD-R, CD-RW, DVD-Video, DVD-Audio,
DVD-R/RW, DVD+R/RW media along with MP3
and WMA formats.
If an error message displays on the video screen or
the radio, see “DVD Display Error Messages” under,
Rear Seat Entertainment (RSE) System on page 3-125
and “DVD Radio Error Messages” in this section for
more information.
Playing a DVD
DVD/CD AUX (Auxiliary):Press this button to cycle
through DVD, CD, or Auxiliary when listening to the radio.
The DVD/CD text label and a message showing track or
chapter number displays when a disc is in either slot.
Press this button again and the system automatically
searches for an auxiliary input device, such as a portableaudio player. If a portable audio player is not connected,
“No Aux Input Device” displays. If a disc is in both the
DVD slot and the CD slot the DVD/CD AUX button cycles
between the two sources and does not indicate “No Aux
Input Device”. If a front auxiliary device is connected, the
DVD/CD AUX button cycles through all available options,
such as: DVD slot, CD slot, Front Auxiliary, and Rear
Auxiliary (if available). See “Using the Auxiliary Input
Jack(s)” later in this section, or “Audio/Video (A/V) Jacks”
under,Rear Seat Entertainment (RSE) System on
page 3-125for more information.
O(Power):Press to turn the radio on or off. Turn
clockwise or counterclockwise to increase or decrease
the volume. Press and hold for more than two seconds to
turn off the radio and Rear Seat Entertainment (RSE)
system, and to start the parental control feature. Parental
control prevents the rear seat occupant from operating
the Rear Seat Audio (RSA) system or remote control.
A lock symbol displays next to the clock display. The
parental control feature remains on until this knob is
pressed and held for more than two seconds again, or
until the driver turns the ignition off and exits the vehicle.
f(Tune):Turn to change tracks on a CD or DVD, to
manually tune a radio station, or to change clock or date
settings, while in the clock or date setting mode. See
the information given earlier in this section speci�c to the
radio, CD, and the DVD. Also, see “Setting the Clock”
in the index, for setting the clock and date.
3-97
Page 284 of 576
©SEEK (Previous Track/Chapter):Press the left
arrow to return to the start of the current track or
chapter. Press the left arrow again to go to the previous
track or chapter. This button might not work when the
DVD is playing the copyright information or the previews.
SEEK
¨(Next Track/Chapter):Press the right
arrow to go to the next track or chapter. This button
might not work when the DVD is playing the copyright
information or the previews.
sREV (Fast Reverse):Press to quickly reverse the
CD or DVD at �ve times the normal speed. The
radio displays the elapsed time while in fast reverse. To
stop fast reversing, press again. This button might
not work when the DVD is playing the copyright
information or the previews.
\FWD (Fast Forward):Press to fast forward the CD
or DVD. The radio displays the elapsed time and fast
forwards �ve times the normal speed. To stop fast
forwarding, press again. This button might not work
when the DVD is playing the copyright information or the
previews.
Z(Eject):Press this button to eject a CD or DVD.
If a CD or DVD is ejected, but not removed, the player
automatically pulls it back in after 15 seconds.
If loading and reading of a CD cannot be completed,
because of an unknown format, etc., and the disc fails to
eject, press and hold this button for more than
�ve seconds to force the disc to eject.
DVD-V (Video) Display Buttons
Once a DVD-V is inserted, the radio display menu
shows several tag options for DVD playing. Press the
pushbuttons located under any desired tag option during
DVD playback. See the tag options listed after, for
more information.
The rear seat passenger can navigate the DVD-V
menus and controls through the remote control. See
“Remote Control”, underRear Seat Entertainment (RSE)
System on page 3-125for more information. The
Video Screen automatically turns on when the DVD-V is
inserted into the DVD slot.
3-98
Page 285 of 576
r/j(Play/Pause):Press either the play or pause
icon displayed on the radio system, to toggle between
pausing or restarting playback of a DVD. If the
forward arrow is showing on display, the system is in
pause mode. If the pause icon is showing on display, the
system is in playback mode. If the DVD screen is off,
press the play button to turn the screen on.
Some DVDs begin playing after the previews have
�nished, although there could be a delay of up to
30 seconds. If the DVD does not begin playing the movie
automatically, press the pushbutton located under the
play/pause symbol tag displayed on the radio. If the DVD
still does not play, refer to the on-screen instructions, if
available.
c(Stop):Press to stop playing, rewinding, or fast
forwarding a DVD.
r(Enter):Press to select the choices that are
highlighted in any menu.
y(Menu):Press to access the DVD menu. The DVD
menu is different on every DVD. Use the pushbuttons
located under the navigation arrows to navigate
the cursor through the DVD menu. After making a
selection press this button. This button only operates
when using a DVD.Nav (Navigate):Press to display directional arrows for
navigating through the menus.
q(Return):Press to exit the current active menu
and return to the previous menu. This button operates
only when a DVD is playing and a menu is active.
DVD-A (Audio) Display Buttons
Once a DVD-A is inserted, radio display menu shows
several tag options for DVD playing. Press the
pushbuttons located under any desired tag option
during DVD playback. See the tag options listed after,
for more information.
The rear seat operator can navigate the DVD-A menus
and controls through the remote control. See “Remote
Control”, underRear Seat Entertainment (RSE) System
on page 3-125for more information. The Video Screen
does not automatically power on when the DVD-A is
inserted into the DVD slot. It must be manually turned on
by the rear seat occupant through the remote control
power button.
r/j(Play/Pause):Press either the play or pause
icon displayed on the radio system, to toggle between
pausing or restarting playback of a DVD. If the forward
arrow is showing on the display, the system is in pause
mode. If the pause icon is showing on the display, the
system is in playback mode.
3-99
Page 286 of 576
qGroupr:Press to cycle through musical groupings
on the DVD-A disc.
Nav (Navigate):Press to display directional arrows for
navigating through the menus.
e(Audio Stream):Press to cycle through audio
stream formats located on the DVD-A disc. The video
screen shows the audio stream changing.
Inserting a Disc
To play a disc, gently insert the disc, with the label side
up, into the loading slot. The DVD player might not
accept some paper labeled media. The player starts
loading the disc into the system and shows “Loading
Disc” on the radio display. At the same time, the radio
displays a softkey menu of option(s). Some discs
automatically play the movie while others default to the
softkey menu display, which requires the radio’s
Play, Enter, or Navigation softkeys to be pressed. The
rear seat passenger can also start the disc with the
remote control.
Loading a disc into the system, depending on media
type and format, ranges from 5 to 20 seconds for a CD,
and up to 30 seconds for a DVD.
Stopping and Resuming Playback
To stop playing a DVD without turning off the system,
press the
cbutton on the remote control, or press the
pushbutton located under the stop or the play/pause
symbol tags displayed on the radio. If the radio head is
sourced to something other than DVD-V, press the
DVD/CD AUX button to make DVD-V the active source.
To resume DVD playback, press the
r/jbutton on the
remote control, or press the pushbutton located under the
play/pause symbol tag displayed on the radio. The DVD
should resume play from where it last stopped if the disc
has not been ejected and the stop button has not been
pressed twice on the remote control. If the disc has been
ejected or the stop button has been pressed twice on the
remote control, the disc resumes playing at the beginning
of the disc.
Ejecting a Disc
Press theZbutton on the radio to eject the disc. If a
disc is ejected from the radio, but not removed, the radio
reloads the disc after a short period of time. The disc is
stored in the radio. The radio does not resume play of the
disc automatically. If the RSA system is sourced to the
DVD, the movie when reloaded into the DVD player
begins to play again. In case loading and reading of a
DVD or CD cannot be completed (unknown format, etc.),
and the disc fails to eject, press and hold the DVD
Z
button more than �ve seconds to force the disc to eject.
3-100