remote control GMC YUKON 2011 User Guide
[x] Cancel search | Manufacturer: GMC, Model Year: 2011, Model line: YUKON, Model: GMC YUKON 2011Pages: 528, PDF Size: 6.36 MB
Page 50 of 528

Black plate (14,1)GMC Yukon/Yukon XL Owner Manual - 2011
2-14 Keys, Doors and Windows
Power Assist Steps
The vehicle may have power assist
steps.
The switch used to disable the
power assist steps is located on the
center console below the climate
control system.
The power assist steps
automatically extend from beneath
the vehicle on the side in which the
door has been opened. Once the
door is closed, the assist steps
automatically move back under
the vehicle after a brief delay. The
vehicle must not be moving for the
assist steps to extend or retract.
The assist steps cannot be disabled
in the extended position.
Vehicle Security
This vehicle has theft-deterrent
features; however, they do not make
it impossible to steal.
Anti-Theft Alarm System
Your vehicle has a content
theft-deterrent alarm system.
This is the security light.
To arm the theft-deterrent system:
1. Open the door.
2. Lock the door with the RemoteKeyless Entry (RKE) transmitter
or the power door lock switch.
The security light will come on to
inform the driver the system is arming. If a door is open when
the doors are locked, the
security light will flash.
If the delayed locking feature is
turned on, the theft‐deterrent
system will not start the arming
process until the last door is
closed and the delay timer has
expired. See
Delayed Locking
on page 2‑9.
3. Close all doors. The security light should go off after about
30 seconds. The alarm is not
armed until the security light
goes off.
If a locked driver door is opened
without using the RKE transmitter,
a 10-second pre-alarm will occur.
The horn will chirp and the lights
will flash. If the key is not placed in
the ignition and turned to START or
the door is not unlocked by pressing
the unlock button on the RKE
transmitter during the 10-second
pre-alarm, the alarm will go off.
Page 65 of 528
Black plate (5,1)GMC Yukon/Yukon XL Owner Manual - 2011
Seats and Restraints 3-5
Storing Memory Positions
To save into memory:
1. Adjust the driver seat, seatbackrecliner, both outside mirrors,
and the throttle and brake
pedals, if available.
See Power Mirrors on page 2‑18
and Adjustable Throttle and
Brake Pedal on page 9‑28 for
more information.
Not all mirrors and adjustable
throttles and brake pedals will
have the ability to save and
recall their positions.
2. Press and hold “1”until
two beeps sound.
3. Repeat for a second driver position using “2.” To recall, press and release
“1”
or “2.” The vehicle must be in
P (Park). A single beep will sound.
The seat, outside mirrors, and
adjustable throttle and brake pedals
will move to the position previously
stored for the identified driver.
Memory Remote Recall
The memory feature can recall the
driver seat, outside mirrors, and
pedals, if available, to stored
positions when entering the vehicle.
To activate, unlock the driver
door with the Remote Keyless
Entry (RKE) transmitter. The driver
seat, outside mirrors, and adjustable
pedals, if available, will move to the
memory position associated with
the transmitter used to unlock the
vehicle. This feature can be turned on or off
using the vehicle personalization
menu. See
“Memory Seat Recall”
under Vehicle Personalization (With
DIC Buttons) on page 5‑47 for more
information.
To stop recall movement, press one
of the power seat controls, memory
buttons, or power mirror buttons,
or the adjustable pedal switch.
If something has blocked the driver
seat and/or the adjustable pedals
while recalling a memory position,
the recall may stop. Remove the
obstruction; then press and hold the
appropriate manual control for the
memory item that is not recalling
for two seconds. Try recalling the
memory position again by pressing
the appropriate memory button.
If the memory position is still not
recalling, see the dealer for service.
Page 142 of 528
Black plate (2,1)GMC Yukon/Yukon XL Owner Manual - 2011
5-2 Instruments and Controls
Transmission Messages . . . . . 5-46
Vehicle ReminderMessages . . . . . . . . . . . . . . . . . . 5-46
Washer Fluid Messages . . . . . 5-47
Vehicle Personalization
Vehicle Personalization (With DIC Buttons) . . . . . . . . . . . . . . . 5-47
Universal Remote System
Universal Remote System . . . 5-55
Universal Remote SystemProgramming . . . . . . . . . . . . . . . 5-55
Universal Remote System Operation . . . . . . . . . . . . . . . . . . 5-61
Controls
Steering Wheel
Adjustment
The tilt lever is located on the lower
left side of the steering column.
To adjust the steering wheel:
1. Hold the steering wheel and pull
the lever.
2. Move the steering wheel up or down. 3. Release the lever to lock the
wheel in place.
Do not adjust the steering wheel
while driving.
Steering Wheel Controls
If equipped, some audio controls
can be adjusted at the steering
wheel.
w/c x(Next/Previous): Press
to select preset or favorite radio
stations, select tracks on a CD/
DVD, or navigate an iPod or USB
device.
Page 150 of 528
Black plate (10,1)GMC Yukon/Yukon XL Owner Manual - 2011
5-10 Instruments and Controls
Power Outlet 110 Volt
Alternative Current
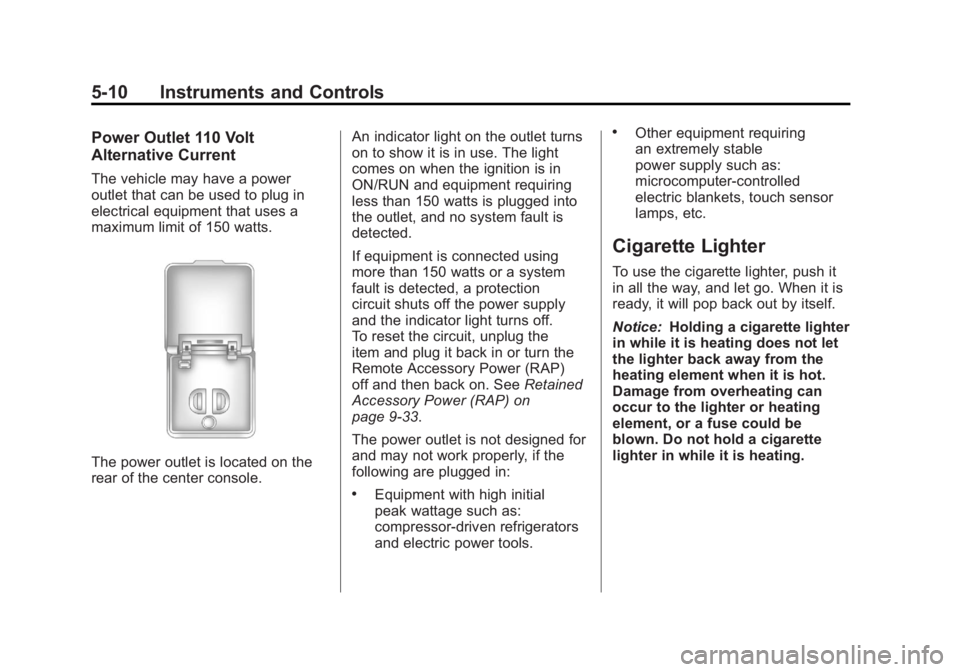
The vehicle may have a power
outlet that can be used to plug in
electrical equipment that uses a
maximum limit of 150 watts.
The power outlet is located on the
rear of the center console.An indicator light on the outlet turns
on to show it is in use. The light
comes on when the ignition is in
ON/RUN and equipment requiring
less than 150 watts is plugged into
the outlet, and no system fault is
detected.
If equipment is connected using
more than 150 watts or a system
fault is detected, a protection
circuit shuts off the power supply
and the indicator light turns off.
To reset the circuit, unplug the
item and plug it back in or turn the
Remote Accessory Power (RAP)
off and then back on. See
Retained
Accessory Power (RAP) on
page 9‑33.
The power outlet is not designed for
and may not work properly, if the
following are plugged in:
.Equipment with high initial
peak wattage such as:
compressor-driven refrigerators
and electric power tools.
.Other equipment requiring
an extremely stable
power supply such as:
microcomputer-controlled
electric blankets, touch sensor
lamps, etc.
Cigarette Lighter
To use the cigarette lighter, push it
in all the way, and let go. When it is
ready, it will pop back out by itself.
Notice: Holding a cigarette lighter
in while it is heating does not let
the lighter back away from the
heating element when it is hot.
Damage from overheating can
occur to the lighter or heating
element, or a fuse could be
blown. Do not hold a cigarette
lighter in while it is heating.
Page 159 of 528

Black plate (19,1)GMC Yukon/Yukon XL Owner Manual - 2011
Instruments and Controls 5-19
{WARNING
If the airbag readiness light stays
on after the vehicle is started or
comes on while driving, it means
the airbag system might not be
working properly. The airbags in
the vehicle might not inflate in a
crash, or they could even inflate
without a crash. To help avoid
injury, have the vehicle serviced
right away.
If there is a problem with the airbag
system, a Driver Information Center
(DIC) message can also come on.
See Airbag System Messages on
page 5‑45 for more information.
Passenger Airbag Status
Indicator
If the vehicle has the airbag status
indicator pictured in the following
illustration, then the vehicle has a
passenger sensing system for the
right front passenger position. The
passenger airbag status indicator
is on the overhead console. See
Passenger Sensing System on
page 3‑47for important safety
information.
In addition, if the vehicle has a
passenger sensing system for the
right front passenger position, the
label on the vehicle's sun visors
refers to “ADVANCED AIRBAGS.”
United States
Canada
When the vehicle is started, the
passenger airbag status indicator
will light ON and OFF, or the
symbols for on and off, for several
seconds as a system check. If you
are using remote start, if equipped,
to start the vehicle from a distance,
you may not see the system check.
Page 182 of 528

Black plate (42,1)GMC Yukon/Yukon XL Owner Manual - 2011
5-42 Instruments and Controls
Fuel System Messages
FUEL LEVEL LOW
This message displays and a chime
sounds if the fuel level is low. Refuel
as soon as possible. SeeFuel
Gauge on page 5‑14 andFuel on
page 9‑68 for more information.
TIGHTEN GAS CAP
This message may display along
with the check engine light on the
instrument panel cluster if the fuel
cap is not tightened properly. See
Malfunction Indicator Lamp on
page 5‑21. Reinstall the fuel cap
fully. SeeFilling the Tank on
page 9‑72. The diagnostic system
can determine if the fuel cap has
been left off or improperly installed.
A loose or missing fuel cap
allows fuel to evaporate into the
atmosphere. A few driving trips with
the cap properly installed should
turn this light and message off.
Key and Lock Messages
REPLACE BATTERY IN
REMOTE KEY
This message displays if a Remote
Keyless Entry (RKE) transmitter
battery is low. The battery needs
to be replaced in the transmitter.
See “Battery Replacement” under
Remote Keyless Entry (RKE)
System Operation on page 2‑3.
Lamp Messages
TURN SIGNAL ON
This message displays and a chime
sounds if a turn signal is left on for
1.2 km (0.75 mile). Move the turn
signal/multifunction lever to the off
position.
Object Detection System
Messages
PARK ASST BLOCKED SEE
OWNERS MANUAL
If your vehicle has the Ultrasonic
Rear Parking Assist (URPA) system,
this message displays if there is
something interfering with the park
assist system. See Ultrasonic
Parking Assist on page 9‑58 for
more information.
PARK ASSIST OFF
If your vehicle has the Ultrasonic
Rear Parking Assist (URPA) system,
after the vehicle has been started,
this message displays to remind the
driver that the URPA system has
been turned off. Press the set/reset
button or the trip odometer reset
stem to acknowledge this message
and clear it from the DIC display.
To turn the URPA system back on,
see Ultrasonic Parking Assist on
page 9‑58.
Page 189 of 528
Black plate (49,1)GMC Yukon/Yukon XL Owner Manual - 2011
Instruments and Controls 5-49
Press the customization button until
AUTO DOOR LOCK appears on the
DIC display. Press the set/reset
button once to access the settings
for this feature. Then press the
customization button to scroll
through the following settings:
SHIFT OUT OF PARK (default):
The doors will automatically lock
when the vehicle is shifted out of
P (Park).
AT VEHICLE SPEED:The doors
will automatically lock when the
vehicle speed is above 8 mph
(13 km/h) for 3 seconds.
NO CHANGE: No change will be
made to this feature. The current
setting will remain.
To select a setting, press the
set/reset button while the desired
setting is displayed on the DIC. AUTO DOOR UNLOCK
This feature allows you to select
whether or not to turn off the
automatic door unlocking feature.
It also allows you to select which
doors and when the doors will
automatically unlock. See
Automatic
Door Locks on page 2‑9 for more
information.
Press the customization button until
AUTO DOOR UNLOCK appears on
the DIC display. Press the set/reset
button once to access the settings
for this feature. Then press the
customization button to scroll
through the following settings:
OFF: None of the doors will
automatically unlock.
DRIVER AT KEY OUT: Only the
driver door will unlock when the key
is taken out of the ignition.
DRIVER IN PARK: Only the driver
door will unlock when the vehicle is
shifted into P (Park) . ALL AT KEY OUT:
All of the doors
will unlock when the key is taken
out of the ignition.
ALL IN PARK (default): All of the
doors will unlock when the vehicle is
shifted into P (Park).
NO CHANGE: No change will be
made to this feature. The current
setting will remain.
To select a setting, press the
set/reset button while the desired
setting is displayed on the DIC.
REMOTE DOOR LOCK
This feature allows you to select the
type of feedback you will receive
when locking the vehicle with the
Remote Keyless Entry (RKE)
transmitter. You will not receive
feedback when locking the vehicle
with the RKE transmitter if the doors
are open. See Remote Keyless
Entry (RKE) System Operation on
page 2‑3 for more information.
Page 190 of 528
Black plate (50,1)GMC Yukon/Yukon XL Owner Manual - 2011
5-50 Instruments and Controls
Press the customization button until
REMOTE DOOR LOCK appears on
the DIC display. Press the set/reset
button once to access the settings
for this feature. Then press the
customization button to scroll
through the following settings:
OFF:There will be no feedback
when you press the lock button on
the RKE transmitter.
LIGHTS ONLY: The exterior lamps
will flash when you press the lock
button on the RKE transmitter.
HORN ONLY: The horn will sound
on the second press of the lock
button on the RKE transmitter.
HORN & LIGHTS (default): The
exterior lamps will flash when you
press the lock button on the RKE
transmitter, and the horn will sound
when the lock button is pressed
again within five seconds of the
previous command.
NO CHANGE: No change will be
made to this feature. The current
setting will remain. To select a setting, press the
set/reset button while the desired
setting is displayed on the DIC.
REMOTE DOOR UNLOCK
This feature allows you to select the
type of feedback you will receive
when unlocking the vehicle with
the Remote Keyless Entry (RKE)
transmitter. You will not receive
feedback when unlocking the
vehicle with the RKE transmitter if
the doors are open. See
Remote
Keyless Entry (RKE) System
Operation on page 2‑3 for more
information.
Press the customization button
until REMOTE DOOR UNLOCK
appears on the DIC display. Press
the set/reset button once to access
the settings for this feature. Then
press the customization button to
scroll through the following settings:
LIGHTS OFF: The exterior lamps
will not flash when you press
the unlock button on the RKE
transmitter. LIGHTS ON (default):
The exterior
lamps will flash when you press
the unlock button on the RKE
transmitter.
NO CHANGE: No change will be
made to this feature. The current
setting will remain.
To select a setting, press the
set/reset button while the desired
setting is displayed on the DIC.
DELAY DOOR LOCK
This feature allows you to select
whether or not the locking of the
vehicle's doors and liftgate will be
delayed. When locking the doors
and liftgate with the power door
lock switch and a door or the liftgate
is open, this feature will delay
locking the doors and liftgate until
five seconds after the last door is
closed. You will hear three chimes
to signal that the delayed locking
feature is in use. The key must be
out of the ignition for this feature to
work. You can temporarily override
delayed locking by pressing the
Page 191 of 528
Black plate (51,1)GMC Yukon/Yukon XL Owner Manual - 2011
Instruments and Controls 5-51
power door lock switch twice. See
Delayed Locking on page 2‑9for
more information.
Press the customization button until
DELAY DOOR LOCK appears on
the DIC display. Press the set/reset
button once to access the settings
for this feature. Then press the
customization button to scroll
through the following settings:
OFF: There will be no delayed
locking of the vehicle's doors.
ON (default): The doors will not
lock until 5 seconds after the last
door or the liftgate is closed.
NO CHANGE: No change will be
made to this feature. The current
setting will remain.
To select a setting, press the
set/reset button while the desired
setting is displayed on the DIC. EXIT LIGHTING
This feature allows you to select
the amount of time you want the
exterior lamps to remain on when it
is dark enough outside. This
happens after the key is turned
from ON/RUN to LOCK/OFF.
Press the customization button
until EXIT LIGHTING appears on
the DIC display. Press the set/reset
button once to access the settings
for this feature. Then press the
customization button to scroll
through the following settings:
OFF:
The exterior lamps will not
turn on.
30 SECONDS (default): The
exterior lamps will stay on for
30 seconds.
1 MINUTE: The exterior lamps will
stay on for 1 minute.
2 MINUTES: The exterior lamps will
stay on for 2 minutes. NO CHANGE:
No change will be
made to this feature. The current
setting will remain.
To select a setting, press the
set/reset button while the desired
setting is displayed on the DIC.
APPROACH LIGHTING
This feature allows you to select
whether or not to have the exterior
lights turn on briefly during low light
periods after unlocking the vehicle
using the Remote Keyless Entry
(RKE) transmitter.
Press the customization button until
APPROACH LIGHTING appears on
the DIC display. Press the set/reset
button once to access the settings
for this feature. Then press the
customization button to scroll
through the following settings:
OFF: The exterior lights will not
turn on when you unlock the vehicle
with the RKE transmitter.
Page 192 of 528
Black plate (52,1)GMC Yukon/Yukon XL Owner Manual - 2011
5-52 Instruments and Controls
ON (default):If it is dark enough
outside, the exterior lights will turn
on briefly when you unlock the
vehicle with the RKE transmitter.
The lights will remain on for
20 seconds or until the lock button
on the RKE transmitter is pressed,
or the vehicle is no longer off.
See Remote Keyless Entry (RKE)
System Operation on page 2‑3 for
more information.
NO CHANGE: No change will be
made to this feature. The current
setting will remain.
To select a setting, press the
set/reset button while the desired
setting is displayed on the DIC.
CHIME VOLUME
This feature allows you to select the
volume level of the chime.
Press the customization button until
CHIME VOLUME appears on the
DIC display. Press the set/reset
button once to access the settings for this feature. Then press the
customization button to scroll
through the following settings:
NORMAL:
The chime volume will
be set to a normal level.
LOUD: The chime volume will be
set to a loud level.
NO CHANGE: No change will be
made to this feature. The current
setting will remain.
There is no default for chime
volume. The volume will stay at
the last known setting.
To select a setting, press the
set/reset button while the desired
setting is displayed on the DIC.
PARK TILT MIRRORS
If your vehicle has this feature, it
allows you to select whether or
not the outside mirror(s) will
automatically tilt down when the
vehicle is shifted into R (Reverse).
See Park Tilt Mirrors on page 2‑20
for more information. Press the customization button until
PARK TILT MIRRORS appears on
the DIC display. Press the set/reset
button once to access the settings
for this feature. Then press the
customization button to scroll
through the following settings:
OFF (default):
Neither outside
mirror will be tilted down when the
vehicle is shifted into R (Reverse).
DRIVER MIRROR: The driver
outside mirror will be tilted down
when the vehicle is shifted into
R (Reverse).
PASSENGER MIRROR: The
passenger outside mirror will be
tilted down when the vehicle is
shifted into R (Reverse).
BOTH MIRRORS: The driver and
passenger outside mirrors will be
tilted down when the vehicle is
shifted into R (Reverse).
NO CHANGE: No change will be
made to this feature. The current
setting will remain.