climate control GMC YUKON 2016 User Guide
[x] Cancel search | Manufacturer: GMC, Model Year: 2016, Model line: YUKON, Model: GMC YUKON 2016Pages: 416, PDF Size: 5.64 MB
Page 55 of 416
GMC Yukon/Yukon XL Owner Manual (GMNA-Localizing-U.S/Canada-
9159297) - 2016 - CRC - 10/12/15
54 Keys, Doors, and Windows
Folding Mirrors
Power Folding
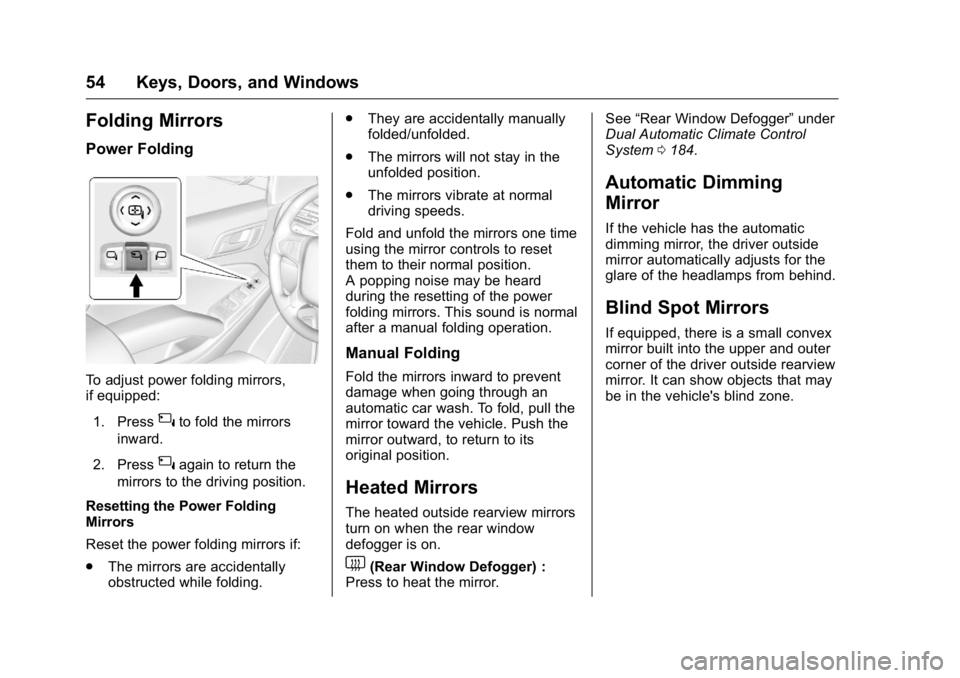
To adjust power folding mirrors,
if equipped:1. Press
{to fold the mirrors
inward.
2. Press
{again to return the
mirrors to the driving position.
Resetting the Power Folding
Mirrors
Reset the power folding mirrors if:
. The mirrors are accidentally
obstructed while folding. .
They are accidentally manually
folded/unfolded.
. The mirrors will not stay in the
unfolded position.
. The mirrors vibrate at normal
driving speeds.
Fold and unfold the mirrors one time
using the mirror controls to reset
them to their normal position.
A popping noise may be heard
during the resetting of the power
folding mirrors. This sound is normal
after a manual folding operation.
Manual Folding
Fold the mirrors inward to prevent
damage when going through an
automatic car wash. To fold, pull the
mirror toward the vehicle. Push the
mirror outward, to return to its
original position.
Heated Mirrors
The heated outside rearview mirrors
turn on when the rear window
defogger is on.
1(Rear Window Defogger) :
Press to heat the mirror. See
“Rear Window Defogger” under
Dual Automatic Climate Control
System 0184.
Automatic Dimming
Mirror
If the vehicle has the automatic
dimming mirror, the driver outside
mirror automatically adjusts for the
glare of the headlamps from behind.
Blind Spot Mirrors
If equipped, there is a small convex
mirror built into the upper and outer
corner of the driver outside rearview
mirror. It can show objects that may
be in the vehicle's blind zone.
Page 68 of 416
GMC Yukon/Yukon XL Owner Manual (GMNA-Localizing-U.S/Canada-
9159297) - 2016 - CRC - 10/12/15
Seats and Restraints 67
not recalling for two seconds. Try
recalling the memory position again
by opening the driver door and
pressing
Kon the RKE transmitter.
If the exit position is still not
recalling, see your dealer for
service.
Heated and Cooled Front
Seats
If equipped, the vehicle may have
heated or heated and cooled seats.
{Warning
If you cannot feel temperature
change or pain to the skin, the
seat heater may cause burns. To
reduce the risk of burns, people
with such a condition should use
care when using the seat heater,
especially for long periods of
time. Do not place anything on
the seat that insulates against
heat, such as a blanket, cushion,
cover, or similar item. This may
cause the seat heater to
(Continued)
Warning (Continued)
overheat. An overheated seat
heater may cause a burn or may
damage the seat.
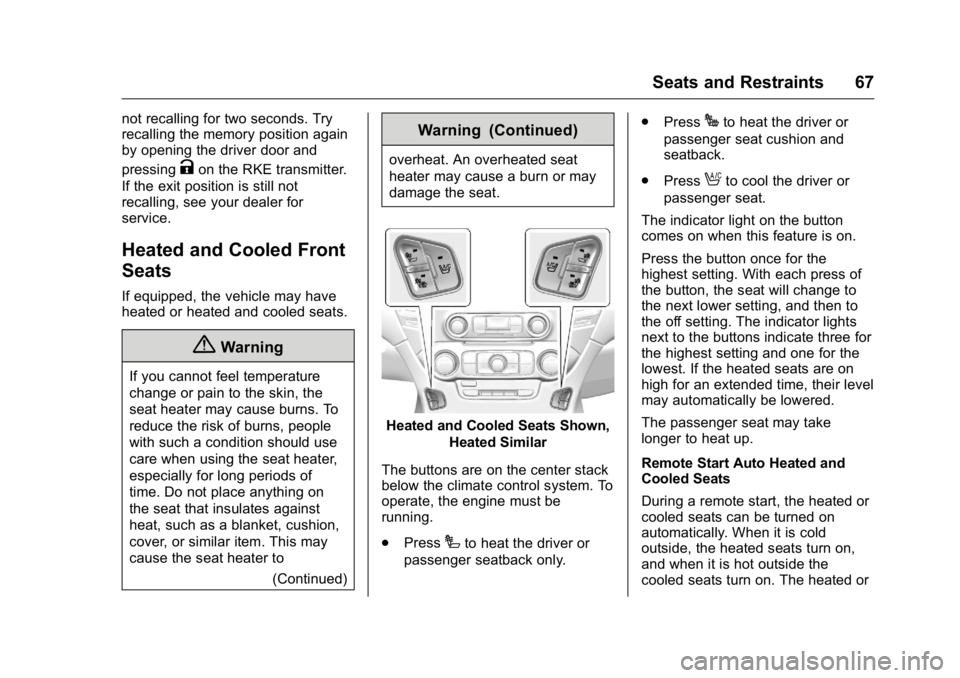
Heated and Cooled Seats Shown,Heated Similar
The buttons are on the center stack
below the climate control system. To
operate, the engine must be
running.
. Press
Ito heat the driver or
passenger seatback only. .
Press
Jto heat the driver or
passenger seat cushion and
seatback.
. Press
Ato cool the driver or
passenger seat.
The indicator light on the button
comes on when this feature is on.
Press the button once for the
highest setting. With each press of
the button, the seat will change to
the next lower setting, and then to
the off setting. The indicator lights
next to the buttons indicate three for
the highest setting and one for the
lowest. If the heated seats are on
high for an extended time, their level
may automatically be lowered.
The passenger seat may take
longer to heat up.
Remote Start Auto Heated and
Cooled Seats
During a remote start, the heated or
cooled seats can be turned on
automatically. When it is cold
outside, the heated seats turn on,
and when it is hot outside the
cooled seats turn on. The heated or
Page 130 of 416

GMC Yukon/Yukon XL Owner Manual (GMNA-Localizing-U.S/Canada-
9159297) - 2016 - CRC - 10/12/15
Instruments and Controls 129
Setting the Time and Date with
Touchscreen Controls
To set the time:1. Touch SETTINGS on the Home Page, then touch Time
and Date.
2. Touch Set Time, then touch
«
orªto increase or decrease
hours, minutes, and AM or PM.
Touch 12–24 Hr for 12 or
24 hour clock.
3. Touch
Sto go back to the
previous menu.
Auto Set requires an active
connection to OnStar.
If auto timing is set, the time
displayed on the clock may not
update immediately when driving
into a new time zone.
To set the date:
1. Touch SETTINGS on the Home Page, then touch Time
and Date. 2. Touch Set Date, then touch
«
orªto increase or decrease
month, day, or year.
3. Touch
Sto go back to the
previous menu.
To set the clock display:
1. Touch SETTINGS on the Home Page, then touch Time
and Date.
2. Touch Clock Display, then touch Off or On to turn the
clock display off or on.
3. Touch
Sto go back to the
previous menu.
Power Outlets
Power Outlets 12 Volt Direct
Current
Accessory power outlets can be
used to plug in electrical equipment,
such as a cell phone, MP3
player, etc.
The vehicle may have up to five
accessory power outlets: Vehicles with a Center Console
.
One in front of the cupholders on
the center console.
. One inside the center storage
console.
. One on the rear of the center
storage console.
. One in the third row seat on the
driver side.
. One in the rear cargo area on
the passenger side.
Vehicles with Bench Seats
. One on the center stack below
the climate control system.
. One in the storage area on the
bench seat.
. One on the rear of the center
armrest storage.
. One in the third row seat area on
the driver side.
. One in the rear cargo area on
the passenger side.
Lift the cover to access and replace
when not in use.
Page 132 of 416
GMC Yukon/Yukon XL Owner Manual (GMNA-Localizing-U.S/Canada-
9159297) - 2016 - CRC - 10/12/15
Instruments and Controls 131
For vehicles with bench seats, the
110/120 volt power outlet is on the
center stack below the climate
controls.
An indicator light on the outlet turns
on to show it is in use. The light
comes on when the ignition is in
ON/RUN, equipment requiring less
than 150 watts is plugged into the
outlet, and no system fault is
detected.
The indicator light does not come on
when the ignition is in LOCK/OFF or
if the equipment is not fully seated
into the outlet.
If equipment is connected using
more than 150 watts or a system
fault is detected, a protection circuit
shuts off the power supply and the
indicator light turns off. To reset the
circuit, unplug the item and plug it
back in or turn the ignition off and
then back to ON/RUN. The power
restarts when equipment using 150
watts or less is plugged into the
outlet and a system fault is not
detected.The power outlet is not designed for
the following, and may not work
properly if they are plugged in:
.
Equipment with high initial peak
wattage, such as
compressor-driven refrigerators
and electric power tools.
. Other equipment requiring an
extremely stable power supply,
such as
microcomputer-controlled
electric blankets and touch
sensor lamps.
. Medical equipment.
Wireless Charging
The vehicle may have wireless
charging on top of the center
console. See Center Console
Storage 0120. The system
wirelessly charges one PMA or Qi
compatible mobile device.
To check for phone or other device
compatibility:
. In the U.S., see my.gmc.com/
learn. .
In Canada, see
gmtotalconnect.ca.
. Or, see your dealer for details.
{Warning
Wireless charging can affect the
operation of an implanted
pacemaker or other medical
devices. If you have one, it is
recommended to consult with
your doctor before using the
wireless charging system.
The vehicle must be in ON/RUN,
ACC/ACCESSORY, or Retained
Accessory Power (RAP). The
wireless charging feature may not
correctly indicate charging when the
vehicle is in RAP. See Retained
Accessory Power (RAP) 0216.
The operating temperature is −20 °C
(−4 °F) to 60 °C (140 °F) for the
charging system and 0 °C (32 °F) to
35 °C (95 °F) for the phone.
Page 153 of 416
GMC Yukon/Yukon XL Owner Manual (GMNA-Localizing-U.S/Canada-
9159297) - 2016 - CRC - 10/12/15
152 Instruments and Controls
Vehicle Messages
Messages displayed on the DIC
indicate the status of the vehicle or
some action that may be needed to
correct a condition. Multiple
messages may appear one after
another.
The messages that do not require
immediate action can be
acknowledged and cleared by
pressing
Vor the trip odometer
reset stem on the base cluster.
The messages that require
immediate action cannot be cleared
until that action is performed.
All messages should be taken
seriously and clearing the message
does not correct the problem.
The following are the possible
messages and some information
about them.
Battery Voltage and
Charging Messages
BATTERY LOW START
VEHICLE
When the vehicle’ s battery is
severely discharged, this message
will display and four chimes will
sound. Start the vehicle
immediately. If the vehicle is not
started and the battery continues to
discharge, the climate controls,
heated seats, and audio systems
will shut off and the vehicle may
require a jump start. These systems
will function again after the vehicle
is started.
BATTERY SAVER ACTIVE
This message displays when the
battery voltage drops below
expected levels and features are
disabled. Turn off all unnecessary
accessory features.
SERVICE BATTERY
CHARGING SYSTEM
On some vehicles, this message
displays if there is a problem with
the battery charging system. Under
certain conditions, the charging
system light may also turn on in the
instrument cluster. See Charging
System Light 0142. Driving with this
problem could drain the battery.
Turn off all unnecessary
accessories. Have the electrical
system checked as soon as
possible. See your dealer.
TRANSPORT MODE ON
This message is displayed when the
vehicle is in transport mode. Some
features can be disabled while in
this mode, including Remote
Keyless Entry (RKE), remote start,
and the vehicle alarm system. Take
the vehicle to your dealer for service
to turn transport mode off.
Page 166 of 416

GMC Yukon/Yukon XL Owner Manual (GMNA-Localizing-U.S/Canada-
9159297) - 2016 - CRC - 10/12/15
Instruments and Controls 165
.Number of Favorites Shown
. Audible Touch Feedback
. Bose AudioPilot
. Auto Volume
. Maximum Startup Volume
. Audio Cue Volume
Manage Favorites
This allows favorites to be edited.
See “Manage Favorites” in
“Settings” under“Radio” in the
infotainment manual.
Number of Favorites Shown
Press to set the number of favorites
to display.
Select the desired number or select
Auto and the infotainment system
will automatically adjust the number
of favorites shown.
Audible Touch Feedback
This allows Audible Touch
Feedback to be turned on or off.
Select Off or On. Bose AudioPilot
This allows Bose AudioPilot to be
turned on or off.
Select Off or On.
Auto Volume
This feature adjusts the volume
based on vehicle speed and
ambient noise.
Select Off, Low, Medium-Low,
Medium, Medium-High, or High.
Maximum Startup Volume
This feature sets the maximum
startup volume. If the vehicle is
started and the volume is greater
than this level, the volume is
adjusted to this level. To set the
maximum startup volume, press +
or
−to increase or decrease.
Audio Cue Volume
This feature sets the volume of
audio files played at system startup
and shutdown.
Select On, then press + or −to
increase or decrease the volume.Vehicle
Select and the following may
display:
. Climate and Air Quality
. Collision/Detection Systems
. Comfort and Convenience
. Lighting
. Power Door Locks
. Remote Lock, Unlock, Start
Climate and Air Quality
Select the Climate and Air Quality
menu and the following may display:
.Auto Fan Max Speed
. Auto Defog
. Auto Rear Defog
Auto Fan Max Speed
This feature will set the maximum
auto fan speed.
Select Low, Medium, or High.
Page 167 of 416
GMC Yukon/Yukon XL Owner Manual (GMNA-Localizing-U.S/Canada-
9159297) - 2016 - CRC - 10/12/15
166 Instruments and Controls
Auto Defog
When set to On, the auto defog
comes on when the climate control
sensor detects high interior
humidity. Air will be directed to the
windshield.
Select Off or On.
Auto Rear Defog
If equipped, this feature will
automatically turn on the rear
window defogger when the vehicle
is first started in cold weather and
turn off when the vehicle is warmed.
Select Off or On.
Collision/Detection Systems
Select the Collision/Detection
Systems menu and the following
may display:
.Alert Type
. Auto Collision Preparation
. Go Notifier
. Park Assist
. Side Blind Zone Alert
. Rear Cross Traffic Alert Alert Type
This feature will set crash alerts to
beeps or seat vibrations. This
setting affects all crash alerts
including Forward Collision Alert,
Lane Departure Warning, and Park
Assist alerts.
Select Beeps or Safety Alert Seat.
Auto Collision Preparation
This feature will turn on or off the
Forward Collision Alert (FCA) and
Front Automatic Braking (FAB). The
Off setting disables all FCA and
FAB functions. With the Alert and
Brake setting, both FCA and FAB
are available. The Alert setting
disables FAB, but some last-second
automatic braking capability is still
provided, though less likely to occur.
See
Front Automatic Braking (FAB)
System 0250.
Select Off, Alert and Brake, or Alert.
Go Notifier
This feature will give a reminder that
Adaptive Cruise Control provides
when it has brought the vehicle to a complete stop behind another
stopping vehicle, and then that
vehicle drives on.
Select Off or On.
Park Assist
This allows the feature to be turned
on or off. See
Assistance Systems
for Parking or Backing 0245.
Select Off, On, or On with Towbar
Attached.
Side Blind Zone Alert
This allows the feature to be turned
on or off. See Side Blind Zone Alert
(SBZA) 0251.
Select Off or On.
Rear Cross Traffic Alert
This allows the feature to be turned
on or off. See Assistance Systems
for Parking or Backing 0245.
Select Off or On.
Comfort and Convenience
Select the Comfort and
Convenience menu and the
following may display:
Page 182 of 416
GMC Yukon/Yukon XL Owner Manual (GMNA-Localizing-U.S/Canada-
9159297) - 2016 - CRC - 10/12/15
Lighting 181
Lighting Features
Entry Lighting
Some exterior lamps and the interior
lamps turn on briefly at night, or in
areas with limited lighting, when
K
is pressed on the Remote Keyless
Entry (RKE) transmitter. When a
door is opened, the interior lamps
come on if the dome lamp control is
in the DOOR position. After about
30 seconds the exterior lamps turn
off. Entry lighting can be disabled
manually by changing the ignition
out of the OFF position, or by
pressing the RKE transmitter
Q
button.
This feature can be changed. See
“Vehicle Locator Lights”under
Vehicle Personalization 0164.
Exit Lighting
Some exterior lamps and interior
lamps come on when the key is
removed from the ignition. The
exterior and interior lamps remain
on for a set amount of time, then
automatically turn off. If equipped with Keyless Access,
the exterior lamps automatically turn
on when the driver
’s door is opened
after the ignition is turned to OFF.
The interior lights turn on when the
ignition is turned to OFF.
The exterior lamps turn off
immediately by turning the exterior
lamp control off.
This feature can be changed. See
Vehicle Personalization 0164.
Battery Load
Management
The vehicle has Electric Power
Management (EPM), which
estimates the battery's temperature
and state of charge. It then adjusts
the voltage for best performance
and extended life of the battery.
When the battery's state of charge
is low, the voltage is raised slightly
to quickly bring the charge back up.
When the state of charge is high,
the voltage is lowered slightly to
prevent overcharging. The voltmeter
gauge or the voltage display on the
Driver Information Center (DIC), if equipped, may show the voltage
moving up or down. This is normal.
If there is a problem, an alert will be
displayed.
The battery can be discharged at
idle if the electrical loads are very
high. This is true for all vehicles.
This is because the generator
(alternator) may not be spinning fast
enough at idle to produce all the
power that is needed for very high
electrical loads.
A high electrical load occurs when
several of the following are on, such
as: headlamps, high beams, fog
lamps, rear window defogger,
climate control fan at high speed,
heated seats, engine cooling fans,
trailer loads, and loads plugged into
accessory power outlets.
EPM works to prevent excessive
discharge of the battery. It does this
by balancing the generator's output
and the vehicle's electrical needs.
It can increase engine idle speed to
generate more power, whenever
needed. It can temporarily reduce
the power demands of some
accessories.
Page 185 of 416
GMC Yukon/Yukon XL Owner Manual (GMNA-Localizing-U.S/Canada-
9159297) - 2016 - CRC - 10/12/15
184 Climate Controls
Climate Controls
Climate Control Systems
Dual Automatic ClimateControl System . . . . . . . . . . . . . 184
Rear Climate Control System . . . . . . . . . . . . . . . . . . . . . . 188
Air Vents
Air Vents . . . . . . . . . . . . . . . . . . . . . 189
Maintenance
Passenger Compartment AirFilter . . . . . . . . . . . . . . . . . . . . . . . . 190
Service . . . . . . . . . . . . . . . . . . . . . . . 191
Climate Control
Systems
Dual Automatic Climate
Control System
With this system the heating,
cooling, and ventilation in the
vehicle can be controlled. Some
climate control settings can be
changed. See “Climate and Air
Quality” underVehicle
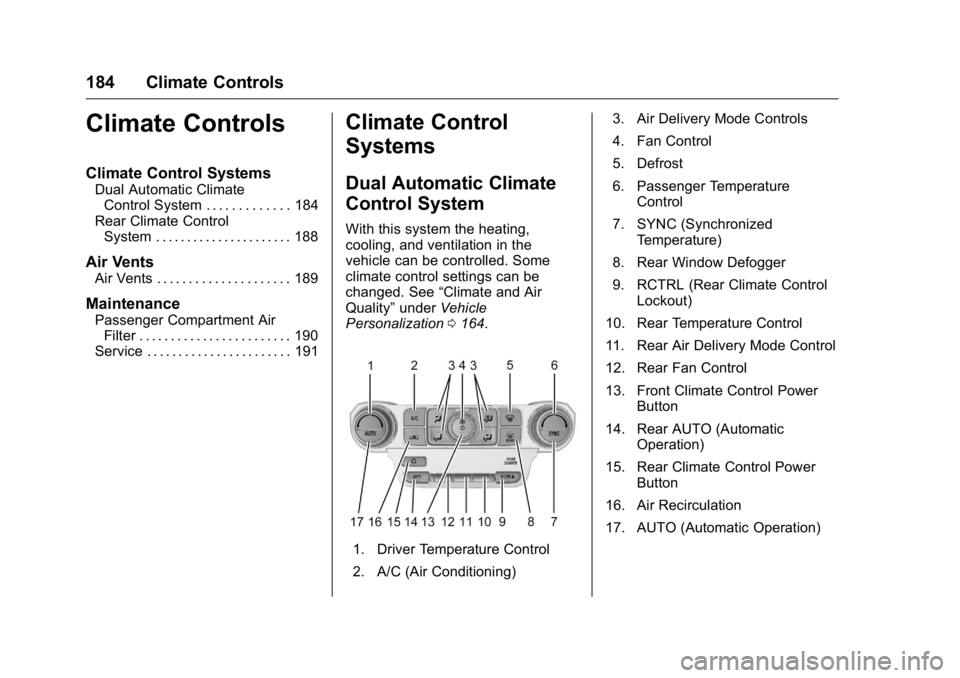
Personalization 0164.
1. Driver Temperature Control
2. A/C (Air Conditioning) 3. Air Delivery Mode Controls
4. Fan Control
5. Defrost
6. Passenger Temperature
Control
7. SYNC (Synchronized Temperature)
8. Rear Window Defogger
9. RCTRL (Rear Climate Control Lockout)
10. Rear Temperature Control
11. Rear Air Delivery Mode Control
12. Rear Fan Control
13. Front Climate Control Power Button
14. Rear AUTO (Automatic Operation)
15. Rear Climate Control Power Button
16. Air Recirculation
17. AUTO (Automatic Operation)
Page 186 of 416

GMC Yukon/Yukon XL Owner Manual (GMNA-Localizing-U.S/Canada-
9159297) - 2016 - CRC - 10/12/15
Climate Controls 185
Front Climate Controls
Automatic Operation
The system automatically controls
the fan speed, air delivery, air
conditioning, and recirculation in
order to heat or cool the vehicle to
the desired temperature.
When the indicator light is on, the
system is in full automatic operation.
If the air delivery mode or fan
setting is manually adjusted, the
auto indicator turns off and the
selected settings are displayed.
To place the system in
automatic mode:1. Press AUTO.
2. Set the driver and passenger temperature.
To find your comfort setting,
start with 22 °C (72 °F) and
allow the system time to
stabilize. Then adjust the
temperature as needed for best
comfort. To improve fuel efficiency and to
cool the vehicle faster, recirculation
may be automatically selected in
warm weather.
The recirculation light will not come
on when automatically controlled.
Press
@to manually select
recirculation; press it again to select
outside air.
Do not cover the solar sensor on the
top of the instrument panel near the
windshield. This sensor regulates
air temperature based on sun load.
See “Sensors” later in this section.
Manual Operation
O(On/Off) : Press to turn the
climate control system on or off.
Outside air still enters the vehicle,
and is directed to the floor. This
direction can be changed by
pressing the air delivery mode.
9(Fan Control) : Turn clockwise
or counterclockwise to increase or
decrease the fan speed. Press
AUTO to return to automatic
operation. The maximum auto fan speed can
be adjusted. See
“Climate and Air
Quality” underVehicle
Personalization 0164.
Driver and Passenger
Temperature Control : The
temperature can be adjusted
separately for the driver and
passenger.
Turn the knob clockwise or
counterclockwise to increase or
decrease the driver or passenger
temperature setting.
SYNC (Synchronized
Temperature) : Press to link the
passenger and rear climate
temperature settings to the driver
setting. The SYNC indicator light will
turn on. When the passenger or rear
climate settings are adjusted, the
SYNC indicator light turns off.
Air Delivery Mode Control :
PressY,\,[, or-to change
the direction of the airflow. An
indicator light comes on in the
selected mode button.