turn signal GMC YUKON 2020 Get To Know Guide
[x] Cancel search | Manufacturer: GMC, Model Year: 2020, Model line: YUKON, Model: GMC YUKON 2020Pages: 20, PDF Size: 3.06 MB
Page 2 of 20

2
INSTRUMENT PANEL
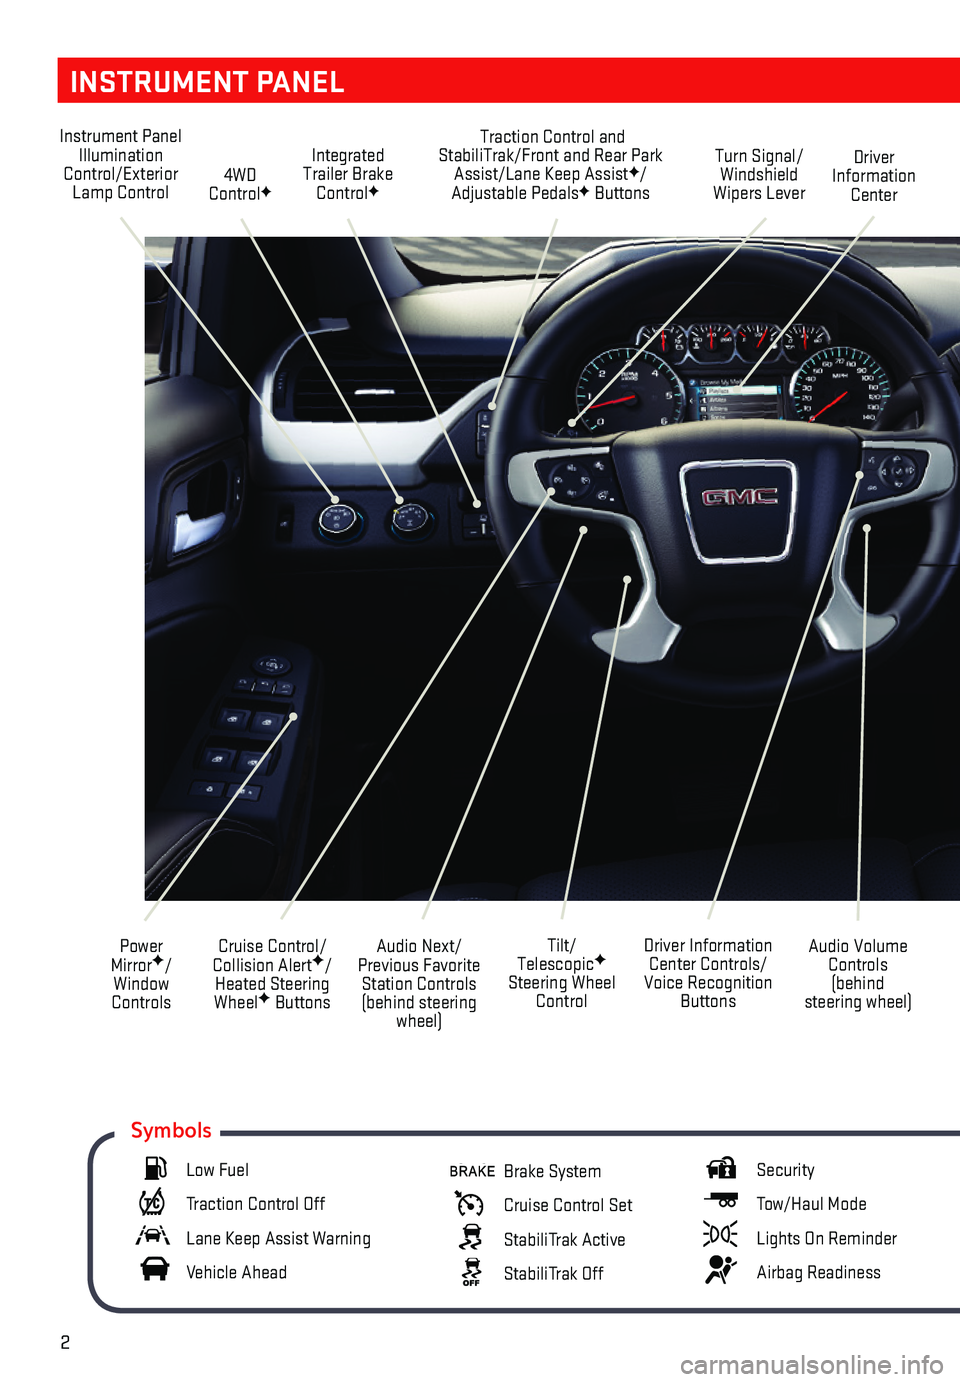
Audio Next/Previous Favorite Station Controls (behind steering wheel)
Cruise Control/ Collision AlertF/Heated Steering WheelF Buttons
Power MirrorF/Window Controls
Driver Information Center Controls/Voice Recognition Buttons
Audio Volume Controls (behind steering wheel)
Tilt/ TelescopicF Steering Wheel Control
Instrument Panel Illumination Control/Exterior Lamp Control4WD ControlF
Traction Control and StabiliTrak/Front and Rear Park Assist/Lane Keep AssistF/Adjustable PedalsF Buttons
Driver Information Center
Turn Signal/ Windshield Wipers Lever
Integrated Trailer Brake ControlF
Low Fuel
Traction Control Off
Lane Keep Assist Warning
Vehicle Ahead
Brake System
Cruise Control Set
StabiliTrak Active
StabiliTrak Off
Security
Tow/Haul Mode
Lights On Reminder
Airbag Readiness
Symbols
Page 4 of 20

4
REMOTE KEYLESS ENTRY TRANSMITTER (KEY FOB)
KEYED IGNITION SYSTEM (IF EQUIPPED)
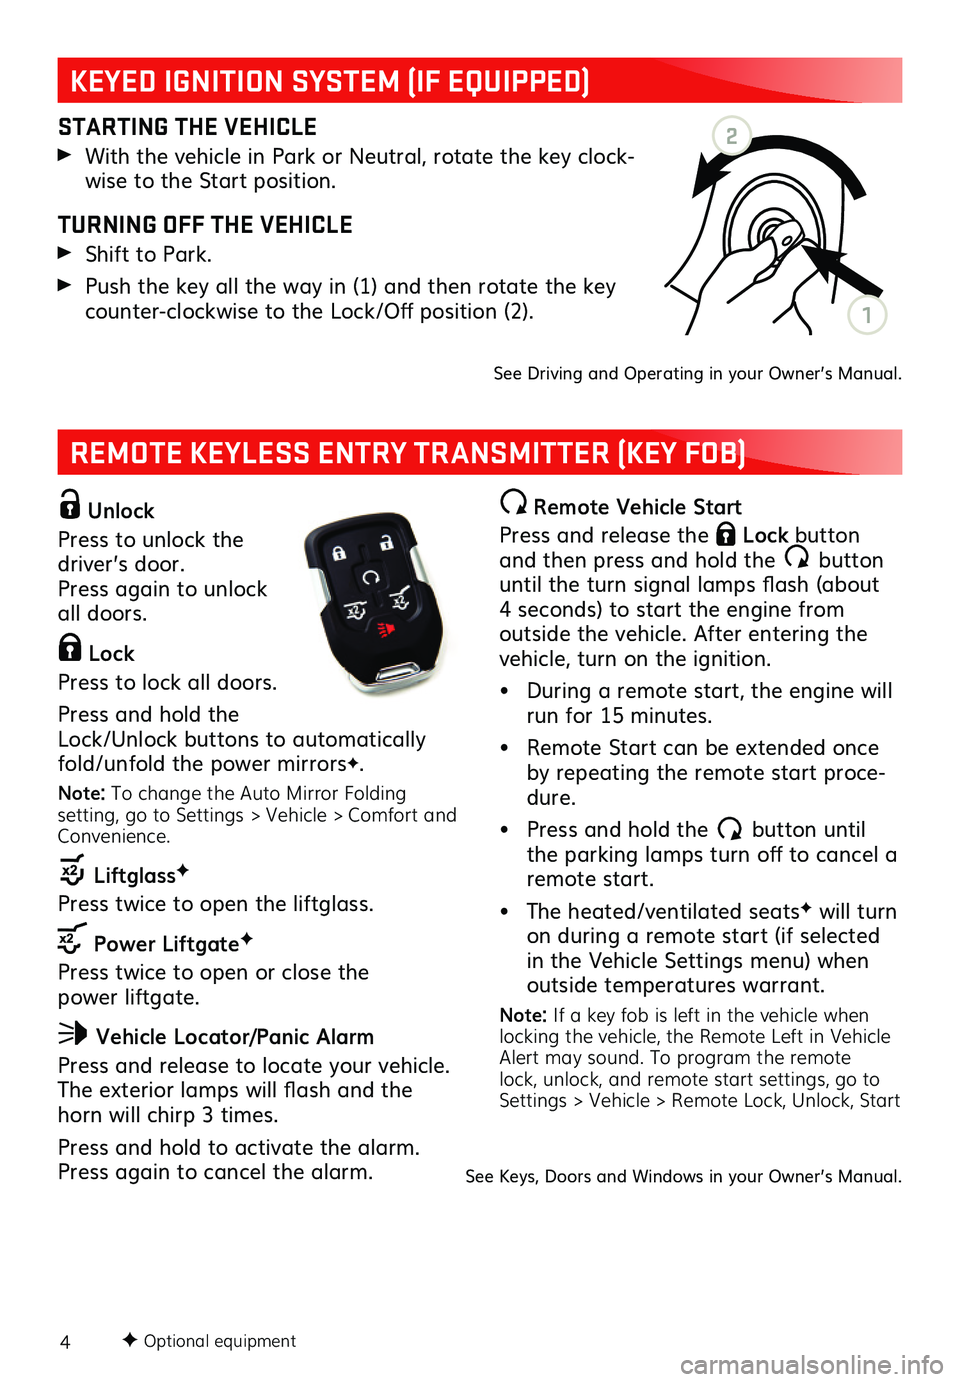
Unlock
Press to unlock the driver’s door. Press again to unlock all doors.
Lock
Press to lock all doors.
Press and hold the Lock/Unlock buttons to automatically fold/unfold the power mirrorsF.
Note: To change the Auto Mirror Folding setting, go to Settings > Vehicle > Comfort and Convenience.
LiftglassF
Press twice to open the liftglass.
Power LiftgateF
Press twice to open or close the power liftgate.
Vehicle Locator/Panic Alarm
Press and release to locate your vehicle. The exterior lamps will flash and the horn will chirp 3 times.
Press and hold to activate the alarm. Press again to cancel the alarm.
STARTING THE VEHICLE
With the vehicle in Park or Neutral, rotate the key clock-wise to the Start position.
TURNING OFF THE VEHICLE
Shift to Park.
Push the key all the way in (1) and then rotate the key counter-clockwise to the Lock/Off position (2).
See Driving and Operating in your Owner’s Manual.
Remote Vehicle Start
Press and release the Lock button and then press and hold the button until the turn signal lamps flash (about 4 seconds) to start the engine from outside the vehicle. After entering the vehicle, turn on the ignition.
• During a remote start, the engine will run for 15 minutes.
• Remote Start can be extended once by repeating the remote start proce-dure.
• Press and hold the button until the parking lamps turn off to cancel a remote start.
• The heated/ventilated seatsF will turn on during a remote start (if selected in the Vehicle Settings menu) when outside temperatures warrant.
Note: If a key fob is left in the vehicle when locking the vehicle, the Remote Left in Vehicle Alert may sound. To program the remote lock, unlock, and remote start settings, go to Settings > Vehicle > Remote Lock, Unlock, Start
F Optional equipment
See Keys, Doors and Windows in your Owner’s Manual.
2
1
Page 8 of 20

8
REAR SEAT REMINDER
When the vehicle is turned off, a chime may sound and a Rear Seat Reminder
message may display on the Driver Information Center. The system does not actu-ally detect people or items in the rear seat. It works by monitoring when a rear door is opened and closed, under certain conditions. The feature is active only once each time the vehicle is turned on and off. Always check the rear seat before exiting the vehicle.
To turn the Rear Seat Reminder on or off, go to Settings > Rear Seat Reminder.
See Seats and Restraints in your Owner’s Manual.
PROGRAMMING THE LIFTGATE
HEIGHT
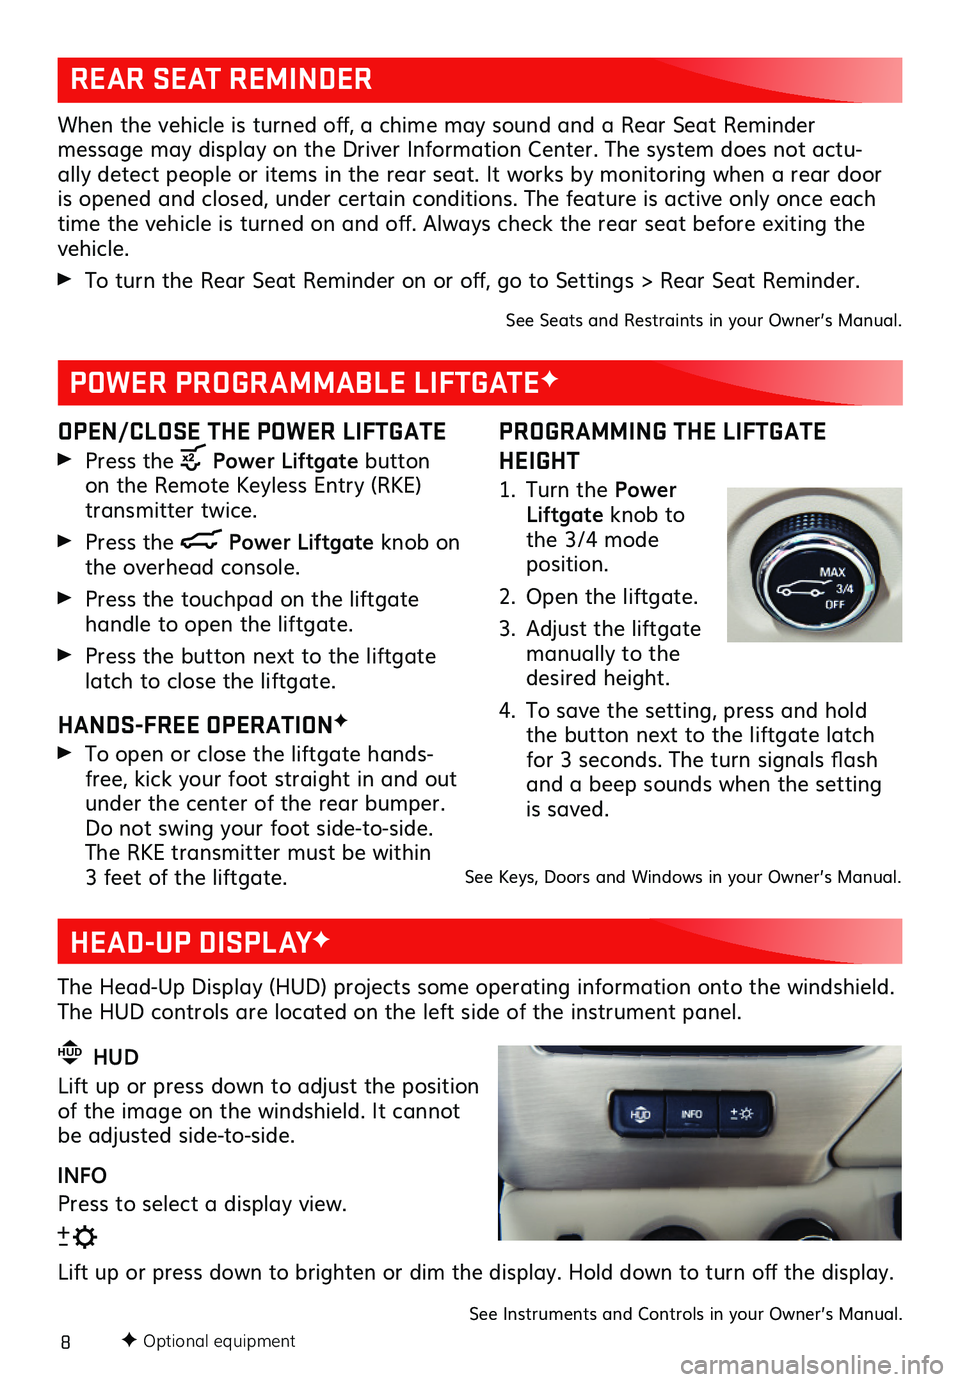
1. Turn the Power Liftgate knob to the 3/4 mode position.
2. Open the liftgate.
3. Adjust the liftgate manually to the desired height.
4. To save the setting, press and hold the button next to the liftgate latch for 3 seconds. The turn signals flash and a beep sounds when the setting is saved.
OPEN/CLOSE THE POWER LIFTGATE
Press the Power Liftgate button on the Remote Keyless Entry (RKE) transmitter twice.
Press the Power Liftgate knob on the overhead console.
Press the touchpad on the liftgate
handle to open the liftgate.
Press the button next to the liftgate latch to close the liftgate.
HANDS-FREE OPERATIONF
To open or close the liftgate hands-free, kick your foot straight in and out under the center of the rear bumper. Do not swing your foot side-to-side. The RKE transmitter must be within 3 feet of the liftgate.
POWER PROGRAMMABLE LIFTGATEF
See Keys, Doors and Windows in your Owner’s Manual.
F Optional equipment
HEAD-UP DISPLAYF
The Head-Up Display (HUD) projects some operating information onto the windshield. The HUD controls are located on the left side of the instrument panel.
HUD HUD
Lift up or press down to adjust the position of the image on the windshield. It cannot be adjusted side-to-side.
INFO
Press to select a display view.
Lift up or press down to brighten or dim the display. Hold down to turn off the display.
See Instruments and Controls in your Owner’s Manual.
Page 17 of 20

17
DRIVER ASSISTANCE SYSTEMS
AUTOMATIC EMERGENCY BRAKINGF – In potential front-end imminent collision situations with detected vehicles, the brakes may be applied, if you have not already done so, to help reduce damage or help avoid collisions at very low speeds with
vehicles directly ahead. Automatic Emergency Braking works at speeds of 5–50 mph or, if also equipped with Adaptive Cruise Control–AdvancedF, at speeds above 2 mph.
To set the Automatic Emergency Braking and Forward Collision Alert systems to Alert and Brake, Alert, or Off, go to Settings > Vehicle > Collision/Detection Systems > Forward Collision System.
LANE KEEP ASSIST WITH LANE DEPARTURE WARNINGF – The system may help you avoid collisions due to unintentional lane departures. The Lane Keep Assist Indicator is green if the system is available to assist. If the vehicle approaches a detected lane marking without using a turn signal in that direction, the system may assist by gently turning the steering wheel and displaying an amber .
If active driver steering is not detected, the amber may flash and the Safety Alert Seat may pulse or beeps may sound (if selected) on the side of the departure direction as the lane marking is crossed. The Lane Keep Assist system does not continuously steer the vehicle; the driver needs to steer and be in complete control of the vehicle.
Press the Lane Keep Assist button on the left side of the instrument panel to turn the system on or off.
LANE CHANGE ALERT WITH SIDE BLIND ZONE ALERTF – While driving, the
system displays a warning symbol on the left or right side mirror when a vehicle is detected in that side blind zone area or rapidly approaching that area. The symbol flashes if a turn signal is activated when a vehicle has been detected on the same side.
To turn the system on or off, go to Settings > Vehicle > Collision/Detection Systems > Lane Change Alert.
REAR VISION CAMERA – When the vehicle is in Reverse, a view of the area behind the vehicle displays on the infotainment system. Vehicle speed must be below 8 mph.
To turn the Rear Vision Camera Guidelines or Rear Park Assist Symbols on or off, go to Settings > Rear Camera.
REAR CROSS TRAFFIC ALERTF – When the vehicle is in Reverse, the system warns of cross-traffic approaching in either direction by displaying a red alert on the info-tainment screen and pulsing the left or right side of the Safety Alert Seat or sounding 3 beeps (if selected).
To turn the system on or off, go to Settings > Vehicle > Collision/Detection Systems > Rear Cross Traffic Alert.
FRONT AND REAR PARK ASSIST – During low-speed parking maneuvers, the system provides
“distance to closest object” information on the Driver Information Center and the Safety Alert Seat pulses or a beep sounds (if selected). When an object is very close, the Safety Alert Seat pulses or a continuous beep sounds (if selected).
To turn the system on or off, press the Park Assist button on the left side of the instrument panel.See Driving and Operating in your Owner’s Manual.
F Optional equipment
Page 19 of 20

19
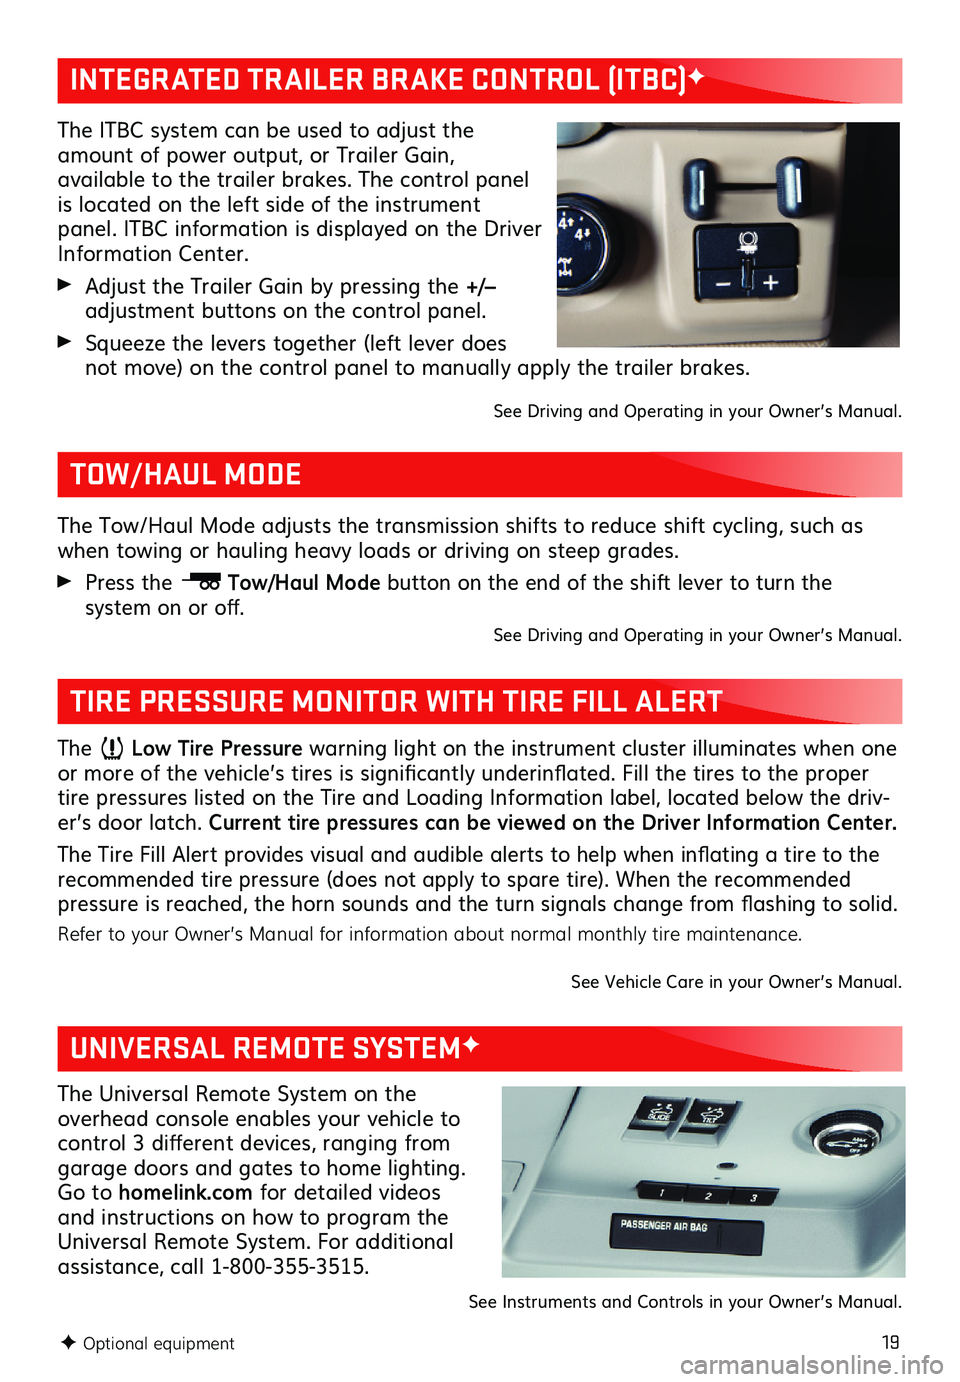
The ITBC system can be used to adjust the amount of power output, or Trailer Gain,
available to the trailer brakes. The control panel is located on the left side of the instrument panel. ITBC information is displayed on the Driver Information Center.
Adjust the Trailer Gain by pressing the +/– adjustment buttons on the control panel.
Squeeze the levers together (left lever does not move) on the control panel to manually apply the trailer brakes.
See Driving and Operating in your Owner’s Manual.
INTEGRATED TRAILER BRAKE CONTROL (ITBC)F
The Low Tire Pressure warning light on the instrument cluster illuminates when one or more of the vehicle’s tires is significantly underinflated. Fill the tires to the proper tire pressures listed on the Tire and Loading Information label, located below the driv-er’s door latch. Current tire pressures can be viewed on the Driver Information Center.
The Tire Fill Alert provides visual and audible alerts to help when inflating a tire to the recommended tire pressure (does not apply to spare tire). When the recommended pressure is reached, the horn sounds and the turn signals change from flashing to solid.
Refer to your Owner’s Manual for information about normal monthly tire maintenance.
See Vehicle Care in your Owner’s Manual.
TIRE PRESSURE MONITOR WITH TIRE FILL ALERT
The Tow/Haul Mode adjusts the transmission shifts to reduce shift cycling, such as when towing or hauling heavy loads or driving on steep grades.
Press the Tow/Haul Mode button on the end of the shift lever to turn the
system on or off.See Driving and Operating in your Owner’s Manual.
TOW/HAUL MODE
F Optional equipment
UNIVERSAL REMOTE SYSTEMF
The Universal Remote System on the overhead console enables your vehicle to control 3
different devices, ranging from garage doors and gates to home lighting. Go to homelink.com for detailed videos and instructions on how to program the Universal Remote System. For additional assistance, call 1-800-355-3515.
See Instruments and Controls in your Owner’s Manual.