brake GMC YUKON 2021 Get To Know Guide
[x] Cancel search | Manufacturer: GMC, Model Year: 2021, Model line: YUKON, Model: GMC YUKON 2021Pages: 20, PDF Size: 5 MB
Page 2 of 20
2
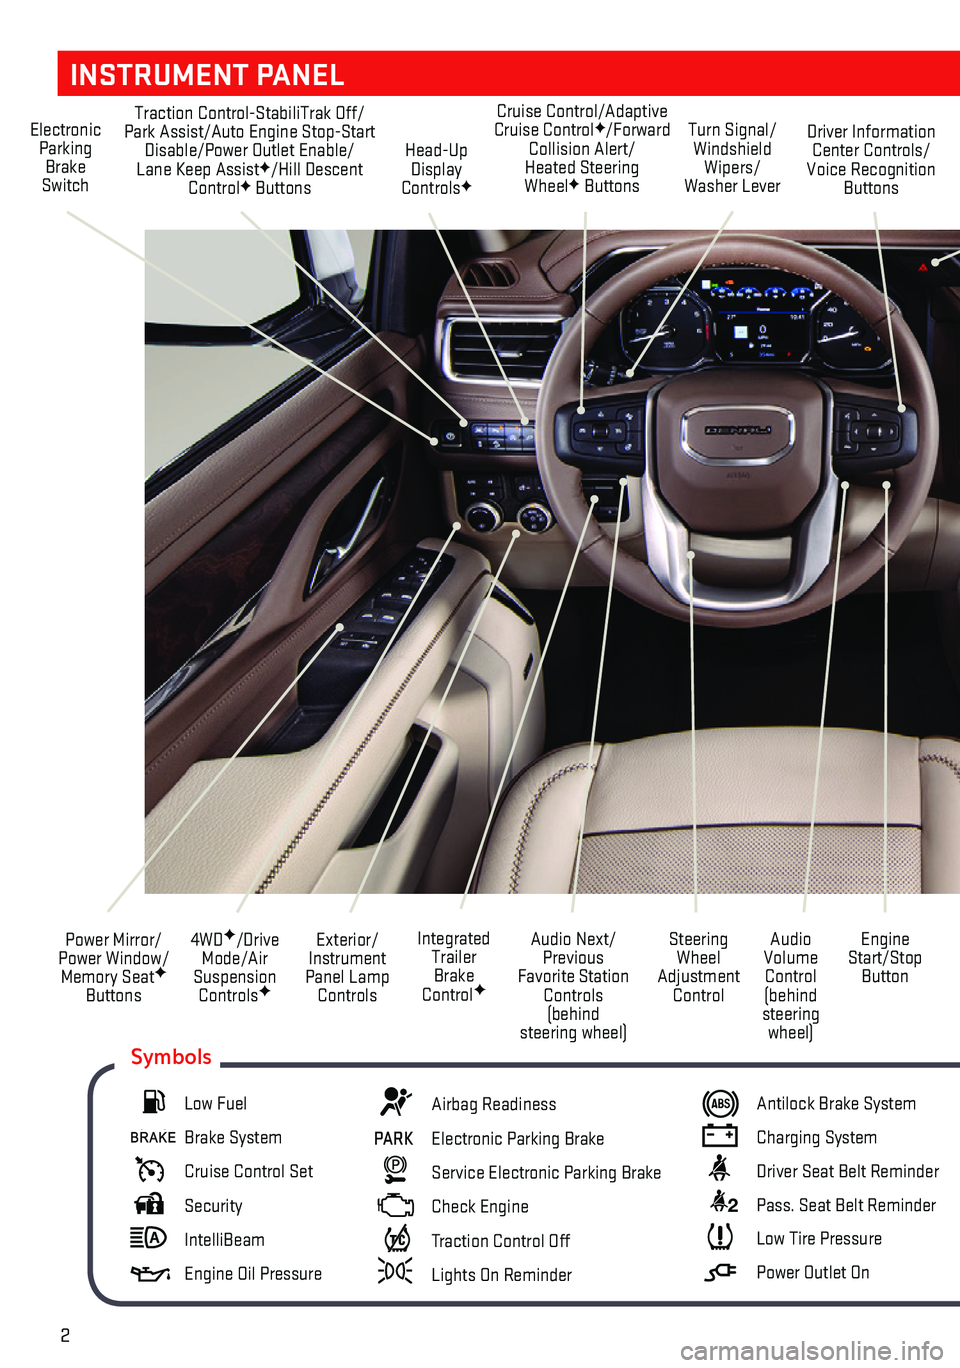
INSTRUMENT PANEL
Exterior/ Instrument Panel Lamp Controls
4WDF/Drive Mode/Air Suspension ControlsF
Power Mirror/ Power Window/ Memory SeatF Buttons
Audio Next/Previous Favorite Station Controls (behind steering wheel)
Audio Volume Control (behind steering wheel)
Steering Wheel Adjustment Control
Engine Start/Stop Button
Integrated Trailer Brake ControlF
Electronic Parking Brake Switch
Traction Control-StabiliTrak Off/Park Assist/Auto Engine Stop-Start Disable/Power Outlet Enable/ Lane Keep AssistF/Hill Descent ControlF Buttons
Turn Signal/ Windshield Wipers/Washer Lever
Driver Information Center Controls/Voice Recognition Buttons
Head-Up Display ControlsF
Cruise Control/Adaptive Cruise ControlF/Forward Collision Alert/ Heated Steering WheelF Buttons
Low Fuel
Brake System
Cruise Control Set
Security
IntelliBeam
Engine Oil Pressure
Airbag Readiness
PARK Electronic Parking Brake
Service Electronic Parking Brake
Check Engine
Traction Control Off
Lights On Reminder
Antilock Brake System
Charging System
Driver Seat Belt Reminder
2 Pass. Seat Belt Reminder
Low Tire Pressure
Power Outlet On
Symbols
Page 5 of 20
5
The fuel-saving Engine Stop/Start system automatically turns off the engine, referred to as an Auto Stop, when the brake pedal is pressed and the vehicle is at a complete stop, if certain operating conditions are met. In Auto Stop mode, the tachometer will read AUTO STOP. When the brake pedal is released or the accelerator pedal is pressed, the engine will restart. After parking the vehicle and turning off the engine, the tachometer will read OFF.
The engine may remain running or restart when the vehicle is stopped if:
• A minimum vehicle speed was not reached prior to stopping.
• The engine or transmission is not at the required operating temperature.
• The outside temperature is not in the required operating range.
• The shift lever is in any gear other than Drive (D).
• The battery charge is low.
• The climate control system requires the engine to run based on the current settings.
• The Auto Stop has reached the maximum allowed time.
AUTO ENGINE STOP/START DISABLE
Press the �$ button on the left side of the instrument panel to turn off the system. The button indicator turns off when the system is disabled.
The Auto Engine Stop/Start system is enabled each time the vehicle is started.
See Driving and Operating in your Owner’s Manual.
AUTO ENGINE STOP/START OPERATION
KEYLESS (PUSHBUTTON) START
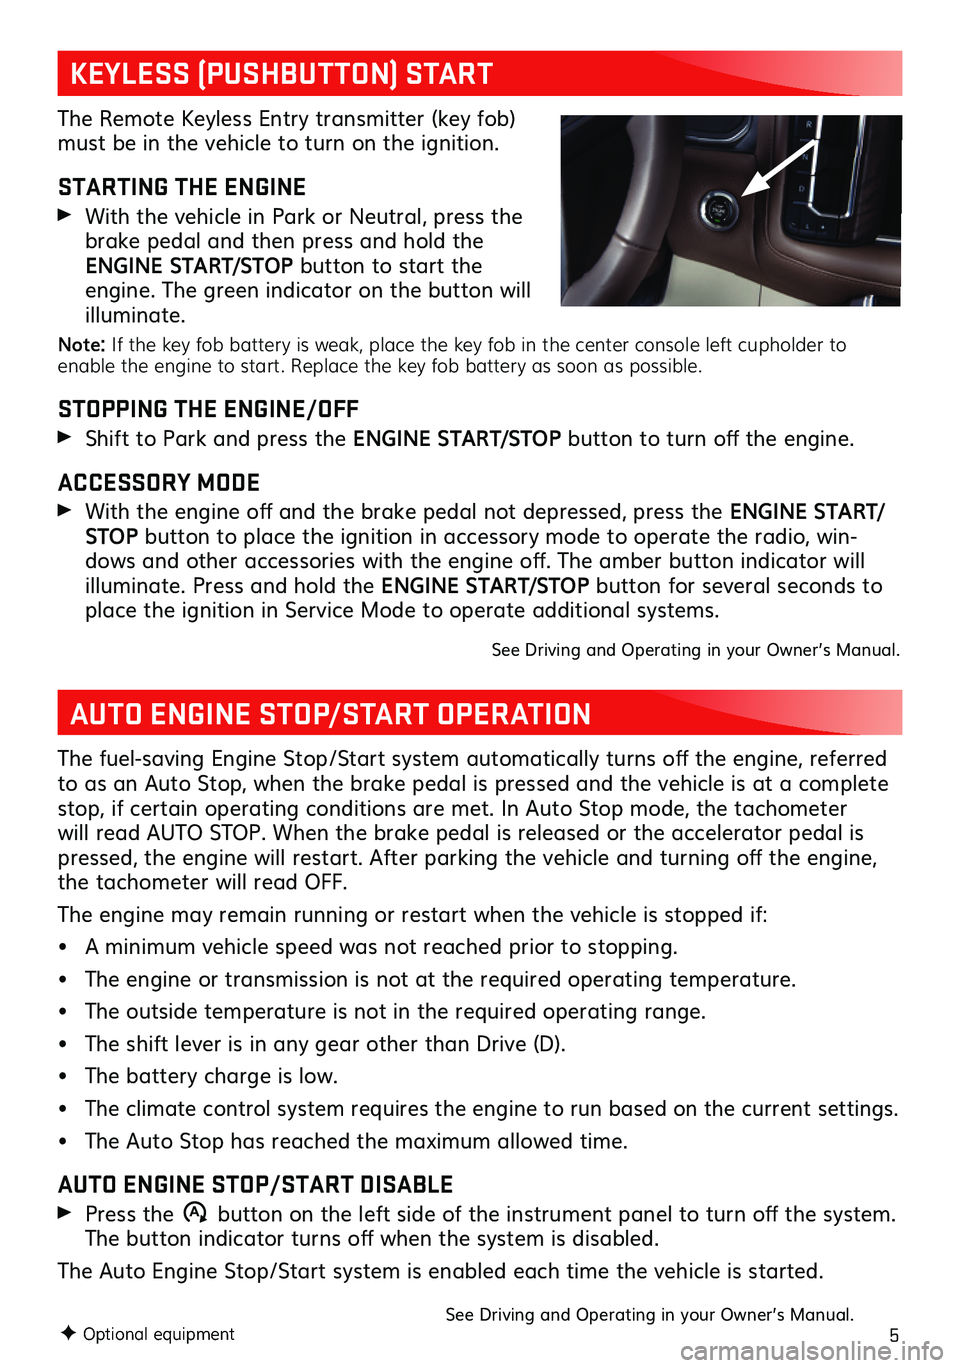
The Remote Keyless Entry transmitter (key fob) must be in the vehicle to turn on the ignition.
STARTING THE ENGINE
With the vehicle in Park or Neutral, press the brake pedal and then press and hold the ENGINE START/STOP button to start the engine. The green indicator on the button will illuminate.
Note: If the key fob battery is weak, place the key fob in the center console left cupholder to enable the engine to start. Replace the key fob battery as soon as possible.
STOPPING THE ENGINE/OFF
Shift to Park and press the ENGINE START/STOP button to turn off the engine.
ACCESSORY MODE
With the engine off and the brake pedal not depressed, press the ENGINE START/ STOP button to place the ignition in accessory mode to operate the radio, win-dows and other accessories with the engine off. The amber button indicator will illuminate. Press and hold the ENGINE START/STOP button for several seconds to place the ignition in Service Mode to operate additional systems.
See Driving and Operating in your Owner’s Manual.
F Optional equipmentF Optional equipment
Page 16 of 20
16F Optional equipment
HILL DESCENT CONTROLF
Hill Descent Control sets and maintains vehicle speed from 1–19 mph while descend-ing a steep incline in a forward or reverse gear.
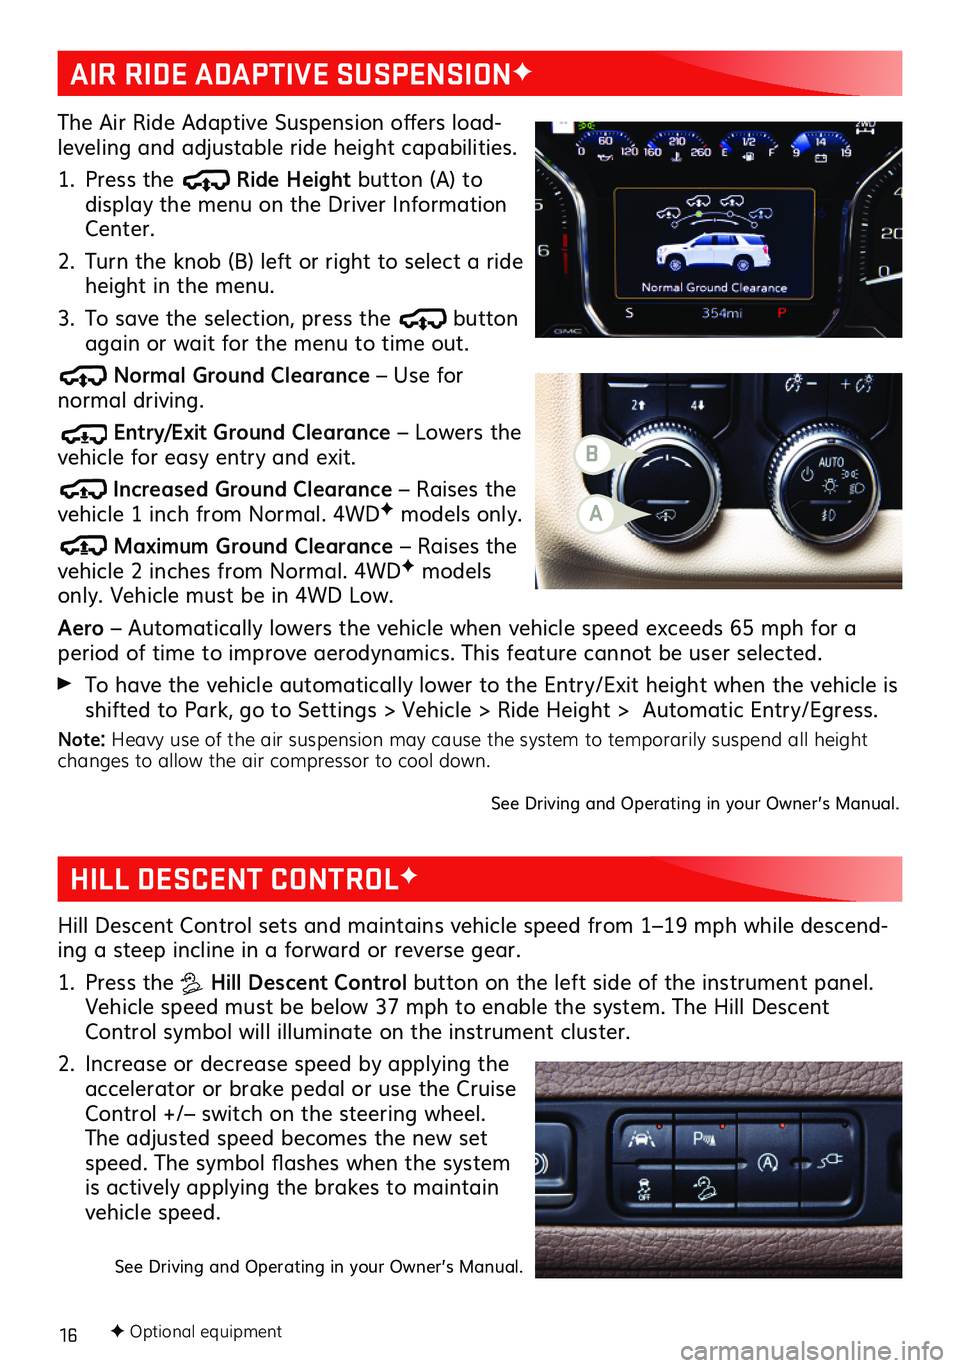
1. Press the Hill Descent Control button on the left side of the instrument panel. Vehicle speed must be below 37 mph to enable the system. The Hill Descent Control symbol will illuminate on the instrument cluster.
2. Increase or decrease speed by applying the accelerator or brake pedal or use the Cruise Control +/– switch on the steering wheel. The adjusted speed becomes the new set speed. The symbol flashes when the system is actively applying the brakes to maintain vehicle speed.
See Driving and Operating in your Owner’s Manual.
The Air Ride Adaptive Suspension offers load-leveling and adjustable ride height capabilities.
1. Press the Ride Height button (A) to display the menu on the Driver Information Center.
2. Turn the knob (B) left or right to select a ride height in the menu.
3. To save the selection, press the button again or wait for the menu to time out.
Normal Ground Clearance – Use for normal driving.
Entry/Exit Ground Clearance – Lowers the vehicle for easy entry and exit.
Increased Ground Clearance – Raises the vehicle 1 inch from Normal. 4WDF models only.
Maximum Ground Clearance – Raises the vehicle 2 inches from Normal. 4WDF models only. Vehicle must be in 4WD Low.
Aero – Automatically lowers the vehicle when vehicle speed exceeds 65 mph for a period of time to improve aerodynamics. This feature cannot be user selected.
To have the vehicle automatically lower to the Entry/Exit height when the vehicle is shifted to Park, go to Settings > Vehicle > Ride Height > Automatic Entry/Egress.
Note: Heavy use of the air suspension may cause the system to temporarily suspend all height changes to allow the air compressor to cool down.
See Driving and Operating in your Owner’s Manual.
AIR RIDE ADAPTIVE SUSPENSIONF
B
A
Page 17 of 20
17F Optional equipment
DRIVER ASSISTANCE SYSTEMS
Safety or driver assistance features are no substitute for the driver’s responsibility to operate the vehicle in a safe manner. The driver should remain attentive to traffic, surroundings and road conditions at all times. Read your Owner’s Manual for important feature limitations and information.
To turn the following driver assistance systems on/off or to change the system settings, go to Settings > Vehicle > Collision/Detection Systems on the infotainment screen.
SAFETY ALERT SEATF – The driver’s seat pulses — left, right, or both sides — to alert you of the direction of potential hazards. Audible alerts may be selected instead.
LANE CHANGE ALERT WITH SIDE BLIND ZONE ALERTF – While driving, the
system displays a warning symbol on the left or right side mirror when a moving vehicle is detected rapidly approaching or is in a side blind zone. The symbol flashes if a turn signal is activated when a vehicle has been detected on the same side.
AUTOMATIC EMERGENCY BRAKING – In detected potential imminent collision
situations with vehicles directly ahead, the system can provide alerts and enhance driver braking or automatically apply hard emergency braking, if you have not already done so, to help reduce the severity or help avoid collisions at very low speeds.
FORWARD COLLISION ALERT – The Vehicle Ahead indicator is green on the instrument cluster when a vehicle is detected and is amber when following a vehicle ahead much too closely. When approaching a detected vehicle directly ahead too rapidly, a red alert flashes on the windshield and the Safety Alert Seat pulses or rapid beeps sound (if selected).
Press the Forward Collision Alert button on the steering wheel to set the alert timing to Far, Medium, or Near.
FRONT PEDESTRIAN BRAKING – During daytime driving, the system detects pedes-trians directly ahead and displays an amber indicator on the instrument cluster. When approaching a detected pedestrian too quickly, a red alert flashes on the wind-shield and the Safety Alert Seat pulses or rapid beeps sound (if selected). The system may prepare the brakes or automatically apply hard emergency braking, if you have not already done so.
REAR PEDESTRIAN ALERTF – During daytime driving with the vehicle in Reverse, the system can detect pedestrians directly behind the vehicle and will display an amber indicator on the infotainment screen. When a pedestrian is detected close to the vehicle, the indicator flashes red and the Safety Alert Seat pulses or rapid beeps sound (if selected).
LANE KEEP ASSIST WITH LANE DEPARTURE WARNINGF – The system may help avoid collisions due to unintentional lane departures. The Lane Keep Assist indica-tor is green on the instrument cluster if the system is available to assist. If the vehicle approaches a detected lane marking without using a turn signal in that direction, the system may assist by providing brief, gentle steering wheel turns and displaying an amber indicator. If active driver steering is not detected, the amber indicator may flash and the Safety Alert Seat may pulse or beeps may sound (if selected) on the side of the departure direction as the lane marking is crossed. In order to use this system safely, the driver needs to steer and be in complete control of the vehicle.
To turn the system on or off, press the Lane Keep Assist button on the left side of the instrument panel.See Driving and Operating in your Owner’s Manual.
Page 19 of 20
19
TRAILERING APPF
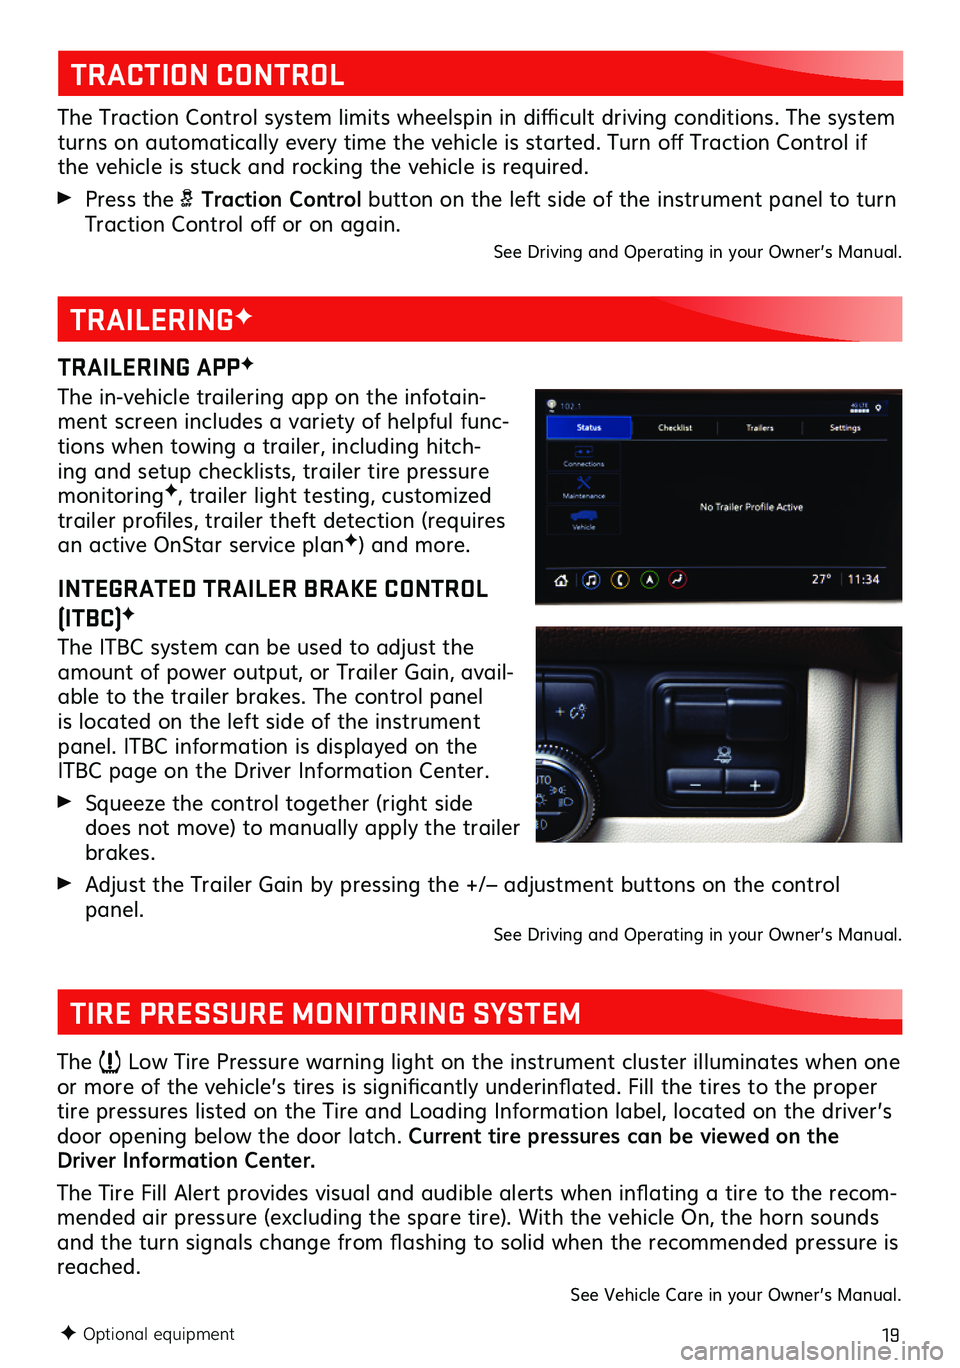
The in-vehicle trailering app on the infotain-ment screen includes a variety of helpful func-tions when towing a trailer, including hitch-ing and setup checklists, trailer tire pressure monitoringF, trailer light testing, customized trailer profiles, trailer theft detection (requires an active OnStar service planF) and more.
INTEGRATED TRAILER BRAKE CONTROL
(ITBC)F
The ITBC system can be used to adjust the amount of power output, or Trailer Gain, avail-able to the trailer brakes. The control panel is located on the left side of the instrument panel. ITBC information is displayed on the ITBC page on the Driver Information Center.
Squeeze the control together (right side does not move) to manually apply the trailer brakes.
Adjust the Trailer Gain by pressing the +/– adjustment buttons on the control panel. See Driving and Operating in your Owner’s Manual.
F Optional equipment
TRACTION CONTROL
The Traction Control system limits wheelspin in difficult driving conditions. The system turns on automatically every time the vehicle is started. Turn off Traction Control if the vehicle is stuck and rocking the vehicle is required.
Press the Traction Control button on the left side of the instrument panel to turn Traction Control off or on again. See Driving and Operating in your Owner’s Manual.
TRAILERINGF
TIRE PRESSURE MONITORING SYSTEM
The Low Tire Pressure warning light on the instrument cluster illuminates when one or more of the vehicle’s tires is significantly underinflated. Fill the tires to the proper tire pressures listed on the Tire and Loading Information label, located on the driver’s door opening below the door latch. Current tire pressures can be viewed on the Driver Information Center.
The Tire Fill Alert provides visual and audible alerts when inflating a tire to the recom-mended air pressure (excluding the spare tire). With the vehicle On, the horn sounds and the turn signals change from flashing to solid when the recommended pressure is reached.See Vehicle Care in your Owner’s Manual.