ECO mode GMC YUKON 2021 Owner's Guide
[x] Cancel search | Manufacturer: GMC, Model Year: 2021, Model line: YUKON, Model: GMC YUKON 2021Pages: 433, PDF Size: 6.54 MB
Page 180 of 433
GMC Yukon/Yukon XL/Denali Owner Manual (GMNA-Localizing-U.S./
Canada/Mexico-13690468) - 2021 - crc - 8/14/20
Infotainment System 177
Hybrid Speech Recognition
If equipped, this feature helps distinguish
words by using Internet-based information
along with the system’s voice recognition
database. This allows you to speak more
naturally when using voice recognition.
Using Voice Recognition
Voice recognition becomes available once
the system has been initialized. This begins
when the ignition is turned on. Initialization
may take a few moments.1. Press
gon the steering wheel controls
to activate voice recognition.
2. The audio system mutes and the system plays a prompt.
3. Clearly speak one of the commands described in this section.
A voice recognition system prompt can
be interrupted while it is playing by
pressing
gagain.
Once voice recognition is started, both the
infotainment display and instrument cluster
show the selections and visual dialog
content. These displays can be turned on or
off in the Tutorial Mode under Settings
0 187. There are three voice prompt modes
supported:
.Informative verbal prompts: This type of
prompt will provide more information
regarding the supported actions.
.Short prompts: This type of prompt will
provide simple instructions about what
can be stated.
.Auto informative prompts: This type of
prompt plays during the first few speech
sessions, then automatically switches to
the short prompt after some experience
has been gained through using the
system.
If a command is not spoken, the voice
recognition system says a help prompt.
Prompts and Infotainment Displays
While a voice recognition session is active,
there may be corresponding options
showing on the displays. A selection can be
made by manually touching the option,
or by speaking the number for the option to
select. Manual interaction in the voice
recognition session is permitted. Interaction
during a voice session may be completed
entirely using voice commands while some
manual commands may expedite a task. If a
selection is made using a manual control, the voice recognition dialog will progress in
the same way as if the selection were made
using a voice command. Once the system
completes the task, or the session is
terminated, the voice recognition dialog
stops.
An example of this type of manual
intervention is touching an entry of a
displayed number list instead of speaking
the number associated with the entry
desired.
Canceling Voice Recognition
.Touch or say
“Cancel”or“Exit” to
terminate the voice recognition session
and show the display where voice
recognition was initiated.
.Pression the steering wheel controls
to terminate the voice recognition session
and show the display where voice
recognition was initiated.
Natural Language Commands
Most languages do not support natural
language commands in sentence form. For
those languages, use direct commands like
the examples shown on the display.
Page 184 of 433
GMC Yukon/Yukon XL/Denali Owner Manual (GMNA-Localizing-U.S./
Canada/Mexico-13690468) - 2021 - crc - 8/14/20
Infotainment System 181
The name must be precisely spoken.
Nicknames or short names for the
businesses will not likely be found. Lesser
known businesses might have to be located
by category, such as fast food, hotels,
or banks.
“Navigate to Contact”:Begin a dialog to
enter a specific destination contact name.
“Cancel Route” :End route guidance.
“Take Me Home” :Create a route to a
stored home location.
Voice Recognition for the Phone
“Call
stored contact. The command may include
location if the contact has location numbers
stored.
“Call
Mobile,” or“On Other” :Initiate a call to a
stored contact and location at home, at
work, on mobile device, or on another
phone.
“Call
to a cell phone number of seven digits, 10
digits, or three digit emergency numbers.
“Pair Phone” :Begin the Bluetooth pairing
process. Follow the instructions on the
infotainment display. “Redial”
:Initiate a call to the last dialed
number.
“Switch Phone” :Select a different
connected cell phone for outgoing calls.
“Voice Keypad” :Begin a dialog to enter
special numbers like international numbers.
The numbers can be entered in groups of
digits with each group of digits being
repeated back by the system. If the group
of digits is not correct, the command
“Delete” will remove the last group of digits
and allow them to be re-entered. Once the
entire number has been entered, the
command “Call”will start dialing the
number.
Phone Assistant Voice Recognition
Press and holdgon the steering wheel
controls to pass through and launch Google
phone assistant or Siri.
For the low radio, whether connected by
Bluetooth or phone projection, the only
available voice recognition is either Siri
(iPhone) or the Google Assistant (Android).
Phone
Bluetooth (Overview)
The Bluetooth-capable system can interact
with many mobile devices, allowing:
.Placement and receipt of calls in a
hands-free mode.
.Sharing of the device’s address book or
contact list with the vehicle.
To minimize driver distraction, before
driving, and with the vehicle parked:
.Become familiar with the features of the
mobile device. Organize the phone book
and contact lists clearly and delete
duplicate or rarely used entries.
If possible, program speed dial or other
shortcuts.
.Review the controls and operation of the
infotainment system.
.Pair mobile device(s) to the vehicle. The
system may not work with all mobile
devices. See “Pairing”later in this section.
Vehicles with a Bluetooth system can use a
Bluetooth-capable mobile device with a
Hands-Free Profile to make and receive
phone calls. The infotainment system and
voice recognition are used to control the
system. The system can be used while the
Page 187 of 433

GMC Yukon/Yukon XL/Denali Owner Manual (GMNA-Localizing-U.S./
Canada/Mexico-13690468) - 2021 - crc - 8/14/20
184 Infotainment System
If needed, touch the Secondary Phone while
in the Phones list to swap it into the
Outgoing and Incoming role. This role makes
it possible to place outgoing calls from the
Contacts and Recents list.
Listing All Paired and Connected Phones1. Touch the Phone icon on the Home Page or the phone icon on the shortcut tray
near the bottom of the display.
2. Touch Phones.
Disconnecting a Connected Phone 1. Touch the Phone icon on the Home Page.
2. Touch Phones.
3. Touch the information icon next to the connected cell phone or mobile device to
show the cell phone’s or mobile device’s
information display.
4. Touch Disconnect.
Deleting a Paired Phone 1. Touch the Phone icon on the Home Page or the phone icon on the shortcut tray
near the bottom of the display.
2. Touch Phones. 3. Touch the information icon next to the
connected cell phone to display the cell
phone’s or mobile device’s information
display.
4. Touch Forget Device.
Linking to a Different Phone
To link to a different cell phone, the new
cell phone must be in the vehicle and paired
to the Bluetooth system. 1. Touch the Phone icon on the Home Page or the phone icon on the shortcut tray
near the bottom of the display.
2. Touch Phones.
3. Touch the new cell phone to link to from the not connected phone list. See “First
to Connect Paired Phones” and
“Secondary Phone” previously in this
section.
Switching to Handset or
Handsfree Mode
To switch between handset or
handsfree mode:
.While the active call is hands-free, touch
the Handset option to switch to the
handset mode.
The mute icon will not be available or
functional while Handset mode is active.
.While the active call is on the handset,
touch the Handset option to switch to the
hands-free mode.
Making a Call Using Contacts and Recent
Calls
Calls can be made through the Bluetooth
system using personal cell phone contact
information for all cell phones that support
the Phone Book feature. Become familiar
with the cell phone settings and operation.
Verify the cell phone supports this feature.
The Contacts menu accesses the phone book
stored in the cell phone.
The Recents menu accesses the recents call
list from your cell phone.
To make a call using the Contacts menu:
1. Touch the Phone icon on the Home Page.
2. Touch Contacts.
3. The Contacts list can be searched by using the first character. Touch A-Z on
the infotainment display to scroll
through the list of names.
Touch the name to call.
4. Touch the desired contact number to call.
To make a call using the Recents menu: 1. Touch Phone on the Home Page.
Page 192 of 433
GMC Yukon/Yukon XL/Denali Owner Manual (GMNA-Localizing-U.S./
Canada/Mexico-13690468) - 2021 - crc - 8/14/20
Infotainment System 189
.Mode: This adjusts the appearance of the
navigation map view and any
downloaded apps optimized for day or
night time conditions. Set to Auto for the
display to automatically adjust based on
bright/dark conditions.
Touch Auto, Day, or Night to adjust the
display.
.Calibrate Touchscreen: Touch to calibrate
the infotainment display and follow the
prompts.
.Turn Display Off: Touch to turn the
display off. Touch anywhere on the
infotainment display or press any
infotainment control on the center stack
again to turn the display on.
Sounds
Touch and the following may display:
.Maximum Startup Volume: This feature
adjusts the maximum volume of the
infotainment system when you start your
vehicle. To set the maximum startup
volume, touch the controls on the
infotainment display to increase or
decrease.
.Audio Cues: This feature determines if
sounds play when the infotainment
system starts up and shuts down. This
feature can be turned off or on.
.Set Audio Cue Volume: This setting
controls the volume of Audio Cues played
on startup and shut down. Touch the
controls on the infotainment display to
increase or decrease.
.Audible Touch Feedback: This setting
determines if a sound plays when
touching the infotainment display or
radio controls. This feature can be turned
off or on.
Voice
Touch and the following may display:
.Confirm More/Less: This setting specifies
how often the voice recognition system
confirms commands. Touch Confirm More
to have the system check with you more
often before acting on your commands.
.Prompt Length: This setting specifies the
amount of detail the voice recognition
system provides when giving you
feedback. Touch Auto to have the system
automatically adjust to your speech
habits. Touch Informative, Short, or Auto.
.Audio Feedback Speed: Touch Slow,
Medium, or Fast to adjust how quickly
the voice recognition system speaks.
.Friendly Prompts: This setting adjusts the
formality of voice prompts. Touch Off for
shorter prompts. Touch On to hear
prompts with more personality. Touch
Auto to have the prompt match your
command style.
.Tutorial Mode: Touch Off or On to
provide tutorial feedback on the display.
.Allow Prompt Interruptions: This setting
controls whether voice commands can be
spoken before voice prompts finish. Turn
this on to speak commands without
hearing the full prompt. Speaking while
the prompt is still playing will
immediately stop playing the current
prompt and recognize your command.
Background noise may cause accidental
interruptions. Touch Off or On.
Favorites
Touch and the following may display:
.Manage Favorites: Touch to display a list
of Audio, Phone, and Navigation favorites.
Favorites can be moved, renamed,
or deleted.
Page 215 of 433
GMC Yukon/Yukon XL/Denali Owner Manual (GMNA-Localizing-U.S./
Canada/Mexico-13690468) - 2021 - crc - 8/14/20
212 Driving and Operating
Driving and Operating
Driving Information
Driving for Better Fuel Economy . . . . . . . 213
Distracted Driving . . . . . . . . . . . . . . . . . . . . . . 213
Defensive Driving . . . . . . . . . . . . . . . . . . . . . . 214
Impaired Driving . . . . . . . . . . . . . . . . . . . . . . . 214
Control of a Vehicle . . . . . . . . . . . . . . . . . . . 214
Braking . . . . . . . . . . . . . . . . . . . . . . . . . . . . . . . . 214
Steering . . . . . . . . . . . . . . . . . . . . . . . . . . . . . . . 215
Off-Road Recovery . . . . . . . . . . . . . . . . . . . . . 215
Loss of Control . . . . . . . . . . . . . . . . . . . . . . . . 216
Off-Road Driving . . . . . . . . . . . . . . . . . . . . . . . 216
Driving on Wet Roads . . . . . . . . . . . . . . . . . 219
Hill and Mountain Roads . . . . . . . . . . . . . . 220
Winter Driving . . . . . . . . . . . . . . . . . . . . . . . . . 221
If the Vehicle Is Stuck . . . . . . . . . . . . . . . . . . 221
Vehicle Load Limits . . . . . . . . . . . . . . . . . . . . 222
Starting and Operating
New Vehicle Break-In . . . . . . . . . . . . . . . . . . 226
Ignition Positions . . . . . . . . . . . . . . . . . . . . . . 226
Starting the Engine . . . . . . . . . . . . . . . . . . . . 228
Stop/Start System . . . . . . . . . . . . . . . . . . . . . 229
Retained Accessory Power (RAP) . . . . . . . 229
Shifting Into Park . . . . . . . . . . . . . . . . . . . . . 230
Shifting out of Park . . . . . . . . . . . . . . . . . . . 230
Parking over Things That Burn . . . . . . . . . 231
Dynamic Fuel Management . . . . . . . . . . . . 231
Extended Parking . . . . . . . . . . . . . . . . . . . . . . 231
Engine Exhaust
Engine Exhaust . . . . . . . . . . . . . . . . . . . . . . . . 231
Running the Vehicle While Parked . . . . . 232
Automatic Transmission
Automatic Transmission . . . . . . . . . . . . . . . 232
Manual Mode . . . . . . . . . . . . . . . . . . . . . . . . . 235
Tow/Haul Mode . . . . . . . . . . . . . . . . . . . . . . . 235
Drive Systems
Four-Wheel Drive . . . . . . . . . . . . . . . . . . . . . . 236
Brakes
Electric Brake Boost . . . . . . . . . . . . . . . . . . . 240
Antilock Brake System (ABS) . . . . . . . . . . 240
Electric Parking Brake . . . . . . . . . . . . . . . . . 240
Brake Assist . . . . . . . . . . . . . . . . . . . . . . . . . . . 241
Hill Start Assist (HSA) . . . . . . . . . . . . . . . . . 242
Ride Control Systems
Traction Control/Electronic StabilityControl . . . . . . . . . . . . . . . . . . . . . . . . . . . . . . 242
Hill Descent Control (HDC) . . . . . . . . . . . . 244
Driver Mode Control . . . . . . . . . . . . . . . . . . . 245
Magnetic Ride Control . . . . . . . . . . . . . . . . . 247
Locking Rear Axle . . . . . . . . . . . . . . . . . . . . . 248
Four Corner Air Suspension System . . . 248
Cruise Control
Cruise Control . . . . . . . . . . . . . . . . . . . . . . . . . . 251
Adaptive Cruise Control (Advanced) . . . . 253
Driver Assistance Systems
Driver Assistance Systems . . . . . . . . . . . . . 260
Assistance Systems for Parking or Backing . . . . . . . . . . . . . . . . . . . . . . . . . . . . . . 262
Rear Pedestrian Alert . . . . . . . . . . . . . . . . . . 266
Assistance Systems for Driving . . . . . . . . 267
Forward Collision Alert (FCA) System . . . . . . . . . . . . . . . . . . . . . . . . . . . . . . 267
Automatic Emergency Braking (AEB) . . . . . . . . . . . . . . . . . . . . . . . . 269
Front Pedestrian Braking (FPB) System . . . . . . . . . . . . . . . . . . . . . . . . . . . . . . 270
Side Blind Zone Alert (SBZA) . . . . . . . . . . . 272
Lane Change Alert (LCA) . . . . . . . . . . . . . . . 272
Lane Keep Assist (LKA) . . . . . . . . . . . . . . . . . 275
Fuel
Top Tier Fuel . . . . . . . . . . . . . . . . . . . . . . . . . . 276
Recommended Fuel (5.3L Engine) . . . . . . 277
Recommended Fuel (6.2L Engine) . . . . . . 277
Prohibited Fuels . . . . . . . . . . . . . . . . . . . . . . . 277
Fuels in Foreign Countries . . . . . . . . . . . . . 278
Fuel Additives . . . . . . . . . . . . . . . . . . . . . . . . . 278
Filling the Tank . . . . . . . . . . . . . . . . . . . . . . . . 278
Filling a Portable Fuel Container . . . . . . . 279
Trailer Towing
General Towing Information . . . . . . . . . . 280
Driving Characteristics and Towing Tips . . . . . . . . . . . . . . . . . . . . . . . . . 280
Trailer Towing . . . . . . . . . . . . . . . . . . . . . . . . . 284
Page 230 of 433

GMC Yukon/Yukon XL/Denali Owner Manual (GMNA-Localizing-U.S./
Canada/Mexico-13690468) - 2021 - crc - 8/14/20
Driving and Operating 227
interference to the Keyless Access system.
SeeRemote Keyless Entry (RKE) System
Operation 08.
To shift out of P (Park), the ignition must be
on or in Service Mode, and the brake pedal
must be applied.
{Warning
Turning off the vehicle while moving may
cause loss of power assist in the brake
and steering systems and disable the
airbags. While driving, only shut the
vehicle off in an emergency.
Stopping the Engine/LOCK/OFF (No Indicator
Lights) : When the vehicle is stopped, press
ENGINE START/STOP once to turn the
engine off.
If the vehicle is in P (Park), the ignition will
turn off, and Retained Accessory Power (RAP)
will remain active. See Retained Accessory
Power (RAP) 0229.
If the vehicle is not in P (Park), the ignition
will return to ACC/ACCESSORY and display
the message SHIFT TO PARK in the Driver
Information Center (DIC). When the vehicle is
shifted into P (Park), the ignition system will
turn off. The vehicle may have an electric steering
column lock. The lock is activated when the
ignition is turned off and either front door is
opened. A sound may be heard as the lock
actuates or releases. The steering column
lock may not release with the wheels turned
off center. If this happens, the vehicle may
not start. Move the steering wheel from left
to right while attempting to start the
vehicle. If this does not work, the vehicle
needs service.
If the vehicle must be shut off in an
emergency:
1. Brake using a firm and steady pressure. Do not pump the brakes repeatedly. This
may deplete power assist, requiring
increased brake pedal force.
2. Shift the vehicle to N (Neutral). This can be done while the vehicle is moving.
After shifting to N (Neutral), firmly apply
the brakes and steer the vehicle to a
safe location.
3. Come to a complete stop. Hold the brake pedal down and shift to P (Park). The
vehicle must be in P (Park) to turn the
ignition off.
4. Continue to hold the brake pedal down. 5. Set the parking brake. See
Electric
Parking Brake 0240.
6. Press ENGINE START/STOP once to turn the ignition off.
7. Release the brake pedal.
If the vehicle cannot be pulled over, and
must be shut off while driving, press and
hold ENGINE START/STOP for longer than
two seconds, or press twice in five seconds.
ACC/ACCESSORY (Amber Indicator Light) :
This mode allows some electrical accessories
to be used when the engine is off.
With the ignition off, pressing the button
one time without the brake pedal applied
will place the ignition system in ACC/
ACCESSORY.
The ignition will switch from ACC/
ACCESSORY to off after five minutes to
prevent battery rundown.
ON/RUN/START (Green Indicator Light) : This
mode is for driving and starting. With the
ignition off, and the brake pedal applied,
pressing the button once will turn the
ignition on. Once engine cranking begins,
release the button. Engine cranking will
continue until the engine starts. See Starting
the Engine 0228.
Page 231 of 433
GMC Yukon/Yukon XL/Denali Owner Manual (GMNA-Localizing-U.S./
Canada/Mexico-13690468) - 2021 - crc - 8/14/20
228 Driving and Operating
Service Mode
This power mode is available for service and
diagnostics, and to verify the proper
operation of the malfunction indicator lamp
as may be required for emission inspection
purposes. With the vehicle off, and the
brake pedal not applied, pressing and
holding the button for more than
five seconds will place the vehicle in Service
Mode. The instruments and audio systems
will operate as they do when the ignition is
on, but the vehicle will not be able to be
driven. The engine will not start in Service
Mode. Press the button again to turn the
ignition off.
Starting the Engine
If the vehicle has a diesel engine, see the
Duramax diesel supplement.
Caution
If you add electrical parts or accessories,
you could change the way the engine
operates. Any resulting damage would
not be covered by the vehicle warranty.
SeeAdd-On Electrical Equipment 0306. Shift the vehicle into P (Park) or N (Neutral).
To restart the engine when the vehicle is
already moving, use N (Neutral) only.
Caution
Do not try to shift to P (Park) if the
vehicle is moving. If you do, you could
damage the transmission. Shift to P (Park)
only when the vehicle is stopped.
Starting Procedure
1. The remote key must be in the vehicle.
Press ENGINE START/STOP with the brake
pedal applied. When the engine begins
cranking, let go of the button.
The idle speed will go down as the
engine gets warm. Do not race the
engine immediately after starting it.
Operate the engine and transmission
gently to allow the oil to warm up and
lubricate all moving parts.
When the low fuel warning light is on
and the FUEL LEVEL LOW message is
displayed in the Driver Information
Center (DIC), press the ENGINE START/
STOP position to continue engine
cranking.
Caution
Cranking the engine for long periods of
time, by trying to start the engine
immediately after cranking has ended,
can overheat and damage the cranking
motor, and drain the battery. Wait at
least 15 seconds between each try, to let
the cranking motor cool down.
2. If the engine does not start after five to 10 seconds, especially in very cold
weather (below −18 °C or 0 °F), it could
be flooded with too much gasoline. Try
pushing the accelerator pedal all the way
to the floor and holding it there while
pressing ENGINE START/STOP for up to a
maximum of 15 seconds. Wait at least
15 seconds between each try, to allow
the cranking motor to cool down. When
the engine starts, let go of the button
and accelerator. If the vehicle starts
briefly but then stops again, do the
same thing. This clears the extra gasoline
from the engine. Do not race the engine
immediately after starting it. Operate
the engine and transmission gently until
the oil warms up and lubricates all
moving parts.
Page 241 of 433

GMC Yukon/Yukon XL/Denali Owner Manual (GMNA-Localizing-U.S./
Canada/Mexico-13690468) - 2021 - crc - 8/14/20
238 Driving and Operating
Once the 4x4 shift has completed, the
DIC message disappears, the 4x4 graphic
stops flashing and the current setting is
indicated.
If vehicle speed is higher when shift request
occurs, a DIC message displays. Reduce
vehicle speed.
If the transmission is not in N (Neutral)
when shift request occurs, a DIC message
displays. The vehicle will allow 20 seconds
for the shift to occur. After this time, a
graphic in the instrument cluster will
indicate that the transfer case is in 4
n.
Caution
Shifting the transmission into gear before
the requested mode indicator light has
stopped flashing could damage the
transfer case.
If the transmission is not shifted into
N (Neutral) or the vehicle has not slowed to
5 km/h (3 mph) within 20 seconds, the
transfer case will remain in its original state.
This will be indicated in the instrument
cluster. With the vehicle moving less than
5 km/h (3 mph) and the transmission in
N (Neutral), attempt the shift again.
Shifting Out of 4
n
1. The vehicle must be stopped or moving
less than 5 km/h (3 mph) with the
transmission in N (Neutral) and the
ignition on. It is best for the vehicle to
be moving 1.6 to 3.2 km/h (1 to 2 mph).
2. Press 4
m, AUTO, or 2m. The actual 4x4
shift request is only made after the
button is released. The 4x4 graphic will
remain flashing until the shift request
has completed. A DIC message displays
to indicate the state of the request.
Once the 4x4 shift has completed, the
DIC message disappears, the 4x4 graphic
stops flashing, and the current setting is
indicated.
If vehicle speed is higher when shift
request occurs, a DIC message displays.
Reduce vehicle speed.
If the transmission is not in N (Neutral)
when shift request occurs, DIC messages will
display. The vehicle will allow 20 seconds for
this shift to occur. After this time, a graphic
in the instrument cluster will indicate that
the transfer case is in 4
n.
Caution
Shifting the transmission into gear before
the requested mode indicator light has
stopped flashing could damage the
transfer case.
If the transmission is not shifted into
N (Neutral) or the vehicle has not slowed to
5 km/h (3 mph) within 20 seconds, the
transfer case will remain in its original state.
This will be indicated in the instrument
cluster.
With the vehicle moving less than 5 km/h
(3 mph), and the transmission in N (Neutral),
attempt the shift again.
Shifting Into N (Neutral)
To shift into N (Neutral): 1. Start the vehicle.
2. Shift the transmission to N (Neutral).
3. Shift the transfer case to 2
m.
4. Apply the parking brake and/or brake pedal.
5. Press 2
mfive times in 10 seconds until
the N (Neutral) graphic starts flashing in
the instrument cluster. When the shift is
complete, the graphic stops flashing.
Page 249 of 433
GMC Yukon/Yukon XL/Denali Owner Manual (GMNA-Localizing-U.S./
Canada/Mexico-13690468) - 2021 - crc - 8/14/20
246 Driving and Operating
6Snow/Ice Mode :Snow/Ice improves
vehicle acceleration on snow and ice covered
roads. When active, Snow/Ice Mode will
adjust acceleration to optimize traction on
slippery surfaces. This can compromise the
acceleration on dry asphalt. This feature is
not intended for use when the vehicle is
stuck in sand, mud, ice, snow, or gravel.
If the vehicle becomes stuck see If the
Vehicle Is Stuck 0221.
7Off-Road Mode : Use this mode for
off-road recreational driving. Off-Road Mode
should be used to improve driving at
moderate speeds, on grass, gravel, dirt,
unpaved roads, or snow-covered roads. The
accelerator pedal is tuned for off-road use.
This mode modifies pedal mapping, AWD,
steering, ride height, ABS, ESC, and TCS
performance. For more information on
off-road driving, see Off-Road Driving0216.
_Tow/Haul Mode : For more
information on Tow/Haul Mode, see Tow/
Haul Mode 0235.
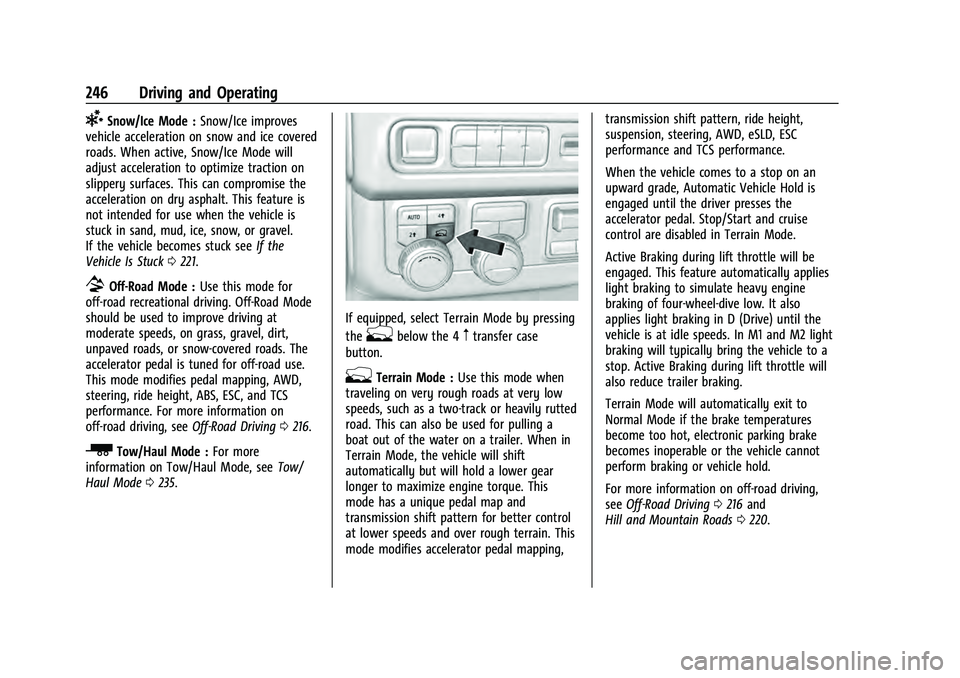
If equipped, select Terrain Mode by pressing
the
gbelow the 4mtransfer case
button.
gTerrain Mode : Use this mode when
traveling on very rough roads at very low
speeds, such as a two-track or heavily rutted
road. This can also be used for pulling a
boat out of the water on a trailer. When in
Terrain Mode, the vehicle will shift
automatically but will hold a lower gear
longer to maximize engine torque. This
mode has a unique pedal map and
transmission shift pattern for better control
at lower speeds and over rough terrain. This
mode modifies accelerator pedal mapping, transmission shift pattern, ride height,
suspension, steering, AWD, eSLD, ESC
performance and TCS performance.
When the vehicle comes to a stop on an
upward grade, Automatic Vehicle Hold is
engaged until the driver presses the
accelerator pedal. Stop/Start and cruise
control are disabled in Terrain Mode.
Active Braking during lift throttle will be
engaged. This feature automatically applies
light braking to simulate heavy engine
braking of four-wheel-dive low. It also
applies light braking in D (Drive) until the
vehicle is at idle speeds. In M1 and M2 light
braking will typically bring the vehicle to a
stop. Active Braking during lift throttle will
also reduce trailer braking.
Terrain Mode will automatically exit to
Normal Mode if the brake temperatures
become too hot, electronic parking brake
becomes inoperable or the vehicle cannot
perform braking or vehicle hold.
For more information on off-road driving,
see
Off-Road Driving 0216 and
Hill and Mountain Roads 0220.
Page 252 of 433
GMC Yukon/Yukon XL/Denali Owner Manual (GMNA-Localizing-U.S./
Canada/Mexico-13690468) - 2021 - crc - 8/14/20
Driving and Operating 249
Turn the knob left or right to select the
desired ride height in the menu. To finalize
the selection, either press the Ride Height
button again or wait three seconds for the
menu to timeout. Ride Heights that are
unavailable for selection will be greyed out
in the menu.
Ride Height Descriptions
Normal Height is the standard vehicle height
used for everyday driving.
Entry/Exit Height is 50 mm (2 in) lower than
Normal Height. This ride height lowers the
vehicle for easy entry and exit from the
vehicle as well as providing a lower height
for loading and unloading cargo.
This ride height can be selected in the Ride
Height Menu at any vehicle speed. When
Entry/Exit Height is selected at higher
speeds, the vehicle will wait to lower until
the vehicle slows to less than
12 km/h (7 mph).
The vehicle will automatically raise to
Normal Height from Entry/Exit Height when
speed increases above 8 km/h (5 mph). If no
door has been opened since lowering to
Entry/Exit Height, the vehicle will wait to
raise to Normal Height until 30 km/h(19 mph). This gives the driver more
flexibility when lowering to Entry/Exit
Height for passenger pick up and drop off.
The driver can enable Automatic Entry/
Egress Mode to automatically lower to
Entry/Exit Height when the vehicle is shifted
to P (PARK). Automatic Entry/Egress Mode
may be enabled via the infotainment screen
under Settings/Vehicle/Ride Height. When
the vehicle is higher than Normal Height,
Automatic Entry/Egress Mode is disabled.
When the vehicle is in Tow/Haul Driver
Mode, Off-Road Driver Mode, or it senses a
trailer is connected, Automatic Entry/Egress
Mode is disabled.
Increased Height is 25 mm (1 in) higher than
Normal Height. This ride height raises the
vehicle for off-road use, allows for higher
speeds than Maximum Height, and is only
available with specific optional content.
Increased Height can be selected in the Ride
Height Menu while vehicle speed is less
than 80 km/h (50 mph). If vehicle speed
exceeds 80 km/h (50 mph), the vehicle will
automatically lower to Normal Height.
Off-Road Driver Mode and Terrain Driver
Mode will automatically set Increased
Height when vehicle speed is less than
80 km/h (50 mph). If vehicle speed exceeds80 km/h (50 mph), the vehicle will lower to
Normal Height. Normal Height will be
maintained until vehicle speed is slowed to
less than 16 km/h (10 mph) and then the
vehicle will automatically raise back to
Increased Height.
The vehicle will automatically lower from
Increased Height to Normal Height to
provide improved stability if aggressive
maneuvers are detected.
Maximum Height is 50 mm (2 in) higher
than Normal Height. This ride height raises
the vehicle for off-road use and is only
available with specific optional content.
To raise the vehicle to Maximum Height,
first shift the transfer case to 4
n. Once the
transfer case is in 4
nand vehicle speed is
less than 48 km/hr (30 mph), select
Maximum Height in the Ride Height Menu.
If vehicle speed exceeds 48 km/h, the
vehicle will automatically lower to Increased
Height.
The vehicle will automatically lower from
Maximum Height to Normal Height to
provide improved stability if aggressive
maneuvers are detected.