reset GMC YUKON 2023 User Guide
[x] Cancel search | Manufacturer: GMC, Model Year: 2023, Model line: YUKON, Model: GMC YUKON 2023Pages: 432, PDF Size: 9.3 MB
Page 124 of 432
GMC Yukon/Yukon XL/Denali Owner Manual (GMNA-Localizing-U.S./
Canada/Mexico-16417394) - 2023 - CRC - 4/26/22
Instruments and Controls 123
Curve Speed Control Light
If equipped, this light may illuminate green
when ACC is actively controlling the vehicle
speed and detects a sharp curve on the road
ahead.
ACC automatically slows the vehicle down
while navigating the curve and may increase
speed out of the curve, but will not exceed
the set speed.
SeeAdaptive Cruise Control (Advanced)
0 225.
Super Cruise Light
This light comes on to show the status of
Super Cruise. See Super Cruise0235.
Door Ajar Light
This light comes on when a door is open or
not securely latched. Before driving, check
that all doors are properly closed.
Information Displays
Driver Information Center (DIC)
The DIC displays are shown in the center of
the instrument cluster in the Info app. See
Instrument Cluster 0105. The displays show
the status of many vehicle systems.
If the vehicle has a diesel engine, see the
Duramax diesel supplement.
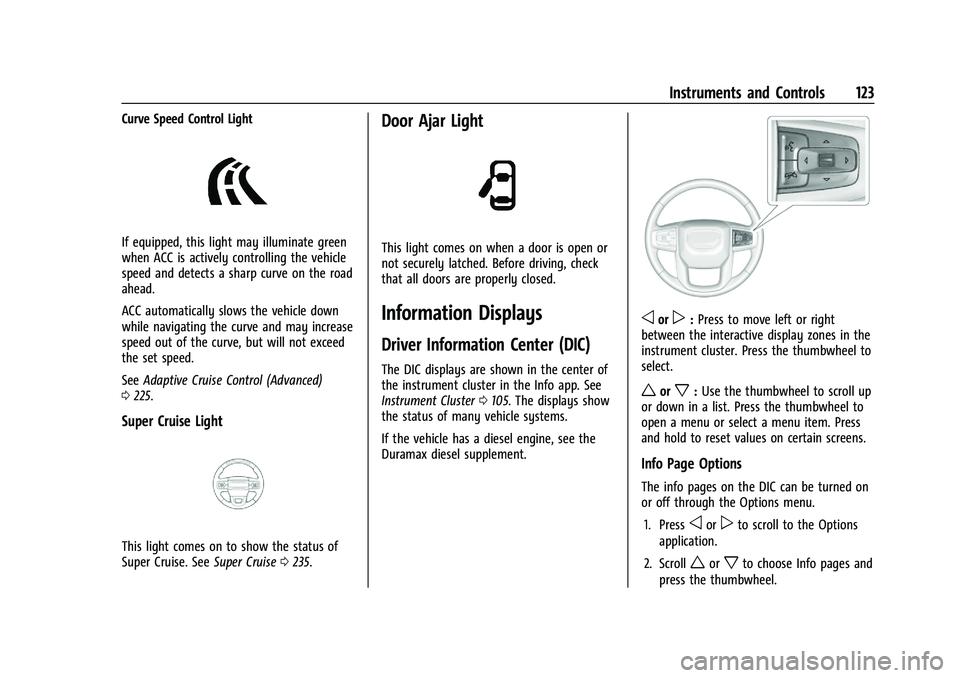
oorp: Press to move left or right
between the interactive display zones in the
instrument cluster. Press the thumbwheel to
select.
worx: Use the thumbwheel to scroll up
or down in a list. Press the thumbwheel to
open a menu or select a menu item. Press
and hold to reset values on certain screens.
Info Page Options
The info pages on the DIC can be turned on
or off through the Options menu.
1. Press
oorpto scroll to the Options
application.
2. Scroll
worxto choose Info pages and
press the thumbwheel.
Page 125 of 432
GMC Yukon/Yukon XL/Denali Owner Manual (GMNA-Localizing-U.S./
Canada/Mexico-16417394) - 2023 - CRC - 4/26/22
124 Instruments and Controls
3. Scrollworxto move through the list
of possible information displays.
4. Press the thumbwheel, while an item is highlighted, to select or deselect
that item.
The info pages can also be turned on or off
through the DIC page Info Page Options.
Info Pages
The following is the list of all possible DIC
info page displays. Some may not be
available for your particular vehicle. Some
items may not be turned on by default but
can be turned on through the Options app.
See “Info Page Options” earlier in this
section.
Speed : Shows the vehicle speed in either
kilometers per hour (km/h) or miles per
hour (mph).
Drive Summary : Displays the current
distance traveled, in either kilometers (km)
or miles (mi).
It also includes the Average Fuel Economy.
Average Fuel Economy shows the
approximate average liters per
100 kilometers (L/100 km), kilometers per
liter (km/L), or miles per gallon (mpg). This
number only reflects the approximate Average Fuel Economy that the vehicle has
at that moment, and changes as driving
conditions change.
The timer shows the time in the current
drive cycle.
All values in the Drive Summary are
automatically reset each time the vehicle is
started.
Trip 1 or Trip 2, Average Fuel Economy, and
Average Speed :
Shows the current distance
traveled, in either kilometers (km) or
miles (mi), since the trip odometer was last
reset.
The Average Fuel Economy display shows
the approximate average liters per
100 kilometers (L/100 km), kilometers per
liter (km/L), or miles per gallon (mpg). This
number is calculated based on the value
recorded since the last time this menu item
was reset. This number reflects only the
approximate average fuel economy that the
vehicle has at that moment, and changes as
driving conditions change.
Average Speed shows the average speed of
the vehicle in kilometers per hour (km/h) or
miles per hour (mph). This average is
calculated based on various vehicle speeds
recorded since the last reset of this value. Press the thumbwheel while this display is
active to reset the values.
Timer :
To start the timer, press the
thumbwheel while this display is active. The
display will show the amount of time that
has passed since the timer was last reset. To
stop the timer, press the thumbwheel
briefly while this display is active and the
timer is running.
Press the thumbwheel while this display is
active to reset the timer.
Tire Pressure : Shows the approximate
pressures of all four tires. Tire pressure is
displayed in either kilopascal (kPa) or in
pounds per square inch (psi). If the pressure
is low, the value for that tire is shown in
amber. See Tire Pressure Monitor System
0 348 and
Tire Pressure Monitor Operation 0349.
Fuel Economy : Displays average fuel
economy, the best fuel economy over the
selected distance, and a bar graph showing
instantaneous fuel economy.
Press the thumbwheel to change the
selected distance. This display can be reset
by selecting Reset in the menu.
Page 126 of 432
GMC Yukon/Yukon XL/Denali Owner Manual (GMNA-Localizing-U.S./
Canada/Mexico-16417394) - 2023 - CRC - 4/26/22
Instruments and Controls 125
Driver Assistance :If equipped, shows
information for Adaptive Cruise Control
(ACC), Lane Keep Assist (LKA), Forward
Collision Alert (FCA), and Follow Distance
Indicator(FDI).
Oil Life : Shows an estimate of the
remaining oil life. If REMAINING OIL LIFE
99% is displayed, that means 99% of the
current oil life remains.
When the remaining oil life is low, the
CHANGE ENGINE OIL SOON message will
appear on the display. The oil should be
changed as soon as possible. See Engine Oil
0 314. In addition to the engine oil life
system monitoring the oil life, additional
maintenance is recommended. See
Maintenance Schedule 0388.
The Oil Life display must be reset after each
oil change. It will not reset itself. Do not
reset the Oil Life display at any time other
than when the oil has just been changed.
It cannot be reset accurately until the next
oil change. To reset, see Engine Oil Life
System 0316.
Brake Pad Life : Displays an estimate of the
remaining life of the front and rear brake
pads. Messages will display based on brake
pad wear and the state of the system. Reset the Brake Pad Life display after replacing the
brake pads. See
Brake Pad Life System
0 324.
Air Filter Life : Shows an estimate of the
remaining engine air filter’s life and the
state of the system. Engine Air Filter Life
95% means 95% of the current air filter life
remains. Messages will display based on the
engine air filter life and the state of the
system. When the REPLACE SOON message
displays, the engine air filter should be
replaced at the earliest convenience.
The Air Filter Life display must be reset after
the engine air filter replacement. To reset,
see Engine Air Filter Life System 0317.
Trailer Brake : On vehicles with the
Integrated Trailer Brake Control (ITBC)
system, the trailer brake display appears in
the DIC.
TRAILER GAIN shows the trailer gain setting.
This setting can be adjusted from 0.0 to 10.0
with either a trailer connected or
disconnected.
OUTPUT shows the power output to the
trailer any time a trailer with electric brakes
is connected. Output is displayed as a bar
graph. Dotted lines may appear in the
OUTPUT display if a trailer is not connected. Off Road :
If equipped, displays vehicle pitch
and roll information, road wheel angle, and
four-wheel drive (4WD) status. If the vehicle
has low traction, a low traction indicator
and the wheels affected will display amber
in the Off-Road page.
Engine Hours (Hourmeter) : Shows the total
number of hours the engine has run. This
display also shows the engine idle hours.
Transmission Fluid Temperature : Shows the
temperature of the automatic transmission
fluid in either degrees Celsius (°C) or degrees
Fahrenheit (°F).
Info Page Options : Scroll to choose which
info pages appear on the DIC. Press the
thumbwheel to select or deselect.
Blank Page : Shows no information.
Head-Up Display (HUD)
{Warning
If the HUD image is too bright or too
high in your field of view, it may take
you more time to see things you need to
see when it is dark outside. Be sure to
keep the HUD image dim and placed low
in your field of view.
Page 143 of 432

GMC Yukon/Yukon XL/Denali Owner Manual (GMNA-Localizing-U.S./
Canada/Mexico-16417394) - 2023 - CRC - 4/26/22
142 Infotainment System
Before driving:
.Become familiar with the operation,
center stack controls, steering wheel
controls, and infotainment display.
.Set up the audio by presetting favorite
stations, setting the tone, and adjusting
the speakers.
.Set up phone numbers in advance so they
can be called easily by pressing a single
control or by using a single voice
command.
See Distracted Driving 0184.
Active Noise Cancellation (ANC)
If equipped, ANC reduces engine noise in the
vehicle’s interior. ANC requires the
factory-installed audio system, radio,
speakers, amplifier (if equipped), induction
system, and exhaust system to work
properly. Deactivation is required by your
dealer if related aftermarket equipment is
installed.
Overview
Infotainment System
The infotainment system is controlled by using the infotainment display, controls on the
center stack, steering wheel controls, and voice recognition, if available.
1.O(Power)
.Press to turn the power on.
.Press to mute/unmute the system
when on.
.Press and hold to display the
power off screen or the option to
display the power off screen.
.Turn to decrease or increase the
volume.
2.7
.Radio: Press and release to go to
the previous strong station or
channel. Press and hold to scroll
through the stations or channels.
Release to stop at the next
previous strong station or channel.
See AM-FM Radio 0146.
Page 154 of 432
GMC Yukon/Yukon XL/Denali Owner Manual (GMNA-Localizing-U.S./
Canada/Mexico-16417394) - 2023 - CRC - 4/26/22
Infotainment System 153
.While the headphones are powered off,
press and hold the power button for
two seconds to enter pairing mode. The
headphone name will display as“GM RSI
BT HP.” See“Pairing to RSI Screen” below
for pairing instructions with RSI screen.
.To power off, press and hold the power
button for two seconds while the power
is on.
.Press the CH-CHANNEL SELECT button (1)
to change between the audio associated
with Screen 1 or Screen 2. This function
only works after pairing to both RSI
Screens.
Paring to RSI Screen
Only two headphones can be active per RSI
Screen.
To pair a Bluetooth headphone to one of
the rear screens: 1. Touch the Headphone icon from the desired Rear Screen Home Page.
2. Select Add New Headphones.
3. Make sure the Bluetooth headphone is in pairing mode.
4. Once recognized by the system, the Bluetooth headphone is displayed on the
list of Available Headphones. 5. Select the Bluetooth headphone from the
list. Once connected, touch OK at the
Pairing Successful pop-up.
6. Touch OK.
To un-pair the Headphones from the screens,
touch the Headphone icon from the desired
Rear Screen Home page. Then touch the
options button under the Headphone that
you want to un-pair. Select Forget
Headphones. This step must be done
separately for each screen.
Voice Over
If equipped, the RSI system has a Voice Over
feature to benefit the visually and hearing
impaired.
When activated, Voice Over provides audible
feedback to the user about which area on
the screen they are touching, identifying
active buttons, as well as providing
information feedback of screen identification,
current status, list content, metadata, and
pop-up information. It allows for the user to
activate features through a double tap
anywhere on the screen which relates to the
last single touched and audibly announced
actionable button. To turn Voice Over on or off, touch
*,
touch the toggle, and then press OK to
confirm. Voice Over turns off every time the
vehicle is turned off.
Reset Rear Media
Select to reset the Apps and log out users.
Open Source License
Select to show the license information.
Rear Consumer Ports (RCP)
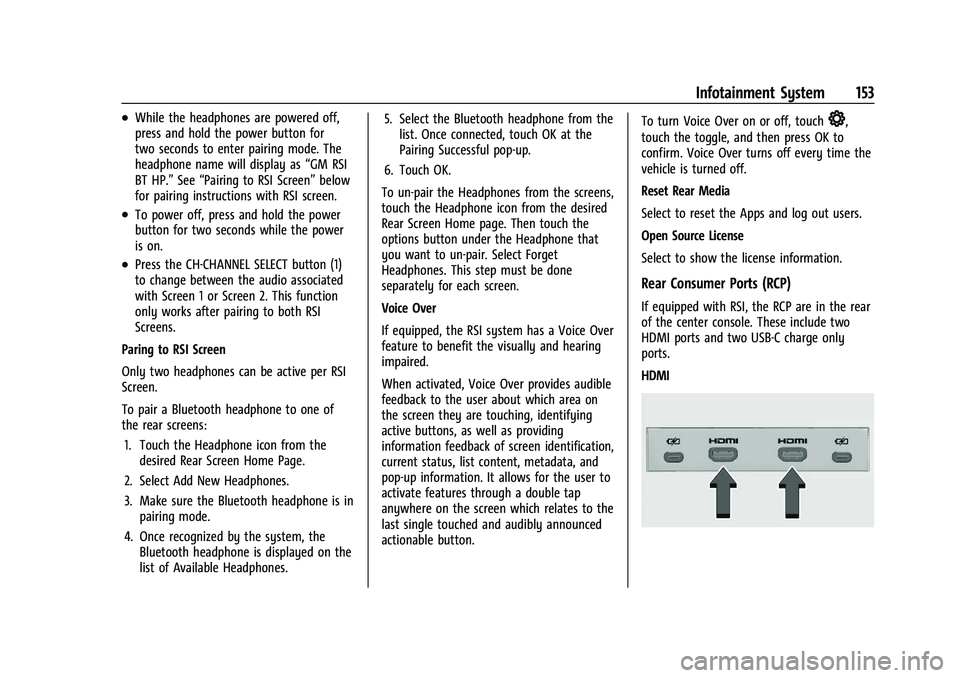
If equipped with RSI, the RCP are in the rear
of the center console. These include two
HDMI ports and two USB-C charge only
ports.
HDMI
Page 157 of 432
GMC Yukon/Yukon XL/Denali Owner Manual (GMNA-Localizing-U.S./
Canada/Mexico-16417394) - 2023 - CRC - 4/26/22
156 Infotainment System
Rear Media Settings
From the Rear Media page, touch Settings to
access the settings menu.
The menu may contain the following:
Remember Screen Power Status
Select to have rear screens automatically
power on when the vehicle is started.
Rear Screen Voice-Over
Select to have Video Voice Over for the
individual rear screens.
Allowed Applications
Select to choose which applications are
visible.
Account
Select to show the vehicle data plan.
Reset Rear Media
Select to reset the applications.
Rear Media Terms of Use
Select to view the terms of use.
Privacy Statement
Select to view the Privacy statement.RSI Troubleshooting
No power :
The ignition might not be on or
in accessory mode.
There is no sound from the headphones
with the indicator light on : Make sure the
headphones have sufficient charge. Plug the
headphones to a USB-C port to charge.
Check to see if headphones are paired to the
screens. Make sure that you are listening in
to the correct screen by pressing the
channel select button.
If the steps above do not work, then unpair
the headphones from the RSI screens, turn
the headphones off, turn them back on and
attempt to pair them. See pairing
procedures for the Bluetooth headphone
previously in this section.
Video Distortion
Video distortion can occur when operating
cellular phones, scanners, CB radios, Global
Positioning Systems (GPS), two-way radios,
mobile faxes, or walkie talkies.
It might be necessary to turn off the video
player when operating one of these devices
in or near the vehicle.
Navigation
Using the Navigation System
The Navigation software is provided by
Google Maps. The information provided in
this section is a general overview and is
subject to change. For the latest functional
information, see g.co/mapsincar.
Accept the Terms and Conditions to use.
Internet Connectivity
Google Maps relies on a subscription data
plan for full functionality, including
availability of offline maps. With an
applicable connected services plan, Google
Maps can be used offline when driving
through connectivity dead zones by
auto-downloading offline maps prior to
going offline.
Profiles
Sign in to a Google Account for personalized
service. Information available in the Google
Account will be shown.
To log into a profile, see Accounts under
Settings 0167.
Page 164 of 432
GMC Yukon/Yukon XL/Denali Owner Manual (GMNA-Localizing-U.S./
Canada/Mexico-16417394) - 2023 - CRC - 4/26/22
Infotainment System 163
3. If no mobile device is connected, touchManage Phones and the Phones screen
will display.
If another mobile device is connected
already, touch Settings, Connections, and
then Phones.
4. Touch Add Phone. If a previously added phone is
disconnected, the "Add Phone" card will
just be a "+" card.
5. Follow the on-screen prompts to pair the cell phone.
6. Follow the instructions on the cell phone to confirm the six-digit code showing on
the infotainment display and touch Pair.
The code on the cell phone and
infotainment display needs to be
acknowledged for a successful pair.
7. Start the pairing process on the cell phone to be paired to the vehicle. See
the cell phone manufacturer's user guide
for information on this process. Once the
cell phone is paired, it will show as
Connected. 8. If the vehicle name does not appear on
your cell phone, there are a few ways to
start the pairing process over:
.Make sure there is not an entry for
the vehicle under the previously
connected list. If the vehicle and cell
phone were previously paired and
one still remembers the other, it will
not identify as a new device when
searching.
.Turn the Bluetooth off and on the
device.
.Go back to the beginning of the
Phone menus on the infotainment
display and restart the pairing
process.
.Turn the cell phone off and then
back on.
.Reset the cell phone, but this step
should be done as a last effort.
9. If the cell phone prompts to accept connection or allow phone book
download, touch Always Accept and
Allow. The phone book may not be
available if not accepted.
10. To pair additional cell phones, touch Settings, Connections, and then Phones. First to Connect Paired Phones
If multiple paired cell phones are within
range of the system, the system connects to
the paired cell phone that is set as First to
Connect. To enable a paired cell phone as
the First to Connect phone:
1. Make sure the cell phone is turned on.
2. Touch the Settings icon on the home page.
3. Touch Connections.
4. Touch Phone.
5. Touch Options under the connected phone.
6. Touch First to Connect from the cell phone’s settings menu. The settings will
be enabled for that device.
Cell phones and mobile devices can be
added, removed, connected, and
disconnected. A sub-menu will display
whenever a request is made to add or
manage cell phones and mobile devices.
Page 170 of 432
GMC Yukon/Yukon XL/Denali Owner Manual (GMNA-Localizing-U.S./
Canada/Mexico-16417394) - 2023 - CRC - 4/26/22
Infotainment System 169
Accounts
Allows adding or adjusting of the user
accounts.
Privacy
Allows adjustment of the privacy settings.
Storage
This menu shows the storage info on the
infotainment system.
Security
This menu allows adjustment of the
infotainment security settings.
System
The menu may contain the following:
Language
This will set the display language used on
the infotainment display.
Keyboard & speech
Touch to change keyboard and speech
settings.
Reset Options
Touch to change reset settings.TTY Mode
When on, OnStar calls are made as a series
of text exchanges. A keyboard is shown for
text entry and the phone audio is muted.
About
Touch to view the infotainment system
software information.
Legal Information
Touch to view legal and license information.
Updates
This menu allows adjustment of the vehicle
update settings.
Google
This menu allows adjustment of the Google
settings.
Teen Driver
If equipped, this allows multiple keys to be
registered for beginner drivers to encourage
safe driving habits. When the vehicle is
started with a Teen Driver key, it will
automatically activate certain safety
systems, allow setting of some features, and
limit the use of others. The Report Card will
record vehicle data about driving behavior
that can be viewed later. When the vehicleis started with a registered key, the Driver
Information Center (DIC) displays a message
that Teen Driver is active.
To access:
1. Touch Settings on the Home Page, then touch Vehicle, and then Teen Driver.
2. Create a Personal Identification Number (PIN) by choosing a four-digit PIN.
Re-enter the PIN to confirm. To change
the PIN, touch Change PIN.
The PIN is required to:
.Set up/Add or remove keys.
.Change Teen Driver settings.
.Change or clear the Teen Driver PIN.
.Access or delete Report Card data.
Set up/Add keys to activate Teen Driver and
assign restrictions to the key:
Any vehicle key can be registered, up to a
maximum of eight keys. Label the key to
tell it apart from the other keys.
For a pushbutton start system: 1. Start the vehicle.
2. For automatic transmissions, the vehicle must be in P (Park). For manual
transmissions, the vehicle must be
stopped with the parking brake set.
Page 172 of 432
GMC Yukon/Yukon XL/Denali Owner Manual (GMNA-Localizing-U.S./
Canada/Mexico-16417394) - 2023 - CRC - 4/26/22
Infotainment System 171
or off and choose the desired speed warning
level. The speed warning does not limit the
speed of the vehicle. On some infotainment
systems, touch Set Teen Driver Speed
Warning to set the warning speed.
Set Teen Driver Speed Warning :Choose the
desired speed warning level. The speed
warning does not limit the speed of the
vehicle.
SiriusXM Explicit Content Filter : Allows the
SiriusXM Explicit Content Filter to be turned
ON or OFF. When ON, the teen driver will
not be able to listen to SiriusXM stations
that contain explicit content, and the Explicit
Content Filter selection in the Audio Settings
will be unavailable for change.
When Teen Driver is Active:
.If equipped, the radio will mute when the
driver seat belt, and in some vehicles the
front passenger seat belt, is not buckled.
The audio from any device paired to the
vehicle will also be muted.
.An object placed on the front passenger
seat, such as a briefcase, handbag,
grocery bag, laptop, or other electronic
device, could cause the passenger sensing
system to falsely sense an unbuckled
front passenger and mute the radio. If this happens, remove the object from
the seat. See
Passenger Sensing System
0 67.
.Some safety systems, such as Automatic
Emergency Braking, if equipped, cannot
be turned off.
.The gap setting for Adaptive Cruise
Control and alert timing for Forward
Collision Alert, if equipped, cannot be
changed.
.When trying to change a safety feature
that is not configurable in Teen Driver,
the feature may be grayed out or
removed from the infotainment menu,
or the DIC will display a message
indicating that Teen Driver is active and
the action is not available.
.Super Cruise, if equipped, is not available.
.Enhanced Low Fuel Warning
(if equipped) –When the vehicle is low
on fuel, the low fuel light on the
instrument cluster flashes and the DIC
low fuel warning cannot be dismissed.
.Do not tow a trailer if equipped with
Automatic Emergency Braking. Report Card
The vehicle owner must secure the driver’s
consent to record certain vehicle data when
the vehicle is driven with a registered Teen
Driver key. There is one Report Card per
vehicle. Data is only recorded when a
registered Teen Driver key is used to
operate the vehicle.
The Report Card data is collected from the
time Teen Driver is activated or the last
time the Report Card was reset. The
following items may be recorded:
.Distance Driven
–the total distance
driven.
.Maximum Speed –the maximum vehicle
speed detected.
.Overspeed Warnings –the number of
times the speed warning setting was
exceeded.
.Wide Open Throttle –the number of
times the accelerator pedal was pressed
nearly all the way down.
.Forward Collision Alerts (if equipped) –
the number of times the driver was
notified when approaching a vehicle
ahead too quickly and at potential risk for
a crash.
Page 173 of 432
GMC Yukon/Yukon XL/Denali Owner Manual (GMNA-Localizing-U.S./
Canada/Mexico-16417394) - 2023 - CRC - 4/26/22
172 Infotainment System
.Forward Automatic Braking, also called
Automatic Emergency Braking (if
equipped)–the number of times the
vehicle detected that a forward collision
was imminent and applied the brakes.
.Reverse Automatic Braking (if equipped) –
the number of times the vehicle detected
that a rearward collision was imminent
and applied the brakes.
.Traction Control –the number of times
the Traction Control System activated to
reduce wheel spin or loss of traction.
.Stability Control –the number of events
which required the use of electronic
stability control.
.Antilock Braking System Active –The
number of Antilock Brake System
activations.
.Tailgating Alerts (if equipped)– the
number of times the driver was alerted
for following a vehicle ahead too closely.
Report Card Data
Cumulative Data is saved for all trips until
the Report Card is reset or until the
maximum count is exceeded. If the
maximum count is exceeded for a Report
Card line item, that item will no longer be
updated in the Report Card until it is reset. Each item will report a maximum of
1,000 counts. The distance driven will report
a maximum of 64 374 km (40,000 mi).
To delete Report Card data, do one of the
following:
.From the Report Card display, touch
Reset.
.Touch Clear PIN and All Teen Driver Keys
from the Teen Driver menu. This will also
unregister any Teen Driver keys and
delete the PIN.
Forgotten PIN
See your dealer to reset the PIN.
Trademarks and License
Agreements
FCC Information
See Radio Frequency Statement 0407.
"Made for iPhone," means that an electronic
accessory has been designed to connect
specifically to iPhone, and has been certified
by the developer to meet Apple
performance standards. Apple is not
responsible for the operation of this device
or its compliance with safety and regulatory
standards. Please note that the use of this
accessory with iPhone may affect wireless
performance. iPhone are trademarks of
Apple Inc., registered in the U.S. and other
countries.
If you decide to continue service after your
trial, your selected subscription plan will
automatically renew thereafter. You will be
charged at then-current rates. Fees and taxes
apply. Please see the SiriusXM Customer
Agreement at siriusxm.com for complete
terms and how to cancel, which includes
calling SiriusXM at 1-866-635-2349. All fees
and programming are subject to change.