ESP GMC YUKON DENALI 2010 User Guide
[x] Cancel search | Manufacturer: GMC, Model Year: 2010, Model line: YUKON DENALI, Model: GMC YUKON DENALI 2010Pages: 560, PDF Size: 4.32 MB
Page 156 of 560
Automatic Transmission Operation
The vehicle has a Hydra-Matic®6L80 automatic
transmission, and has an electronic shift position
indicator within the instrument panel cluster.
The electronic shift position indicator displays when
the shift lever is moved out of P (Park).
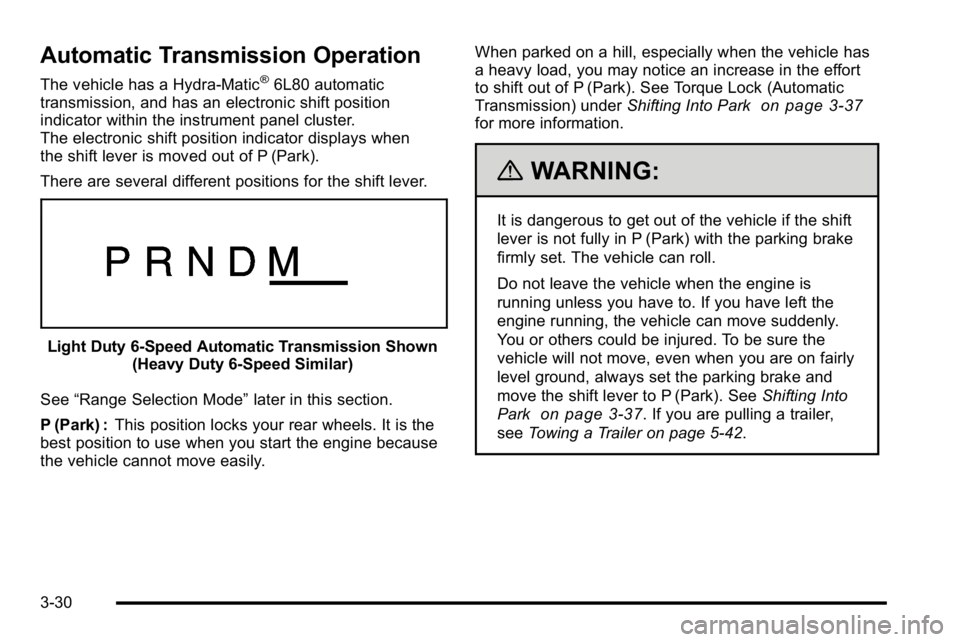
There are several different positions for the shift lever.
Light Duty 6‐Speed Automatic Transmission Shown (Heavy Duty 6‐Speed Similar)
See “Range Selection Mode” later in this section.
P (Park) : This position locks your rear wheels. It is the
best position to use when you start the engine because
the vehicle cannot move easily. When parked on a hill, especially when the vehicle has
a heavy load, you may notice an increase in the effort
to shift out of P (Park). See Torque Lock (Automatic
Transmission) under
Shifting Into Park
on page 3‑37for more information.
{WARNING:
It is dangerous to get out of the vehicle if the shift
lever is not fully in P (Park) with the parking brake
firmly set. The vehicle can roll.
Do not leave the vehicle when the engine is
running unless you have to. If you have left the
engine running, the vehicle can move suddenly.
You or others could be injured. To be sure the
vehicle will not move, even when you are on fairly
level ground, always set the parking brake and
move the shift lever to P (Park). See Shifting Into
Park
on page 3‑37. If you are pulling a trailer,
see Towing a Trailer on page 5‑42.
3-30
Page 175 of 560
The SBZA displays may remain on if a trailer is
attached to the vehicle, or a bicycle or object is
extending out to either side of the vehicle.
When SBZA is disabled for any reason other than the
driver turning it off, the driver will not be able to turn
SBZA back on using the DIC. The SIDE BLIND ZONE
ALERT ON option will not be selectable if the conditions
for normal system operation are not met. Until normal
operating conditions for SBZA are met, you should not
rely upon SBZA while driving.
SBZA Error Messages
The following messages may appear in the DIC:
SIDE BLIND ZONE ALERT SYSTEM OFF :This
message indicates that the driver has turned the
system off.
SIDE BLIND ZONE SYS. UNAVAILABLE : This
message indicates that the SBZA system is disabled
either because the sensor is blocked and cannot detect
vehicles in your blind zone, or the vehicle is passing
through an open field of view area, such as the
desert, where there is insufficient data for operation. The sensor may be blocked by mud, dirt, snow, ice,
slush, or even heavy rainstorms. This message may
also activate during heavy rain or due to road spray.
The vehicle does not need service. For cleaning, see
Washing Your Vehicle on page 6‑102.
SERVICE SIDE BLIND ZONE ALERT SYSTEM :
If this
message appears, both SBZA displays will remain on
indicating there is a problem with the SBZA system.
If these displays remain on after continued driving,
the system needs service. Take the vehicle to your
dealer/retailer.FCC Information
See Radio Frequency Statementon page 8‑19for
FCC information.
Frequency of operation: 24.05GHz –24.25GHz
Field Strength: Not greater than 2.5V/m peak (0.25V/m
average) at a distance of 3m
The manufacturer is not responsible for any radio or
TV interference caused by unauthorized modifications
to this equipment. Such modifications could void the
user's authority to operate the equipment.
3-49
Page 244 of 560
Language
This display allows you to select the language in which
the DIC messages will appear. To select a language:1. Press the trip odometer reset stem until ODOMETER displays.
2. While in the ODOMETER display, press and hold the trip odometer reset stem for three seconds until
the currently set language displays.
3. Continue to press and hold the trip odometer reset stem to scroll through all of the available
languages.
The available selections are ENGLISH (default),
FRANCAIS (French), ESPANOL (Spanish), and
NO CHANGE.
4. Once the desired language is displayed, release the trip odometer reset stem to set your choice.
Engine Hours
To display the ENGINE HOURS, place the ignition in
LOCK/OFF or ACC/ACCESSORY, then press and hold
the trip odometer reset stem for four seconds while
viewing the ODOMETER. This display shows the total
number of hours the engine has run.
DIC Operation and Displays
(Using Trip Odometer Reset Stem)
The DIC has different displays which can be accessed
by pressing the trip odometer reset stem located on the
instrument panel cluster. Pressing the trip odometer
reset stem will also turn off, or acknowledge, DIC
messages.
You can use the trip odometer reset stem to view the
following displays: language selection, trip odometer,
transmission temperature, trailer brake gain and output
information for vehicles with the Integrated Trailer Brake
Control (ITBC) system, compass zone setting, compass
recalibration, oil life, Tire Pressure Monitor System
(TPMS) programming for vehicles with the TPMS, and
Remote Keyless Entry (RKE) transmitter programming.
Trip Odometer Reset Stem Menu Items
Language
This display allows you to select the language in which
the DIC messages will appear. To select a language:
1. Press the trip odometer reset stem until ODOMETER displays.
2. While in the ODOMETER display, press and hold the trip odometer reset stem for three seconds until
the currently set language displays.
4-50
Page 245 of 560
3. Continue to press and hold the trip odometer resetstem to scroll through all of the available
languages.
The available languages are ENGLISH (default),
FRANCAIS (French), ESPANOL (Spanish), and
NO CHANGE.
4. Once the desired language is displayed, release the trip odometer reset stem to set your choice.
Trip Odometer
Press the trip odometer reset stem until TRIP displays.
This display shows the current distance traveled in
either miles (mi) or kilometers (km) since the last reset
for the trip odometer.
The trip odometer can be reset to zero by pressing and
holding the trip odometer reset stem while the trip
odometer is displayed.
The trip odometer has a feature called the retro-active
reset. This can be used to set the trip odometer to the
number of miles (kilometers) driven since the ignition
was last turned on. This can be used if the trip
odometer is not reset at the beginning of the trip.
To use the retro-active reset feature, press and hold
the trip odometer reset stem for at least four seconds.
The trip odometer will display the number of miles (mi)
or kilometers (km) driven since the ignition was last
turned on and the vehicle was moving. Once the vehicle
begins moving, the trip odometer will accumulate mileage. For example, if the vehicle was driven
5 miles (8 km) before it is started again, and then the
retro-active reset feature is activated, the display will
show 5 miles (8 km). As the vehicle begins moving,
the display will then increase to 5.1 miles (8.2 km),
5.2 miles (8.4 km), etc.
Transmission Temperature
Press the trip odometer reset stem until TRANS TEMP
displays. This display shows the temperature of the
automatic transmission fluid in either degrees
Fahrenheit (°F) or degrees Celsius (°C).
Trailer Gain and Output
On vehicles with the Integrated Trailer Brake Control
(ITBC) system, the trailer brake display appears in the
DIC. Press the trip odometer reset stem until TRAILER
GAIN and OUTPUT display.
TRAILER GAIN shows the trailer gain setting. This
setting can be adjusted from 0.0 to 10.0 with either a
trailer connected or disconnected. To adjust this setting,
see
“Integrated Trailer Brake Control System” under
Towing a Trailer
on page 5‑42for more information.
OUTPUT shows the power output to the trailer anytime
a trailer with electric brakes is connected. Output is
displayed in 0 to 10 bars. Dashes may appear in the
OUTPUT display. See “Integrated Trailer Brake Control
System” underTowing a Trailer
on page 5‑42for more
information.
4-51
Page 261 of 560
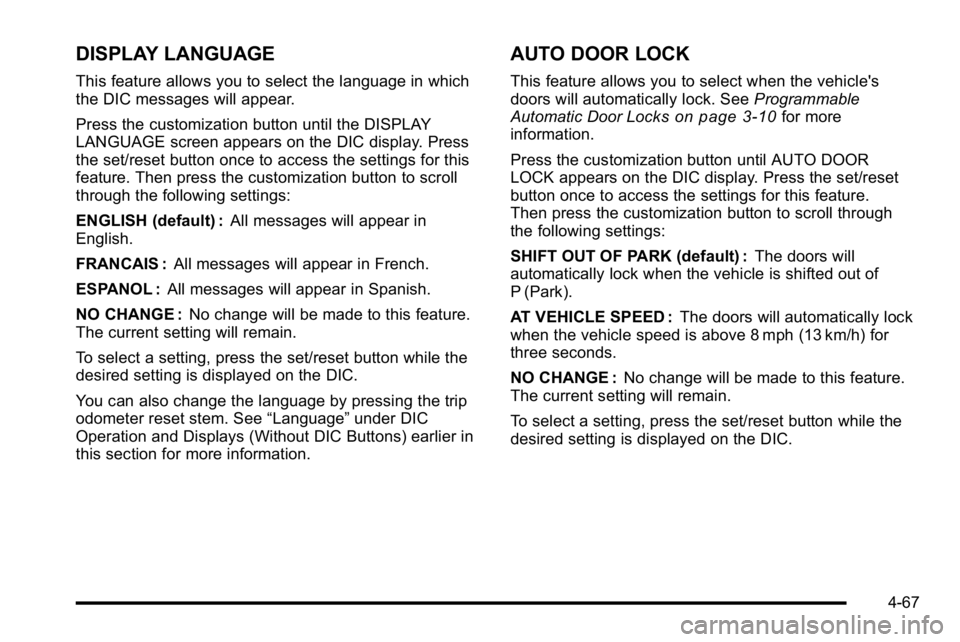
DISPLAY LANGUAGE
This feature allows you to select the language in which
the DIC messages will appear.
Press the customization button until the DISPLAY
LANGUAGE screen appears on the DIC display. Press
the set/reset button once to access the settings for this
feature. Then press the customization button to scroll
through the following settings:
ENGLISH (default) :All messages will appear in
English.
FRANCAIS : All messages will appear in French.
ESPANOL : All messages will appear in Spanish.
NO CHANGE : No change will be made to this feature.
The current setting will remain.
To select a setting, press the set/reset button while the
desired setting is displayed on the DIC.
You can also change the language by pressing the trip
odometer reset stem. See “Language”under DIC
Operation and Displays (Without DIC Buttons) earlier in
this section for more information.
AUTO DOOR LOCK
This feature allows you to select when the vehicle's
doors will automatically lock. See Programmable
Automatic Door Locks
on page 3‑10for more
information.
Press the customization button until AUTO DOOR
LOCK appears on the DIC display. Press the set/reset
button once to access the settings for this feature.
Then press the customization button to scroll through
the following settings:
SHIFT OUT OF PARK (default) : The doors will
automatically lock when the vehicle is shifted out of
P (Park).
AT VEHICLE SPEED : The doors will automatically lock
when the vehicle speed is above 8 mph (13 km/h) for
three seconds.
NO CHANGE : No change will be made to this feature.
The current setting will remain.
To select a setting, press the set/reset button while the
desired setting is displayed on the DIC.
4-67
Page 304 of 560
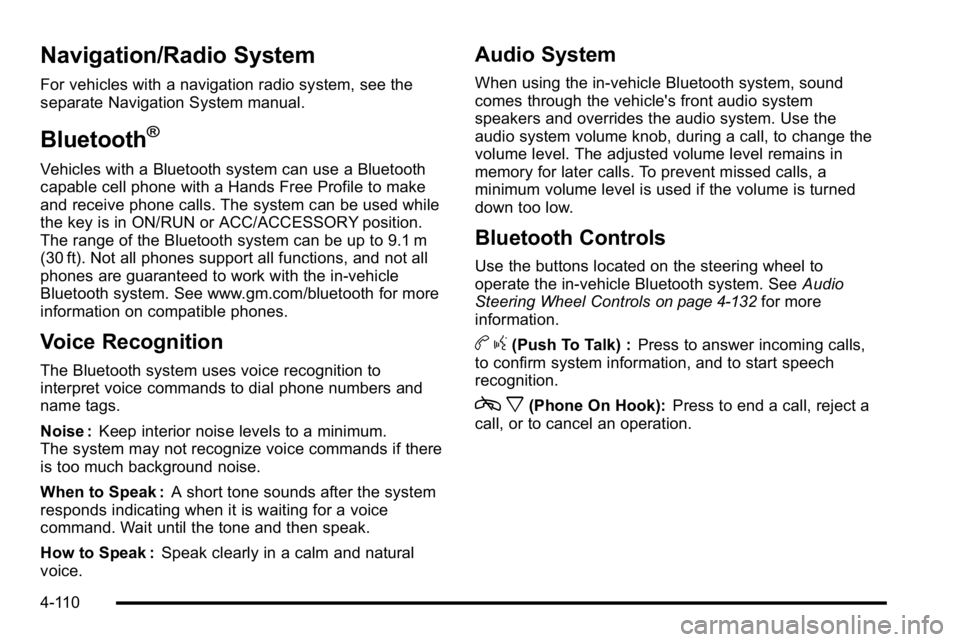
Navigation/Radio System
For vehicles with a navigation radio system, see the
separate Navigation System manual.
Bluetooth®
Vehicles with a Bluetooth system can use a Bluetooth
capable cell phone with a Hands Free Profile to make
and receive phone calls. The system can be used while
the key is in ON/RUN or ACC/ACCESSORY position.
The range of the Bluetooth system can be up to 9.1 m
(30 ft). Not all phones support all functions, and not all
phones are guaranteed to work with the in-vehicle
Bluetooth system. See www.gm.com/bluetooth for more
information on compatible phones.
Voice Recognition
The Bluetooth system uses voice recognition to
interpret voice commands to dial phone numbers and
name tags.
Noise :Keep interior noise levels to a minimum.
The system may not recognize voice commands if there
is too much background noise.
When to Speak : A short tone sounds after the system
responds indicating when it is waiting for a voice
command. Wait until the tone and then speak.
How to Speak : Speak clearly in a calm and natural
voice.
Audio System
When using the in‐vehicle Bluetooth system, sound
comes through the vehicle's front audio system
speakers and overrides the audio system. Use the
audio system volume knob, during a call, to change the
volume level. The adjusted volume level remains in
memory for later calls. To prevent missed calls, a
minimum volume level is used if the volume is turned
down too low.
Bluetooth Controls
Use the buttons located on the steering wheel to
operate the in‐vehicle Bluetooth system. See Audio
Steering Wheel Controls
on page 4‑132for more
information.
b g(Push To Talk) : Press to answer incoming calls,
to confirm system information, and to start speech
recognition.
c x(Phone On Hook): Press to end a call, reject a
call, or to cancel an operation.
4-110
Page 305 of 560
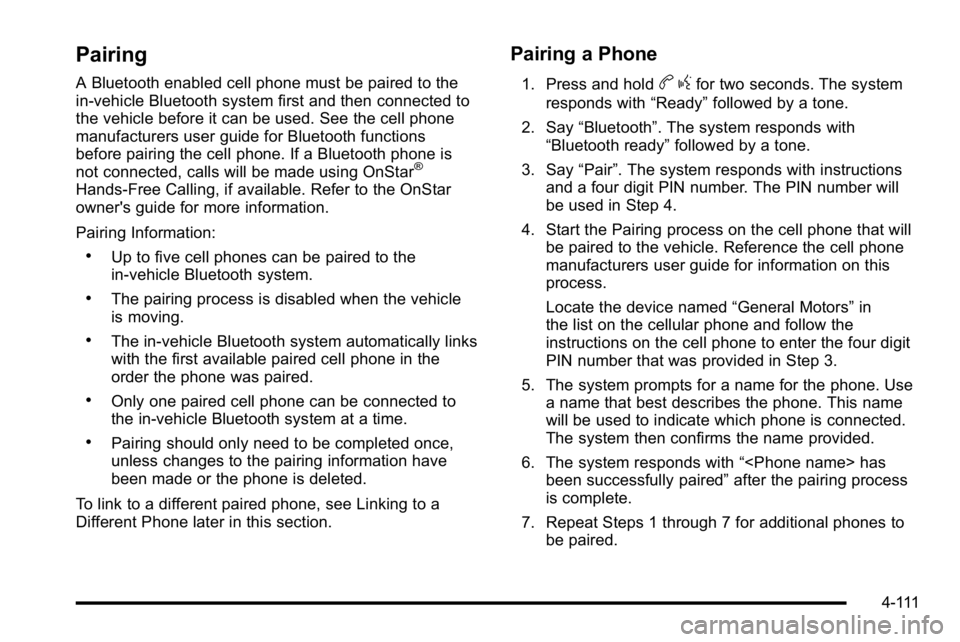
Pairing
A Bluetooth enabled cell phone must be paired to the
in‐vehicle Bluetooth system first and then connected to
the vehicle before it can be used. See the cell phone
manufacturers user guide for Bluetooth functions
before pairing the cell phone. If a Bluetooth phone is
not connected, calls will be made using OnStar
®
Hands‐Free Calling, if available. Refer to the OnStar
owner's guide for more information.
Pairing Information:
.Up to five cell phones can be paired to the
in‐vehicle Bluetooth system.
.The pairing process is disabled when the vehicle
is moving.
.The in‐vehicle Bluetooth system automatically links
with the first available paired cell phone in the
order the phone was paired.
.Only one paired cell phone can be connected to
the in‐vehicle Bluetooth system at a time.
.Pairing should only need to be completed once,
unless changes to the pairing information have
been made or the phone is deleted.
To link to a different paired phone, see Linking to a
Different Phone later in this section.
Pairing a Phone
1. Press and holdb gfor two seconds. The system
responds with “Ready”followed by a tone.
2. Say “Bluetooth”. The system responds with
“Bluetooth ready” followed by a tone.
3. Say “Pair”. The system responds with instructions
and a four digit PIN number. The PIN number will
be used in Step 4.
4. Start the Pairing process on the cell phone that will be paired to the vehicle. Reference the cell phone
manufacturers user guide for information on this
process.
Locate the device named “General Motors”in
the list on the cellular phone and follow the
instructions on the cell phone to enter the four digit
PIN number that was provided in Step 3.
5. The system prompts for a name for the phone. Use a name that best describes the phone. This name
will be used to indicate which phone is connected.
The system then confirms the name provided.
6. The system responds with “
been successfully paired” after the pairing process
is complete.
7. Repeat Steps 1 through 7 for additional phones to be paired.
4-111
Page 306 of 560
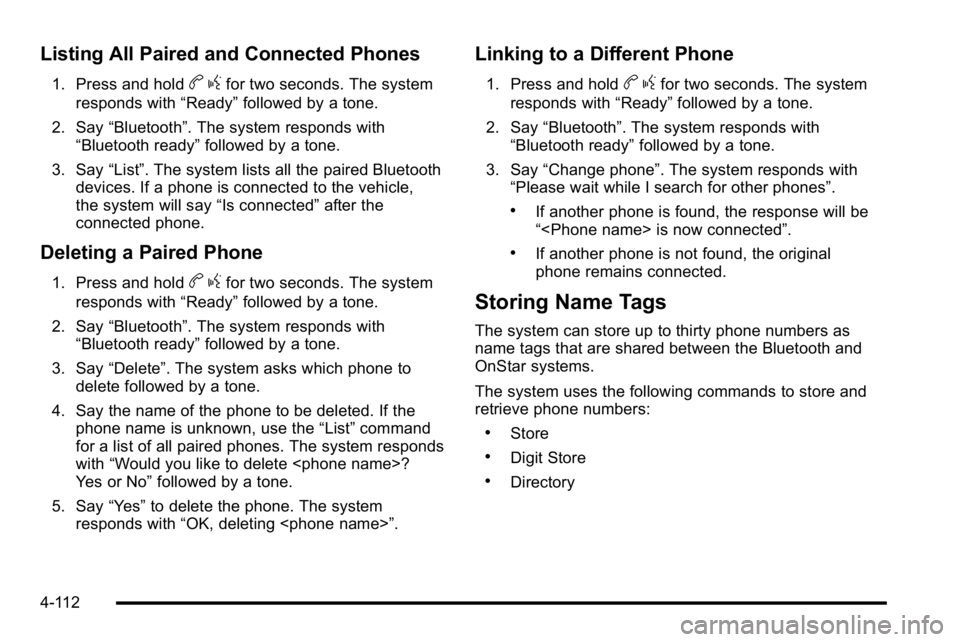
Listing All Paired and Connected Phones
1. Press and holdbgfor two seconds. The system
responds with “Ready”followed by a tone.
2. Say “Bluetooth”. The system responds with
“Bluetooth ready” followed by a tone.
3. Say “List”. The system lists all the paired Bluetooth
devices. If a phone is connected to the vehicle,
the system will say “Is connected”after the
connected phone.
Deleting a Paired Phone
1. Press and holdb gfor two seconds. The system
responds with “Ready”followed by a tone.
2. Say “Bluetooth”. The system responds with
“Bluetooth ready” followed by a tone.
3. Say “Delete”. The system asks which phone to
delete followed by a tone.
4. Say the name of the phone to be deleted. If the phone name is unknown, use the “List”command
for a list of all paired phones. The system responds
with “Would you like to delete
Yes or No” followed by a tone.
5. Say “Yes”to delete the phone. The system
responds with “OK, deleting
Linking to a Different Phone
1. Press and holdbgfor two seconds. The system
responds with “Ready”followed by a tone.
2. Say “Bluetooth”. The system responds with
“Bluetooth ready” followed by a tone.
3. Say “Change phone”. The system responds with
“Please wait while I search for other phones”.
.If another phone is found, the response will be
“
.If another phone is not found, the original
phone remains connected.
Storing Name Tags
The system can store up to thirty phone numbers as
name tags that are shared between the Bluetooth and
OnStar systems.
The system uses the following commands to store and
retrieve phone numbers:
.Store
.Digit Store
.Directory
4-112
Page 307 of 560
Using the Store Command
The store command allows a phone number to be
stored without entering the digits individually.1. Press and hold
b gfor two seconds. The system
responds with “Ready”followed by a tone.
2. Say “Store”. The system responds with “Store,
number please” followed by a tone.
3. Say the complete phone number to be stored at once with no pauses.
.If the system recognizes the number it
responds with “OK, Storing”and repeats the
phone number.
.If the system is unsure it recognizes the phone
number, it responds with “Store”and repeats
the number followed by “Please say yes or no”.
If the number is correct, say “Yes”. If the
number is not correct, say “No”. The system
will ask for the number to be re‐entered. 4. After the system stores the phone number,
it responds with “Please say the name tag”
followed by a tone.
5. Say a name tag for the phone number. The name tag is recorded and the system responds with
“About to store
sound OK?”.
.If the name tag does not sound correct, say
“No” and repeat Step 5.
.If the name tag sounds correct, say “Yes”and
the name tag is stored. After the number is
stored the system returns to the main menu.
Using the Digit Store Command
The digit store command allows a phone number to be
stored by entering the digits individually.
1. Press and hold
b gfor two seconds. The system
responds with “Ready”followed by a tone.
2. Say “Digit Store”. The system responds with
“Please say the first digit to store” followed by
a tone.
4-113
Page 308 of 560
3. Say the first digit to be stored. The system willrepeat back the digit it heard followed by a tone.
Continue entering digits until the number to be
stored is complete.
.If an unwanted number is recognized by the
system, say “Clear”at any time to clear the last
number.
.To hear all of the numbers recognized by the
system, say “Verify”at any time and the system
will repeat them.
4. After the complete number has been entered, say “Store”. The system responds with “Please say the
name tag” followed by a tone.
5. Say a name tag for the phone number. The name tag is recorded and the system responds with
“About to store
sound OK?”.
.If the name tag does not sound correct, say
“No” and repeat Step 5.
.If the name tag sounds correct, say “Yes”and
the name tag is stored. After the number is
stored the system returns to the main menu.
Using the Directory Command
The directory command lists all of the name tags stored
by the system. To use the directory command:
1. Press and hold
b gfor two seconds. The system
responds with “Ready”followed by a tone.
2. Say “Directory”. The system responds with
“Directory” and then plays back all of the stored
name tags. When the list is complete, the system
returns to the main menu.
Deleting Name Tags
The system uses the following commands to delete
name tags:
.Delete
.Delete all name tags
Using the Delete Command
The delete command allows specific name tags to be
deleted.
To use the delete command:
1. Press and hold
b gfor two seconds. The system
responds with “Ready”followed by a tone.
2. Say “Delete”. The system responds with “Delete,
please say the name tag” followed by a tone.
4-114