oil pressure GMC YUKON DENALI 2010 User Guide
[x] Cancel search | Manufacturer: GMC, Model Year: 2010, Model line: YUKON DENALI, Model: GMC YUKON DENALI 2010Pages: 560, PDF Size: 4.32 MB
Page 244 of 560
Language
This display allows you to select the language in which
the DIC messages will appear. To select a language:1. Press the trip odometer reset stem until ODOMETER displays.
2. While in the ODOMETER display, press and hold the trip odometer reset stem for three seconds until
the currently set language displays.
3. Continue to press and hold the trip odometer reset stem to scroll through all of the available
languages.
The available selections are ENGLISH (default),
FRANCAIS (French), ESPANOL (Spanish), and
NO CHANGE.
4. Once the desired language is displayed, release the trip odometer reset stem to set your choice.
Engine Hours
To display the ENGINE HOURS, place the ignition in
LOCK/OFF or ACC/ACCESSORY, then press and hold
the trip odometer reset stem for four seconds while
viewing the ODOMETER. This display shows the total
number of hours the engine has run.
DIC Operation and Displays
(Using Trip Odometer Reset Stem)
The DIC has different displays which can be accessed
by pressing the trip odometer reset stem located on the
instrument panel cluster. Pressing the trip odometer
reset stem will also turn off, or acknowledge, DIC
messages.
You can use the trip odometer reset stem to view the
following displays: language selection, trip odometer,
transmission temperature, trailer brake gain and output
information for vehicles with the Integrated Trailer Brake
Control (ITBC) system, compass zone setting, compass
recalibration, oil life, Tire Pressure Monitor System
(TPMS) programming for vehicles with the TPMS, and
Remote Keyless Entry (RKE) transmitter programming.
Trip Odometer Reset Stem Menu Items
Language
This display allows you to select the language in which
the DIC messages will appear. To select a language:
1. Press the trip odometer reset stem until ODOMETER displays.
2. While in the ODOMETER display, press and hold the trip odometer reset stem for three seconds until
the currently set language displays.
4-50
Page 246 of 560
Compass Zone Setting
This display allows for setting the compass zone.
SeeDIC Compasson page 4‑53for more information.
Compass Recalibration
This display allows for calibrating the compass.
SeeDIC Compasson page 4‑53for more information.
Oil Life
To access this display, the vehicle must be in P (Park).
Press the trip odometer reset stem until OIL LIFE
REMAINING displays. This display shows an estimate
of the oil's remaining useful life. If you see 99% OIL
LIFE REMAINING on the display, that means 99% of
the current oil life remains. The engine oil life system
will alert you to change the oil on a schedule consistent
with your driving conditions.
When the remaining oil life is low, the CHANGE
ENGINE OIL SOON message will appear on the
display. See "CHANGE ENGINE OIL SOON" under DIC
Warnings and Messages
on page 4‑56. You should
change the oil as soon as you can. See Engine Oilon
page 6‑15. In addition to the engine oil life system monitoring the oil life, additional maintenance is
recommended in the Maintenance Schedule in this
manual. See
Scheduled Maintenance
on page 7‑3for
more information.
Remember, you must reset the OIL LIFE display
yourself after each oil change. It will not reset itself.
Also, be careful not to reset the OIL LIFE display
accidentally at any time other than when the oil has just
been changed. It cannot be reset accurately until the
next oil change. To reset the engine oil life system,
see Engine Oil Life System on page 6‑18.
Relearn Tire Positions
Your vehicle may have this display. To access this
display, the vehicle must be in P (Park). If your vehicle
has the Tire Pressure Monitor System (TPMS), after
rotating the tires or after replacing a tire or sensor, the
system must re-learn the tire positions. To re-learn the
tire positions, see Tire Pressure Monitor System
on
page 6‑66. See Tire Inspection and Rotationon
page 6‑71and DIC Warnings and Messageson
page 4‑56for more information.
4-52
Page 253 of 560
ICE POSSIBLE DRIVE WITH CARE
This message displays when ice conditions are
possible.
LEFT REAR DOOR OPEN
This message displays and a chime sounds if the driver
side rear door is not fully closed and the vehicle is
shifted out of P (Park). Stop and turn off the vehicle,
check the door for obstructions, and close the door
again. Check to see if the message still appears on
the DIC.
OIL PRESSURE LOW STOP ENGINE
Notice:If you drive your vehicle while the engine oil
pressure is low, severe engine damage may occur.
If a low oil pressure warning appears on the Driver
Information Center (DIC), stop the vehicle as soon
as possible. Do not drive the vehicle until the cause
of the low oil pressure is corrected. See Engine Oil
on page 6‑15for more information.
This message displays if low oil pressure levels occur.
Stop the vehicle as soon as safely possible and do not
operate it until the cause of the low oil pressure has
been corrected. Check the oil as soon as possible and
have your vehicle serviced by your dealer/retailer. See
Engine Oil on page 6‑15.
PARK ASST BLOCKED SEE OWNERS
MANUAL
If your vehicle has the Ultrasonic Rear Parking Assist
(URPA) system, this message displays if there is
something interfering with the park assist system. See
Ultrasonic Rear Parking Assist (URPA)
on page 3‑45for more information.
PARK ASSIST OFF
After the vehicle has been started, this message
displays to remind the driver that the Ultrasonic Rear
Parking Assist (URPA) system has been turned off.
Press the set/reset button or the trip odometer reset
stem to acknowledge this message and clear it from the
DIC display. To turn the URPA system back on, see
Ultrasonic Rear Parking Assist (URPA) on page 3‑45.
PASSENGER DOOR OPEN
This message displays and a chime sounds if the front
passenger door is not fully closed and the vehicle is
shifted out of P (Park). Stop and turn off the vehicle,
check the door for obstructions, and close the door
again. Check to see if the message still appears on
the DIC.
4-59
Page 355 of 560
Hydroplaning
Hydroplaning is dangerous. Water can build up under
your vehicle's tires so they actually ride on the water.
This can happen if the road is wet enough and you are
going fast enough. When your vehicle is hydroplaning, it
has little or no contact with the road.
There is no hard and fast rule about hydroplaning. The
best advice is to slow down when the road is wet.
Other Rainy Weather Tips
Besides slowing down, other wet weather driving tips
include:
.Allow extra following distance.
.Pass with caution.
.Keep windshield wiping equipment in good shape.
.Keep the windshield washer fluid reservoir filled.
.Have good tires with proper tread depth. SeeTireson page 6‑57.
.Turn off cruise control.
Before Leaving on a Long Trip
To prepare your vehicle for a long trip, consider having
it serviced by your dealer/retailer before departing.
Things to check on your own include:
.Windshield Washer Fluid:Reservoir full? Windows
clean —inside and outside?
.Wiper Blades: In good shape?
.Fuel, Engine Oil, Other Fluids: All levels checked?
.Lamps:Do they all work and are lenses clean?
.Tires:Are treads good? Are tires inflated to
recommended pressure?
.Weather and Maps: Safe to travel? Have
up-to-date maps?
5-25
Page 391 of 560
Section 6 Service and Appearance Care
Service. . . . . . . . . . . . . . . . . . . . . . . . . . . . . . . . . . . . . . . . . . . . . 6-3
Accessories and Modifications . . . . . . . . . . . . . . . . . . 6-3
California Proposition 65 Warning . . . . . . . . . . . . . . . 6-4
California Perchlorate Materials Requirements . . . . . . . . . . . . . . . . . . . . . . . . . . . . . . . . . 6-4
Doing Your Own Service Work . . . . . . . . . . . . . . . . . . 6-4
Adding Equipment to the Outside of the Vehicle . . . . . . . . . . . . . . . . . . . . . . . . . . . . . . . . . . . . . . . . 6-5
Fuel . . . . . . . . . . . . . . . . . . . . . . . . . . . . . . . . . . . . . . . . . . . . . . . . . 6-5
Gasoline Octane . . . . . . . . . . . . . . . . . . . . . . . . . . . . . . . . 6-6
Gasoline Specifications . . . . . . . . . . . . . . . . . . . . . . . . . 6-6
California Fuel . . . . . . . . . . . . . . . . . . . . . . . . . . . . . . . . . . 6-6
Additives . . . . . . . . . . . . . . . . . . . . . . . . . . . . . . . . . . . . . . . . 6-6
Fuel E85 (85% Ethanol) . . . . . . . . . . . . . . . . . . . . . . . . . 6-7
Fuels in Foreign Countries . . . . . . . . . . . . . . . . . . . . . . 6-8
Filling the Tank . . . . . . . . . . . . . . . . . . . . . . . . . . . . . . . . . . 6-9
Filling a Portable Fuel Container . . . . . . . . . . . . . . . 6-11
Checking Things Under the Hood . . . . . . . . . . . . . . .6-12
Hood Release . . . . . . . . . . . . . . . . . . . . . . . . . . . . . . . . . 6-12
Engine Compartment Overview . . . . . . . . . . . . . . . . 6-14
Engine Oil . . . . . . . . . . . . . . . . . . . . . . . . . . . . . . . . . . . . . 6-15
Engine Oil Life System . . . . . . . . . . . . . . . . . . . . . . . . 6-18
Engine Air Cleaner/Filter . . . . . . . . . . . . . . . . . . . . . . . 6-20
Automatic Transmission Fluid . . . . . . . . . . . . . . . . . . 6-22
Cooling System . . . . . . . . . . . . . . . . . . . . . . . . . . . . . . . . 6-26
Engine Coolant . . . . . . . . . . . . . . . . . . . . . . . . . . . . . . . . 6-27 Engine Overheating . . . . . . . . . . . . . . . . . . . . . . . . . . . 6-32
Overheated Engine Protection
Operating Mode . . . . . . . . . . . . . . . . . . . . . . . . . . . . . 6-35
Engine Fan Noise . . . . . . . . . . . . . . . . . . . . . . . . . . . . . 6-35
Power Steering Fluid . . . . . . . . . . . . . . . . . . . . . . . . . . 6-36
Windshield Washer Fluid . . . . . . . . . . . . . . . . . . . . . . 6-37
Brakes . . . . . . . . . . . . . . . . . . . . . . . . . . . . . . . . . . . . . . . . . 6-38
Battery . . . . . . . . . . . . . . . . . . . . . . . . . . . . . . . . . . . . . . . . . 6-41
Jump Starting . . . . . . . . . . . . . . . . . . . . . . . . . . . . . . . . . . 6-42
All-Wheel Drive . . . . . . . . . . . . . . . . . . . . . . . . . . . . . . . . . . . 6-47
Rear Axle . . . . . . . . . . . . . . . . . . . . . . . . . . . . . . . . . . . . . . . . . 6-48
Front Axle . . . . . . . . . . . . . . . . . . . . . . . . . . . . . . . . . . . . . . . . . 6-49
Headlamp Aiming . . . . . . . . . . . . . . . . . . . . . . . . . . . . . . . . 6-50
Bulb Replacement . . . . . . . . . . . . . . . . . . . . . . . . . . . . . . . . 6-52
Halogen Bulbs . . . . . . . . . . . . . . . . . . . . . . . . . . . . . . . . . 6-53
Taillamps, Turn Signal, Stoplamps and Back-up Lamps . . . . . . . . . . . . . . . . . . . . . . . . . . . . . . 6-53
License Plate Lamp . . . . . . . . . . . . . . . . . . . . . . . . . . . . 6-54
Replacement Bulbs . . . . . . . . . . . . . . . . . . . . . . . . . . . . 6-54
Windshield Wiper Blade Replacement . . . . . . . . . . .6-55
Tires . . . . . . . . . . . . . . . . . . . . . . . . . . . . . . . . . . . . . . . . . . . . . . . 6-57
Tire Sidewall Labeling . . . . . . . . . . . . . . . . . . . . . . . . . 6-58
Tire Terminology and Definitions . . . . . . . . . . . . . . . 6-61
Inflation - Tire Pressure . . . . . . . . . . . . . . . . . . . . . . . . 6-64
6-1
Page 405 of 560
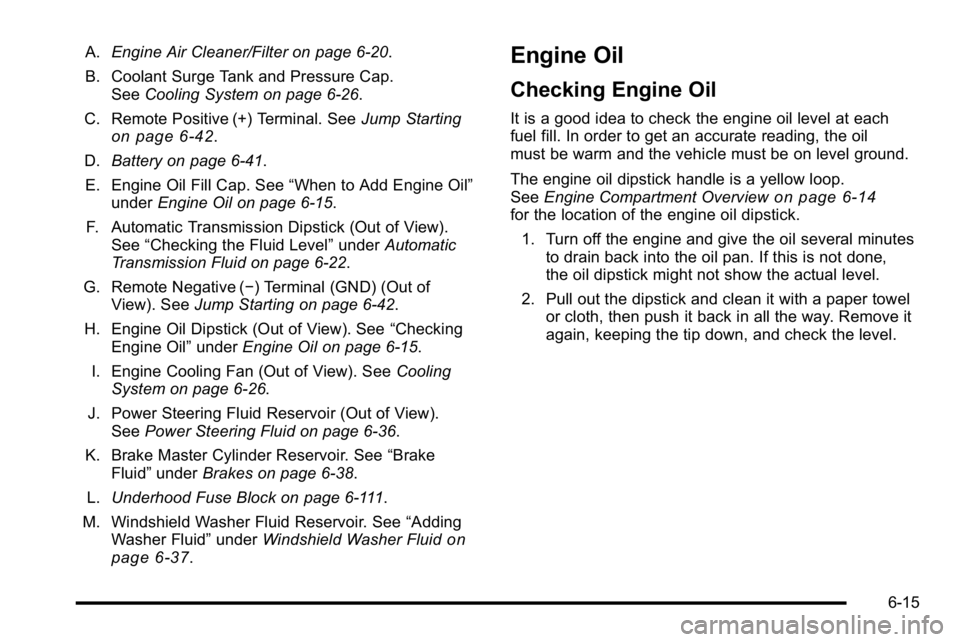
A.Engine Air Cleaner/Filter on page 6‑20.
B. Coolant Surge Tank and Pressure Cap. See Cooling System on page 6‑26.
C. Remote Positive (+) Terminal. See Jump Starting
on page 6‑42.
D. Battery on page 6‑41.
E. Engine Oil Fill Cap. See “When to Add Engine Oil”
under Engine Oil on page 6‑15.
F. Automatic Transmission Dipstick (Out of View). See “Checking the Fluid Level” underAutomatic
Transmission Fluid on page 6‑22.
G. Remote Negative (−) Terminal (GND) (Out of View). See Jump Starting on page 6‑42.
H. Engine Oil Dipstick (Out of View). See “Checking
Engine Oil” underEngine Oil on page 6‑15.
I. Engine Cooling Fan (Out of View). See Cooling
System on page 6‑26.
J. Power Steering Fluid Reservoir (Out of View). See Power Steering Fluid on page 6‑36.
K. Brake Master Cylinder Reservoir. See “Brake
Fluid” under Brakes on page 6‑38.
L. Underhood Fuse Block on page 6‑111.
M. Windshield Washer Fluid Reservoir. See “Adding
Washer Fluid” underWindshield Washer Fluid
on
page 6‑37.
Engine Oil
Checking Engine Oil
It is a good idea to check the engine oil level at each
fuel fill. In order to get an accurate reading, the oil
must be warm and the vehicle must be on level ground.
The engine oil dipstick handle is a yellow loop.
See Engine Compartment Overview
on page 6‑14for the location of the engine oil dipstick.
1. Turn off the engine and give the oil several minutes to drain back into the oil pan. If this is not done,
the oil dipstick might not show the actual level.
2. Pull out the dipstick and clean it with a paper towel or cloth, then push it back in all the way. Remove it
again, keeping the tip down, and check the level.
6-15
Page 451 of 560
Tire Terminology and Definitions
Air Pressure:The amount of air inside the tire
pressing outward on each square inch of the tire.
Air pressure is expressed in pounds per square
inch (psi) or kilopascal (kPa).
Accessory Weight
:This means the combined
weight of optional accessories. Some examples of
optional accessories are, automatic transmission,
power steering, power brakes, power windows,
power seats, and air conditioning.
Aspect Ratio
:The relationship of a tire's height
to its width.
Belt
:A rubber coated layer of cords that is
located between the plies and the tread. Cords
may be made from steel or other reinforcing
materials.
Bead
:The tire bead contains steel wires wrapped
by steel cords that hold the tire onto the rim.
Bias Ply Tire
:A pneumatic tire in which the plies
are laid at alternate angles less than 90 degrees
to the centerline of the tread. Cold Tire Pressure
:The amount of air pressure
in a tire, measured in pounds per square inch (psi)
or kilopascals (kPa) before a tire has built up heat
from driving. See Inflation - Tire Pressure
on
page 6‑64
.
Curb Weight
:The weight of a motor vehicle with
standard and optional equipment including the
maximum capacity of fuel, oil, and coolant, but
without passengers and cargo.
DOT Markings
:A code molded into the sidewall
of a tire signifying that the tire is in compliance
with the U.S. Department of Transportation (DOT)
motor vehicle safety standards. The DOT code
includes the Tire Identification Number (TIN), an
alphanumeric designator which can also identify
the tire manufacturer, production plant, brand, and
date of production.
GVWR
:Gross Vehicle Weight Rating. See
Loading the Vehicle
on page 5‑31.
GAWR FRT
:Gross Axle Weight Rating for the
front axle. See Loading the Vehicle
on page 5‑31.
GAWR RR
:Gross Axle Weight Rating for the rear
axle. See Loading the Vehicle
on page 5‑31.
6-61
Page 488 of 560
Spare Tire
Your vehicle, when new, had a fully-inflated spare tire.
A spare tire may lose air over time, so check its inflation
pressure regularly. SeeInflation - Tire Pressure
on
page 6‑64and Loading the Vehicleon page 5‑31for
information regarding proper tire inflation and loading
your vehicle. For instruction on how to remove, install or
store a spare tire, see Removing the Flat Tire and
Installing the Spare Tire
on page 6‑86and Storing a
Flat or Spare Tire and Tools on page 6‑94.
After installing the spare tire on your vehicle, you should
stop as soon as possible and make sure the spare is
correctly inflated. The spare tire is made to perform well
at speeds up to 70 mph (112 km/h) at the recommended
inflation pressure, so you can finish your trip.
Have the damaged or flat road tire repaired or replaced
as soon as you can and installed back onto your
vehicle. This way, a spare tire will be available in case
you need it again. Do not mix tires and wheels of
different sizes, because they will not fit. Keep your
spare tire and its wheel together.
Appearance Care
Interior Cleaning
The vehicle's interior will continue to look its best if it is
cleaned often. Although not always visible, dust and
dirt can accumulate on the upholstery. Dirt can damage
carpet, fabric, leather, and plastic surfaces. Regular
vacuuming is recommended to remove particles from
the upholstery. It is important to keep the upholstery
from becoming and remaining heavily soiled.
Soils should be removed as quickly as possible.
The vehicle's interior may experience extremes of
heat that could cause stains to set rapidly.
Lighter colored interiors may require more frequent
cleaning. Use care because newspapers and garments
that transfer color to home furnishings may also transfer
color to the vehicle's interior.
6-98
Page 489 of 560
When cleaning the vehicle's interior, only use cleaners
specifically designed for the surfaces being cleaned.
Permanent damage may result from using cleaners on
surfaces for which they were not intended. Use glass
cleaner only on glass. Remove any accidental
over-spray from other surfaces immediately. To prevent
over-spray, apply cleaner directly to the cleaning cloth.
Notice:Using abrasive cleaners when cleaning
glass surfaces on the vehicle, could scratch the
glass and/or cause damage to the rear window
defogger. When cleaning the glass on the vehicle,
use only a soft cloth and glass cleaner.
Many cleaners contain solvents that may become
concentrated in the vehicle's breathing space.
Before using cleaners, read and adhere to all safety
instructions on the label. While cleaning the vehicle's
interior, maintain adequate ventilation by opening the
vehicle's doors and windows.
Dust may be removed from small buttons and knobs
using a small brush with soft bristles. Products that remove odors from the vehicle's
upholstery and clean the vehicle's glass can be
obtained from your dealer/retailer.
Do not clean the vehicle using:
.A knife or any other sharp object to remove a soil
from any interior surface.
.A stiff brush. It can cause damage to the vehicle's
interior surfaces.
.Heavy pressure or aggressive rubbing with a
cleaning cloth. Use of heavy pressure can damage
the interior and does not improve the effectiveness
of soil removal.
.Laundry detergents or dishwashing soaps with
degreasers can leave residue that streaks and
attracts dirt. For liquid cleaners, about 20 drops per
gallon (3.78 L) of water is a good guide. Use only
mild, neutral-pH soaps.
.Too much cleaner that saturates the upholstery.
.Organic solvents such as naptha, alcohol, etc. that
can damage the vehicle's interior.
6-99
Page 510 of 560
When the Change Engine Oil Soon message displays,
certain services, checks, and inspections are required.
The services described for MaintenanceIshould be
performed at every engine oil change. The services
described for Maintenance IIshould be
performed when:
.Maintenance Iwas performed the last time the
engine oil was changed.
.It has been 10 months or more since the Change
Engine Oil Soon message has displayed or since
the last service.
Maintenance I
.Change engine oil and filter. See Engine Oilon
page 6‑15. An Emission Control Service.
.Engine coolant level check. See Engine Coolanton page 6‑27.
.Windshield washer fluid level check. See
Windshield Washer Fluid on page 6‑37.
.Tire inflation check. SeeInflation - Tire Pressureon page 6‑64.
.Tire wear inspection. See Tire Inspection and
Rotation on page 6‑71.
.Rotate tires. See Tire Inspection and Rotationon
page 6‑71.
.Fluids visual leak check (or every 12 months,
whichever occurs first). A leak in any system
must be repaired and the fluid level checked.
.Engine air cleaner filter inspection (vehicles
driven in dusty conditions only). See Engine
Air Cleaner/Filter on page 6‑20.
.Brake system inspection (or every 12 months,
whichever occurs first).
Maintenance II
.Perform all services described in Maintenance I.
.Steering and suspension inspection. Visual
inspection for damaged, loose, or missing parts or
signs of wear.
.Lubricate the front suspension, steering linkage,
and parking brake cable guides. Control arm ball
joints are maintenance‐free.
.Engine cooling system inspection. Visual
inspection of hoses, pipes, fittings, and clamps
and replacement, if needed.
7-4