buttons GMC YUKON XL 2011 Workshop Manual
[x] Cancel search | Manufacturer: GMC, Model Year: 2011, Model line: YUKON XL, Model: GMC YUKON XL 2011Pages: 528, PDF Size: 7.64 MB
Page 273 of 528
Black plate (7,1)GMC Yukon/Yukon XL Owner Manual - 2011
Climate Controls 8-7
-(Defog):This mode clears the
windows of fog or moisture. Air is
directed to the windshield, floor
outlets, and side window vents.
In this mode, the system turns
off recirculation and runs the air
conditioning compressor unless
the outside temperature is close to
freezing. The recirculation mode
cannot be selected while in the
defog mode.
0(Defrost): This mode removes
fog or frost from the windshield
more quickly. Air is directed to the
windshield and side window vents,
with some directed to the floor
vents. In this mode, the system
automatically forces outside air
into the vehicle and runs the air
conditioning compressor unless
the outside temperature is close to
freezing. The recirculation mode
cannot be selected while in the
defrost mode. The passenger temperature
control cannot be activated while in
defrost mode. If the PASS button is
pressed, the button indicator flashes
three times and will not work. If the
passenger temperature buttons are
adjusted, the driver temperature
indicator changes. The passenger
temperature will not be displayed.
If vent, bi-level, or floor mode is
selected again, the climate control
system displays the previous
temperature settings.
Do not drive the vehicle until all the
windows are clear.
#(Air Conditioning):
Press
to turn the air conditioning (A/C)
compressor on and off. An indicator
light comes on to show that the air
conditioning is on. If this button is pressed when the
air conditioning compressor is
unavailable, the indicator flashes
three times and then turns off. If
the air conditioning is on and the
outside temperature drops below a
temperature which is too cool for air
conditioning to be effective, the air
conditioning light turns off to show
that the air conditioning mode has
been canceled.
On hot days, open the windows long
enough to let hot inside air escape.
This helps to reduce the time it
takes for the vehicle to cool down.
It also helps the system to operate
more efficiently.
The air conditioning system
removes moisture from the air, so
a small amount of water might drip
under the vehicle while idling or
after turning off the engine. This is
normal.
Page 278 of 528
Black plate (12,1)GMC Yukon/Yukon XL Owner Manual - 2011
8-12 Climate Controls
The rear climate control system can
also be turned off by pressing and
holding the
Cbutton. To turn the
system on from the rear seats,
press any rear climate control
button, except the
Cbutton.
Mimic Mode: This mode matches
the rear climate control to the front
climate control airflow settings.
It comes on when REAR is pressed
the first time.
Independent Mode: This mode
directs rear seating airflow
according to the settings of the
rear controls.
To turn the system on from the
rear, press any rear climate control
button, except the
Cbutton.
Automatic Operation, If
Equipped
AUTO: Press the air delivery
mode button until this setting is
selected to control the inside
temperature, air delivery, and fan
speed. AUTO appears in the display
when automatic operation is active.
+/−(Increase/Decrease
Temperature): Press the +
or −buttons to increase or
decrease the cabin temperature.
The rear control temperature
display will show the temperature
setting increasing or decreasing.
The display only indicates climate
control functions when the system is
in rear independent mode.
Manual Operation
D C(Fan Control): Press these
buttons on the rear seat audio
control panel to increase or
decrease the airflow. Pressing
the fan up button when the system
is off will turn the system on. The air
delivery mode will remain under
automatic control.
+/−(Temperature Control):
Press these buttons to adjust
the temperature of the air flowing
into the passenger area. Press
the + button for warmer air and
press the −button for cooler air.
N(Air Delivery Mode Control):
Press the mode button to change
the direction of the airflow in the
vehicle. Repeatedly press the
button until the desired mode
appears on the display. Multiple
presses will cycle through the
delivery selections.
Page 321 of 528
Black plate (41,1)GMC Yukon/Yukon XL Owner Manual - 2011
Driving and Operating 9-41
Manual Mode
Range Selection Mode
(Hydra-Matic®6-Speed
Transmission)
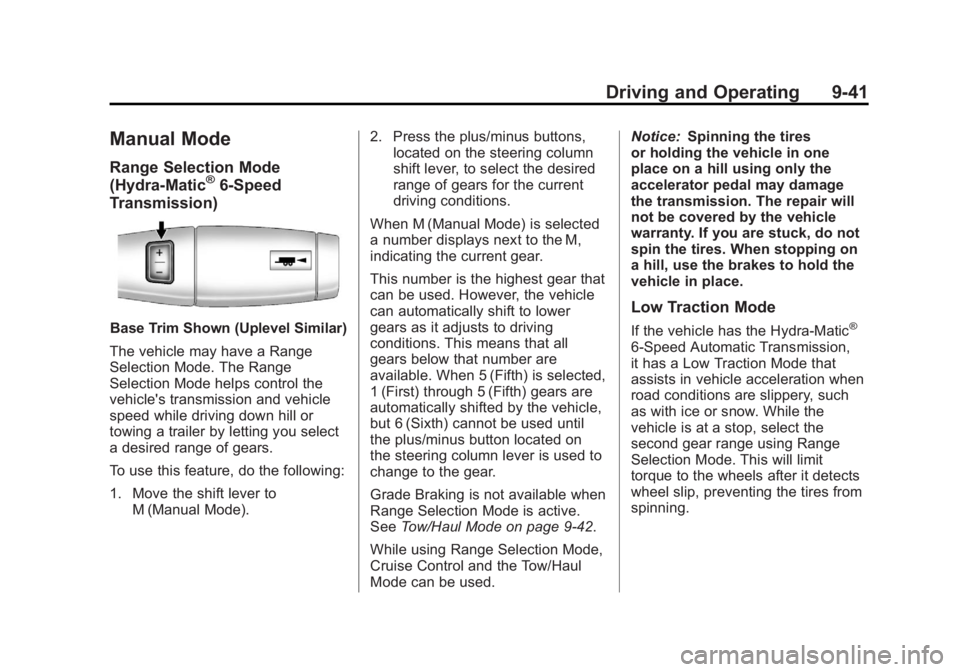
Base Trim Shown (Uplevel Similar)
The vehicle may have a Range
Selection Mode. The Range
Selection Mode helps control the
vehicle's transmission and vehicle
speed while driving down hill or
towing a trailer by letting you select
a desired range of gears.
To use this feature, do the following:
1. Move the shift lever to M (Manual Mode). 2. Press the plus/minus buttons,
located on the steering column
shift lever, to select the desired
range of gears for the current
driving conditions.
When M (Manual Mode) is selected
a number displays next to the M,
indicating the current gear.
This number is the highest gear that
can be used. However, the vehicle
can automatically shift to lower
gears as it adjusts to driving
conditions. This means that all
gears below that number are
available. When 5 (Fifth) is selected,
1 (First) through 5 (Fifth) gears are
automatically shifted by the vehicle,
but 6 (Sixth) cannot be used until
the plus/minus button located on
the steering column lever is used to
change to the gear.
Grade Braking is not available when
Range Selection Mode is active.
See Tow/Haul Mode on page 9‑42.
While using Range Selection Mode,
Cruise Control and the Tow/Haul
Mode can be used. Notice:
Spinning the tires
or holding the vehicle in one
place on a hill using only the
accelerator pedal may damage
the transmission. The repair will
not be covered by the vehicle
warranty. If you are stuck, do not
spin the tires. When stopping on
a hill, use the brakes to hold the
vehicle in place.
Low Traction Mode
If the vehicle has the Hydra-Matic®
6-Speed Automatic Transmission,
it has a Low Traction Mode that
assists in vehicle acceleration when
road conditions are slippery, such
as with ice or snow. While the
vehicle is at a stop, select the
second gear range using Range
Selection Mode. This will limit
torque to the wheels after it detects
wheel slip, preventing the tires from
spinning.
Page 336 of 528
Black plate (56,1)GMC Yukon/Yukon XL Owner Manual - 2011
9-56 Driving and Operating
Cruise Control
{WARNING
Cruise control can be dangerous
where you cannot drive safely at
a steady speed. So, do not use
the cruise control on winding
roads or in heavy traffic.
Cruise control can be dangerous
on slippery roads. On such roads,
fast changes in tire traction can
cause excessive wheel slip, and
you could lose control. Do not use
cruise control on slippery roads.
With cruise control, a speed of
about 40 km/h (25 mph) or more can
be maintained without keeping your
foot on the accelerator. Cruise
control does not work at speeds
below about 40 km/h (25 mph).
When the brakes are applied, cruise
control is turned off. If the vehicle has StabiliTrak and the
system begins to limit wheel spin,
cruise control will automatically
disengage. See
StabiliTrak
®System
on page 9‑52. When road conditions
allow the cruise control to be safely
used again, it can be turned
back on.
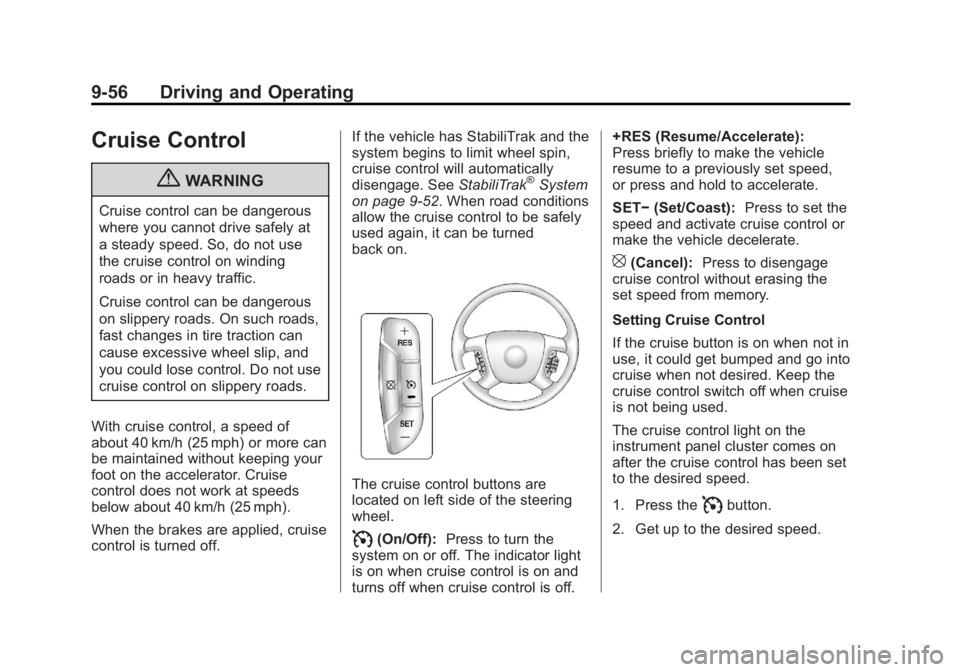
The cruise control buttons are
located on left side of the steering
wheel.
I(On/Off): Press to turn the
system on or off. The indicator light
is on when cruise control is on and
turns off when cruise control is off. +RES (Resume/Accelerate):
Press briefly to make the vehicle
resume to a previously set speed,
or press and hold to accelerate.
SET−
(Set/Coast): Press to set the
speed and activate cruise control or
make the vehicle decelerate.
[(Cancel): Press to disengage
cruise control without erasing the
set speed from memory.
Setting Cruise Control
If the cruise button is on when not in
use, it could get bumped and go into
cruise when not desired. Keep the
cruise control switch off when cruise
is not being used.
The cruise control light on the
instrument panel cluster comes on
after the cruise control has been set
to the desired speed.
1. Press the
Ibutton.
2. Get up to the desired speed.
Page 345 of 528
Black plate (65,1)GMC Yukon/Yukon XL Owner Manual - 2011
Driving and Operating 9-65
Adjusting the Brightness and
Contrast of the Screen
To adjust the brightness and
contrast of the screen, press the
MENU button while the rear vision
camera image is on the display. Any
adjustments made will only affect
the rear vision camera screen.
](Brightness):Touch the + (plus)
or –(minus) screen buttons to
increase or decrease the brightness
of the screen.
_(Contrast): Touch the + (plus)
or –(minus) screen buttons to
increase or decrease the contrast of
the screen. Symbols
The navigation system may have
a feature that lets the driver view
symbols on the navigation screen
while using the rear vision camera.
The Ultrasonic Rear Park Assist
(URPA) system must not be
disabled to use the caution symbols.
If URPA has been disabled and the
symbols have been turned on, the
Rear Parking Assist Symbols
Unavailable error message may
display. See
Ultrasonic Parking
Assist on page 9‑58.
The symbols appear when an object
has been detected by the URPA
system. The symbol may cover the
object when viewing the navigation
screen. To turn the symbols on or off:
1. Make sure that URPA has not
been disabled.
2. Shift into P (Park).
3. Press the MENU hard key to enter the configure menu
options, then press the MENU
hard key repeatedly until Display
is selected or touch the Display
screen button.
4. Select the Rear Camera Options screen button. The Rear Camera
Options screen will display.
5. Touch the Symbols screen button. The screen button will be
highlighted when on.
Page 369 of 528
Black plate (89,1)GMC Yukon/Yukon XL Owner Manual - 2011
Driving and Operating 9-89
When trailering, make sure of the
following:
.The ITBC system is used only
with trailers that are equipped
with electric brakes.
.All applicable local and federal
laws and regulations are
followed.
.All electrical and mechanical
connections to the trailer are
made correctly.
.The trailer’s brakes are in proper
working condition.
.The trailer and vehicle are
properly loaded for the towing
condition.
The ITBC system is a factory
installed item. Out‐of‐factory
installation of this system should not
be attempted. GM is not responsible
for warranty or performance of the
system resulting from out‐of‐factory
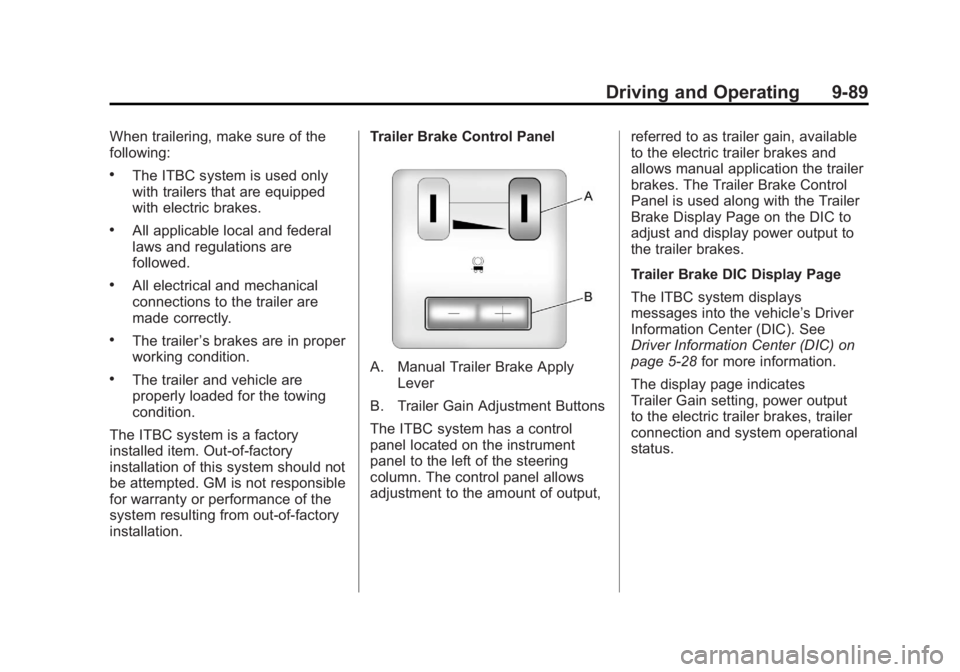
installation. Trailer Brake Control PanelA. Manual Trailer Brake Apply
Lever
B. Trailer Gain Adjustment Buttons
The ITBC system has a control
panel located on the instrument
panel to the left of the steering
column. The control panel allows
adjustment to the amount of output, referred to as trailer gain, available
to the electric trailer brakes and
allows manual application the trailer
brakes. The Trailer Brake Control
Panel is used along with the Trailer
Brake Display Page on the DIC to
adjust and display power output to
the trailer brakes.
Trailer Brake DIC Display Page
The ITBC system displays
messages into the vehicle’s Driver
Information Center (DIC). See
Driver Information Center (DIC) on
page 5‑28
for more information.
The display page indicates
Trailer Gain setting, power output
to the electric trailer brakes, trailer
connection and system operational
status.
Page 370 of 528
Black plate (90,1)GMC Yukon/Yukon XL Owner Manual - 2011
9-90 Driving and Operating
The Trailer Brake Display Page can
be displayed by performing any of
the following actions:
.Scrolling through the DIC
menu pages using the odometer
trip stem or the DIC Vehicle
Information button (if equipped).
.Pressing a Trailer Gain
button–If the Trailer Brake
Display Page is not currently
displayed, pressing a Trailer
Gain button will first recall the
current Trailer Gain setting.
After the Trailer Brake Display
Page is displayed, each press
and release of the gain buttons
will then cause the Trailer Gain
setting to change.
.Activating the Manual Trailer
Brake Apply lever
.Connecting a trailer equipped
with electric trailer brakes All DIC warning and service
messages must first be
acknowledged by the driver
by pressing the odometer trip
stem or the DIC Vehicle Information
button (if equipped) before the
Trailer Brake Display Page can be
displayed and Trailer Gain can be
adjusted.
TRAILER GAIN
–This setting is
displayed anytime the Trailer Brake
Display Page is active. This setting
can be adjusted from 0.0 to 10.0
with either a trailer connected or
disconnected. To adjust the Trailer
Gain, press one of the Trailer Gain
adjustment buttons located on the
Trailer Brake Control Panel. Press
and hold a gain button to cause the
Trailer Gain to continuously adjust.
To turn the output to the trailer off,
adjust the Trailer Gain setting to
0.0 (zero).
0.0 (zero) gain is the factory
default setting. To properly adjust
trailer gain, see the Trailer Gain
Adjustment Procedure later in this
section. TRAILER OUTPUT
–This is
displayed any time a trailer with
electric brakes is connected.
Output to the electric brakes is
based on the amount of vehicle
braking present and relative to
the Trailer Gain setting. Output is
displayed from 0 to 10 bars for each
gain setting.
The Trailer Output will
indicate “- - - - - -“ on the
Trailer Brake Display Page
whenever the following occur:
.No trailer is connected.
.A trailer without electric brakes
is connected (no DIC message
is displayed).
.A trailer with electric brakes
has become disconnected
(a CHECK TRAILER WIRING
message will also be displayed
on the DIC).
Page 372 of 528
Black plate (92,1)GMC Yukon/Yukon XL Owner Manual - 2011
9-92 Driving and Operating
.In the Trailer Output display
on the DIC,“- - - - - -“will
disappear if there is no
error present. Connecting
a trailer without electric
brakes will not clear the
six dashed lines.
4. Adjust the Trailer Gain by using the gain adjustment (+ / -)
buttons on the Trailer Brake
Control Panel.
5. Drive the vehicle with the trailer attached on a level road
surface representative of the
towing condition and free of
traffic at about 32 to 40 km/h
(20 to 25 mph) and fully apply
the Manual Trailer Brake Apply
lever.
Adjusting trailer gain at speeds
lower than 32 to 40 km/h
(20 to 25 mph) may result in an
incorrect gain setting. 6. Adjust the Trailer Gain to just
below the point of trailer wheel
lock-up, indicated by trailer
wheel squeal or tire smoke when
a trailer wheel locks.
Trailer wheel lock-up may not
occur if towing a heavily loaded
trailer. In this case, adjust the
Trailer Gain to the highest
allowable setting for the towing
condition.
7. Re-adjust Trailer Gain any time vehicle loading, trailer loading or
road surface conditions change
or if trailer wheel lock-up is
noticed at any time while towing
Other ITBC Related DIC Messages
In addition to displaying TRAILER
GAIN and TRAILER OUTPUT
through the DIC, trailer connection
and ITBC system status is displayed
in the DIC. TRAILER CONNECTED
–This
message will be briefly displayed
when a trailer with electric brakes is
first connected to the vehicle. This
message will automatically turn off
in about ten seconds. The driver
can also acknowledge this message
before it automatically turns off.
CHECK TRAILER WIRING –This
message will be displayed if:
1. The ITBC system first determines connection to a
trailer with electric brakes and
then the trailer harness becomes
disconnected from the vehicle.
If the disconnect occurs while
the vehicle is stationary, this
message will automatically
turn off in about thirty seconds.
This message will also turn off if
the driver acknowledges this
message off or if the trailer
harness is re-connected.
Page 389 of 528
Black plate (11,1)GMC Yukon/Yukon XL Owner Manual - 2011
Vehicle Care 10-11
It is possible that, if driving under
the best conditions, the oil life
system might indicate that an
oil change is not necessary for
up to a year. The engine oil and
filter must be changed at least
once a year and, at this time, the
system must be reset. For vehicles
without the CHANGE ENGINE
OIL SOON message, an oil change
is needed when the OIL LIFE
REMAINING percentage is near
0%. Your dealer has trained service
people who will perform this work
and reset the system. It is also
important to check the oil regularly
over the course of an oil drain
interval and keep it at the proper
level.
If the system is ever reset
accidentally, the oil must be
changed at 5 000 km (3,000 mi)
since the last oil change.
Remember to reset the oil life
system whenever the oil is
changed.How to Reset the Engine Oil
Life System
Reset the system whenever the
engine oil is changed so that the
system can calculate the next
engine oil change. Always reset the
engine oil life to 100% after every oil
change. It will not reset itself. To
reset the system on most vehicles:
1. Display the OIL LIFEREMAINING on the DIC.
If the vehicle does not have
DIC buttons, the vehicle must
be in P (Park) to access this
display. See Driver Information
Center (DIC) on page 5‑28.
2. Press and hold the SET/RESET button on the DIC, or the trip
odometer reset stem if the
vehicle does not have DIC
buttons, for more than
five seconds. The oil life
will change to 100%. On all vehicles, the Engine Oil Life
System can be reset as follows:
1. Turn the ignition to ON/RUN with
the engine off.
2. Fully press the accelerator pedal slowly three times within
five seconds.
3. Display the OIL LIFE REMAINING on the DIC. If the
display shows 100%, the system
is reset. See Driver Information
Center (DIC) on page 5‑28.
If the vehicle has a CHANGE
ENGINE OIL SOON message and
it comes back on when the vehicle
is started and/or the OIL LIFE
REMAINING is near 0%, the engine
oil life system has not been reset.
Repeat the procedure.
Page 481 of 528
Black plate (103,1)GMC Yukon/Yukon XL Owner Manual - 2011
Vehicle Care 10-103
Dust may be removed from small
buttons and knobs using a small
brush with soft bristles.
Products that remove odors from
the upholstery and clean the glass
can be obtained from your dealer.
Do not clean the vehicle using:
.A knife or any other sharp object
to remove a soil from any interior
surface.
.A stiff brush. It can cause
damage to the interior surfaces.
.Heavy pressure or aggressive
rubbing with a cleaning cloth.
Use of heavy pressure can
damage the interior and does
not improve the effectiveness of
soil removal.
.Laundry detergents or
dishwashing soaps with
degreasers can leave residue
that streaks and attracts dirt. For
liquid cleaners, about 20 drops
per 3.78 L (1 gal) of water is a
good guide. Use only mild,
neutral-pH soaps.
.Too much cleaner that saturates
the upholstery.
.Cleaners that contain solvents
can damage the interior.
Fabric/Carpet
Use a vacuum cleaner with a
soft brush attachment frequently
to remove dust and loose dirt.
A canister vacuum with a beater bar
in the nozzle may only be used on
floor carpet and carpeted floor mats.
For any soil, always try to remove it
first with plain water or club soda.
Before cleaning, gently remove as
much of the soil as possible using
one of the following techniques:
.For liquids: gently blot the
remaining soil with a paper
towel. Allow the soil to absorb
into the paper towel until no
more can be removed.
.For solid dry soils: remove as
much as possible and then
vacuum.To clean:
1. Saturate a lint-free, clean white
cloth with water or club soda.
2. Wring the cloth to remove excess moisture.
3. Start on the outside edge of the soil and gently rub toward the
center. Continue cleaning, using
a clean area of the cloth each
time it becomes soiled.
4. Continue to gently rub the soiled area until the cleaning cloth
remains clean.
5. If the soil is not completely removed, use a mild soap
solution and repeat the cleaning
process that was used with plain
water.
If any of the soil remains, a
commercial fabric cleaner or spot
lifter may be necessary. When a
commercial upholstery cleaner or
spot lifter is to be used, test a small
hidden area for colorfastness first.