transmission oil GREAT WALL FLORID 2008 Service Manual
[x] Cancel search | Manufacturer: GREAT WALL, Model Year: 2008, Model line: FLORID, Model: GREAT WALL FLORID 2008Pages: 281, PDF Size: 43.97 MB
Page 51 of 281
Downloaded from www.Manualslib.com manuals search engine GWFLORID Maintenance Manual44
Transmission's Proper Use and Care
1. Transmission's proper operation
1.1 Shift the gear gently, not excessively.
1.2 Do not start with high speed.
1.3 To avoid premature abrasion of the gear shift fork, do not rest your hand on the \
gear lever while driving.
2. Model number of the lubricant to be used:
GL-4 80W-90 (For China domestic model)
GL-4 75W-90 (For alpine region model)
GL-5 140 (For high-temperature region model)
Caution: Please only use the lubricant with model numbers specified by t\
he Great Wall Motor Co., Ltd.
Do not mix lubricants with different model numbers. Only fill with clean lubricant.
3. Areas of importance for new vehicle usage:
3.1 Before using a new vehicle, be sure to check the transmission and all exposed connectors and fastening
pieces, so as to avoid failure due to faulty installation or loose conne\
ctions.
3.2 Since the new vehicle is still in the run-in period, the transmission's lubricant should be replaced after 5000 km
distance.
4. Transmission three-level maintenance:
4.1 Transmission level-one maintenance: During the first level of maintenance, the liquid level of the lubricant
should be checked to ensure that it is up to the oil-filling mouth. Add more if insufficient. Excessive low
oil level can lead to ineffective lubrication, as well as burning of the bearings and gears. Excessive high oil
level, however, can overheat the transmission or cause oil to leak. In addition, during the first level of main-
tenance, the breather plug should be checked and cleaned. If the breather plug is clogged, internal pressure
will build up and oil will leak from the transmission.
4.2 Transmission level-two maintenance: The transmission's lubricant should be replaced the first time that the
vehicle undergoes the second level of maintenance. Clean the transmission with kerosene. The quality of the
lubricant should be inspected during the future second level of maintenance practises. The lubricant should
be replaced if diluted, gummy, or dirty.
4.3 Transmission level-three maintenance: During the third level of maintenance, it should be removed for in-
spection, cleaning, and oil changing.
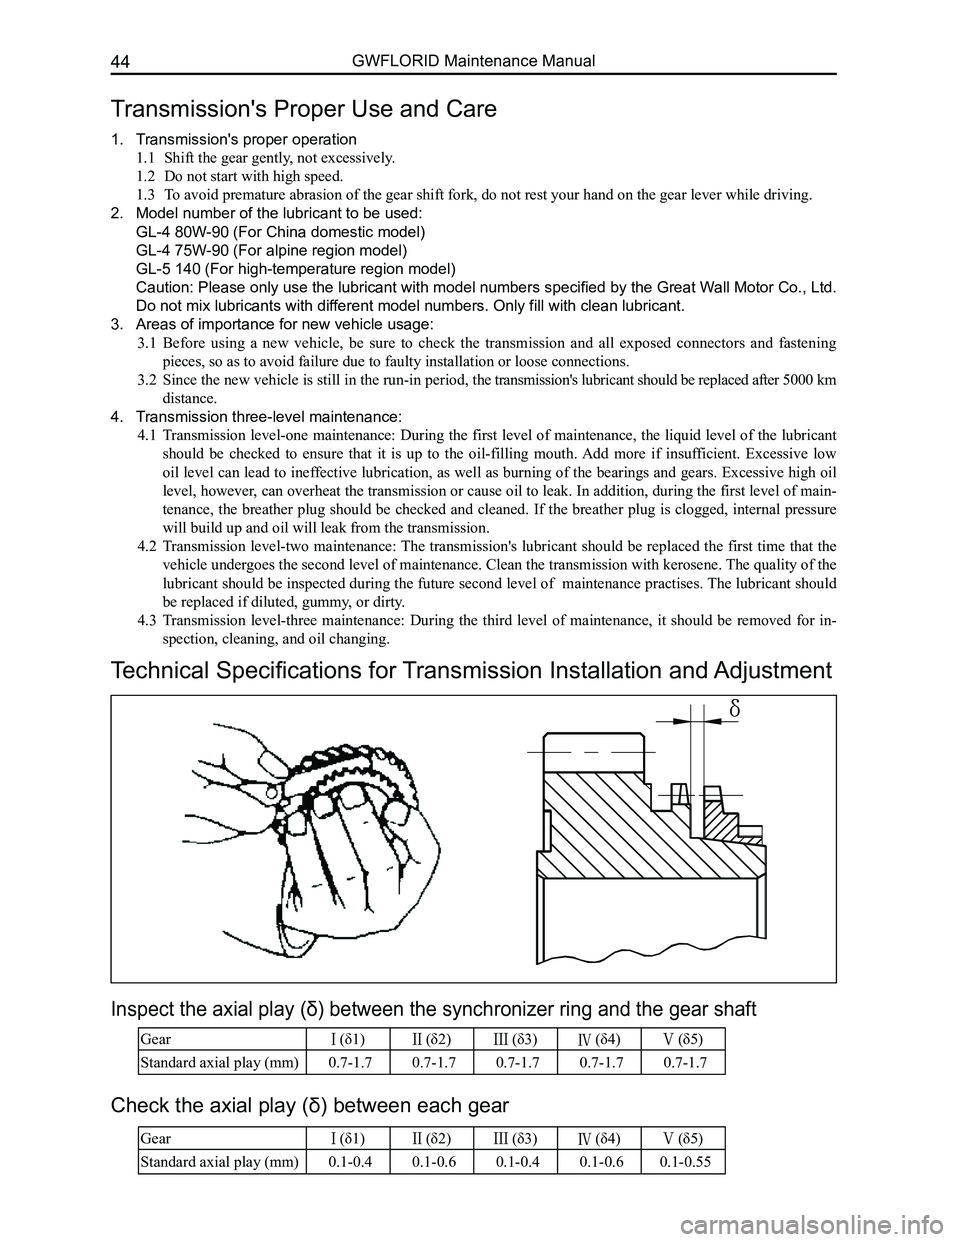
Technical Specifications for Transmission Installation and Adjustment
Inspect the axial play (δ) between the synchronizer ring and the gear shaft
Gear (δ1) (δ2) (δ3) (δ4) (δ5)
Standard axial play (mm)0.7-1.70.7-1.70.7-1.70.7-1.70.7-1.7
Gear (δ1) (δ2) (δ3) (δ4) (δ5)
Standard axial play (mm)0.1-0.40.1-0.60.1-0.40.1-0.60.1-0.55
Check the axial play (δ) between each gear
Page 52 of 281
Downloaded from www.Manualslib.com manuals search engine 45Transmission
Areas of Importance
Removal
During removal, all components should be gently handled to avoid knocking, especially the joint surface.
All components should be placed in the proper order to avoid misplacing \
and mistaking.
Installation
1. Clean all parts before installation (except rubber pieces and gaskets)\
.
2. All oil seals, shaft retainers, and elastic pins should not be reused.
3. All rubbing surfaces should be coated with lubricant, and the lips of all oil seals should be coated with
grease.
4. During installation of the bearings, do not use any kind of rolling element to transmit pressure, and
make sure not to tilt it.
5. During the installation of synchronizer components, the two sides of the spring piston's openings
should alternate.
6. When the transmission is operating under normal working conditions, there should be no lubricant
leakage from any of the parts.
Transportation and storage
1. When transporting a transmission, make sure the conditions are dustproof and rainproof, as well as
take proper care not to damage it due to jolting, shaking, removal, or i\
nstallation.
2. Transmission assembly should be stored in a ventilated, dustproof, and dr\
y place.
3. Users with special transportation or storage requirements should have another discussion to reach an
agreement on this matter in the supply contract.
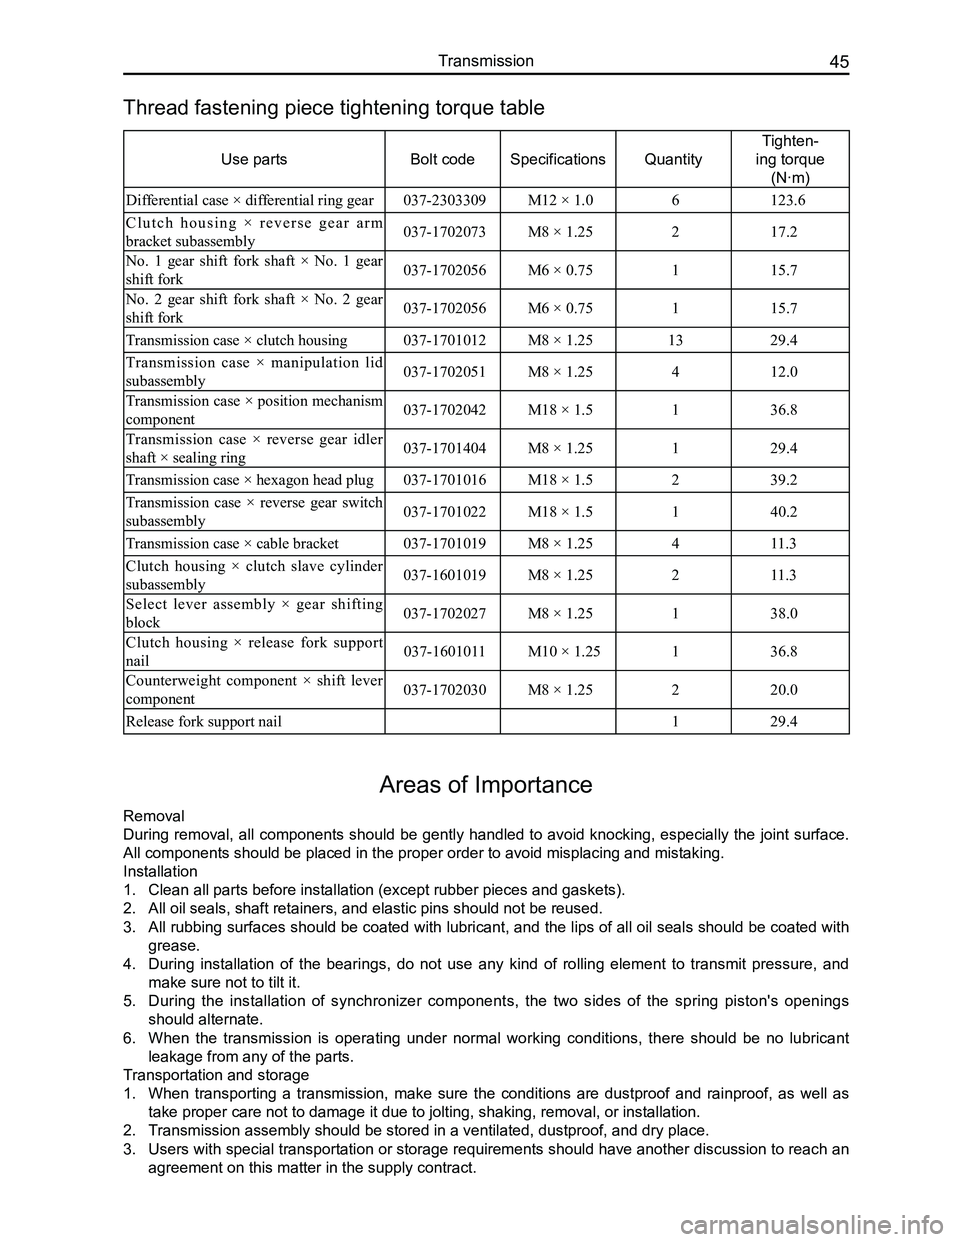
Use partsBolt codeSpecificationsQuantity
Tighten-
ing torque
(N·m)
Differential case × differential ring gear037-2303309M12 × 1.06123.6
C l u t c h h o u s i n g × r e v e r s e g e a r a r m
bracket subassembly037-1702073M8 × 1.25217.2
No. 1 gear shift fork shaft × No. 1 gear
shift fork037-1702056M6 × 0.75115.7
No. 2 gear shift fork shaft × No. 2 gear
shift fork037-1702056M6 × 0.75115.7
Transmission case × clutch housing037-1701012M8 × 1.251329.4
Transmission case × manipulation lid
subassembly037-1702051M8 × 1.25412.0
Transmission case × position mechanism
component037-1702042M18 × 1.5136.8
Transmission case × reverse gear idler
shaft × sealing ring037-1701404M8 × 1.25129.4
Transmission case × hexagon head plug037-1701016M18 × 1.5239.2
Transmission case × reverse gear switch
subassembly037-1701022M18 × 1.5140.2
Transmission case × cable bracket037-1701019M8 × 1.25411.3
Clutch housing × clutch slave cylinder
subassembly037-1601019M8 × 1.25211.3
Select lever assembly × gear shifting
block037-1702027M8 × 1.25138.0
Clutch housing × release fork support
nail037-1601011M10 × 1.25136.8
Counterweight component × shift lever
component037-1702030M8 × 1.25220.0
Release fork support nail129.4
Thread fastening piece tightening torque table
Page 54 of 281
Downloaded from www.Manualslib.com manuals search engine 47Transmission
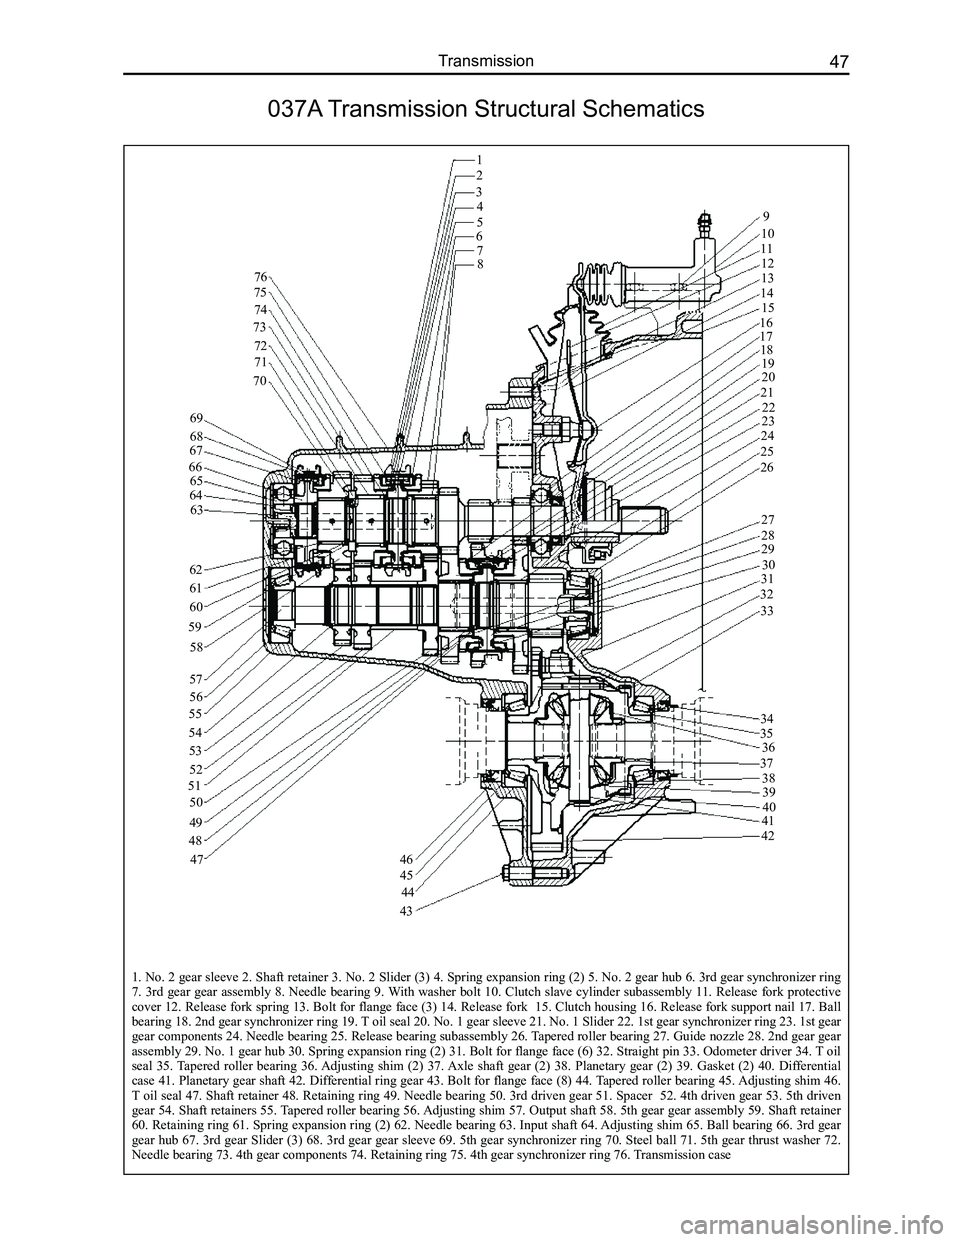
1. No. 2 gear sleeve 2. Shaft retainer 3. No. 2 Slider (3) 4. Spring expansion ring (2) 5. No. 2 gear hub 6. 3rd gear synchronizer ring 7. 3rd gear gear assembly 8. Needle bearing 9. With washer bolt 10. Clutch slave cylinder subassembly 11. Release fork protective cover 12. Release fork spring 13. Bolt for flange face (3) 14. Release fork 15. Clutch housing 16. Release fork support nail 17. Ball bearing 18. 2nd gear synchronizer ring 19. T oil seal 20. No. 1 gear sleeve 21. No. 1 Slider 22. 1st gear synchronizer ring 23. 1st gear gear components 24. Needle bearing 25. Release bearing subassembly 26. Tapered roller bearing 27. Guide nozzle 28. 2nd gear gear
assembly 29. No. 1 gear hub 30. Spring expansion ring (2) 31. Bolt for flange face (6) 32. Straight pin 33. Odometer driver 34. T oil seal 35. Tapered roller bearing 36. Adjusting shim (2) 37. Axle shaft gear (2) 38. Planetary gear (2) 39. Gasket (2) 40. Differential case 41. Planetary gear shaft 42. Differential ring gear 43. Bolt for flange face (8) 44. Tapered roller bearing 45. Adjusting shim 46. T oil seal 47. Shaft retainer 48. Retaining ring 49. Needle bearing 50. 3rd driven gear 51. Spacer 52. 4th driven gear 53. 5th driven gear 54. Shaft retainers 55. Tapered roller bearing 56. Adjusting shim 57. Output shaft 58. 5th gear gear assembly 59. Shaft retainer 60. Retaining ring 61. Spring expansion ring (2) 62. Needle bearing 63. Input shaft 64. Adjusting shim 65. Ball bearing 66. 3rd gear gear hub 67. 3rd gear Slider (3) 68. 3rd gear gear sleeve 69. 5th gear synchronizer ring 70. Steel ball 71. 5th gear thrust washer 72. Needle bearing 73. 4th gear components 74. Retaining ring 75. 4th gear synchronizer ring 76. Transmission case
037A Transmission Structural Schematics
1
2
34
567
9
8
10
111213
1415
1617181920
21
222324
25
26
27
2829
3031
32
33
343536
37
3839
4041
42
43
44
45
4647
48
49
50
51
52
53
54
55
59
56
57
58
60
61
62
63646566
6768
69
70
71
72
73
74
75
76
Page 57 of 281
Downloaded from www.Manualslib.com manuals search engine GWFLORID Maintenance Manual50
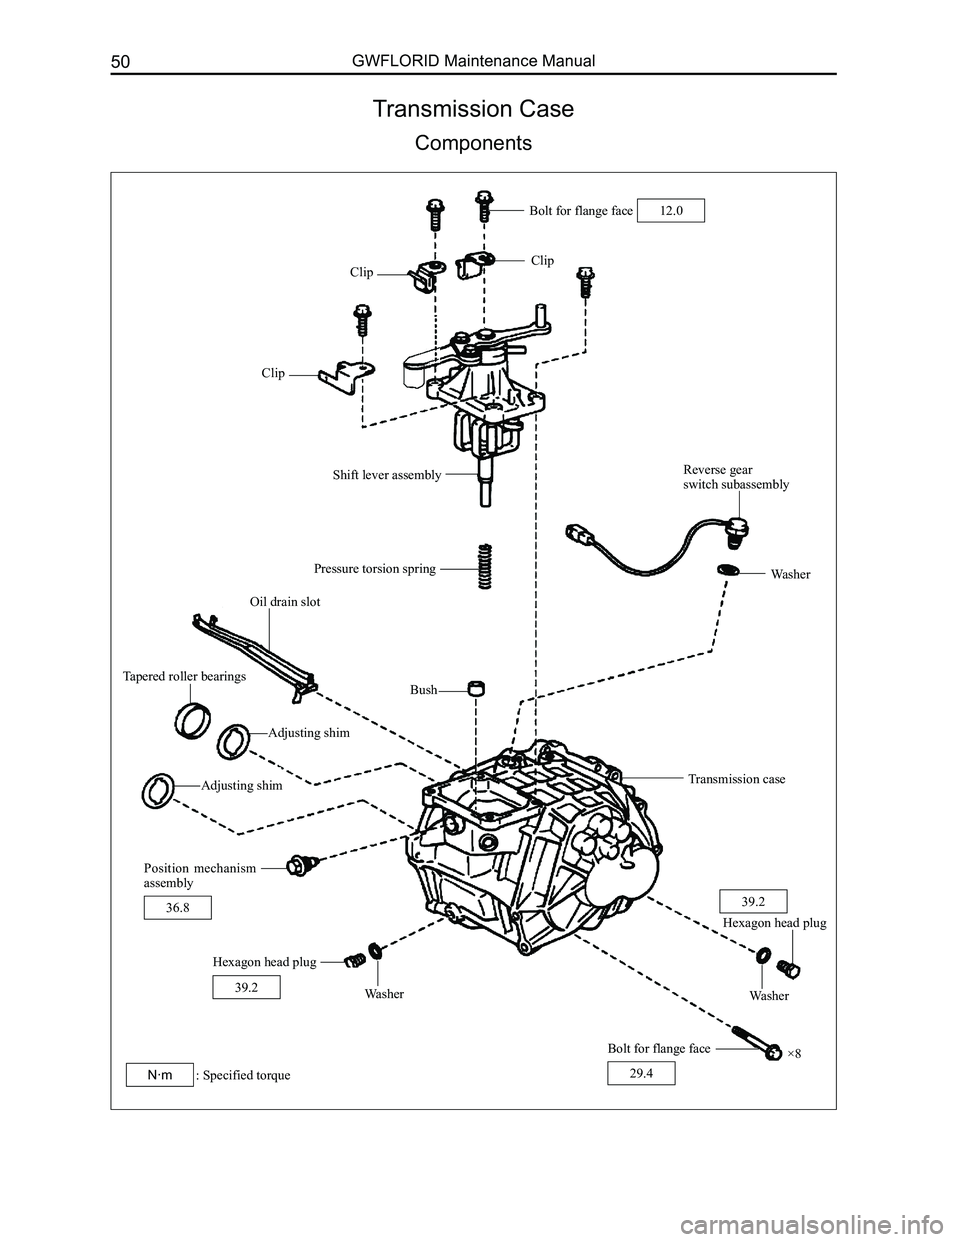
Transmission Case
Components
Clip
Shift lever assembly
Pressure torsion spring
Reverse gear switch subassembly
Washer
Bush
Oil drain slot
Tapered roller bearings
Adjusting shim
Transmission case
Clip
Clip
Adjusting shim
×8
WasherWasher
Hexagon head plug
39.2
Bolt for flange face12.0
: Specified torqueN·m
Hexagon head plug
39.2
Bolt for flange face
29.4
Position mechanism assembly
36.8
Page 62 of 281
Downloaded from www.Manualslib.com manuals search engine 55Transmission
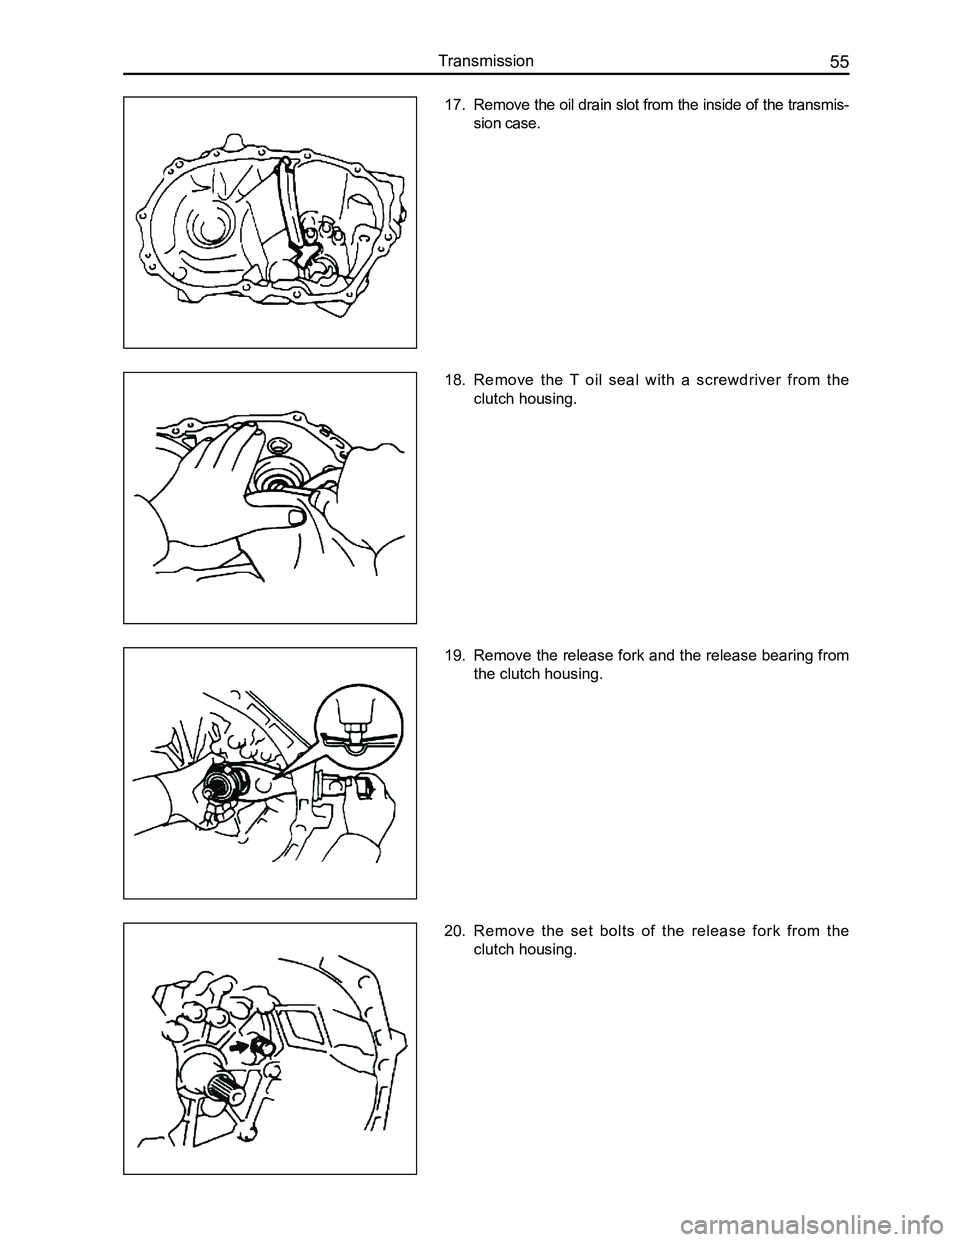
17. Remove the oil drain slot from the inside of the transmis-
sion case.
18. Remove the T oil seal with a screwdriver from the
clutch housing.
19. Remove the release fork and the release bearing from
the clutch housing.
20. Remove the set bolts of the release fork from the
clutch housing.
Page 74 of 281
Downloaded from www.Manualslib.com manuals search engine 67Transmission
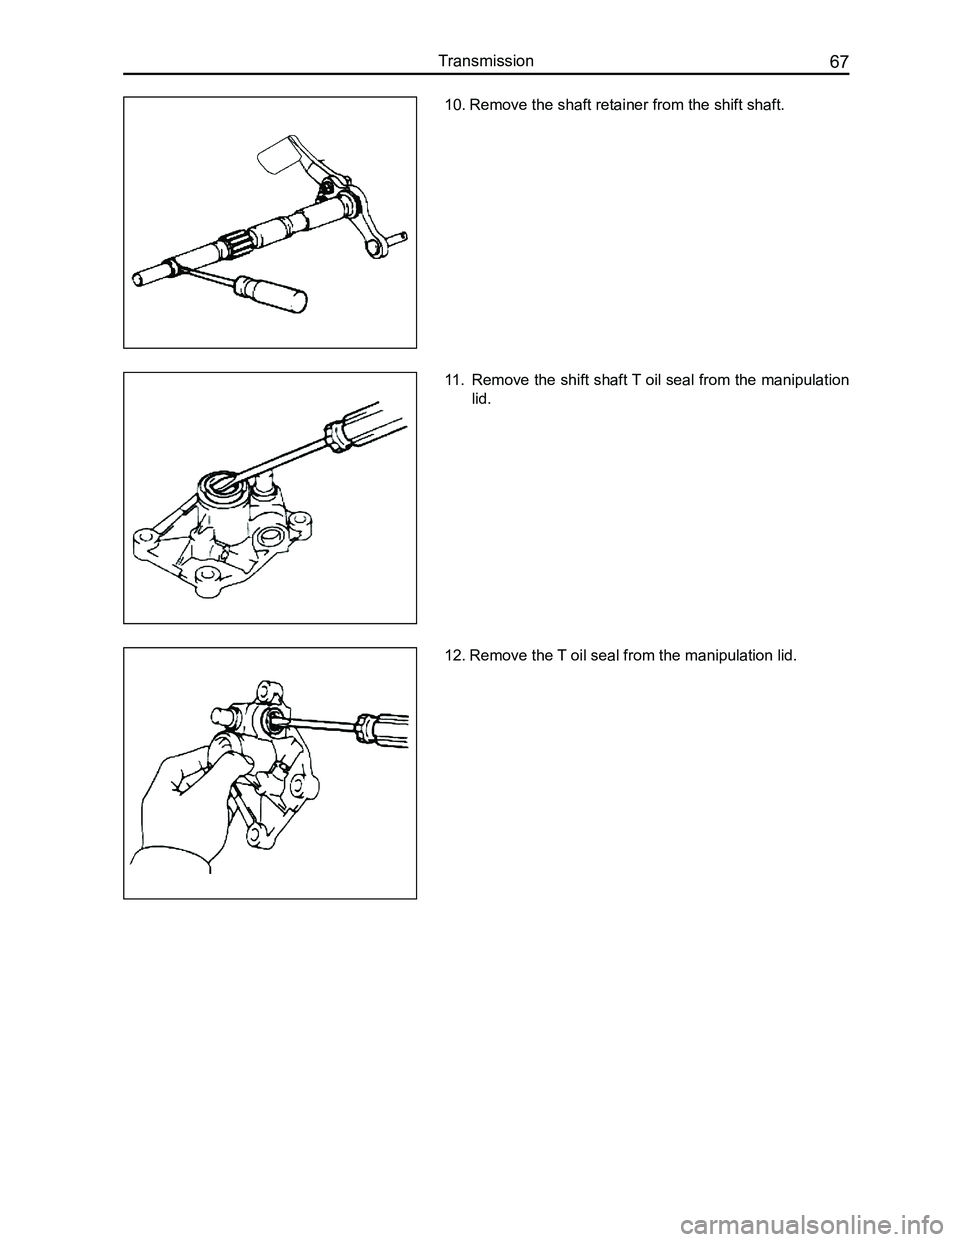
10. Remove the shaft retainer from the shift shaft.
11. Remove the shift shaft T oil seal from the manipulation
lid.
12. Remove the T oil seal from the manipulation lid.
Page 75 of 281
Downloaded from www.Manualslib.com manuals search engine GWFLORID Maintenance Manual68
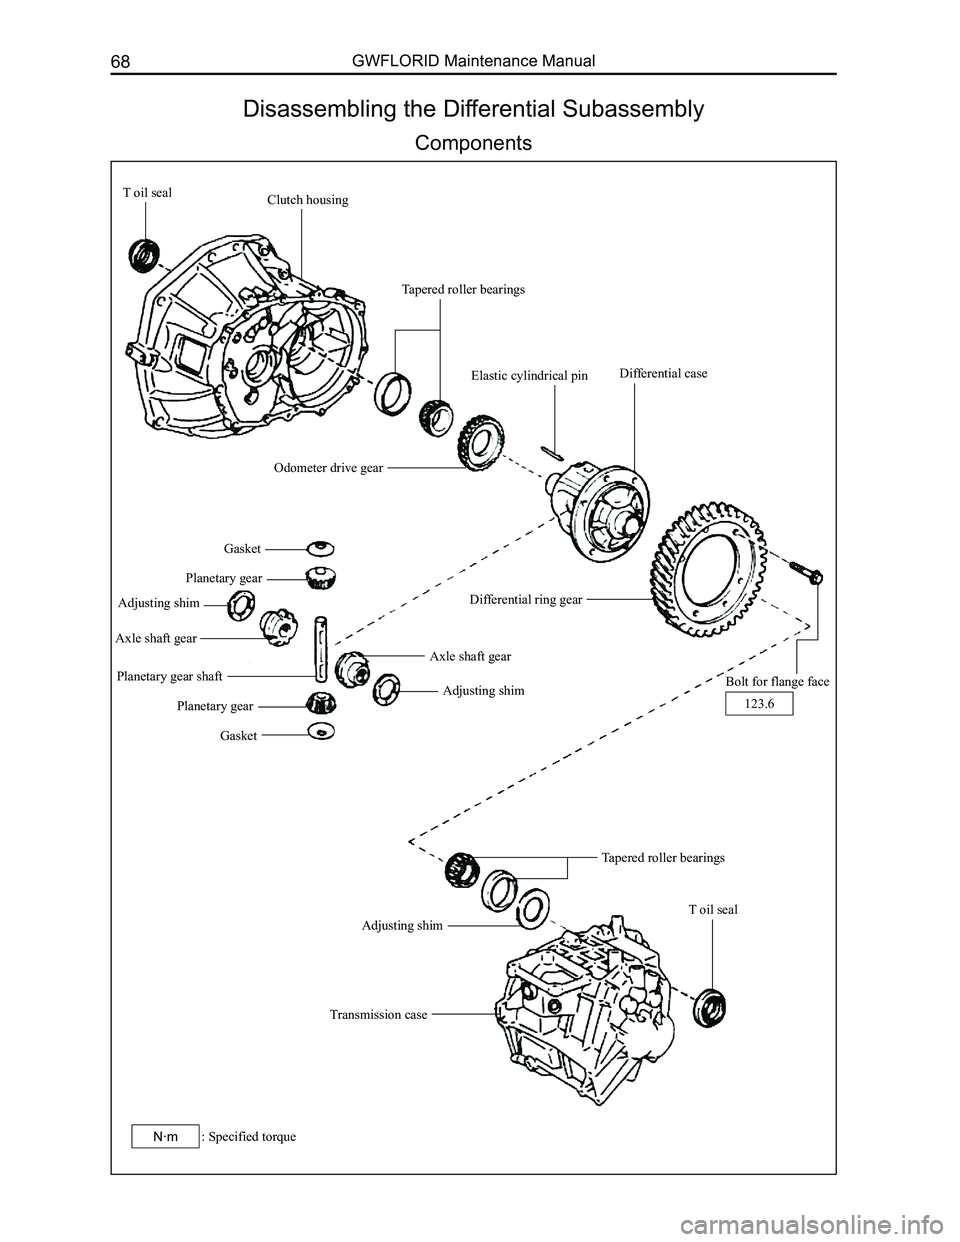
Disassembling the Differential Subassembly
Components
T oil sealClutch housing
Tapered roller bearings
Elastic cylindrical pin
Odometer drive gear
Differential case
Differential ring gear
Bolt for flange face
Gasket
Planetary gear
Adjusting shim
Axle shaft gear
Planetary gear shaft
Planetary gear
Gasket
Axle shaft gear
Adjusting shim
Tapered roller bearings
Transmission case
Adjusting shim
T oil seal
123.6
: Specified torqueN·m
Page 91 of 281
Downloaded from www.Manualslib.com manuals search engine GWFLORID Maintenance Manual84
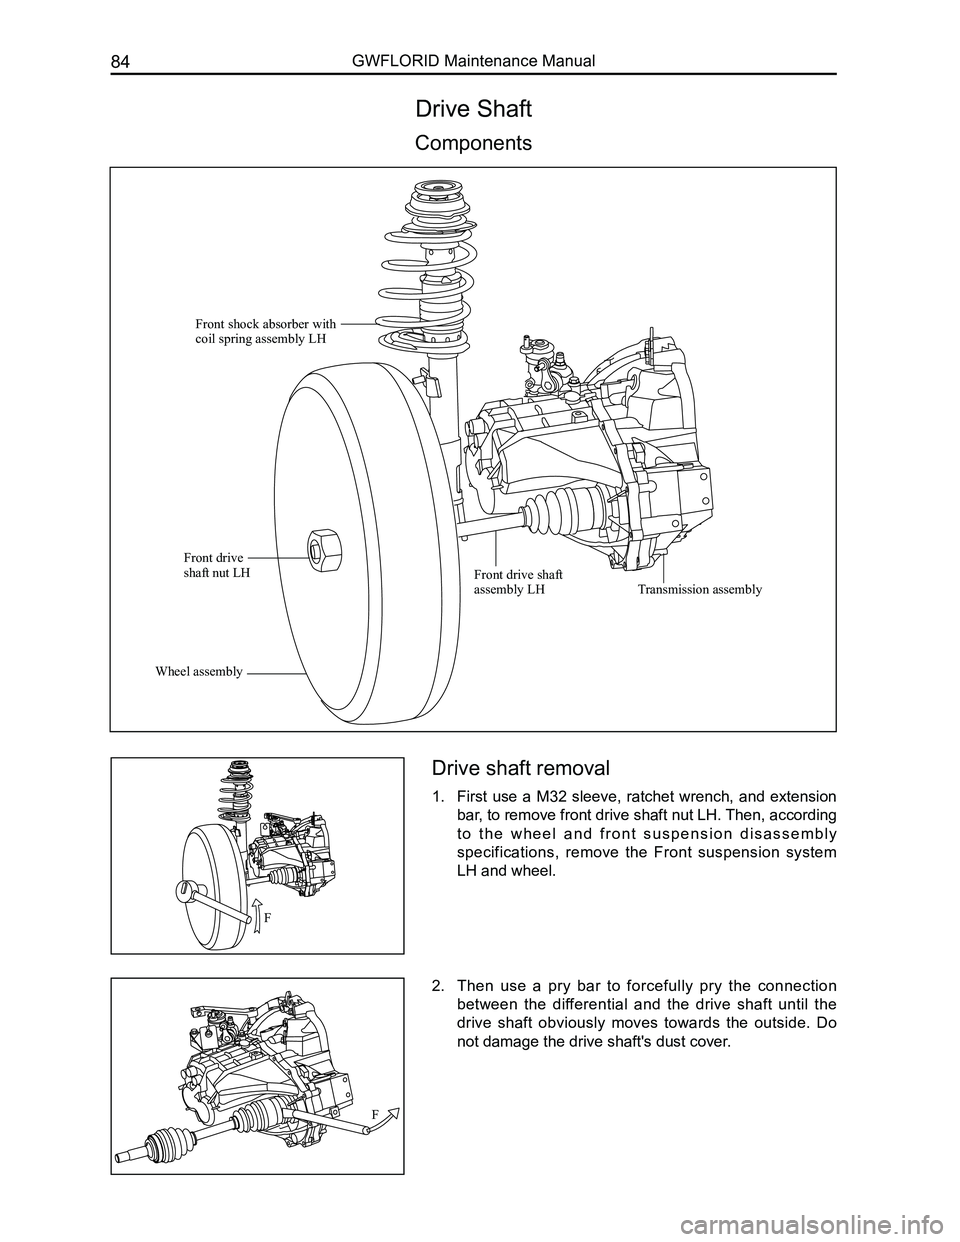
Drive Shaft
Components
Drive shaft removal
1. First use a M32 sleeve, ratchet wrench, and extension
bar, to remove front drive shaft nut LH. Then, according
t o t h e w h e e l a n d f r o n t s u s p e n s i o n d i s a s s e m b l y
specifications, remove the Front suspension system
LH and wheel.
2. Then use a pry bar to forcefully pry the connection
between the differential and the drive shaft until the
drive shaft obviously moves towards the outside. Do
not damage the drive shaft's dust cover.
Front shock absorber with coil spring assembly LH
Front drive shaft nut LH
Wheel assembly
Front drive shaft assembly LHTransmission assembly
F
F
Page 92 of 281

Downloaded from www.Manualslib.com manuals search engine 85Suspension System
Drive shaft installation
1. Insert the drive shaft.
First, align the inner end of the drive shaft and differential
spline. Keep the drive shaft axes and the differential axes
bases uniform, then hammer towards the direction of the
differential drive shaft's outer end until a clear and sharp
clicking sound is heard. Here, the drive shaft and the
transmission should have a clearance of about 1 mm.
2. According to the front suspension and wheel assembly
installation specifications, properly install the front
shock absorber with coil spring assembly LH and
wheel.
3. Use an M32 sleeve, ratchet wrench, and extension bar
to tighten front drive shaft nut LH.
Tightening torque: 225±20 N·m
F
F
Page 193 of 281
Downloaded from www.Manualslib.com manuals search engine GWFLORID Maintenance Manual186
Immobilizer System
Immobilizer system composition
This vehicle's engine immobilizer system consists of a theft deterrent ECU assembly, a theft deterrent coil as-
sembly, and two theft deterrent converter assemblies. The theft deterrent coil assembly is put on the head of
ignition lock cylinder, with the other end connected to the theft deterrent ECU assembly. The two theft deterrent
converter assemblies are separately installed inside the plastic handles\
of the two keys.
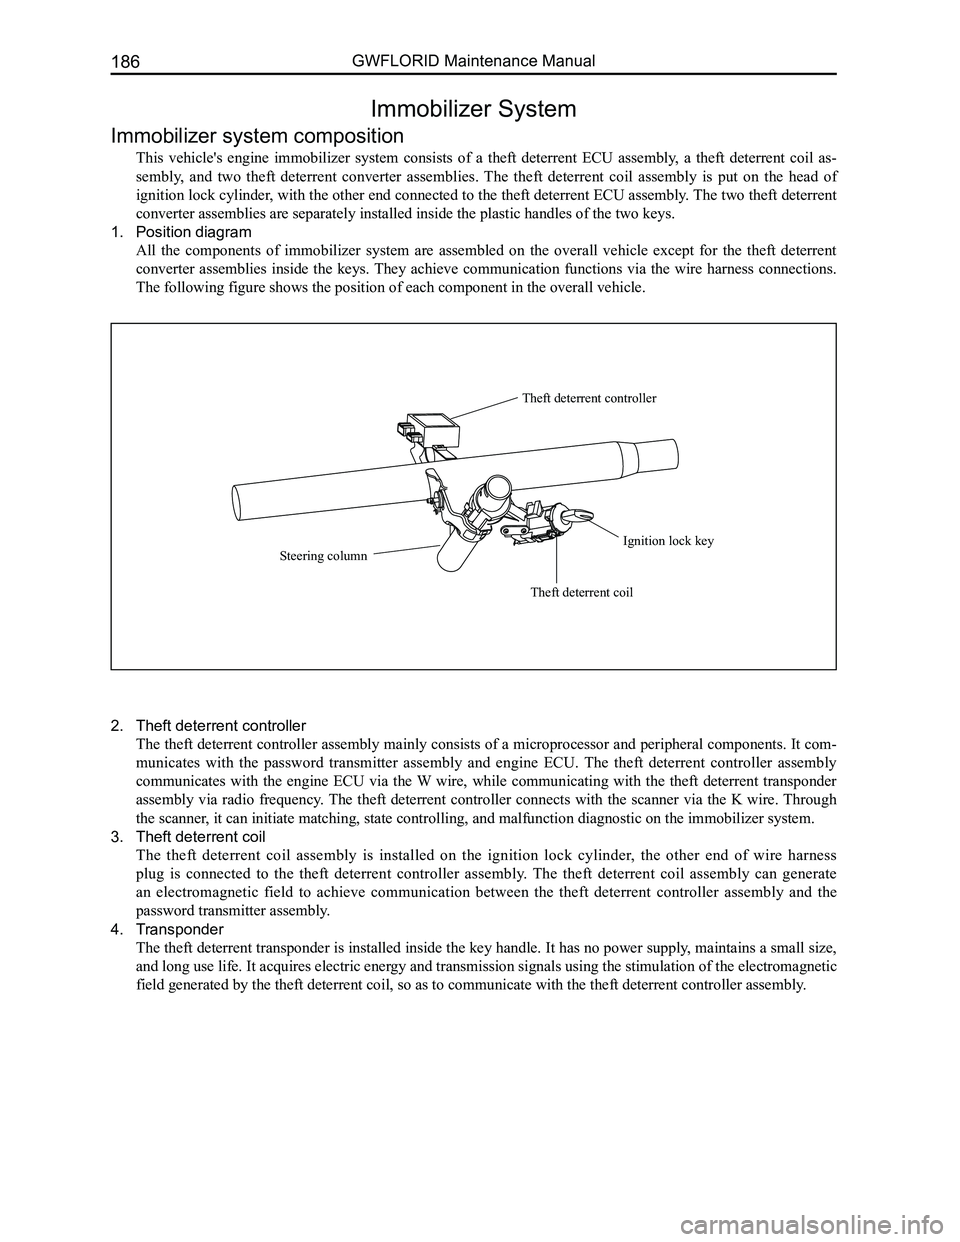
1. Position diagram
All the components of immobilizer system are assembled on the overall vehicle except for the theft deterrent
converter assemblies inside the keys. They achieve communication functions via the wire harness connections.
The following figure shows the position of each component in the overall\
vehicle.
Theft deterrent controller
Ignition lock key
Theft deterrent coil
Steering column
2. Theft deterrent controller
The theft deterrent controller assembly mainly consists of a microprocessor and peripheral components. It com-
municates with the password transmitter assembly and engine ECU. The theft deterrent controller assembly
communicates with the engine ECU via the W wire, while communicating with the theft deterrent transponder
assembly via radio frequency. The theft deterrent controller connects with the scanner via the K wire. Through
the scanner, it can initiate matching, state controlling, and malfunction diagnosti\
c on the immobilizer system.
3. Theft deterrent coil
The theft deterrent coil assembly is installed on the ignition lock cylinder, the other end of wire harness
plug is connected to the theft deterrent controller assembly. The theft deterrent coil assembly can generate
an electromagnetic field to achieve communication between the theft deterrent controller assembly and the
password transmitter assembly.
4. Transponder
The theft deterrent transponder is installed inside the key handle. It has no power supply, maintains a small size,
and long use life. It acquires electric energy and transmission signals using the stimulation of the electromagnetic
field generated by the theft deterrent coil, so as to communicate with t\
he theft deterrent controller assembly.