window HONDA ACCORD 2010 8.G Navigation Manual
[x] Cancel search | Manufacturer: HONDA, Model Year: 2010, Model line: ACCORD, Model: HONDA ACCORD 2010 8.GPages: 155, PDF Size: 3.7 MB
Page 5 of 155
Navigation System5
Introduction
The navigation system applies location,
direction, and speed information to the
maps and calculates a route to the
destination you enter. As you drive to
that destination, the system provides
map and voice guidance.
The navigation system is easy to use.
The locations of many places of
business and entertainment are already
entered in the system. You can select
any of them as a destination by using the
Interface Dial or voice control.
There are several ways to enter a
destination, such as by point of interest
(POI), by address, by phone number,
and by selecting it from the map. The
last 50 destinations are saved for reuse
at a later date. The system also allows
you to store a home address to simplify
returning home from your destination.Accessories Precautions
If you have rear window tinting
installed, be aware that if the tint has
metallic properties, it can seriously
degrade or prevent GPS reception. This
is because the GPS antenna is located on
the passenger’s side of the rear shelf.
If you plan to install electronic
components, such as radar detectors,
vehicle tracking devices, remote
starters, additional amplifiers, or other
audio components, ensure that they are
not located near the navigation control
unit in the trunk, near the navigation
display in the dash, or near the GPS
antenna on the passenger’s side of the
rear shelf. Signal noise emanating from
these devices can cause intermittent
disruption of the navigation system.
Important Safety Information
The navigation system can distract your
attention from the road if you focus on
the screen or operate the system’s
controls while driving.
Enter as much information as possible
into the system before you begin
driving, or when the vehicle is stopped.
Then, as you drive, listen to the audio
instructions and use voice commands
when possible.
2010 Accord
Page 14 of 155
14Navigation System
Getting Started
Using the Voice Control System
You should use the voice control system
as much as possible, and consider
manual entry using the Interface Dial
as a backup method of entry.
Most of the system’s functions can be
controlled by voice commands activated
with the NAVI TALK button. To
control the navigation system by voice:
• Press and release the NAVI TALK
button.
• Wait for the beep (the icon is displayed on the top left of the
screen).
• Give a voice command.
Once the microphone picks up your
command, the system changes the
display in response to the command and
prompts you for the next command.
Using the NAVI TALK button, answer
the prompts as required. If the system does not understand a
command or you wait too long to give a
command, it responds with “Pardon,”
“Please repeat,” or “Would you say
again.” If the system cannot perform a
command or the command is not
appropriate for the screen you are on, it
sounds a beep.
Anytime you are unsure of what voice
commands are available on a screen,
you can always say “Help.” The system
will then read the list of available
commands to you.
When you give a command, the system
generally either repeats the command as
a confirmation or asks you for further
information. If you do not wish to hear
this feedback, you can turn it off.
However, hearing the feedback will
familiarize you with the way the system
expects commands to be phrased. See
the
Voice Recognition Feedback
setting in SETUP. If you hear a prompt such as “Please use
the Interface Dial to...” or “Please
choose an area with the Interface Dial,”
the system is asking for input that
cannot be performed using the voice
control system.
Improving Voice Recognition
To achieve optimum voice recognition
when using either the navigation or
Bluetooth
® HandsFreeLink® voice
control system, the following guidelines
should be followed:
NOTE:
Make sure the correct screen is
displayed for the vo ice command that
you are using. See Voice Command
Index on page 139.
• It is best if the windows and sunroof are closed. If you drive with the
windows or sunroof open, speak a
little louder to overcome the wind
noises.
• Adjust the dashboard and side vents so air does not blow against the
microphone on the ceiling.
2010 Accord
Page 53 of 155
Navigation System53
Driving to Your Destination
Voice Guidance Prompts
As you get near the maneuver, you will
hear a voice reminder and see a pop-up
window showing you the maneuver.
The number of reminders that you will
hear before a maneuver is determined
by Guidance Prompts in SETUP on
page 78.
With the factory default (NORMAL),
typically you will hear two prompts:
• The first is about 1/4 mile from the maneuver.
• The final prompt is close to your actual turn.
If the distance between the next two
driving maneuvers is very small, both
maneuvers are displayed on the screen
in a single window, and the voice will
remind you of both of them at the same
time. NOTE:
You can say “Voice” at any time, or
select Voice after pushing on the
Interface Dial to be reminded of the
next maneuver. For information on
the available voice commands, see
Voice Command Index on page139.
Typically, a pop-up guidance window shows your next turn, and a voice
guidance prompt is heard. The timing
of these prompts varies, depending on
the type of road you are on, and the
distance to your next maneuver.
When given guidance in unverified
areas, the words “if possible” are
inserted before each guidance prompt.
See Unverified Area Routing on page87
for more details about unverified
routing.
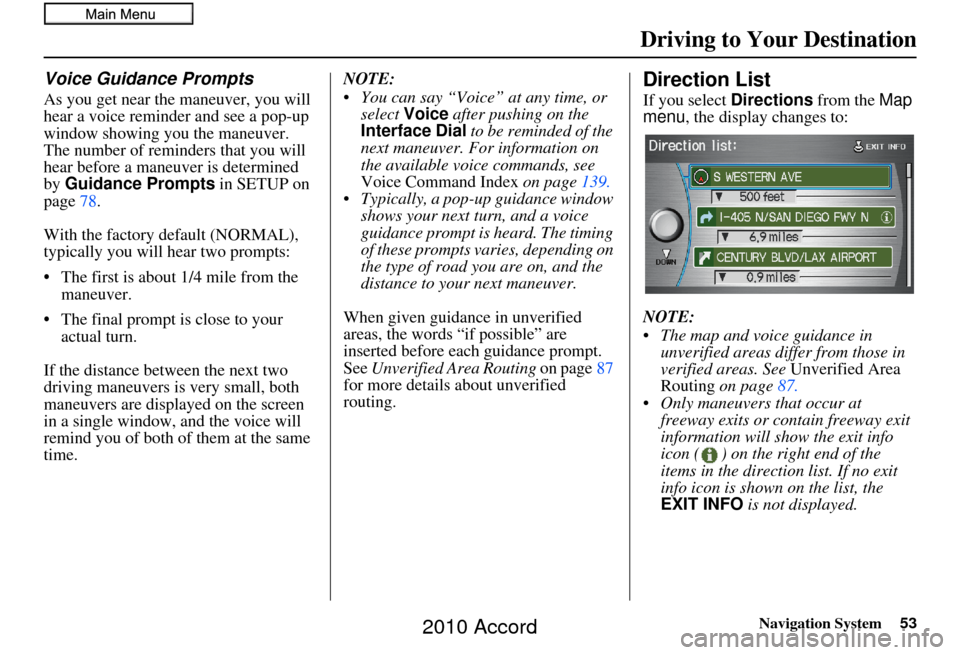
Direction List
If you select Directions from the Map
menu , the display changes to:
NOTE:
The map and voice guidance in unverified areas differ from those in
verified areas. See Unverified Area
Routing on page 87.
Only maneuvers that occur at freeway exits or contain freeway exit
information will show the exit info
icon ( ) on the right end of the
items in the direction list. If no exit
info icon is shown on the list, the
EXIT INFO is not displayed.
2010 Accord
Page 55 of 155
Navigation System55
Driving to Your Destination
Guidance Mode
When en route to a destination, you
have two display options: single-screen
mode (the factory default) and split-
screen mode.
Single-screen mode - A map is
displayed with occasional guidance
pop-up windows as you approach a
maneuver.
Split-screen mode - The map is always
displayed on the left of the screen, and
the maneuver or direction list is
displayed on the right-hand side of the
screen.
Guidance mode can be changed in either
SETUP (see Guidance Mode on
page 94), or by accessing the icon bar
(see CHANGE GUIDANCE MODE on
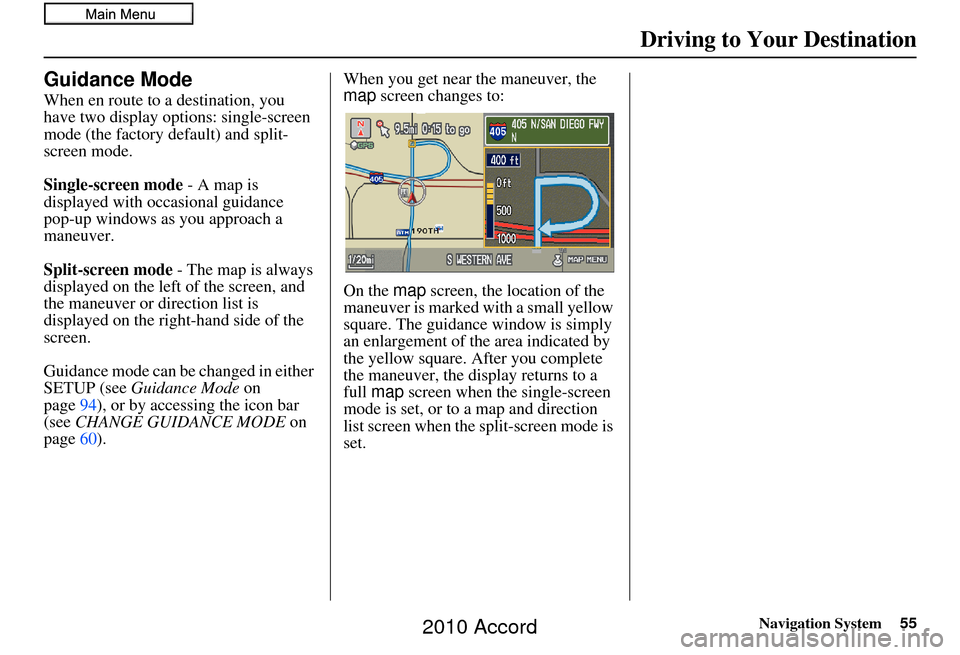
page 60). When you get near the maneuver, the
map
screen changes to:
On the map screen, the location of the
maneuver is marked with a small yellow
square. The guidance window is simply
an enlargement of the area indicated by
the yellow square. After you complete
the maneuver, the display returns to a
full map screen when the single-screen
mode is set, or to a map and direction
list screen when the split-screen mode is
set.
2010 Accord
Page 60 of 155
60Navigation System
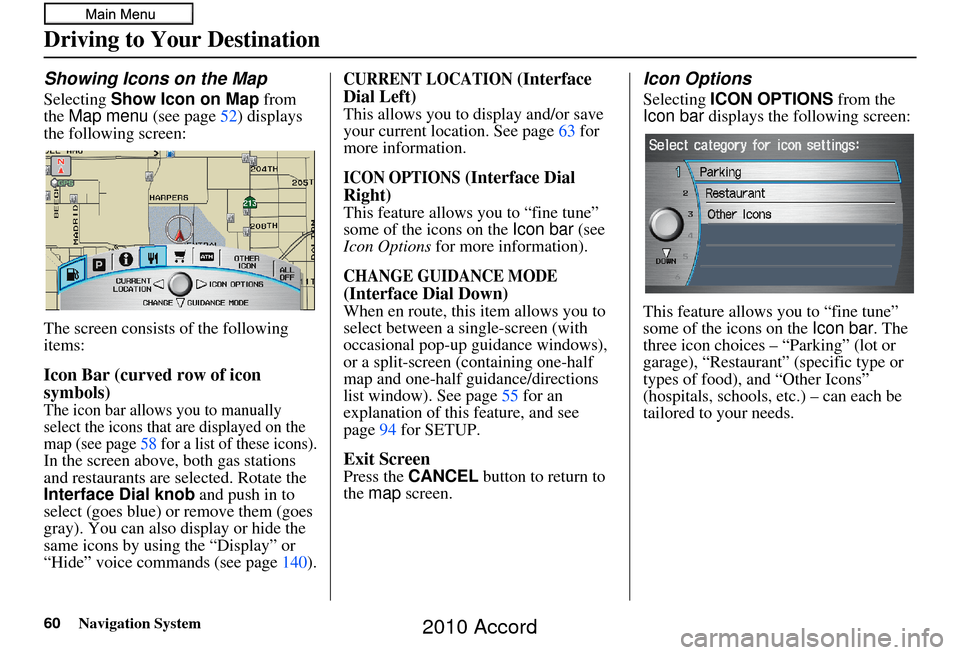
Showing Icons on the Map
Selecting Show Icon on Map from
the Map menu (see page52) displays
the following screen:
The screen consists of the following
items:
Icon Bar (curved row of icon
symbols)
The icon bar allows you to manually
select the icons that are displayed on the
map (see page 58 for a list of these icons).
In the screen above, both gas stations
and restaurants are selected. Rotate the
Interface Dial knob and push in to
select (goes blue) or remove them (goes
gray). You can also display or hide the
same icons by using the “Display” or
“Hide” voice commands (see page 140).
CURRENT LOCATION (Interface
Dial Left)
This allows you to display and/or save
your current location. See page 63 for
more information.
ICON OPTIONS (Interface Dial
Right)
This feature allows you to “fine tune”
some of the icons on the Icon bar (see
Icon Options for more information).
CHANGE GUIDANCE MODE
(Interface Dial Down)
When en route, this item allows you to
select between a single-screen (with
occasional pop-up guidance windows),
or a split-screen (containing one-half
map and one-half guidance/directions
list window). See page 55 for an
explanation of this feature, and see
page 94 for SETUP.
Exit Screen
Press the CANCEL button to return to
the map screen.
Icon Options
Selecting ICON OPTIONS from the
Icon bar displays the following screen:
This feature allows you to “fine tune”
some of the icons on the Icon bar. The
three icon choices – “Parking” (lot or
garage), “Restaurant” (specific type or
types of food), and “Other Icons”
(hospitals, schools, etc.) – can each be
tailored to your needs.
Driving to Your Destination
2010 Accord
Page 90 of 155
90Navigation System
System Setup
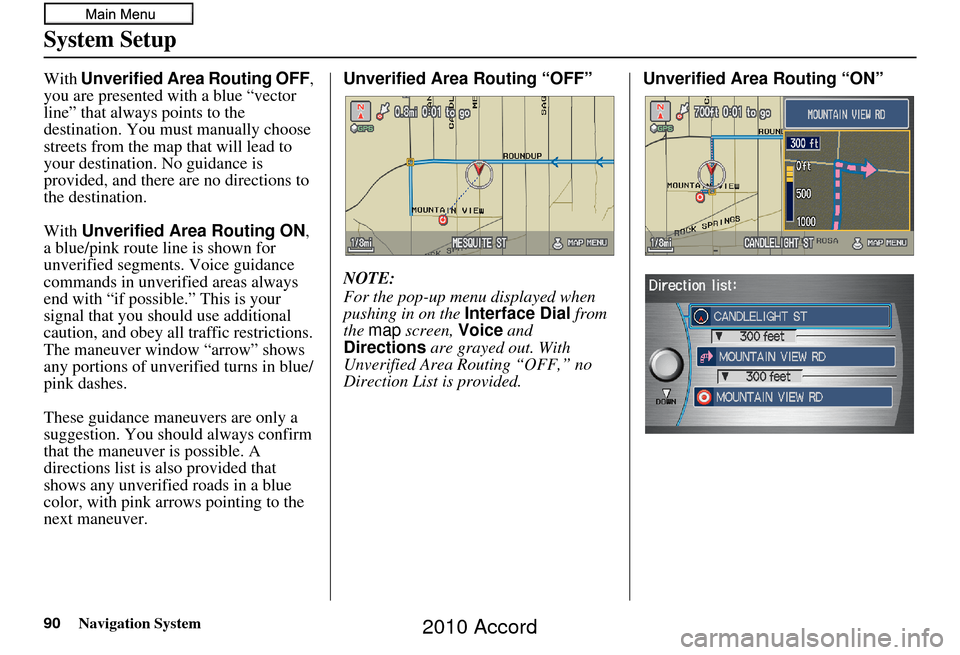
With Unverified Area Routing OFF ,
you are presented with a blue “vector
line” that always points to the
destination. You must manually choose
streets from the map that will lead to
your destination. No guidance is
provided, and there are no directions to
the destination.
With Unverified Area Routing ON,
a blue/pink route line is shown for
unverified segments. Voice guidance
commands in unverified areas always
end with “if possible.” This is your
signal that you should use additional
caution, and obey all traffic restrictions.
The maneuver window “arrow” shows
any portions of unverified turns in blue/
pink dashes.
These guidance maneuvers are only a
suggestion. You should always confirm
that the maneuver is possible. A
directions list is also provided that
shows any unverified roads in a blue
color, with pink arrows pointing to the
next maneuver. Unverified Area Routing “OFF”
NOTE:
For the pop-up menu displayed when
pushing in on the
Interface Dial from
the map screen, Voice and
Directions are grayed out. With
Unverified Area Routing “OFF,” no
Direction List is provided. Unverified Area
Routing “ON”
2010 Accord
Page 103 of 155
Navigation System103
System Initialization
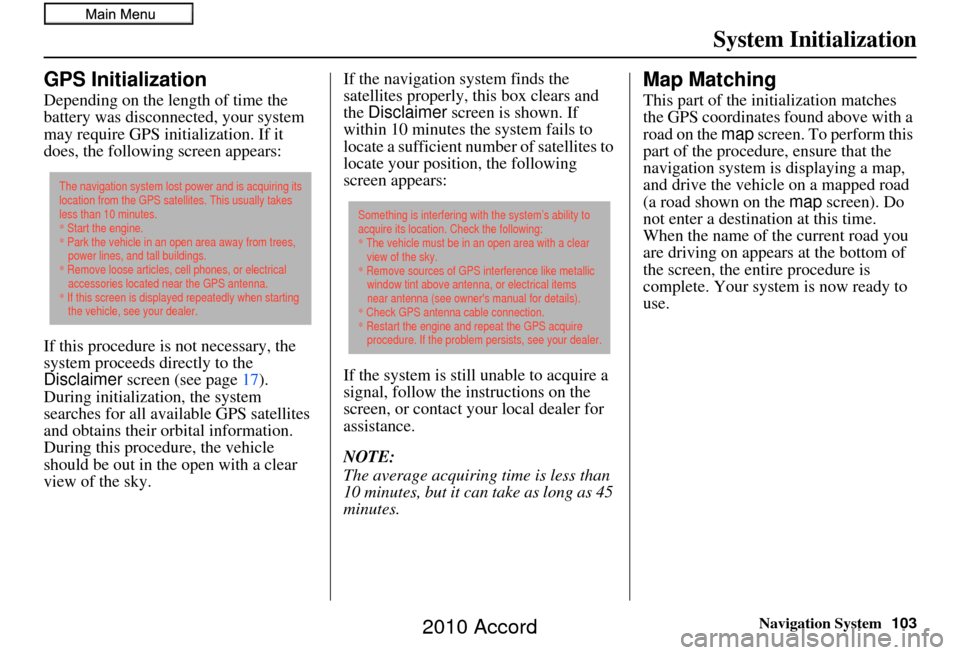
GPS Initialization
Depending on the length of time the
battery was disconnected, your system
may require GPS initialization. If it
does, the following screen appears:
If this procedure is not necessary, the
system proceeds directly to the
Disclaimer screen (see page 17).
During initialization, the system
searches for all available GPS satellites
and obtains their orbital information.
During this procedure, the vehicle
should be out in th e open with a clear
view of the sky. If the navigation system finds the
satellites properly, this box clears and
the
Disclaimer screen is shown. If
within 10 minutes the system fails to
locate a sufficient number of satellites to
locate your position, the following
screen appears:
If the system is still unable to acquire a
signal, follow the instructions on the
screen, or contact you r local dealer for
assistance.
NOTE:
The average acquiring time is less than
10 minutes, but it can take as long as 45
minutes.
Map Matching
This part of the initialization matches
the GPS coordinates found above with a
road on the map screen. To perform this
part of the procedure, ensure that the
navigation system is displaying a map,
and drive the vehicle on a mapped road
(a road shown on the map screen). Do
not enter a destina tion at this time.
When the name of the current road you
are driving on appears at the bottom of
the screen, the entire procedure is
complete. Your system is now ready to
use.
The navigation system lost power and is acquiring its
location from the GPS satellites. This usually takes
less than 10 minutes.
* Start the engine.
* Park the vehicle in an open area away from trees,
power lines, and tall buildings.
* Remove loose articles, cell phones, or electrical
accessories located near the GPS antenna.
* If this screen is displayed repeatedly when starting
the vehicle, see your dealer.
Something is interfering with the system’s ability to
acquire its location. Check the following:
* The vehicle must be in an open area with a clear
view of the sky.
* Remove sources of GPS interference like metallic
window tint above antenna, or electrical items
near antenna (see owner's manual for details).
* Check GPS antenna cable connection.
* Restart the engine and repeat the GPS acquire
procedure. If the problem persists, see your dealer.
2010 Accord
Page 104 of 155
104Navigation System
System Limitations
Although your navigation system is one
of the most highly sophisticated pieces
of equipment you will find in a modern
automobile, you may find during its use
that it has certain limitations.
The system uses GPS signals to aid in
determining its current location. The
GPS is operated by the U.S.
Department of Defense. For security
reasons, there are certain inaccuracies
built into the GPS that the navigation
system must constantly compensate for.
This can cause occasional positioning
errors of up to several hundred feet.
For example, in urban areas where
streets are close together, this could
cause the system to show that you are
traveling on a street that parallels the
street you are actually on. The system
will, under most circumstances, correct
itself while you drive. Depending on your current view of the
sky and the position of the satellites, the
elevation may be shown incorrectly.
You may also notice some delay of the
vehicle position icon at intersections;
this is normal.
GPS Reception Issues
The signals received from the GPS
satellites are extremely weak (less than
a millionth of the strength of a local FM
station) and requir
e an unobstructed
view of sky. The signal can easily be
interrupted or interfered with by the
following:
• Aftermarket metallic window tint above or to the sides of the GPS
antenna (located on the passenger’s
side of the rear shelf)
• Cell phones, PDAs, or other electronic devices docked in a cradle
or lying loose on the rear shelf
• Radar detectors mounted on the rear shelf
• Remote starters, or “hidden” vehicle tracking systems mounted near the
navigation unit • Other aftermarket audio electronic
devices mounted near the navigation
unit
• Trees, tall buildings, freeway overpasses, tunnels, or overhead
electrical power wires
Although the system will direct you to
your desired destination, it may not
always generate what you consider to be
the most direct rout e. Try changing the
method of routing. See Changing
Routing Method on page47. You may
also have Unverified Area Routing set
to OFF. See Unverified Area Routing on
page 87.
Additionally, the mapping database
contains verified and unverified maps.
See Map Overview on page6.
A Disclaimer screen will warn you if
your route includes unverified streets.
Unverified streets may be missing from
the map, in the wrong location, or have
an incorrect name or address range.
Exercise addition al caution when
driving in these unverified areas.
2010 Accord
Page 125 of 155
Navigation System125
Coverage Areas
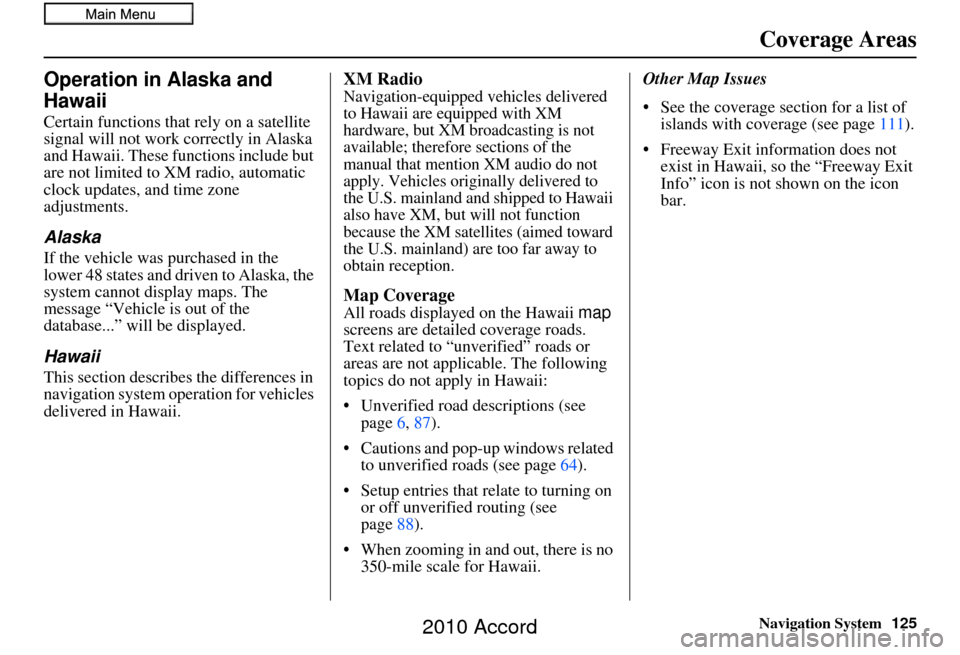
Operation in Alaska and
Hawaii
Certain functions that rely on a satellite
signal will not work correctly in Alaska
and Hawaii. These functions include but
are not limited to XM radio, automatic
clock updates, and time zone
adjustments.
Alaska
If the vehicle was purchased in the
lower 48 states and driven to Alaska, the
system cannot display maps. The
message “Vehicle is out of the
database...” will be displayed.
Hawaii
This section describes the differences in
navigation system operation for vehicles
delivered in Hawaii.
XM Radio
Navigation-equipped vehicles delivered
to Hawaii are equipped with XM
hardware, but XM broadcasting is not
available; therefore sections of the
manual that mention XM audio do not
apply. Vehicles originally delivered to
the U.S. mainland and shipped to Hawaii
also have XM, but will not function
because the XM satellites (aimed toward
the U.S. mainland) are too far away to
obtain reception.
Map Coverage
All roads displayed on the Hawaii map
screens are detailed coverage roads.
Text related to “unverified” roads or
areas are not applicable. The following
topics do not apply in Hawaii:
• Unverified road descriptions (see page 6, 87).
• Cautions and pop-up windows related to unverified roads (see page 64).
• Setup entries that re late to turning on
or off unverified routing (see
page 88).
• When zooming in and out, there is no 350-mile scale for Hawaii. Other Map Issues
• See the coverage section for a list of
islands with coverage (see page 111).
• Freeway Exit information does not exist in Hawaii, so the “Freeway Exit
Info” icon is not shown on the icon
bar.
2010 Accord
Page 134 of 155
134Navigation System
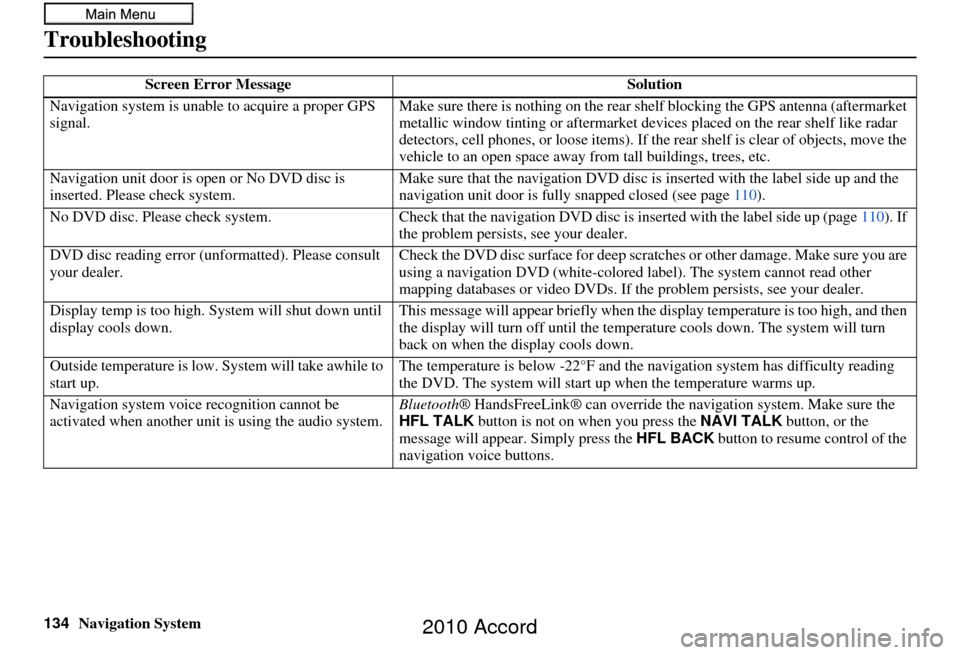
Troubleshooting
Screen Error MessageSolution
Navigation system is unabl e to acquire a proper GPS
signal. Make sure there is nothing on the rear sh
elf blocking the GPS antenna (aftermarket
metallic window tinting or aftermarket devices placed on the rear shelf like radar
detectors, cell phone s, or loose items). If the rear sh elf is clear of objects, move the
vehicle to an open space away from tall buildings, trees, etc.
Navigation unit door is ope n or No DVD disc is
inserted. Please check system. Make sure that the navigati
on DVD disc is inserted with the label side up and the
navigation unit door is fully snapped closed (see page 110).
No DVD disc. Please check syst em.Check that the navigation DVD disc is in serted with the label side up (page110). If
the problem persists, see your dealer.
DVD disc reading error (unf ormatted). Please consult
your dealer. Check the DVD disc surface for deep scra
tches or other damage. Make sure you are
using a navigation DVD (white-colored label). The system cannot read other
mapping databases or video DVDs. If the problem persists, see your dealer.
Display temp is too high. Sy stem will shut down until
display cools down. This message will appear briefly when the
display temperature is too high, and then
the display will turn off until the temper ature cools down. The system will turn
back on when the display cools down.
Outside temperature is low. System will take awhile to
start up. The temperature is below -22°F and the
navigation system has difficulty reading
the DVD. The system will start up when the temperature warms up.
Navigation system voice recognition cannot be
activated when another unit is using the audio system. Bluetooth
® HandsFreeLink® can override the na vigation system. Make sure the
HFL TALK button is not on when you press the NAVI TALK button, or the
message will appear. Simply press the HFL BACK button to resume control of the
navigation voice buttons.
2010 Accord