reset HONDA ACCORD 2015 9.G User Guide
[x] Cancel search | Manufacturer: HONDA, Model Year: 2015, Model line: ACCORD, Model: HONDA ACCORD 2015 9.GPages: 593
Page 98 of 593
Continued
97
uuGauges and Displays uMulti-Information Display
*
Instrument Panel
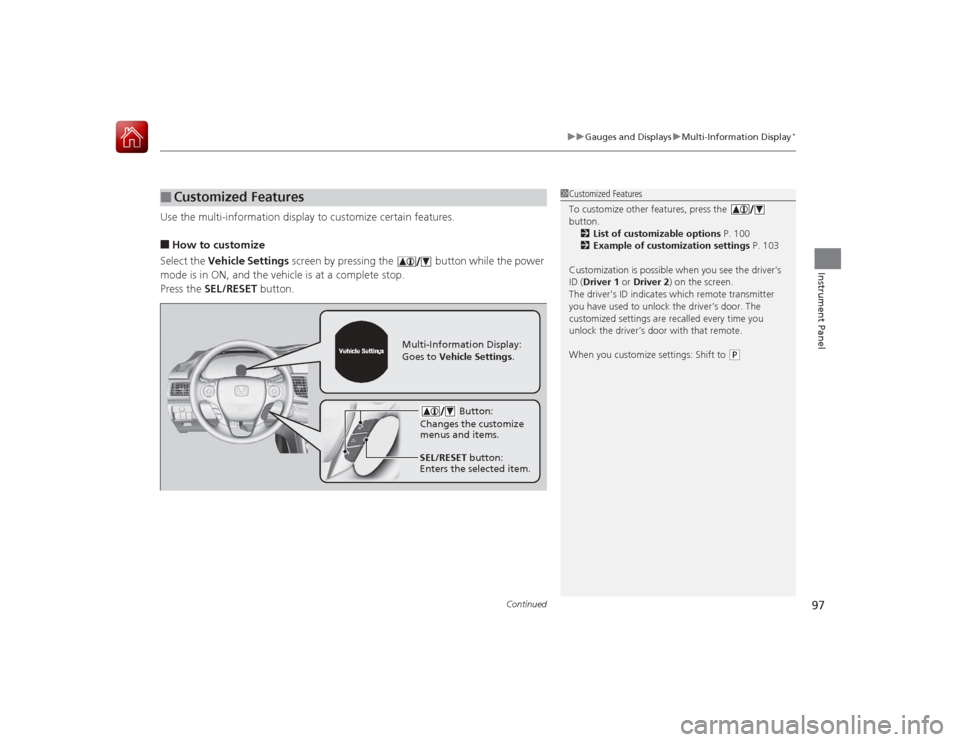
Use the multi-information display to customize certain features.■How to customize
Select the Vehicle Settings screen by pressing the button while the power
mode is in ON, and the vehicle is at a complete stop.
Press the SEL/RESET button.■
Customized Features
1Customized Features
To customize other features, press the
button.
2 List of customizable options P. 100
2 Example of customization settings P. 103
Customization is possible when you see the driver’s
ID ( Driver 1 or Driver 2) on the screen.
The driver’s ID indicates which remote transmitter
you have used to unlock the driver’s door. The
customized settings are recalled every time you
unlock the driver’s door with that remote.
When you customize settings: Shift to
( P
Button:
Changes the customize
menus and items.
Multi-Information Display:
Goes to Vehicle Settings .
SEL/RESET button:
Enters the selected item.
Page 99 of 593
98
uuGauges and Displays uMulti-Information Display
*
Instrument Panel
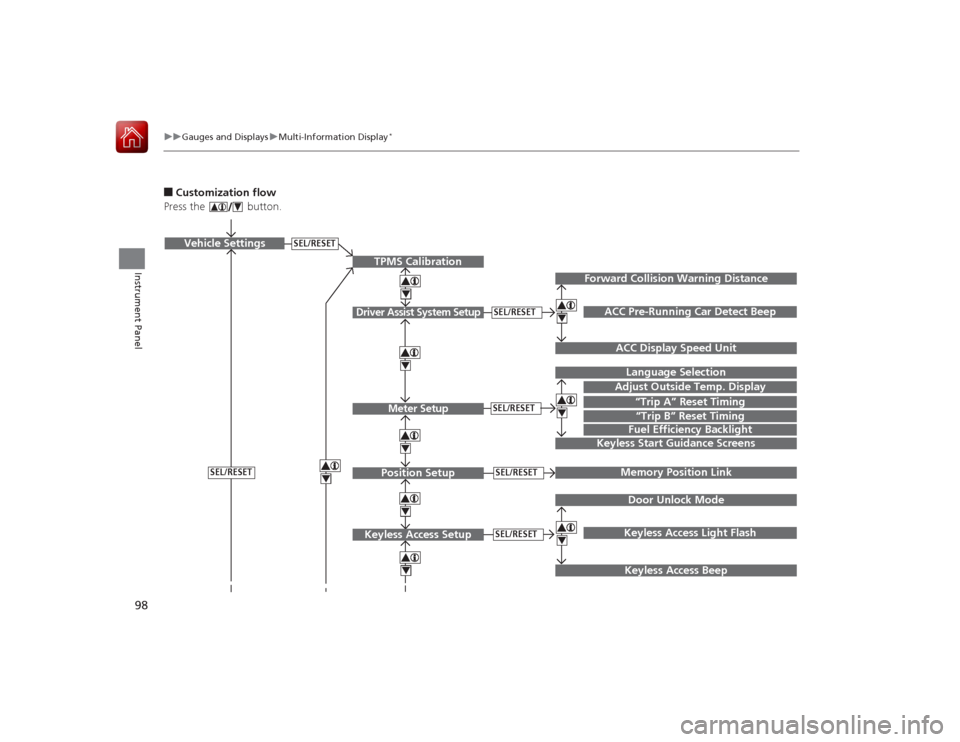
■Customization flow
Press the button.
SEL/RESET
Vehicle Settings
“Trip A” Reset TimingLanguage SelectionAdjust Outside Temp. DisplayMemory Position LinkDoor Unlock ModeKeyless Access Light Flash
4444
TPMS Calibration
Driver Assist System Setup
Meter SetupPosition Setup
Keyless Access Setup
SEL/RESETSEL/RESETSEL/RESETSEL/RESET
Page 100 of 593
99
uuGauges and Displays uMulti-Information Display
*
Continued
Instrument Panel
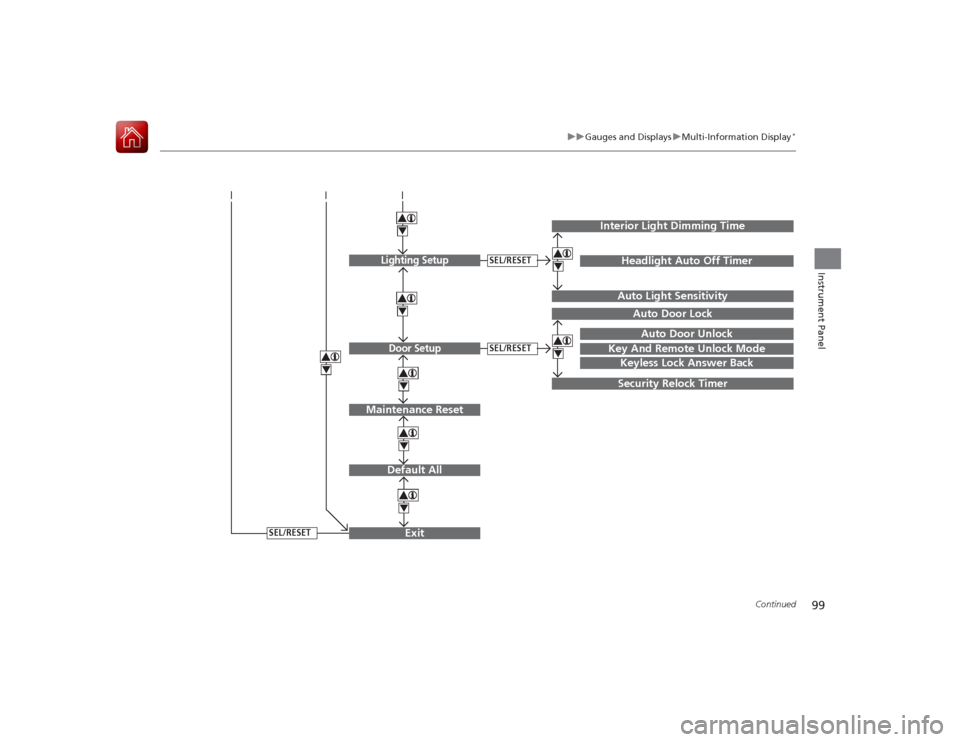
Exit444Door Setup
Maintenance Reset
Default All
SEL/RESET
4
SEL/RESET
4
Lighting Setup
SEL/RESET
4
Key And Remote Unlock Mode
Auto Door LockAuto Door Unlock
Keyless Lock Answer BackSecurity Relock Timer
Interior Light Dimming Time
Headlight Auto Off TimerAuto Light Sensitivity
44
Page 101 of 593
100
uuGauges and Displays uMulti-Information Display
*
Instrument Panel
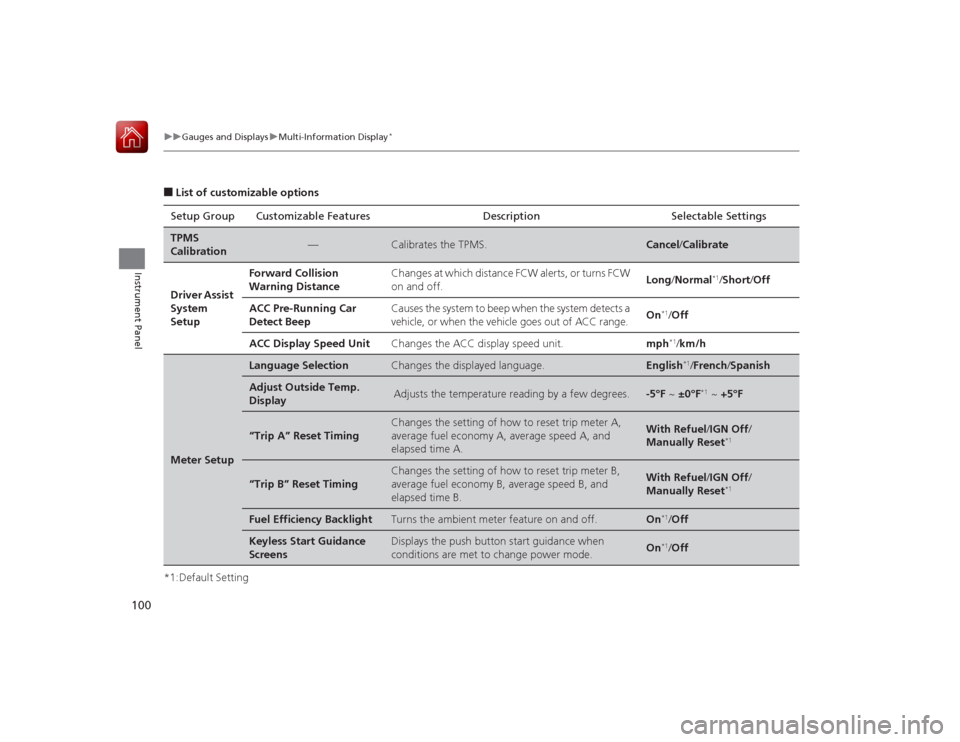
■List of customizable options
*1:Default Setting Setup Group Customizable Features Description Selectable SettingsTPMS
Calibration
—
Calibrates the TPMS.
Cancel
/Calibrate
Driver Assist
System
Setup
Forward Collision
Warning Distance
Changes at which distance FCW alerts, or turns FCW
on and off.
Long /Normal
*1/Short /Off
ACC Pre-Running Car
Detect Beep
Causes the system to beep when the system detects a
vehicle, or when the vehicle goes out of ACC range.
On
*1/Off
ACC Display Speed Unit
Changes the ACC display speed unit.
mph
*1/km/h
Meter Setup
Language Selection
Changes the displayed language.
English
*1/French /Spanish
Adjust Outside Temp.
Display
Adjusts the temperature reading by a few degrees.
-5°F ~ ±0°F
*1 ~ +5°F
“Trip A” Reset Timing
Changes the setting of how to reset trip meter A,
average fuel economy A, average speed A, and
elapsed time A.
With Refuel /IGN Off /
Manually Reset
*1
“Trip B” Reset Timing
Changes the setting of how to reset trip meter B,
average fuel economy B, average speed B, and
elapsed time B.
With Refuel /IGN Off /
Manually Reset
*1
Fuel Efficiency Backlight
Turns the ambient meter feature on and off.
On
*1/ Off
Keyless Start Guidance
Screens
Displays the push button start guidance when
conditions are met to change power mode.
On
*1/ Off
Page 103 of 593
102
uuGauges and Displays uMulti-Information Display
*
Instrument Panel
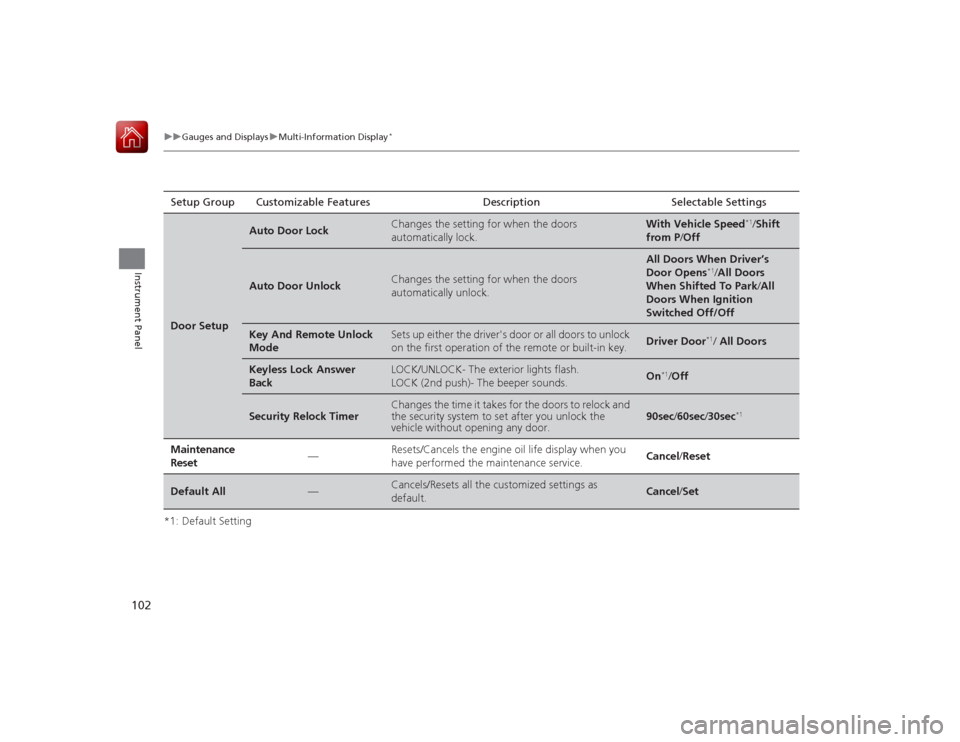
*1: Default SettingSetup Group Customizable Features Description Selectable SettingsDoor Setup
Auto Door Lock
Changes the setting for when the doors
automatically lock.
With Vehicle Speed
*1/
Shift
from P /Off
Auto Door Unlock
Changes the setting for when the doors
automatically unlock.
All Doors When Driver’s
Door Opens
*1/All Doors
When Shifted To Park /All
Doors When Ignition
Switched Off/Off
Key And Remote Unlock
Mode
Sets up either the driver's door or all doors to unlock
on the first operation of the remote or built-in key.
Driver Door
*1/ All Doors
Keyless Lock Answer
Back
LOCK/UNLOCK- The exterior lights flash.
LOCK (2nd push)- The beeper sounds.
On
*1/ Off
Security Relock Timer
Changes the time it takes for the doors to relock and
the security system to set after you unlock the
vehicle without opening any door.
90sec /60sec /30sec
*1
Maintenance
Reset
—
Resets/Cancels the engine oil life display when you
have performed the maintenance service.
Cancel /Reset
Default All
—
Cancels/Resets all the customized settings as
default.
Cancel /Set
Page 104 of 593
103
uuGauges and Displays uMulti-Information Display
*
Continued
Instrument Panel
■Example of customization settings
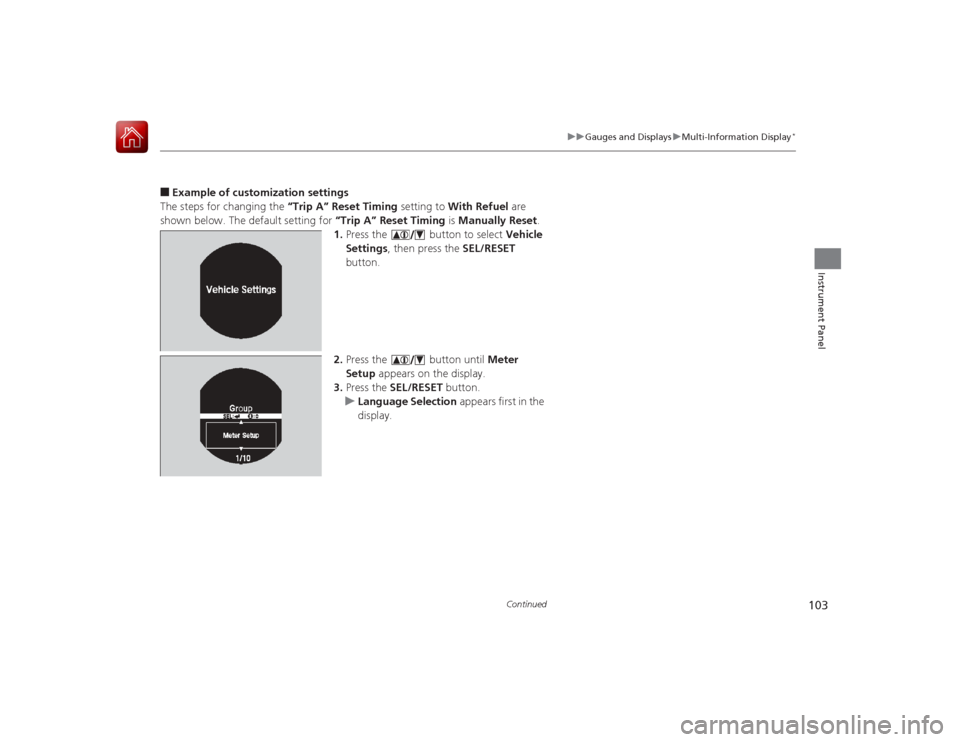
The steps for changing the “Trip A” Reset Timing setting to With Refuel are
shown below. The default setting for “Trip A” Reset Timing is Manually Reset.
1. Press the button to select Vehicle
Settings , then press the SEL/RESET
button.
2. Press the button until Meter
Setup appears on the display.
3. Press the SEL/RESET button.
u Language Selection appears first in the
display.
Page 105 of 593
104
uuGauges and Displays uMulti-Information Display
*
Instrument Panel
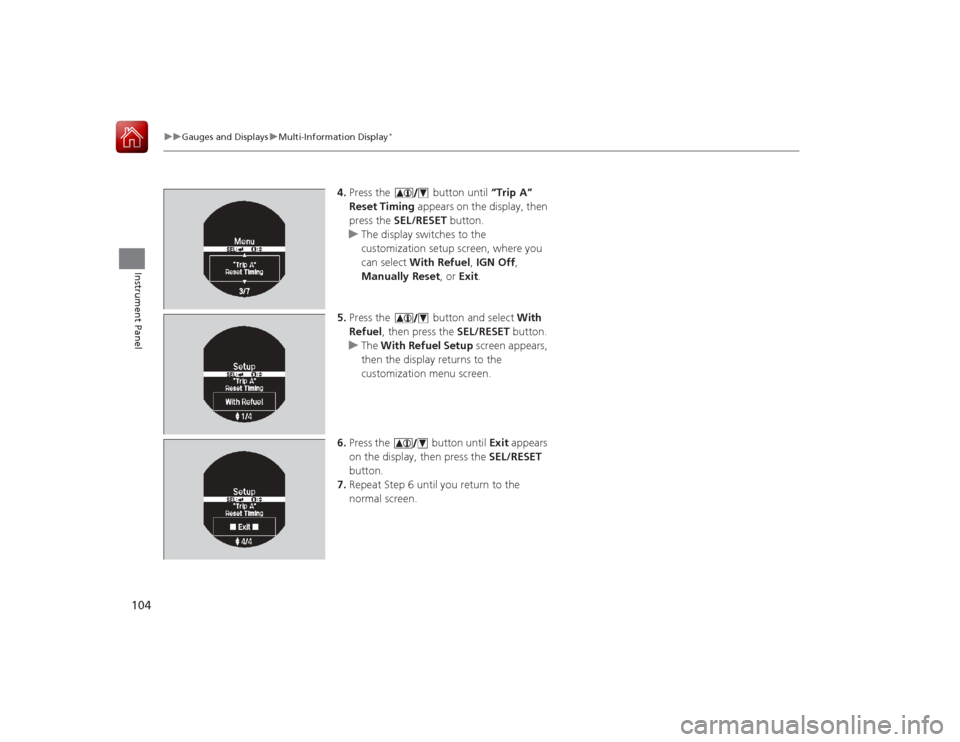
4. Press the button until “Trip A”
Reset Timing appears on the display, then
press the SEL/RESET button.
u The display switches to the
customization setup screen, where you
can select With Refuel , IGN Off ,
Manually Reset , or Exit .
5. Press the button and select With
Refuel , then press the SEL/RESET button.
u The With Refuel Setup screen appears,
then the display returns to the
customization menu screen.
6. Press the button until Exit appears
on the display, then press the SEL/RESET
button.
7. Repeat Step 6 until you return to the
normal screen.
Page 108 of 593
107
uuClock uAdjusting the Clock
Controls
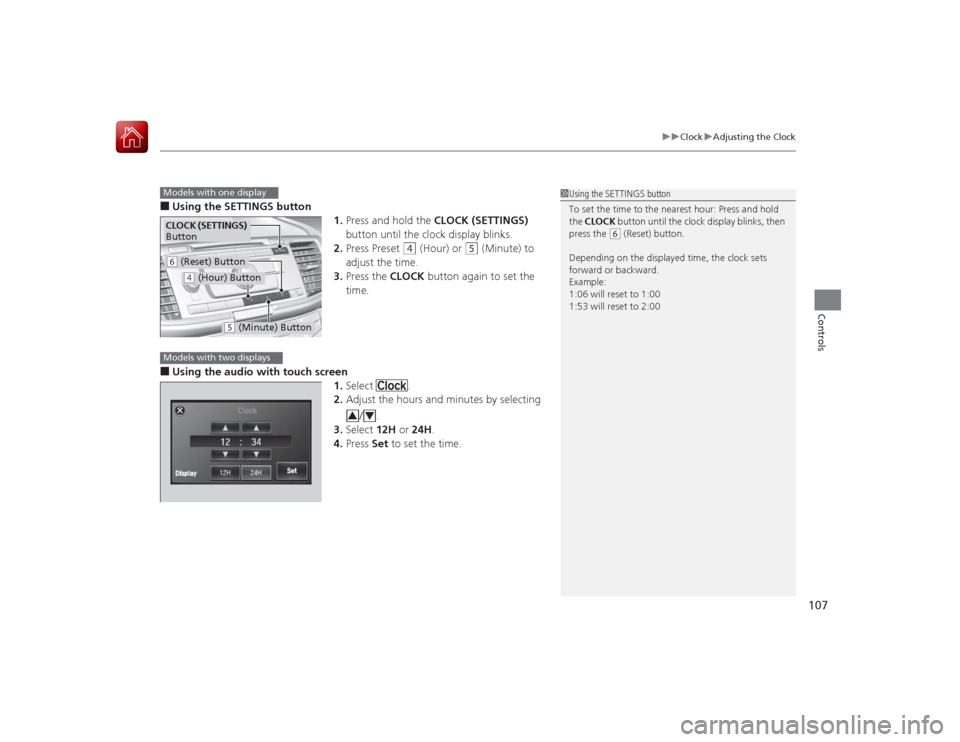
■Using the SETTINGS button
1.Press and hold the CLOCK (SETTINGS)
button until the clock display blinks.
2. Press Preset
(4
(Hour) or
(5
(Minute) to
adjust the time.
3. Press the CLOCK button again to set the
time.
■Using the audio with touch screen 1.Select .
2. Adjust the hours and minutes by selecting
/.
3. Select 12H or 24H.
4. Press Set to set the time.
1Using the SETTINGS button
To set the time to the nearest hour: Press and hold
the CLOCK button until the clock display blinks, then
press the
( 6 (Reset) button.
Depending on the displayed time, the clock sets
forward or backward.
Example:
1:06 will reset to 1:00
1:53 will reset to 2:00
Models with one displayCLOCK (SETTINGS)
Button( 6 (Reset) Button(4 (Hour) Button
(5 (Minute) Button
Models with two displays
3
4
Page 142 of 593
141
uuOperating the Switches Around the Steering Wheel uBrightness Control
Controls
Brightness Control
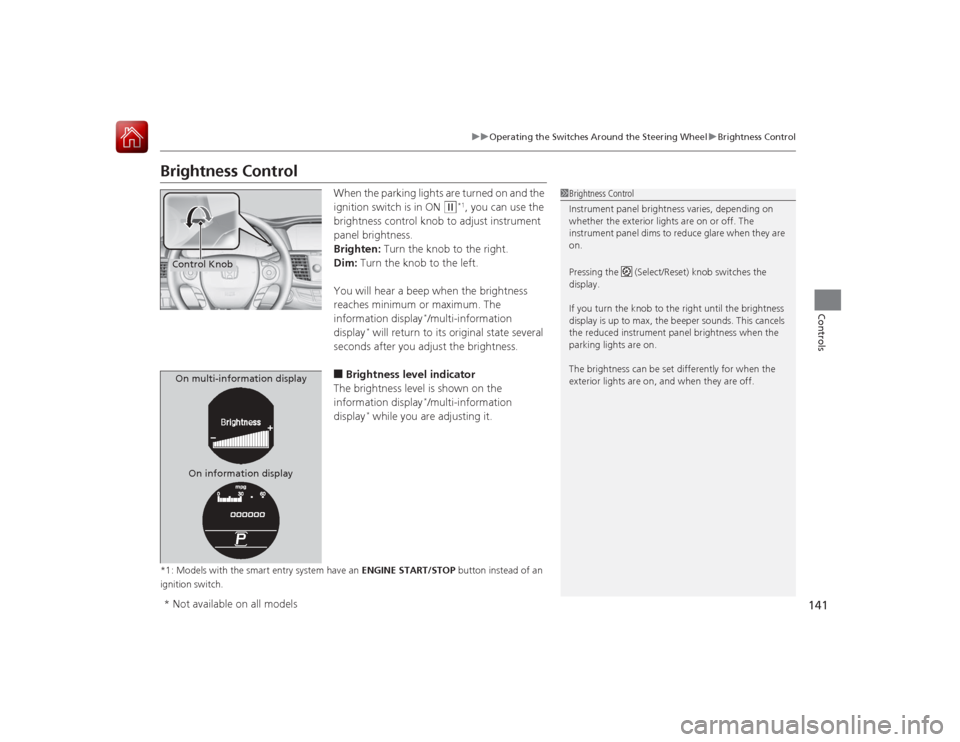
When the parking lights are turned on and the
ignition switch is in ON
(w
*1, you can use the
brightness control knob to adjust instrument
panel brightness.
Brighten: Turn the knob to the right.
Dim: Turn the knob to the left.
You will hear a beep when the brightness
reaches minimum or maximum. The
information display
*/multi-information
display
* will return to its original state several
seconds after you adjust the brightness.
■Brightness level indicator
The brightness level is shown on the
information display
*/multi-information
display
* while you are adjusting it.
*1: Models with the smart entry system have an ENGINE START/STOP button instead of an
ignition switch.
1 Brightness Control
Instrument panel brightness varies, depending on
whether the exterior lights are on or off. The
instrument panel dims to reduce glare when they are
on.
Pressing the (Select/Reset) knob switches the
display.
If you turn the knob to the right until the brightness
display is up to max, the beeper sounds. This cancels
the reduced instrument panel brightness when the
parking lights are on.
The brightness can be set differently for when the
exterior lights are on, and when they are off.
Control KnobOn multi-information display
On information display* Not available on all models
Page 144 of 593
143
uuOperating the Switches Around the Steering Wheel uDriving Position Memory System
*
Continued
Controls
Driving Position Memory System
*
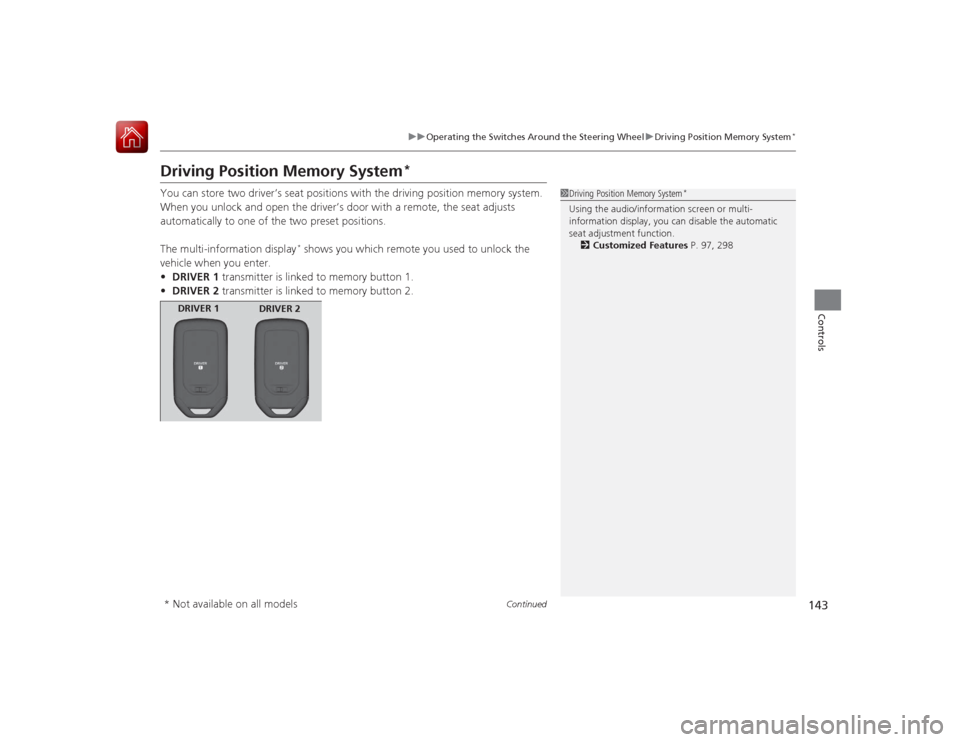
You can store two driver’s seat positions with the driving position memory system.
When you unlock and open the driver’s door with a remote, the seat adjusts
automatically to one of the two preset positions.
The multi-information display
* shows you which remote you used to unlock the
vehicle when you enter.
• DRIVER 1 transmitter is linked to memory button 1.
• DRIVER 2 transmitter is linked to memory button 2.
1Driving Position Memory System
*
Using the audio/information screen or multi-
information display, you can disable the automatic
seat adjustment function.
2 Customized Features P. 97, 298
DRIVER 1
DRIVER 2
* Not available on all models