reset HONDA ACCORD 2015 9.G Owner's Manual
[x] Cancel search | Manufacturer: HONDA, Model Year: 2015, Model line: ACCORD, Model: HONDA ACCORD 2015 9.GPages: 593
Page 178 of 593
177
uuAudio System uAudio System Theft Protection
*
Features
Audio System Theft Protection
*
The audio system is disabled when it is disconnected from the power source, such as
when the 12-volt battery is disconnected or goes dead.■Reactivating the audio system
1. Set the power mode to ON, and turn on the audio system.
u If you set the power mode to ACCESSORY, you will be requested to enter the
audio security code. See step 3.
2. Press and hold the power button again for more than two seconds.
u The audio system is reactivated when the system’s control unit recognizes that
the system is in your vehicle.
If the control unit fails to recognize, Enter PIN Code appears on the audio/
information screen.
3. If the two steps do not work, you can enter the audio security code using the
touch screen. If you enter an incorrect digit, continue to the last digit, then try
again. If you do not enter code correctly after 10 tries, leave the system for one
hour before trying again, or visit a dealer to have the system reset.
1 Audio System Theft Protection
*
Find the audio system's security code and serial
number label in your owner’s manual kit.
We recommend that you write down the serial
number in this owner’s manual.
Do not store the label in your vehicle. If you lose the
label, you must first retrieve the serial number, and
then obtain the code.
You can find out about your serial number and
security code from a dealer.
You can register the security code at Honda Owners
(owners.honda.com. ), and find information on how
to retrieve the serial number and obtain the code at
radio-navicode.honda.com .U.S. models
* Not available on all models
Page 180 of 593
179
uuAudio System uAudio Remote Controls
Features
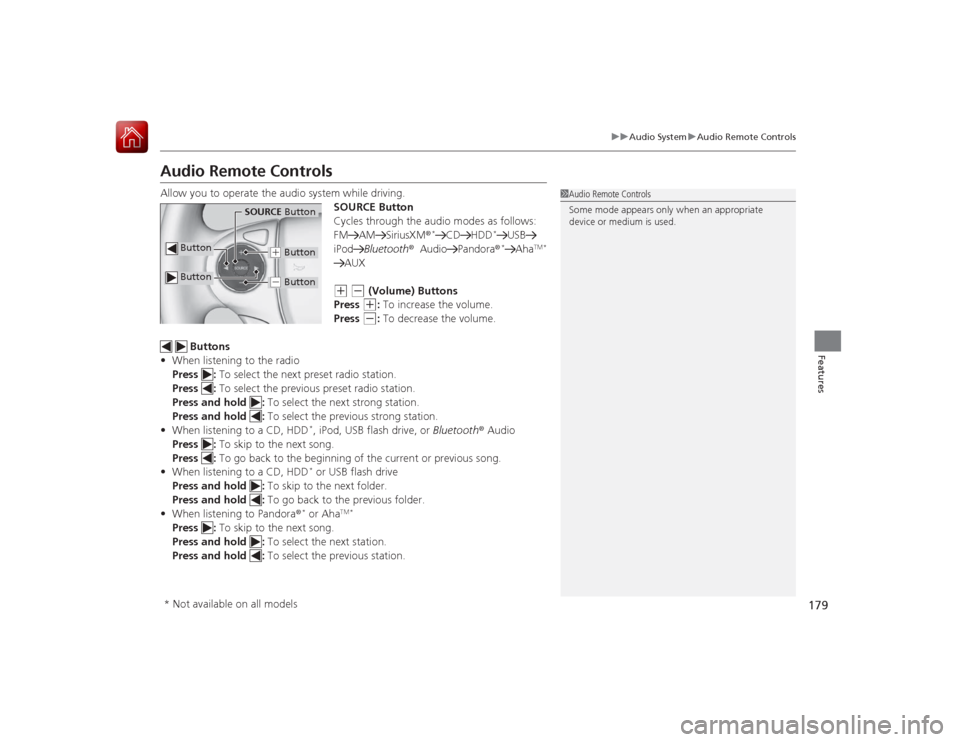
Audio Remote ControlsAllow you to operate the audio system while driving.
SOURCE Button
Cycles through the audio modes as follows:
FM AM SiriusXM ®
*
CD HDD
*
USB
iPod Bluetooth® Audio Pandora ®*
Aha
TM *
AUX(+
(-
(Volume) Buttons
Press (+
: To increase the volume.
Press
(-
: To decrease the volume.
Buttons
• When listening to the radio
Press : To select the next preset radio station.
Press : To select the previous preset radio station.
Press and hold : To select the next strong station.
Press and hold : To select the previous strong station.
• When listening to a CD, HDD
*, iPod, USB flash drive, or Bluetooth ® Audio
Press : To skip to the next song.
Press : To go back to the beginning of the current or previous song.
• When listening to a CD, HDD* or USB flash drive
Press and hold : To skip to the next folder.
Press and hold : To go back to the previous folder.
• When listening to Pandora®* or Aha
TM *
Press : To skip to the next song.
Press and hold : To select the next station.
Press and hold : To select the previous station.
1Audio Remote Controls
Some mode appears only when an appropriate
device or medium is used.
Button
SOURCE Button
Button
(+ Button(- Button
* Not available on all models
Page 181 of 593
180Features
Audio System Basic OperationTo use the audio system function, the ignition switch must be in ACCESSORY
(q
or
ON
(w
*1.
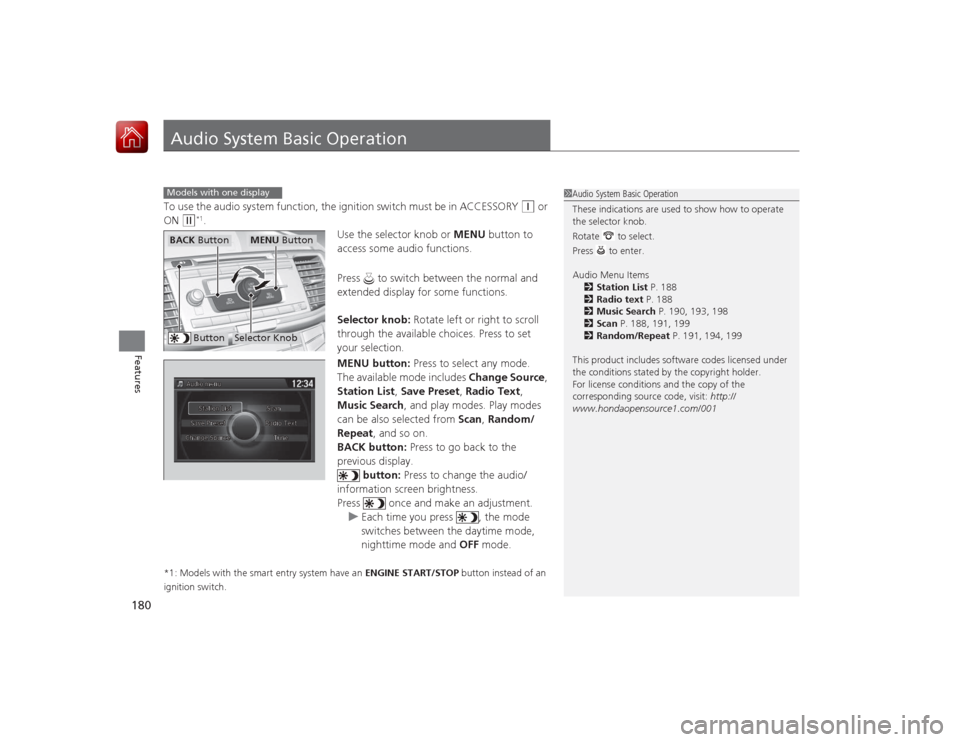
Use the selector knob or MENU button to
access some audio functions.
Press to switch between the normal and
extended display for some functions.
Selector knob: Rotate left or right to scroll
through the available choices. Press to set
your selection.
MENU button: Press to select any mode.
The available mode includes Change Source ,
Station List , Save Preset , Radio Text,
Music Search , and play modes. Play modes
can be also selected from Scan, Random/
Repeat , and so on.
BACK button: Press to go back to the
previous display. button: Press to change the audio/
information screen brightness.
Press once and make an adjustment. u Each time you press , the mode
switches between the daytime mode,
nighttime mode and OFF mode.
*1: Models with the smart entry system have an ENGINE START/STOP button instead of an
ignition switch.Models with one display
1 Audio System Basic Operation
These indications are used to show how to operate
the selector knob.
Rotate to select.
Press to enter.
Audio Menu Items
2 Station List P. 188
2 Radio text P. 188
2 Music Search P. 190, 193, 198
2 Scan P. 188, 191, 199
2 Random/Repeat P. 191, 194, 199
This product includes software codes licensed under
the conditions stated by the copyright holder.
For license conditions and the copy of the
corresponding source code, visit: http://
www.hondaopensource1.com/001
Button
Selector Knob
MENU Button
BACK Button
Page 183 of 593
182
uuAudio System Basic Operation uAudio/Information Screen
Features
■Audio
Shows the current audio information.■Trip computer (Current Drive)
Shows the range, and instant and average fuel economy of the current trip, as well
as the average fuel economy from your last trip.■Trip computer (History of Trip A)
Shows the range, average fuel economy and distance traveled for the current trip,
as well as the average fuel economy and distances traveled during the last three
driving cycles.
Each time you reset the trip meter A, the information on the display updates. The
history of the previous three driving cycles is kept.■Clock/Wallpaper
Shows a clock screen or an image you import.
Page 188 of 593
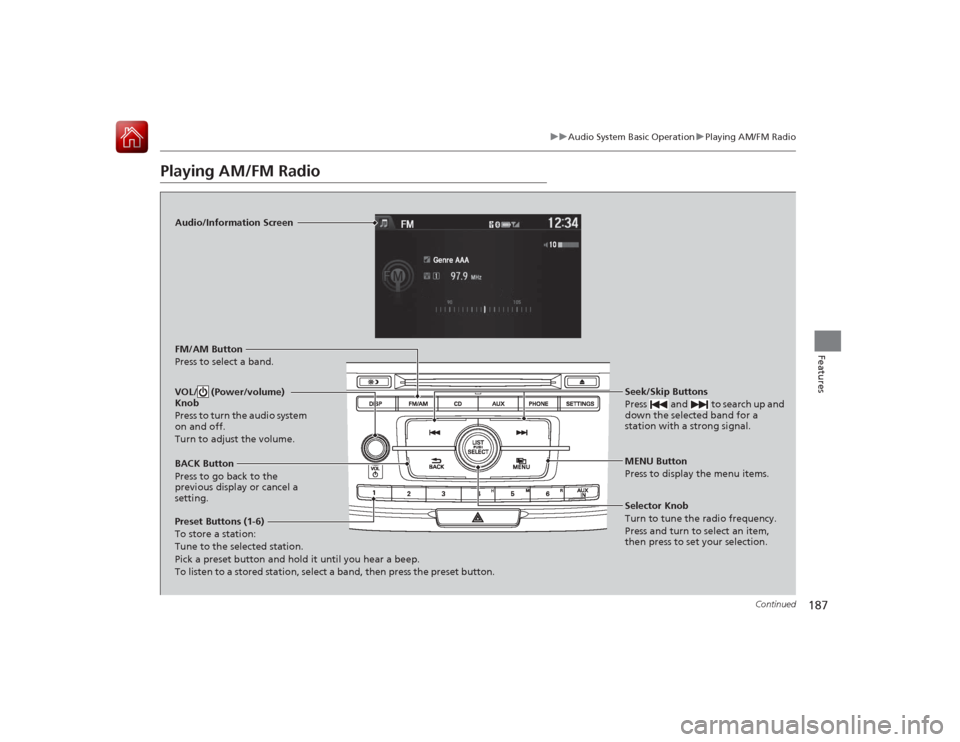
187
uuAudio System Basic Operation uPlaying AM/FM Radio
Continued
Features
Playing AM/FM Radio
Audio/Information Screen
FM/AM Button
Press to select a band.
Preset Buttons (1-6)
To store a station:
Tune to the selected station.
Pick a preset button and hold it until you hear a beep.
To listen to a stored station, select a band, then press the preset button. Seek/Skip Buttons
Press and to search up and
down the selected band for a
station with a strong signal.
MENU Button
Press to display the menu items.
Selector Knob
Turn to tune the radio frequency.
Press and turn to select an item,
then press to set your selection.
VOL/ (Power/volume)
Knob
Press to turn the audio system
on and off.
Turn to adjust the volume.BACK Button
Press to go back to the
previous display or cancel a
setting.
Page 189 of 593
uuAudio System Basic Operation uPlaying AM/FM Radio
188Features
Provides text data information related to your selected RDS-capable FM station.■To find an RDS stat ion from Station List
1. Press while listening to an FM station.
2. Rotate to select the station, then press .■Manual update
Updates your available station list at any time.
1. Press while listening to an FM station.
2. Rotate to select Refresh, then press .■Radio text
Displays the radio text information of the selected RDS station.
1. Press the MENU button.
2. Rotate to select Radio Text, then press .■Scan
Samples each of the strongest stations on the selected band for 10 seconds.
1. Press the MENU button.
2. Rotate to select Scan, then press .
To turn off scan, press to select Stop, or press the BACK button.■
Radio Data System (RDS)
1Playing AM/FM Radio
The ST indicator appears on the display indicating
stereo FM broadcasts.
Stereo reproduction in AM is not available.
Switching the Audio Mode
Press the SOURCE button on the steering wheel.
2 Audio Remote Controls P. 179
You can also switch the mode by pressing the MENU
button and selecting Change Source on the MENU
screen.
You can store 6 AM stations and 12 FM stations into
the preset memory.1 Radio Data System (RDS)
When you select an RDS-capable FM station, the RDS
automatically turns on, and the frequency display
changes to the station name. However, when the
signals of that station become weak, the display
changes from the station name to the frequency.
Page 196 of 593
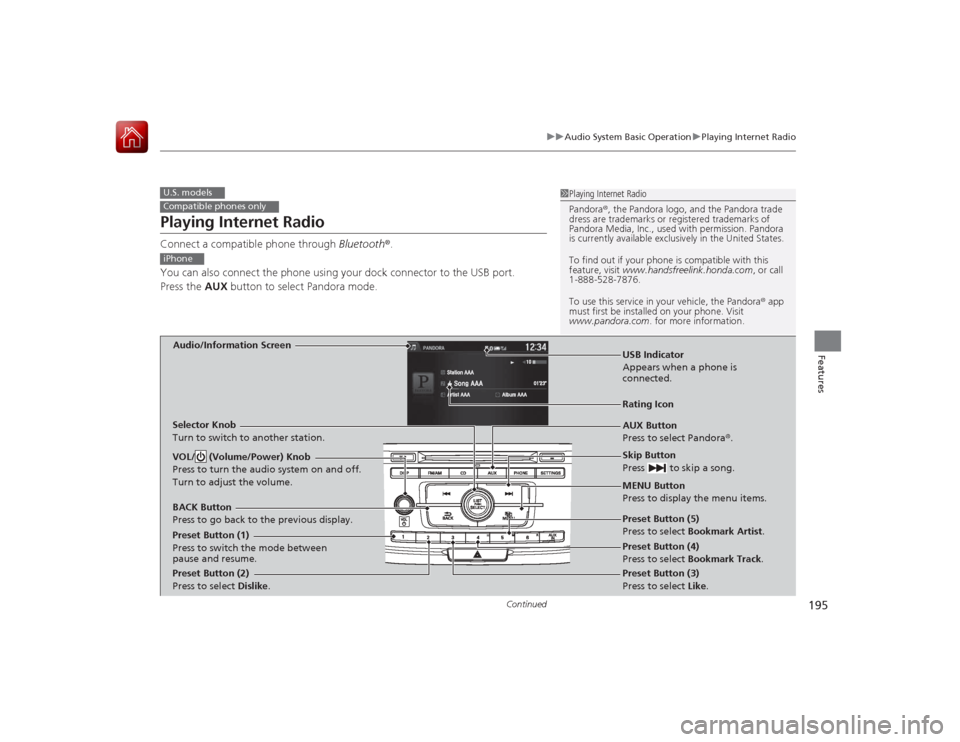
195
uuAudio System Basic Operation uPlaying Internet Radio
Continued
Features
Playing Internet RadioConnect a compatible phone through Bluetooth®.
You can also connect the phone using your dock connector to the USB port.
Press the AUX button to select Pandora mode.U.S. modelsCompatible phones only
1Playing Internet Radio
Pandora ®, the Pandora logo, and the Pandora trade
dress are trademarks or regi stered trademarks of
Pandora Media, Inc., used with permission. Pandora
is currently available exclusively in the United States.
To find out if your phone is compatible with this
feature, visit www.handsfreelink.honda.com , or call
1-888-528-7876.
To use this service in your vehicle, the Pandora ® app
must first be installed on your phone. Visit
www.pandora.com . for more information.
iPhoneAudio/Information Screen
AUX Button
Press to select Pandora®.
Skip Button
Press to skip a song.
MENU Button
Press to display the menu items.
Selector Knob
Turn to switch to another station.
VOL/ (Volume/Power) Knob
Press to turn the audio system on and off.
Turn to adjust the volume.BACK Button
Press to go back to the previous display.
USB Indicator
Appears when a phone is
connected.Rating Icon
Preset Button (1)
Press to switch the mode between
pause and resume.
Preset Button (2)
Press to select Dislike.
Preset Button (3)
Press to select Like. Preset Button (4)
Press to select Bookmark Track
.
Preset Button (5)
Press to select Bookmark Artist
.
Page 201 of 593
200
uuAudio System Basic Operation uPlaying Bluetooth ® Audio
Features
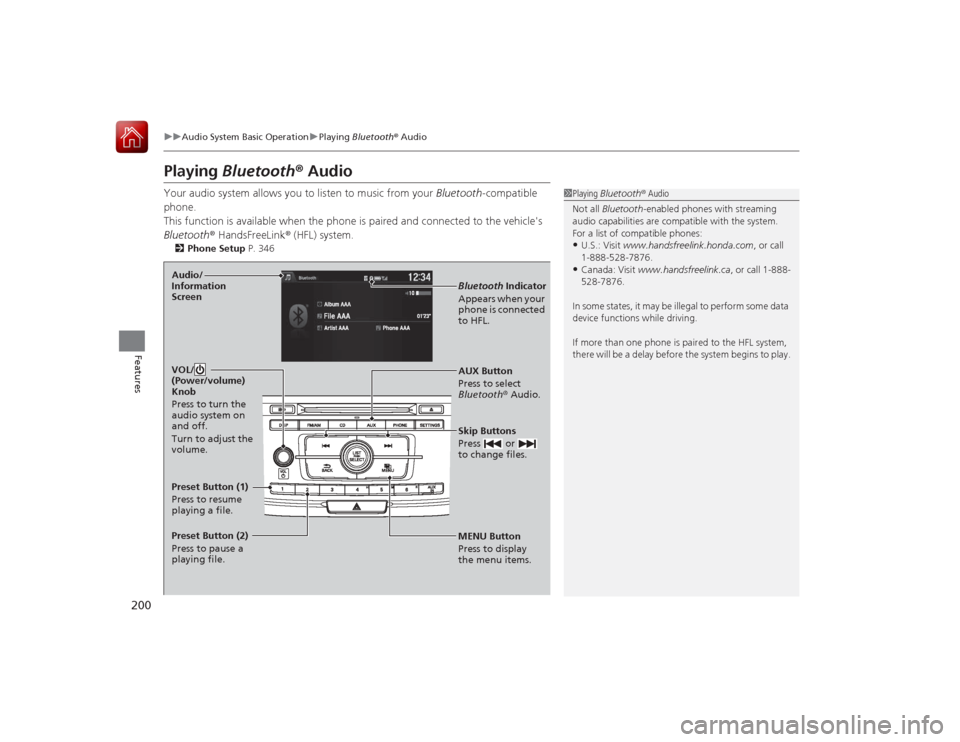
Playing Bluetooth® AudioYour audio system allows you to listen to music from your Bluetooth-compatible
phone.
This function is available when the phone is paired and connected to the vehicle's
Bluetooth ® HandsFreeLink ® (HFL) system.2 Phone Setup P. 346
1Playing Bluetooth ® Audio
Not all Bluetooth-enabled phones with streaming
audio capabilities are compatible with the system.
For a list of compatible phones:•U.S.: Visit www.handsfreelink.honda.com , or call
1-888-528-7876.•Canada: Visit www.handsfreelink.ca , or call 1-888-
528-7876.
In some states, it may be illegal to perform some data
device functions while driving.
If more than one phone is paired to the HFL system,
there will be a delay before the system begins to play.
MENU Button
Press to display
the menu items. AUX Button
Press to select
Bluetooth ® Audio.
Skip Buttons
Press or
to change files.Bluetooth Indicator
Appears when your
phone is connected
to HFL.
VOL/
(Power/volume)
Knob
Press to turn the
audio system on
and off.
Turn to adjust the
volume.
Audio/
Information
ScreenPreset Button (1)
Press to resume
playing a file.
Preset Button (2)
Press to pause a
playing file.
Page 203 of 593
202Features
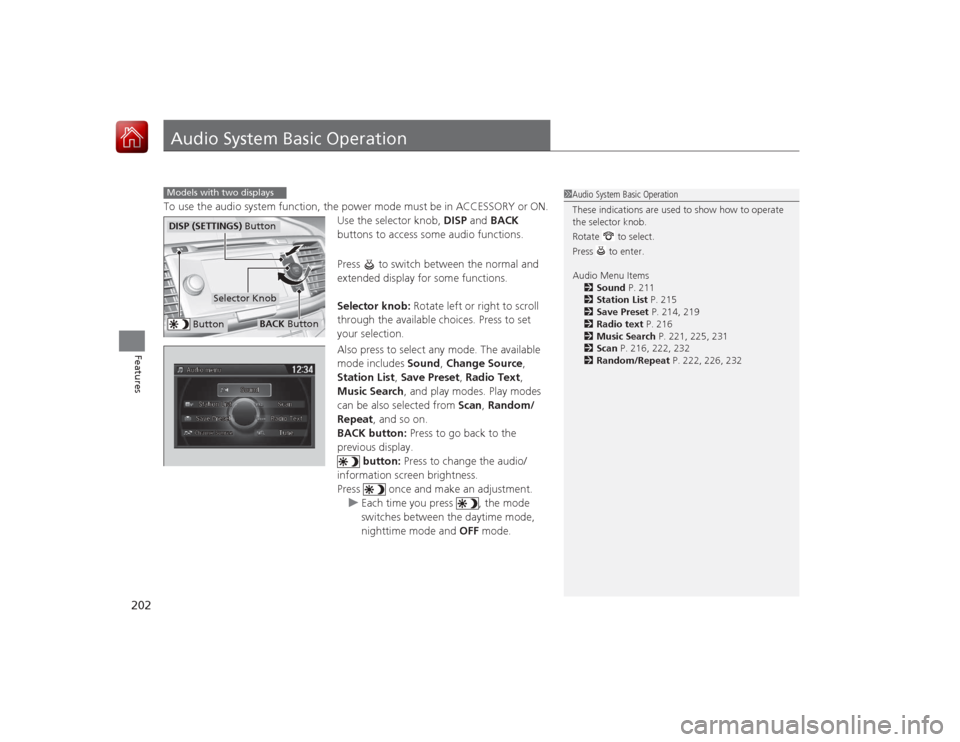
Audio System Basic OperationTo use the audio system function, the power mode must be in ACCESSORY or ON.Use the selector knob, DISP and BACK
buttons to access some audio functions.
Press to switch between the normal and
extended display for some functions.
Selector knob: Rotate left or right to scroll
through the available choices. Press to set
your selection.
Also press to select any mode. The available
mode includes Sound, Change Source ,
Station List , Save Preset , Radio Text,
Music Search , and play modes. Play modes
can be also selected from Scan, Random/
Repeat , and so on.
BACK button: Press to go back to the
previous display.
button: Press to change the audio/
information screen brightness.
Press once and make an adjustment. u Each time you press , the mode
switches between the daytime mode,
nighttime mode and OFF mode.Models with two displays
1Audio System Basic Operation
These indications are used to show how to operate
the selector knob.
Rotate to select.
Press to enter.
Audio Menu Items
2 Sound P. 211
2 Station List P. 215
2 Save Preset P. 214, 219
2 Radio text P. 216
2 Music Search P. 221, 225, 231
2 Scan P. 216, 222, 232
2 Random/Repeat P. 222, 226, 232
Button
Selector Knob
DISP (SETTINGS) Button
BACK Button
Page 209 of 593
208
uuAudio System Basic Operation uAudio/Information Screen
Features
■Info
Shows the Trip Computer or Clock/Wallpaper information.
Press , rotate to select an item, then press .■Trip computer (Current Drive)
Shows the range, and instant and average fuel economy of the current trip, as well
as the average fuel economy from your last trip.■Trip computer (History of Trip A)
Shows the range, average fuel economy and distance traveled for the current trip,
as well as the average fuel economy and distances traveled during the last three
driving cycles.
Each time you reset the trip meter A, the information on the display updates. The
history of the previous three driving cycles is kept.■Deleting the history manually
1. Press on the History of Trip A screen.
2. Rotate to select Delete History, then press .
3. You will receive a confirmation message on the screen. Rotate to select Yes,
then press .■Clock/Wallpaper
Shows a clock screen or an image you import.