warning light HONDA ACCORD 2022 User Guide
[x] Cancel search | Manufacturer: HONDA, Model Year: 2022, Model line: ACCORD, Model: HONDA ACCORD 2022Pages: 657, PDF Size: 11.42 MB
Page 462 of 657
uuHonda Sensing ®u Collision Mitigation Braking SystemTM (CMBSTM)
460
Driving
The system may automatically shut off and the safety support indicator (amber) will
come on under certain conditions. Some ex amples of these conditions are listed
below. Other conditions may reduce some of the CMBS
TM functions.
2 Front Sensor Camera P. 504
2 Radar Sensor P. 506
■Environmental conditions
• Driving in bad weather (rain, fog, snow, etc.).
• Sudden changes between light and dark, such as an entrance or exit of a tunnel.
• There is little contrast between objects and the background.
• Driving into low sunlight (e.g., at dawn or dusk).
• Strong light is reflected onto the roadway.
• Driving in the shadows of trees, buildings, etc.
• Roadway objects or structures are misint erpreted as vehicles and pedestrians.
• Reflections on the interi or of the windshield.
• Driving at night or in a dark place such as a tunnel (due to low-light conditions,
pedestrians or other vehicles may not be detected).
■Roadway conditions
• Driving on a snowy or wet roadway (obs cured lane marking, vehicle tracks,
reflected lights, road spray, high contrast).
• Driving on curvy, winding, or undulating roads.
• The road is hilly or the vehicle is approaching the crest of a hill.
■CMBSTM Conditions and Limitations1Collision Mitigation Braking SystemTM (CMBSTM)
Have your vehicle checked by a dealer if you find any
unusual behavior of the system (e.g., the warning
message appears too frequently).
Page 472 of 657
470
uuHonda Sensing ®u Adaptive Cruise Control (ACC) with Low Speed Follow
Driving
Adaptive Cruise Control (A CC) with Low Speed Follow
Helps maintain a constant vehicle speed a nd a set following-interval behind a vehicle
detected ahead of yours and, if the detect ed vehicle comes to a stop, can decelerate
and stop your vehicle, without you having to keep your foot on the brake or the
accelerator.
When ACC with Low Speed Follow slows y our vehicle by applying the brakes, your
vehicle’s brake lights will illuminate.1 Adaptive Cruise Control (ACC) with Low Speed Follow
Important Reminder
As with any system, there are limits to ACC with Low
Speed Follow. Use the brake pedal whenever
necessary, and always keep a safe interval between
your vehicle and other vehicles.
3WARNING
Improper use of ACC with Low Speed
Follow can lead to a crash.
Use ACC with Low Speed Follow only when
driving on expressways or freeways and in
good road and weather conditions.
3WARNING
ACC with Low Speed Follow has limited
braking capability and may not stop your
vehicle in time to avoid a collision with a
vehicle that quickly stops in front of you.
Always be prepared to apply the brake
pedal if the conditions require.
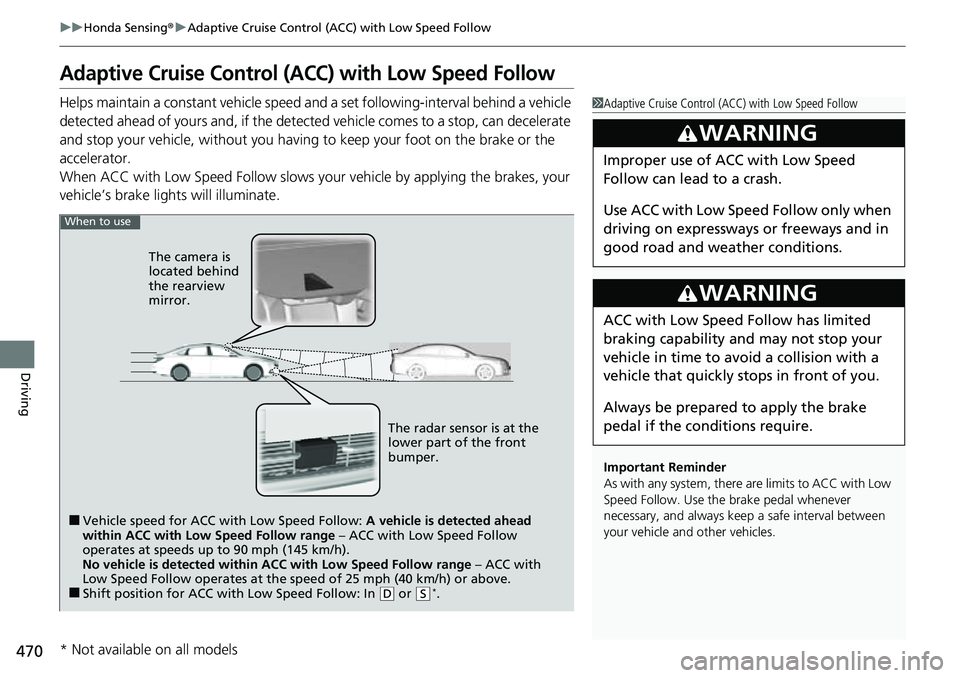
When to use
■Vehicle speed for ACC wi th Low Speed Follow: A vehicle is detected ahead
within ACC with Low Speed Follow range – ACC with Low Speed Follow
operates at speeds up to 90 mph (145 km/h).
No vehicle is detected within ACC with Low Speed Follow range – ACC with
Low Speed Follow operates at the speed of 25 mph (40 km/h) or above.
■Shift position for ACC with Low Speed Follow: In ( D or (S*.
The radar sensor is at the
lower part of the front
bumper.
The camera is
located behind
the rearview
mirror.
* Not available on all models
Page 475 of 657
Continued473
uuHonda Sensing ®u Adaptive Cruise Control (ACC) with Low Speed Follow
Driving
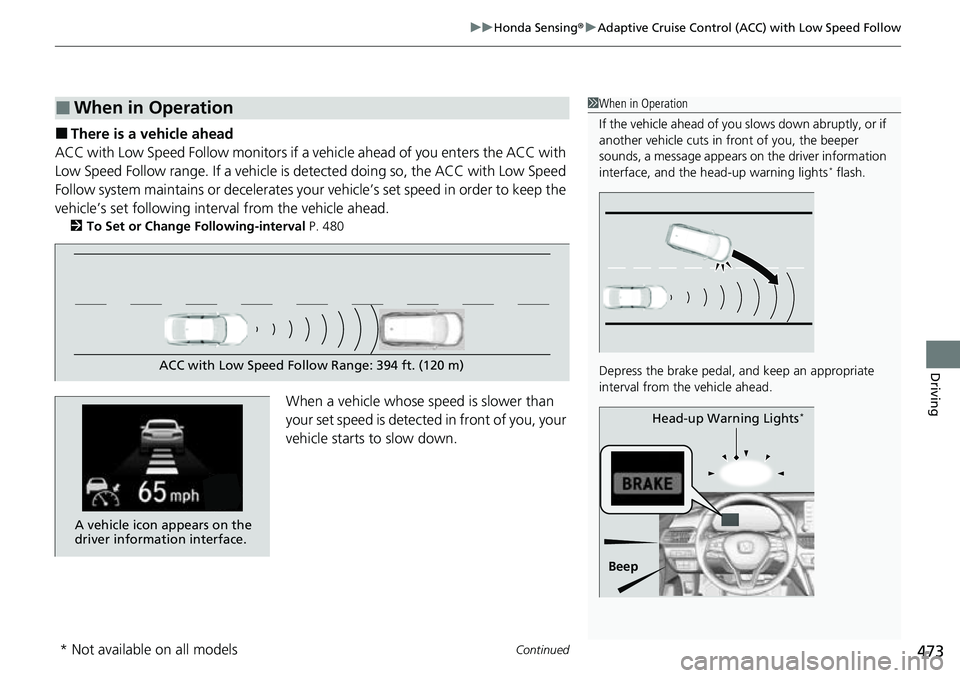
■There is a vehicle ahead
ACC with Low Speed Follow m onitors if a vehicle ahead of you enters the ACC with
Low Speed Follow range. If a vehicle is de tected doing so, the ACC with Low Speed
Follow system maintains or decelerates your vehicle’s set speed in order to keep the
vehicle’s set following interval from the vehicle ahead.
2 To Set or Change Following-interval P. 480
When a vehicle whose speed is slower than
your set speed is detected in front of you, your
vehicle starts to slow down.
■When in Operation1 When in Operation
If the vehicle ahead of you slows down abruptly, or if
another vehicle cuts in front of you, the beeper
sounds, a message appears on the driver information
interface, and the he ad-up warning lights
* flash.
Depress the brake pedal, and keep an appropriate
interval from the vehicle ahead.
Beep Head-up Warning Lights
*
ACC with Low Speed Follow Range: 394 ft. (120 m)
A vehicle icon appears on the
driver information interface.
* Not available on all models
Page 478 of 657
uuHonda Sensing ®u Adaptive Cruise Control (ACC) with Low Speed Follow
476
Driving
The system may automatically shut off under certain conditions. Some examples of
these conditions are listed below. Other conditions may reduce some of the ACC
with Low Speed Follow functions.
2 Front Sensor Camera P. 504
2 Radar Sensor P. 506
■Environmental conditions
• Driving in bad weather (rain, fog, snow, etc.).
■Roadway conditions
• Driving on a snowy or wet roadway (obs cured lane marking, vehicle tracks,
reflected lights, road spray, high contrast).
■Vehicle conditions
• The outside of the windshie ld is blocked by dirt, mud, leaves, wet snow, etc.
• An abnormal tire or wheel condition (incorre ct sizes, varied sizes or construction,
improperly inflated, comp act spare tire, etc.).
• The camera temperature gets too high.
• The parking brake is applied.
• When the radar sensor cover is dirty.
• The vehicle is tilted due to a heav y load or suspension modifications.
• When tire chains
* are installed.
■ACC with Low Speed Follow Conditions and Limitations1ACC with Low Speed Follow Conditions and Limitations
If you need the radar sensor to be repaired, or
removed, or the radar se nsor cover is strongly
impacted, turn off the system by pressing the
button and take your vehicle to a dealer.
Have your vehicle checked by a dealer if you find any
unusual behavior of the system (e.g., the warning
message appears too frequently).
* Not available on all models
Page 489 of 657
Continued487
uuHonda Sensing ®u Lane Keeping Assist System (LKAS)
Driving
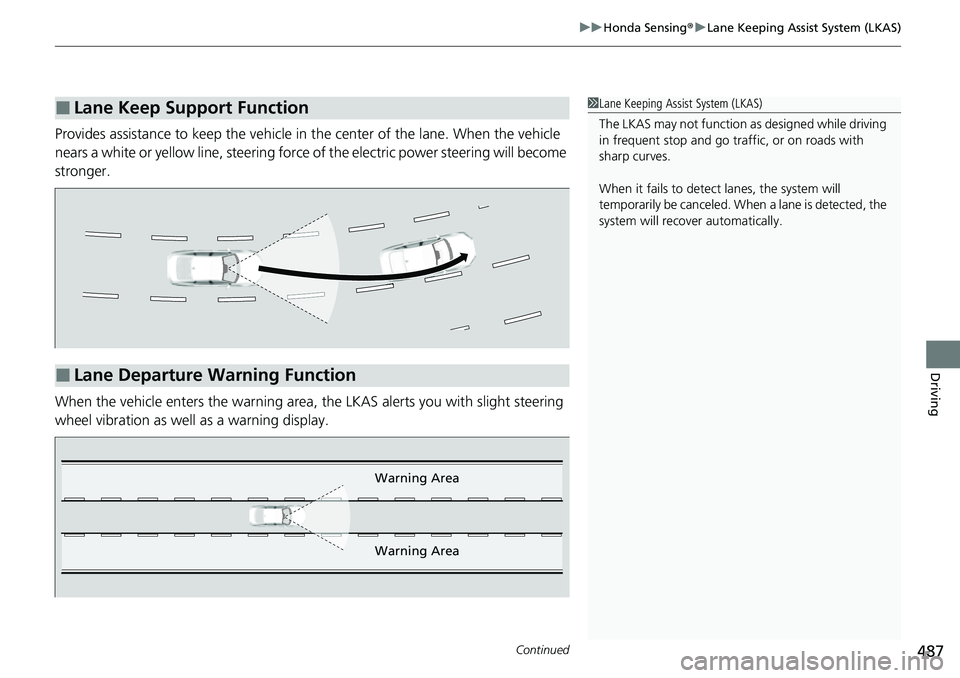
Provides assistance to keep the vehicle in the center of the lane. When the vehicle
nears a white or yellow line, steering force of the electric power steering will become
stronger.
When the vehicle enters the warning area, the LKAS alerts you with slight steering
wheel vibration as well as a warning display.
■Lane Keep Support Function1 Lane Keeping Assist System (LKAS)
The LKAS may not function as designed while driving
in frequent stop and go traf fic, or on roads with
sharp curves.
When it fails to detect lanes, the system will
temporarily be canceled. When a lane is detected, the
system will recover automatically.
■Lane Departure Warning Function
Warning Area
Warning Area
Page 498 of 657
uuHonda Sensing ®u Road Departure Mitigation (RDM) System
496
Driving
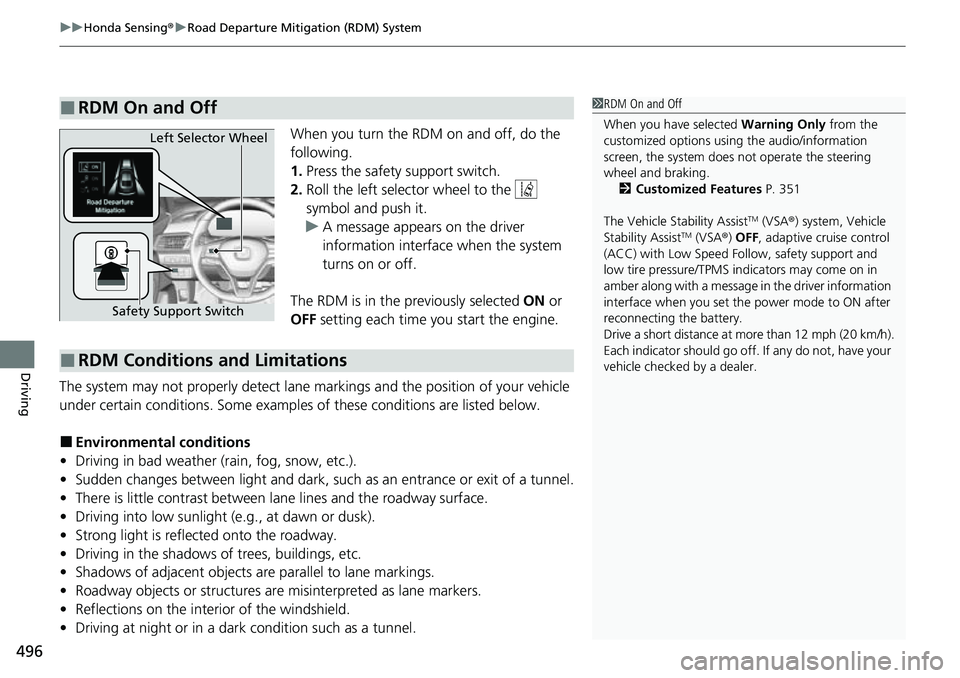
When you turn the RDM on and off, do the
following.
1. Press the safety support switch.
2. Roll the left selector wheel to the
symbol and push it.
u A message appears on the driver
information interface when the system
turns on or off.
The RDM is in the previously selected ON or
OFF setting each time you start the engine.
The system may not properly detect lane markings and the position of your vehicle
under certain conditions. Some examples of these conditions are listed below.
■Environmental conditions
• Driving in bad weather (rain, fog, snow, etc.).
• Sudden changes between light and dark, such as an entrance or exit of a tunnel.
• There is little contrast between la ne lines and the roadway surface.
• Driving into low sunlight (e.g., at dawn or dusk).
• Strong light is reflected onto the roadway.
• Driving in the shadows of trees, buildings, etc.
• Shadows of adjacent objects are parallel to lane markings.
• Roadway objects or structures are misinterpreted as lane markers.
• Reflections on the interi or of the windshield.
• Driving at night or in a dark condition such as a tunnel.
■RDM On and Off1RDM On and Off
When you have selected Warning Only from the
customized options using the audio/information
screen, the system does not operate the steering
wheel and braking. 2 Customized Features P. 351
The Vehicle Stability Assist
TM (VSA ®) system, Vehicle
Stability AssistTM (VSA ®) OFF, adaptive cruise control
(ACC) with Low Speed Follow, safety support and
low tire pressure/TPMS indicators may come on in
amber along with a message in the driver information
interface when you set the power mode to ON after
reconnecting the battery.
Drive a short distance at more than 12 mph (20 km/h).
Each indicator should go off. If any do not, have your
vehicle checked by a dealer.
Safety Support Switch Left Selector Wheel
■RDM Conditions and Limitations
Page 515 of 657
Continued513
uuBraking uBrake System
Driving
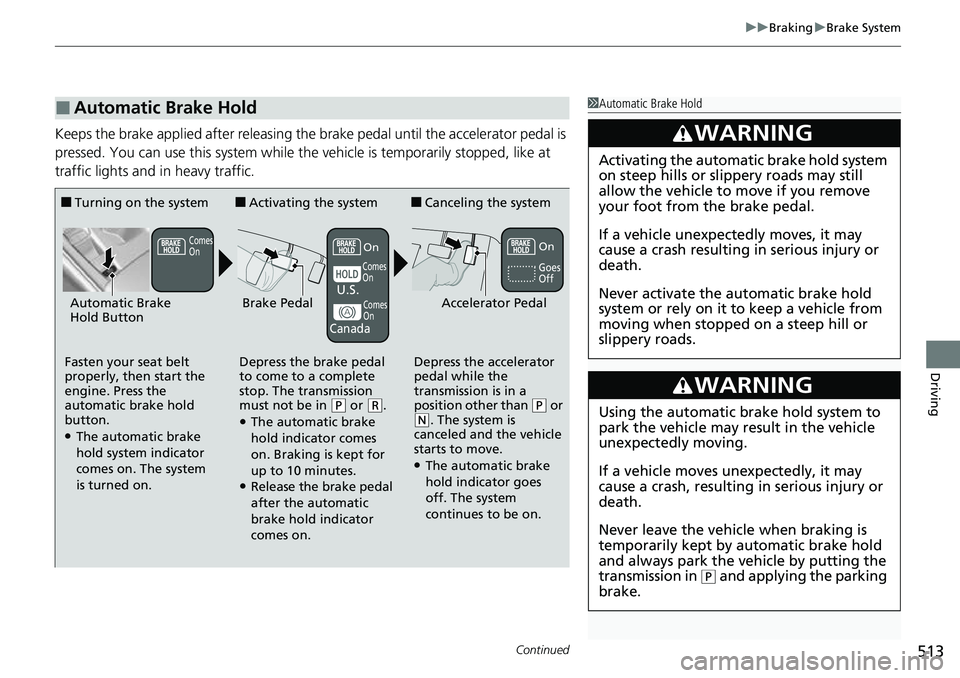
Keeps the brake applied after releasing the brake pedal until the accelerator pedal is
pressed. You can use this system while th e vehicle is temporarily stopped, like at
traffic lights and in heavy traffic.
■Automatic Brake Hold1 Automatic Brake Hold
3WARNING
Activating the automatic brake hold system
on steep hills or slippery roads may still
allow the vehicle to move if you remove
your foot from the brake pedal.
If a vehicle unexpectedly moves, it may
cause a crash resulting in serious injury or
death.
Never activate the automatic brake hold
system or rely on it to keep a vehicle from
moving when stopped on a steep hill or
slippery roads.
3WARNING
Using the automatic brake hold system to
park the vehicle may result in the vehicle
unexpectedly moving.
If a vehicle moves unexpectedly, it may
cause a crash, resulting in serious injury or
death.
Never leave the vehicle when braking is
temporarily kept by automatic brake hold
and always park the vehicle by putting the
transmission in
( P and applying the parking
brake.
■Turning on the system
Fasten your seat belt
properly, then start the
engine. Press the
automatic brake hold
button.
●The automatic brake
hold system indicator
comes on. The system
is turned on.
■Activating the system
Depress the brake pedal
to come to a complete
stop. The transmission
must not be in
( P or (R.●The automatic brake
hold indicator comes
on. Braking is kept for
up to 10 minutes.
●Release the brake pedal
after the automatic
brake hold indicator
comes on.
■Canceling the system
Depress the accelerator
pedal while the
transmission is in a
position other than
( P or (N. The system is
canceled and the vehicle
starts to move.
●The automatic brake
hold indicator goes
off. The system
continues to be on.
Accelerator PedalBrake PedalAutomatic Brake
Hold Button
Goes
Off
U.S.
Canada
On
On
Comes
On
Comes
On
Comes
On
Page 534 of 657
532
uuRefueling uHow to Refuel
Driving
How to Refuel
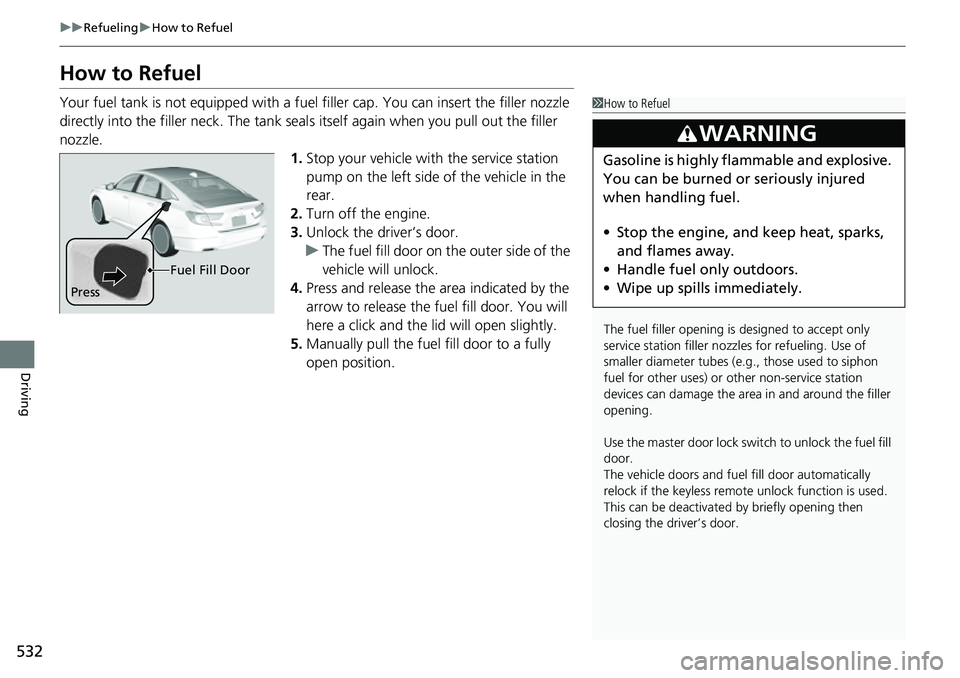
Your fuel tank is not equipped with a fuel filler cap. You can insert the filler nozzle
directly into the filler neck. The tank seal s itself again when you pull out the filler
nozzle.
1.Stop your vehicle with the service station
pump on the left side of the vehicle in the
rear.
2. Turn off the engine.
3. Unlock the driver’s door.
u The fuel fill door on the outer side of the
vehicle will unlock.
4. Press and release the area indicated by the
arrow to release the fu el fill door. You will
here a click and the lid will open slightly.
5. Manually pull the fuel fill door to a fully
open position.1How to Refuel
The fuel filler opening is designed to accept only
service station filler nozzles for refueling. Use of
smaller diamet er tubes (e.g., those used to siphon
fuel for other uses) or other non-service station
devices can damage the area in and around the filler
opening.
Use the master door lock switch to unlock the fuel fill
door.
The vehicle doors and fuel fill door automatically
relock if the keyless remo te unlock function is used.
This can be deactivated by briefly opening then
closing the driver’s door.
3WARNING
Gasoline is highly flammable and explosive.
You can be burned or seriously injured
when handling fuel.
• Stop the engine, and keep heat, sparks,
and flames away.
• Handle fuel only outdoors.
• Wipe up spills immediately.
Press Fuel Fill Door
Page 552 of 657

550
uuMaintenance Under the Hood uOpening the Hood
Maintenance
Opening the Hood
1. Park the vehicle on a level surface, and set
the parking brake.
2. Pull the hood release handle under the
driver’s side lower corner of the dashboard.
u The hood will pop up slightly.
3. Push the hood latch lever (located under
the front edge of the hood to the center) to
the side and raise the hood. Once you have
raised the hood slightly, you can release the
lever.
4. Remove the support rod from the clamp
using the grip. Mount the support rod in
the hood.
When closing, remove the support rod, and
stow it in the clamp, then gently lower the
hood. Remove your hand at a height of
approximately 12 inches (30 cm) and let the
hood close.1 Opening the Hood
NOTICE
Do not open the hood when the wiper arms are
raised.
The hood will strike the wipe rs, resulting in possible
damage to the hood and/or the wipers.
Do not press the engine cover forcibly. This may
damage the engine cover and component parts.
When closing the hood, check that the hood is
securely latched.
If the hood latch lever moves stiffly, or if you can
open the hood without lifti ng the lever, the latch
mechanism should be cl eaned and lubricated.
Do not open the hood while the Auto Idle Stop
function is activated.
3WARNING
The hood support rod can become very hot
due to heat fr om the engine.
To ensure against po ssible burns, do not
handle the metal section of the rod:
Use the foam grip instead.
2.0 L engine models
Models with Auto Idle Stop
Hood Release Handle
Pull
Lever
Support Rod
Grip
Clamp
Page 560 of 657
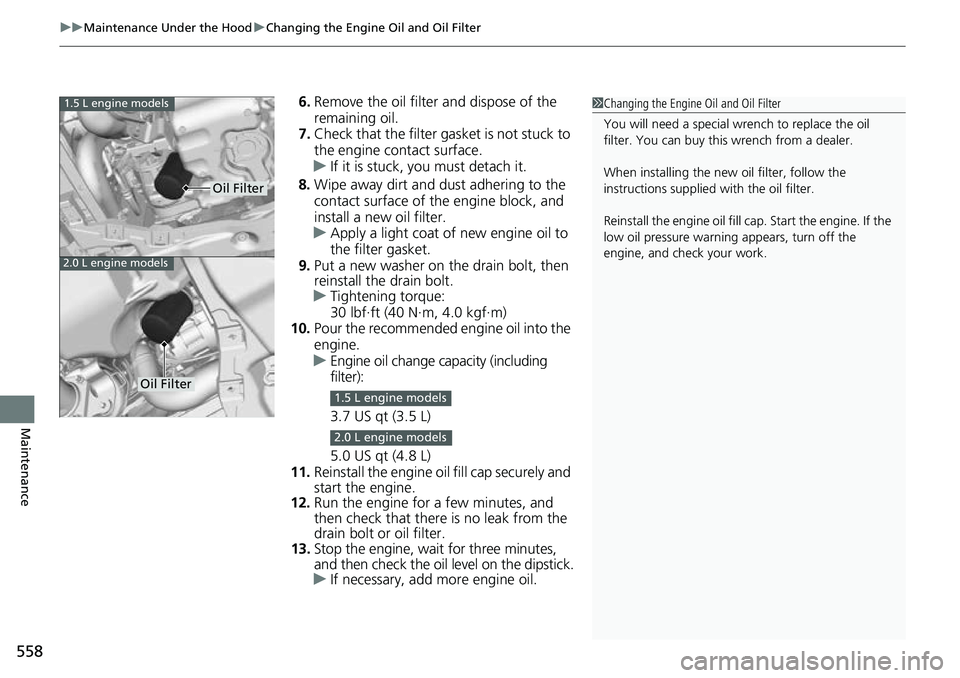
uuMaintenance Under the Hood uChanging the Engine Oil and Oil Filter
558
Maintenance
6. Remove the oil filter and dispose of the
remaining oil.
7. Check that the filter ga sket is not stuck to
the engine contact surface.
u If it is stuck, you must detach it.
8. Wipe away dirt and dust adhering to the
contact surface of the engine block, and
install a new oil filter.
u Apply a light coat of new engine oil to
the filter gasket.
9. Put a new washer on the drain bolt, then
reinstall the drain bolt.
u Tightening torque:
30 lbf∙ft (40 N∙m, 4.0 kgf∙m)
10. Pour the recommended engine oil into the
engine.
u Engine oil change capacity (including
filter):
3.7 US qt (3.5 L)
5.0 US qt (4.8 L)
11. Reinstall the engine oi l fill cap securely and
start the engine.
12. Run the engine for a few minutes, and
then check that there is no leak from the
drain bolt or oil filter.
13. Stop the engine, wait for three minutes,
and then check the oil level on the dipstick.
u If necessary, add more engine oil.1Changing the Engine Oil and Oil Filter
You will need a special wrench to replace the oil
filter. You can buy this wrench from a dealer.
When installing the new oil filter, follow the
instructions supplied with the oil filter.
Reinstall the engine oil fill cap. Start the engine. If the
low oil pressure warning appears, turn off the
engine, and check your work.1.5 L engine models
2.0 L engine models
Oil Filter
Oil Filter1.5 L engine models
2.0 L engine models