HONDA ACCORD COUPE 2014 9.G Owners Manual
Manufacturer: HONDA, Model Year: 2014, Model line: ACCORD COUPE, Model: HONDA ACCORD COUPE 2014 9.GPages: 593, PDF Size: 22.22 MB
Page 461 of 593
460
uuWhen Driving uLane Departure Warning (LDW)*
Driving
Lane Departure Warning (LDW)*
Alerts you when the system detects a possibility of your vehicle unintentionally
crossing over detected side lane markings.
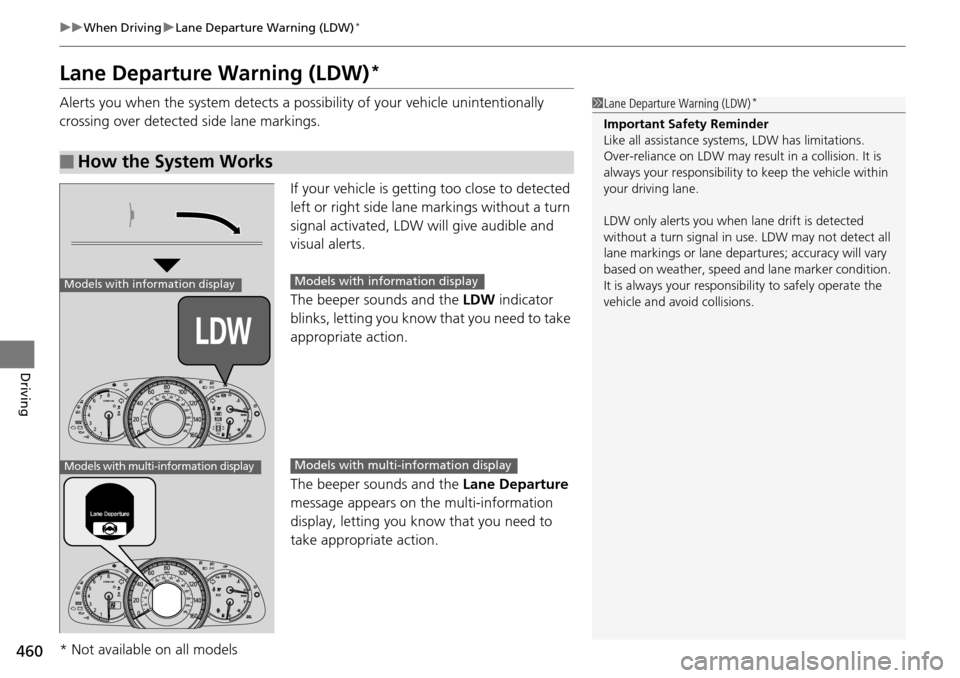
If your vehicle is getting too close to detected
left or right side lane markings without a turn
signal activated, LDW will give audible and
visual alerts.
The beeper sounds and the LDW indicator
blinks, letting you know that you need to take
appropriate action.
The beeper sounds and the Lane Departure
message appears on the multi-information
display, letting you know that you need to
take appropriate action.
■How the System Works
1 Lane Departure Warning (LDW)*
Important Safety Reminder
Like all assistance systems, LDW has limitations.
Over-reliance on LDW may result in a collision. It is
always your respons ibility to keep the vehicle within
your driving lane.
LDW only alerts you when lane drift is detected
without a turn signal in us e. LDW may not detect all
lane markings or lane departures; a ccuracy will vary
based on weather, speed and lane marker condition.
It is always your responsibility to safely operate the
vehicle and avoid collisions.
Models with information display
Models with multi-information display
Models with info rmation display
Models with multi- information display
* Not available on all models
Page 462 of 593
Continued461
uuWhen Driving uLane Departure Warning (LDW)*
Driving
The system begins to search for lane mark ings when all the following conditions are
met:
• The vehicle is traveling betw een 40-90 mph (64-145 km/h).
• The vehicle is on a straight or slightly curved road.
• The turn signals are off.
• The brake pedal is not depressed.
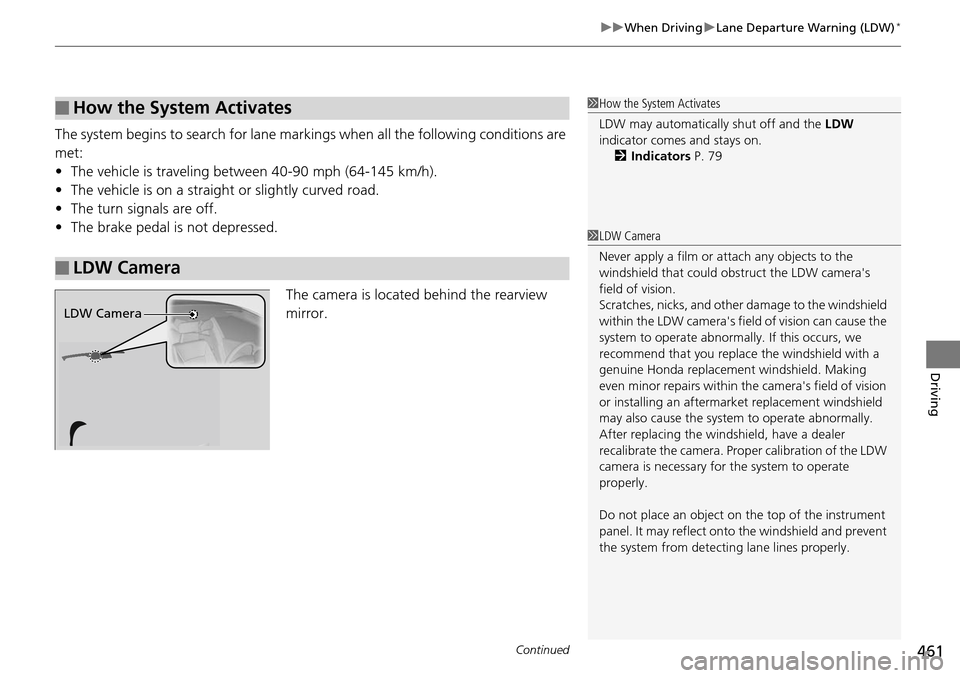
The camera is located behind the rearview
mirror.
■How the System Activates
■LDW Camera
1How the System Activates
LDW may automaticall y shut off and the LDW
indicator comes and stays on.
2 Indicators P. 79
1LDW Camera
Never apply a film or attach any objects to the
windshield that could obs truct the LDW camera's
field of vision.
Scratches, nicks, and othe r damage to the windshield
within the LDW camera's fi eld of vision can cause the
system to operate abnormall y. If this occurs, we
recommend that you replac e the windshield with a
genuine Honda replacem ent windshield. Making
even minor repairs within th e camera's field of vision
or installing an aftermarket replacement windshield
may also cause the system to operate abnormally.
After replacing the winds hield, have a dealer
recalibrate the camera. Prop er calibration of the LDW
camera is necessary for the system to operate
properly.
Do not place an object on the top of the instrument
panel. It may reflect onto the windshield and prevent
the system from detecting lane lines properly.
LDW Camera
Page 463 of 593
uuWhen Driving uLane Departure Warning (LDW)*
462
Driving
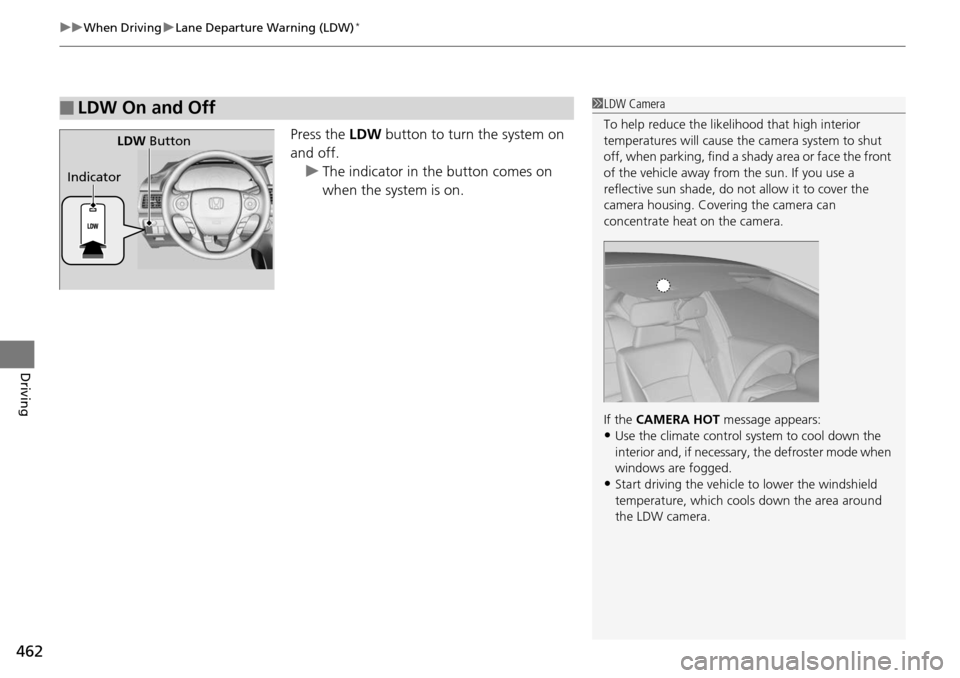
Press the LDW button to turn the system on
and off. u The indicator in the button comes on
when the system is on.
■LDW On and Off1LDW Camera
To help reduce the likel ihood that high interior
temperatures will cause the camera system to shut
off, when parking, find a sh ady area or face the front
of the vehicle away from the sun. If you use a
reflective sun shade, do not allow it to cover the
camera housing. Covering the camera can
concentrate heat on the camera.
If the CAMERA HOT message appears:
•Use the climate control system to cool down the
interior and, if necessary , the defroster mode when
windows are fogged.
•Start driving the vehicle to lower the windshield
temperature, which cool s down the area around
the LDW camera.
LDW Button
Indicator
Page 464 of 593
463
uuWhen Driving uLane Departure Warning (LDW)*
Driving
LDW may not activate or may not recognize lanes, and may activate even when
keeping in the middle of a lane under the following conditions.
■LDW Limitations
Condition
●When you drive in bad weather (rain, fog, etc.).●A heavy load in the rear or modificati ons to the suspension tilts your vehicle.●An abnormal tire condition is detected (wrong tire size, flat tire, etc.).●When the windshield is blocked by dirt, mud, leaves, wet snow, etc.●When the temperature inside the system is high.●A sudden change between light and dark such as an entr ance or exit of a tunnel.●You drive into the sunlight (e.g. at dawn or dusk).●When the windshield is dirty or cloudy.●When you drive in the shadows of trees, buildings, etc.●When your vehicle is towing a trailer.●When you drive on a wet road su rface following another vehicle.
uThe camera may perceive the tire tracks in the water as lane lines.●When there is snow or wheel tracks on the side of the road.●When the road has many repaired areas or erased lines.●When the vehicle is running over pa inted signs or crosswalk markings.●When you drive in a lane with worn-out lane markings.
Page 465 of 593
464
uuWhen Driving uVehicle Stability Assist (VSA® ), aka Electronic Stability Control (ESC), System
Driving
Vehicle Stability Assist (VSA®), aka Electronic
Stability Control (ESC), System
VSA ® helps to stabilize the vehicle during cornering if the vehicle turns more or less
than what was intended. It also assists in maintaining traction on slippery surfaces.
It does so by regulating engine output and select ively applying the brakes.
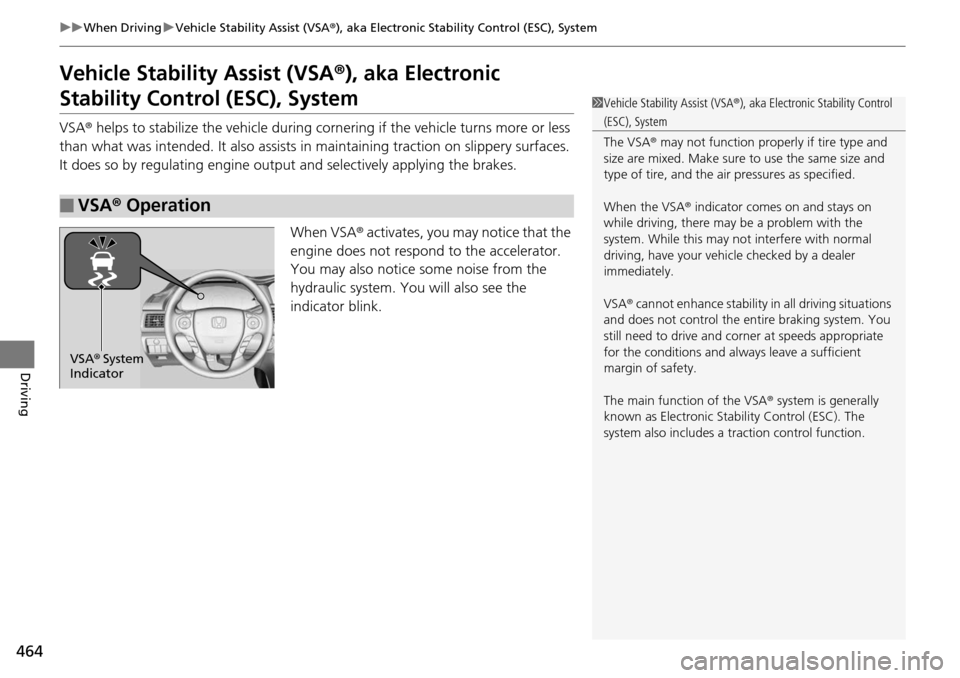
When VSA ® activates, you may notice that the
engine does not respond to the accelerator.
You may also notice some noise from the
hydraulic system. You will also see the
indicator blink.
■VSA ® Operation
1 Vehicle Stability Assist (VSA ®), aka Electronic Stability Control
(ESC), System
The VSA ® may not function properl y if tire type and
size are mixed. Make sure to use the same size and
type of tire, and the air pressures as specified.
When the VSA ® indicator comes on and stays on
while driving, there may be a problem with the
system. While this may not interfere with normal
driving, have your vehi cle checked by a dealer
immediately.
VSA ® cannot enhance stability in all driving situations
and does not control the entire braking system. You
still need to drive and corner at speeds appropriate
for the conditions and always leave a sufficient
margin of safety.
The main function of the VSA ® system is generally
known as Electronic Stability Control (ESC). The
system also includes a traction control function.
VSA® System
Indicator
Page 466 of 593
465
uuWhen Driving uVehicle Stability Assist (VSA ®), aka Electronic Stability Control (ESC), System
Driving
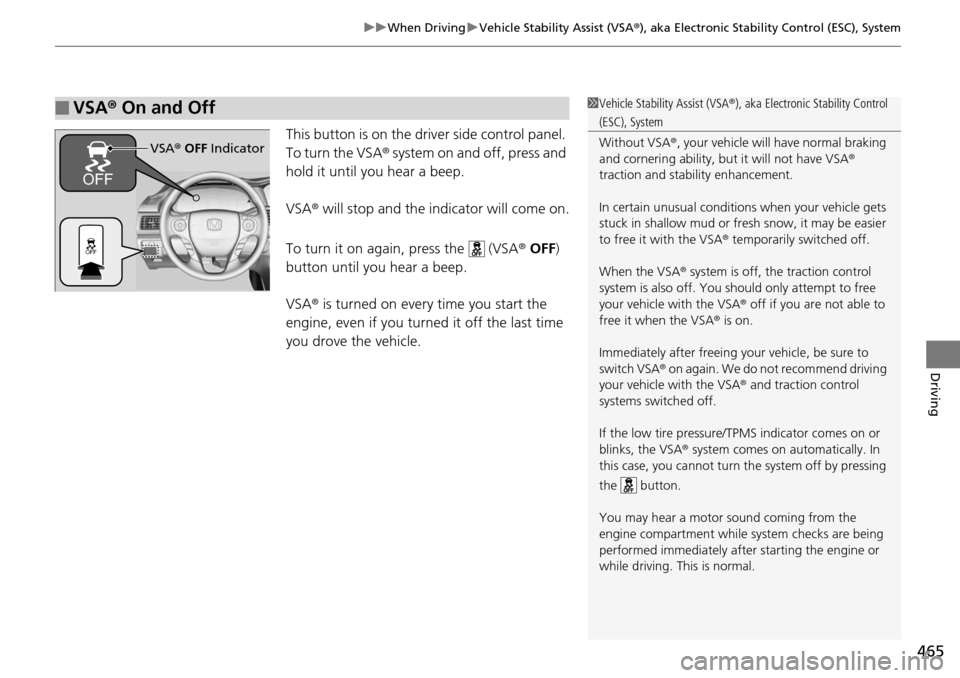
This button is on the driver side control panel.
To turn the VSA ® system on and off, press and
hold it until you hear a beep.
VSA ® will stop and the indicator will come on.
To turn it on again, press the (VSA ® OFF )
button until you hear a beep.
VSA ® is turned on every time you start the
engine, even if you turned it off the last time
you drove the vehicle.
■VSA ® On and Off1 Vehicle Stability Assist (VSA ®), aka Electronic Stability Control
(ESC), System
Without VSA ®, your vehicle will have normal braking
and cornering ability, bu t it will not have VSA®
traction and stability enhancement.
In certain unusual conditions when your vehicle gets
stuck in shallow mud or fr esh snow, it may be easier
to free it with the VSA ® temporarily switched off.
When the VSA ® system is off, the traction control
system is also off. You should only atte mpt to free
your vehicle with the VSA ® off if you ar e not able to
free it when the VSA ® is on.
Immediately after freeing your vehicle, be sure to
switch VSA ® on again. We do not recommend driving
your vehicle with the VSA ® and traction control
systems switched off.
If the low tire pressure/TPMS indicator comes on or
blinks, the VSA® system comes on automatically. In
this case, you cannot turn the system off by pressing
the button.
You may hear a motor sound coming from the
engine compartment while system checks are being
performed immediately after starting the engine or
while driving. This is normal.
VSA ® OFF Indicator
Page 467 of 593
466
uuWhen Driving uLaneWatchTM*
Driving
LaneWatchTM*
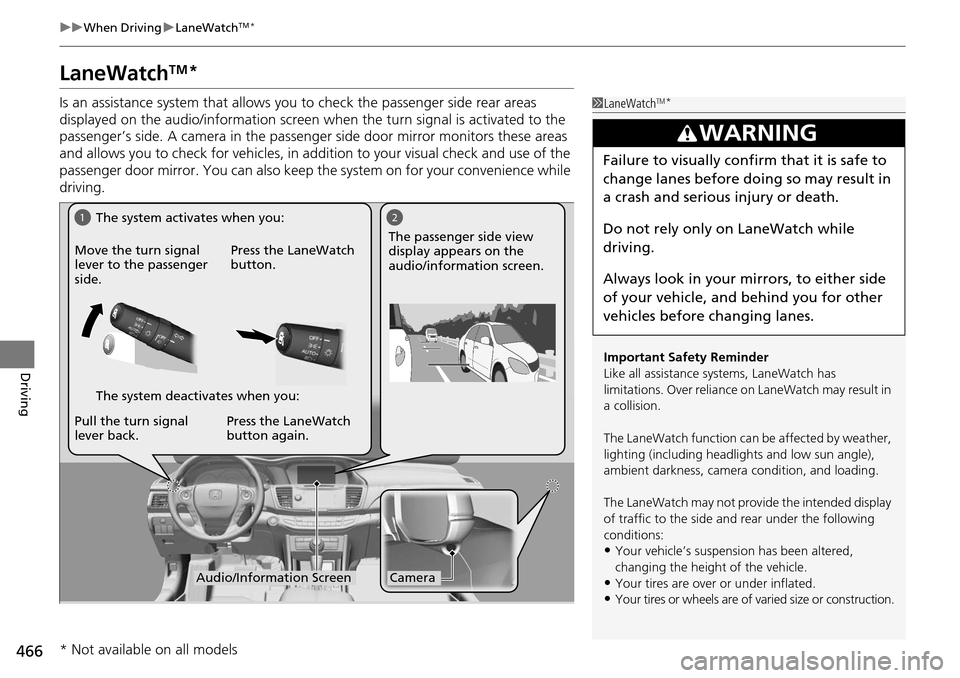
Is an assistance system that allows y ou to check the passenger side rear areas
displayed on the audio/information screen when the turn signal is activated to the
passenger’s side. A camera in the passenger side door mirror monitors these areas
and allows you to check for vehicles, in addition to your visual check and use of the
passenger door mirror. You can also keep th e system on for your convenience while
driving.1 LaneWatchTM*
Important Safety Reminder
Like all assistance systems, LaneWatch has
limitations. Over reliance on LaneWatch may result in
a collision.
The LaneWatch function can be affected by weather,
lighting (including headli ghts and low sun angle),
ambient darkness, camera condition, and loading.
The LaneWatch may not prov ide the intended display
of traffic to the side and rear under the following
conditions:
•Your vehicle’s suspensi on has been altered,
changing the height of the vehicle.
•Your tires are over or under inflated.
•Your tires or wheels are of varied size or construction.
3WARNING
Failure to visually confirm that it is safe to
change lanes before doing so may result in
a crash and serious injury or death.
Do not rely only on LaneWatch while
driving.
Always look in your mi rrors, to either side
of your vehicle, and behind you for other
vehicles before changing lanes.
12
CameraAudio/Information Screen
Move the turn signal
lever to the passenger
side.
Press the LaneWatch
button.
Pull the turn signal
lever back. Press the LaneWatch
button again. The passenger side view
display appears on the
audio/information screen.
The system activates when you:
The system deactivates when you:
* Not available on all models
Page 468 of 593
467
uuWhen Driving uLaneWatchTM*
Driving
■Customizing the La neWatch settings
You can customize the following items using the audio/information screen.
• Show with Turn Signal : Selects whether LaneWatch monitor comes on when
you operate the turn signal light lever.
• Reference Lines : Selects whether the reference lines appear on the LaneWatch
monitor.
• Next Maneuver Pop up
*: Selects whether a turn direction screen of the
navigation system interr upts the LaneWatch display.
• Display : Adjusts display settings.
2Customized Features P. 298
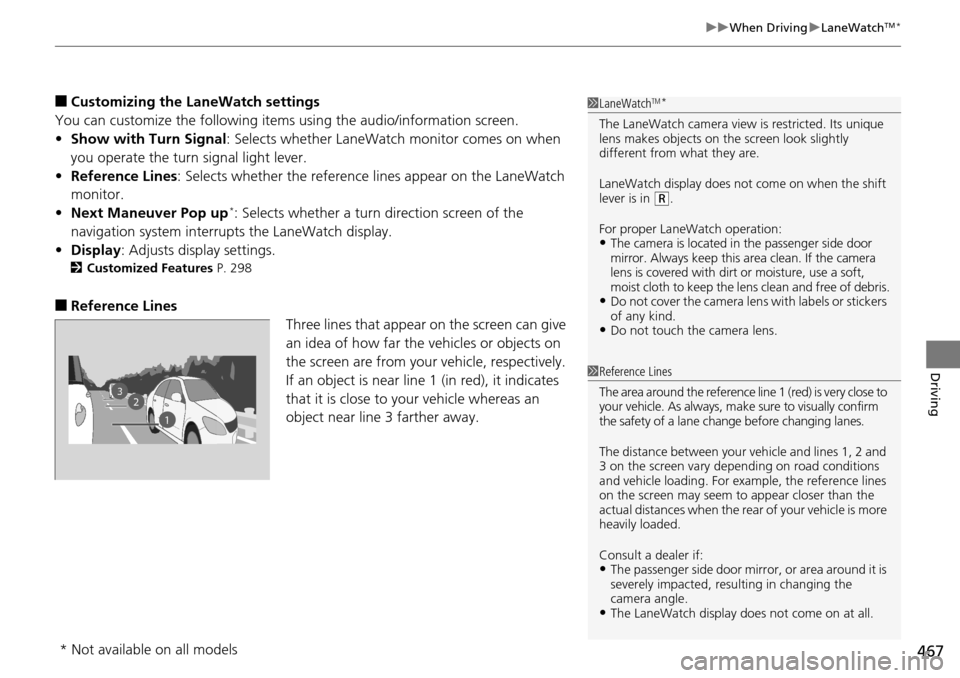
■Reference Lines
Three lines that appear on the screen can give
an idea of how far the vehicles or objects on
the screen are from your vehicle, respectively.
If an object is near line 1 (in red), it indicates
that it is close to your vehicle whereas an
object near line 3 farther away.
1LaneWatchTM*
The LaneWatch camera view is restricted. Its unique
lens makes objects on the screen look slightly
different from what they are.
LaneWatch display does not come on when the shift
lever is in
( R.
For proper LaneWatch operation:
•The camera is located in the passenger side door
mirror. Always keep this area clean. If the camera
lens is covered with dirt or moisture, use a soft,
moist cloth to keep the lens clean and free of debris.
•Do not cover the camera lens with labels or stickers
of any kind.
•Do not touch the camera lens.
23
1
1Reference Lines
The area around the reference line 1 (red) is very close to
your vehicle. As always, m ake sure to visually confirm
the safety of a lane chan ge before changing lanes.
The distance betwee n your vehicle and lines 1, 2 and
3 on the screen vary depending on road conditions
and vehicle loading. For ex ample, the reference lines
on the screen may seem to appear closer than the
actual distances when the rear of your vehicle is more
heavily loaded.
Consult a dealer if:
•The passenger side door mirr or, or area around it is
severely impacted, resulting in changing the
camera angle.
•The LaneWatch display doe s not come on at all.
* Not available on all models
Page 469 of 593
468
uuWhen Driving uTire Pressure Monitoring System (TPMS)
Driving
Tire Pressure Monitoring System (TPMS)
Instead of directly measuring the pressu re in each tire, the TPMS on this vehicle
monitors and compares the rolling radius and rotational characteristics of each
wheel and tire while you are driving to determine if one or more tires are
significantly under-inflated. This will caus e the low tire pressure/TPMS indicator to
come on and a message to appear on the multi-information display
*.
You must start TPMS calibration every time you:
• Adjust the pressure in one or more tires.
• Rotate the tires.
• Replace one or more tires.
Before calibrating the TPMS:
• Set the cold tire pressu re in all four tires.
2Checking Tires P. 523
Make sure:
•The vehicle is at a complete stop.
• The shift lever is in
(N.
• The shift lever is in
(P.
• The ignition switch is in ON
(w*1.
*1: Models with the smart entry system have an ENGINE START/STOP button instead of an
ignition switch.
■TPMS Calibration
1 Tire Pressure Monitoring System (TPMS)
The system does not monitor the tires when driving
at low speed.
Conditions such as low ambient temperature and
altitude change directly a ffect tire pressure and can
trigger the low tire pressure/TPMS indicator to come on.
Tire pressure checked and inflated in:
•Warm weather can beco me under-inflated in
colder weather.
•Cold weather can become over-inflated in warmer
weather.
The low tire pressure indica tor will not come on as a
result of over inflation.
The TPMS may not function pr operly if tire type and
size are mixed. Make sure to use the same size and
type of tire. 2 Checking and Maintaining Tires P. 523
The low tire pressure/TPMS indicator may come on
with a delay or may not come on at all when:
•You rapidly accelerate, decelerate, or turn the
steering wheel.
•You drive on snowy or slippery roads.•Snow chains are used.
The low tire pressure/TPMS indicator may come on
under the following conditions:
•A compact spare tire is used.•There is a heavier and une ven load on the tires,
such as when towing a trailer, than the condition at
calibration.
•Snow chains are used.
Manual transmission models
Automatic transmission/CVT models
All models
* Not available on all models
Page 470 of 593
469
uuWhen Driving uTire Pressure Monitoring System (TPMS)
Driving
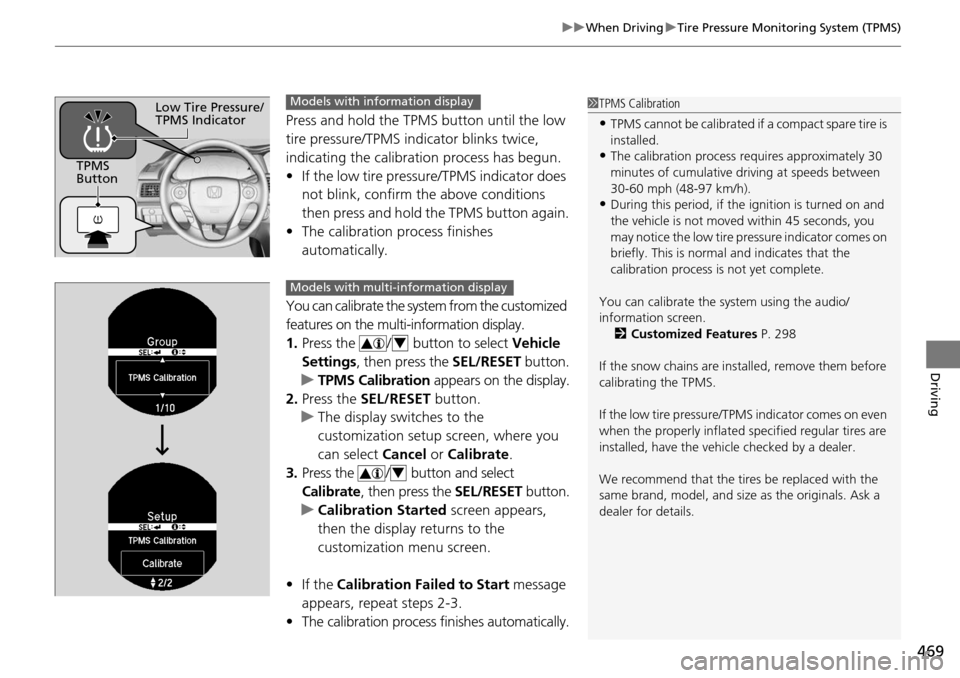
Press and hold the TPMS button until the low
tire pressure/TPMS indicator blinks twice,
indicating the calibration process has begun.
• If the low tire pressure/TPMS indicator does
not blink, confirm the above conditions
then press and hold the TPMS button again.
• The calibration process finishes
automatically.
You can calibrate the system from the customized
features on the multi-information display.
1. Press the / button to select Vehicle
Settings, then press the SEL/RESET button.
u TPMS Calibration appears on the display.
2. Press the SEL/RESET button.
u The display swit ches to the
customization setup screen, where you
can select Cancel or Calibrate .
3. Press the / button and select
Calibrate , then press the SEL/RESET button.
u Calibration Started screen appears,
then the display returns to the
customization menu screen.
• If the Calibration Failed to Start message
appears, repeat steps 2-3.
• The calibration process finishes automatically.
1TPMS Calibration
•TPMS cannot be calibrated if a compact spare tire is
installed.
•The calibration process requires approximately 30
minutes of cumulative dr iving at speeds between
30-60 mph (48-97 km/h).
•During this period, if the ignition is turned on and
the vehicle is not move d within 45 seconds, you
may notice the low tire pressure indicator comes on
briefly. This is normal and indicates that the
calibration process is not yet complete.
You can calibrate the sy stem using the audio/
information screen. 2 Customized Features P. 298
If the snow chains are installed, remove them before
calibrating the TPMS.
If the low tire pressure/TPMS indicator comes on even
when the properly inflated specified regular tires are
installed, have the vehi cle checked by a dealer.
We recommend that the tires be replaced with the
same brand, model, and size as the originals. Ask a
dealer for details.
TPMS
Button
Low Tire Pressure/
TPMS IndicatorModels with info rmation display
Models with multi- information display
4
4