parking brake HONDA ACCORD COUPE 2014 9.G Owners Manual
[x] Cancel search | Manufacturer: HONDA, Model Year: 2014, Model line: ACCORD COUPE, Model: HONDA ACCORD COUPE 2014 9.GPages: 593, PDF Size: 22.22 MB
Page 5 of 593
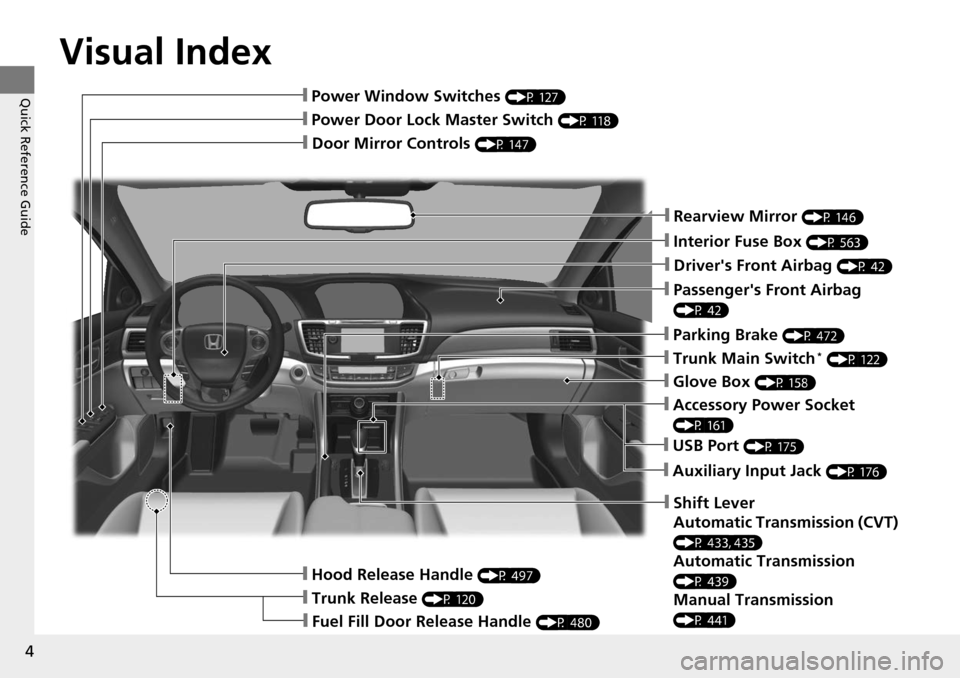
Visual Index
4
Quick Reference Guide
❙Door Mirror Controls (P 147)
❙Passenger's Front Airbag
(P 42)
❙Parking Brake (P 472)
❙Glove Box (P 158)
❙Rearview Mirror (P 146)
❙Hood Release Handle (P 497)
❙Power Door Lock Master Switch (P 118)
❙Power Window Switches (P 127)
❙Interior Fuse Box (P 563)
❙Driver's Front Airbag (P 42)
❙Trunk Main Switch* (P 122)
❙Fuel Fill Door Release Handle (P 480)
❙Trunk Release (P 120)
❙Shift Lever
Automatic Transmission (CVT)
(P 433, 435)
Automatic Transmission
(P 439)
Manual Transmission
(P 441)
❙USB Port (P 175)
❙Auxiliary Input Jack (P 176)
❙Accessory Power Socket
(P 161)
Page 7 of 593
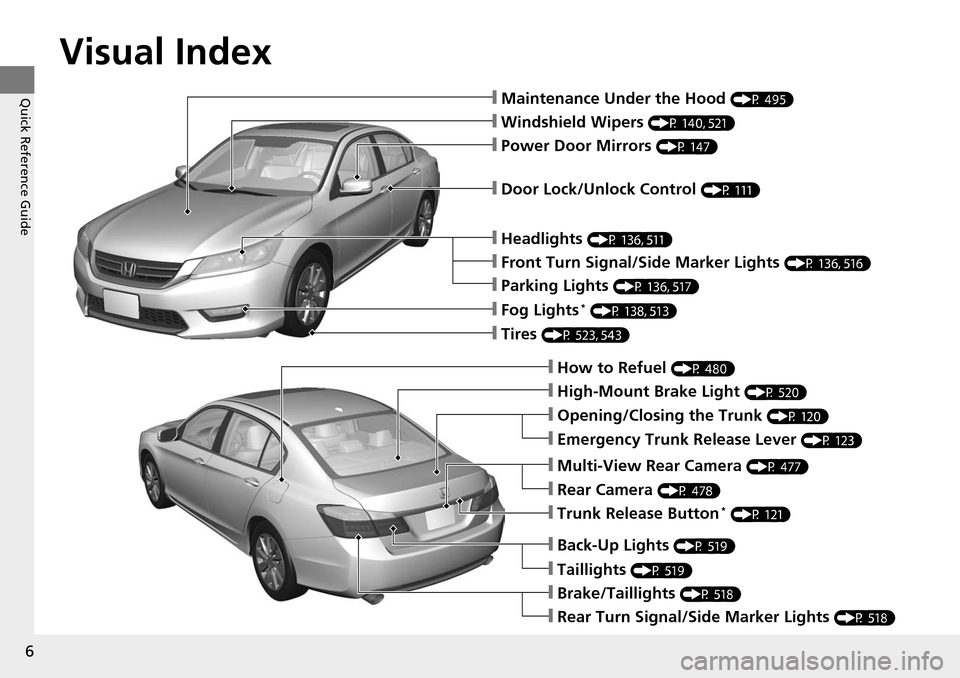
Visual Index
6
Quick Reference Guide❙Maintenance Under the Hood (P 495)
❙Windshield Wipers (P 140, 521)
❙Tires (P 523, 543)
❙Door Lock/Unlock Control (P 111)
❙Power Door Mirrors (P 147)
❙Headlights (P 136, 511)
❙How to Refuel (P 480)
❙High-Mount Brake Light (P 520)
❙Emergency Trunk Release Lever (P 123)
❙Opening/Closing the Trunk (P 120)
❙Parking Lights (P 136, 517)
❙Front Turn Signal/Side Marker Lights (P 136, 516)
❙Fog Lights* (P 138, 513)
❙Multi-View Rear Camera (P 477)
❙Trunk Release Button* (P 121)
❙Back-Up Lights (P 519)
❙Taillights (P 519)
❙Brake/Taillights (P 518)
❙Rear Turn Signal/Side Marker Lights (P 518)
❙Rear Camera (P 478)
Page 10 of 593
9
Quick Reference Guide
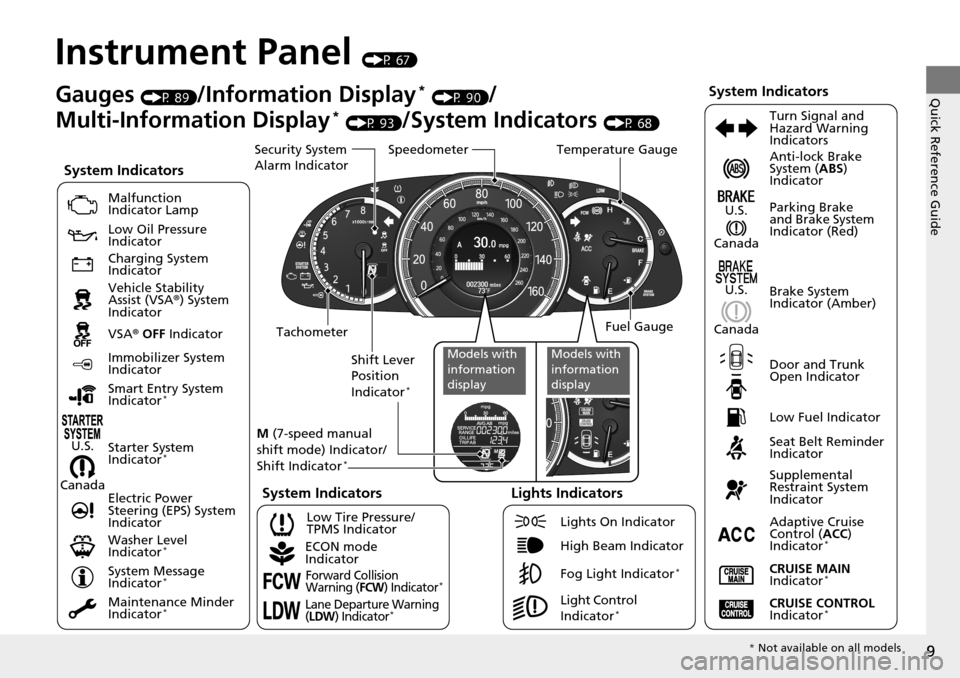
Instrument Panel (P 67)
CanadaU.S.
Low Fuel Indicator
Anti-lock Brake
System (
ABS)
Indicator
Parking Brake
and Brake System
Indicator (Red)
Canada U.S.
Washer Level
Indicator
*
System Indicators
Malfunction
Indicator Lamp
Low Oil Pressure
Indicator
Charging System
Indicator
Vehicle Stability
Assist (VSA ®) System
Indicator
VSA ® OFF Indicator
Low Tire Pressure/
TPMS Indicator
Electric Power
Steering (EPS) System
Indicator
Lights Indicators
Lights On Indicator
High Beam Indicator
Fog Light Indicator
*
Immobilizer System
Indicator
Seat Belt Reminder
Indicator
System Indicators
CRUISE CONTROL
Indicator*
Adaptive Cruise
Control ( ACC)
Indicator
*
CRUISE MAIN
Indicator*
Tachometer Speedometer
Fuel Gauge
Security System
Alarm Indicator
Shift Lever
Position
Indicator
*
Gauges (P 89)/Information Display* (P 90)/
Multi-Information Display
* (P 93)/System Indicators (P 68) Turn Signal and
Hazard Warning
Indicators
System Indicators
Temperature Gauge
M (7-speed manual
shift mode) Indicator/
Shift Indicator
*
Maintenance Minder
Indicator*
Smart Entry System
Indicator*
Starter System
Indicator*
System Message
Indicator*
ECON mode
Indicator
Forward Collision
Warning (FCW) Indicator*
Lane Departure Warning
(LDW) Indicator*Light Control
Indicator*
Door and Trunk
Open Indicator Brake System
Indicator (Amber)
Supplemental
Restraint System
Indicator
Canada U.S.Models with
information
displayModels with
information
display
*
Not available on all models
Page 24 of 593
23
Quick Reference Guide
Why do the doors lock
after I unlocked the doors
using a remote
transmitter?If you do not open the doors within 30 seconds, the doors are
relocked automatically for security.
Why does the beeper
sound when I open the
driver's door?The beeper sounds when:
●The key is left in the ignition switch*.
●The power mode* is in ACCESSORY.
●The exterior lights are left on.
Why does the beeper
sound when I start driving?The beeper sounds when:
●Driver and/or front passenger are not wearing their seat belts.
●The parking brake lever is not fully released.
Why do I hear a screeching
sound when I apply the
brake pedal?The brake pads may need to be replaced. Have your vehicle
inspected by a dealer.
* Not available on all models
Page 69 of 593
68
Instrument Panel
Indicators
*1:Models with the smart entry system have an ENGINE START/STOP button instead of an ignition switch.
IndicatorNameOn/BlinkingExplanationMessage*
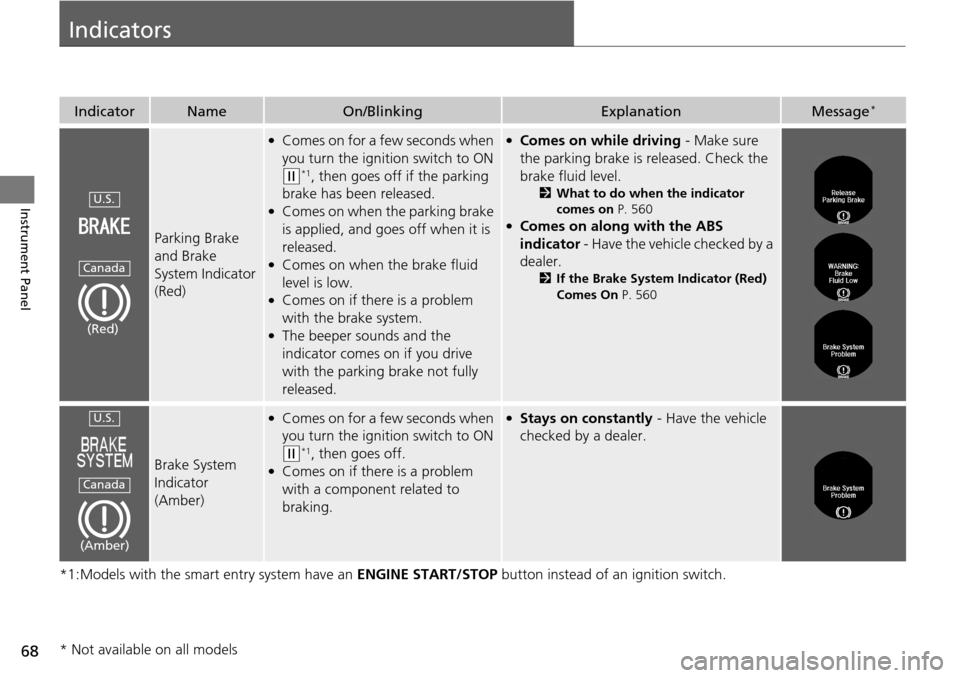
Parking Brake
and Brake
System Indicator
(Red)
●Comes on for a few seconds when
you turn the igniti on switch to ON
(w*1, then goes off if the parking
brake has been released.
●Comes on when the parking brake
is applied, and goes off when it is
released.
●Comes on when the brake fluid
level is low.
●Comes on if there is a problem
with the brake system.
●The beeper sounds and the
indicator comes on if you drive
with the parking brake not fully
released.
●Comes on while driving - Make sure
the parking brake is released. Check the
brake fluid level.
2 What to do when the indicator
comes on P. 560
●Comes on along with the ABS
indicator - Have the vehicle checked by a
dealer.
2 If the Brake System Indicator (Red)
Comes On P. 560
Brake System
Indicator
(Amber)
●Comes on for a fe w seconds when
you turn the igniti on switch to ON
(w*1, then goes off.●Comes on if there is a problem
with a component related to
braking.
●Stays on constantly - Have the vehicle
checked by a dealer.
U.S.
Canada
(Red)
U.S.
Canada
(Amber)
* Not available on all models
Page 140 of 593
139
uuOperating the Switches Around the Steering Wheel uDaytime Running Lights
Controls
Daytime Running Lights
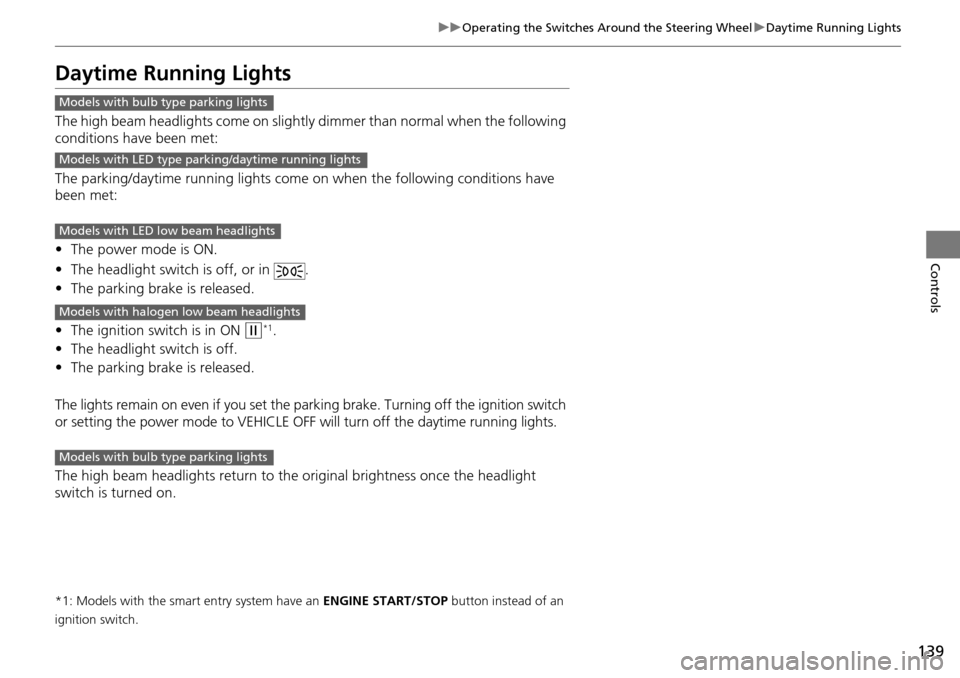
The high beam headlights come on slightly dimmer than normal when the following
conditions have been met:
The parking/daytime running lights come on when the following conditions have
been met:
• The power mode is ON.
• The headlight switch is off, or in .
• The parking brake is released.
• The ignition switch is in ON
(w*1.
• The headlight switch is off.
• The parking brake is released.
The lights remain on even if you set the parking brake. Turning off the ignition switch
or setting the power mode to VEHICLE OFF will turn off the daytime running lights.
The high beam headlights return to the original brightness once the headlight
switch is turned on.
*1: Models with the smart entry system have an ENGINE START/STOP button instead of an
ignition switch.
Models with bulb type parking lights
Models with LED type parking/daytime running lights
Models with LED low beam headlights
Models with halogen low beam headlights
Models with bulb type parking lights
Page 145 of 593
uuOperating the Switches Around the Steering Wheel uDriving Position Memory System*
144
Controls
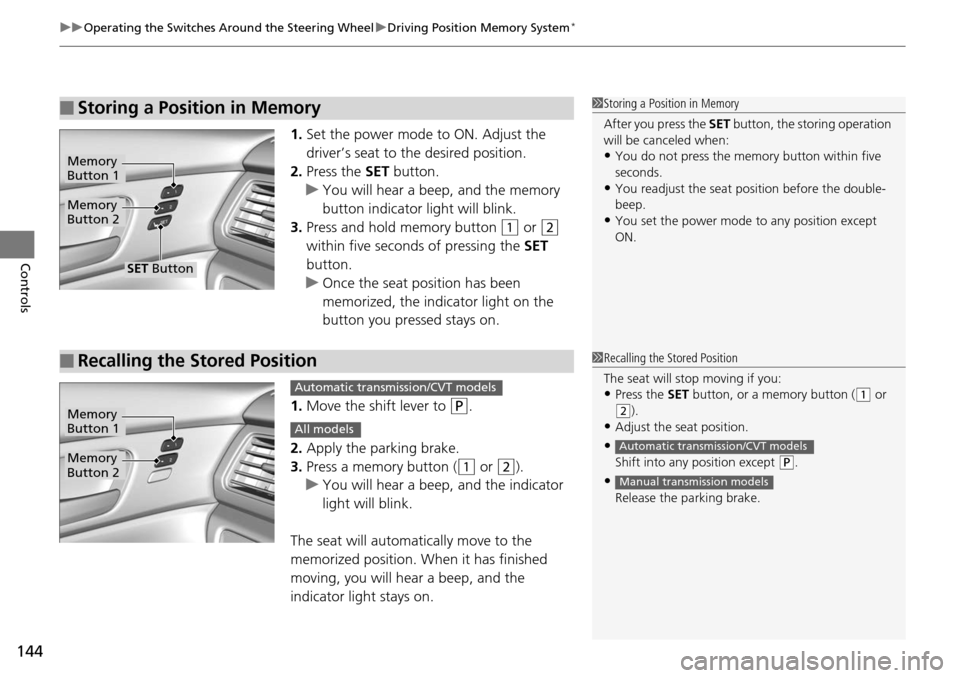
1. Set the power mode to ON. Adjust the
driver’s seat to the desired position.
2. Press the SET button.
u You will hear a beep, and the memory
button indicator light will blink.
3. Press and hold memory button
(1 or (2
within five seconds of pressing the SET
button.
u Once the seat position has been
memorized, the indicator light on the
button you pressed stays on.
1. Move the shift lever to
(P.
2. Apply the parking brake.
3. Press a memory button (
(1 or (2).
u You will hear a beep, and the indicator
light will blink.
The seat will automatically move to the
memorized position. When it has finished
moving, you will hear a beep, and the
indicator light stays on.
■Storing a Position in Memory1 Storing a Position in Memory
After you press the SET button, the storing operation
will be canceled when:
•You do not press the memory button within five
seconds.
•You readjust the seat position before the double-
beep.
•You set the power mode to any position except
ON.
Memory
Button 1
Memory
Button 2
SET Button
■Recalling the Stored Position1 Recalling the Stored Position
The seat will st op moving if you:
•Press the SET button, or a memory button ((1 or
(2).
•Adjust the seat position.
•Shift into any position except ( P.
•
Release the parking brake.
Automatic transmission/CVT models
Manual transmission models
Memory
Button 1
Memory
Button 2
Automatic transmission/CVT models
All models
Page 299 of 593
298
Features
Customized Features
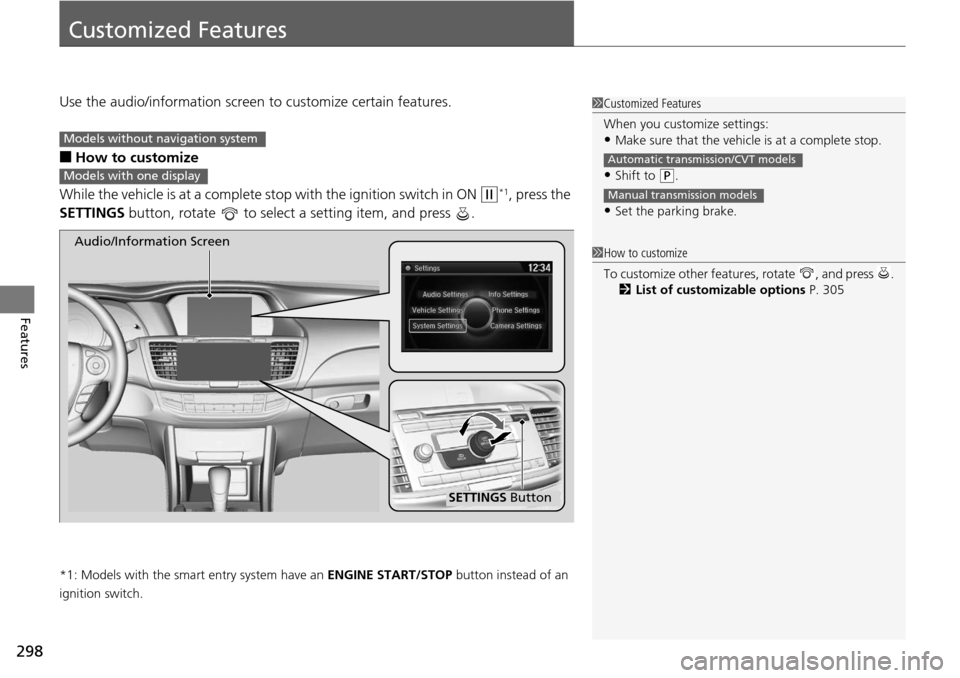
Use the audio/information screen to customize certain features.
■How to customize
While the vehicle is at a complete st op with the ignition switch in ON
(w*1, press the
SETTINGS button, rotate to select a setting item, and press .
*1: Models with the smart entry system have an ENGINE START/STOP button instead of an
ignition switch.
1 Customized Features
When you customize settings:
•Make sure that the vehicle is at a complete stop.
•Shift to (P.
•Set the parking brake.
Automatic transmission/CVT models
Manual transmission models
1 How to customize
To customize other featur es, rotate , and press .
2 List of customizable options P. 305
Models without navigation system
Models with one display
SETTINGS Button
Audio/Information Screen
Page 416 of 593
415
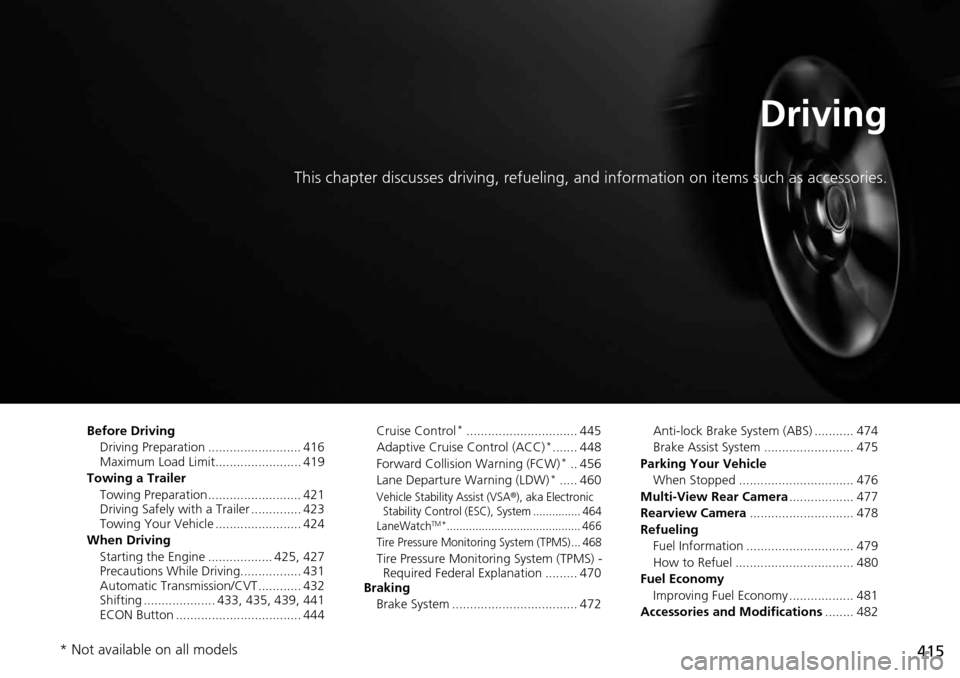
Driving
This chapter discusses driving, refueling, and information on items such as accessories.
Before Driving
Driving Preparation .......................... 416
Maximum Load Limit........................ 419
Towing a Trailer Towing Preparation .......................... 421
Driving Safely with a Trailer .............. 423
Towing Your Vehicle ........................ 424
When Driving Starting the Engine .................. 425, 427
Precautions While Driving................. 431
Automatic Transmission/CVT ............ 432
Shifting .................... 433, 435, 439, 441
ECON Button ................................... 444 Cruise Control*............................... 445
Adaptive Cruise Control (ACC)*....... 448
Forward Collision Warning (FCW)*.. 456
Lane Departure Warning (LDW)*..... 460
Vehicle Stability Assist (VSA®), aka Electronic
Stability Control (ESC), System ............... 464
LaneWatch
TM*.......................................... 466
Tire Pressure Monitoring System (TPMS) ... 468
Tire Pressure Monitoring System (TPMS) - Required Federal Explanation ......... 470
Braking
Brake System ................................... 472 Anti-lock Brake System (ABS) ........... 474
Brake Assist System ......................... 475
Parking Your Vehicle When Stopped ................................ 476
Multi-View Rear Camera .................. 477
Rearview Camera ............................. 478
Refueling Fuel Information .............................. 479
How to Refuel ................................. 480
Fuel Economy Improving Fuel Economy .................. 481
Accessories and Modifications ........ 482
* Not available on all models
Page 424 of 593
423
uuTowing a Trailer uDriving Safely with a Trailer
Continued
Driving
Driving Safely with a Trailer
• Have the trailer properly servic ed and keep it in good condition.
• Make sure that all the weights and load in the vehicle and trailer are within limits.
2Towing Load Limits P. 421
•Securely attach the hitch, safety chains, and other necessary parts to the trailer.
• Securely store all the items in and on the tra iler so that they do not shift while
driving.
• Check if the lights and brakes on the trailer are working properly.
• Check the pressures of the traile r tires, including the spare.
• Drive slower than normal.
• Obey posted speed limits fo r vehicles with trailers.
• Use the
(D position when towing a trailer on level roads.
• Turn more slowly and with a wider turning arc than normal.
• Allow more time and distance for braking.
• Do not brake or turn suddenly.
■Things You Need To Know Before Towing a Trailer
■Towing Speeds and Gears
■Turning and Braking
1Driving Safely with a Trailer
Parking
In addition to the normal precautions, place wheel
chocks at each of the trailer's tires.
Automatic transmission/CVT models