buttons HONDA ACCORD HYBRID 2014 9.G User Guide
[x] Cancel search | Manufacturer: HONDA, Model Year: 2014, Model line: ACCORD HYBRID, Model: HONDA ACCORD HYBRID 2014 9.GPages: 561, PDF Size: 20.3 MB
Page 185 of 561
184
uuAudio System Basic OperationuPlaying a CD
Features
Playing a CD
Your audio system supports audio CDs, CD-Rs and CD-RWs in either MP3, WMA, or AAC*1
format. With the CD loaded, press the CD button.
*1:Only AAC format files recorded with iTunes ® are playable on this unit.
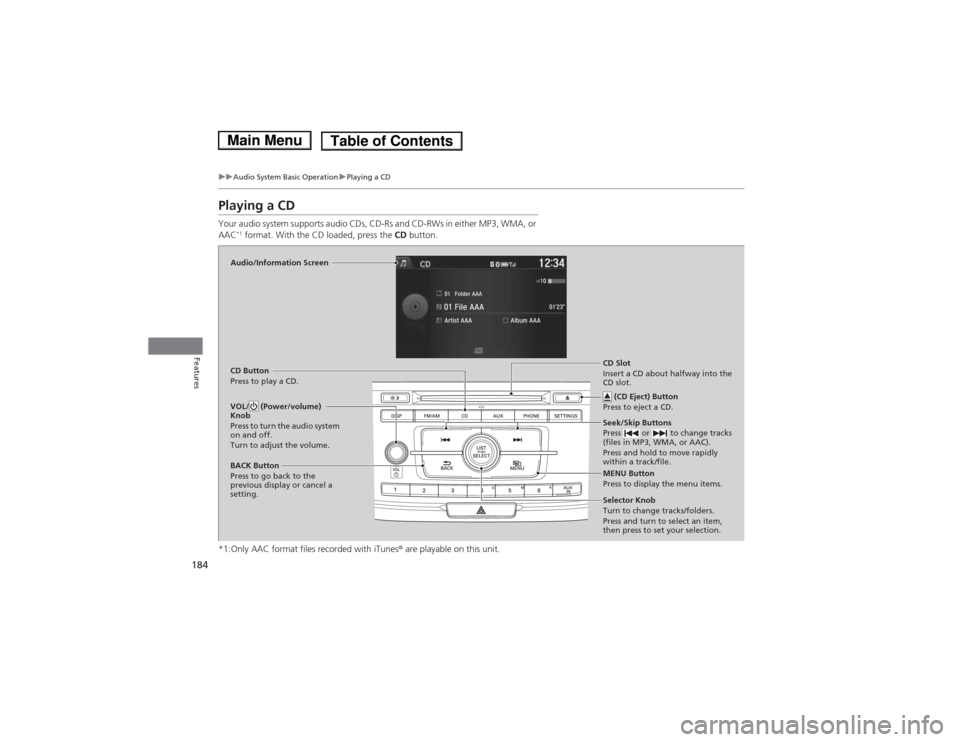
Audio/Information Screen
CD Button
Press to play a CD. Seek/Skip Buttons
Press or to change tracks
(files in MP3, WMA, or AAC).
Press and hold to move rapidly
within a track/file.
MENU Button
Press to display the menu items.
Selector Knob
Turn to change tracks/folders.
Press and turn to select an item,
then press to set your selection.
VOL/ (Power/volume)
Knob
Press to turn the audio system
on and off.
Turn to adjust the volume.
BACK Button
Press to go back to the
previous display or cancel a
setting.
CD Slot
Insert a CD about halfway into the
CD slot. (CD Eject) Button
Press to eject a CD.
Main MenuTable of Contents
Page 188 of 561
187
uuAudio System Basic OperationuPlaying an iPod
Continued
Features
Playing an iPod
Connect the iPod using your dock connector to the USB Port, then press the AUX
button. 2 USB Port P. 171
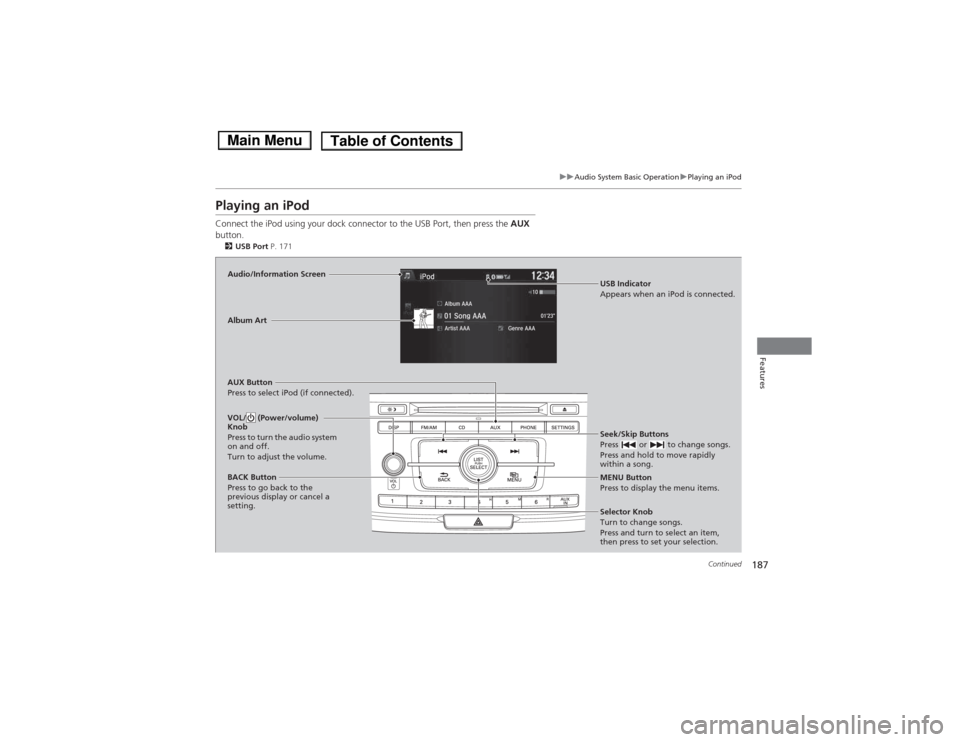
Audio/Information Screen
AUX Button
Press to select iPod (if connected). Seek/Skip Buttons
Press or to change songs.
Press and hold to move rapidly
within a song.
MENU Button
Press to display the menu items.
Selector Knob
Turn to change songs.
Press and turn to select an item,
then press to set your selection.
VOL/ (Power/volume)
Knob
Press to turn the audio system
on and off.
Turn to adjust the volume.
BACK Button
Press to go back to the
previous display or cancel a
setting.
Album Art
USB Indicator
Appears when an iPod is connected.
Main MenuTable of Contents
Page 193 of 561
192
uuAudio System Basic OperationuPlaying a USB Flash Drive
Features
Playing a USB Flash Drive
Your audio system reads and plays sound files on a USB flash drive in either MP3, WMA or AAC*1
format.
Connect your USB flash drive to the USB port, then press the AUX button.
2 USB Port P. 171
*1:Only AAC format files recorded with iTunes ® are playable on this unit.
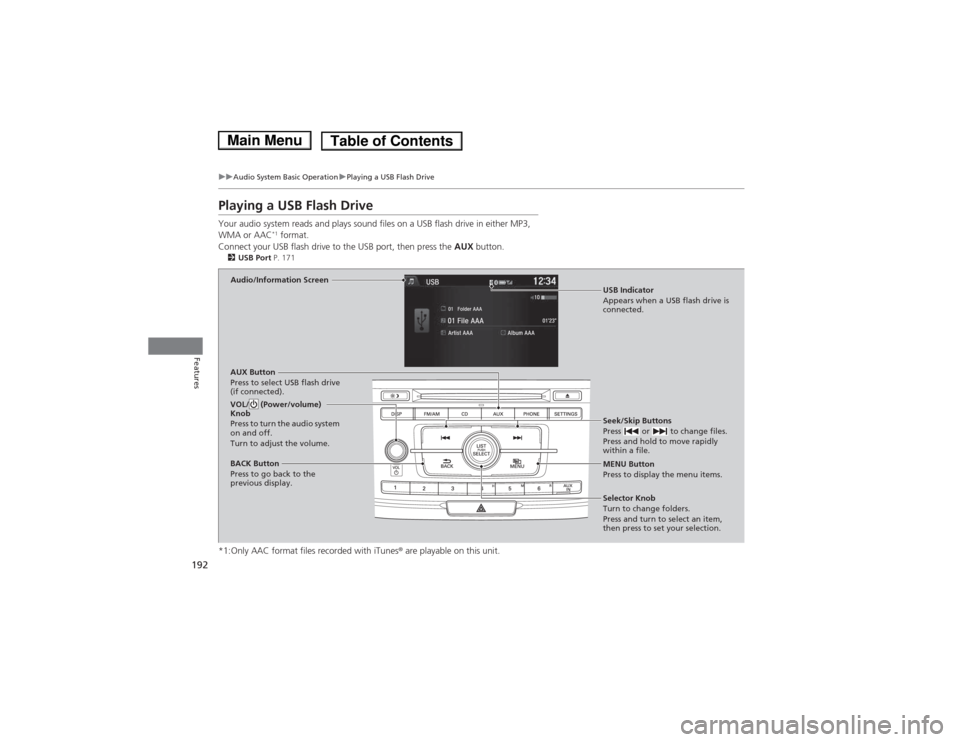
Audio/Information Screen
AUX Button
Press to select USB flash drive
(if connected). Seek/Skip Buttons
Press or to change files.
Press and hold to move rapidly
within a file.
MENU Button
Press to display the menu items.
Selector Knob
Turn to change folders.
Press and turn to select an item,
then press to set your selection.
VOL/ (Power/volume)
Knob
Press to turn the audio system
on and off.
Turn to adjust the volume.
BACK Button
Press to go back to the
previous display.
USB Indicator
Appears when a USB flash drive is connected.
Main MenuTable of Contents
Page 196 of 561
195
uuAudio System Basic OperationuPlaying Bluetooth ® Audio
Continued
Features
Playing Bluetooth ® Audio
Your audio system allows you to listen to music from your Bluetooth®-compatible
phone.
This function is available when the phone is paired and connected to the vehicle's
Bluetooth ® HandsFreeLink ® (HFL) system.
2 Phone Setup P. 341
1Playing Bluetooth ® Audio
Not all Bluetooth -enabled phones with streaming
audio capabilities are compatible with the system.
For a list of compatible phones:• U.S.: Visit www.handsfreelink.honda.com , or call
1-888-528-7876.
• Canada: Visit www.handsfreelink.ca , or call 1-888-
528-7876.
In some states, it may be illegal to perform some data
device functions while driving.
If more than one phone is paired to the HFL system,
there will be a delay before the system begins to play.
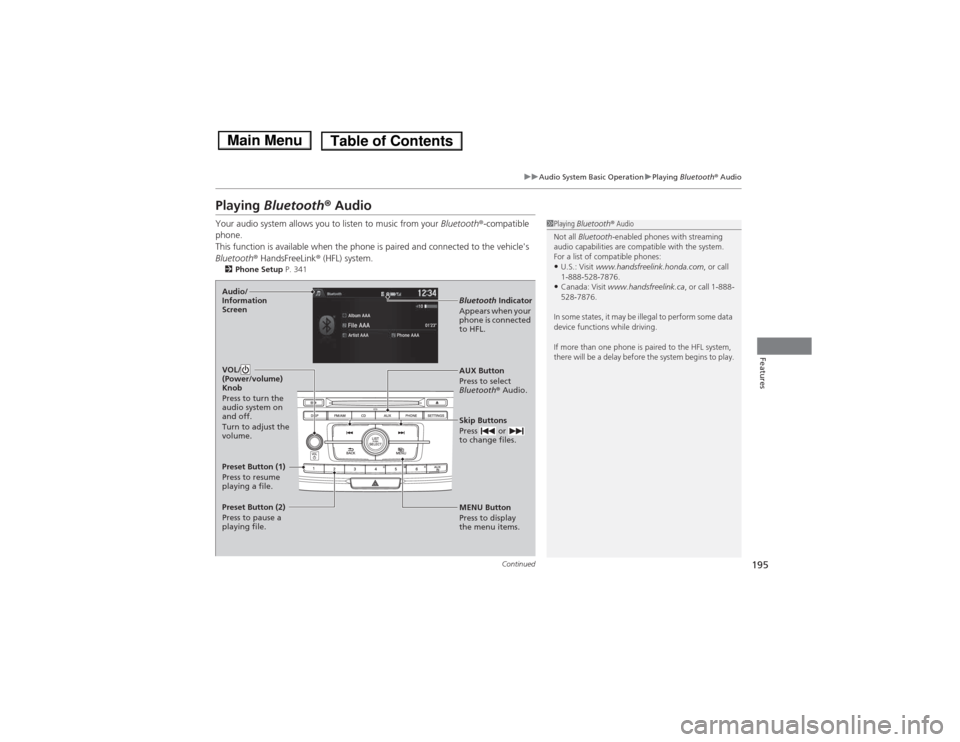
MENU Button
Press to display
the menu items.
AUX Button
Press to select
Bluetooth
® Audio.
Skip Buttons
Press or
to change files.
Bluetooth Indicator
Appears when your
phone is connected
to HFL.
VOL/
(Power/volume) Knob
Press to turn the
audio system on and off.
Turn to adjust the
volume.Audio/
Information Screen
Preset Button (1)
Press to resume
playing a file.
Preset Button (2)
Press to pause a
playing file.
Main MenuTable of Contents
Page 198 of 561
197
Features
Audio System Basic Operation
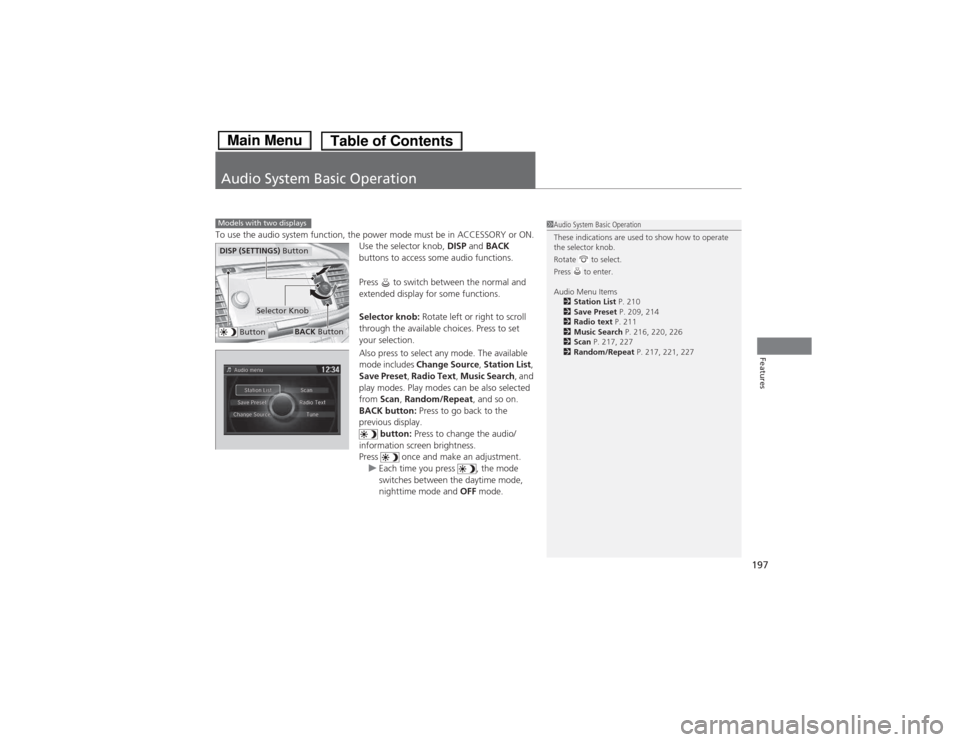
To use the audio system function, the power mode must be in ACCESSORY or ON.Use the selector knob, DISP and BACK
buttons to access some audio functions.
Press to switch between the normal and
extended display for some functions.
Selector knob: Rotate left or right to scroll
through the available choices. Press to set
your selection.
Also press to select any mode. The available
mode includes Change Source , Station List ,
Save Preset , Radio Text , Music Search , and
play modes. Play modes can be also selected from Scan, Random/Repeat , and so on.
BACK button: Press to go back to the
previous display. button: Press to change the audio/
information screen brightness.
Press once and make an adjustment.
uEach time you press , the mode
switches between the daytime mode,
nighttime mode and OFF mode.
Models with two displays1Audio System Basic Operation
These indications are used to show how to operate
the selector knob.
Rotate to select.
Press to enter.
Audio Menu Items
2 Station List P. 210
2 Save Preset P. 209, 214
2 Radio text P. 211
2 Music Search P. 216, 220, 226
2 Scan P. 217, 227
2 Random/Repeat P. 217, 221, 227
Button
Selector Knob
DISP (SETTINGS) Button
BACK Button
Main MenuTable of Contents
Page 234 of 561
233
uuAudio System Basic OperationuAudio/Information Screen
Continued
Features
Audio/Information Screen
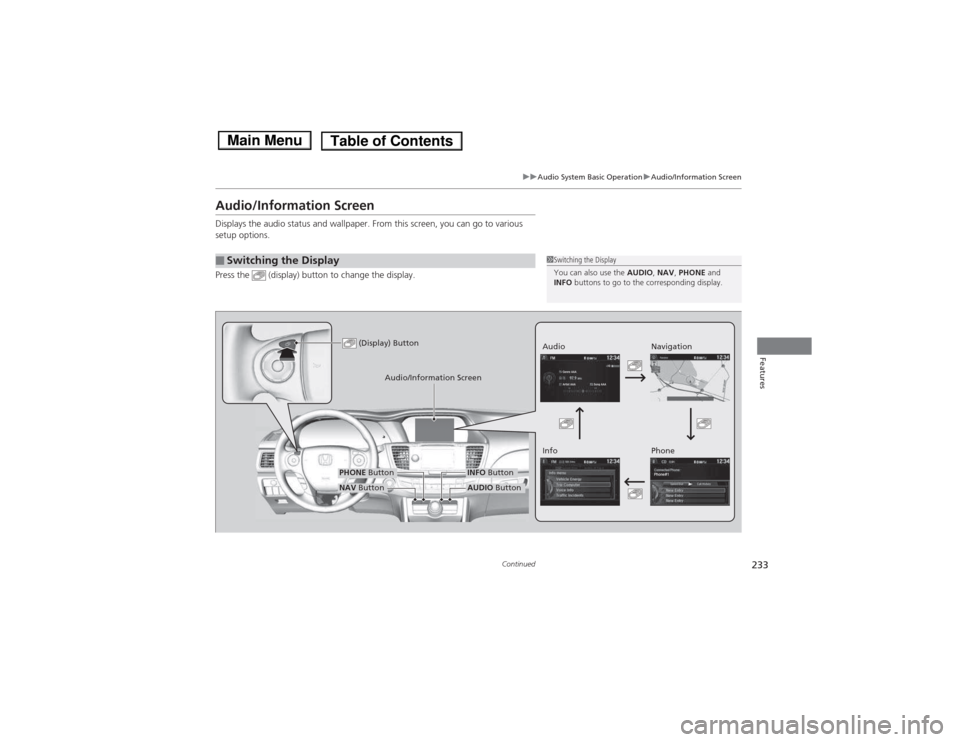
Displays the audio status and wallpaper. From this screen, you can go to various
setup options.
Press the (display) button to change the display.
■Switching the Display1Switching the Display
You can also use the AUDIO, NAV , PHONE and
INFO buttons to go to the corresponding display.
(Display) ButtonAudio
Info
Audio/Information Screen
Navigation Phone
AUDIO ButtonNAV Button
PHONE ButtonINFO Button
Main MenuTable of Contents
Page 240 of 561
239
uuAudio System Basic OperationuVoice Control Operation
Continued
Features
Voice Control Operation
Your vehicle has a voice control system that allows hands-free operation of most of
the navigation system functions.
The voice control system uses the (Talk) and (hang-up/back) buttons on the
steering wheel and a microphone near the map lights on the ceiling.
To achieve optimum voice recognition when using the navigation voice control
system: •Make sure the correct screen is displayed for the voice command that you are
using.
• Close the windows and moonroof.
• Adjust the dashboard and side vents so air does not blow onto the microphone
on the ceiling.
• Speak clearly in a clear, natural speaking voice without pausing between words.
• Reduce any background noise if possible. The system may misinterpret your
command if more than one person is speaking at the same time.
• Refer to the Voice Help feature.
2 Refer to the Navigation System Manual
■Voice Recognition
1Voice Control Operation
When you press the button, a helpful prompt asks
what you would like to do. Press and release the
button again to bypass this prompt and give a command.
1Voice Recognition
The voice control system can only be used from the
driver’s seat because the microphone unit removes
noises from the front passenger’s side.
Main MenuTable of Contents
Page 332 of 561
331
Continued
Features
HomeLink
® Universal Transceiver *
The HomeLink
® Universal Transceiver can be programmed to operate up to three
remote controlled devices around your home, such as garage doors, lighting, or
home security systems.
Refer to the safety information that comes with your garage door opener to test that
the safety features are functioning properly. If you do not have the safety
information, contact the manufacturer.
Before programming HomeLink, make sure that people and objects are out of the
way of the garage or gate to prevent potential injury or damage.
When programming a garage door opener, park just outside the garage door’s path.
Training HomeLink
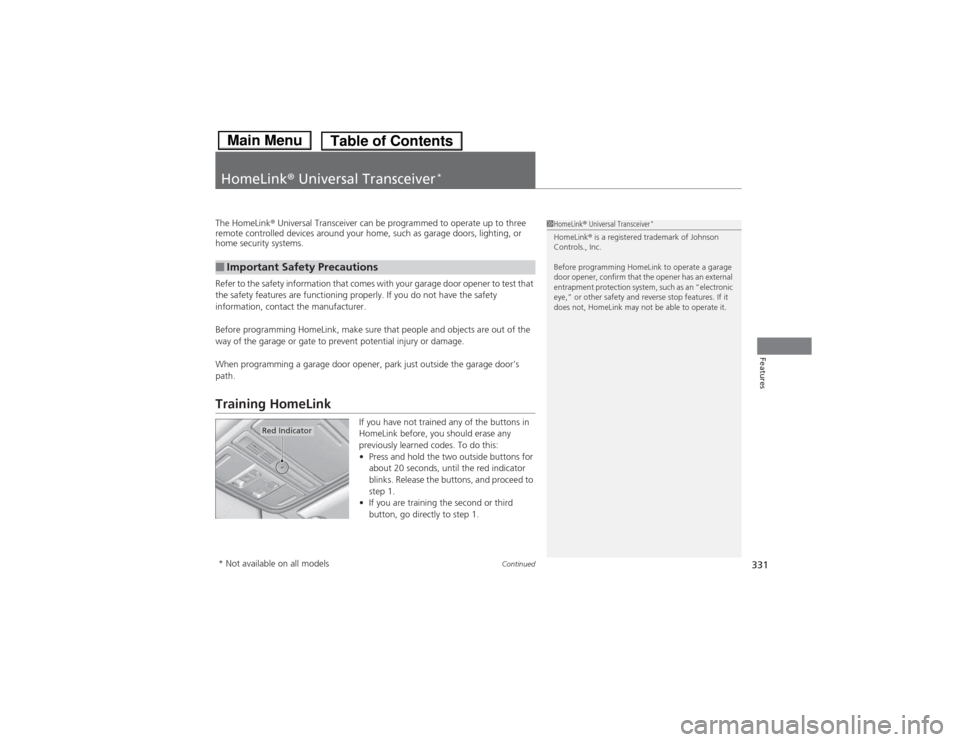
If you have not trained any of the buttons in
HomeLink before, you should erase any
previously learned codes. To do this: •Press and hold the two outside buttons for
about 20 seconds, until the red indicator
blinks. Release the buttons, and proceed to
step 1.
• If you are training the second or third
button, go directly to step 1.
■Important Safety Precautions
1HomeLink ® Universal Transceiver *
HomeLink ® is a registered trademark of Johnson
Controls., Inc.
Before programming HomeLink to operate a garage
door opener, confirm that the opener has an external
entrapment protection system, such as an “electronic
eye,” or other safety and reverse stop features. If it
does not, HomeLink may not be able to operate it.
Red Indicator
* Not available on all models
Main MenuTable of Contents
Page 333 of 561
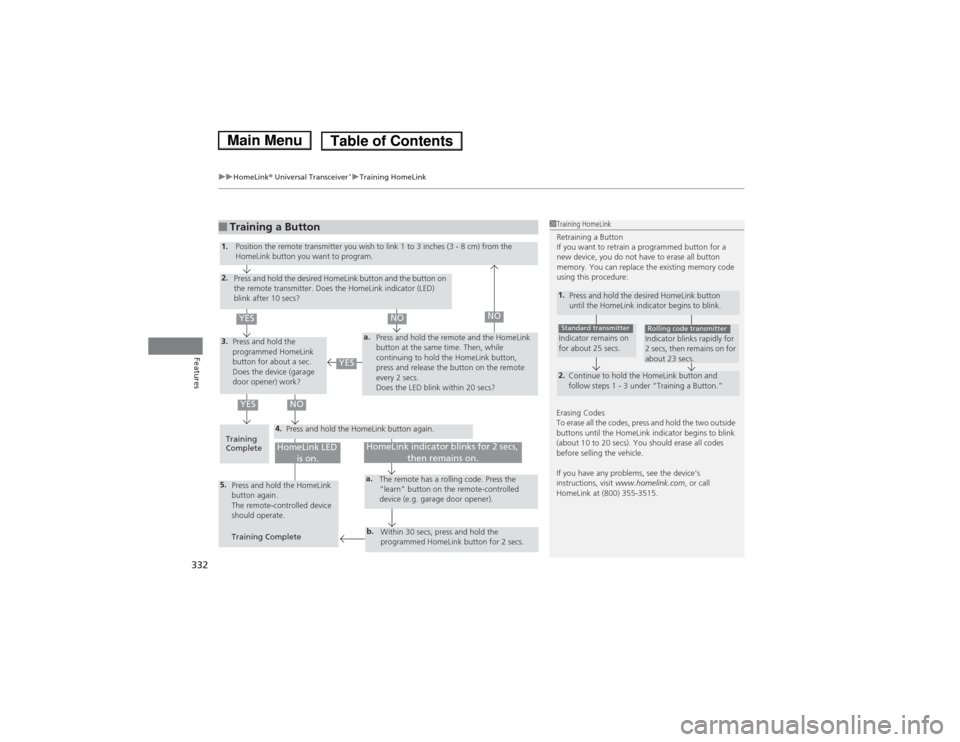
uuHomeLink® Universal Transceiver *uTraining HomeLink
332
Features
■Training a Button1Training HomeLink
Retraining a Button
If you want to retrain a programmed button for a
new device, you do not have to erase all button
memory. You can replace the existing memory code
using this procedure:
1. Press and hold the desired HomeLink button
until the HomeLink indicator begins to blink.
2.
Continue to hold the HomeLink button and
follow steps 1 - 3 under “Training a Button.”
Indicator remains on
for about 25 secs.Standard transmitterIndicator blinks rapidly for
2 secs, then remains on for
about 23 secs.Rolling code transmitter
Erasing Codes
To erase all the codes, press and hold the two outside
buttons until the HomeLink indicator begins to blink
(about 10 to 20 secs). You should erase all codes
before selling the vehicle.
If you have any problems, see the device’s
instructions, visit www.homelink.com , or call
HomeLink at (800) 355-3515.
4.
a.3.
2.
5.a.
b.
1. Position the remote transmitter you wish to link 1 to 3 inches (3 - 8 cm) from the
HomeLink button you want to program.
Press and hold the desired HomeLink button and the button on
the remote transmitter. Does the HomeLink indicator (LED)
blink after 10 secs?
Press and hold the
programmed HomeLink
button for about a sec.
Does the device (garage
door opener) work? Press and hold the remote and the HomeLink
button at the same time. Then, while
continuing to hold the HomeLink button,
press and release the button on the remote
every 2 secs.
Does the LED blink within 20 secs?
Training
Complete Press and hold the HomeLink button again.
Press and hold the HomeLink
button again.
The remote-controlled device
should operate. Training Complete The remote has a rolling code. Press the
“learn” button on the remote-controlled
device (e.g. garage door opener).
Within 30 secs, press and hold the
programmed HomeLink button for 2 secs.
HomeLink indicator blinks for 2 secs, then remains on.HomeLink LED is on.
YESNO
YES
YESNONO
Main MenuTable of Contents
Page 334 of 561
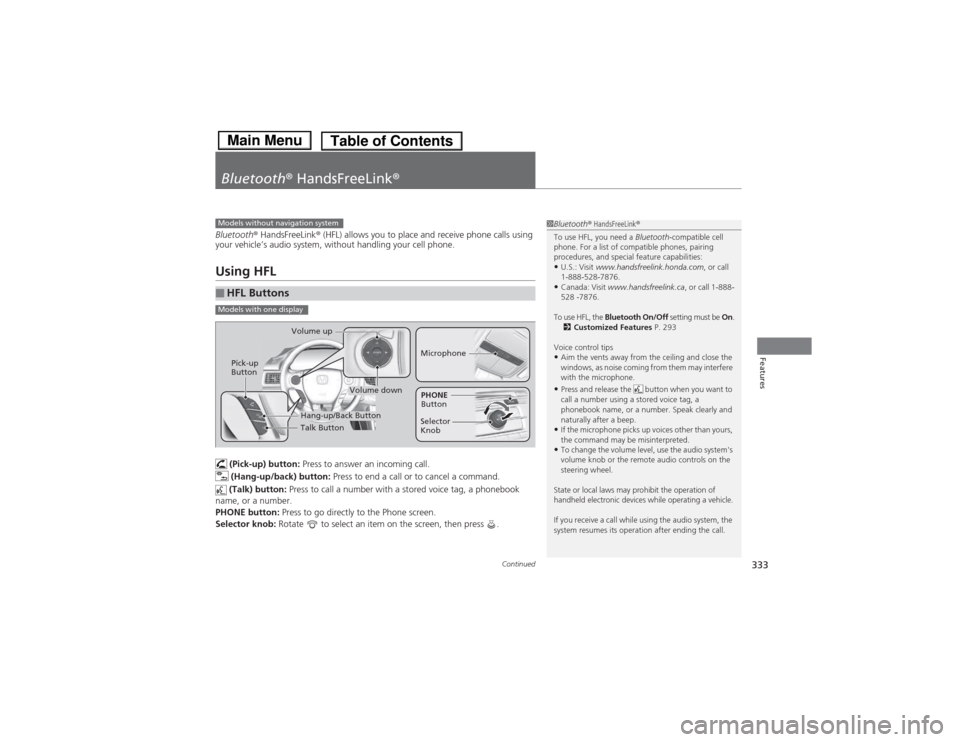
333
Continued
Features
Bluetooth
® HandsFreeLink ®
Bluetooth® HandsFreeLink ® (HFL) allows you to place and receive phone calls using
your vehicle’s audio system, without handling your cell phone.
Using HFL
(Pick-up) button: Press to answer an incoming call.
(Hang-up/back) button: Press to end a call or to cancel a command.
(Talk) button: Press to call a number with a stored voice tag, a phonebook
name, or a number.
PHONE button: Press to go directly to the Phone screen.
Selector knob: Rotate to select an item on the screen, then press .
■HFL Buttons
1Bluetooth® HandsFreeLink ®
To use HFL, you need a Bluetooth-compatible cell
phone. For a list of compatible phones, pairing
procedures, and special feature capabilities:• U.S.: Visit www.handsfreelink.honda.com , or call
1-888-528-7876.
• Canada: Visit www.handsfreelink.ca , or call 1-888-
528 -7876.
To use HFL, the Bluetooth On/Off setting must be On.
2 Customized Features P. 293
Voice control tips • Aim the vents away from the ceiling and close the
windows, as noise coming from them may interfere
with the microphone.
• Press and release the button when you want to
call a number using a stored voice tag, a
phonebook name, or a number. Speak clearly and
naturally after a beep.
• If the microphone picks up voices other than yours,
the command may be misinterpreted.
• To change the volume level, use the audio system's
volume knob or the remote audio controls on the
steering wheel.
State or local laws may prohibit the operation of
handheld electronic devices while operating a vehicle.
If you receive a call while using the audio system, the
system resumes its operation after ending the call.Models without navigation system
Models with one display
Talk Button
Volume up
Microphone
Hang-up/Back Button
Pick-up
Button
Volume down
Selector KnobPHONE
Button
Main MenuTable of Contents