transmission HONDA ACCORD HYBRID 2015 9.G Owners Manual
[x] Cancel search | Manufacturer: HONDA, Model Year: 2015, Model line: ACCORD HYBRID, Model: HONDA ACCORD HYBRID 2015 9.GPages: 569
Page 7 of 569
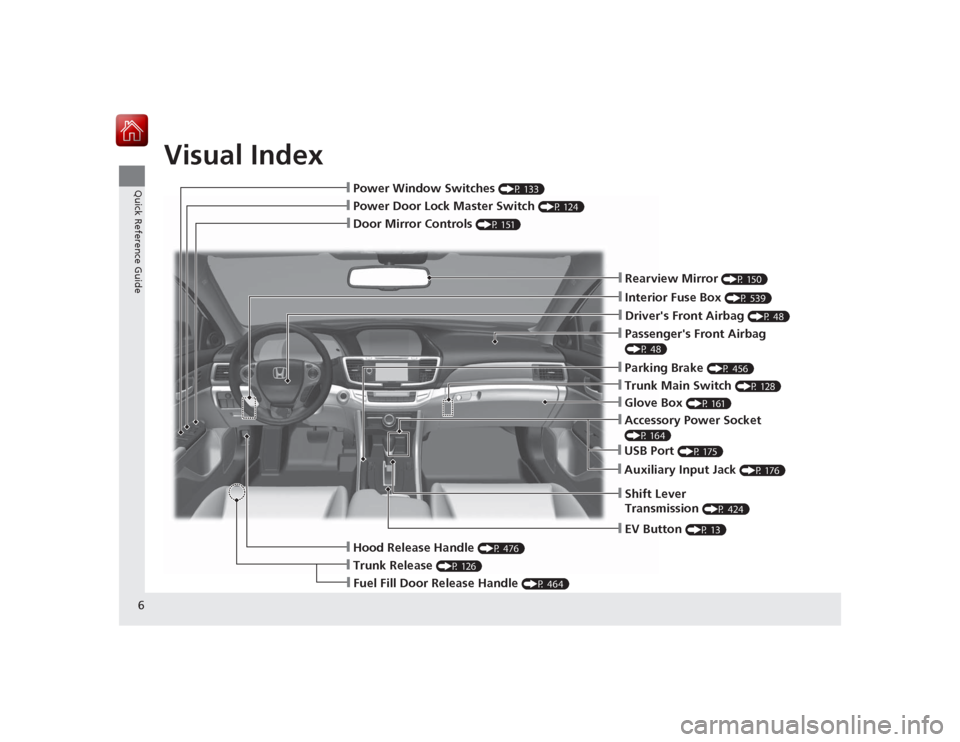
Visual Index
6Quick Reference Guide
❙Door Mirror Controls
(P 151)
❙Passenger's Front Airbag (P 48)❙Parking Brake
(P 456)
❙Glove Box
(P 161)
❙Rearview Mirror
(P 150)
❙Hood Release Handle
(P 476)
❙Power Door Lock Master Switch
(P 124)
❙Power Window Switches
(P 133)
❙Interior Fuse Box
(P 539)
❙Driver's Front Airbag
(P 48)
❙Trunk Main Switch
(P 128)
❙Fuel Fill Door Release Handle
(P 464)
❙Trunk Release
(P 126)
❙Shift Lever
Transmission
(P 424)
❙USB Port
(P 175)
❙Auxiliary Input Jack
(P 176)
❙Accessory Power Socket (P 164)❙EV Button
(P 13)
Page 27 of 569
26Quick Reference Guide
Driving
(P 413)
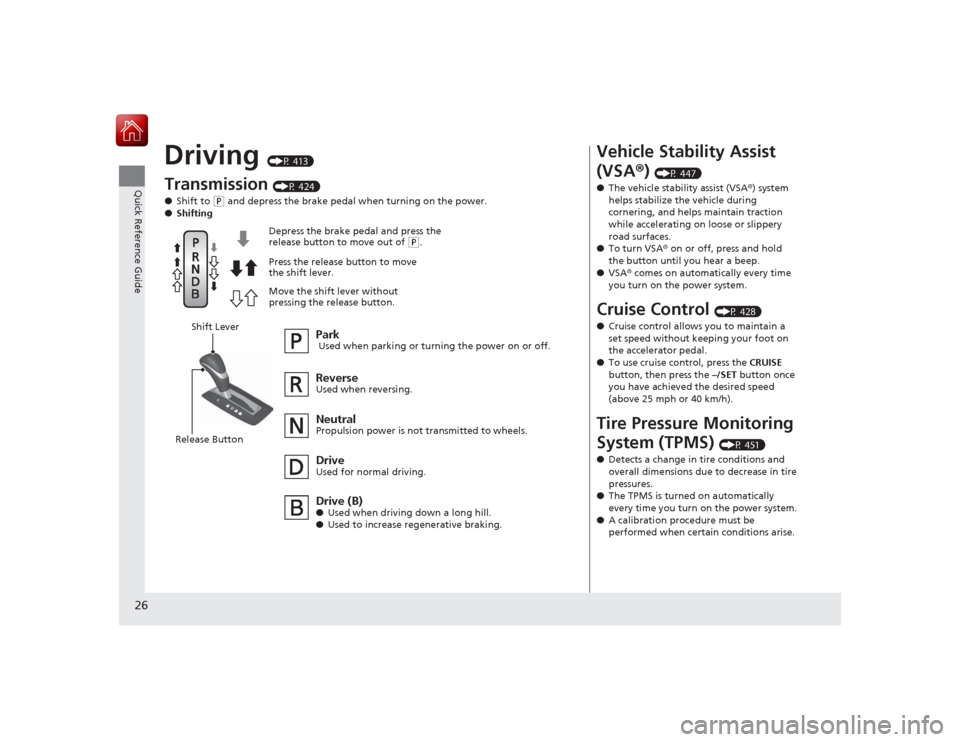
Transmission
(P 424)
● Shift to
(P and depress the brake pedal wh en turning on the power.
● Shifting
Park Used when parking or turning the power on or off.NeutralPropulsion power is not transmitted to wheels.Drive (B)●Used when driving down a long hill.
● Used to increase regenerative braking.
Depress the brake pedal and press the
release button to move out of
(
P.
Press the release button to move
the shift lever.
Move the shift lever without
pressing the release button.
ReverseUsed when reversing.DriveUsed for normal driving.
Shift Lever
Release Button
Vehicle Stability Assist
(VSA ®)
(P 447)
● The vehicle stability assist (VSA ®) system
helps stabilize the vehicle during
cornering, and helps maintain traction
while accelerating on loose or slippery
road surfaces.
● To turn VSA ® on or off, press and hold
the button until you hear a beep.
● VSA ® comes on automatically every time
you turn on the power system.
Cruise Control
(P 428)
● Cruise control allows you to maintain a
set speed without keeping your foot on
the accelerator pedal.
● To use cruise control, press the CRUISE
button, then press the –/SET button once
you have achieved the desired speed
(above 25 mph or 40 km/h).
Tire Pressure Monitoring
System (TPMS)
(P 451)
● Detects a change in tire conditions and
overall dimensions due to decrease in tire
pressures.
● The TPMS is turned on automatically
every time you turn on the power system.
● A calibration procedure must be
performed when certain conditions arise.
Page 78 of 569
77
uuIndicators u
Continued
Instrument Panel
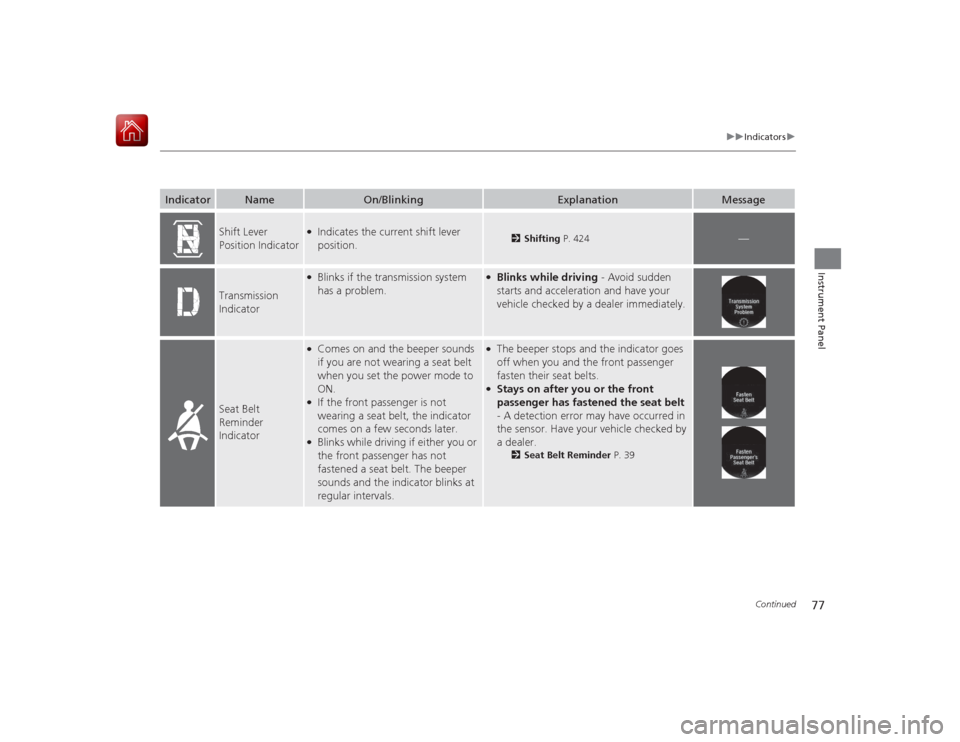
Indicator
Name
On/Blinking
Explanation
Message
Shift Lever
Position Indicator
●Indicates the current shift lever
position.
2Shifting P. 424
—
Transmission
Indicator
●Blinks if the transmission system
has a problem.
●Blinks while driving - Avoid sudden
starts and acceleration and have your
vehicle checked by a dealer immediately.
Seat Belt
Reminder
Indicator
●Comes on and the beeper sounds
if you are not wearing a seat belt
when you set the power mode to
ON.●If the front passenger is not
wearing a seat belt, the indicator
comes on a few seconds later.●Blinks while driving if either you or
the front passenger has not
fastened a seat belt. The beeper
sounds and the indicator blinks at
regular intervals.
●The beeper stops and the indicator goes
off when you and the front passenger
fasten their seat belts.●Stays on after you or the front
passenger has fastened the seat belt
- A detection error may have occurred in
the sensor. Have your vehicle checked by
a dealer.
2 Seat Belt Reminder P. 39
Page 414 of 569
413
Driving
This chapter discusses driving, refueling, and information on items such as accessories.
Before DrivingDriving Preparation .......................... 414
Maximum Load Limit........................ 417
Towing a Trailer
Towing Your Vehicle ........................ 419
When Driving Turning on the Power ...................... 420
Precautions While Driving................. 423
Transmission .................................... 423
Shifting ............................................ 424
ECON Button ................................... 426
Acoustic Vehicle Alerting System ...... 427
Cruise Control
*................................ 428 Adaptive Cruise Control (ACC)
*....... 431
Forward Collision Warning (FCW)*.... 439
Lane Departure Warning (LDW)*..... 443
Vehicle Stability Assist (VSA® ), aka Electronic
Stability Control (ESC), System ........... 447
LaneWatch
TM................................... 449
Tire Pressure Monitoring System (TPMS) ... 451
Tire Pressure Monitoring System (TPMS) - Required Federal Explanation ......... 453
High Voltage Battery ........................ 455
Braking Brake System ................................... 456 Anti-lock Brake System (ABS) ........... 458
Brake Assist System ......................... 459
Parking Your Vehicle When Stopped ................................ 460
Multi-View Rear Camera .................. 461
Rearview Camera ............................. 462
Refueling Fuel Information .............................. 463
How to Refuel ................................. 464
Fuel Economy Improving Fuel Economy .................. 465
Accessories and Modifications ........ 466
* Not available on all models
Page 424 of 569
423
uuWhen Driving uPrecautions While Driving
Driving
Precautions While DrivingAvoid driving in deep water and on flooded roads. This can damage the power
system or driveline, or cause electrical component failure.
If there is a strong impact with something under the vehicle, stop in a safe location.
Check the underside of the vehicle for damage or any fluid leaks.TransmissionAs with a conventional gasoline-powered vehicle with an automatic transmission,
this vehicle will creep.
Keep the brake pedal firmly depressed when stopped.
Quickly depressing the accelerator pedal while driving uphill may cause the vehicle
to react similar to an automatic transmission vehicle, unexpectedly increasing vehicle
speed. Depress the accelerator pedal carefully, especially on slippery roads and
curves.■
In Rain
■
Other Precautions
■
Creeping
■
Kickdown
1 Precautions While DrivingNOTICEDo not operate the shift lever while pressing the
accelerator pedal. You could damage the
transmission.
If the power mode is set to ACCESSORY while
driving, the power system will shut down and all
steering and brake power assist functions will stop,
making it difficult to control the vehicle.
Do not put the shift lever in
(N, as you will lose
regenerative braking (and acceleration) performance.
During the first 600 miles (1,000 km) of operation,
avoid sudden acceleration or full throttle operation so
as to not damage the powertrain.
Avoid hard braking for the first 200 miles (300 km).
You should also follow this when the brake pads are
replaced.
NOTICEIf you repeatedly turn the steering wheel at an
extremely low speed, or hold the steering wheel on
the full left or right position for a while, the electric
power steering (EPS) system heats up. The system
goes into a protective mode, and limits its
performance. The steering wheel becomes harder
and harder to operate. Once the system cools down,
the EPS system is restored.
Repeated operation under these conditions can
eventually damage the system.
Page 426 of 569
425
uuWhen Driving uShifting
Driving
■
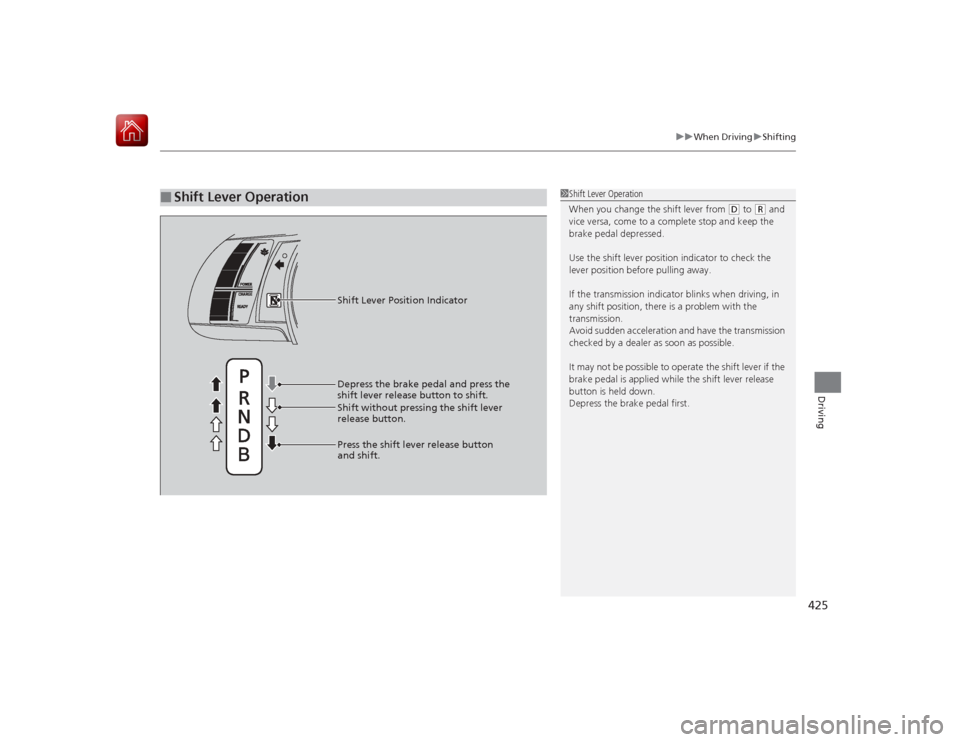
Shift Lever Operation
1Shift Lever Operation
When you change the shift lever from
(D to
( R and
vice versa, come to a complete stop and keep the
brake pedal depressed.
Use the shift lever position indicator to check the
lever position before pulling away.
If the transmission i ndicator blinks when driving, in
any shift position, there is a problem with the
transmission.
Avoid sudden acceleration and have the transmission
checked by a dealer as soon as possible.
It may not be possible to operate the shift lever if the
brake pedal is applied while the shift lever release
button is held down.
Depress the brake pedal first.
Shift Lever Position Indicator
Shift without pressing the shift lever
release button.
Press the shift lever release button
and shift. Depress the brake pedal and press the
shift lever release button to shift.
Page 468 of 569
467
Maintenance
This chapter discusses basic maintenance.
Before Performing MaintenanceInspection and Maintenance ............ 468Safety When Performing Maintenance..... 469Parts and Fluids Used in Maintenance Service ........................................... 470
Maintenance Minder
TM..................... 471
Maintenance Under the Hood
Maintenance Items Under the Hood ..... 475Opening the Hood ........................... 476
Recommended Engine Oil ................ 477
Oil Check ......................................... 478
Adding Engine Oil ............................ 479Changing the Engine Oil and Oil Filter ..... 480
Coolant System................................ 482
Inverter Coolant ............................... 484
Transmission Fluid ............................ 485
Brake Fluid ....................................... 486
Refilling Window Washer Fluid......... 487
Replacing Light Bulbs ....................... 488Checking and Maintaining Wiper
Blades .......................................... 495Checking and Maintaining Tires
Checking Tires ................................. 497Tire and Loading Information Label ...... 498Tire Labeling .................................... 498DOT Tire Quality Grading (U.S. Vehicles)....... 500
Wear Indicators ............................... 502
Tire Service Life ................................ 502
Tire and Wheel Replacement ........... 503
Tire Rotation .................................... 504
Winter Tires ..................................... 505
12-Volt Battery ................................. 506
Remote Transmitter Care Replacing the Button Battery ........... 507
Climate Control System Maintenance ... 508
Cleaning
Interior Care .................................... 509
Exterior Care.................................... 511
Page 474 of 569
473
uuMaintenance Minder
TMuTo Use Maintenance Minder
TM
Continued
Maintenance
■
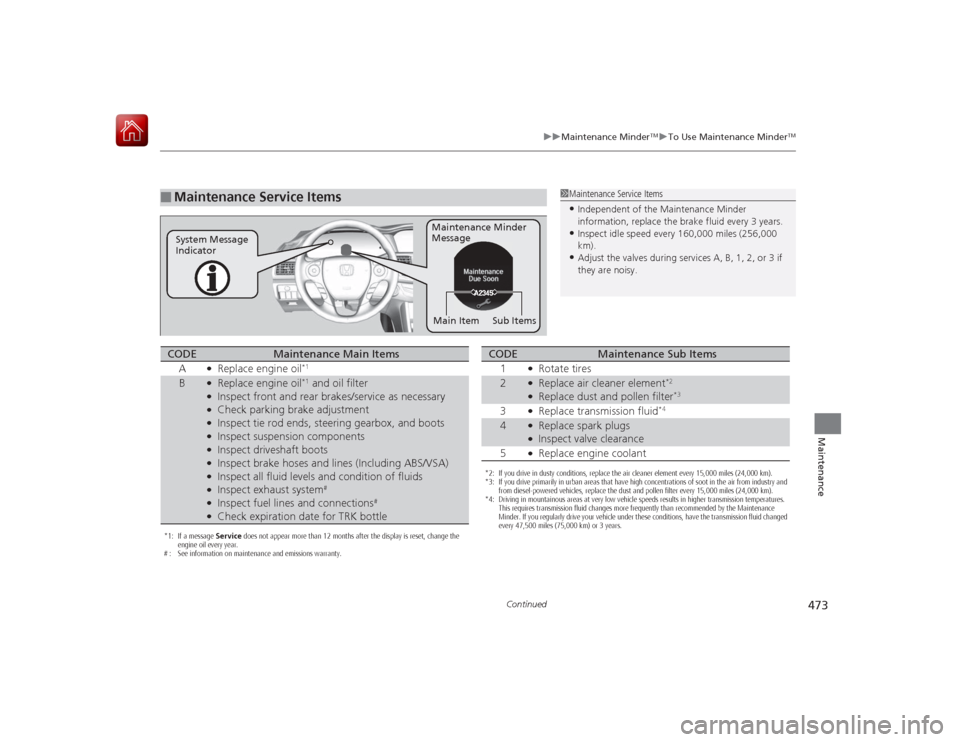
Maintenance Service Items
1Maintenance Service Items•Independent of the Maintenance Minder
information, replace the brake fluid every 3 years.•Inspect idle speed every 160,000 miles (256,000
km).•Adjust the valves during services A, B, 1, 2, or 3 if
they are noisy.
Maintenance Minder
Message
System Message
Indicator
Sub Items
Main Item
*1: If a message Service does not appear more than 12 months after the display is reset, change the
engine oil every year.
# : See information on maintenance and emissions warranty.CODE
Maintenance Main Items
A
●Replace engine oil
*1
B
●Replace engine oil
*1 and oil filter
●Inspect front and rear brakes/service as necessary●Check parking brake adjustment●Inspect tie rod ends, steering gearbox, and boots●Inspect suspension components●Inspect driveshaft boots●Inspect brake hoses and lines (Including ABS/VSA)●Inspect all fluid levels and condition of fluids●Inspect exhaust system
#
●Inspect fuel lines and connections
#
●Check expiration date for TRK bottle
*2: If you drive in dusty conditions, replace the air cleaner element every 15,000 miles (24,000 km).
*3: If you drive primarily in urban areas that have high concentrations of soot in the air from industry and from diesel-powered vehicles, replace the dust and pollen filter every 15,000 miles (24,000 km).
*4: Driving in mountainous areas at very low vehicle speeds results in higher transmission temperatures. This requires transmission fluid changes more frequently than recommended by the Maintenance
Minder. If you regularly drive your vehicle under these conditions, have the transmission fluid changed
every 47,500 miles (75,000 km) or 3 years.CODE
Maintenance Sub Items
1
●Rotate tires
2
●Replace air cleaner element
*2
●Replace dust and pollen filter
*3
3
●Replace transmission fluid
*4
4
●Replace spark plugs●Inspect valve clearance
5●Replace engine coolant
Page 486 of 569
485
uuMaintenance Under the Hood uTransmission Fluid
Maintenance
Transmission FluidHave a dealer check the fluid level and replace if necessary.Specified fluid: Honda ATF DW-1 (automatic transmission fluid)
1Transmission FluidNOTICEDo not mix Honda ATF DW-1 with other
transmission fluids.
Using a transmission fluid other than Honda ATF
DW-1 may adversely affect the operation and
durability of your vehicle's transmission, and damage
the transmission.
Any damage caused by using a transmission fluid that
is not equivalent to Honda ATF DW-1 is not covered
by Honda's new vehicle warranty.
Page 537 of 569
536
uuIndicator, Coming On/Blinking uIf the Brake System Indicator (Red) Comes On
Handling the Unexpected
If the Brake System Indicator (Red) Comes On
■Reasons for the indicator to come on
• The brake fluid is low.
• There is a malfunction in the brake system.■What to do when the indicator comes on while driving
Press the brake pedal lightly to check pedal pressure.
• If normal, check the brake fluid level the next time you stop.
• If abnormal, take immediate action. If necessary, downshift the
transmission to slow the vehicle using regenerative braking.
If the Electric Power Steering (EPS) System Indicator Comes On
■Reasons for the indicator to come on
• Comes on if there is a problem with the EPS system.■What to do when the indicator comes on
Stop the vehicle in a safe place and turn on the power system again.
If the indicator comes on and stays on, immediately have your vehicle
inspected by a dealer.
1 If the Brake System Indicator (Red) Comes On
Have your vehicle repaired immediately.
It is dangerous to drive with low brake fluid. If there
is no resistance from the brake pedal, stop
immediately in a safe place. If necessary, downshift
the transmission.
If the brake system indicator (red) and ABS indicator
come on simultaneously, the electronic brake
distribution system is not working. This can result in
vehicle instability under sudden braking.
Have your vehicle inspected by a dealer immediately.
If both red and amber brake system indicators come
on, stop the vehicle in a safe place and have it
inspected by a dealer immediately.
U.S.
Canada