display HONDA ACCORD SEDAN 2020 (in English) Workshop Manual
[x] Cancel search | Manufacturer: HONDA, Model Year: 2020, Model line: ACCORD SEDAN, Model: HONDA ACCORD SEDAN 2020Pages: 728, PDF Size: 34.06 MB
Page 258 of 728
256
uuAudio System Basic Operation uAudio/Information Screen
Features
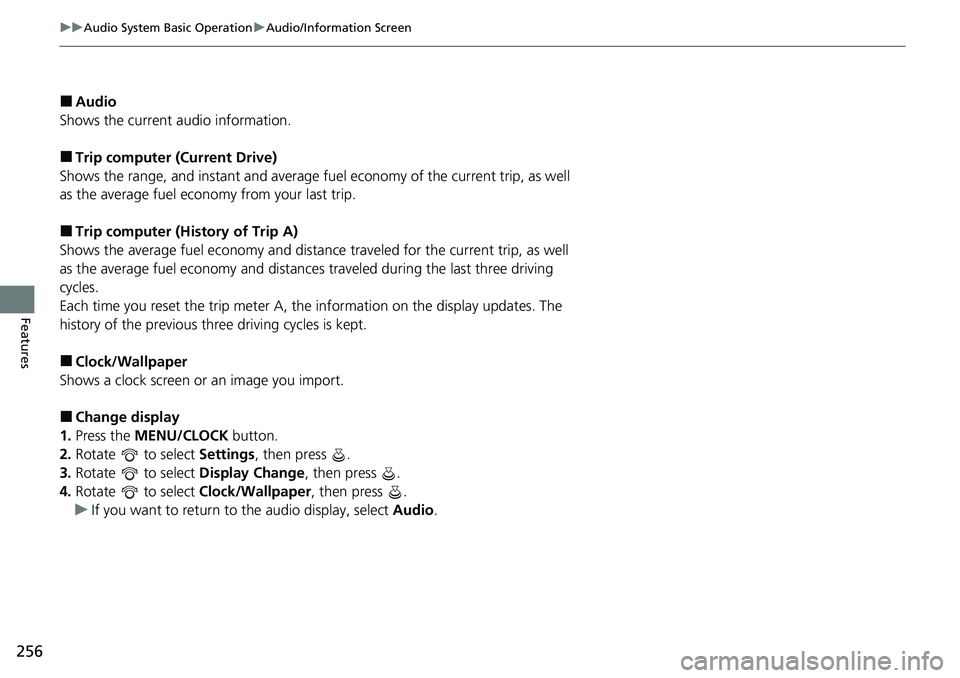
■Audio
Shows the current audio information.
■Trip computer (Current Drive)
Shows the range, and instant and average fu el economy of the current trip, as well
as the average fuel economy from your last trip.
■Trip computer (History of Trip A)
Shows the average fuel economy and distance traveled for the current trip, as well
as the average fuel economy and distances traveled during the last three driving
cycles.
Each time you reset the trip meter A, th e information on the display updates. The
history of the previous th ree driving cycles is kept.
■Clock/Wallpaper
Shows a clock screen or an image you import.
■Change display
1. Press the MENU/CLOCK button.
2. Rotate to select Settings, then press .
3. Rotate to select Display Change, then press .
4. Rotate to select Clock/Wallpaper, then press .
u If you want to return to the audio display, select Audio.
Page 259 of 728
Continued257
uuAudio System Basic Operation uAudio/Information Screen
Features
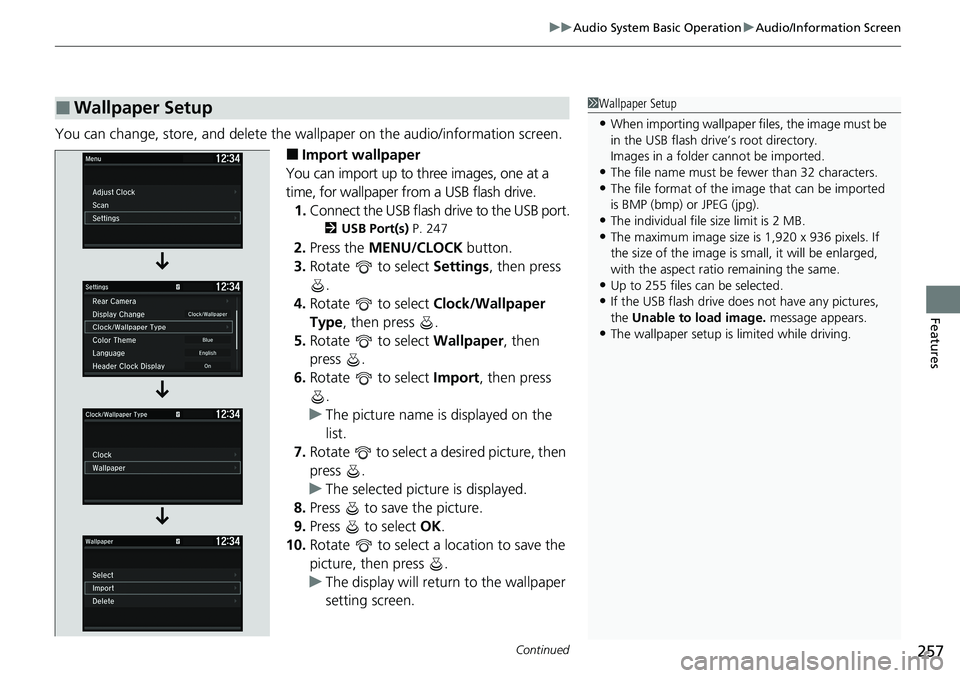
You can change, store, and delete the wallpaper on the audio/ information screen.
■Import wallpaper
You can import up to three images, one at a
time, for wallpaper from a USB flash drive. 1. Connect the USB flash drive to the USB port.
2 USB Port(s) P. 247
2.Press the MENU/CLOCK button.
3. Rotate to select Settings, then press
.
4. Rotate to select Clock/Wallpaper
Type, then press .
5. Rotate to select Wallpaper, then
press .
6. Rotate to select Import, then press
.
u The picture name is displayed on the
list.
7. Rotate to select a desired picture, then
press .
u The selected picture is displayed.
8. Press to save the picture.
9. Press to select OK.
10. Rotate to select a location to save the
picture, then press .
u The display will retu rn to the wallpaper
setting screen.
■Wallpaper Setup1 Wallpaper Setup
•When importing wallpaper f iles, the image must be
in the USB flash driv e’s root directory.
Images in a folder cannot be imported.
•The file name must be fewer than 32 characters.•The file format of the im age that can be imported
is BMP (bmp) or JPEG (jpg).
•The individual file size limit is 2 MB.•The maximum image size is 1,920 x 936 pixels. If
the size of the image is small, it will be enlarged,
with the aspect ratio remaining the same.
•Up to 255 files can be selected.
•If the USB flash drive doe s not have any pictures,
the Unable to load image. message appears.
•The wallpaper setup is limited while driving.
Page 260 of 728
uuAudio System Basic Operation uAudio/Information Screen
258
Features
■Select wallpaper
1. Press the MENU/CLOCK button.
2. Rotate to select Settings, then press .
3. Rotate to select Clock/Wallpaper Type , then press .
4. Rotate to select Wallpaper, then press .
5. Rotate to select Select, then press .
u The screen changes to the wallpaper list.
6. Rotate to select a desired wallpaper, then press .
■To view wallpaper once it is set
1. Press the MENU/CLOCK button.
2. Rotate to select Settings, then press .
3. Rotate to select Display Change, then press .
4. Rotate to select Clock/Wallpaper, then press .
5. Press the (Back) button until the top screen is displayed.
■Delete wallpaper
1. Press the MENU/CLOCK button.
2. Rotate to select Settings, then press .
3. Rotate to select Clock/Wallpaper Type , then press .
4. Rotate to select Wallpaper, then press .
5. Rotate to select Delete, then press .
u The screen changes to the wallpaper list.
6. Rotate to select a wallpaper that you want to delete, then press .
7. Rotate to select Yes, then press .
u The display will return to the wallpaper setting screen.
1Wallpaper Setup
To go back to the previous screen, press the
(Back) button.
When the file size is large, it takes a while to be
previewed.
Page 262 of 728
260
uuAudio System Basic Operation uDisplay Setup
Features
Display Setup
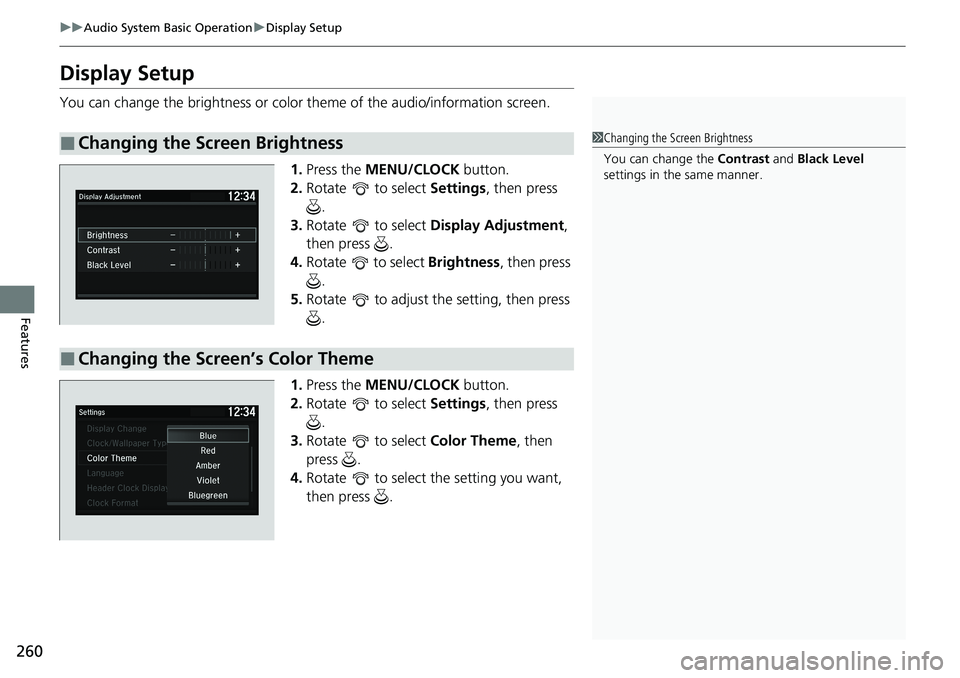
You can change the brightness or color theme of the audio/information screen.
1.Press the MENU/CLOCK button.
2. Rotate to select Settings, then press
.
3. Rotate to select Display Adjustment,
then press .
4. Rotate to select Brightness , then press
.
5. Rotate to adjust the setting, then press
.
1. Press the MENU/CLOCK button.
2. Rotate to select Settings, then press
.
3. Rotate to select Color Theme, then
press .
4. Rotate to select the setting you want,
then press .
■Changing the Screen Brightness1Changing the Screen Brightness
You can change the Contrast and Black Level
settings in the same manner.
■Changing the Screen’s Color Theme
Page 263 of 728
261
uuAudio System Basic Operation uPlaying AM/FM Radio
Continued
Features
Playing AM/FM Radio
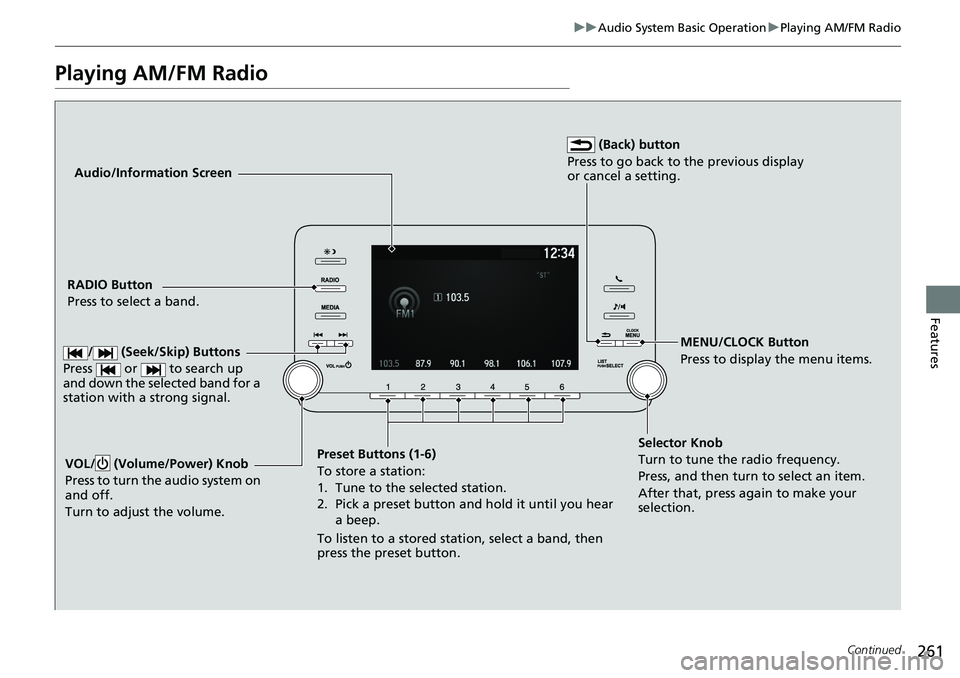
Audio/Information Screen
RADIO Button
Press to select a band.
Preset Buttons (1-6)
To store a station:
1. Tune to the selected station.
2. Pick a preset button and hold it until you hear a beep.
To listen to a stored station, select a band, then
press the preset button. MENU/CLOCK Button
Press to display the menu items.
Selector Knob
Turn to tune the radio frequency.
Press, and then turn to select an item.
After that, press again to make your
selection.
VOL/ (Volume/Power) Knob
Press to turn the audio system on
and off.
Turn to adjust the volume.
(Back) button
Press to go back to the previous display
or cancel a setting.
/ (Seek/Skip) Buttons
Press or to search up
and down the selected band for a
station with a strong signal.
Page 264 of 728
uuAudio System Basic Operation uPlaying AM/FM Radio
262
Features
Provides text data information related to your selected RDS-capable FM station.
■To find an RDS station from Station List
1. Press while listening to an FM station.
2. Rotate to select the station, then press .
■Update List
Updates your available station list at any time.
1. Press while listening to an FM station.
2. Rotate to select Update List, then press .
■Radio text
Displays the radio text informat ion of the selected RDS station.
1. Press the MENU/CLOCK button.
2. Rotate to select Settings, then press .
3. Rotate to select RDS Settings, then press .
4. Rotate to select Radio Text, then press .
■Scan
Samples each of the strongest stations on the selected band for 10 seconds.
1. Press the MENU/CLOCK button.
2. Rotate to select Scan, then press .
To turn off scan, press .
■Radio Data System (RDS)1 Playing AM/FM Radio
The ST indicator appears on the display indicating
stereo FM broadcasts.
Stereo reproduction in AM is not available.
Switching the Audio Mode
Press the SOURCE button on the steering wheel.
2 Audio Remote Controls P. 250
You can store 6 AM stations and 12 FM stations into
the preset memory. FM1 and FM2 let you store 6
stations each.
1 Radio Data System (RDS)
When you select an RDS-capable FM station, the RDS
automatically turns on, and the frequency display
changes to the station name. However, when the
signals of that station become weak, the display
changes from the statio n name to the frequency.
Page 265 of 728
263
uuAudio System Basic Operation uPlaying an iPod
Continued
Features
Playing an iPod
Connect the iPod using your dock connector to the USB Port, then press the MEDIA
button.
2 USB Port(s) P. 247
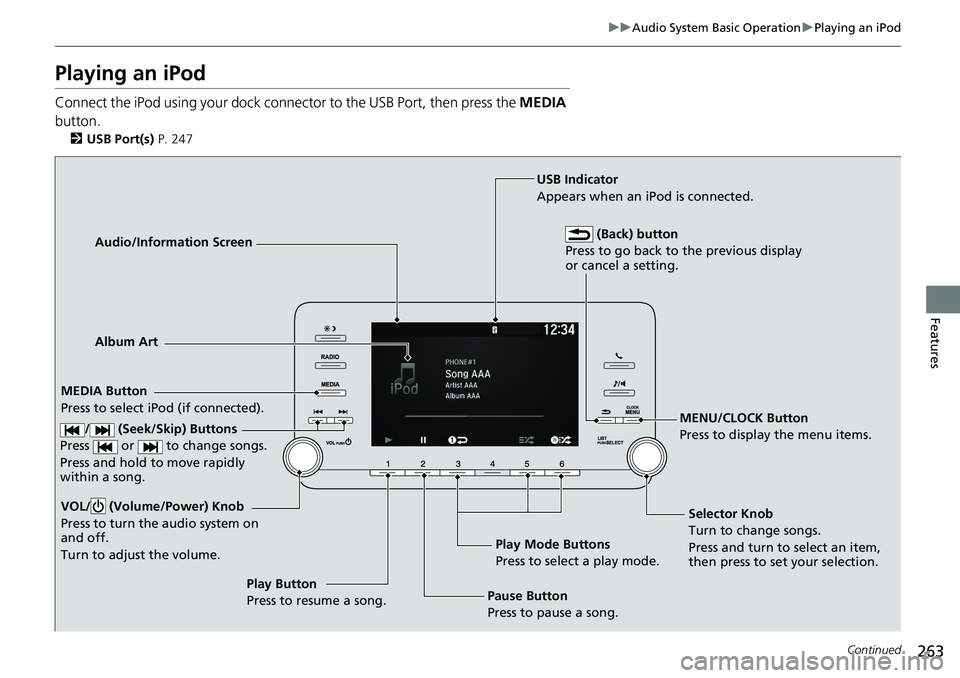
Audio/Information Screen
MEDIA Button
Press to select iPod (if connected). MENU/CLOCK Button
Press to display the menu items.
Selector Knob
Turn to change songs.
Press and turn to select an item,
then press to set your selection.
VOL/ (Volume/Power) Knob
Press to turn the audio system on
and off.
Turn to adjust the volume.
Play Button
Press to resume a song.
Album Art
USB Indicator
Appears when an iPod is connected.
(Back) button
Press to go back to the previous display
or cancel a setting.
/ (Seek/Skip) Buttons
Press or to change songs.
Press and hold to move rapidly
within a song.
Play Mode Buttons
Press to select a play mode.
Pause Button
Press to pause a song.
Page 266 of 728
uuAudio System Basic Operation uPlaying an iPod
264
Features
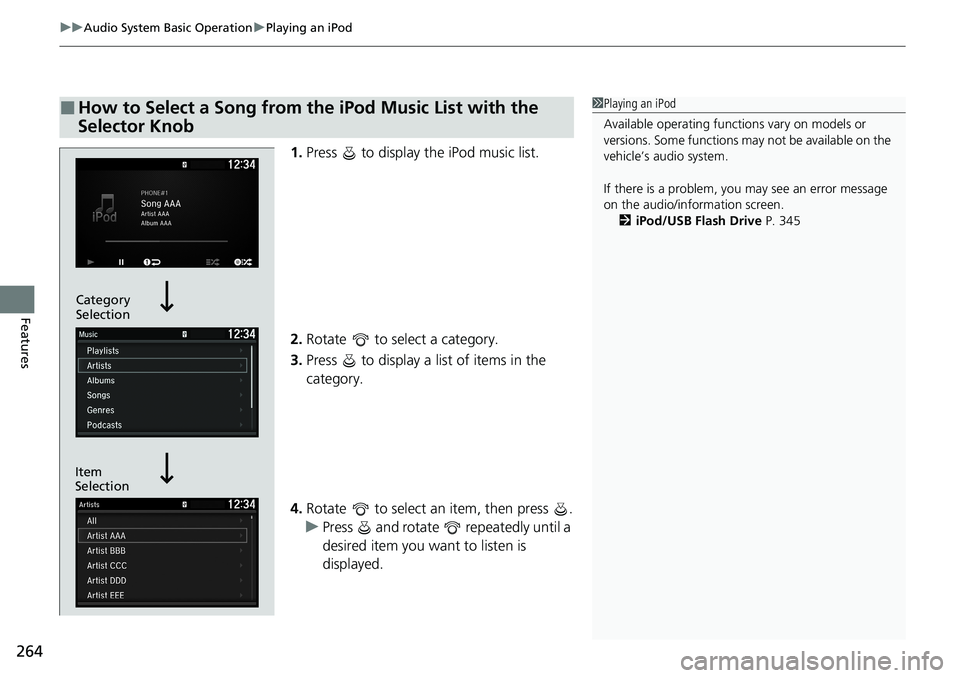
1. Press to display the iPod music list.
2. Rotate to select a category.
3. Press to display a list of items in the
category.
4. Rotate to select an item, then press .
u Press and rotate repeatedly until a
desired item you want to listen is
displayed.
■How to Select a Song from the iPod Music List with the
Selector Knob1 Playing an iPod
Available operating functi ons vary on models or
versions. Some functions ma y not be available on the
vehicle’s audio system.
If there is a problem, you may see an error message
on the audio/information screen. 2 iPod/USB Flash Drive P. 345
Category
Selection
Item
Selection
Page 268 of 728
266
uuAudio System Basic Operation uPlaying Pandora ®
Features
Playing Pandora ®
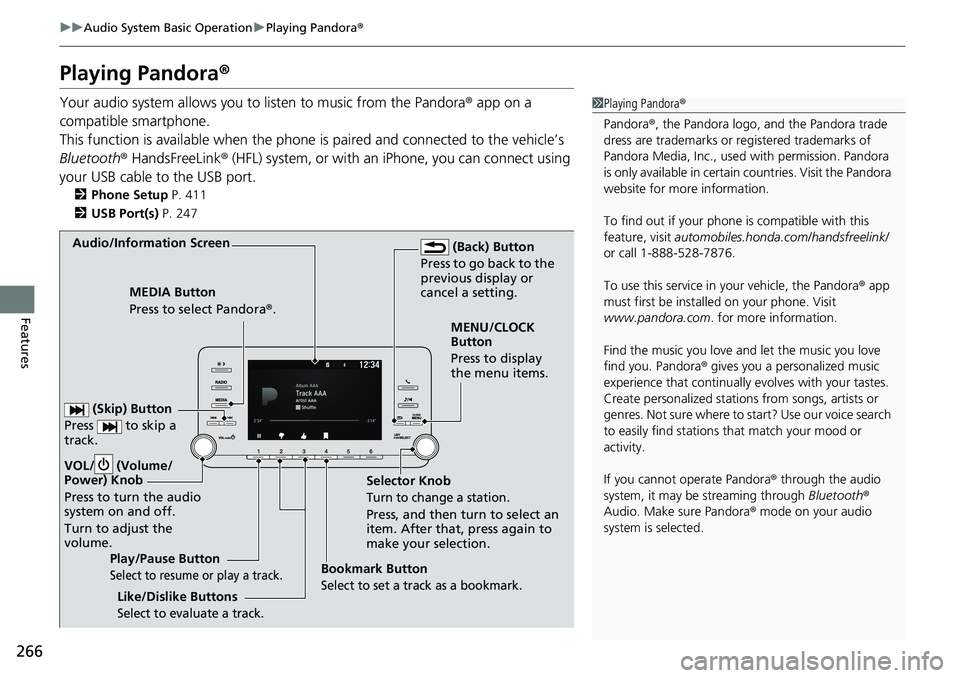
Your audio system allows you to listen to music from the Pandora ® app on a
compatible smartphone.
This function is available when the phone is paired and connected to the vehicle’s
Bluetooth ® HandsFreeLink ® (HFL) system, or with an iPhone, you can connect using
your USB cable to the USB port.
2 Phone Setup P. 411
2 USB Port(s) P. 247
1Playing Pandora ®
Pandora ®, the Pandora logo, and the Pandora trade
dress are trademarks or registered trademarks of
Pandora Media, Inc., used with permission. Pandora
is only available in certai n countries. Visit the Pandora
website for more information.
To find out if your phone is compatible with this
feature, visit automobiles.honda.com /handsfreelink/
or call 1-888-528-7876.
To use this service in your vehicle, the Pandora ® app
must first be installed on your phone. Visit
www.pandora.com . for more information.
Find the music you love and let the music you love
find you. Pandora ® gives you a personalized music
experience that continually evolves with your tastes.
Create personalized stati ons from songs, artists or
genres. Not sure where to start? Use our voice search
to easily find stations th at match your mood or
activity.
If you cannot operate Pandora ® through the audio
system, it may be streaming through Bluetooth®
Audio. Make sure Pandora ® mode on your audio
system is selected.
Audio/Information Screen
Selector Knob
Turn to change a station.
Press, and then turn to select an
item. After that, press again to
make your selection.
VOL/ (Volume/
P
ower) Knob
Press to turn the audio
system on and off.
Turn to adjust the
volume.
(Back) Button
Press to go back to the
previous display or
cancel a setting.
MEDIA Button
Press to select Pandora® .
Play/Pause Button
Select to resume or play a track.
(Skip) Button
Press to skip a
track.
Like/Dislike Buttons
Select to evaluate a track.
MENU/CLOCK
Button
Press to display
the menu items.
Bookmark Button
Select to set a track as a bookmark.
Page 270 of 728
268
uuAudio System Basic Operation uPlaying a USB Flash Drive
Features
Playing a USB Flash Drive
Your audio system reads and plays sound files on a USB flash drive in either MP3,
WMA or AAC*1 format.
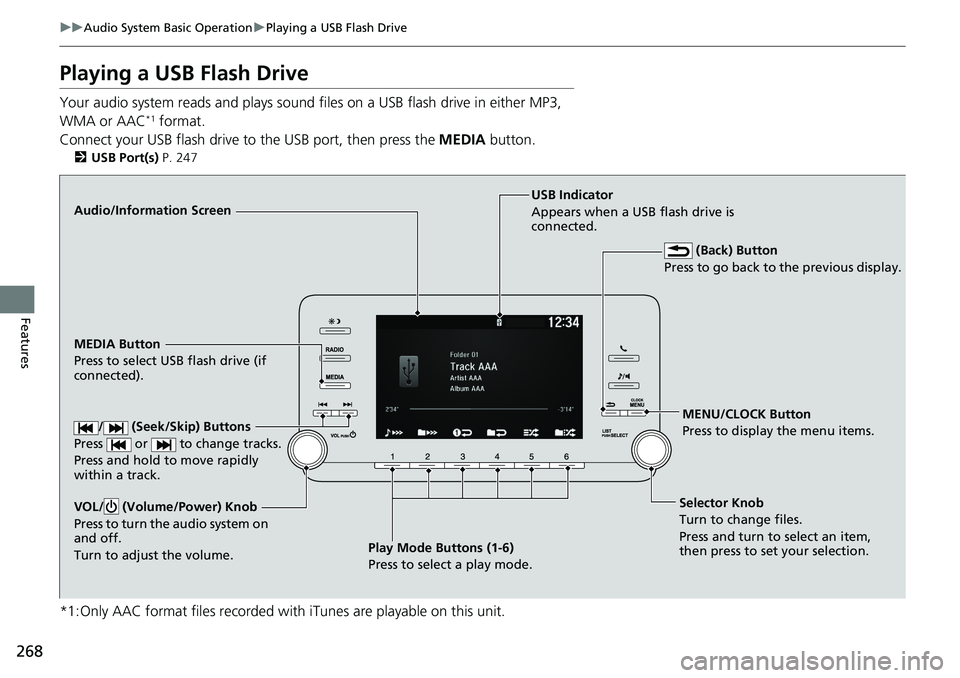
Connect your USB flash drive to the USB port, then press the MEDIA button.
2USB Port(s) P. 247
*1:Only AAC format files recorded with iTunes are playable on this unit.
Audio/Information Screen
MEDIA Button
Press to select USB flash drive (if
connected).
MENU/CLOCK Button
Press to display the menu items.
Selector Knob
Turn to change files.
Press and turn to select an item,
then press to set your selection.
VOL/ (Volume/Power) Knob
Press to turn the audio system on
and off.
Turn to adjust the volume.USB Indicator
Appears when a USB flash drive is
connected.
(Back) Button
Press to go back to the previous display.
/ (Seek/Skip) Buttons
Press or to change tracks.
Press and hold to move rapidly
within a track.
Play Mode Buttons (1-6)
Press to select a play mode.