brake light HONDA ACCORD SEDAN 2020 Owner's Manual (in English)
[x] Cancel search | Manufacturer: HONDA, Model Year: 2020, Model line: ACCORD SEDAN, Model: HONDA ACCORD SEDAN 2020Pages: 728, PDF Size: 34.06 MB
Page 10 of 728
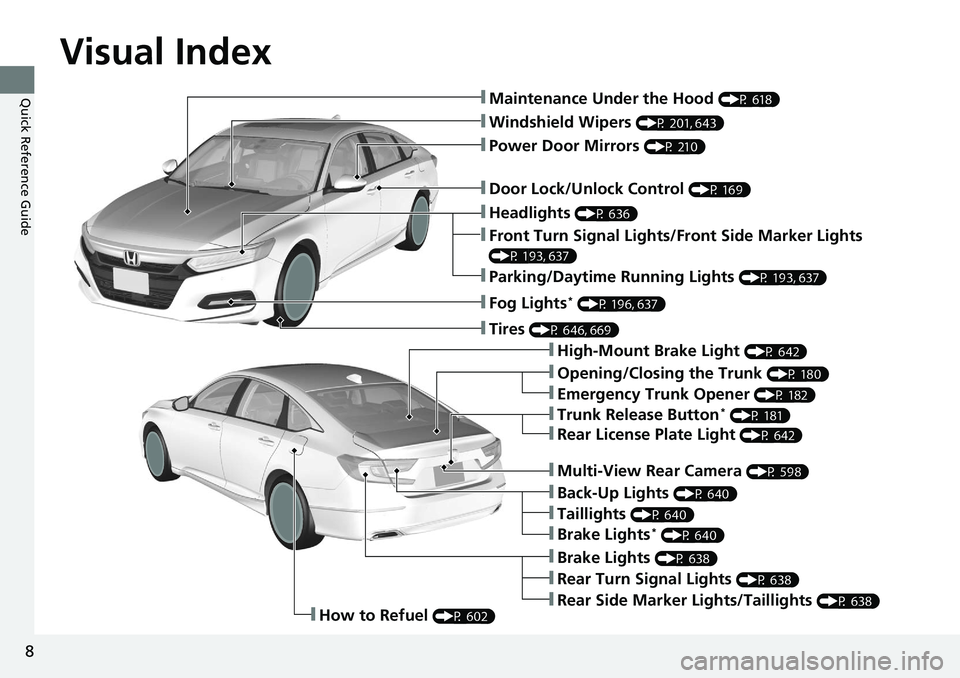
Visual Index
8
Quick Reference Guide❚Maintenance Under the Hood (P 618)
❚Windshield Wipers (P 201, 643)
❚Door Lock/Unlock Control (P 169)
❚Power Door Mirrors (P 210)
❚Headlights (P 636)
❚High-Mount Brake Light (P 642)
❚Emergency Trunk Opener (P 182)
❚Opening/Closing the Trunk (P 180)
❚Parking/Daytime Running Lights (P 193, 637)
❚Front Turn Signal Lights/Front Side Marker Lights
(P 193, 637)
❚Fog Lights* (P 196, 637)
❚Trunk Release Button* (P 181)
❚Brake Lights (P 638)
❚Rear Side Marker Lights/Taillights (P 638)
❚Rear Turn Signal Lights (P 638)
❚Back-Up Lights (P 640)
❚How to Refuel (P 602)
❚Tires (P 646, 669)
❚Brake Lights* (P 640)
❚Taillights (P 640)
❚Multi-View Rear Camera (P 598)
❚Rear License Plate Light (P 642)
Page 29 of 728
27
Quick Reference Guide
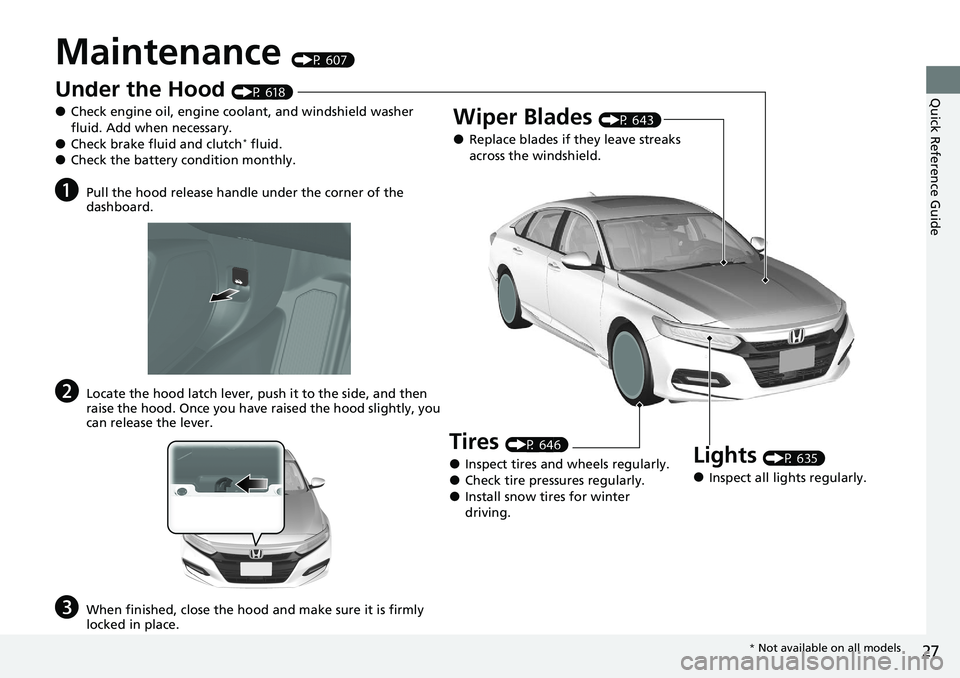
Maintenance (P 607)
Under the Hood (P 618)
●Check engine oil, engine coolant, and windshield washer
fluid. Add when necessary.
●Check brake fluid and clutch* fluid.●Check the battery condition monthly.
aPull the hood release handle under the corner of the
dashboard.
bLocate the hood latch lever, push it to the side, and then
raise the hood. Once you have raised the hood slightly, you
can release the lever.
cWhen finished, close the hood and make sure it is firmly
locked in place.
Lights (P 635)
●Inspect all lights regularly.
Wiper Blades (P 643)
●Replace blades if they leave streaks
across the windshield.
Tires (P 646)
●Inspect tires and wheels regularly.●Check tire pressures regularly.●Install snow tires for winter
driving.
* Not available on all models
Page 31 of 728
29
Quick Reference Guide
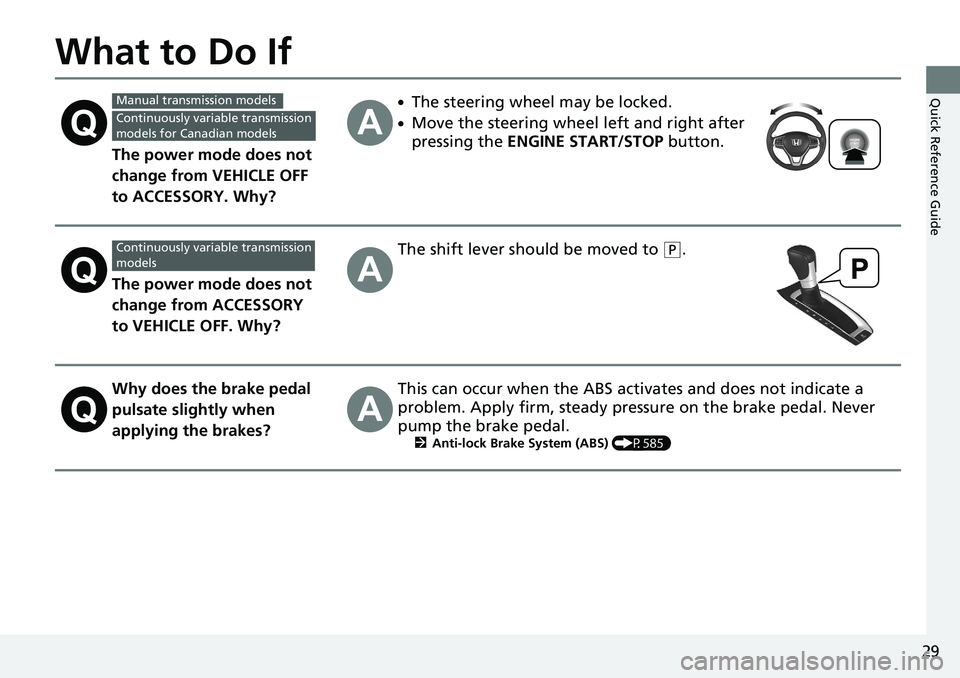
What to Do If
The power mode does not
change from VEHICLE OFF
to ACCESSORY. Why?
●The steering wheel may be locked.
●Move the steering wheel left and right after
pressing the ENGINE START/STOP button.
The power mode does not
change from ACCESSORY
to VEHICLE OFF. Why?
The shift lever should be moved to (P.
Why does the brake pedal
pulsate slightly when
applying the brakes?This can occur when the ABS activates and does not indicate a
problem. Apply firm, steady pressure on the brake pedal. Never
pump the brake pedal.
2Anti-lock Brake System (ABS) (P585)
Manual transmission models
Continuously variable transmission
models for Canadian models
Continuously variable transmission
models
Page 80 of 728
78
Instrument Panel
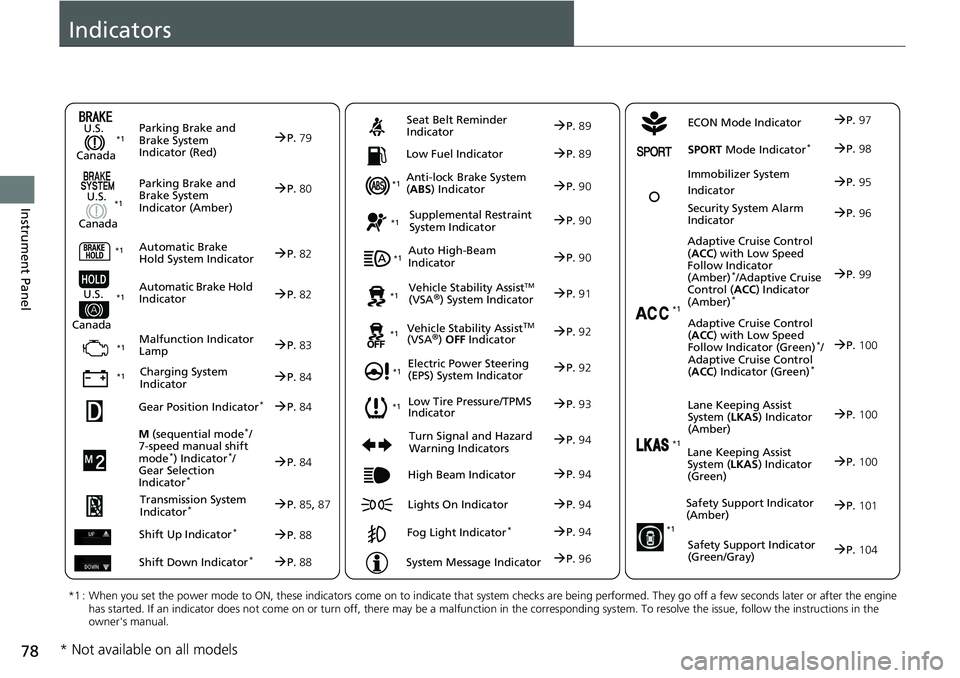
Indicators
ECON Mode Indicator
M (sequential mode
*/
7-speed manual shift
mode
*) Indicator*/
Gear Selection
Indicator
*
P. 84
Parking Brake and
Brake System
Indicator (Red)
Parking Brake and
Brake System
Indicator (Amber)
U.S.
Canada
U.S.
Canada Automatic Brake
Hold System Indicator
Automatic Brake Hold
IndicatorU.S.
Canada
*1 : When you set the power mode to ON, these indicators come on to indicate that system checks are being performed. They go off a few seconds later or after the engine
has started. If an indicator does not come on or turn off, ther e may be a malfunction in the corresponding system. To resolve the issue, follow the instructions in the
owner's manual.
P. 79*1
Malfunction Indicator
Lamp
Charging System
Indicator
Anti-lock Brake System
( ABS ) Indicator
Seat Belt Reminder
Indicator
Low Fuel Indicator
Vehicle Stability AssistTM (VSA®) System Indicator
Vehicle Stability Assist
TM (VSA®) OFF Indicator
Supplemental Restraint
System Indicator
Auto High-Beam
Indicator
Low Tire Pressure/TPMS
Indicator
Electric Power Steering
(EPS) System Indicator
Turn Signal and Hazard
Warning Indicators
Lights On Indicator High Beam Indicator
Fog Light Indicator*
System Message Indicator Adaptive Cruise Control
(
ACC ) with Low Speed
Follow Indicator
(Amber)
*/Adaptive Cruise
Control ( ACC) Indicator
(Amber)
*
Lane Keeping Assist
System ( LKAS) Indicator
(Amber)
Safety Support Indicator
(Amber)
Safety Support Indicator
(Green/Gray)
P. 80
P.82
P.82
P.83
P.84
*1
*1 *1 *1
P.
93
*1
*1
Gear Position Indicator*P. 84
Transmission System
I
ndicator*P. 85, 87
Shift Up Indicator
*P. 88
Shift Down Indicator
*P. 88
P. 89
P.89
P.90
P.90
P.90
P.91
*1
*1
*1
*1
P. 92
*1P.92
P.94
P.99
*1
P.94
P.94
P.94 Security System Alarm
Indi
cator P.96
P.96
P.100
P.101
P.104
*1Adaptive Cruise Control
(ACC ) with Low Speed
Follow Indicator (Green)
*/
Adaptive Cruise Control
( ACC ) Indicator (Green)
*
P.100
*1Lane Keeping Assist
System ( LKAS) Indicator
(Green)P. 100
*1
Immobilizer System
IndicatorP.95
SPORT Mode Indicator*P.98
P.97
* Not available on all models
Page 124 of 728
122
uuIndicators uDriver Information Interface Wa rning and Information Messages
Instrument Panel
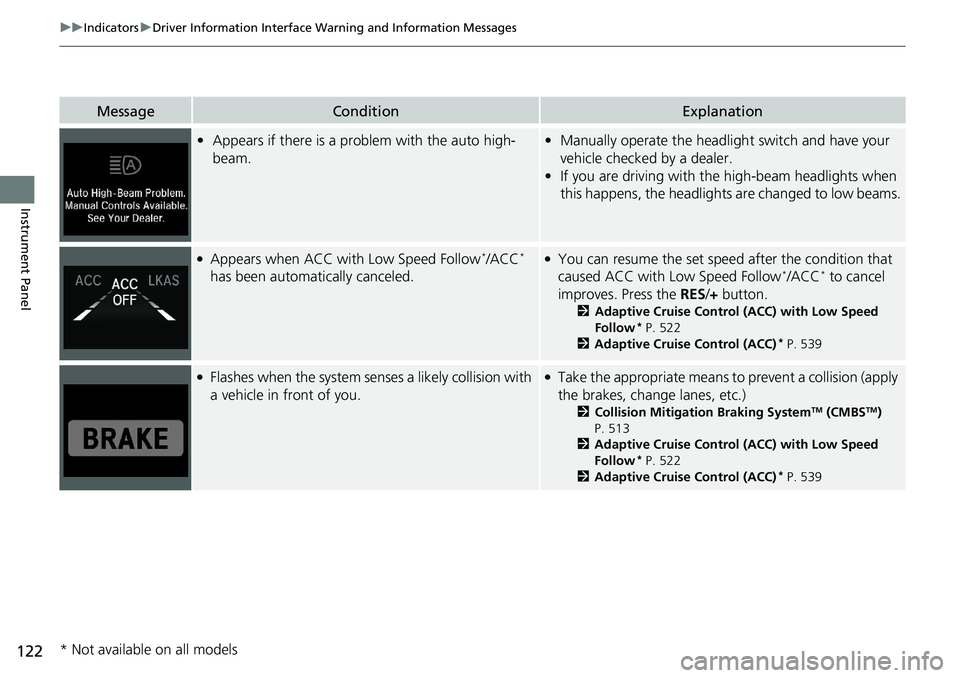
MessageConditionExplanation
•Appears if there is a prob lem with the auto high-
beam.• Manually operate the headlight switch and have your
vehicle checked by a dealer.
• If you are driving with the high-beam headlights when
this happens, the headlights are changed to low beams.
●Appears when ACC with Low Speed Follow*/ACC*
has been automati cally canceled.●You can resume the set spee d after the condition that
caused ACC with Low Speed Follow*/ACC* to cancel
improves. Press the RES/+ button.
2 Adaptive Cruise Control (ACC) with Low Speed
Follow* P. 522
2 Adaptive Cruise Control (ACC)* P. 539
●Flashes when the system sens es a likely collision with
a vehicle in front of you.●Take the appropriate means to prevent a collision (apply
the brakes, change lanes, etc.)
2 Collision Mitigation Braking SystemTM (CMBSTM)
P. 513
2 Adaptive Cruise Control (ACC) with Low Speed
Follow
* P. 522
2 Adaptive Cruise Control (ACC)* P. 539
* Not available on all models
Page 160 of 728
158
uuGauges and Displays uHead-Up Display*
Instrument Panel
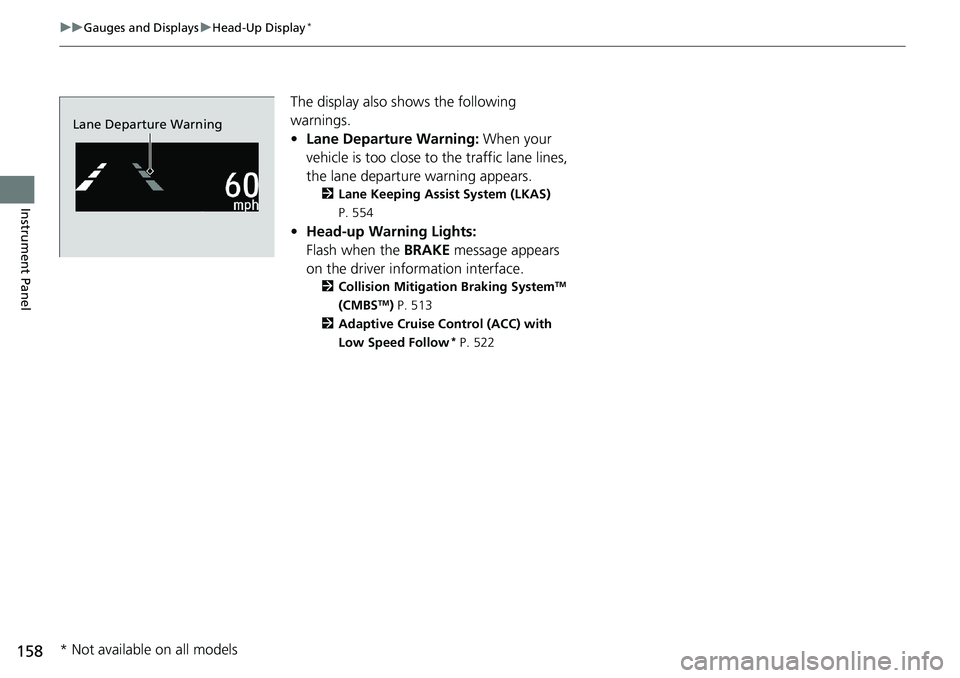
The display also s hows the following
warnings.
• Lane Departure Warning: When your
vehicle is too close to the traffic lane lines,
the lane departure warning appears.
2 Lane Keeping Assist System (LKAS)
P. 554
• Head-up Warning Lights:
Flash when the BRAKE message appears
on the driver information interface.
2 Collision Mitigation Braking SystemTM
(CMBSTM) P. 513
2 Adaptive Cruise Control (ACC) with
Low Speed Follow
* P. 522
Lane Departure Warning
* Not available on all models
Page 196 of 728
194
uuOperating the Switches Around the Steering Wheel uLight Switches
Controls
Light Switches
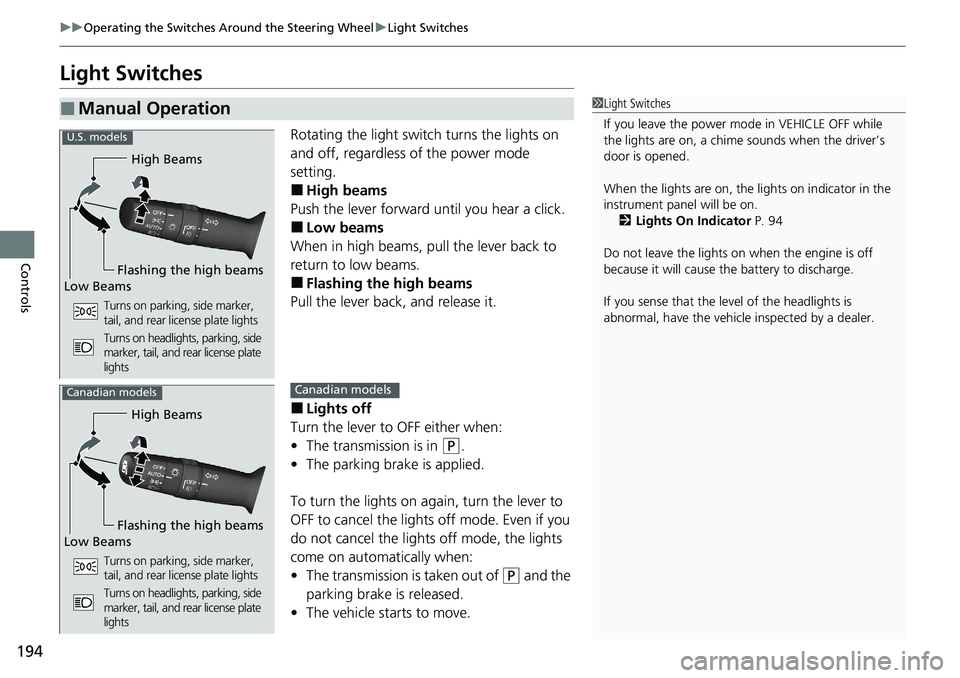
Rotating the light switch turns the lights on
and off, regardless of the power mode
setting.
■High beams
Push the lever forward until you hear a click.
■Low beams
When in high beams, pull the lever back to
return to low beams.
■Flashing the high beams
Pull the lever back, and release it.
■Lights off
Turn the lever to OFF either when:
• The transmission is in
(P.
• The parking brake is applied.
To turn the lights on again, turn the lever to
OFF to cancel the lights off mode. Even if you
do not cancel the lights off mode, the lights
come on automatically when:
• The transmission is taken out of
(P and the
parking brake is released.
• The vehicle starts to move.
■Manual Operation1Light Switches
If you leave the power mode in VEHICLE OFF while
the lights are on, a chime sounds when the driver’s
door is opened.
When the lights are on, the lights on indicator in the
instrument pane l will be on.
2 Lights On Indicator P. 94
Do not leave the lights on when the engine is off
because it will cause the battery to discharge.
If you sense that the le vel of the headlights is
abnormal, have the vehicl e inspected by a dealer.
High Beams
Flashing the high beams
Low Beams
Turns on parking, side marker,
tail, and rear license plate lights
Turns on headlights, parking, side
marker, tail, and rear license plate
lights
U.S. models
High Beams
Flashing the high beams
Low Beams
Turns on parking, side marker,
tail, and rear license plate lights
Turns on headlights, parking, side
marker, tail, and rear license plate
lights
Canadian modelsCanadian models
Page 199 of 728
197
uuOperating the Switches Around the Steering Wheel uDaytime Running Lights
Controls
Daytime Running Lights
The parking/daytime running lights come on when the following conditions have
been met:
• The power mode is in ON.
• The headlight switch is off, or in .
• The parking brake is released.
The lights remain on even if you set the pa rking brake. Setting the power mode to
VEHICLE OFF will turn off the daytime running lights.
The daytime running lights are off once the h eadlight switch is turned on, or when
the head light switch is in AUTO and it is getting darker outside.1Daytime Running Lights
The parking lights serve as daytime running lights.
Page 209 of 728
207
uuOperating the Switches Around the Steering Wheel uDriving Position Memory System*
Controls
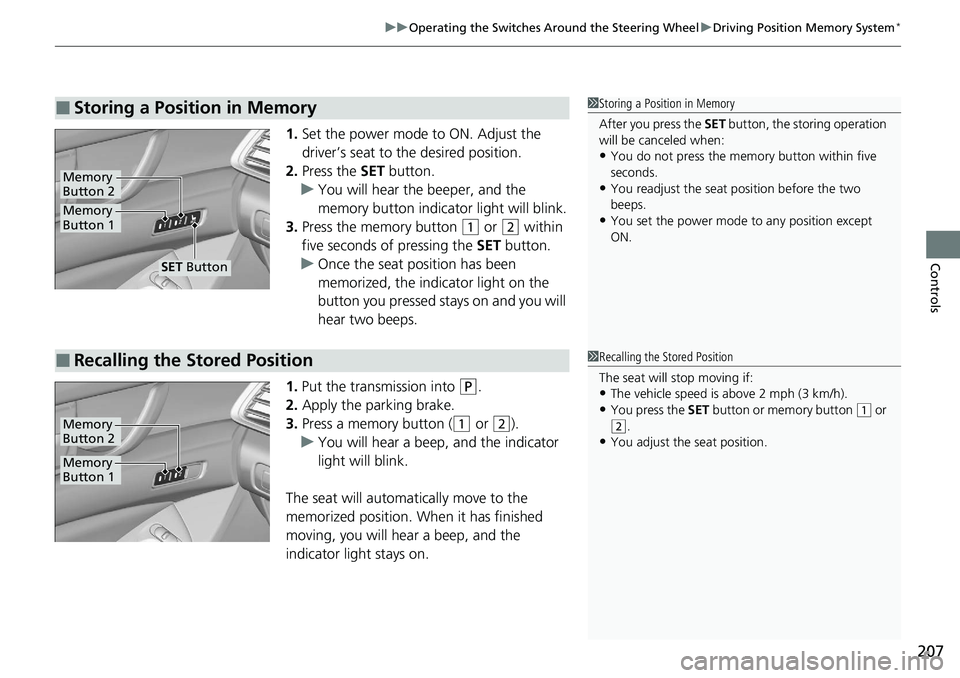
1. Set the power mode to ON. Adjust the
driver’s seat to the desired position.
2. Press the SET button.
u You will hear the beeper, and the
memory button indicator light will blink.
3. Press the memory button
(1 or (2 within
five seconds of pressing the SET button.
u Once the seat position has been
memorized, the indicator light on the
button you pressed stays on and you will
hear two beeps.
1. Put the transmission into
(P.
2. Apply the parking brake.
3. Press a memory button (
(1 or (2).
u You will hear a beep, and the indicator
light will blink.
The seat will automatically move to the
memorized position. When it has finished
moving, you will hear a beep, and the
indicator light stays on.
■Storing a Position in Memory1 Storing a Position in Memory
After you press the SET button, the storing operation
will be canceled when:
•You do not press the memory button within five
seconds.
•You readjust the seat position before the two
beeps.
•You set the power mode to any position except
ON.Memory
Button 1
Memory
Button 2
SET Button
■Recalling the Stored Position1 Recalling the Stored Position
The seat will stop moving if:
•The vehicle speed is above 2 mph (3 km/h).
•You press the SET button or memory button (1 or (2.
•You adjust the seat position.
Memory
Button 1
Memory
Button 2
Page 459 of 728
Continued457
uuBefore Driving uDriving Preparation
Driving
• Store or secure all items on board properly.
u Carrying too much cargo, or improperly storing it, can affect your vehicle’s
handling, stability, sto pping distance, and tires, and make it unsafe.
2Maximum Load Limit P. 459
•Do not pile items higher than the seat height.
u They can block your view and may be thrown forward in the event of sudden
braking.
• Do not place anything in the front seat footwells. Make sure to secure the floor
mat.
u An object or unsecured floor mat can in terfere with your brake and accelerator
pedal operation while driving.
• If you have any animals on board, do not let them move around in the vehicle.
u They may interfere with driving and a crash could occur.
• Securely close and lock all doors and the trunk.
2 Locking/Unlocking the Doors from the Inside P. 176
•Adjust your seating position properly.
u Adjust the head restraint, too.
2Adjusting the Seats P. 211
2 Adjusting the Front and Rear Outer* Head Restraint Positions P. 217
•Adjust the mirrors and steering wh eel properly for your driving.
u Adjust them while sitting in the proper driving position.
2 Adjusting the Mirrors P. 209
2 Adjusting the Steering Wheel P. 208
■Interior Checks1Interior Checks
The headlight aim is set by the factory, and does not
need to be adjusted. Howeve r, if you regularly carry
heavy items in the tr unk or tow a trailer
*, have the
aiming readjusted at a de aler or by a qualified
technician.
* Not available on all models