TPMS HONDA ACCORD SEDAN 2021 (in English) User Guide
[x] Cancel search | Manufacturer: HONDA, Model Year: 2021, Model line: ACCORD SEDAN, Model: HONDA ACCORD SEDAN 2021Pages: 659, PDF Size: 28.71 MB
Page 450 of 659
uuWhen Driving uTire Pressure Monitoring System (TPMS)
448
Driving
You must start TPMS calibration every time you:
• Adjust the pressure in one or more tires.
• Rotate the tires.
• Replace one or more tires.
Before calibrating the TPMS:
• Set the cold tire pressu re in all four tires.
2Checking Tires P. 577
Make sure:
•The vehicle is at a complete stop.
• The transmission is in
(P.
• The power mode is in ON.
■TPMS Calibration1TPMS Calibration
TPMS cannot be calibrated if a compact spare tire is
installed.
The calibration process requires approximately 30
minutes of cumulative driv ing at speeds between 30-
60 mph (48-97 km/h).
During this period, if the pow er mode is set to ON and
the vehicle is not moved wi thin 45 seconds, you may
notice the low tire pressu re/TPMS indicator comes on
briefly. This is normal and indicates that the calibration
process is not yet complete.
Page 451 of 659
449
uuWhen Driving uTire Pressure Monitoring System (TPMS)
Driving
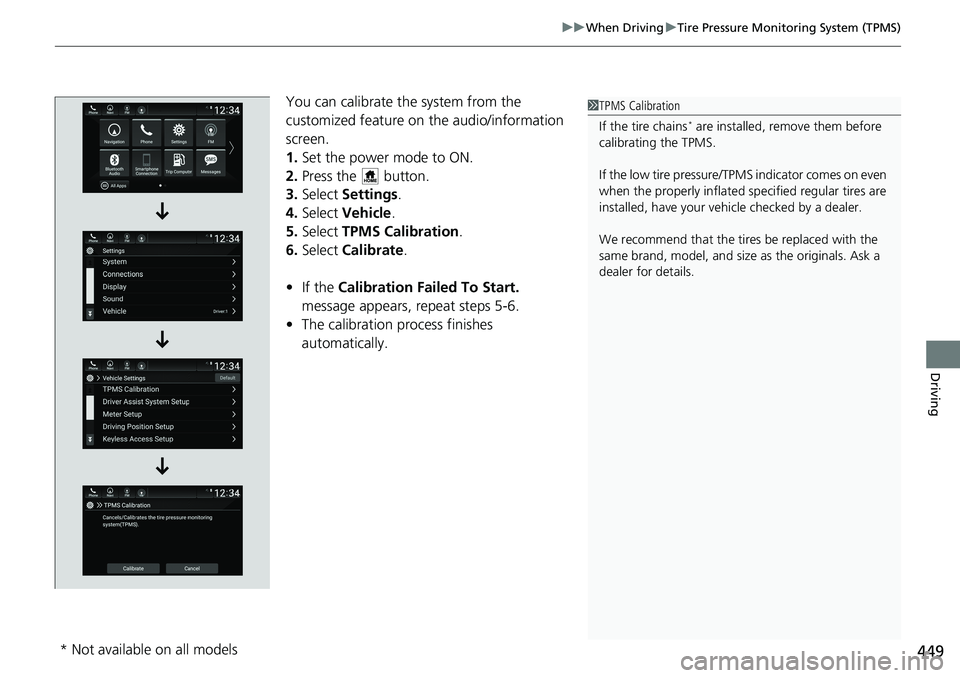
You can calibrate the system from the
customized feature on the audio/information
screen.
1. Set the power mode to ON.
2. Press the button.
3. Select Settings .
4. Select Vehicle .
5. Select TPMS Calibration .
6. Select Calibrate .
• If the Calibration Failed To Start.
message appears, repeat steps 5-6.
• The calibration process finishes
automatically.1TPMS Calibration
If the tire chains
* are installed, remove them before
calibrating the TPMS.
If the low tire pressure/TPMS indicator comes on even
when the properly inflated specified regular tires are
installed, have your vehi cle checked by a dealer.
We recommend that the tires be replaced with the
same brand, model, and size as the originals. Ask a
dealer for details.
* Not available on all models
Page 452 of 659
450
uuWhen Driving uTire Pressure Monitoring System (TPMS) - Required Federal Explanation
Driving
Tire Pressure Monitoring System (TPMS) - Required
Federal Explanation
Each tire, including the spare (i f provided), should be checked
monthly when cold and inflated to the inflation pressure
recommended by the vehicle manufacturer on the vehicle placard
or tire inflation pressure label.
(If your vehicle has tires of a different size than the size indicated
on the vehicle placard or tire infl ation pressure label, you should
determine the proper tire inflat ion pressure for those tires.)
As an added safety feature, your vehicle has been equipped with
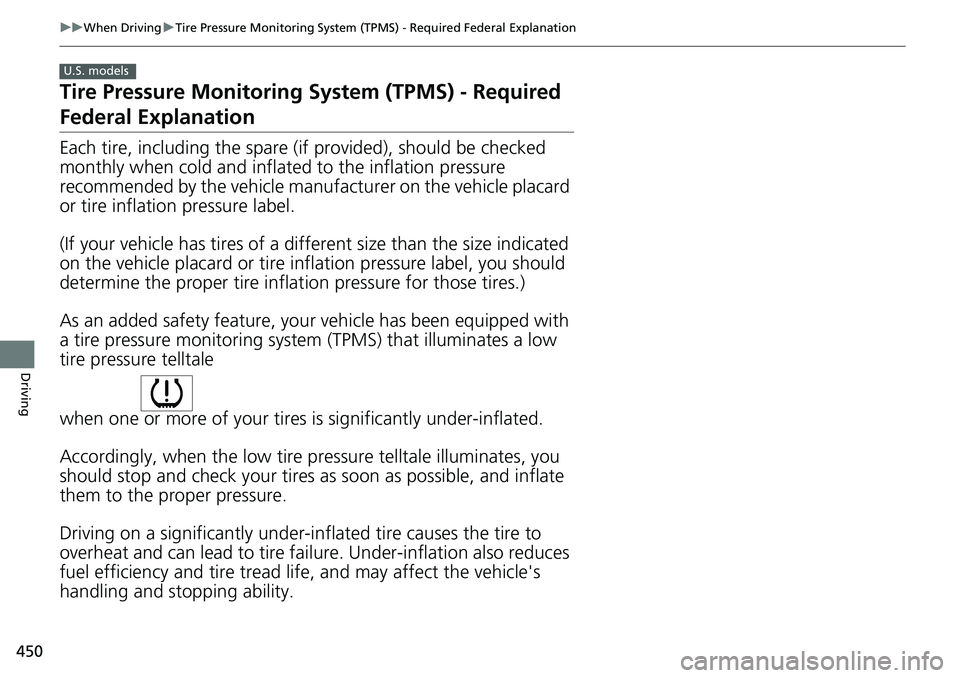
a tire pressure monitoring system (TPMS) that illuminates a low
tire pressure telltale
when one or more of your tire s is significantly under-inflated.
Accordingly, when the low tire pr essure telltale illuminates, you
should stop and check your tires as soon as possible, and inflate
them to the proper pressure.
Driving on a significantly under-in flated tire causes the tire to
overheat and can lead to tire failure. Under-inflat ion also reduces
fuel efficiency and tire tread li fe, and may affect the vehicle's
handling and stopping ability.
U.S. models
Page 453 of 659
451
uuWhen Driving uTire Pressure Monitoring System (TPMS) - Required Federal Explanation
Driving
Please note that the TPMS is not a substitute for proper tire
maintenance, and it is the driver 's responsibility to maintain
correct tire pressure, even if un der-inflation has not reached the
level to trigger illumination of th e TPMS low tire pressure telltale.
Your vehicle has also been equi pped with a TPMS malfunction
indicator to indicate when the system is not operating properly.
The TPMS malfunction indicator is combined with the low tire
pressure telltale. When the syst em detects a malfunction, the
telltale will flash fo r approximately one minute and then remain
continuously illumina ted. This sequence will continue upon
subsequent vehicle start-ups as long as the malfunction exists.
When the malfunction indicator is illuminated, the system may
not be able to detect or signal low tire pressure as intended.
TPMS malfunctions may occur for a variety of reasons, including
the installation of replacement or alternate tires or wheels on the
vehicle that prevent the TPMS from functioning properly.
Always check the TPMS malfunction telltale after replacing one or
more tires or wheels on your vehicle to ensure that the
replacement or alternate tires and wheels allow the TPMS to
continue to function properly.
Page 463 of 659
Continued461
uuHonda Sensing ®u Collision Mitigation Braking SystemTM (CMBSTM)
Driving
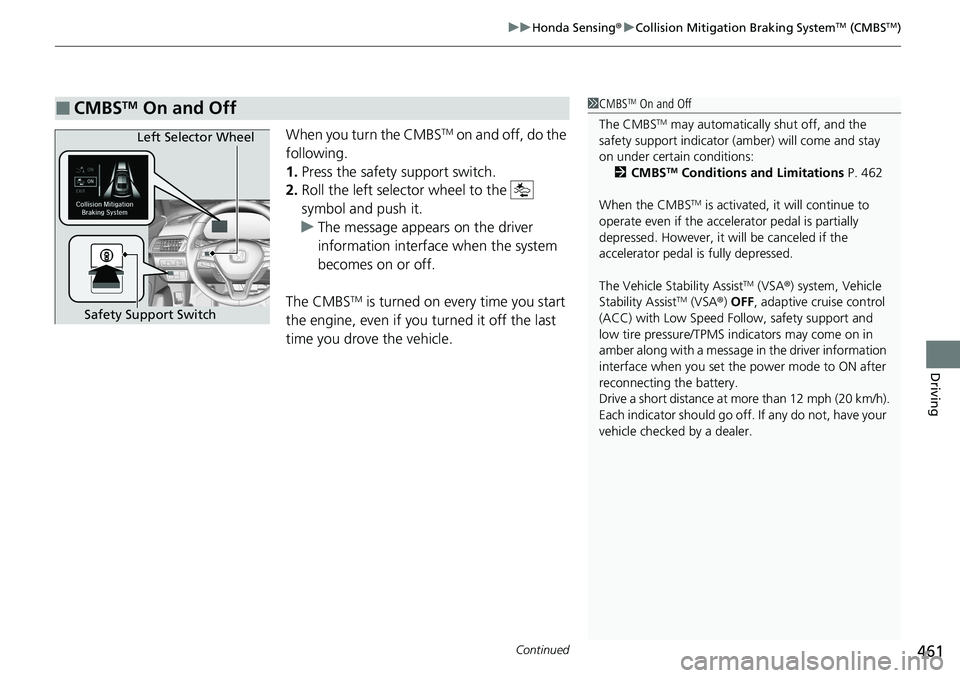
When you turn the CMBSTM on and off, do the
following.
1. Press the safety support switch.
2. Roll the left selector wheel to the
symbol and push it.
u The message appears on the driver
information interface when the system
becomes on or off.
The CMBS
TM is turned on every time you start
the engine, even if you turned it off the last
time you drove the vehicle.
■CMBSTM On and Off1 CMBSTM On and Off
The CMBS
TM may automatically shut off, and the
safety support indicator (amb er) will come and stay
on under certain conditions:
2 CMBS
TM Conditions and Limitations P. 462
When the CMBS
TM is activated, it will continue to
operate even if the accele rator pedal is partially
depressed. However, it w ill be canceled if the
accelerator pedal is fully depressed.
The Vehicle Stability Assist
TM (VSA ®) system, Vehicle
Stability AssistTM (VSA ®) OFF, adaptive cruise control
(ACC) with Low Speed Follow, safety support and
low tire pressure/TPMS indicators may come on in
amber along with a message in the driver information
interface when you set the power mode to ON after
reconnecting the battery.
Drive a short distance at more than 12 mph (20 km/h).
Each indicator should go off. If any do not, have your
vehicle checked by a dealer.
Left Selector Wheel
Safety Support Switch
Page 476 of 659
uuHonda Sensing ®u Adaptive Cruise Control (ACC) with Low Speed Follow
474
Driving
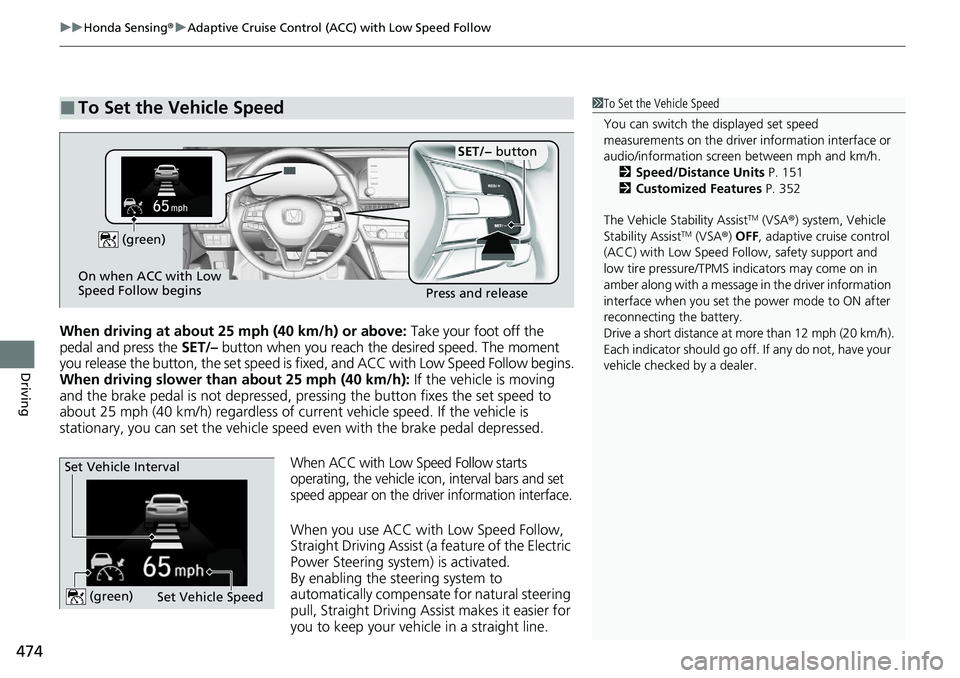
When driving at about 25 mph (40 km/h) or above: Take your foot off the
pedal and press the SET/– button when you reach the desired speed. The moment
you release the button, the set speed is fixed, and ACC with Low Speed Follow begins.
When driving slower than about 25 mph (40 km/h): If the vehicle is moving
and the brake pedal is not depressed, pressing the button fixes the set speed to
about 25 mph (40 km/h) regardless of current vehicle speed. If the vehicle is
stationary, you can set the vehicle speed even with the brake pedal depressed.
When ACC with Low Speed Follow starts
operating, the vehicle icon, interval bars and set
speed appear on the driver information interface.
When you use ACC with Low Speed Follow,
Straight Driving Assist (a feature of the Electric
Power Steering system) is activated.
By enabling the steering system to
automatically compensate for natural steering
pull, Straight Driving Assist makes it easier for
you to keep your vehicl e in a straight line.
■To Set the Vehicle Speed1To Set the Vehicle Speed
You can switch the displayed set speed
measurements on the driver information interface or
audio/information screen between mph and km/h. 2 Speed/Distance Units P. 151
2 Customized Features P. 352
The Vehicle Stability Assist
TM (VSA ®) system, Vehicle
Stability AssistTM (VSA ®) OFF, adaptive cruise control
(ACC) with Low Speed Follow, safety support and
low tire pressure/TPMS indicators may come on in
amber along with a message in the driver information
interface when you set the power mode to ON after
reconnecting the battery.
Drive a short distance at more than 12 mph (20 km/h).
Each indicator should go off. If any do not, have your
vehicle checked by a dealer.
On when ACC with Low
Speed Follow begins Press and release
SET/− button
(green)
Set Vehicle Speed
Set Vehicle Interval (green)
Page 500 of 659
uuHonda Sensing ®u Road Departure Mitigation (RDM) System
498
Driving
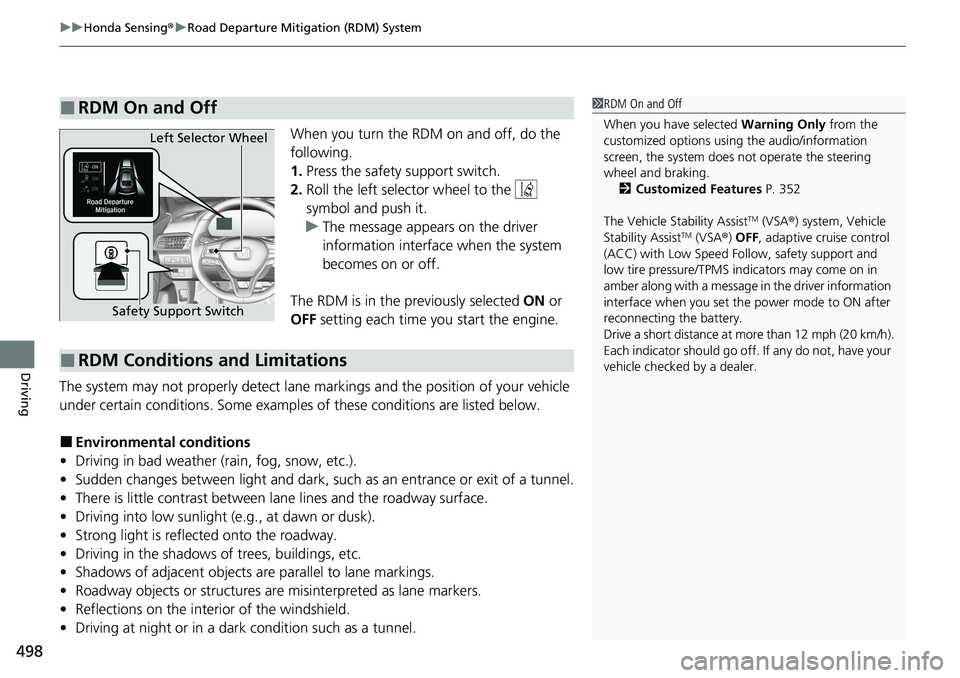
When you turn the RDM on and off, do the
following.
1. Press the safety support switch.
2. Roll the left selector wheel to the
symbol and push it.
u The message appears on the driver
information interface when the system
becomes on or off.
The RDM is in the previously selected ON or
OFF setting each time you start the engine.
The system may not properly detect lane markings and the position of your vehicle
under certain conditions. Some examples of these conditions are listed below.
■Environmental conditions
• Driving in bad weather (rain, fog, snow, etc.).
• Sudden changes between light and dark, such as an entrance or exit of a tunnel.
• There is little contrast between la ne lines and the roadway surface.
• Driving into low sunlight (e.g., at dawn or dusk).
• Strong light is reflected onto the roadway.
• Driving in the shadows of trees, buildings, etc.
• Shadows of adjacent objects are parallel to lane markings.
• Roadway objects or structures are misinterpreted as lane markers.
• Reflections on the interi or of the windshield.
• Driving at night or in a dark condition such as a tunnel.
■RDM On and Off1RDM On and Off
When you have selected Warning Only from the
customized options using the audio/information
screen, the system does not operate the steering
wheel and braking. 2 Customized Features P. 352
The Vehicle Stability Assist
TM (VSA ®) system, Vehicle
Stability AssistTM (VSA ®) OFF, adaptive cruise control
(ACC) with Low Speed Follow, safety support and
low tire pressure/TPMS indicators may come on in
amber along with a message in the driver information
interface when you set the power mode to ON after
reconnecting the battery.
Drive a short distance at more than 12 mph (20 km/h).
Each indicator should go off. If any do not, have your
vehicle checked by a dealer.
Safety Support Switch Left Selector Wheel
■RDM Conditions and Limitations
Page 579 of 659
577
Maintenance
Checking and Maintaining Tires
Checking Tires
To safely operate your vehicle, your tires must be of the proper type and size, in
good condition with adequate tread, and properly inflated.
■Inflation guidelines
Properly inflated tires provid e the best combination of hand ling, tread life, and comfort.
Refer to the driver’s doorjamb label or spec ifications page for the specified pressure.
Under inflated tires wear unevenly, advers ely affect handling and fuel economy, and
are more likely to fail from overheating.
Overinflated tires make your vehicle ride ha rshly, are more prone to road hazards,
and wear unevenly.
Every day before you drive, look at each of the tires. If one looks lower than the
others, check the pressure with a tire gauge.
At least once a month or before long trips, use a gauge to measure the pressure in all
tires, including the spare. Even tires in good condition can lose 1–2 psi (10–20 kPa,
0.1–0.2 kgf/cm
2) per month.
■Inspection guidelines
Every time you check inflation, also examine the tires and valve stems.
Look for:
• Bumps or bulges on the side or in the tread. Replace the tire if you find any cuts,
splits, or cracks in the side of the tire . Replace it if you see fabric or cord.
• Remove any foreign objects and inspect for air leaks.
• Uneven tread wear. Have a deal er check the wheel alignment.
• Excessive tread wear.
2 Wear Indicators P. 582
•Cracks or other damage around valve stem.
1Checking Tires
Measure the air pressure when tires are cold. This
means the vehicle has been parked for at least three
hours, or driven less than 1 mile (1.6 km). If
necessary, add or releas e air until the specified
pressure is reached.
If checked when hot, tire pressure can be as much as
4–6 psi (30–40 kPa, 0.3–0.4 kgf/cm
2) higher than if
checked when cold.
Whenever tire pressure is adjusted, you must
calibrate the TPMS. 2 TPMS Calibration P. 448
Have a dealer check the tires if you feel a consistent
vibration while driving. Ne w tires and any that have
been removed and reinst alled should be properly
balanced.
Check the spare tire pressu re once a month or before
long trips.
3WARNING
Using tires that are excessively worn or
improperly inflated can cause a crash in
which you can be seriously hurt or killed.
Follow all instruction s in this owner’s
manual regarding ti re inflation and
maintenance.
Page 586 of 659
584
uuChecking and Maintaining Tires uTire Rotation
Maintenance
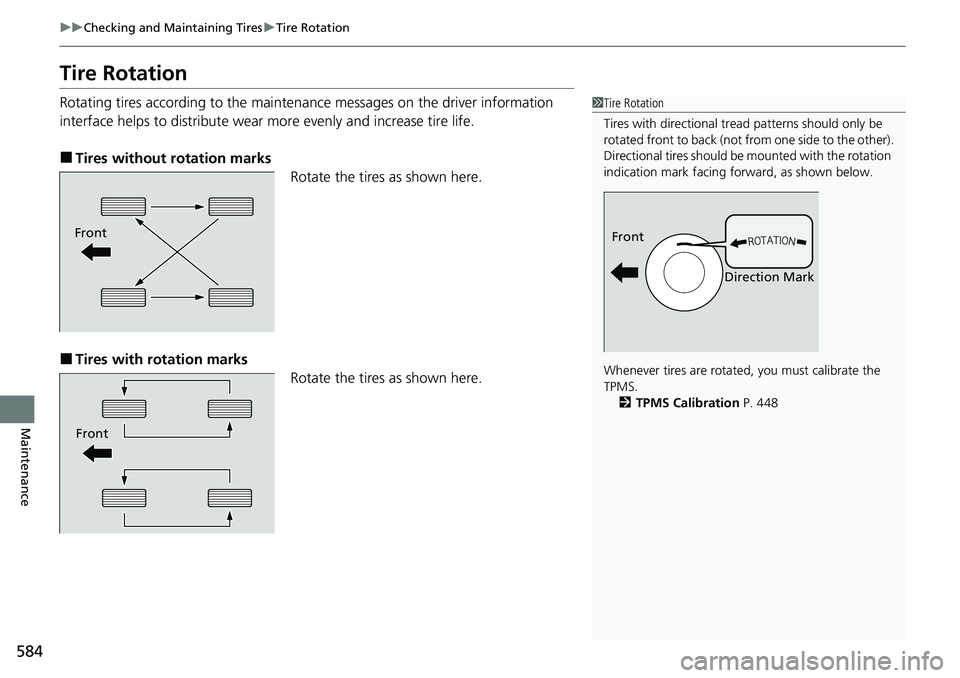
Tire Rotation
Rotating tires according to the maintena nce messages on the driver information
interface helps to distribute wear more evenly and increase tire life.
■Tires without rotation marks Rotate the tires as shown here.
■Tires with rotation marksRotate the tires as shown here.
1Tire Rotation
Tires with directional trea d patterns should only be
rotated front to back (not fr om one side to the other).
Directional tires should be mounted with the rotation
indication mark facing forward, as shown below.
Whenever tires are rotated, you must calibrate the
TPMS. 2 TPMS Calibration P. 448
Front
Direction MarkFront
Front
Page 589 of 659
587
uuBattery uCharging the Battery
Maintenance
Charging the Battery
Disconnect both battery cables to prevent damaging your vehicle’s electrical system.
Always disconnect the negative (–) cable first, and reconnect it last.1Charging the Battery
When replacing the battery, the replacement must be
of the same specifications.
Consult a dealer for more information.
The Vehicle Stability Assist
TM (VSA ®) system, Vehicle
Stability AssistTM (VSA ®) OFF, adaptive cruise control
(ACC) with Low Speed Follow, safety support and
low tire pressure/TPMS indicators may come on in
amber along with a message in the driver information
interface when you set the power mode to ON after
reconnecting the battery.
Drive a short distance at more than 12 mph (20 km/h).
Each indicator should go off. If any do not, have your
vehicle checked by a dealer.
The battery installed in this vehicle is specifically
designed for a model wi th Auto Idle Stop.
Using a battery other than this specified type may
shorten the battery life, a nd prevent Auto Idle Stop
from activating. If you need to replace the battery,
make sure to select the specified type and size. Ask a
dealer for more details.
Models with Auto Idle Stop