brake HONDA CIVIC 1991 Owners Manual
[x] Cancel search | Manufacturer: HONDA, Model Year: 1991, Model line: CIVIC, Model: HONDA CIVIC 1991Pages: 136, PDF Size: 1.33 MB
Page 3 of 136
Introduction
This manual contains important information about the safe operation and maintenance of your car.
We urge you to read it carefully, become familiar with the controls itdescribes, and follow its recommendations, to help make your
driving trouble-free and enjoyable.
Statements or labels on the product preceded by the following
words are of special significance:
indicates severe personal injury or death will result if
instructions are not followed.indicates a strong possibility of severe personal
injury or death if instructions are not followed.means hazards or unsafe practices which could
cause minor personal injury or product or property
damage.
NOTE: gives helpful information.
Break-in Period
During the first 600 miles (1,000 km) of driving, avoid full throttle
starts and cruising for extended periods at a constant speed.
NOTE:
This break-in procedure also applies to exchanged or overhauled
engines.
During and after the break-in period, drive the car at moderate
speeds until the engine is fully warmed up.
During the first 200 miles (300 km), try to avoid severe braking.
Brake misuse during this period will reduce future braking efficiency.
Remember, your Honda Automobile dealer knows your car best,and should be consulted for service assistance and advice.ProCarManuals.comMain Menu s t
Page 32 of 136
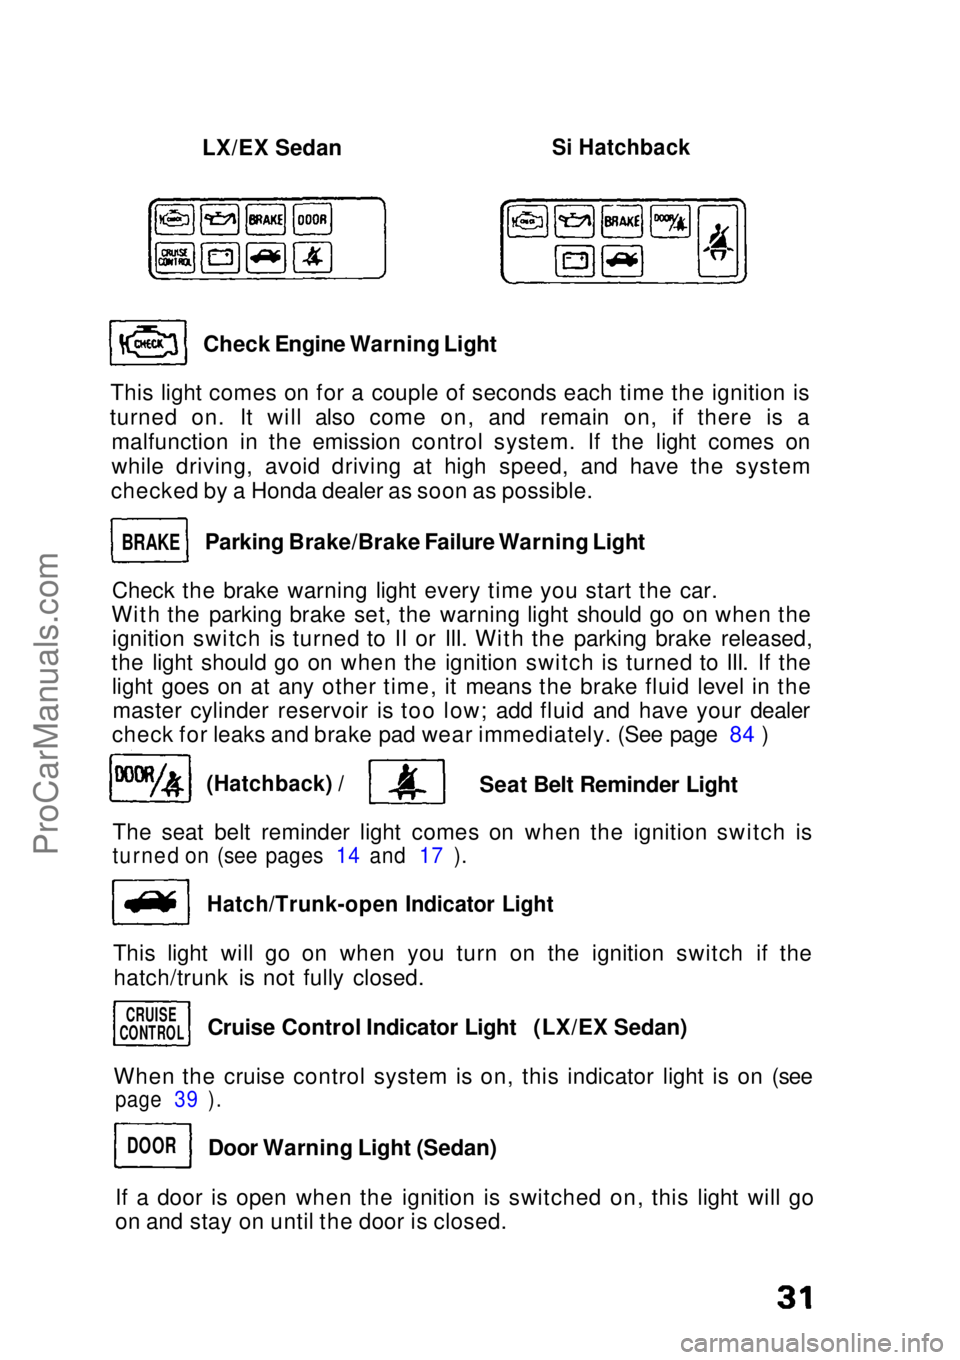
LX/EX Sedan
Si Hatchback
Check Engine Warning Light
This light comes on for a couple of seconds each time the ignition is
turned on. It will also come on, and remain on, if there is a malfunction in the emission control system. If the light comes on
while driving, avoid driving at high speed, and have the system
checked by a Honda dealer as soon as possible.
Parking Brake/Brake Failure Warning Light
Check the brake warning light every time you start the car.
With the parking brake set, the warning light should go on when the ignition switch is turned to II or III. With the parking brake released,
the light should go on when the ignition switch is turned to III. If the light goes on at any other time, it means the brake fluid level in themaster cylinder reservoir is too low; add fluid and have your dealer
check for leaks and brake pad wear immediately. (See page 84 )
(Hatchback) /
Seat Belt Reminder Light
The seat belt reminder light comes on when the ignition switch is
turned on (see pages 14 and 17 ).
Hatch/Trunk-open Indicator Light
This light will go on when you turn on the ignition switch if the hatch/trunk is not fully closed.
When the cruise control system is on, this indicator light is on (see
page 39 ).
If a door is open when the ignition is switched on, this light will go
on and stay on until the door is closed.
BRAKE
CRUISE
CONTROL
DOOR
Cruise Control Indicator Light (LX/EX Sedan)
Door Warning Light (Sedan)ProCarManuals.comMain Menu s t
Page 40 of 136
Cruise Control (LX/EX Sedan)
Cruise Control
The Cruise Control system allows you to set and automatically maintain any speed above 25 mph (40 km/h) without keeping your
foot on the accelerator. As its name implies, it is meant for cruising
on straight, uncongested highways or freeways. It is not
recommended to be used in traffic, on winding roads or in bad
weather conditions where the driver should have total control.
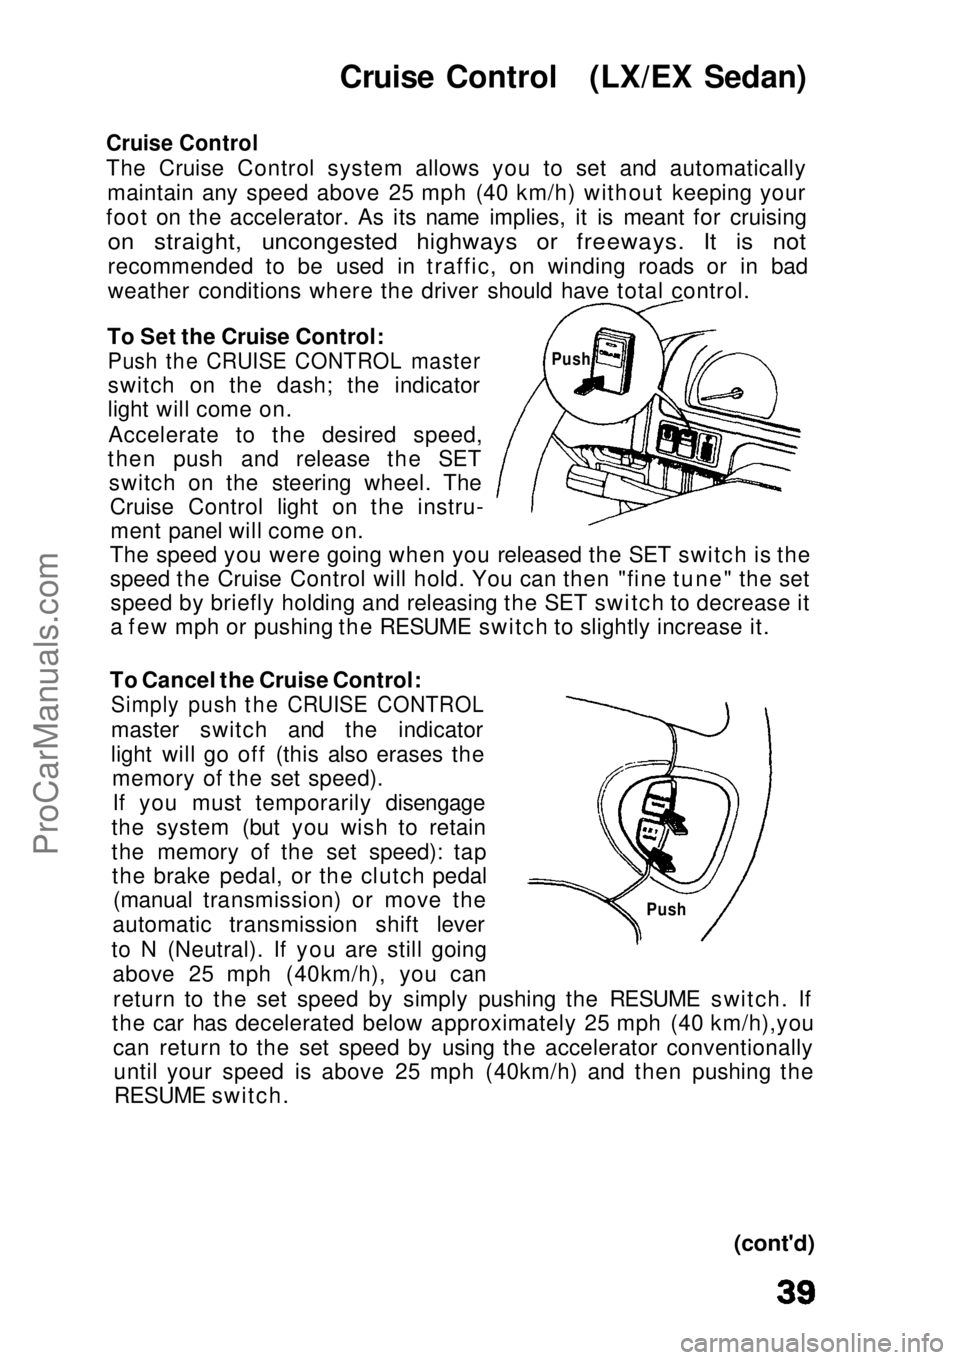
To Set the Cruise Control:
Push the CRUISE CONTROL master
switch on the dash; the indicator
light will come on.
Accelerate to the desired speed,
then push and release the SET switch on the steering wheel. TheCruise Control light on the instru-ment panel will come on.
The speed you were going when you released the SET switch is the
speed the Cruise Control will hold. You can then "fine tune" the set speed by briefly holding and releasing the SET switch to decrease it
a few mph or pushing the RESUME switch to slightly increase it.
To Cancel the Cruise Control:
Simply push the CRUISE CONTROL
master switch and the indicator
light will go off (this also erases thememory of the set speed).
If you must temporarily disengage
the system (but you wish to retain
the memory of the set speed): tap the brake pedal, or the clutch pedal (manual transmission) or move the
automatic transmission shift lever
to N (Neutral). If you are still going above 25 mph (40km/h), you can
return to the set speed by simply pushing the RESUME switch. If
the car has decelerated below approximately 25 mph (40 km/h),you
can return to the set speed by using the accelerator conventionallyuntil your speed is above 25 mph (40km/h) and then pushing theRESUME switch.
(cont'd)
Push
PushProCarManuals.comMain Menu s t
Page 41 of 136

Cruise Control (cont'd)
To Change the Set Speed: To a faster speed — For gradual acceleration with your foot off the
accelerator, push and hold the RESUME switch until you reach the
desired speed; release the switch and the system's memory will bere-programmed to the new speed.
For faster acceleration, push the accelerator until you reach the
desired speed, then push and release the SET switch to re-program
the system.
To a slower speed — push and hold the SET switch and the car will coast; when you reach the desired slower speed, release the switch
and the system will be re-programmed.
For temporary acceleration above the set speed, such as for passing,
use the accelerator pedal conventionally. When you want to return
to the set speed, take your foot off the accelerator and coast without applying the brakes.
The Cruise Control automates the function of the accelerator pedal to maintain your car at a constant speed. This can be a
convenience on long trips, but it can also be a danger if there aremany other cars on the road or if the road is unfamiliar. Pay strict
attention to the responsibility of driving whenever using the Cruise Control.
CAUTION:
Because the Cruise Control directly activates the acceleratorpedal, don't rest your foot under the pedal when the Cruise
Control is on; it may pull the pedal down onto your foot.
NOTE:
With Cruise Control on, your speed will still vary slightly,
particularly when going up or down hills. Do not drive with your foot on the brake or clutch pedal (manual
transmission), as this will cause the Cruise Control to disengage.ProCarManuals.comMain Menu s t
Page 43 of 136
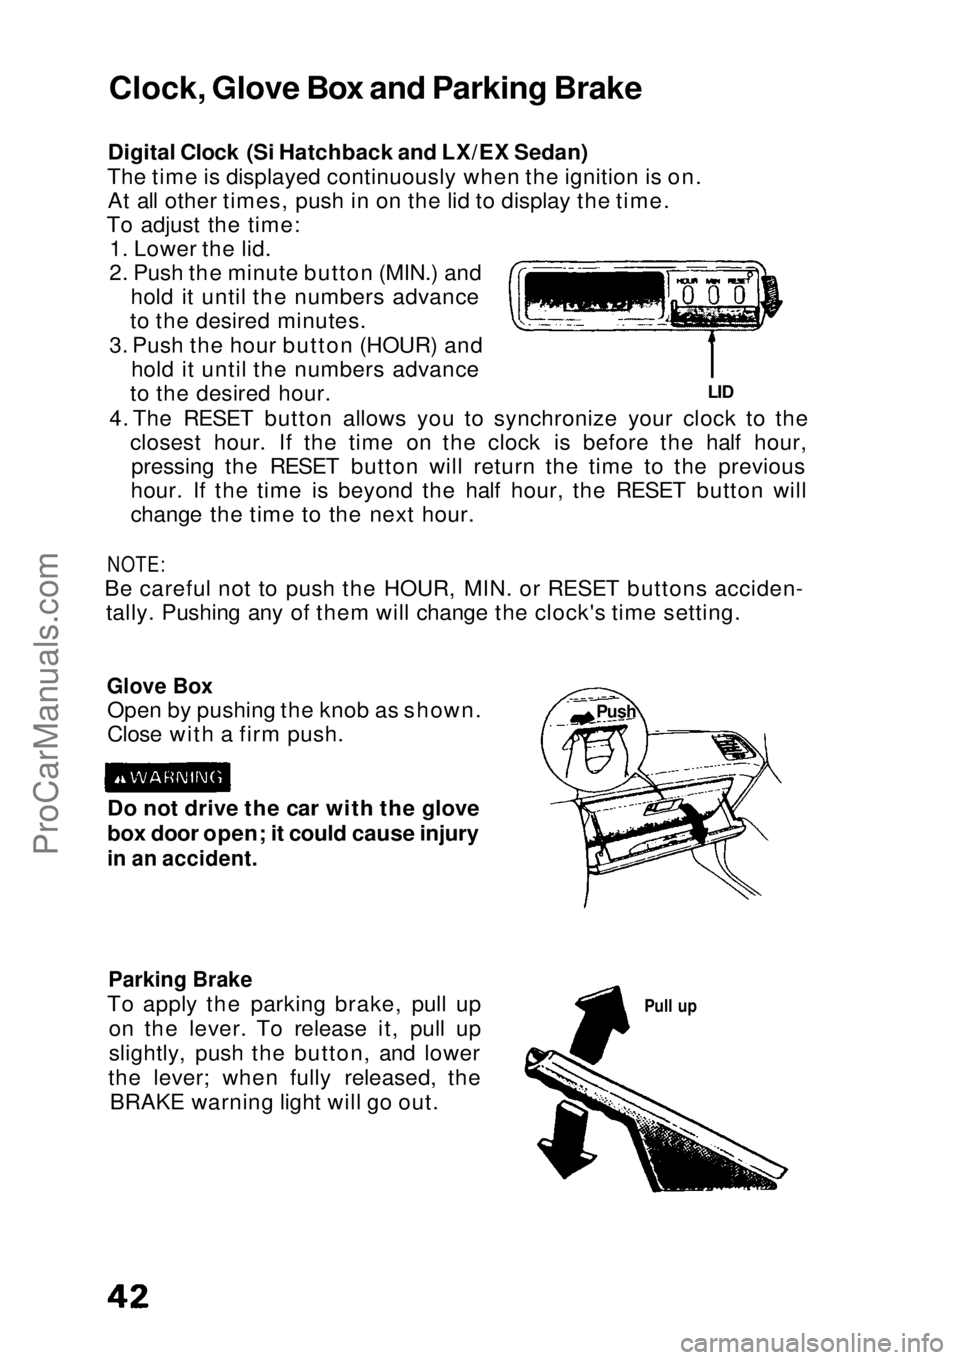
Digital Clock (Si Hatchback and LX/EX Sedan)
The time is displayed continuously when the ignition is on. At all other times, push in on the lid to display the time.
To adjust the time: 1. Lower the lid.
2. Push the minute button (MIN.) and hold it until the numbers advance
to the desired minutes.
3. Push the hour button (HOUR) and hold it until the numbers advance
to the desired hour.
4. The RESET button allows you to synchronize your clock to the closest hour. If the time on the clock is before the half hour,pressing the RESET button will return the time to the previous
hour. If the time is beyond the half hour, the RESET button will
change the time to the next hour.
NOTE:
Be careful not to push the HOUR, MIN. or RESET buttons acciden- tally. Pushing any of them will change the clock's time setting.
Glove Box
Open by pushing the knob as shown.
Close with a firm push.
Parking Brake
To apply the parking brake, pull up on the lever. To release it, pull up
slightly, push the button, and lower
the lever; when fully released, the BRAKE warning light will go out.
Pull up
Do not drive the car with the glove
box door open; it could cause injury
in an accident.
LID
Clock, Glove Box and Parking Brake
PushProCarManuals.comMain Menu s t
Page 53 of 136
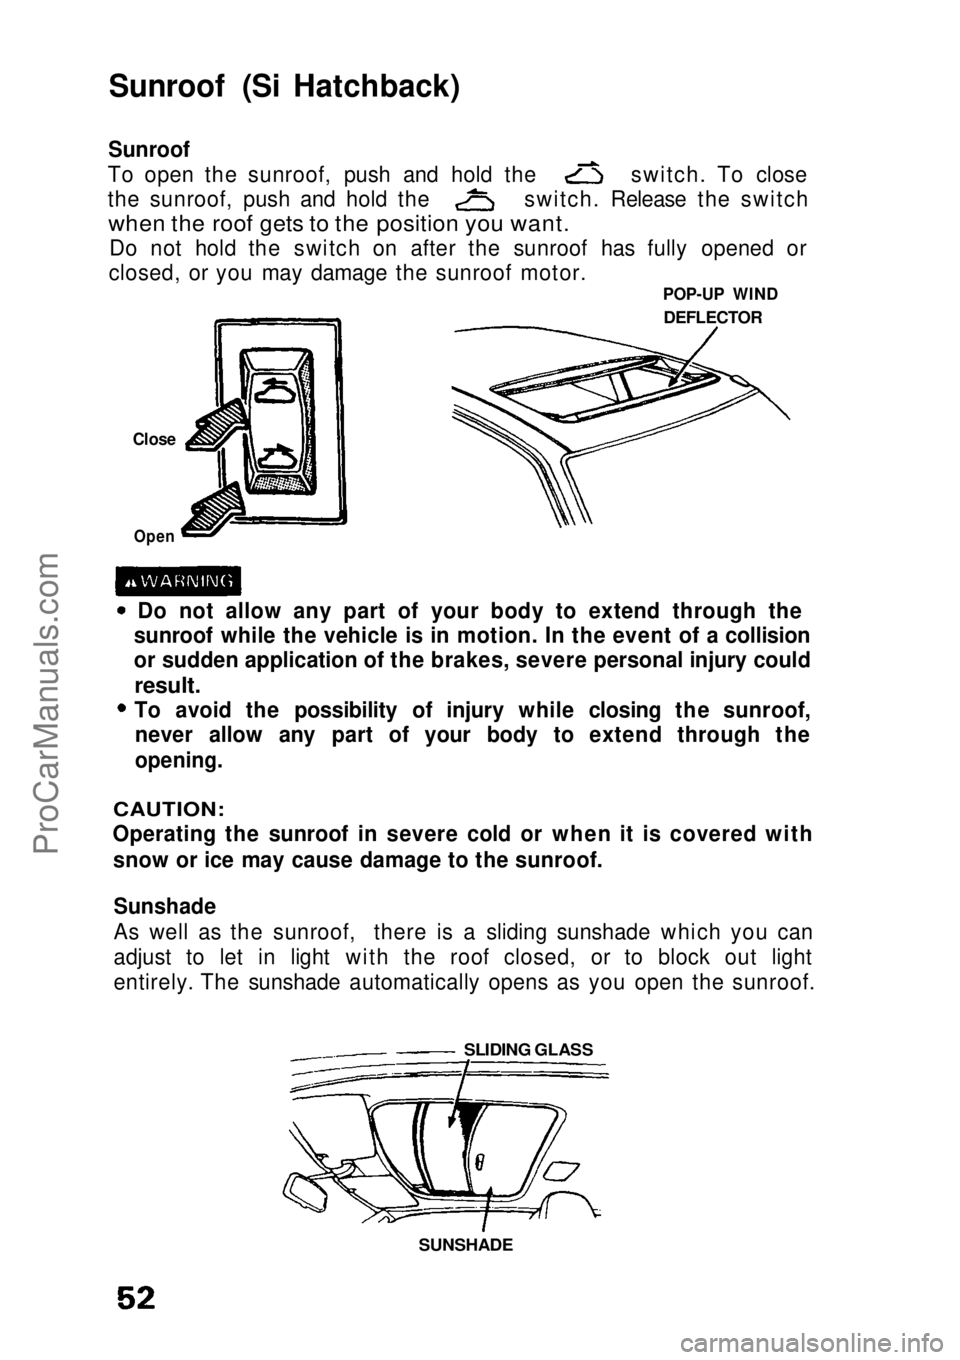
Sunroof (Si Hatchback)
Sunroof
To open the sunroof, push and hold the switch. To close
the sunroof, push and hold the switch. Release the switch
when the roof gets to the position you want.
Do not hold the switch on after the sunroof has fully opened or
closed, or you may damage the sunroof motor.
Do not allow any part of your body to extend through the
sunroof while the vehicle is in motion. In the event of a collision
or sudden application of the brakes, severe personal injury could
result.
To avoid the possibility of injury while closing the sunroof,
never allow any part of your body to extend through the
opening.
CAUTION:
Operating the sunroof in severe cold or when it is covered with
snow or ice may cause damage to the sunroof.
Sunshade
As well as the sunroof, there is a sliding sunshade which you can
adjust to let in light with the roof closed, or to block out light
entirely. The sunshade automatically opens as you open the sunroof. POP-UP WIND
DEFLECTOR
Close
Open
SLIDING GLASS
SUNSHADE
ProCarManuals.comMain Menu s t
Page 57 of 136

Gasoline (cont'd)
Fuel vapor is extremely hazardous under certain conditions.
Always stop the engine before refueling, and never refuel near
sparks or open flames. CAUTION:
When reinstalling the fuel cap, be sure both tabs on the cap are
engaged in the slots of the filler neck and turn the cap until it stops. If you replace the cap, use only a genuine Honda replacement part
or its equivalent. Failure to use the proper part could cause serious
fuel system problems.
How to Improve Your Gas Mileage: Drive at a smooth, steady pace to avoid unnecessary decele-
rations and stops — accelerating back to speed uses more fuel.Plan trips to avoid rush hour traffic if possible. Make sure the parking brake is completely released.
Consolidate trips whenever possible.
Keep vehicle weight to a minimum by removing unnecessary
items from the luggage area.
Whenever possible, use fresh air from the dash vents to keep
cool when driving; open windows, or use of the optional air
conditioning both affect fuel economy.
Keep the tires adjusted to the recommended pressure.
Tire Pressure (measured cold): STD Hatchback front 240 kPa (35 psi)
rear 220 kPa (32 psi)
DX Hatchback front 220 kPa (32 psi)
rear 220 kPa (32 psi)
Si Hatchback front 195 kPa (28 psi)
rear 195 kPa (28 psi)
DX Sedan front 220 kPa (32 psi)
rear 220 kPa (32 psi)
LX Sedan front 180 kPa (26 psi)
rear 180 kPa (26 psi)
EX Sedan front 180 kPa (26 psi)
rear 180 kPa (26 psi)
Condition of Your Car You can only get maximum fuel economy if your car is in toprunning condition. Have all required maintenance done at the proper
intervals. Check tire pressures and tire wear frequently. If tire wear is uneven, have the alignment checked by your Honda dealer.
Proper alignment saves gasoline and prolongs tire life.ProCarManuals.comMain Menu s t
Page 59 of 136

Starting the Engine
Before Starting
Manual Transmission:
1. Apply the parking brake.
2. Push the clutch pedal all the way in (see NOTE below). 3. Shift the transmission to neutral.
NOTE:
On cars equipped with manual transmissions, the engine will not
crank unless the clutch pedal is fully depressed.
Automatic Transmission:
1. Make sure the shift lever is in Park (P).
2. Apply the parking brake and the foot brake.
NOTE:
When starting in cold weather, keep all unnecessary electrical
circuits off (lights, defogger, etc.) for the best battery output.
Do not crank the engine for more than 15 seconds at a time. Wait
10 seconds before going to the next step.
Starting the Engine 1. With your foot off the accelerator start the engine by turning the key to the III position.
2. If the engine won't start within 15 seconds or starts but fails to continue to run, push the accelerator pedal halfway, and hold it
there while cranking the engine. Once the engine starts, release
the accelerator gradually as the engine speeds up.
3. If it doesn't start within 15 seconds, push the accelerator pedal down to the floor and hold it there while cranking in order to clearflooding. Try step 2 again.
Cold Weather at High Altitude Starting 1. When starting in cold weather at high altitude (above 8,000 feet), push the accelerator pedal about halfway and hold it there while
cranking the engine. Once the engine starts, release the accelerator gradually as the engine speeds up.
2. If it doesn't start within 15 seconds, push the accelerator pedal down to the floor and hold it there while cranking in order to clearflooding. Try step 1 again.
NOTE:
If the outside temperature is below freezing, or if your car has not
been driven for several days, warm up the engine for a few minutes
before driving.ProCarManuals.comMain Menu s t
Page 60 of 136

Safety Items
Before driving away, check that: The doors are closed properly.
The mirrors are properly adjusted, and the windows clean.
The driver and passengers are wearing properly adjusted seat
belts.
The head restraints are properly adjusted.
The warning and indicator lights are operating properly. The brake pedal feels normal.
All luggage and cargo is secured.
Nothing is interfering with the driver's feet or blocking vision to
the rear.
While driving remember to: Always drive defensively; expect the unexpected.Reduce your speed during night hours and bad weather.Follow at a safe distance; don't tailgate. Get off the highway when you are tired; stop and take a rest.
When stopping for repairs: Park the car well off the road.
Turn on the hazard warning flasher. Use flares or other warning devices to warn other motorists.
After parking your car: Apply the parking brake and shift to first gear if equipped with
manual transmission, or PARK on automatic transmission equip-ped cars.
Make sure the sunroof and windows are closed and the doors are
locked.
If parked on a hill:
1. Turn the front wheels away from the curb if facing uphill.
2. Turn the front wheels toward the curb if facing downhill.
Never leave children unattended in a parked car. Take your keys.ProCarManuals.comMain Menu s t
Page 62 of 136
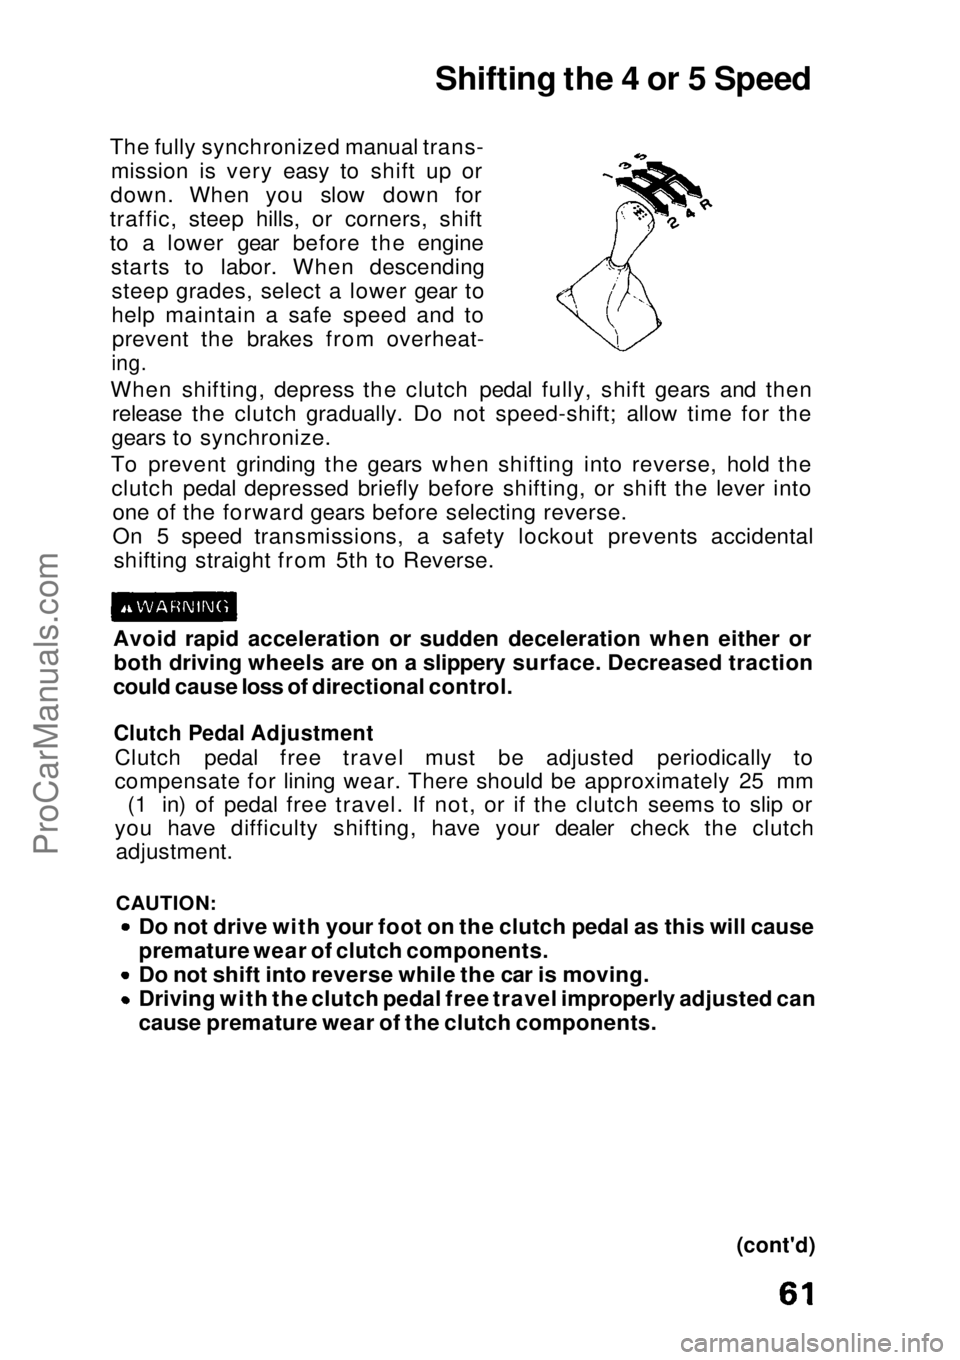
Shifting the 4 or 5 Speed
The fully synchronized manual trans- mission is very easy to shift up or
down. When you slow down for
traffic, steep hills, or corners, shift
to a lower gear before the engine starts to labor. When descendingsteep grades, select a lower gear to
help maintain a safe speed and toprevent the brakes from overheat-
ing.
When shifting, depress the clutch pedal fully, shift gears and then release the clutch gradually. Do not speed-shift; allow time for the
gears to synchronize.
To prevent grinding the gears when shifting into reverse, hold the clutch pedal depressed briefly before shifting, or shift the lever into one of the forward gears before selecting reverse.
On 5 speed transmissions, a safety lockout prevents accidentalshifting straight from 5th to Reverse.
Avoid rapid acceleration or sudden deceleration when either or both driving wheels are on a slippery surface. Decreased traction
could cause loss of directional control.
Clutch Pedal Adjustment
Clutch pedal free travel must be adjusted periodically to
compensate for lining wear. There should be approximately 25 mm (1 in) of pedal free travel. If not, or if the clutch seems to slip or
you have difficulty shifting, have your dealer check the clutch adjustment.
CAUTION:
Do not drive with your foot on the clutch pedal as this will cause
premature wear of clutch components.
Do not shift into reverse while the car is moving. Driving with the clutch pedal free travel improperly adjusted can
cause premature wear of the clutch components.
(cont'd)ProCarManuals.comMain Menu s t