ect HONDA CIVIC 2000 6.G Workshop Manual
[x] Cancel search | Manufacturer: HONDA, Model Year: 2000, Model line: CIVIC, Model: HONDA CIVIC 2000 6.GPages: 2189, PDF Size: 69.39 MB
Page 739 of 2189
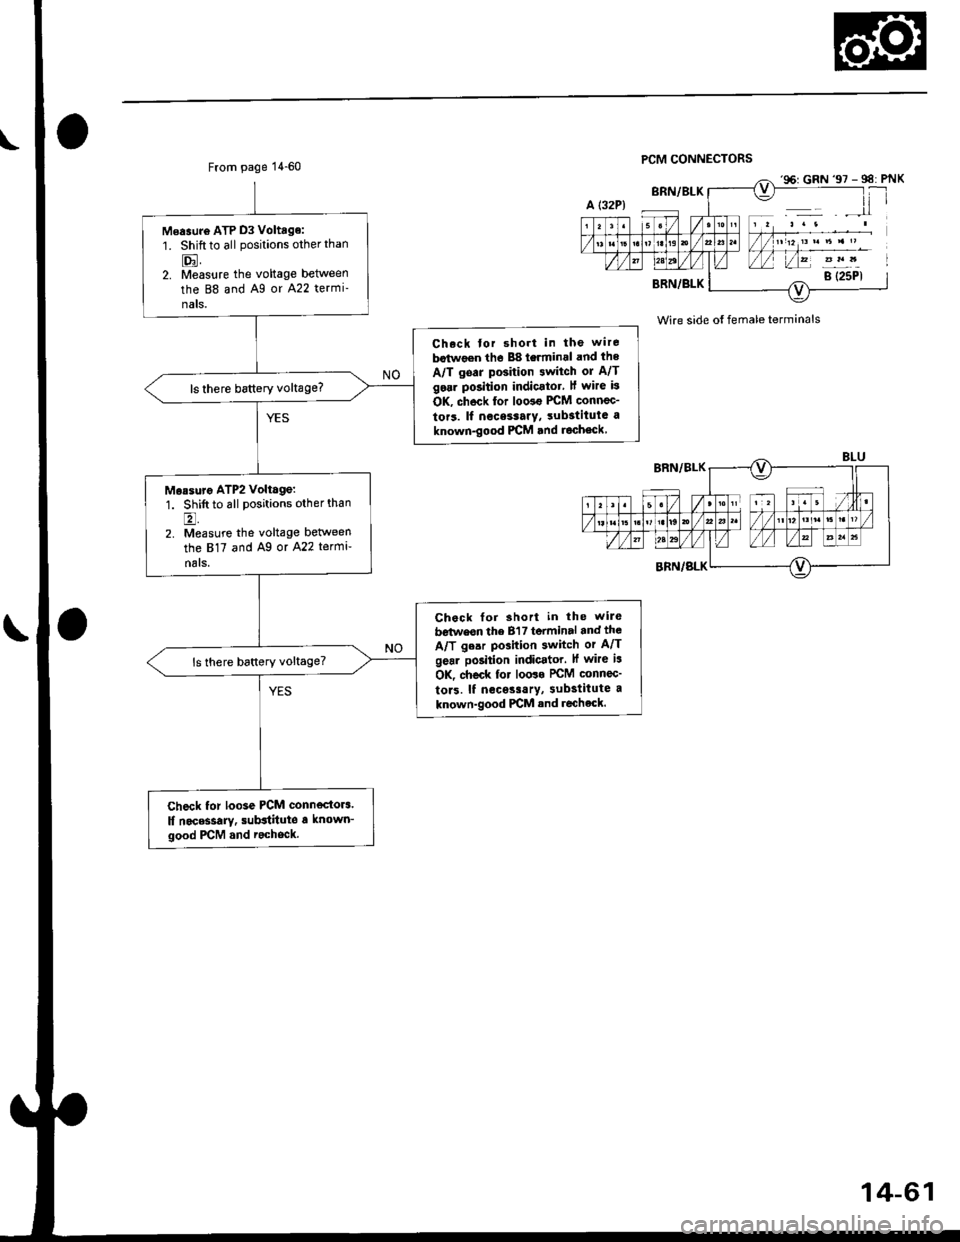
From page 1 4-60PCM CONNECTORS
Wire side ot female terminals
Measuro ATP D3 Voltage:
1. Shift to all positions other than
tr.2. Measure the voltage between
the 88 and A9 or A22 termi-
nals.
Ch.ck tor short in the wire
botwoen tho 88 terminal and ihe
A/T goar position 3witch ol A/T
gosr position indicator, ll wirc is
OK, chock for loo3€ PCM connec-
tor3. lf nece3rary, substituta a
known-good PCM lnd roch€ck
ls there battery voltage?
Morsuro ATP2 Voltage:
1. Shift to all positions other than6t
2. Measurc the voltage between
the 817 and Ag or A22 terml-
n6ls.
Check for short in the wile
b€twesn the B'l 7 terminal and the
A/T ge.r pGition switch or A/T
gear po3ition indicator. lf wire i3
OK, check for loo3o rcM connec'
to13. lf necossarY, substitute a
known-good PICM and recheck.
ls there battery voltage?
check for loose PCM connectors.
lf noc*sarY. sub3titute a known_
good PCM and r.chock.
'96: GRN'97 - 98: PNX
B (25P1
14-61
Page 740 of 2189
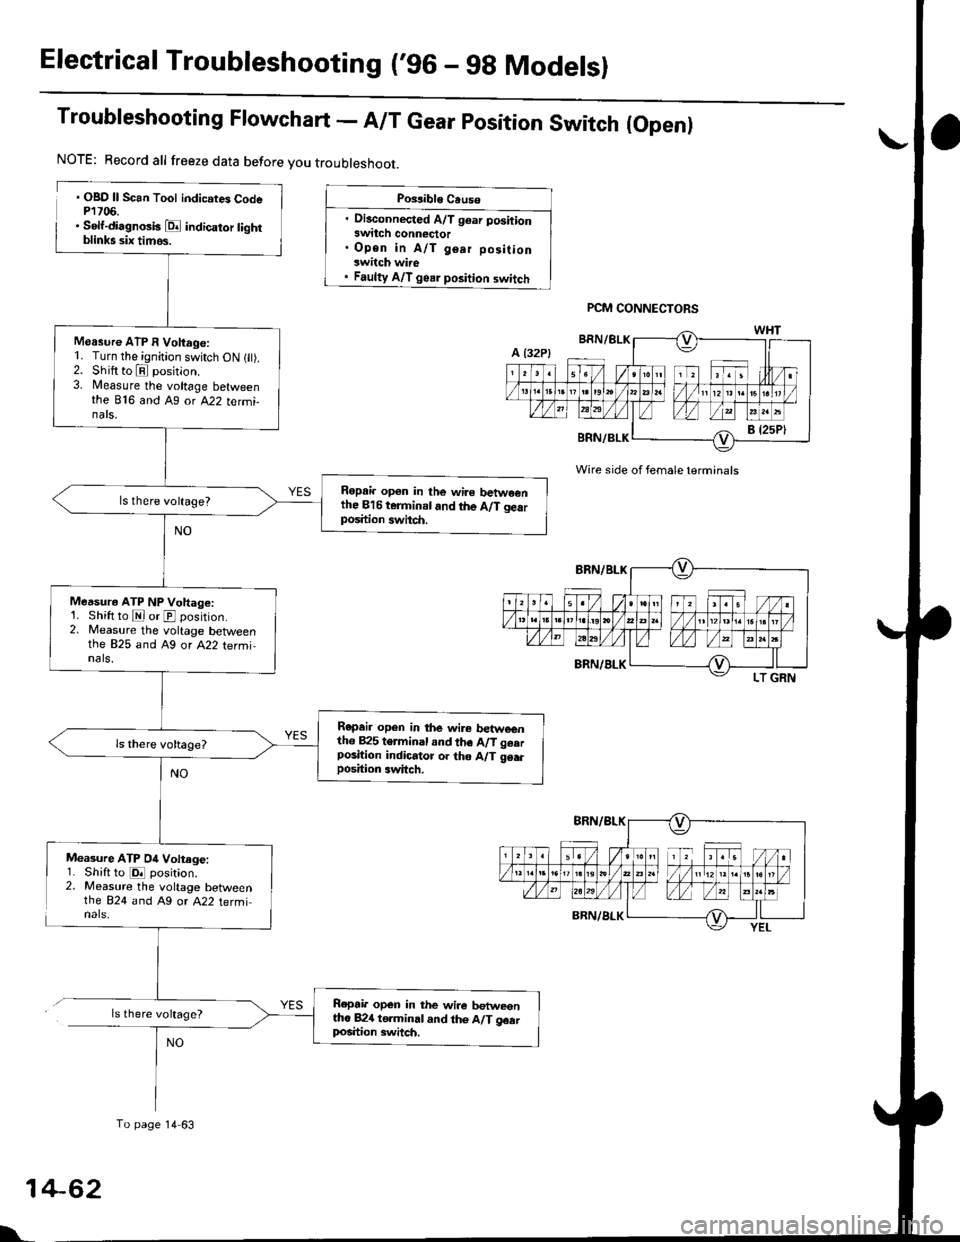
Electrical Troubleshooting ('96 - gg Modelsl
Troubleshooting Flowchart - A/T Gear position Switch (Open)
. OBD ll Scan Tool indicates CodeP1706.. Self-di.gnosk E indicator tightblinks six timos.
Measure ATP 04 Voltege:1. Shiftto E position.2. Measure the voltage betweenthe 824 and A9 or A22 terminals,
ls there voltage?
Possible Causo
. Disconnected A/T gear positionswitch conn€ctor. Open in A/T gear positionswitch wire. Faulty A/T gear position switch
Wire side of female terminals
NOTE: Record all freeze data before you troubleshoot.
Moasure ATP I Voltage:1. Turn the ignition switch ON 1 ).2. Shift to E position.3. Measure the voltage betweenthe B'f6 and Ag ot A22 tetmi-nats.
Ropai. op€n in the wire betwe€nthe Bl6 terminal.nd the A/T gearposition swhch.
Measur€ ATP NP Voltage:1. Shift to E or E position.2. Measure the voltage betweenthe 825 and A9 or A22 termi,nals,
Repeir open in the wir€ betweentho B25 terminal and th6 A/T geerposition indicator or tho A/T 96.rposition 3witch.
Rcpair open in the wire betweentto 82{ to.minal and th6 A/T geatlrosition 3witch.
To page 14 63
PCM CONNECTORS
NO
1
L
+62
Page 741 of 2189
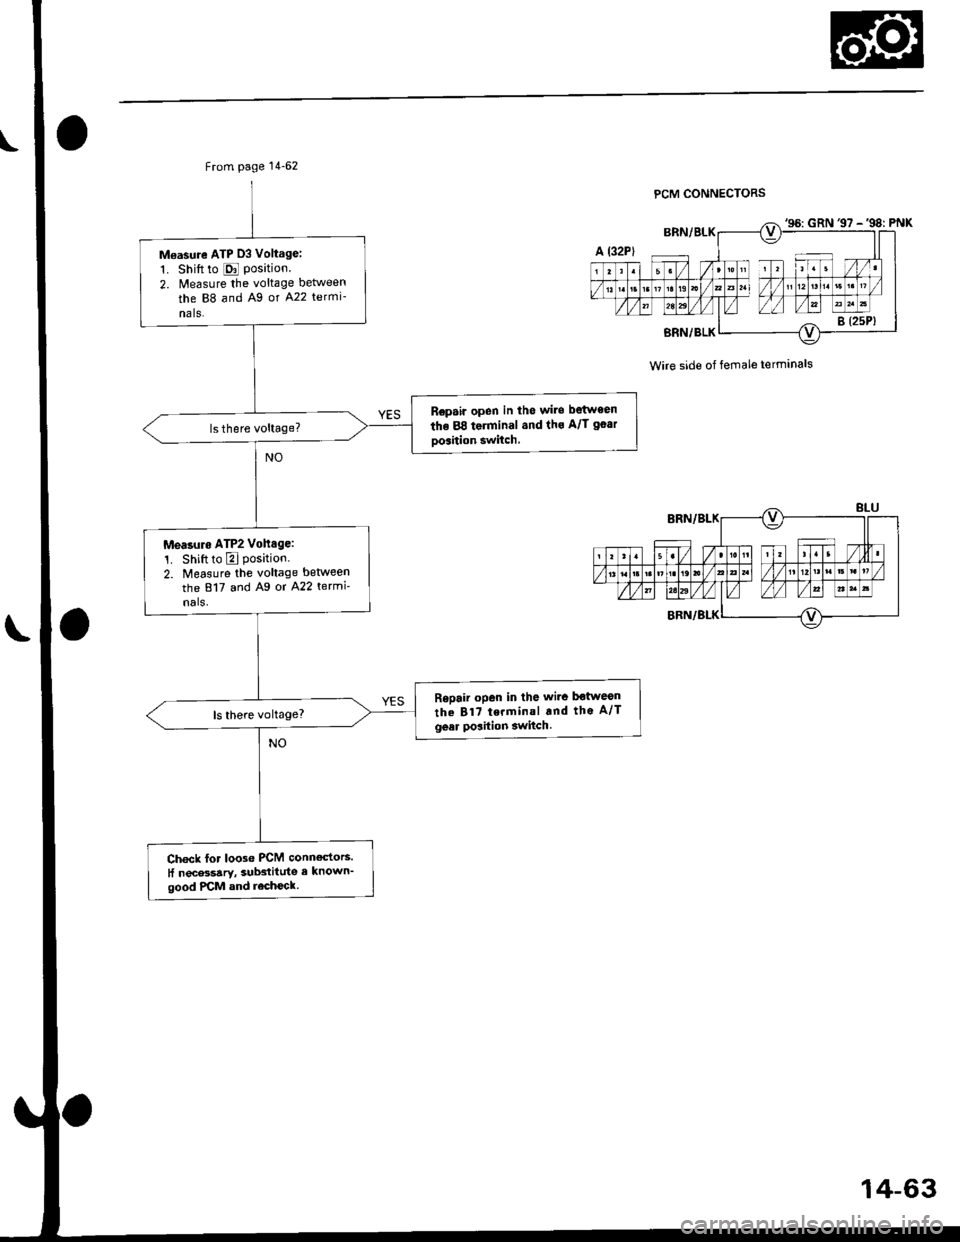
From page 14-62
Measure ATP 03 Voltagei
1. Shift to E Position.2. lvteasure the voltage between
the 88 and A9 or A22 termi-
nals.
Ropair open in tho wils between
the 88 terminal .nd tho A/T goar
oosition switch
Mea3ur. ATP2 Vohage:
1. Shiftto E Position.2. Measure the voltage between
the 817 and Ag or A22 termi'
nals,
Repair open in the wirc botweon
the B17 terminal rnd the A/Tgeer poaition 3witch.
Chock for loose PCM conn€ctoB.
lf nec*sary, sub3titute e known'good PCM and rocheck.
PCM CONNECTORS
Wire side of female terminals
'95: GRN 37 -'98: PNK
14-63
Page 742 of 2189
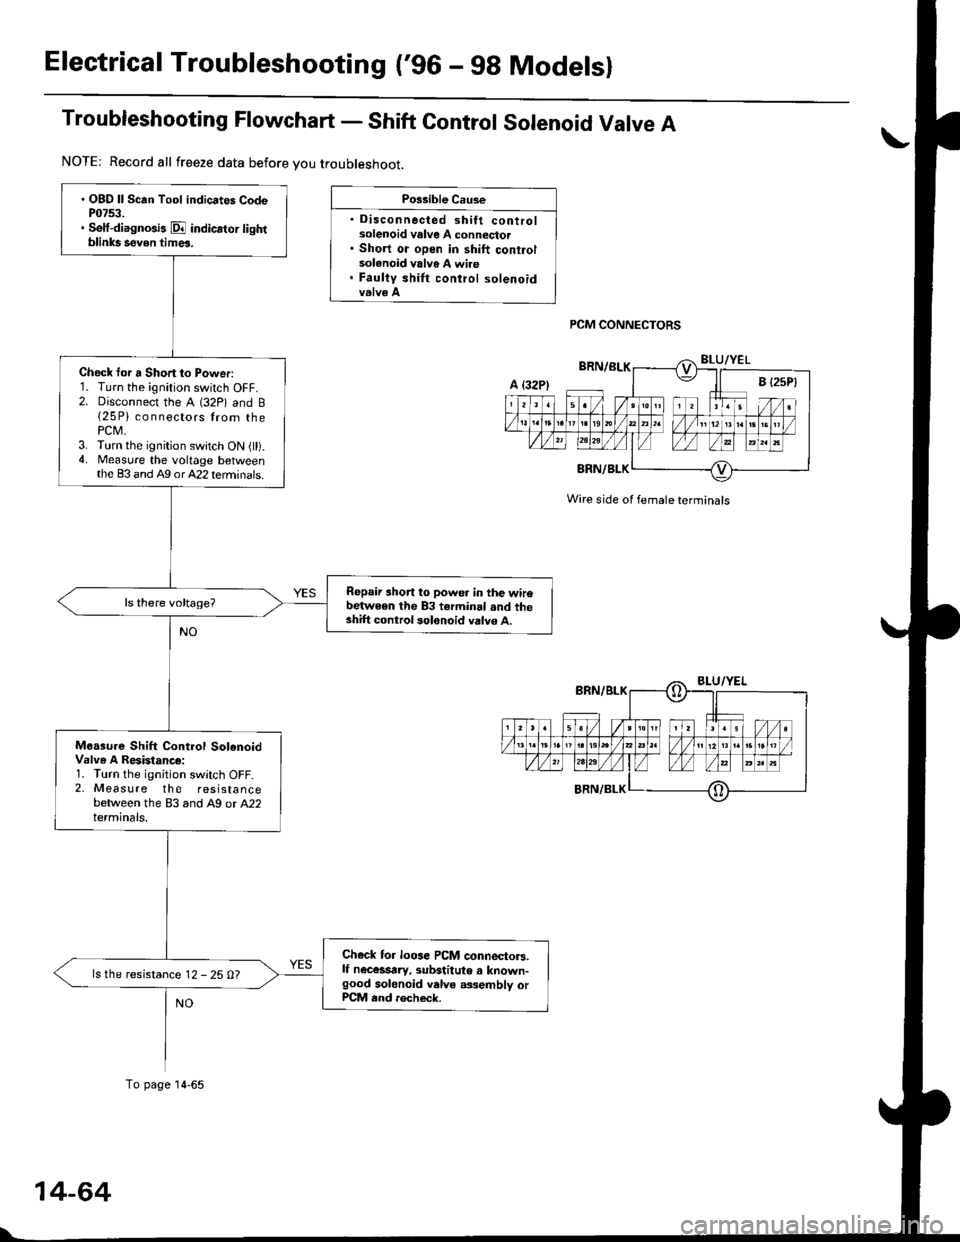
Electrical Troubleshooting ('96 - 98 Modelsl
Troubleshooting Flowchart - Shift Gontrol Solenoid Valve A
Po$ible Cau3e
. Disconnected shift controlsolenoid valve A connector. Short oi open in shift controlsolenoid valve A wire. Faulty shirt control solenoid
PCM CONNECTORS
' OBD ll Scan Tool indicates CodeP0753.. Sett{iagnosis E indicator lightblinks seven tim6.
Check tor a Short to Power:1. Turn the ignition switch OFF.2. Disconnect the A (32P) and B{25 Pi connectors trom thePCM.3. Turn the ignition switch ON {ll).4. Measure the voltage betweenthe 83 and A9 orA22 terminals.
Repair short to powe. in the wir6between the 83 terminal .nd theshift control solonoid valvo A.
Moa3ure Shift Control SolenoidValve A Resistanc€:1. Turn the ignition switch OFF.2, Measure the resistancebetween the 83 and A9 or A22terminals.
Ch€ck for loose PCM connectors.lf n€c6srry, subatitute a known-good solenoid valve a3,sembly orPCM end rocheck.
ls the resistance 12 - 25 0?
NOTE: Record all freeze data before you troubleshoot.
A t32Pl
To page 14-65
Wire side ol female terminals
Page 743 of 2189
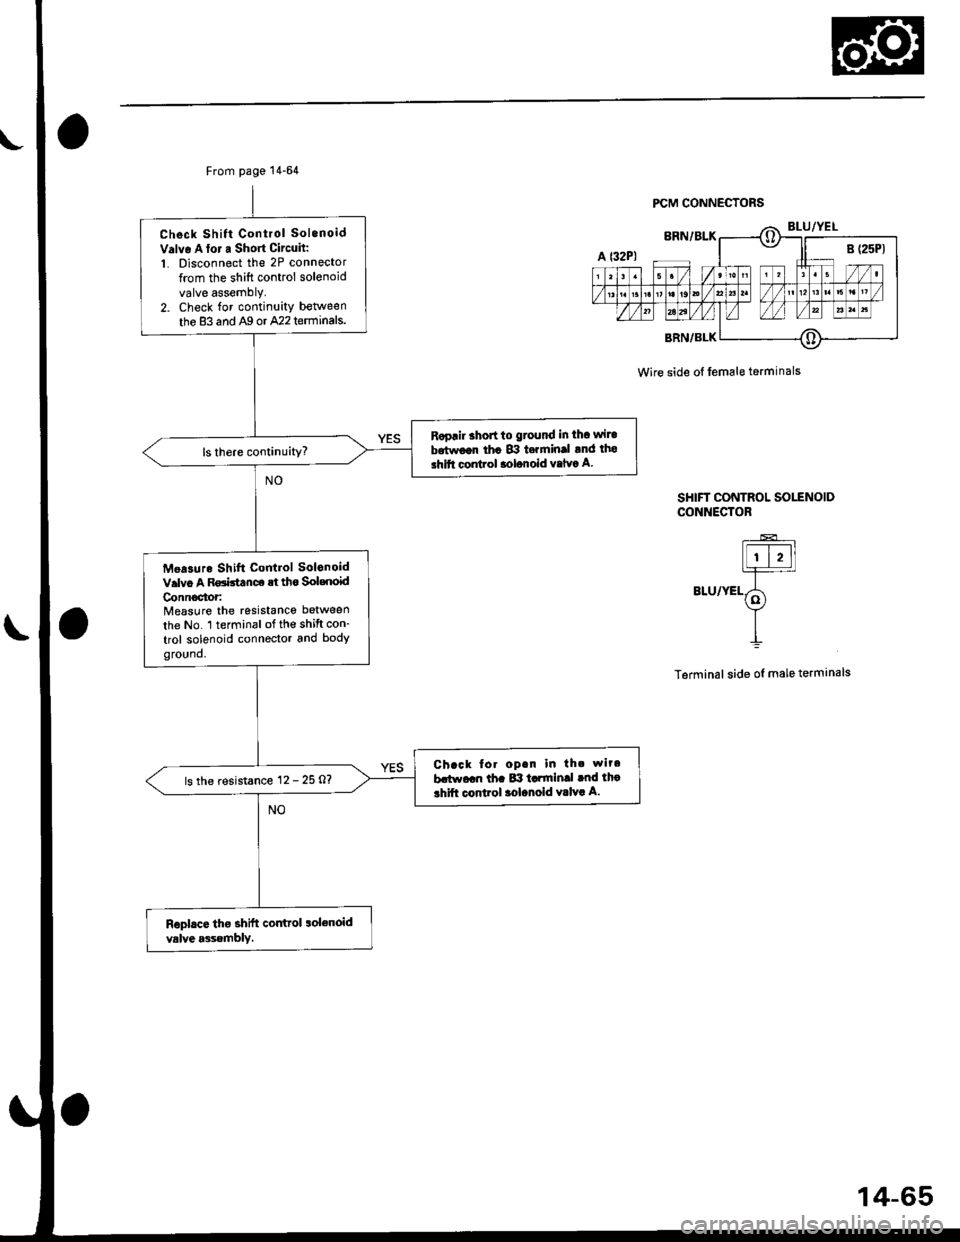
From page 14-64
Check Shift Control Sol.noid
v.lve A loi a Short Circuh:'1. Disconnect the 2P connector
from the shift control solenoid
valve assemblY.2. Check for continuity between
the 83 and Ag or A22 terminals.
Roprir shon to ground in th. wil.
b.tw€on th. B:t t.rmin.l rnd tho
ihift conLol aolonoid valvc A
Mea3ur. Shift Control Solonoid
v.lvo A Rgistance !t tho solendd
Connoc'tor:Measure the resistance between
the No. l terminalofth€ shift con_
trol solenoid connector and bodyground.
Chack to. open in th. rtir.
b.t^raan tha 8:l Lrtnlnll tnd tho
thift conlrol 3olanoid valva A.ls the resistance 12 - 25 O?
PCM CONNECTORS
Wire side o{ female terminals
SHIFT CONTROL SOLENOIDCONNECTOR
----!=--
FI-I1=r==--
alurvEL5f
II
Terminal side ol male terminals
14-65
Page 744 of 2189
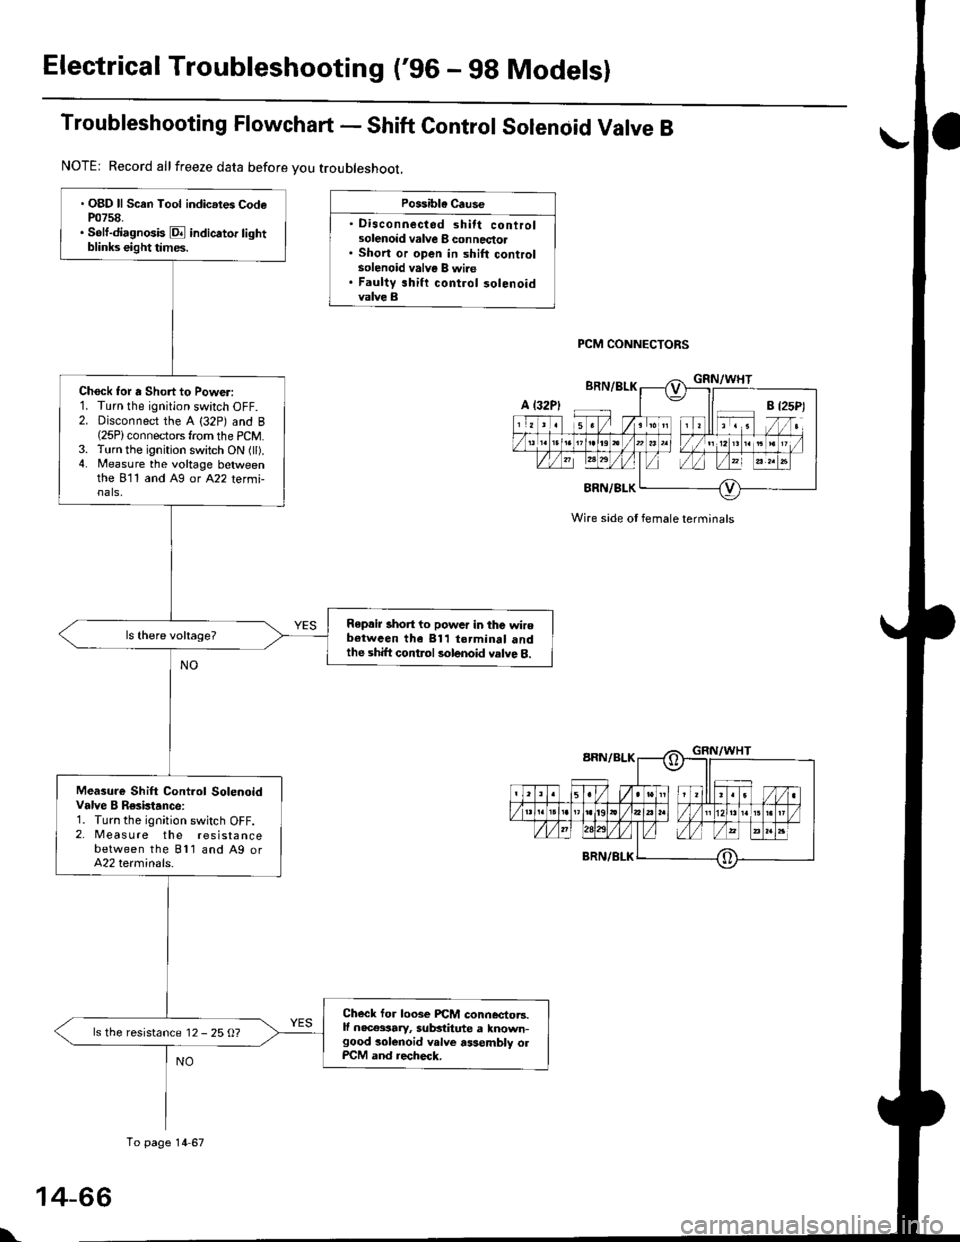
Electrical Troubleshooting ('96 - g8 Modelsl
Troubleshooting Flowchart - Shift Control Solenoid Valve B
Possible Cause
' Disconnected shift controlsolenoid valve I connectol. Short or open in shift controlsolenoid valve B wire. Faulty shift control 30lenoidvalve B
PCM CONNECTORS
Wire side ot female terminals
. OBD ll Scan Tool indic.tes CodeP0758.. Solt-diagnosis E indicator lightblinks eight times.
Chock for a Short to Power:1. Turn the ignition swatch OFF.2. Disconnect the A (32P) and B(25P)connectors from the PCM.3. Turn the ignition switch ON (ll).4. Measure the voltage betweenthe 811 and Ag or A22 termi-nals,
Repair short to powar in the wirebotwcen the 811 torminal andthe shift control solenoid valve 8.
Measure Shift Cont.ol SolenoidValve B Resktance:1. Turn the ignition switch OFF.2, Meas u re the resistancebetween the Bll and A9 orA22 terminals.
Checl for loose PiCM connector3.lf nec€ssary, sub3titute a known-good solenoid v.lve assembly olPCM and recheck.
ls the resistance 12 - 25 O?
NOTE: Record allfreeze data before you troubleshoot,
A t32P)
To page 14 67
\
Page 745 of 2189
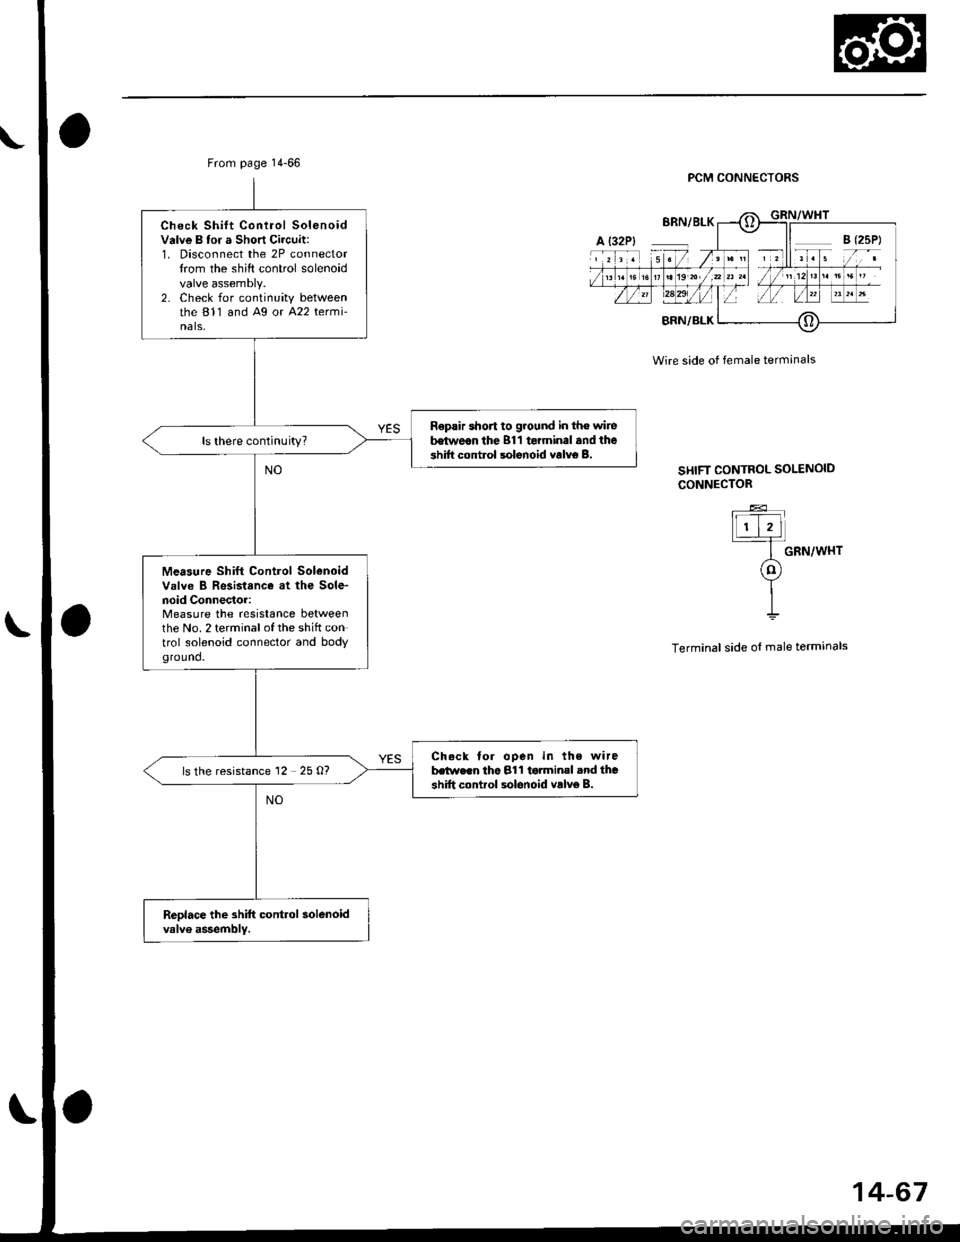
From page 14-66
Check Shift Conlrol Sol€noidvalve B tor a Short Circuit:1. Disconnect the 2P connectortrom the shift control solenoidvalve assembly.2. Check for continuity betweenthe 811 and Ag or A22 termi-nals,
Replir shon to ground in th€ wirebetwe.n the 811 terminal and the3hift control solenord valvo B.ls there continuity?
Measure Shift Control Solenoidvrlve B Resistance at the Sole-noid Connector:Measure the resistance betweenthe No.2 terminalofthe shift control solenoid connector and bodyground.
Check tor ooen in the wirebetw..n thc 81 1 t€tminal ard thashift control solonoid vrlv6 B.ls the resistance 12 25 O?
, 2 ll r . 5
PCM CONNECTORS
Wire side of female terminals
SHIFT CONTROL SOLENOID
CONNECTOR
GRN/WHT
Terminal side ol male terminals
14-67
Page 746 of 2189
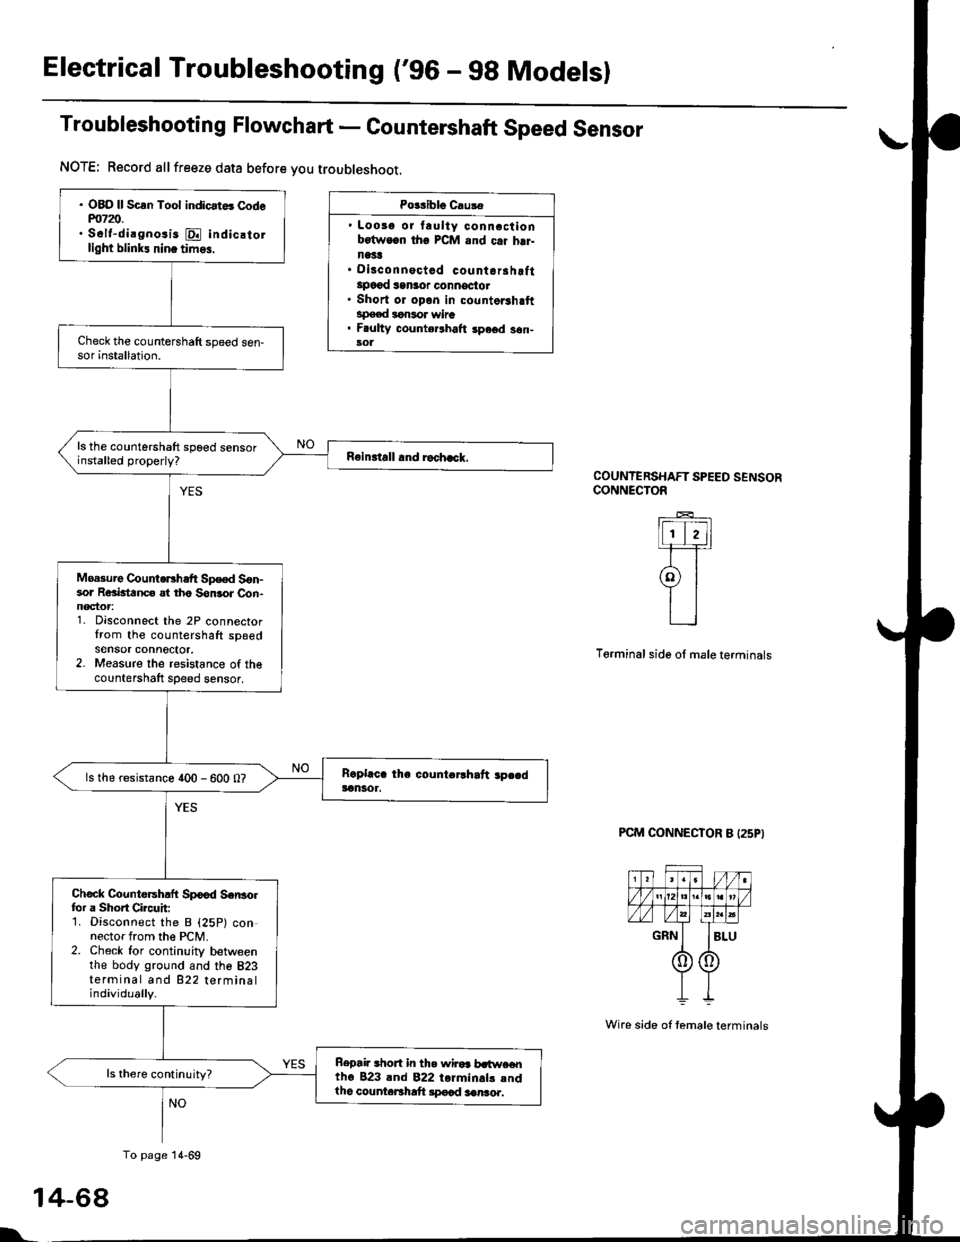
Electrical Troubleshooting ('gO - 98 Modelsl
Troubleshooting Flowchart - Countershaft Speed Sensor
Po$iblo Causa
' Loosg or laulty conncctionbotwocn tho PCM and c.i hrr-n1't!' Disconnoctad countorahottlpo€{ san3or oonnoctot. Short or opon in countorshaftspeed lonsor wire. F ulty counte.lhalt spe6d s6n-sol
COUNTERSHAFT SPEED SENSORCONNECTOR
lFI,]1-F=r
9l
L_l
Terminal side ol male terminals
PCM CONNECTOR B I25P}
1
l'
NOTE; Record allfreeze data before you troubleshoot.
. OBO ll Scln Tool indicat6 Codem7z).. S6lt-dirgnosis E indic.tollight blink! nin. tim6,
ls the countershaft spoed sensorinstalled properly?
Moa3ure CountoEhaft Sp€ed S6n-sor Reaktanc€ at tho Son3or Con-noctor1. Disconnect the 2P connectortrom the countershaft spgedsensor connector,2. Measure the resistance of thecountershaft sDeed sensor,
ls the resistance 400 - 600 0?
Chock Countersh.ft Spood Scr|3olfor a Shoft Circuit:1. Disconnect the B {25P) connector from the PCM.2. Check for continuity betweenthe body ground and the 823terminal and 822 terminalindividually.
Repai. .hort in th. wiroa b.t$re€ntho 823 lnd 822 torminals .ndlho counteBhaft lpocd aenro..
To page 14-69
4-68
Wire side of temale terminals
Page 747 of 2189
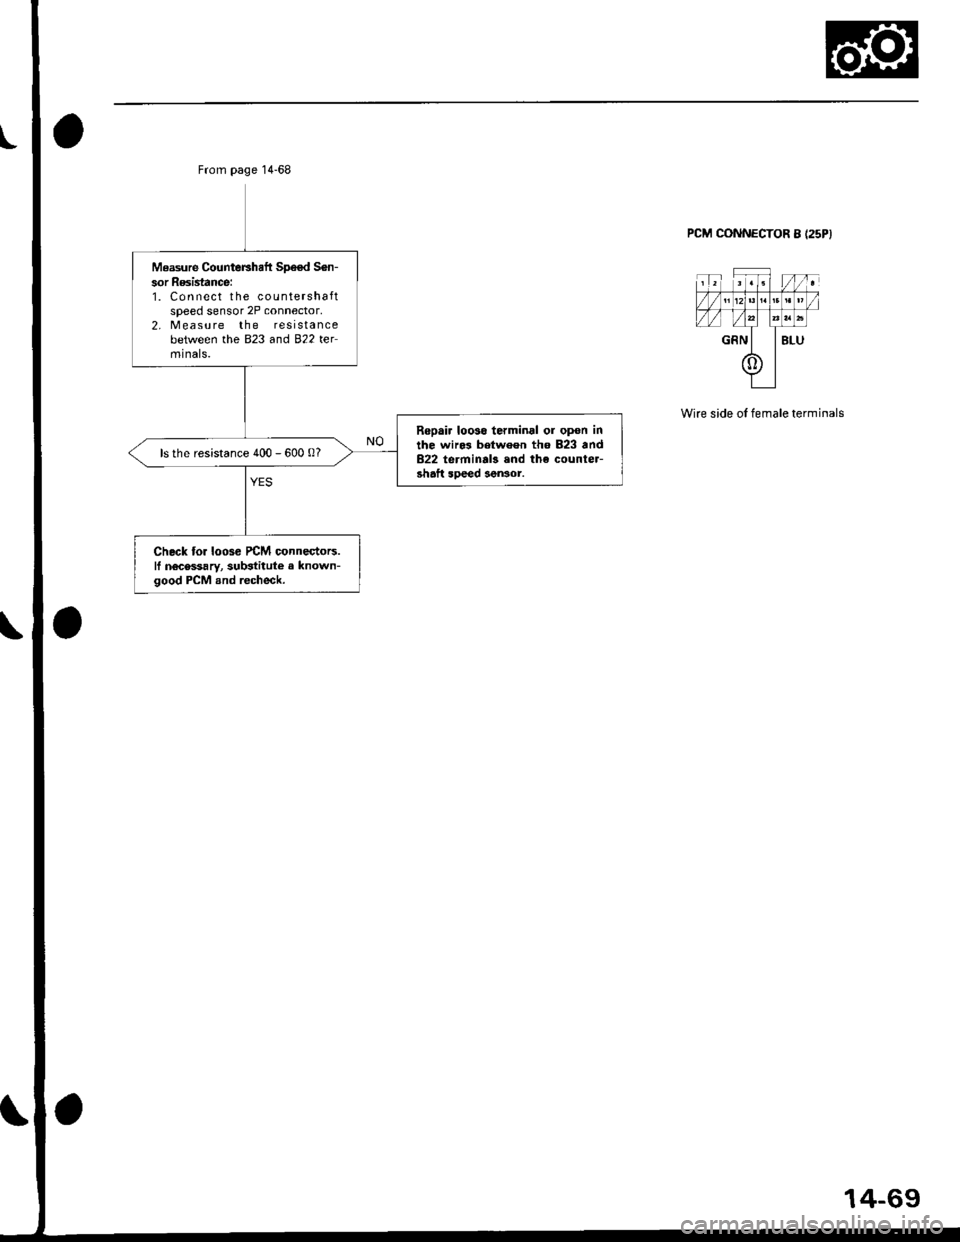
Measure CounteFhaft Sp€€d S6n-
sor Resistance:1. Connect the countershaftspeed sensor 2P connector,2, Measure the resistancebetween the B�23 and 822 telmtnals.
Repair looso terminal ol opon inthe wiro3 between th6 823 and822 terminal3 and the counter-shaft soeed aen3or.
ls the resistance 400 - 600 0?
Check tor loosc rcM connestors.ll nocessary, sub3titute a known-good PCM and recheck.
PCM CONNECTOR 8 I25PI
Wire side oI female terminals
14-69
Page 748 of 2189
Electrical Troubleshooting ('96 - 98 Modelsl
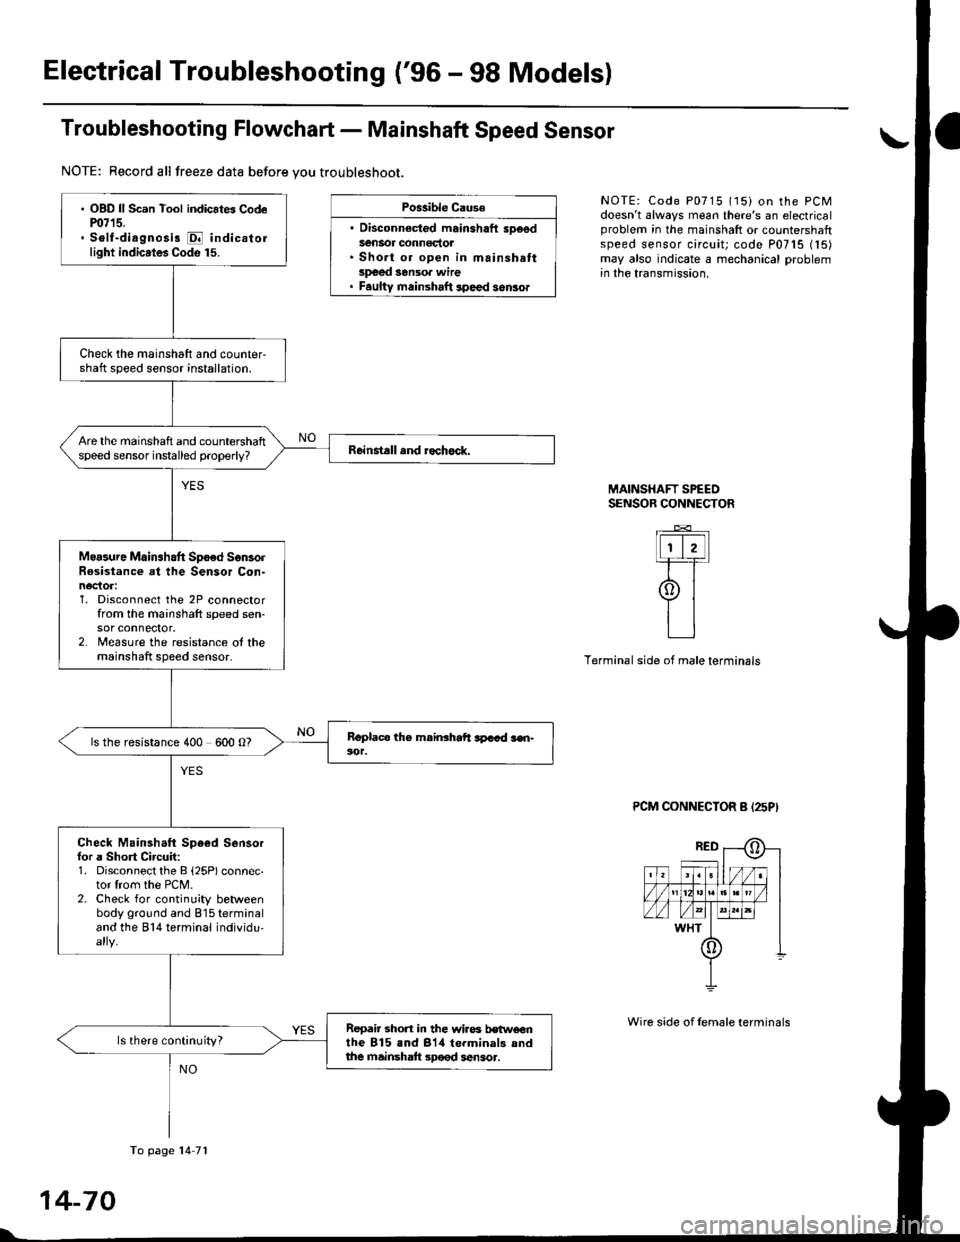
Troubleshooting Flowchart - Mainshaft Speed Sensor
NOTE: Record all freeze data before you troubleshoot.
Po$ible Cause
. Disconnect€d mainshaft sD€edSensor @nnoctot. Short or open in mainshattsJt€ed s6nsoa wire. Faulty mainshaft lpeed s6nso.
NOTE: Code P0715 (15) on the PCMdoesn't always mean there's an electricalproblem in the mainshaft or countershaftspeed sensor circuit; code P0715 (15)may also indicate a mechanical problemin the transmission.
MAINSHAFT SPEEOSENSOR CONNECTOR
Terminal side of male terminals
PCM CONNECTOR B I25PI
. OBD ll Scan Tool indicates Codem715.. Self-dirgnosi3 E indicatorlight indicstes Code 15.
Check the mainshaft and counter-shaft speed sensor installation.
Are the mainshaft and countershaftspeed sensor installed properly?
Moasure Mainshaft Spoed SgnsolRosistance at the Sensor Con-n€ctor:1. Disconnect the 2P connectorfrom the mainshaft speed sen-sor connector.2. Measure the resistance ot themainshaft speed sensor.
ls the resistance 400 600 O?
Check Mainshaft Sp6ed Sensorfor a Short Circuil:1. Disconnect the B {25P) connec'tor lrom the PCM.2. Check for continuity betweenbody ground and 815 terminaland the 814 terminal individu,
Repai. shon in the wi.os bstwoenthe 815 and 814 te.minals andthe mainshatt .Dood 3ensor.
ls there continuity?
To page 14-71
14-70
Wire side of female terminals