multiplex control HONDA CIVIC 2002 7.G User Guide
[x] Cancel search | Manufacturer: HONDA, Model Year: 2002, Model line: CIVIC, Model: HONDA CIVIC 2002 7.GPages: 1139, PDF Size: 28.19 MB
Page 879 of 1139
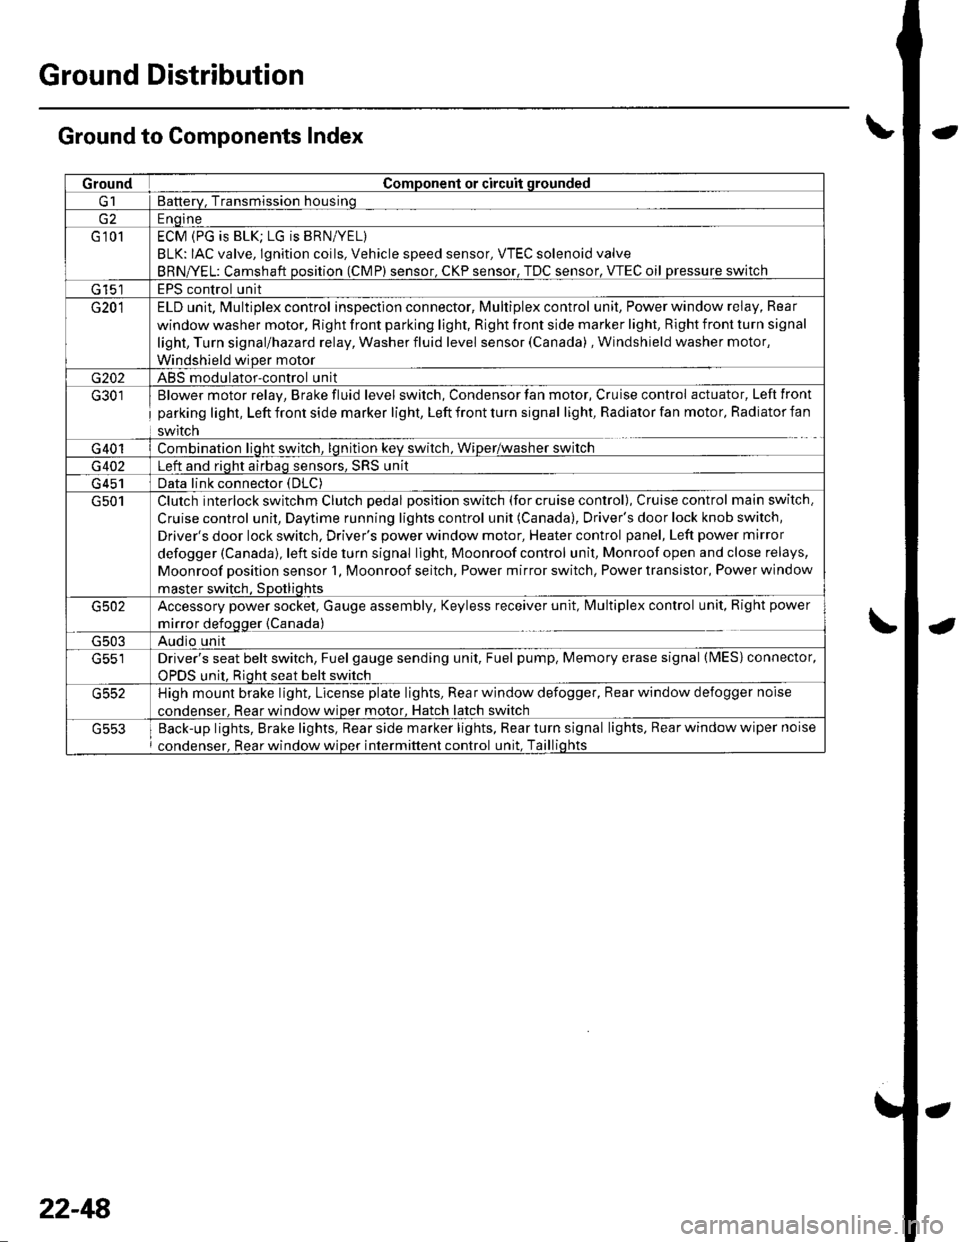
Ground Distribution
Ground to Components Index
GroundComponent or circuit qrounded
Batterv, Transmission housinq
E ngine
G 101ECM (PG is BLK; LG is BRN/YEL)
BLK: IAC valve, lgnition coils, Vehicle speed sensor, VTEC solenoid valve
BRNA/EL: Camshaft oosition (CMP) sensor. CKP sensor, TDC sensor. VTEC oil pressure switch
G 15'�]EPS control unit
G201ELD unit. Multiplex control inspection connector, Multiplex control unit, Power window relay, Rear
window washer motor, Right front parking light, Right front side marker light, Right front turn signal
light, Turn signal/hazard relay, Washer fluid level sensor (Canada) , Windshield washer motor,
Windshield wiDer motor
G202ABS modulator-control unit
G301
G401
Blower motor relay, Brake fluid level switch, Condensor fan motor, Cruise control actuator, Left front
parking light, Left front side marker light, Left front turn signal light, Radiator fan motor, Radiator fan
swrtcn
Combination liqht switch, lqnitlon kev srvitch, Wiper/wasfrer sr,virch
G402Left and riqht airbaq sensors, SRS unit
G 451Data link connector (DLC)
G501Clutch interlock switchm Clutch pedal position switch (for cruise control), Cruise control main switch,
Cruise control unit, Daytime running lights control unit (Canada), Driver's door lock knob switch,
Driver's door lock switch, Driver's power window motor, Heater control panel, Left power mirror
defogger (Canada), left side turn signal light, Moonroof control unit, Monroof open and close relays,
Moonroof position sensor '1, Moonroof seitch, Power mirror switch, Power transistor, Power window
master switch. SDotliqhts
G502Accessory power socket, Gauge assembly, Keyless receiver unit, lvlultiplex control unit, Right power
mirror defogger {Canada)
G503Audio unit
G551Driver's seat belt switch, Fuel gauge sending unit, Fuel pump, Memory erase signal (IMES) connector,
OPDS unit. Rioht seat belt switch
G552High mount brake light, License plate lights, Rear window defogger, Rear window defogger noise
condenser. Rear window wioer motor, Hatch latch switch
Back-up lights, Brake lights, Rear side marker lights, Rear turn signal lights, Rear window wiper noise
condenser, Rear window wiper intermittent control unit, Taillights
22-48
Page 895 of 1139
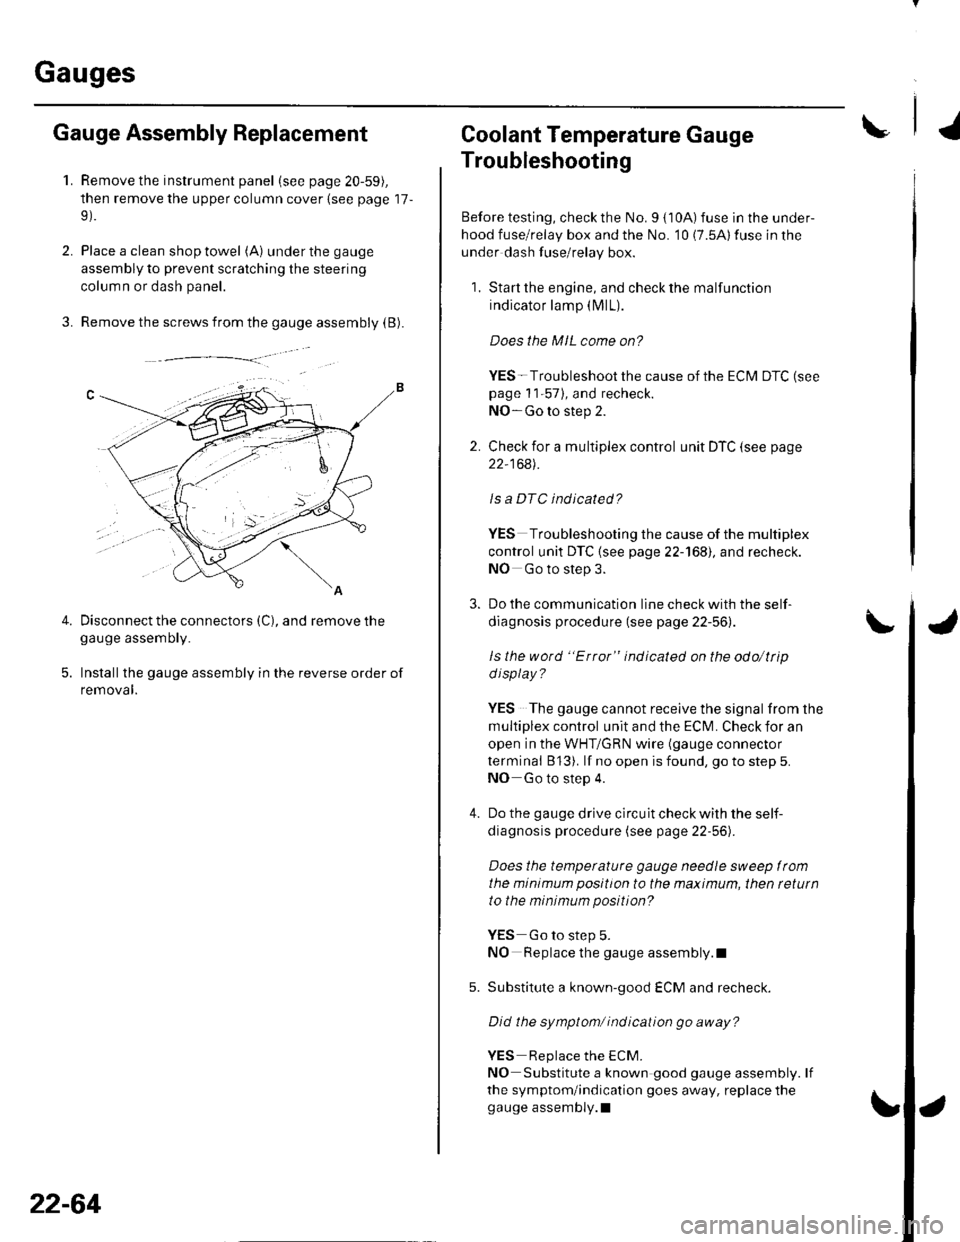
Gauges
2.
3.
Gauge Assembly Replacement
1.Remove the instrument panel (see page 20-59),
then remove the upper column cover {see page 17-
Place a clean shop towel (A) under the gauge
assembly to prevent scratching the steering
colum n or dash panel.
Remove the screws from the gauge assembly (B).
Disconnect the connectors (C), and remove thegauge assemDry.
Installthe gauge assembly in the reverse order of
removal.
Coolant Temperature Gauge
Troubleshooting
Before testing, check the No. I { 10A) fuse in the under-
hood fuse/relay box and the No. '10 (7.5A) fuse in the
under dash fuse/relay box.
1. Start the engine, and check the malfunction
indicator lamp (MlL).
Does the MIL come on?
YES- Troubleshoot the cause of the ECM DTC (see
page 1 1-57), and recheck.
NO-Go to step 2.
2. Check for a multiplex control unit DTC (see page
22,168).
ls a DTC ind icated?
YES Troubleshooting the cause of the multiplex
control unit DTC {see page 22-168), and recheck.
NO Go to step 3.
3. Do the communication line check with the self-
diagnosis procedure (see page 22-56).
ls the word "Error" indicated on the odo/ttip
d isplay ?
YES The gauge cannot receive the signal from the
multiplex control unit and the ECI\,4. Check for an
open in the WHT/GRN wire (gauge connector
terminal B 13). lf no open is found, go to step 5.
NO Go to step 4.
4. Do the gauge drive circuit check with the self-
diagnosis procedure (see page 22-56).
Does the temperature gauge needle sweep lrom
the minimum position to the maximum, then tetutn
to the minimum position?
YES Go to step 5.
NO Replace the gauge assembly.l
5. Substitute a known-good ECM and recheck.
Did the symptom/ ind ication go away?
YES Replace the ECM.
NO Substitute a known good gauge assembly. lf
the symptom/indication goes away, replace thegauge assembly.l
4.
22-64
Page 922 of 1139
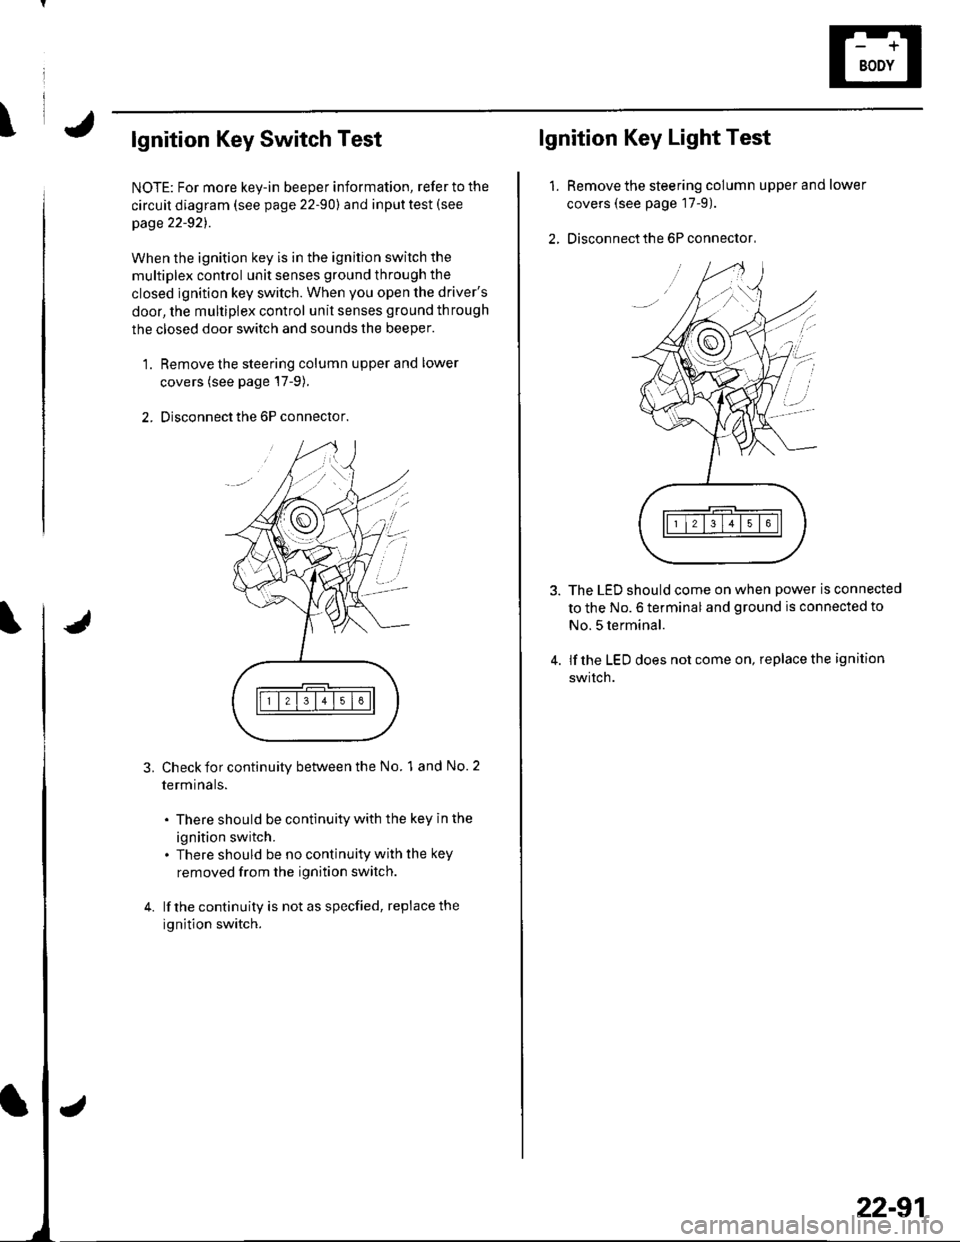
\lgnition Key Switch Test
NOTE: For more key-in beeper information, refer to the
circuit diagram (see page 22-90) and input test (see
page 22-921.
When the ignition key is in the ignition switch the
multiplex control unit senses ground through the
closed ignition key switch. When you open the driver's
door, the multiplex control unit senses ground through
the closed door switch and sounds the beeper.
1. Remove the steering column upper and lower
covers (see page'17-9).
2. Disconnect the 6P connector.
3.Check for continuity between the No. 1 and No. 2
termrnars.
. There should be continuity with the key in the
ignition switch.. There should be no continuity with the key
removed from the ignition switch.
lf the continuity is not as specfied, replace the
ignition switch.
lgnition Key Light Test
1.Remove the steering column upper and lower
covers (see page 17-9).
Disconnect the 6P connector,
The LED should come on when power is connected
to the No. 6 terminal and ground is connected to
No. 5 terminal.
lf the LED does not come on, replace the ignition
swrtch.
i'
/.'
22-91
Page 924 of 1139
I
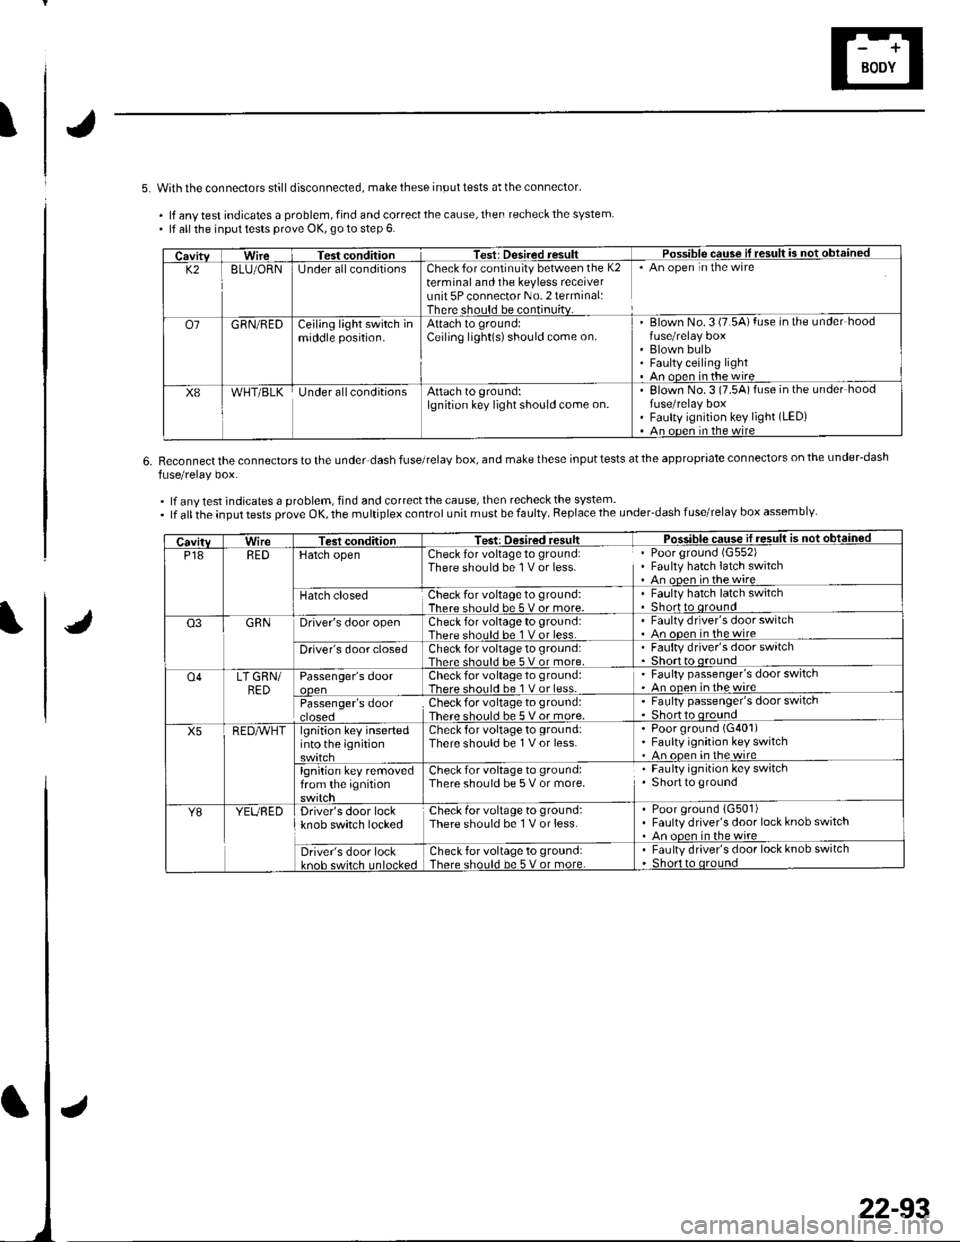
5. With the connectors stilldisconnected, make these input tests at the connector'
. lf anv test indicates a problem, find and correct the cause, then recheck the system. lf all the inpul tests prove OK, go to step 6.
6.Reconnect the connectors to the under dash fuse/relaV box, and make these input tests at the appropriate connectors on the under-dash
fuse/relay box.
.lfanytestindicatesaproblem,findandcorrectthecause,thenrecheckthesystem..lfalltheinputtestsproveOK,themultiplexcontrolunitmustbefaulty.Replacetheunder'dashfuse/relaYboxassemblY
CavitvWireTest conditionTest: Desired resultPossible cquse il result is not obtained
K28LU/ORNlJnder allconditionsCheck for continuity between the K2terminal and the keyless receiverunit 5P connector No. 2 terminal:There should be continuitv.
An open in the wire
o7GRN/REDCejling light switch inmiddle position.Attach to ground:Ceiling light(s)should come on.Blown No. 3 (7.5A) fuse in the under hood
Blown bulbFaulty ceiling lightAn ooen in the wire
X8WHT/BLKUnder allconditionsAttach to ground:lgnition key light should come on.Elown No.3 (7.5A)fuse in the under hoodfuse/relay boxFaulty ignition key light (LED)
An ooen in the wire
CavitvWireTest conditionTest: Desired resultPosq!!!c sq!!ej1!.9!!!!j €d
P18REDHatch openCheck for voltage to ground:There should be 1 V or less.Poor ground (G552)
Fauhy hatch latch switchAn open inthewire
Hatch closedCheck for voltage to ground:There should be 5 v or more.Faulty hatch latch switchShortto oround
Q3GRNDriver's door openCheck for voltage to ground:There should be 1 V or less.Faulty drlver's door switchAn oDen in the wire
Driver's door closedCheck for voltage to ground:Thar. shoul.l he 5 V or more.Faulty driver's door switch
o4LT GRN/BED
RED^vHT
Passenger's doorCheck for voltage to ground:There should be 1 V or less.
' Faulty passenger's door switch' An onen inthewire
Passenger's doorcroseoCheckfor voltage to ground:There should be 5 Vor more.
. Faulty passenger's door switch. Shor o oround
X5lgnition key insertedinto the ignitionCheck for voltage to ground:There should be 1 V or less.Poor ground (G401)
Faulty ignition key switchAn ooen in the wire
lgnition key removedfrom the ignitionCheck for voltage to ground:There should be 5 V or more.Faulty ignition key switchShort to ground
Y8YEUREDDriver's door lockknob switch lockedCheck for voltage to ground:There should be 1 V or less.Poor ground {G501)Faulty driver's door lock knob switchAn ooen in the wire
Driver's door lockkn6h cwirch Inl6cke.lCheck for voltage to ground:There should be 5 V or more.Faulty driver's door lock knob switchShort to oround
22-93
Page 965 of 1139
Wipers/Washers
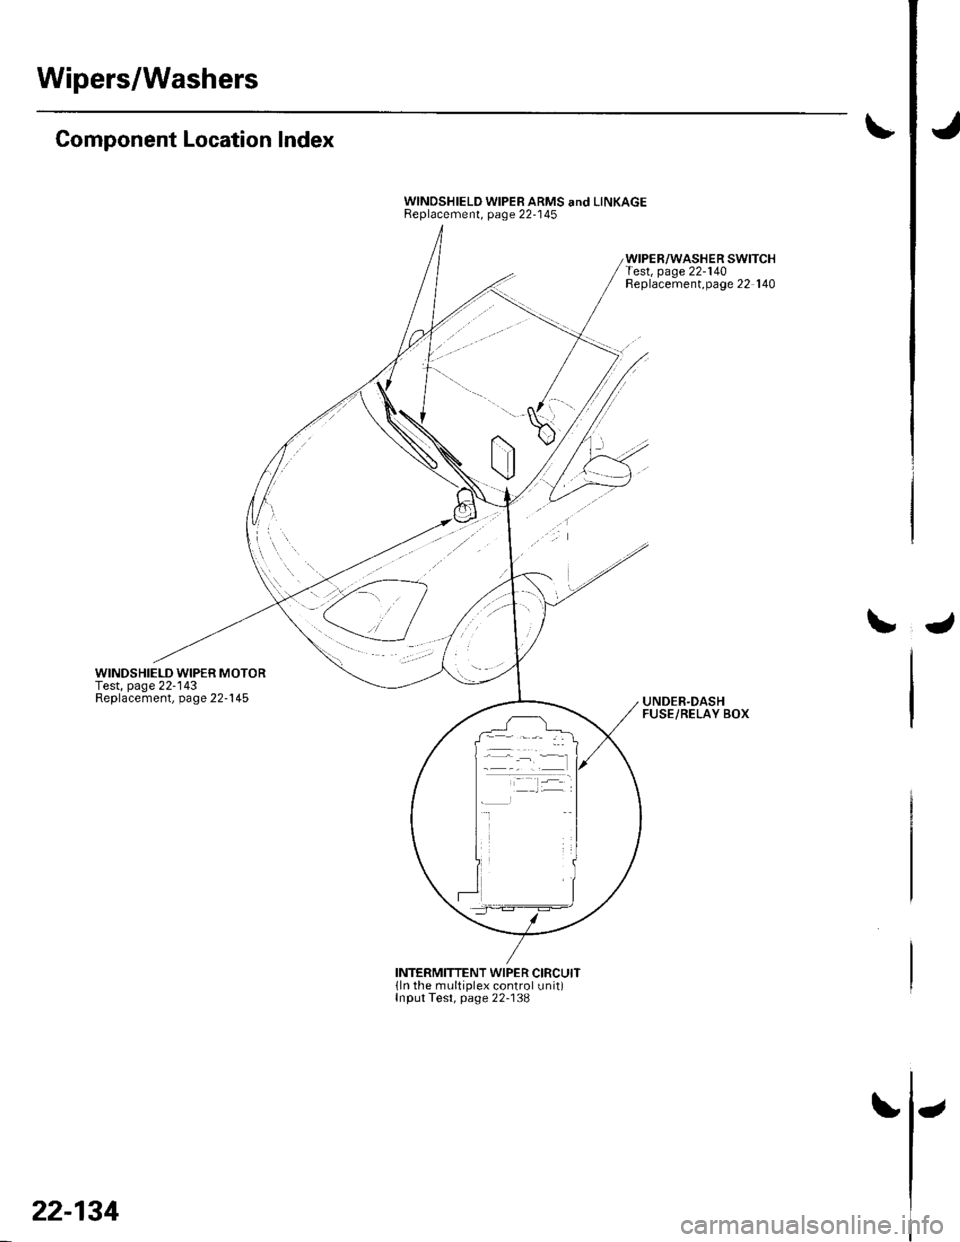
Component Location Index
WINDSHIELD WIPER MOTORTest, page 22-'143Replacement, page 22-145
WINDSHIELD WIPER ARMS and LINKAGEReplacement, page 22-'145
WIPER/WASHER SWITCHTest, page 22-140Replacement,page 22 140
UNDER.DASHFUSE/RELAY BOX
INTERMITTENT WIPER CIRCUITlln the multiplex control unit)Input Test, page 22-138
22-134
Page 972 of 1139
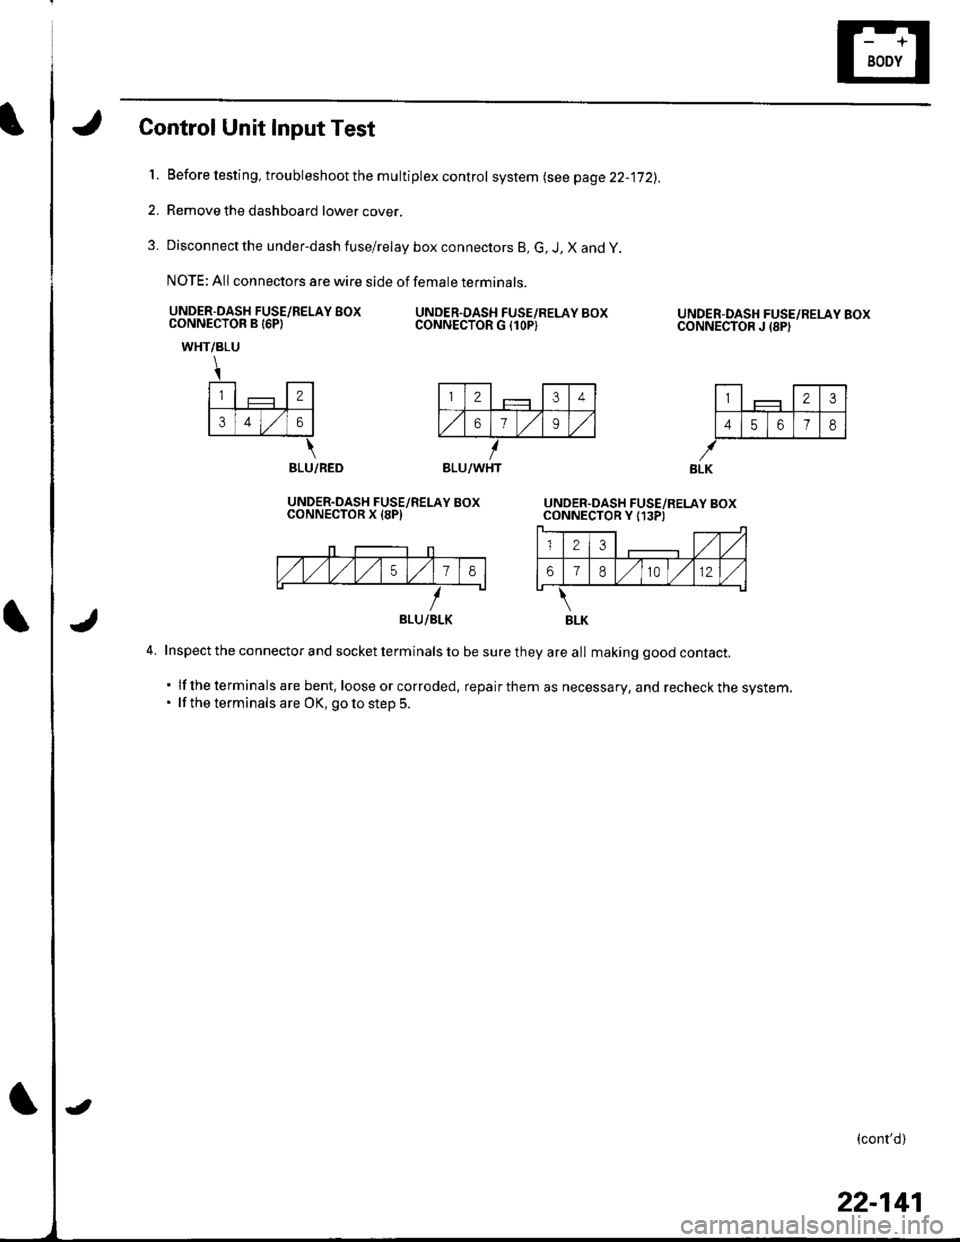
Control Unit Input Test
l.Before testing, troubleshoot the multiplex control system lsee page 22-jj2).
Remove the dashboard lower cover,
Disconnect the under-dash fuse/relay box connectors B, G, J, X and y
NOTE: All connectors are wire side of female terminals.
UNDER-DASH FUSE/RELAY BOXCONNECTOR B I6PIUNDER.DASH FUSE/RELAY BOXCONNECTOR G {1OP)
2.
3.
UNDER-DASH FUSE/RELAY BOXCONNECTOR J {8PI
l-,1 - llTtlF_j-JF-#
141516 7l8l
WHT/BLU
\
l-,1 - l-rl€ll
lslrlzlol
\BLU/RED
UNDER.DASH FUSE/RELAY BOXCONNECTOR X I8PI
4. Inspect the connector and socket terminals to be sure they are all making good contact.
. lf the terminals are bent, loose or corroded, repairthem as necessary, and recheckthe system.. lf the terminals are OK, goto step 5.
(cont'd)
BLU/WHT
BLU/BLK
22-141
Page 973 of 1139
Wipers/Washers
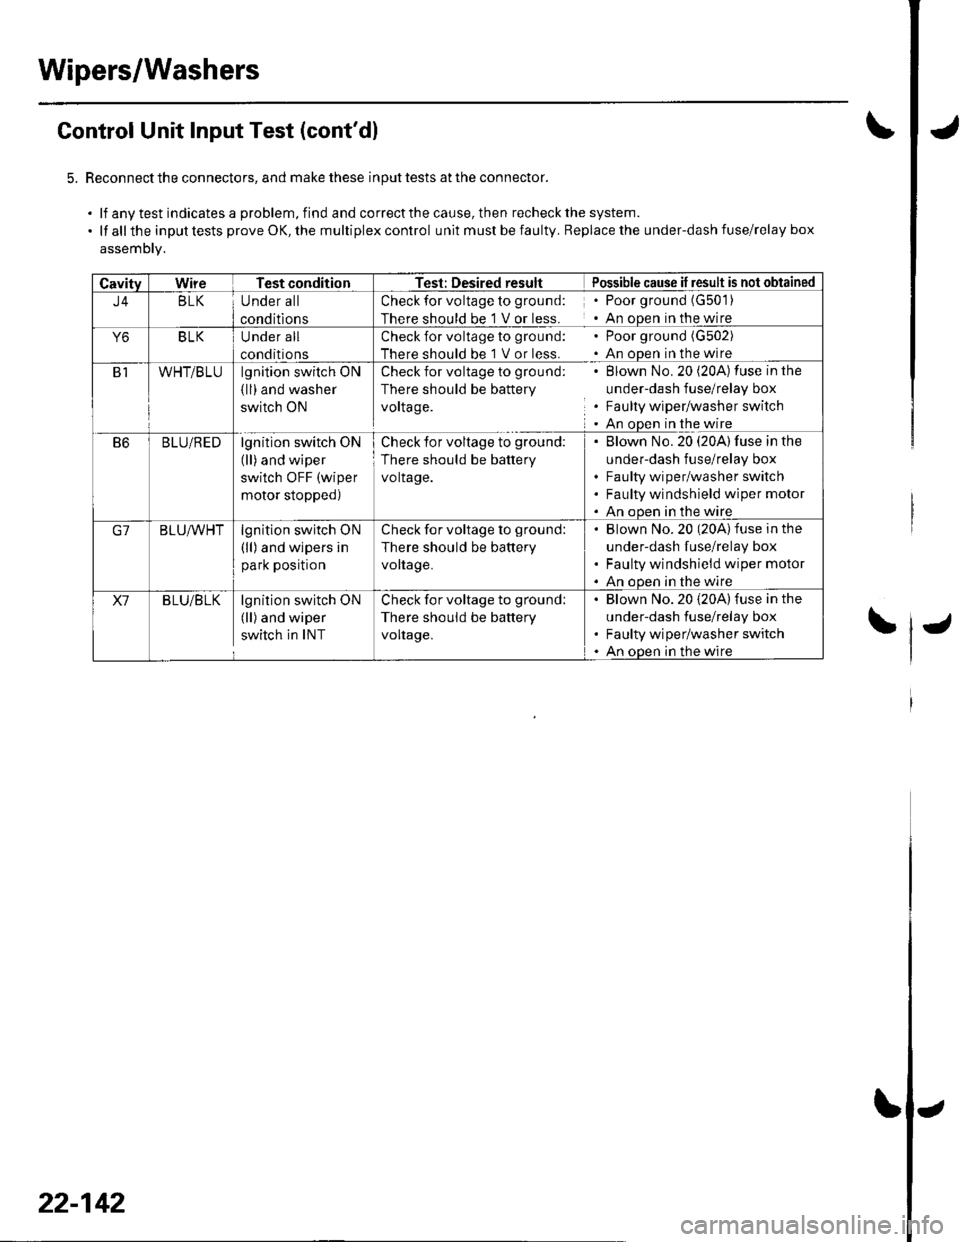
Control Unit Input Test (cont'dl
5. Reconnect the connectors, and make these input tests at the connector.
.lfanytestindicatesaproblem,findandcorrectthecause,thenrecheckthesystem.
.lfalltheinputtestsproveOK,themultiplexcontrol unit must be faulty. Replace the under-dash fuse/relay box
assembly.
CavityWireTest conditionTest: Desired resultPossible cause if result is not obtained
J4BLKU nder all
conditlons
Check for voltage to ground: . Poor ground (G501)
There should be 1V or less. . AnoDeninthewire
Y6BLKU nder all
conditions
Check for voltage to ground: . Poor ground (G502)
There should be 1 V or less. . An oDen in the wire
BIWHTiBLUlgnition switch ON
{ll) and washer
switch ON
Check for voltage to ground:
There should be battery
vortage.
Blown No. 20 (20A) fuse in the
under-dash fuse/relay box
Faulty wiper/washer switch
An open in the wire
E'0BLU/REDlgnition switch ON
(ll) and wiper
switch OFF (wiper
motor stopped)
Check for voltage to ground:
There should be battery
voltage.
Blown No. 20 (20A) fuse in the
under-dash fuse/relay box
Faulty wiper/washer switch
Faulty windshield wiper motor
An open in the wire
G7BLUA/VHTlgnition switch ON(ll) and wipers in
park position
Check for voltage to ground:
There should be battery
voltage.
Blown No.20 (20A)fuse in the
under-dash fuse/relay box
Faulty windshield wiper motor
An ooen in the wire
x1BLU/BLKlgnition switch ON(ll) and wiper
switch in INT
Check for voltage to ground:
There should be battery
voltage.
Blown No.20 (20A)fuse in the
under-dash fuse/relay box
Faulty wiper/washer switch
An oDen in the wire
\J
\J
L
22-142
J
Page 988 of 1139
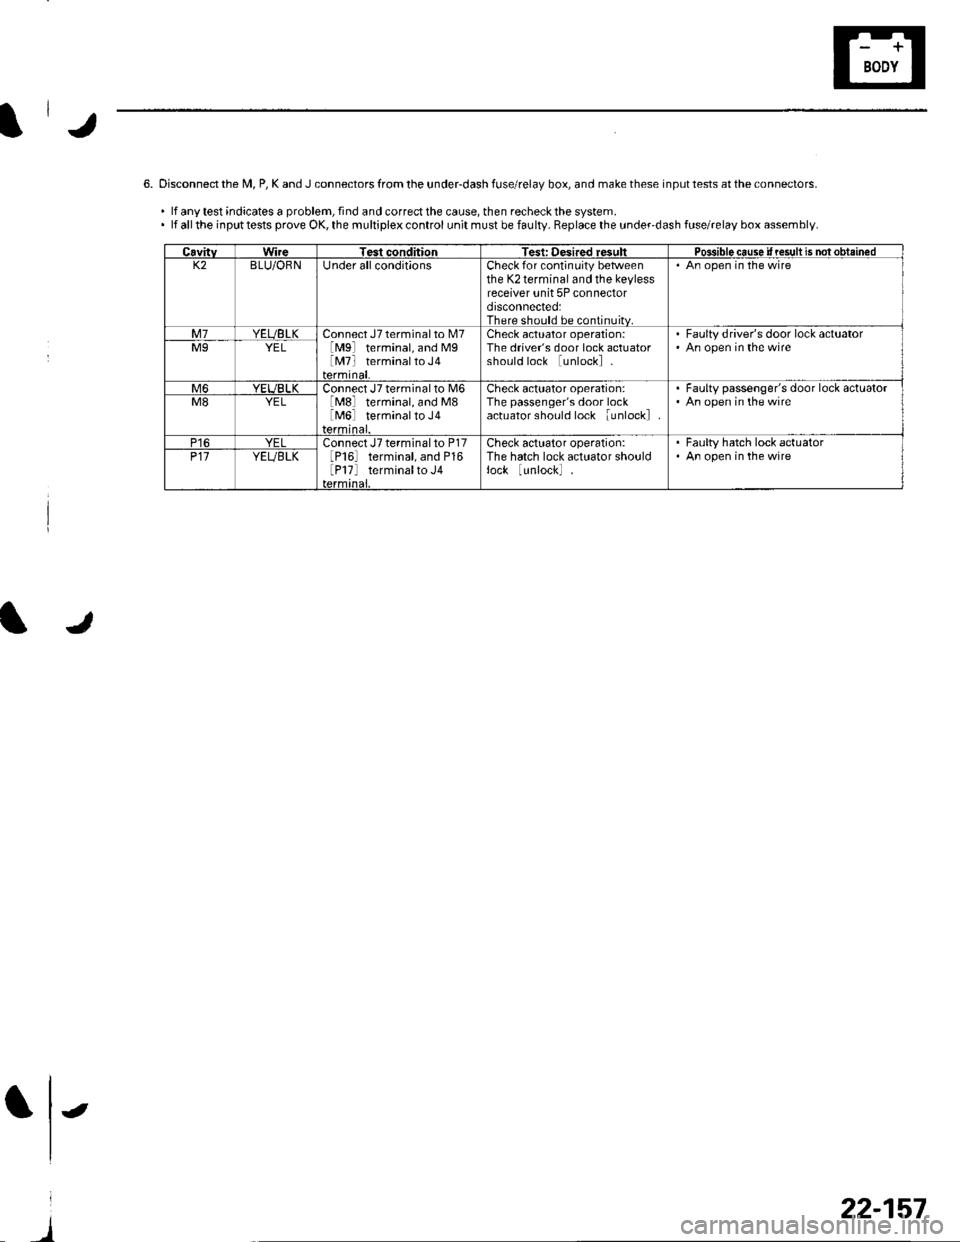
6. Disconnect the M, P, K and J connectors from the underdash fuse/relay box, and make these input tests at the connectors.
.lfanytestindicatesaproblem,findandcorrectthecause,thenrecheckthesystem..lfalltheinputtestsproveOK,themultiplexcontrolunitmustbefaulty.Replacetheunder-dashfuse/relayboxassembly.
CavitvWireTest conditionTest: Desired resultPdsiblo c6use if result is not obtain€dK2BLU/ORNUnder all conditionsCheck for continuity betweenthe K2 terminal and the keylessreceiver unit 5P connectordisconnected:There should be continuitv.
An open in the wire
M7YEUBLKConnect J7 terminal to [,47lMgl terminal, and MglMTl terminalto J4
Check actuator operation:The driver's door lock actuatorshould lock lunlockl
Faulty driver's door lock actuatorAn open in the wireM9YEL
M6YEUBLKConnect J7 terminal to M6lMSl terminal, and M8lM6l terminalto J4
Check actuator operation:The passenger's door lockactuator should lock iunlockl
Faulty passenger's door lock actuatorAn open in the wireM8YEL
P16YELConnect J7 terminal to P17lP16l terminal, and P16lP17l terminalto J4
Check actuator operation:The hatch lock actuator shouldlock lunlockl
. Faulty hatch lock actuator. An open in the wireP17YEUBLK
-
22-157
Page 992 of 1139
Transmitter Test
NOTE:. lf the doors unlockorlockwiththetransmitter, but
the LED on the transmitter does not come on, the LED
is faulty. Replace the transmitter,. lf anydoor isopen, you cannotlockthedoorwiththe
transmrtter.. lf you unlocked the doors with the transmitter, but do
not open any of the doors within 30 seconds, the
doors relock automatically.. The doors do not lock or unlock with the transmitter if
the ignition key is inserted in the ignition switch.
1. Press the lock or unlock button five or six times to
reset the transmitter.
. lf the locks work, the transmitter is OK.. lf the locks don't work, go to step 2.
2. Open the transmitter and check for water damage.
. lf you find any water damage, replace the
transmrtter.. lf there is no waterdamage, go to step 3.
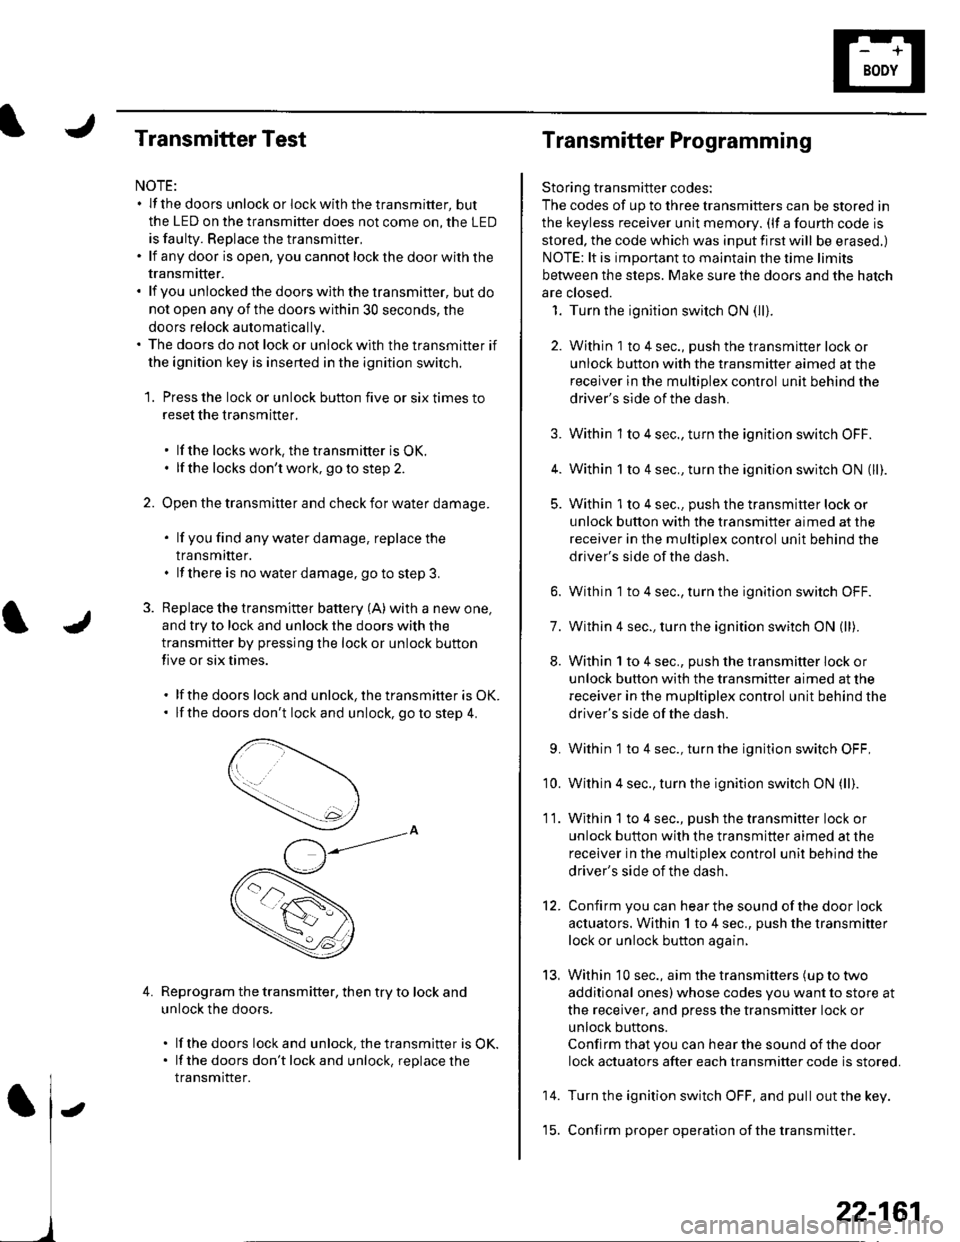
3. Replace the transmitter battery (A) with a new one,
and try to lock and unlock the doors with the
transmitter by pressing the lock or unlock button
five or six times.
. lf the doors lock and unlock, the transmifter is OK.. lf the doors don't lock and unlock, go to step 4.
Reprogram the transmitter, then try to lock and
unlock the doors.
. lf thedoors lockand unlock.thetransmitter is OK.. lf the doors don'tlockand unlock, replacethe
transmitter.
4.
Transmitter Programming
Storing transmitter codes:
The codes of up to three transmitters can be stored in
the keyless receiver unit memory. (lf a fourth code is
stored. the code which was input first will be erased.)
NOTE: lt is important to maintain the time limits
between the steps. Make sure the doors and the hatch
are closed.
1. Turn the ignition switch ON (lli.
2. Within 1 to 4 sec., push the transmitter lock or
unlock button with the transmitter aimed at the
receiver in the multiplex control unit behind the
driver's side of the dash.
3. Within 1 to 4 sec., turn the ignition switch OFF.
4. Within 1 to 4 sec., turn the ignition switch ON (ll).
5. Within 'l to 4 sec., push the transmitter lock or
unlock button with the transmitter aimed at the
receiver in the multiplex control unit behind the
driver's side of the dash.
6. Within 1 to 4 sec., turn the ignition switch OFF.
7. Within 4 sec., turn the ignition switch ON (ll).
8. Within 1 to 4 sec., push the transmitter lock or
unlock button with the transmifter aimed at the
receiver in the mupltiplex control unit behind the
driver's side of the dash.
9. Within 1 to 4 sec., turn the ignition switch OFF,
'10. Within 4 sec., turn the ignition switch ON (ll).
11. Within 1 to 4 sec., push the transmitter lock or
unlock button with the transmitter aimed at the
receiver in the multiplex control unit behind the
driver's side of the dash.
12. Confirm you can hearthe sound ofthe door lock
actuators. Within 1 to 4 sec., push the transmitter
lock or unlock button again,
13, Within 10 sec., aim the transmitters (up to two
additional ones) whose codes you want to store at
the receiver, and press the transmitter lock or
unlock buttons.
Confirm that you can hear the sound of the door
lock actuators after each transmitter code is stored.
14. Turn the ignition switch OFF, and pull out the key.
'15. Confirm proper operation ofthe transmitter.
22-161
Page 999 of 1139
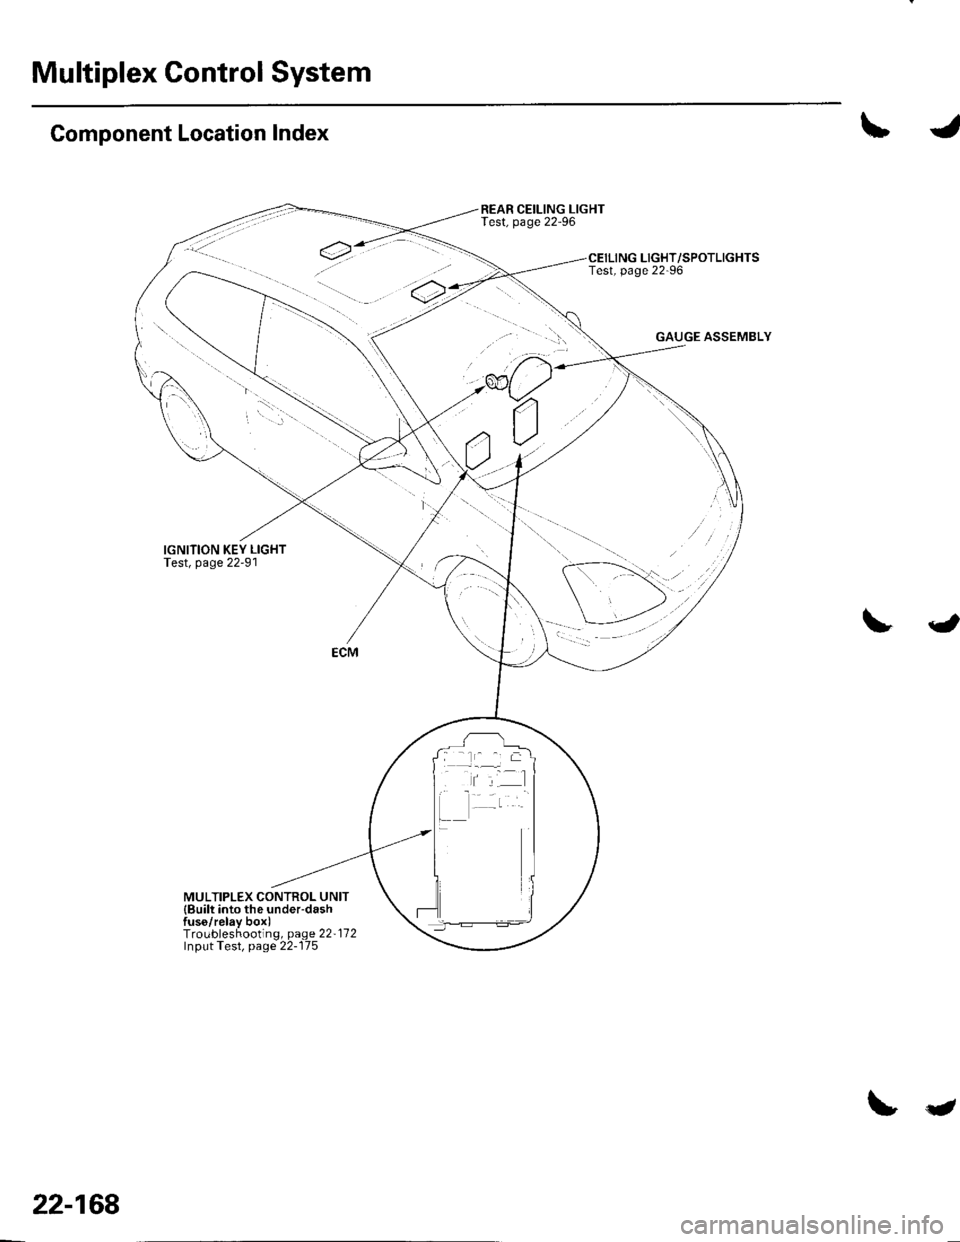
Multiplex Control System
Component Location Index
IGNITION KEY LIGHTTest, page 22'91
lr, J
REAR CEILING LIGHTTest, page 22'96
LIGHT/SPOTLIGHTSTest, page 22-96
GAUGE ASSEMBLY
ECM
MULTIPLEX CONTROL UNIT{Built into the under-dashfus6/relav boxlTroubleshooting, page 22'172Input Test, page 22-175
22-168
t