EVAP canister HONDA CIVIC 2002 7.G Owner's Manual
[x] Cancel search | Manufacturer: HONDA, Model Year: 2002, Model line: CIVIC, Model: HONDA CIVIC 2002 7.GPages: 1139, PDF Size: 28.19 MB
Page 373 of 1139
Intake Air System
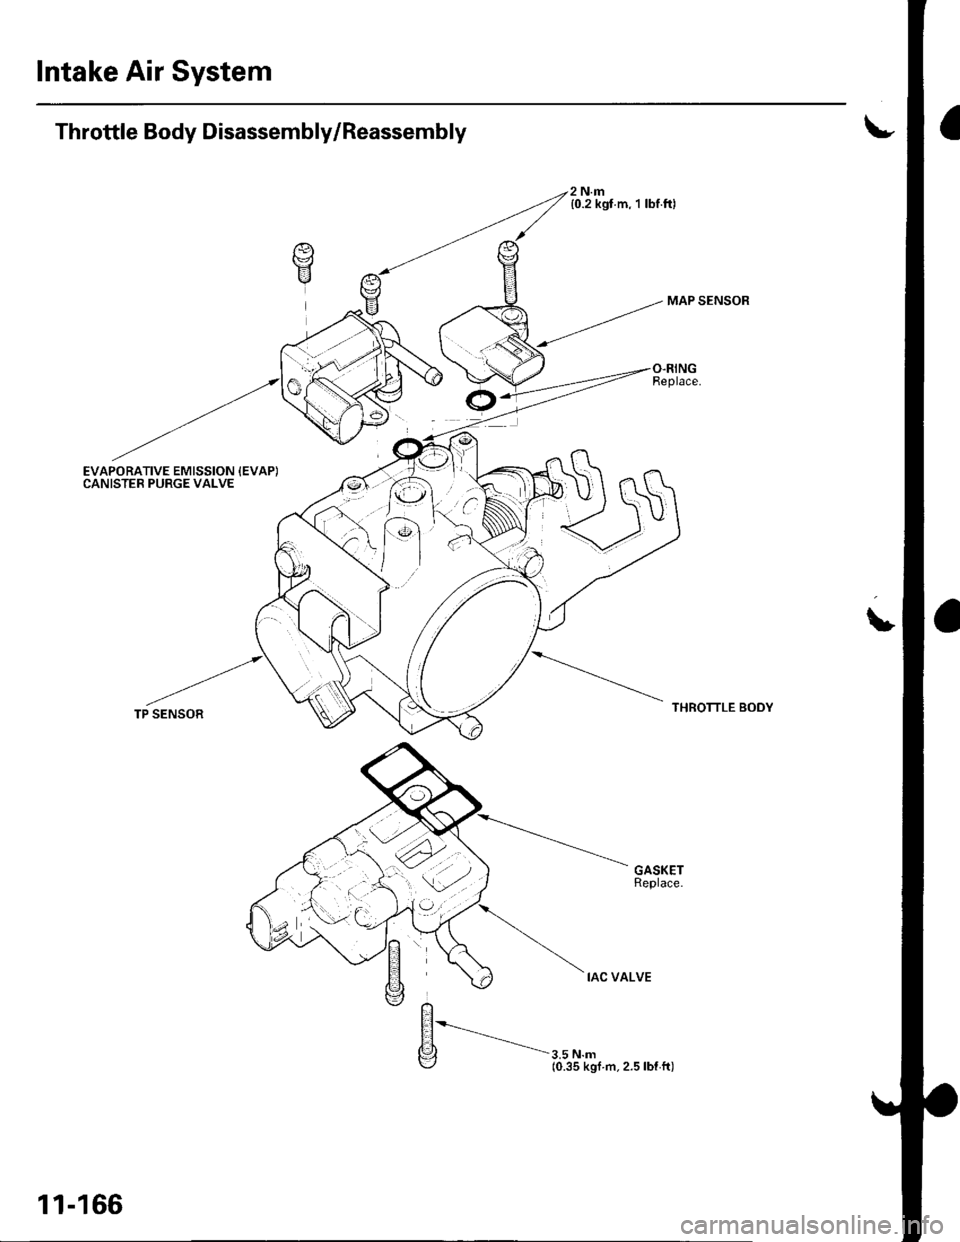
Throttle Body Disassembly/Reassembly
EVAPORATIVE EMISSION {EVAP)CANISTER PURGE VALVE
A
V
2 N.m{0.2 kgt m, 1 lbf.ft)
3.5 N.m(0.35 kgf m.2.5lbf ft)
MAP SENSOR
THROTTLE BODY
L
TP SENSOR
11-166
Page 375 of 1139
PCV System
DTC Troubleshooting
DTC P1505: PCV Air Leakage
1. Reset the ECM (see page 11-4).
2. Start the engine. Hold the engine at 3,000 rpm with
no load (in neutral) until the radiator fan comes on
3. Let the engine idle tor al least 40 seconds with the
throttle fully closed.
4. Check for a DTC P1505 with the scan tool
ls DTC P1505 indicated?
YES-Check these parts for vacuum leaks l
. PCV valve. PCV hose. EVAP canister purge valve
. Throttle body. Brake booster hose
NO - Intermittent failure, system is OK at this
time.l
11-168
Page 377 of 1139
EVAP System
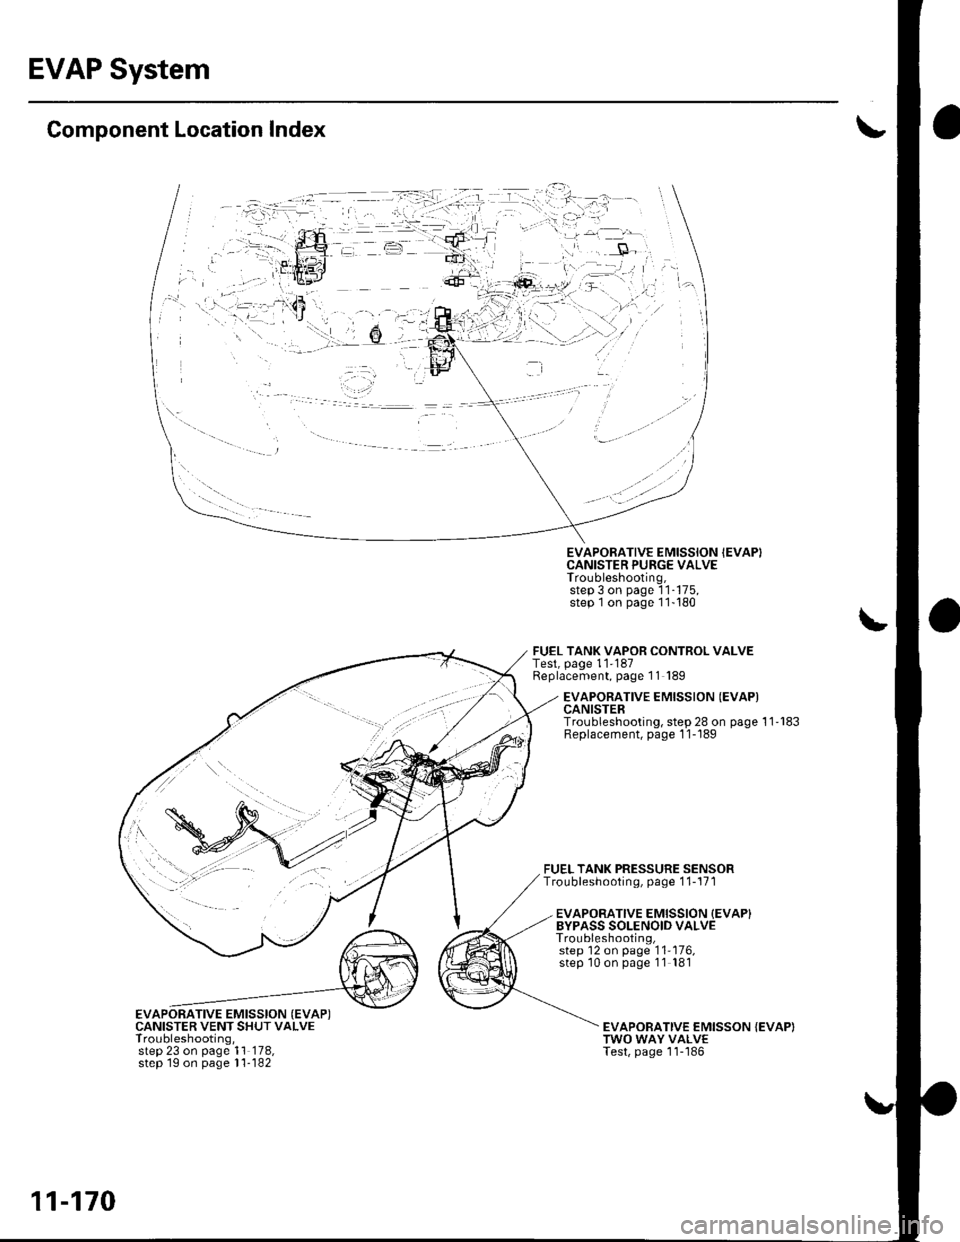
Component Location Index
EVAPORATIVE EMISSION {EVAP)CANISTER VENT SHUT VALVETroubleshooting,step 23 on page 1'l 178,step 1g on page l1- 182
EVAPORATIVE EMISSION IEVAPICANISTER PURGE VALVETroubleshooting,step 3 on page 'l1-175,
step 1on page 11-180
FUEL TANK VAPOR CONTROL VALVETest, page 11'187Replacement, page 11 189
FUEL TANK PRESSURE SENSORTroubleshooting, page 1 1-171
EVAPORATIVE EMISSION {EVAPICANISTERTroubleshooting, step 28 on page 11'183Replacement, page 1 1-189
EVAPORATIVE EMISSION {EVAP}BYPASS SOLENOID VALVETroubleshooting,step 12 on page '11'176,
step '10 on page 11 181
EVAPOBATIVE EMISSON {EVAP)TWO WAY VALVETest, page 'l1-'186
11-170
Page 382 of 1139
DTC Pl456: EVAP Control(Fuel Tank Svstem)
System Leakage
The fuel system is designed to allow specified
maximum vacuum and pressure conditions. Do not
deviate from the vacuum and pressure tests as
indicated in these procedures. Excessive pressure/
vacuum would damage the EVAP components or cause
eventual fuel tank failure.
Special Tools Required
Vacuum Pump/Gauge, 0-30 in. Hg A973X-041-XXXXX
This is a two-trip code. Once cleared, it cannot be
reproduced in one trip. Also, cenain specific driving
and ambient conditions must occur before the ECM will
complete the system checks. Additional test drives may
still not meet the specific conditions needed to
reproduce the code.
Follow these troubleshooting procedures carefully to
ensure the integrity of the system and to confirm the
cause of the problem or code.
NOTE: Fresh fuel has a higher volatility that createsgreater pressure/vacuum. The optimum condltlon for
testing is fresh fuel, and must be less than a full tank. lf
possible, to assist in leak detection, add 1 gallon of
fresh fuel to the tank (as long as it will not fill the tank).just before starting these procedures.
Fuel Fill Cap Check
1. Check the fuel fill cap (the cap must say "lf not
tightened 3 clicks check engine light may come
on" ).
ls the proper luel till cap installed and properly
tightened?
YES Go to step 2.
NO- Replace or tighten the cap.I
2. Check the fuel fill cap seal.
ls the tuel fill cap seal missing or damaged?
YES- Replace the fuel fill cap.I
NO The fuelfill cap is OK. Go to step 3.
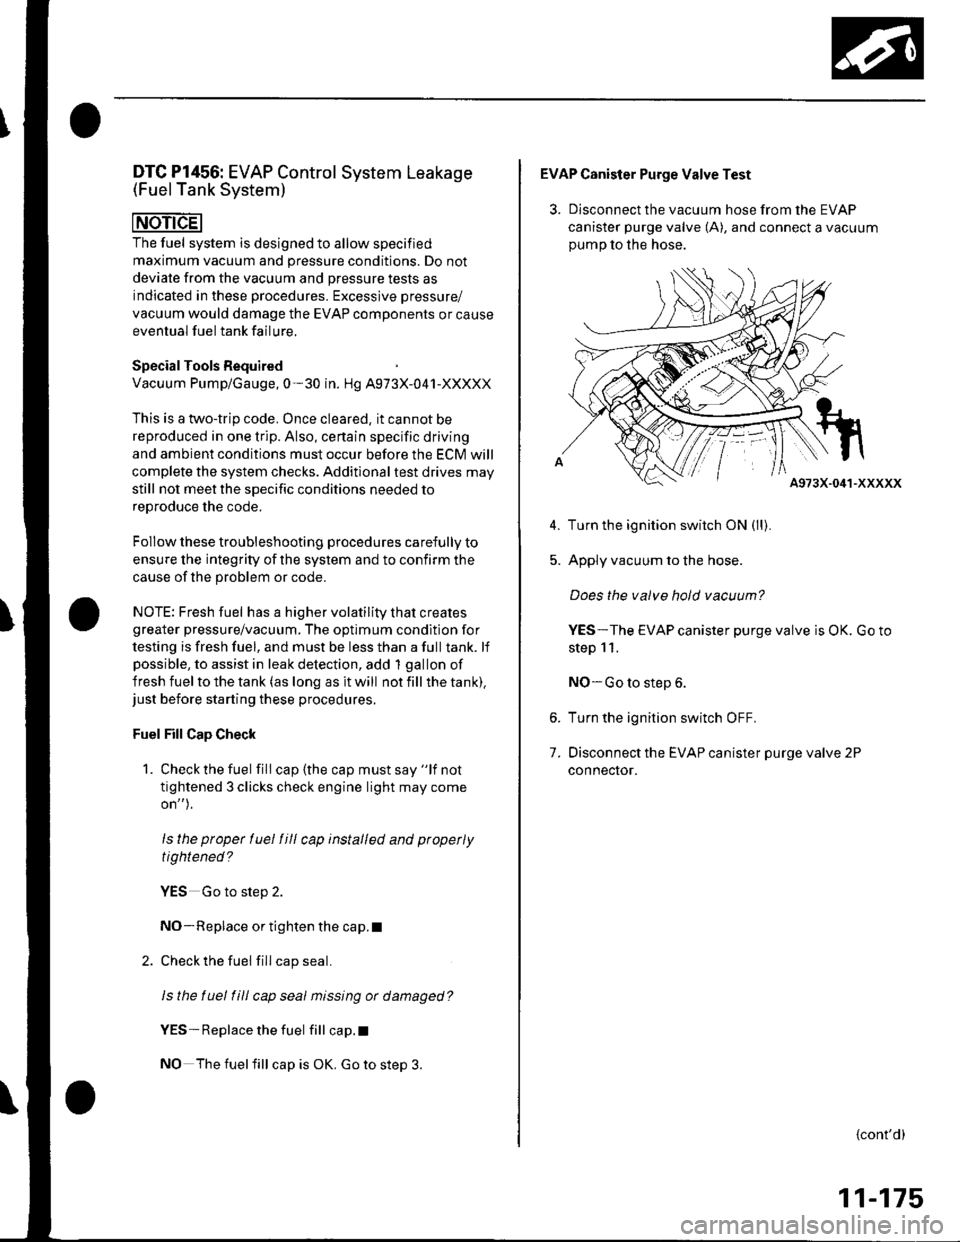
EVAP Canister Purge Valve Test
3. Disconnect the vacuum hose from the EVAP
canister purge valve (A), and connect a vacuum
oumo to the hose.
A973X-041-XXXXX
Turn the ignition switch ON (ll).
Apply vacuum to the hose.
Does the valve hold vacuum?
YES-The EVAP canister purge valve is OK. Go to
step 11.
NO-Go to step 6.
Turn the ignition switch OFF.
Disconnect the EVAP canister purge valve 2P
connecror.
5.
7.
{cont'd)
11-175
Page 383 of 1139
EVAP System
DTC Troubleshooting (cont'd)
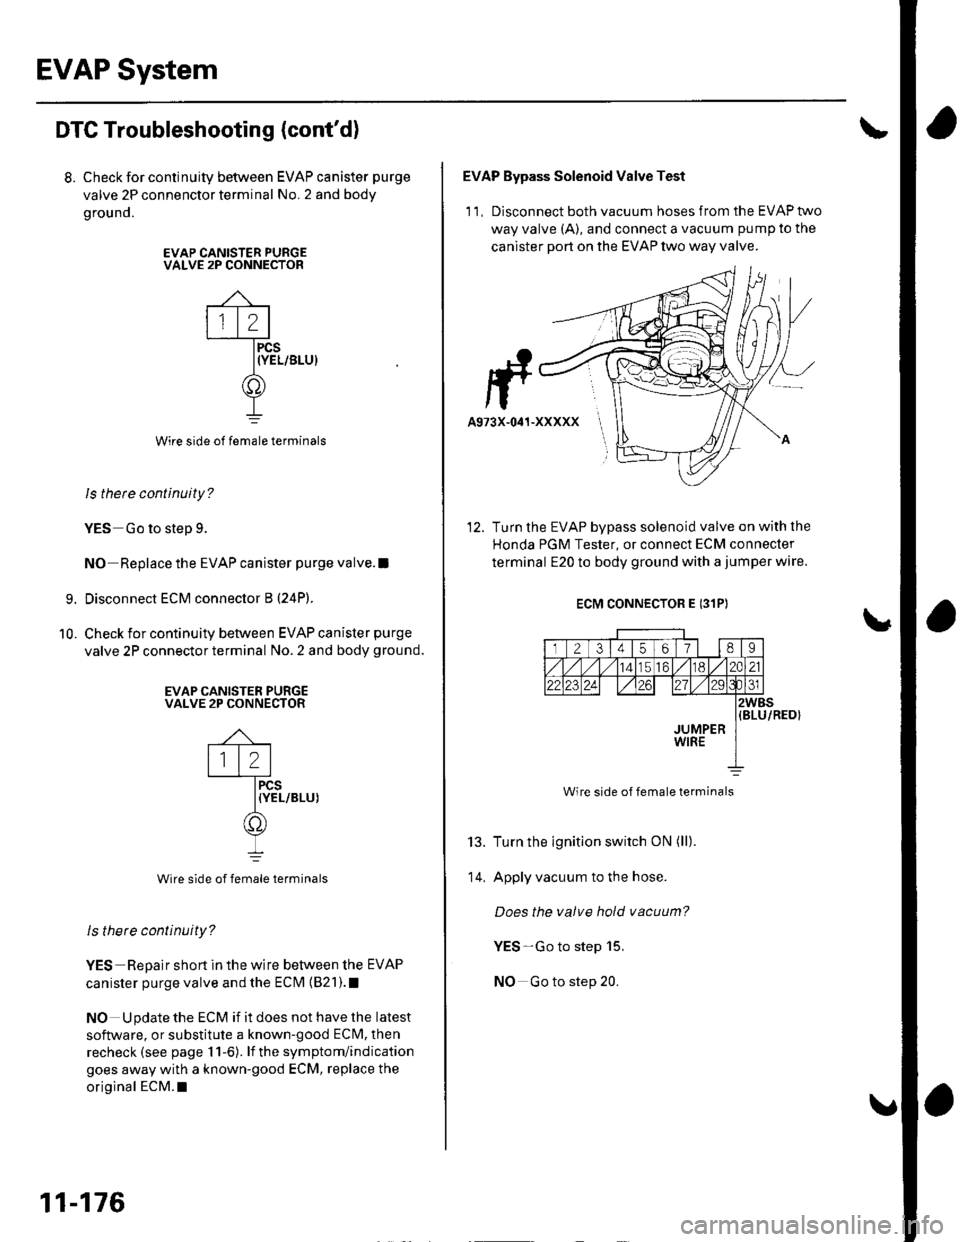
8. Check for continuity between EVAP canister purge
valve 2P connenctor terminal No. 2 and body
grou no.
EVAP CANISTER PURGEVALVE 2P CONNECTOR
Wire side of female terminals
ls there continuity?
YES Go to step 9.
NO Replace the EVAP canister purge valve.l
Disconnect ECM connector B (24P).
Check for continuity between EVAP canister purge
valve 2P connector terminal No. 2 and body ground.
EVAP CANISTER PURGEVALVE 2P CONNECTOR
PCS{YEL/BLU)
Wire side of female terminals
ls there continuity?
YES Repair short in the wire between the EVAP
canister purge valve and the ECI\4 {821).1
NO Update the ECM if it does not have the latest
software, or substitute a known-good ECM, then
recheck (see page 11-6). lf the symptom/indication
goes away with a known-good ECM, replace the
original ECM.I
9.
10.
12
'.\'
11-176
v
F-
A973X-041-XXXXX
EVAP Bypass Solenoid Valve Test
1 1 , Disconnect both vacuum hoses from the EVAP two
way valve (A), and connect a vacuum pump to the
canister port on the EVAP two way valve.
Turn the EVAP bypass solenoid valve on with the
Honda PGM Tester, or connect ECM connecter
terminal E20 to body ground with a jumper wire.
ECM CONNECTOR E 131P)
12345617l 189
456/ 1182C21
22t2?24z7l./29
JUMPERWIRE
2WBS(BLU/RED}
13.
14.
Wire side of female terminals
Turn the ignition switch ON (ll).
Apply vacuum to the hose.
Does the valve hold vacuum?
YES-Go to step 15,
NO Go to step 20.
Page 385 of 1139
EVAP System
DTC Troubleshooting (cont'dl
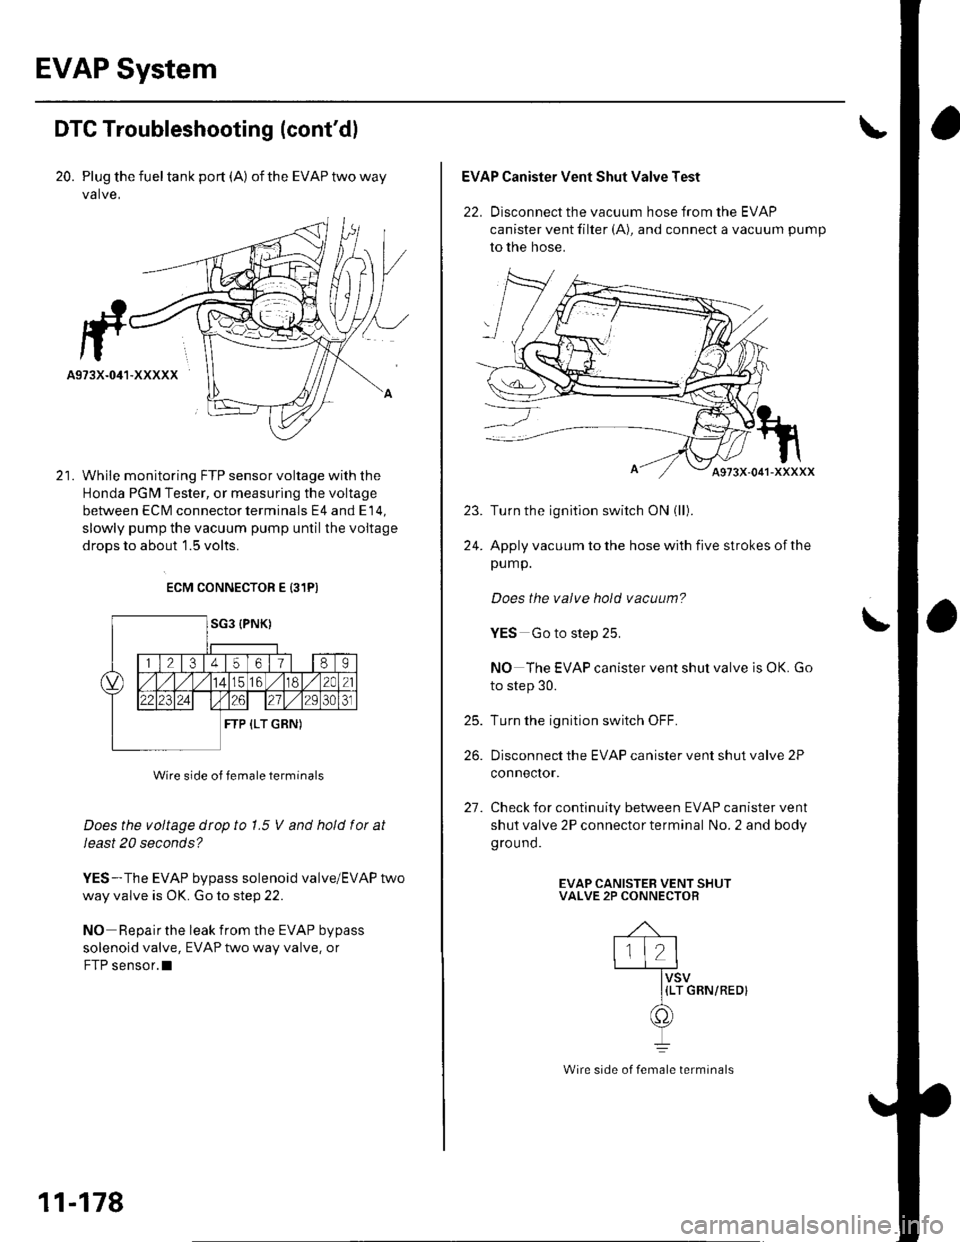
20. Plug the fueltank port (A) oftheEVAPtwoway
valve,
While monitoring FTP sensor voltage with the
Honda PGM Tester, or measuring the voltage
between ECM connector terminals E4 and E 14,
slowly pump the vacuum pump until the voitage
droDS to about 1.5 volts.
ECM CONNECTOR E {31PI
Wire side of female terminals
Does the voltage dtop to 1.5 V and hold fot at
Ieast 20 seconds?
YES-The EVAP bypass solenoid valve/EVAP two
way valve is OK. Go to step 22.
NO Repair the leak from the EVAP bypass
solenoid valve, EVAP two way valve. or
FTP sensor.l
11-178
Wire side of female terminals
EVAP Canister Vent Shut Valve Test
22. Disconnect the vacuum hose from the EVAP
canister vent filter (A), and connect a vacuum pump
to the hose.
Turn the ignitlon switch ON (ll).
Apply vacuum to the hose with five strokes of the
pump.
Does the valve hold vacuum?
YES Go to step 25.
NO The EVAP canister vent shut valve is OK. Go
to step 30.
Turn the ignition switch OFF.
Disconnect the EVAP canister vent shut valve 2P
conneclor.
Check for continuity between EVAP canister vent
shut valve 2P connector terminal No. 2 and body
ground.
EVAP CANISTEB VENT SHUTVALVE 2P CONNECTOR
{LT GRN/REOI
\
25.
26.
21.
Page 386 of 1139
28.
29.
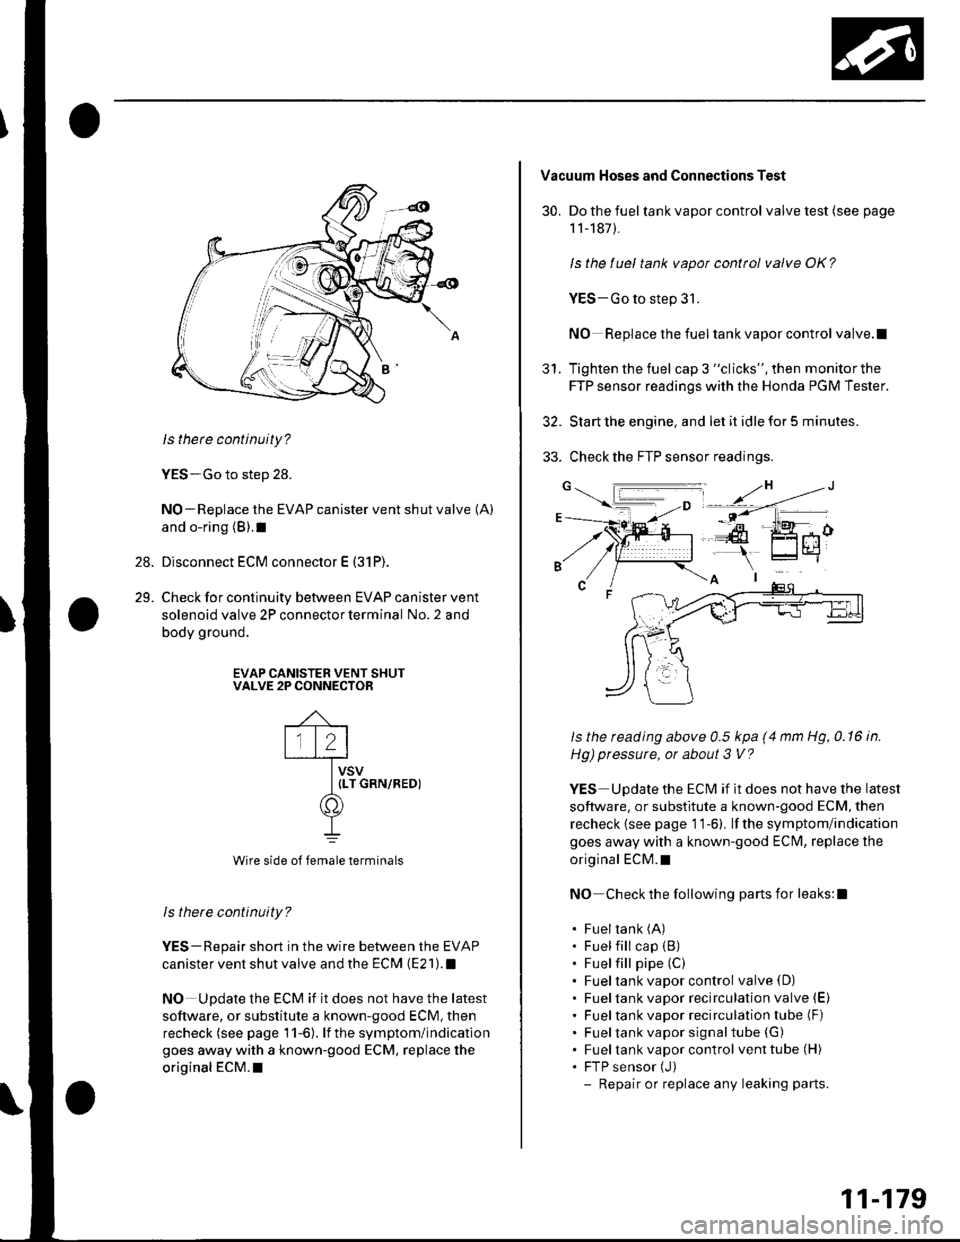
ls thete continuity?
YES-Go to step 28.
NO-Replace the EVAP canister vent shut valve (A)
and o-ring (B).1
Disconnect ECM connector E (31P).
Check for continuity between EVAP canister vent
solenoid valve 2P connector terminal No. 2 and
body ground.
EVAP CANISTER VENT SHUTVALVE 2P CONNECTOR
Wire side o{ female terminals
ls there continuity?
YES-Repair short in the wire between the EVAP
canister vent shut valve and the ECM (E21).1
NO Update the ECM if it does not have the latest
soflware, or substitute a known-good ECM, then
recheck (see page 11-6). lf the symptom/indication
goes away with a known-good ECM, replace the
original ECM.I
30.
Vacuum Hoses and Connections Test
Do the fuel tank vapor control valve test (see page
1 1-187).
ls the fuel tank vapot control valve OK?
YES-Go to step 31.
NO Replace the fueltank vapor control valve.l
Tighten the fuel cap 3 "clicks", then monitorthe
FTP sensor readings with the Honda PGM Tester.
Start the engine. and let it idle for 5 minutes.
Check the FTP sensor readings.
ls the reading above 0.5 kpa (4 mm Hg, 0.16 in.
Hg) pressure, or about 3 V?
YES Update the ECM if it does not have the latest
software, or substitute a known-good ECM, then
recheck {see page 1 1-6). lf the symptom/indication
goes away with a known-good ECfvl, replace the
original ECM.t
NO Check the following parts for leaks:l
. Fueltank (A)
. Fuel fill cap (B)
. Fuel fill pipe (C)
. Fueltank vapor control valve(D). Fueltank vapor recirculation valve (E)
. Fueltank vapor recirculation tube (F)
. Fueltank vapor signaltube (G)
. Fueltank vapor control venttube(H). FTP sensor (J)
- Repair or replace any leaking parts.
5t.
11-179
Page 387 of 1139
EVAP System
DTC Troubleshooting (cont'd)
DTC Pl457: EVAP Control System(EVAP Canister System)
Leakage
The fuel system is designed to allow specified
maximum vacuum and pressure conditions. Do not
deviate from the vacuum and pressure tests as
indicated in these procedures. Excessive pressure/
vacuum would damage the EVAP components or
cause eventual fuel tank system failure.
SpecialTools Required
Vacuum pump/gauge, 0-30 in.Hg A973X-041-XXXXX
This is a two-trip code. Once cleared, it cannot be
reproduced in one trip. Also, certain specific driving
and ambient conditions must occur before the ECfM will
complete the system checks, Additional test drives may
still not meet the specific conditions needed to16^r^.1' '^6 rh6 ^^.16
Follow these troubleshooting procedures carefully to
ensure the integrity of the system and to confirm the
cause of the problem or code.
NOTE: Fresh fuel has a higher volatility lhat creates
greater pressure/vacuum. The optimum condition for
testing is fresh fuel, and there must be less than a full
tank. lf possible, to assist in leak detection, add I gallon
of fresh fuel to the tank (as long as it will not fill the
tank), just before starting these procedures.
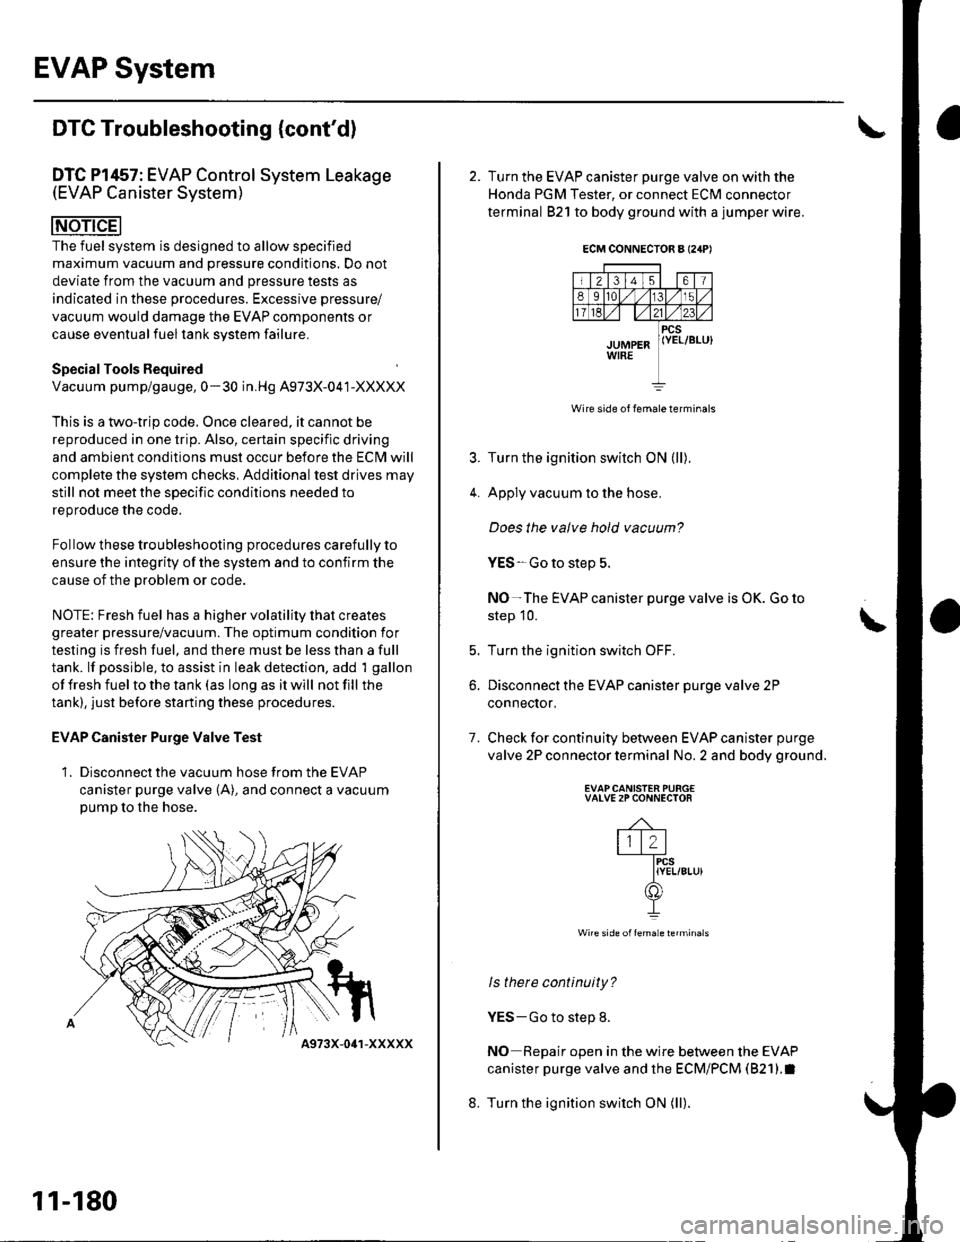
EVAP Canister Purge Valve Test
1. Disconnect the vacuum hose from the EVAP
canister purge valve (A), and connect a vacuumpump to the hose.
11-180
4973X-041-XXXXX
ECM CONNECTOR A I24P'
Wire side of lemale terminals
4.
7.
2. Turn the EVAP canister purge valve on with the
Honda PGM Tester, or connect ECM connector
terminal 821 to body ground with a jumper wire.
Turn the ignition switch ON (ll).
Apply vacuum to the hose.
Does the valve hold vacuum?
YES-Go to step 5.
NO-The EVAP canister purge valve is OK. Go to
step 10.
Turn the ignition switch OFF.
Disconnect the EVAP canister purge valve 2P
conneclor,
Check for continuity between EVAP canister purge
valve 2P connector terminal No. 2 and body ground.
EVAPCANISTEN PURG€VALVE 2P CONNECTOR
-4-
lll2l-fircs
IYEL/8Lu)(f])
I
Wire side offemale lerminals
ls there continuity?
YES-Go to step 8.
NO Repair open in the wire between the EVAP
canister purge valve and the ECM/PCM (821).I
Turn the ignition switch ON (ll).
t
b.
8.
Page 388 of 1139
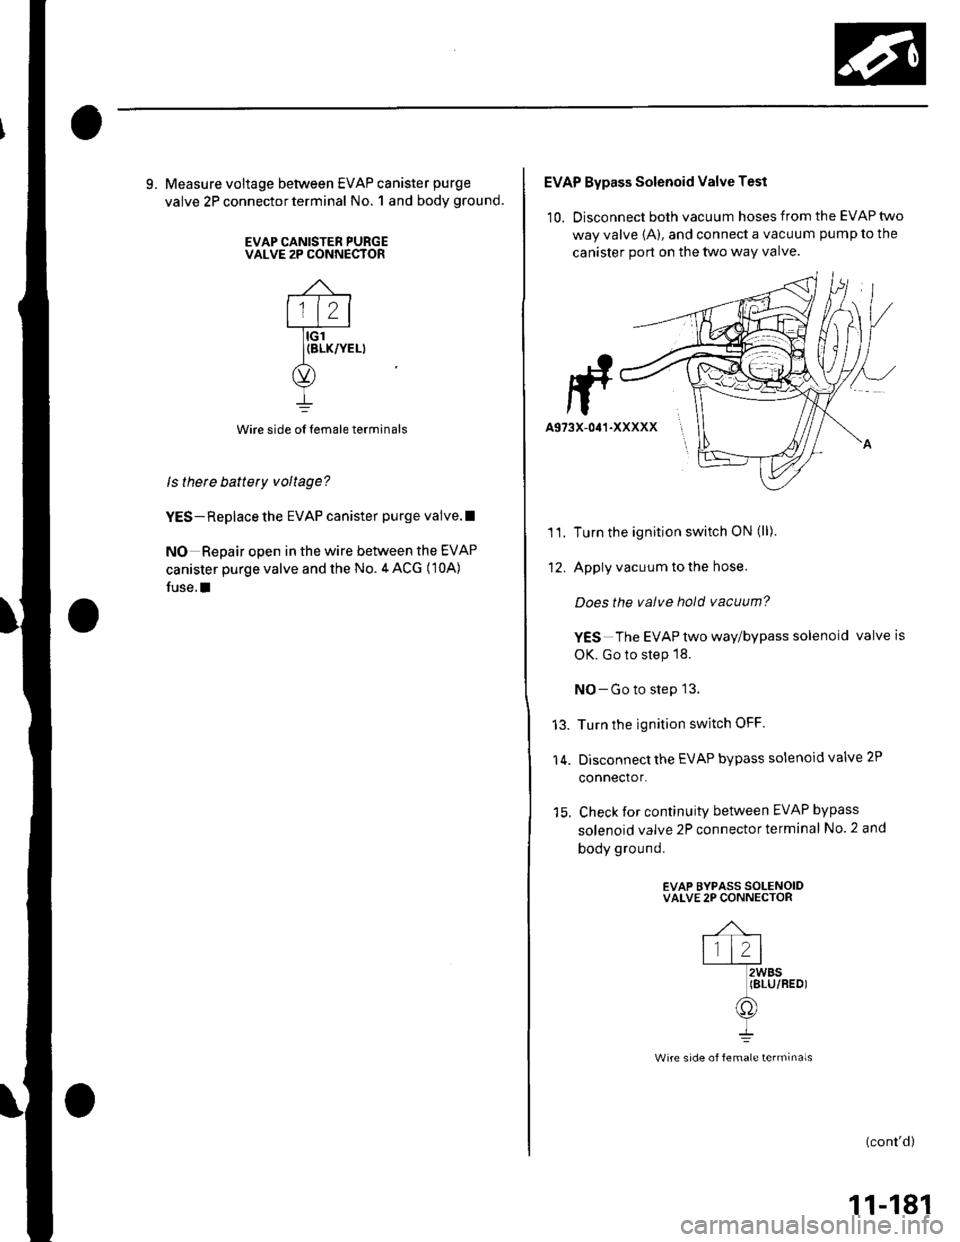
9. Measure voltage between EVAP canister purge
valve 2P connector terminal No. 1 and body ground.
EVAP CANISTER PURGEVALVE 2P CONNECTOR
Wire side oI lemale terminals
ls thete battery voltage?
YES- Replace the EVAP canister purge valve.l
NO Repair open in the wire between the EVAP
canister purge valve and the No.4 ACG (10A)
fuse.I
EVAP Bypass Solenoid Valve Test
10. Disconnect both vacuum hoses from the EVAP two
way valve {A), and connect a vacuum pump to the
canister port on the two way valve.
Turn the ignition switch ON (ll).
Apply vacuum to the hose.
Does the valve hold vacuum?
YES The EVAP two way/bypass solenoid valveis
OK. Go to step 18.
NO-Go to step 13.
Turn the ignition switch OFF.
Disconnect the EVAP bypass solenoid valve 2P
connector.
Check for continuity between EVAP bypass
solenoid valve 2P connector terminal No. 2 and
body ground.
EVAP BYPASS SOLENOIDVALVE 2P CONNECTOR
11.
'It
14.
(cont'd)
11-181
Wire side of female terminals
Page 389 of 1139
EVAP System
to.
't7.
DTC Troubleshooting (cont'd)
ls there continuity?
YES Go to step 16.
NO- Replace the EVAP two waylbypass solenoidvalve (A).1
Disconnect ECM connector E {31P).
Check for continuity between EVAP bypass
solenoid valve 2P connector terminal No. 2 and
body ground.
ls there continuity?
YES Repair the short in the wire between theEVAP bypass solenoid valve and the ECM {E20). f
NO Update the ECI\4 if it does not have the latest
software. or substitute a known-good EClvl, thenrecheck (see page 11-6). lf the symptom/indlcationgoes away with a known-good ECM, replace theoriginal ECM.I
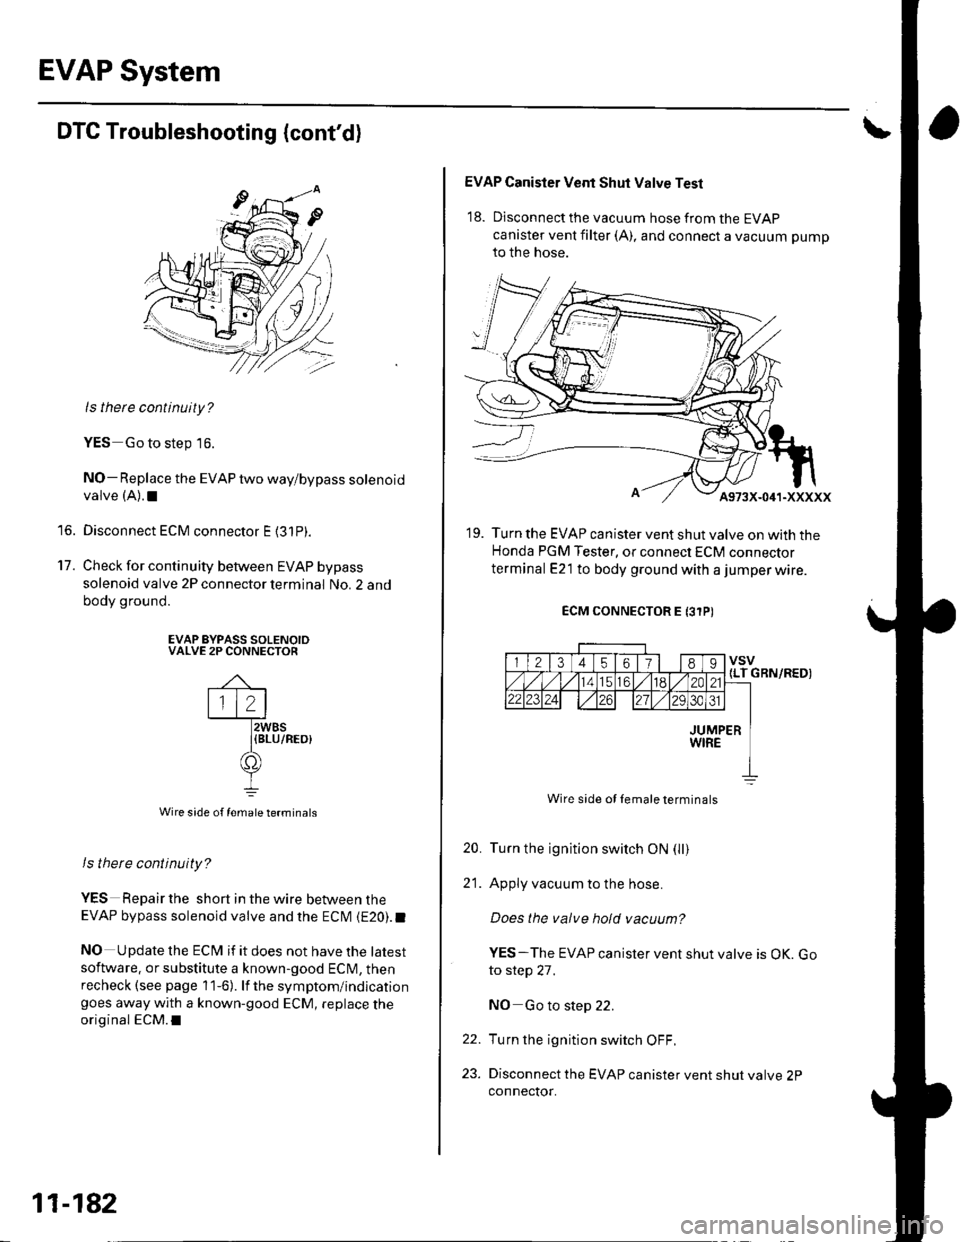
EVAP BYPASS SOLENOIDVALVE 2P CONNECTOR
\,
lll2lI t-l2WBS
-[BLU/REo)())
I
Wire side of female terminals
11-182
EVAP Canisler Vent Shut Valve Test
18. Disconnect the vacuum hose from the EVAP
canister vent filter (A), and connect a vacuum pump
to the hose.
19. Turn the EVAP canister vent shut valve on with theHonda PGM Tester, or connect ECM connector
terminal E21 to body ground with a jumper wire.
ECM CONNECTOR E (3TP)
112134589vsv{LT (1/15tal/la2A21
z3lz4zil./m31
JUMPERWIRE
Wire side ol lemale terminals
Turn the ignition switch ON (ll)
Apply vacuum to the hose.
Does the valve hold vacuum?
YES-The EVAP canister vent shut valve is OK. Goto step 27.
NO Go to step 22.
Turn the ignition switch OFF.
Disconnect the EVAP canister vent shut valve 2Pconnector.
GBN/RED)
20.
21.
22.
23.