engine coolant HONDA CIVIC 2002 7.G Owner's Guide
[x] Cancel search | Manufacturer: HONDA, Model Year: 2002, Model line: CIVIC, Model: HONDA CIVIC 2002 7.GPages: 1139, PDF Size: 28.19 MB
Page 256 of 1139
![HONDA CIVIC 2002 7.G Owners Guide PGM-FI System
Component Location Index
CAMSHAFT POS]TION {CMP) SENSOR B(TOP DEAD CENTER (TDC}SENSORITroubleshootina. oaoe 1 1-95Replacement, p;ge 1-1.1 14
ELECTRICAL LOADDETECTOR {ELDITroubleshooting, HONDA CIVIC 2002 7.G Owners Guide PGM-FI System
Component Location Index
CAMSHAFT POS]TION {CMP) SENSOR B(TOP DEAD CENTER (TDC}SENSORITroubleshootina. oaoe 1 1-95Replacement, p;ge 1-1.1 14
ELECTRICAL LOADDETECTOR {ELDITroubleshooting,](/img/13/5744/w960_5744-255.png)
PGM-FI System
Component Location Index
CAMSHAFT POS]TION {CMP) SENSOR B(TOP DEAD CENTER (TDC}SENSORITroubleshootina. oaoe 1 1-95Replacement, p;ge 1-1.1 14
ELECTRICAL LOADDETECTOR {ELDITroubleshooting,page 1'l -92
INTAKE AIR TEMPERATURE{IATI SENSORTroubleshooting,page 'l'l-55
Replacement, page 11-'l 15
f- \
rl
KNOCK SENSORTroubleshooting, page 1 1-77Beplacement, page 11 115
ENGINE COOLANT TEMPERATURE(ECTI SENSORTroubleshooting, page 1 1-57Replacement, page 11 114
MANIFOLD ABSOLUTE PRESSURE(MAP) SENSORTroubleshooting, page 1 1-52
THROTTLE POSITIONITP} SENSORTroubleshooting, page 11-60CRANKSHAFT POSITIONICKPISENSORTroubleshooting, page'l 1-78Beplacement, page 1 1-'l 16
AIR FUEL RATIO {A/F)SENSOR ISENSOR 1}Trorrbleshooting, page 1 1-84Replacement, page 11- 1 13
{cont'd)
ii'- r'1
.I11 ---:,I''.!,i(..,.?:fir-J-
.....,..:--.
11-49
Page 271 of 1139
PGM-FI System
aDTG Troubleshootang (cont'dl
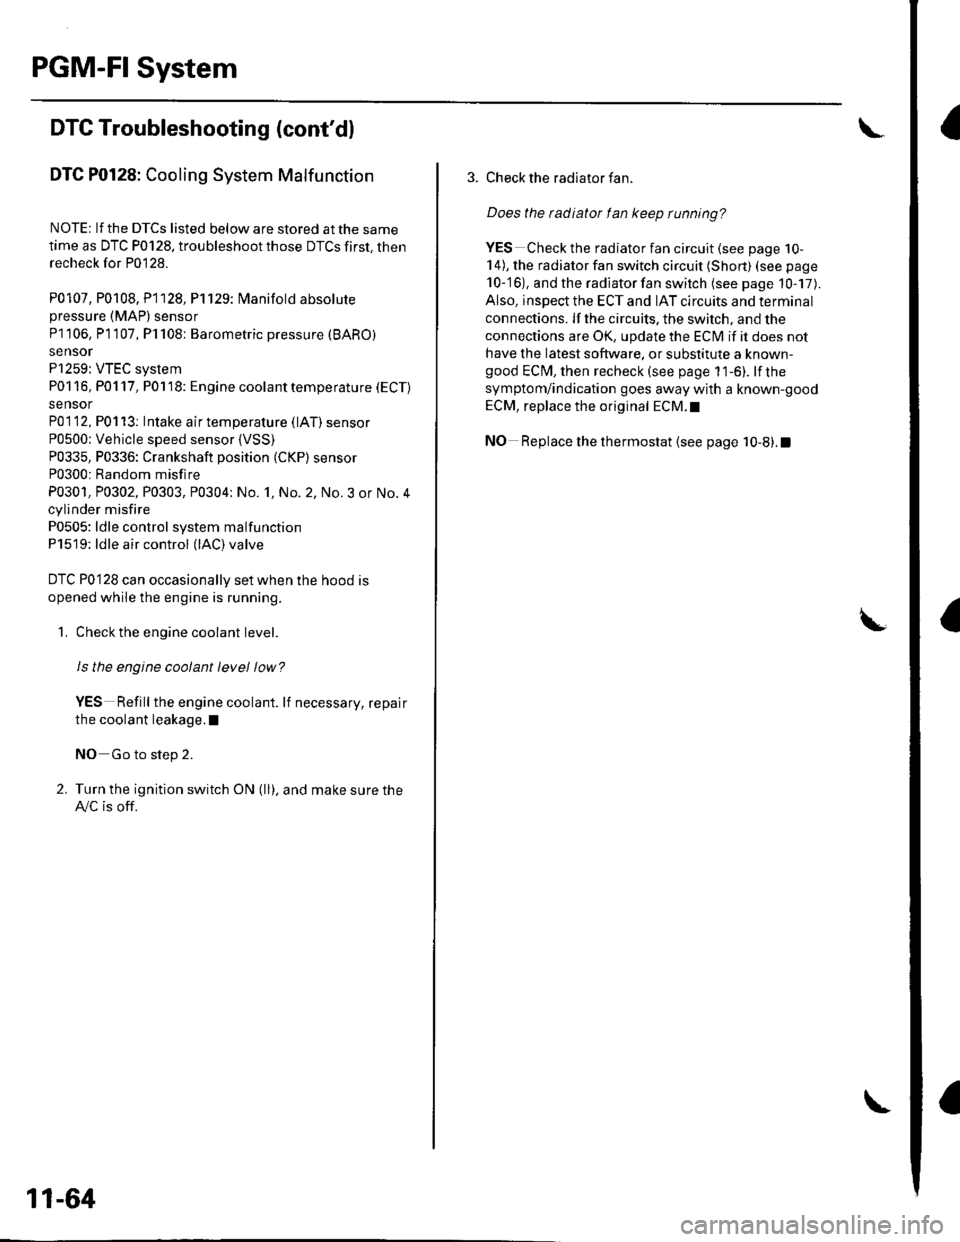
DTC P0128: Cooling System Malfunction
NOTE; lf the DTCS listed below are stored at the same
time as DTC P0128. troubleshoot those DTCS first, thenrecheck for P0128.
P0107, P0108, P1128, P1129: N4anifold absolutepressure (MAP) sensor
P] I06, P1 107, P1 108: Barometric pressure (BARO)
sensor
P1259: VTEC system
P01 16, P01 17, P01 18: Engine coolant temperature (ECT)
sensor
P01 12, P01 13: Intake air temperature (lAT) sensor
P0500: Vehicle speed sensor {VSS)P0335, P0336: Crankshaft position (CKP) sensor
P0300: Random misfire
P0301, P0302, P0303, P0304: No. 1, No. 2, No.3 or No.4
cylinder misfire
P0505: ldle control system malfunction
P1519: ldle air control (lAC)valve
DTC P0128 can occasionally set when the hood is
opened while the engine is running.
1. Check the engine coolant level
Is the engine coolant level low?
VES Refill the engine coolant. lf necessary, repair
the coolant leakage.l
NO Go to step 2.
2. Turn the ignition switch ON (ll), and make sure the
A,/C is off.
11-64
\
3. Check the radiator fan.
Does the tadiator fan keep running?
YES Checkthe rad iato r fan circuit (see page 10-
14), the radiator fan switch circuit (Short) (see page
10-'16), and the radiator fan switch (see page 10-17).
Also, inspect the ECT and IAT circuits and terminal
connections. lf the circuits, the switch, and the
connections are OK, update the ECI\4 if it does not
have the latest software. or substitute a known-good ECM, then recheck (see page 1 1-6). lf the
symptom/indication goes away with a known-good
ECM, replace the original ECM.I
NO Replace the thermostat (see page 10-8).1
Page 346 of 1139
ECM ldle Learn Procedure
The idle learn procedure must be done so the ECM can
learn the engine idle characteristics.
Do the idle learn procedure whenever you do any of
these actions:. Disconnect the battery.
Replace the ECM or disconnect its connector.
Reset the ECM.
NOTE: Erasing DTCS with the Honda PGM Tester
does not require you to do the idle learn procedure.
Remove the No.6 ECU {ECM) ( 15A) fuse from the
under-hood fuse/relay box.
Remove the No.19 baftery (80A) fuse from the under-
hood fuse/relay box.
Remove PGM-FI main relay 1.
Remove any of the wires from the under-hood fuse/
retay Dox.
Disconnect any of the connectors from the under
hood fuse/relay box.
Disconnect the connector between the engine
compartment wire harness and ECM wire harness.
Disconnect the G2 terminal from the transmission
ho u srng.
Disconnectthe G'l terminal from the body.
Disconnectthe G101 terminal from the cylinder head
cover.
Procedure:
To complete the idle learn procedure, do this:
1. Make sure all electrical items (Ay'C, audio, rear
defogger, l:ghts, etc.,) are off.
2. Start the engine, and hold it at 3,000 rpm with no
load {in neutral) until the radiator fan comes on, or
until the engine coolanttemperature reaches 194"F(90'c).
3. Let the engine idle for about 5 minutes with the
throttle fully closed.
NOTE: lf the radiator fan comes on, do not include its
running time in the 5 minutes.
11-139
Page 368 of 1139
Intake Air Bypass GontrolThermalValve Test
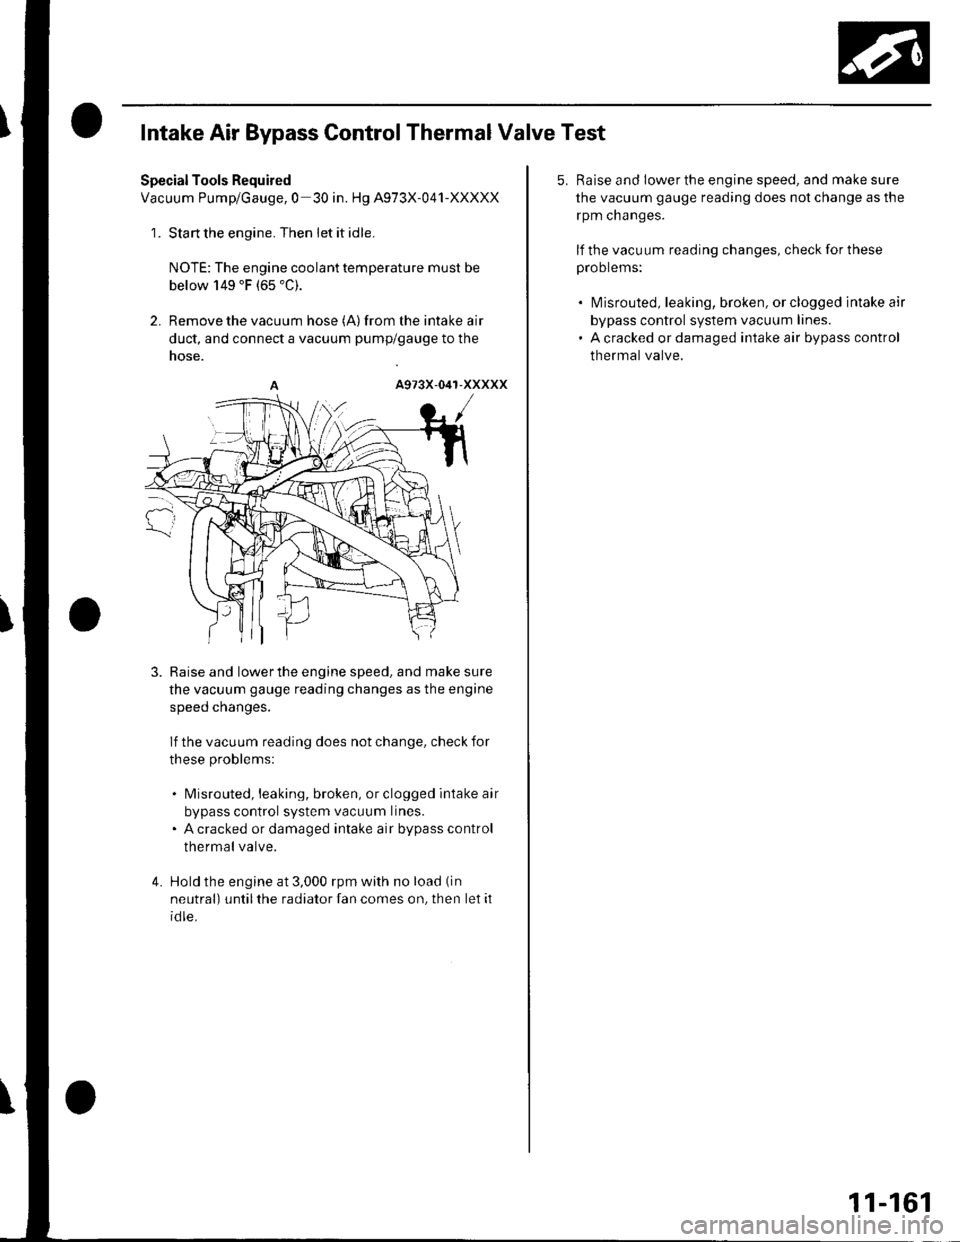
Special Tools Required
Vacuum Pump/Gauge,0 30 in. Hg A973X-041-XXXXX
1. Stan the engine. Then let it idl€.
NOTE: The engine coolant temperature must be
below 149'F (65'C).
2. Remove the vacuum hose (A)from the intake air
duct, and connect a vacuum pump/gauge to the
nose.
3. Raise and lowerthe engine speed. and make sure
the vacuum gauge reading changes as the engine
speeo cnanges.
lf the vacuum reading does not change, check for
these problems:
. Misrouted, leaking, broken, or clogged intake air
bypass control system vacuum lines.. A cracked or damaged intake air bypass control
thermal valve.
4. Hold the engine at 3,000 rpm with no load (in
neutral) until the radiator fan comes on, then let it
id le.
5. Raise and lower the engine speed, and make sure
the vacuum gauge reading does not change as the
rpm cnanges.
lf the vacuum reading changes, check for these
proorems:
. l\4isrouted, leaking, broken, or clogged intake air
bypass control system vacuum lines.. A cracked or damaged intake air bypass control
thermal valve.
11-161
Page 391 of 1139
EVAP System
DTC Troubleshooting (cont'dl
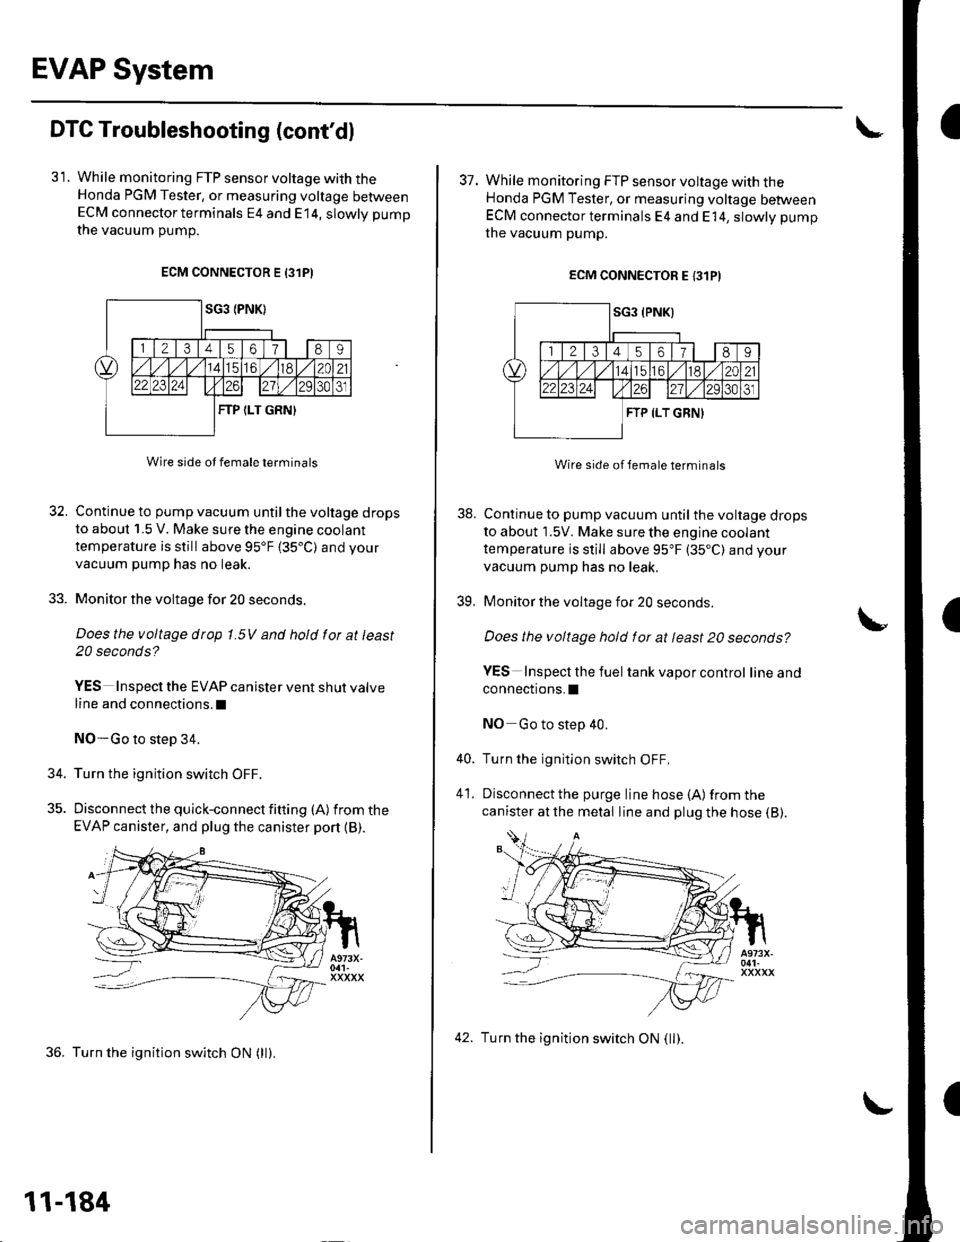
31. While monitoring FTP sensor voltage with theHonda PGM Tester, or measuring voltage betweenECM connector terminals E4 and E14, slowly pump
the vacuum oumD.
ECM CONNECTOR E 13lPI
Wire side ot female terminals
32. Continue to pump vacuum until the voltage drops
to about 1.5 V. Make sure the engine coolant
temperature is still above 95'F 135.C) and your
vacuum pump has no leak.
33. Monitor the voltage for 20 seconds.
Does the voltage drop 1.5V and hold for at least
20 seconds?
YES Inspect the EVAP canister vent shut valve
line and connections.l
NO-Go to step 34.
34. Turn the ignition switch OFF.
35. Discon nect the quick-con nect fitting (A) fromthe
EVAP canister, and plug the canister port {B).
36. Turn the ignition switch ON (ll).
11-184
42. Turn the ignition switch ON (ll).
I
38.
39.
37. While monitoring FTP sensor voltage with theHonda PGM Tester, or measuring voltage betweenECM connector terminals E4 and E 14, slowly pump
the vacuum pump.
ECM CONNECTOR E {31PI
Wire side of lemale terminals
Continue to pump vacuum until the voltage drops
to about 1.5V. Make sure the engine coolant
temperature is still above 95"F (35"C) and your
vacuum pump has no leak.
Monitor the voltage for 20 seconds
Does the voltage hold for at least 20 seconds?
YES Inspecl the fuel tank vapor control lineand
connections.I
NO Go to step 40.
Turn the ignition switch OFF.
Disconnect the purge line hose {A) from the
canister at the metal line and plug the hose (B).
40.
41.
Page 392 of 1139
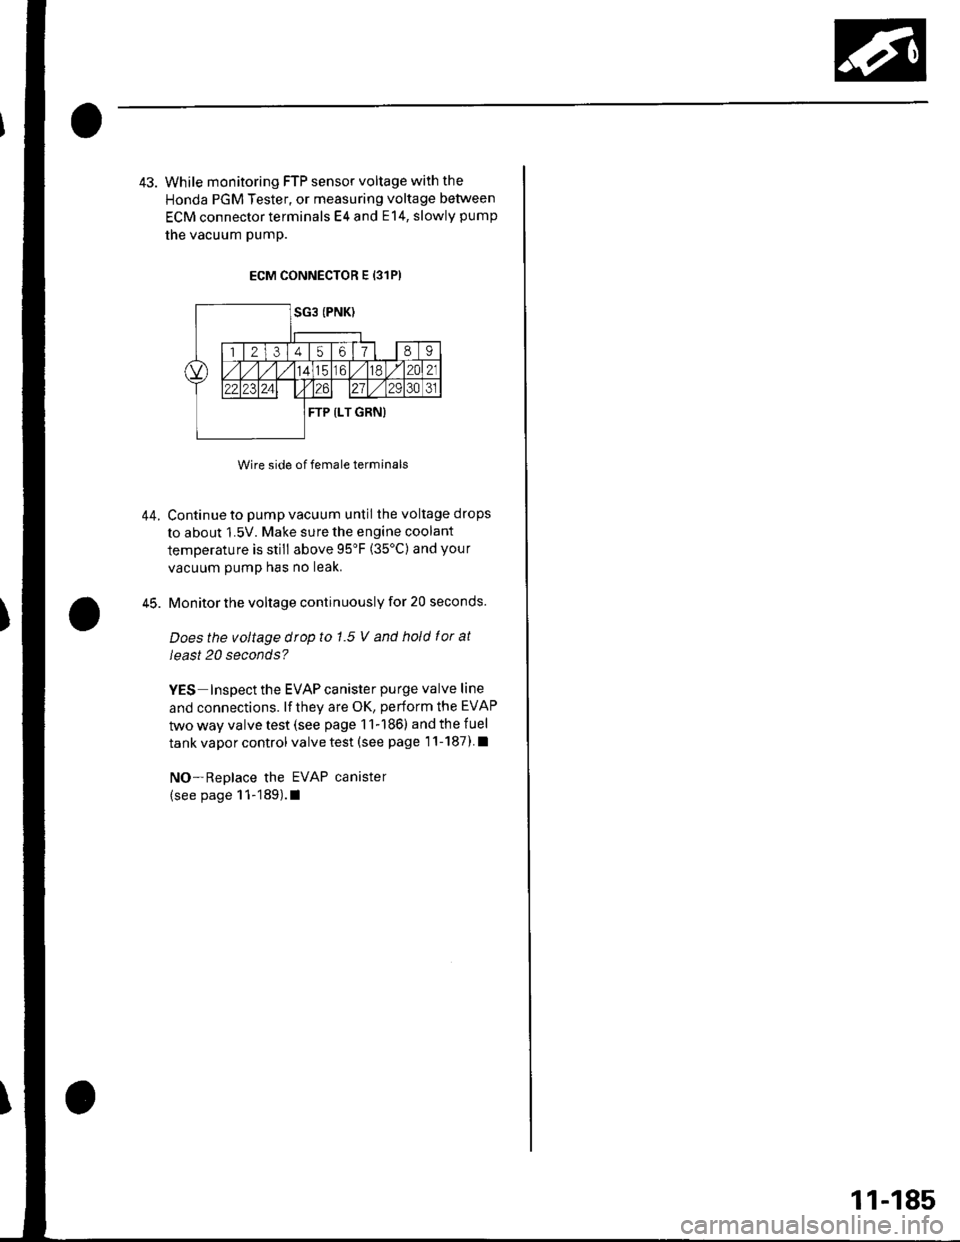
43. While monitoring FTP sensor voltage with the
Honda PGM Tester, or measuring voltage between
ECM connector terminals E4 and E14, slowly pump
the vacuum pump.
ECM CONNECTOR E {31P)
Wire side of female terminals
Continue to pump vacuum until the voltage drops
to about 1.5V. Make sure the engine coolant
temperature is still above 95'F (35'C) and your
vacuum pump has no leak.
Monitor the voltage continuously for 20 seconds.
Does the voltage drop to 1.5 V and hold f or at
least 20 seconds?
YES Inspect the EVAP canister purge valve line
and connections. lf they are OK, perform the EVAP
two way valve test (see page 11-186) and the fuel
tank vapor control valve test (see page 1'l-187) l
NO-Replace the EVAP canister
(see page 11-189).1
44.
45.
11-185
Page 801 of 1139
Heating and Air Conditioning
Radiator and Condenser Fans
Common
(cont'dl
Circuit Troubleshooting
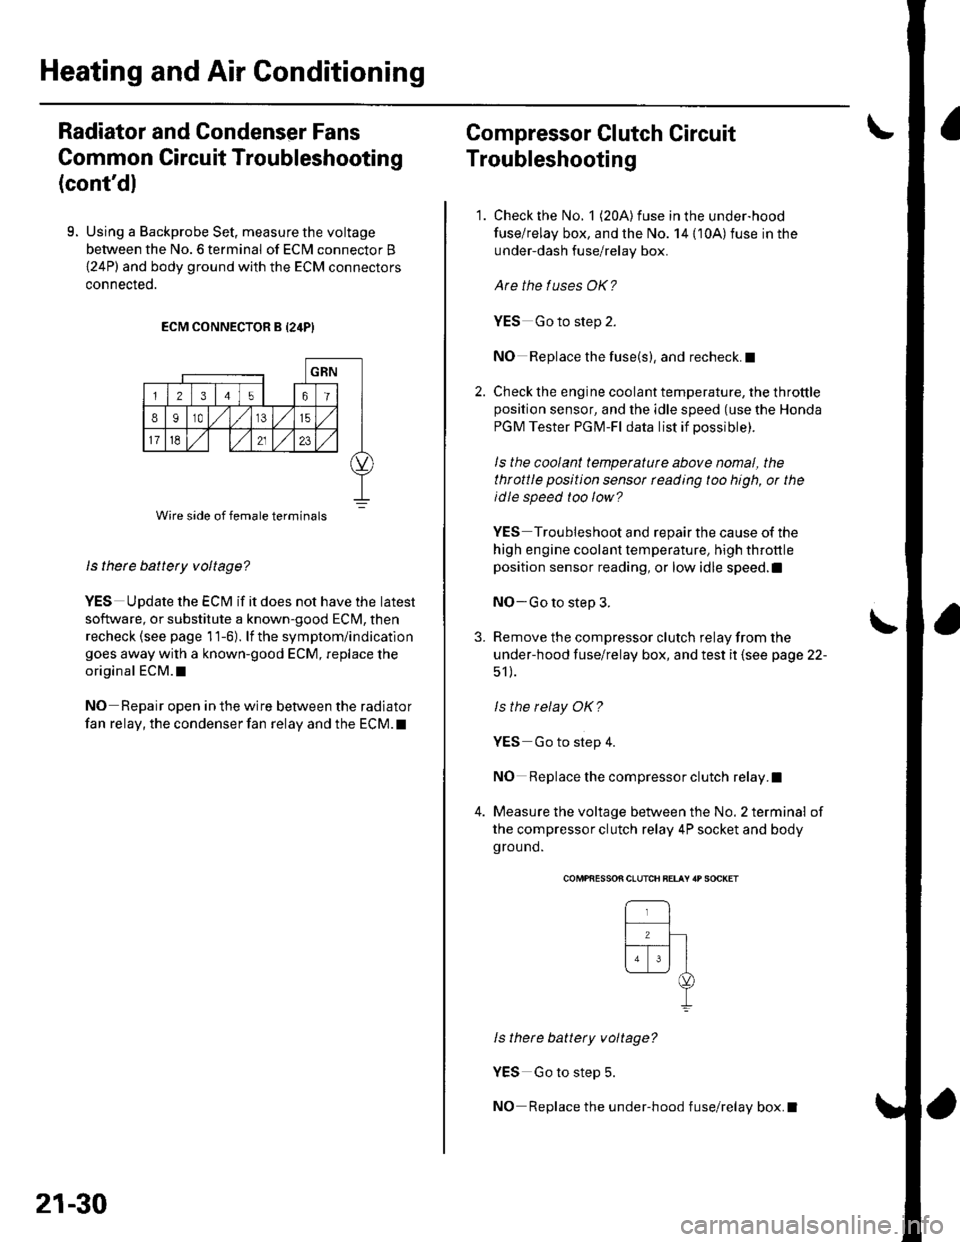
9. Using a Backprobe Set, measure the voltage
between the No. 6 terminal of ECN4 connector B
{24P) and body ground with the ECM connectors
connecteo.
ECM CONNECTOR B {24P}
ls there battery voltage?
YES UDdate the ECM if it does not have the latest
so{tware, or substitute a known-good ECM, then
recheck (see page 11-6). lf the symptom/indication
goes away with a known-good ECM, replace the
original ECM.I
NO Repair open in the wire between the radiator
fan relay, the condenser fan relay and the ECM. t
Wire side of female terminals
21-30
Compressor Clutch Circuit
Troubleshooting
1. Check the No. 1 (20A) fuse in the under-hood
fuse/relay box, and the No. 14 {10A)fuse in the
under-dash fuse/relay box.
Are the tuses OK?
YES Go to step 2.
NO Replace the fuse(s), and recheck.I
2. Check the engine coolant temperature, the throttleposition sensor, and the idle speed (use the Honda
PGM Tester PGM-Fl data list if possible).
ls the coolant temperaturc above nomal, the
throttle position sensor rcading too high, or the
idle speed too low?
YES Troubleshoot and repair the cause of the
high engine coolant temperature, high throttle
position sensor reading, or low idle speed.l
NO-Go to step 3.
3. Remove the compressor clutch relay from the
under-hood fuse/relay box, and test it (see page 22-
51 ).
ls the relay OK?
YES Go to step 4.
NO Replace the compressor clutch relay.I
4. Measure the voltage between the No. 2 terminal of
the compressor clutch relay 4P socket and body
ground.
\
COMPfiESSON CLUTCH BELAY 'P SOCKET
ls there battery voltage?
YES Go to step 5.
NO Replace the under-hood fuse/relay box.I
Page 814 of 1139
Heater Unit/Core Replacement
SRS components are located in this area. Review the
SRS component locations (see page 23'13), and
precautions and procedures (see page 23-14) in the SRS
section before performing repairs or service.
1. Make sure you have the anti-theft code forthe radio,
then write down the freouencies for the radio's
Dreset buttons.
4.
Disconnect the negative cable from the battery,
Disconnect the suction and receiver lines from the
evaporator core (see page 21-42).
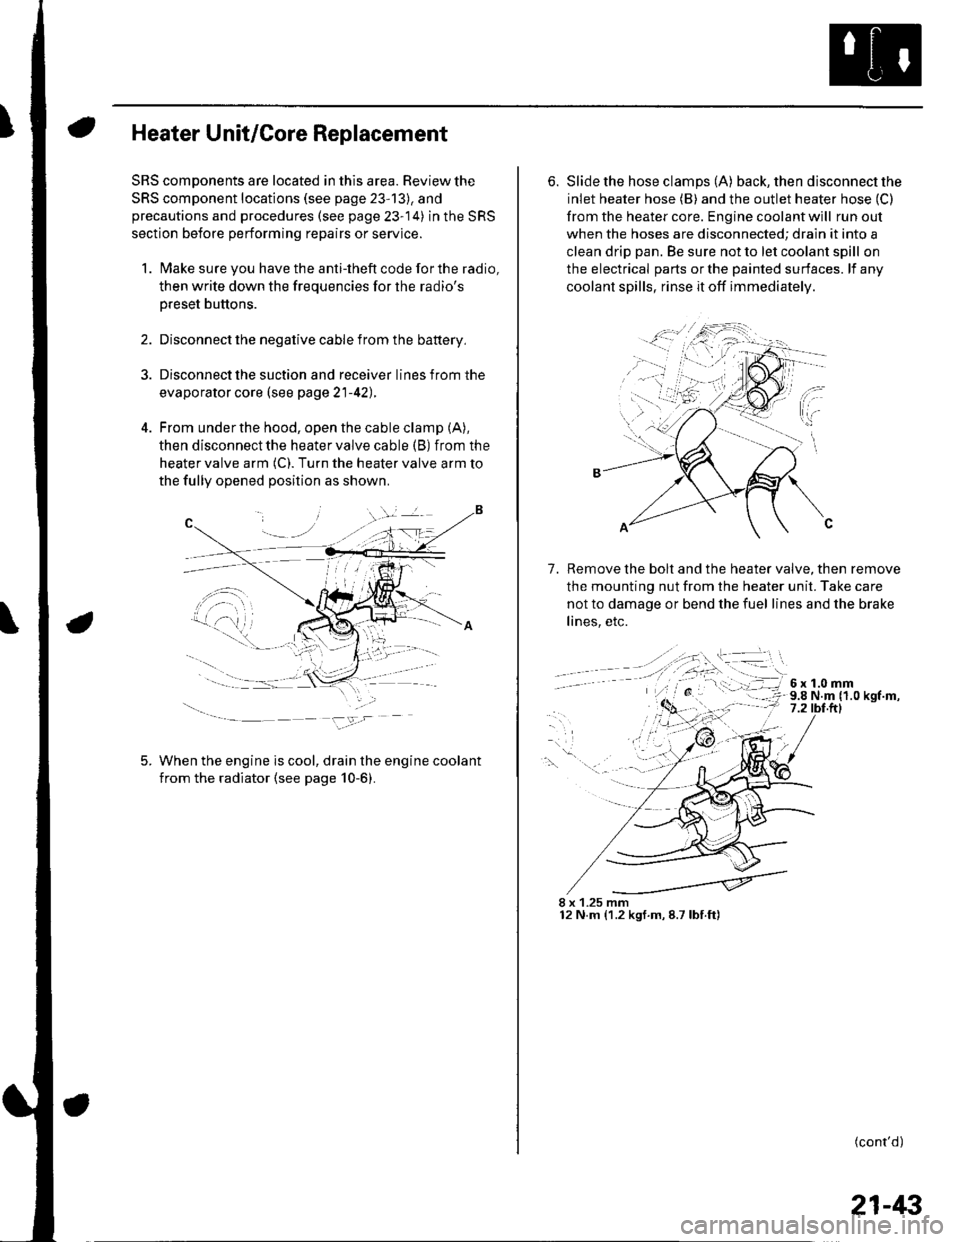
From under the hood, open the cable clamp (A),
then disconnect the heater valve cable (B) from the
heater valve arm (C). Turn the heater valve arm to
the fully opened position as shown
When the engine is cool, drain the engine coolant
from the radiator (see page 10-6).
6. Slide the hose clamps (A) back, the n d isconnect the
inlet heater hose (B) and the outlet heater hose (C)
from the heater core. Engine coolant will run out
when the hoses are disconnected; drain it into a
clean drip pan. Be sure not to let coolant spill on
the electrical parts or the painted surfaces. lf any
coolant spills, rinse it off immediately.
Remove the bolt and the heater valve, then remove
the mounting nut from the heater unit. Take care
not to damage or bend the fuel lines and the brake
lines, etc.
7.
8 x 1.25 mm12 N.m (1.2 kgf.m,8.7lbf.ft)
(cont'd)
21-43
Page 816 of 1139
13. Installthe heater core and the evaporator core in
the reverse order of removal.
14. Installthe heater unit in the reverse order of
removal, and note these items:
. Do not interchange the inlet and outlet heater
hoses, and installthe hose clamps securely.. Refillthe cooling system with engine coolant (see
page 10-6).. Adjust the heater valve cable (see page 2'l-461.. Make sure that there is no coolant leakage.. Make sure that there is no air leakage.. Refer to evaporator core replacement {see step 6
on page 21-42).. Do the engine control module (ECl\4) idle learn
procedure (see page 11-139).. Enter the anti-theft code for the radio, then enter
the customer's radio station Dresets.
21-45
Page 847 of 1139
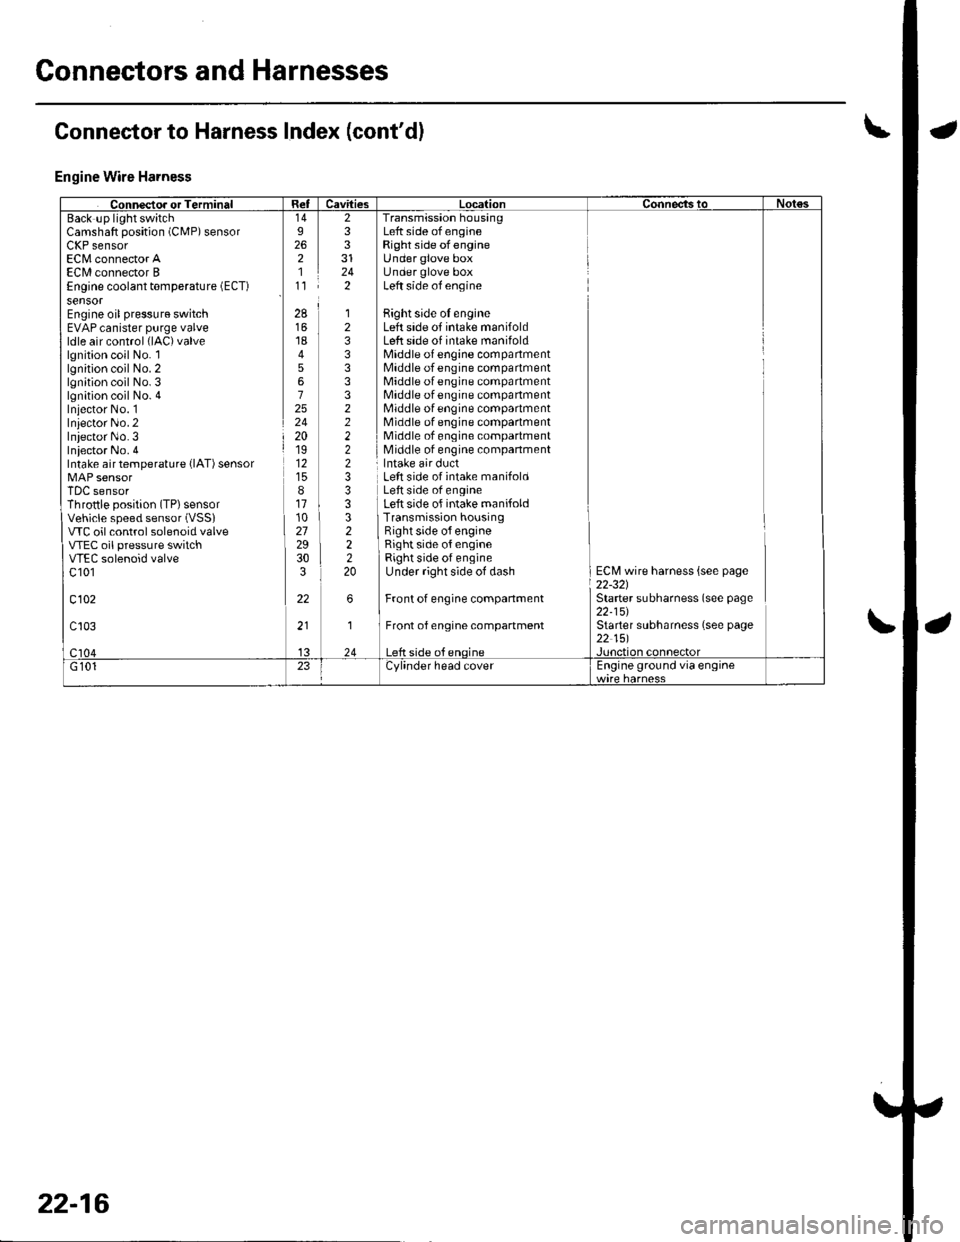
Connectors and Harnesses
Engine Wire Harness
Camshaft position (CMP) sensorLllr sensorEC[,4 connector AECI/l connector BEngine coolant temperature (ECT)
sensorEngine oil pressure switchEVAP canister purge valveldle air control (lAC)valve
lgnition coil No. llgnition coil No. 2lgnition coil No. 3lgnition coil No. 4Iniector No. 1Inlector No.2Iniector No.3Iniector No. 4Intake air temperature {lAT) sensor
TDC sensorThrottle position (TP) sensorVehicle speed sensor (VSSI
VTC oil control solenoid valveVTEC oil pressure switchVTEC solenoid valvec 101
c102
233
242
Transmission housingLeft side of engineRight side ofengineUnder glove boxUnder glove boxLeft side of engine
Bight side oI engineLeft side of intake manifoldLeft side of intake manifoldMiddle of engine compartmentMiddle of engine compartmentMiddle of engine compartmentMiddle of engine compartmentMiddle of engine compartmentMiddle of engine compartmentMiddle of engine compartmentMiddle of engine companment
28
1845672524201912
811102729303
22
12333332222233
322220
Left side of intake manifoldLeft side of engineLeft side of intake manifoldTransmission housingRight side o{ engineRight side of engineRight side of engineUnder right side of dash
Front of engine companment
Front of engine compartment
ECM wire harness {see page22-321Starter subharness (see page22-15)Starter subharness (see page22 151
Connector to Harness Index (cont'dl
22-16