dtc HONDA CIVIC 2002 7.G Manual Online
[x] Cancel search | Manufacturer: HONDA, Model Year: 2002, Model line: CIVIC, Model: HONDA CIVIC 2002 7.GPages: 1139, PDF Size: 28.19 MB
Page 382 of 1139
DTC Pl456: EVAP Control(Fuel Tank Svstem)
System Leakage
The fuel system is designed to allow specified
maximum vacuum and pressure conditions. Do not
deviate from the vacuum and pressure tests as
indicated in these procedures. Excessive pressure/
vacuum would damage the EVAP components or cause
eventual fuel tank failure.
Special Tools Required
Vacuum Pump/Gauge, 0-30 in. Hg A973X-041-XXXXX
This is a two-trip code. Once cleared, it cannot be
reproduced in one trip. Also, cenain specific driving
and ambient conditions must occur before the ECM will
complete the system checks. Additional test drives may
still not meet the specific conditions needed to
reproduce the code.
Follow these troubleshooting procedures carefully to
ensure the integrity of the system and to confirm the
cause of the problem or code.
NOTE: Fresh fuel has a higher volatility that createsgreater pressure/vacuum. The optimum condltlon for
testing is fresh fuel, and must be less than a full tank. lf
possible, to assist in leak detection, add 1 gallon of
fresh fuel to the tank (as long as it will not fill the tank).just before starting these procedures.
Fuel Fill Cap Check
1. Check the fuel fill cap (the cap must say "lf not
tightened 3 clicks check engine light may come
on" ).
ls the proper luel till cap installed and properly
tightened?
YES Go to step 2.
NO- Replace or tighten the cap.I
2. Check the fuel fill cap seal.
ls the tuel fill cap seal missing or damaged?
YES- Replace the fuel fill cap.I
NO The fuelfill cap is OK. Go to step 3.
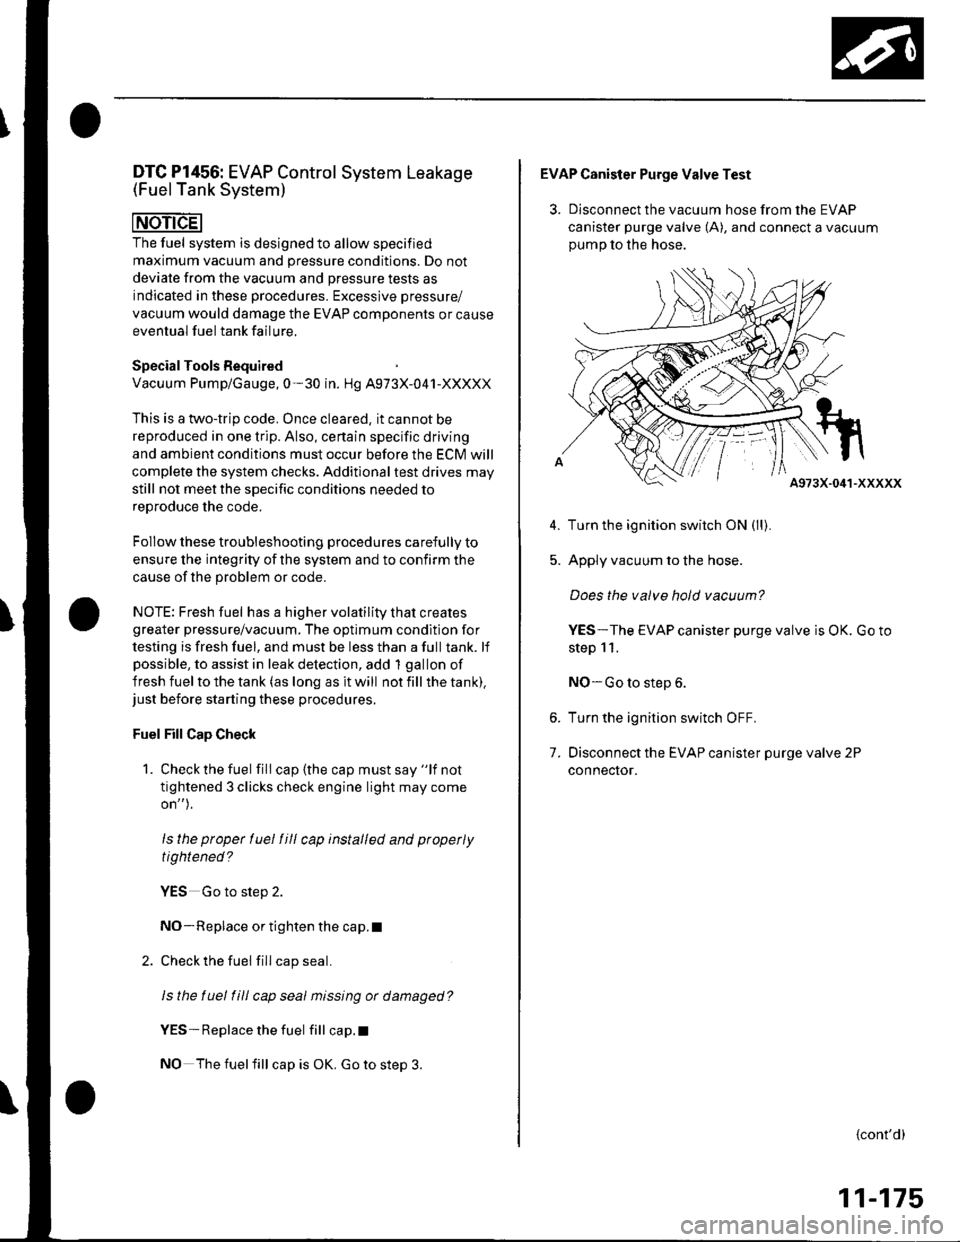
EVAP Canister Purge Valve Test
3. Disconnect the vacuum hose from the EVAP
canister purge valve (A), and connect a vacuum
oumo to the hose.
A973X-041-XXXXX
Turn the ignition switch ON (ll).
Apply vacuum to the hose.
Does the valve hold vacuum?
YES-The EVAP canister purge valve is OK. Go to
step 11.
NO-Go to step 6.
Turn the ignition switch OFF.
Disconnect the EVAP canister purge valve 2P
connecror.
5.
7.
{cont'd)
11-175
Page 383 of 1139
EVAP System
DTC Troubleshooting (cont'd)
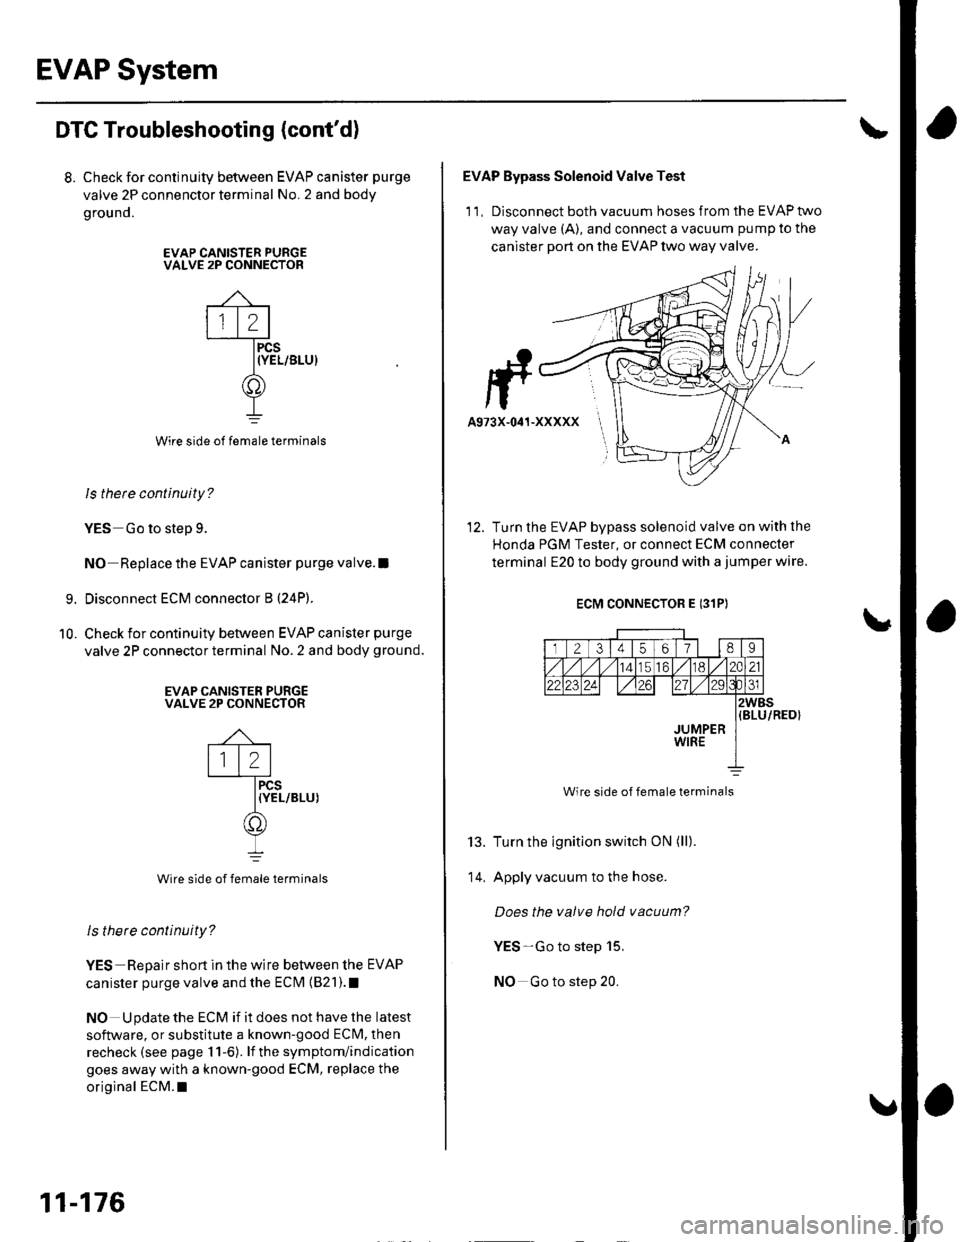
8. Check for continuity between EVAP canister purge
valve 2P connenctor terminal No. 2 and body
grou no.
EVAP CANISTER PURGEVALVE 2P CONNECTOR
Wire side of female terminals
ls there continuity?
YES Go to step 9.
NO Replace the EVAP canister purge valve.l
Disconnect ECM connector B (24P).
Check for continuity between EVAP canister purge
valve 2P connector terminal No. 2 and body ground.
EVAP CANISTER PURGEVALVE 2P CONNECTOR
PCS{YEL/BLU)
Wire side of female terminals
ls there continuity?
YES Repair short in the wire between the EVAP
canister purge valve and the ECI\4 {821).1
NO Update the ECM if it does not have the latest
software, or substitute a known-good ECM, then
recheck (see page 11-6). lf the symptom/indication
goes away with a known-good ECM, replace the
original ECM.I
9.
10.
12
'.\'
11-176
v
F-
A973X-041-XXXXX
EVAP Bypass Solenoid Valve Test
1 1 , Disconnect both vacuum hoses from the EVAP two
way valve (A), and connect a vacuum pump to the
canister port on the EVAP two way valve.
Turn the EVAP bypass solenoid valve on with the
Honda PGM Tester, or connect ECM connecter
terminal E20 to body ground with a jumper wire.
ECM CONNECTOR E 131P)
12345617l 189
456/ 1182C21
22t2?24z7l./29
JUMPERWIRE
2WBS(BLU/RED}
13.
14.
Wire side of female terminals
Turn the ignition switch ON (ll).
Apply vacuum to the hose.
Does the valve hold vacuum?
YES-Go to step 15,
NO Go to step 20.
Page 385 of 1139
EVAP System
DTC Troubleshooting (cont'dl
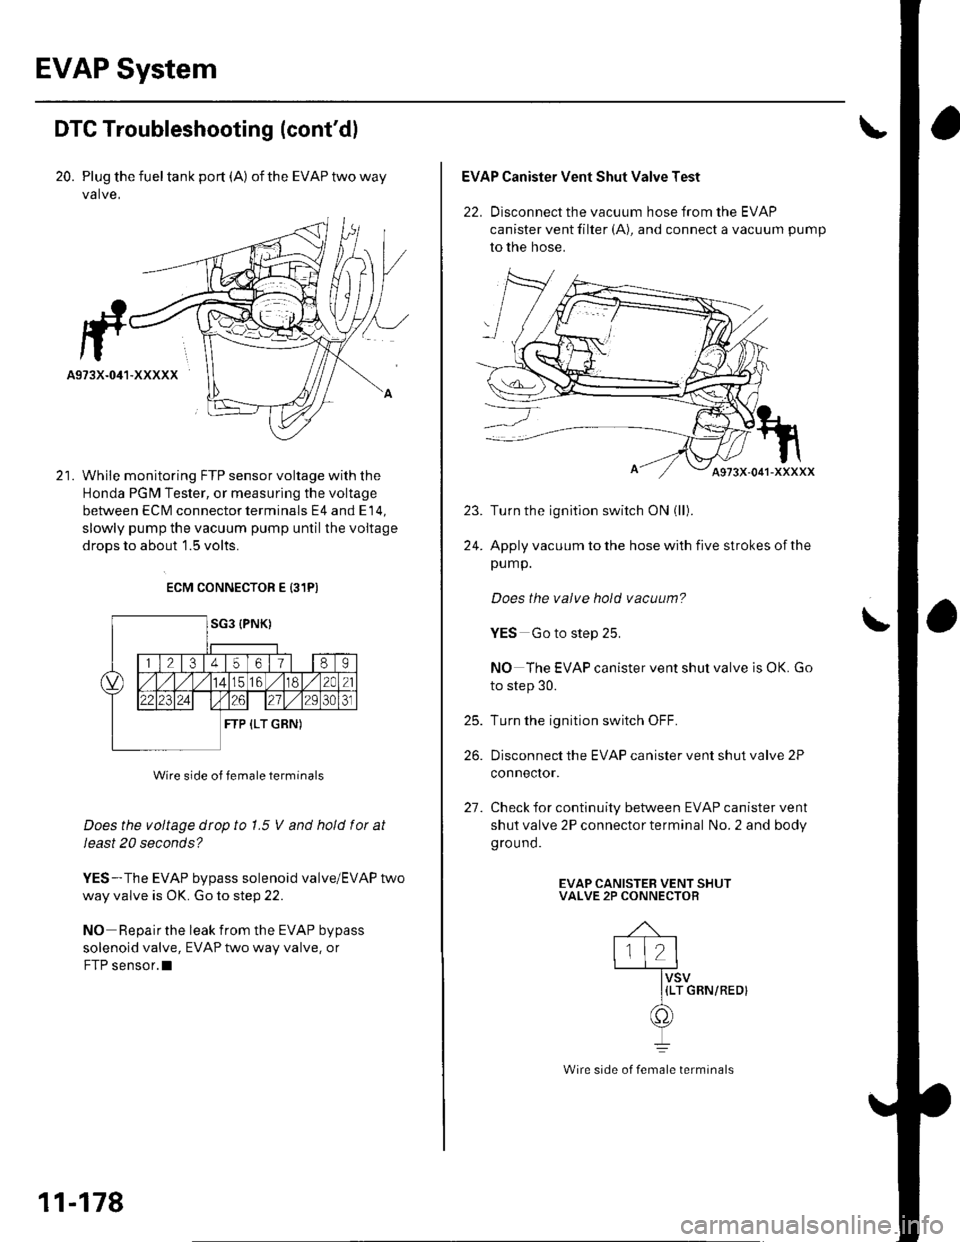
20. Plug the fueltank port (A) oftheEVAPtwoway
valve,
While monitoring FTP sensor voltage with the
Honda PGM Tester, or measuring the voltage
between ECM connector terminals E4 and E 14,
slowly pump the vacuum pump until the voitage
droDS to about 1.5 volts.
ECM CONNECTOR E {31PI
Wire side of female terminals
Does the voltage dtop to 1.5 V and hold fot at
Ieast 20 seconds?
YES-The EVAP bypass solenoid valve/EVAP two
way valve is OK. Go to step 22.
NO Repair the leak from the EVAP bypass
solenoid valve, EVAP two way valve. or
FTP sensor.l
11-178
Wire side of female terminals
EVAP Canister Vent Shut Valve Test
22. Disconnect the vacuum hose from the EVAP
canister vent filter (A), and connect a vacuum pump
to the hose.
Turn the ignitlon switch ON (ll).
Apply vacuum to the hose with five strokes of the
pump.
Does the valve hold vacuum?
YES Go to step 25.
NO The EVAP canister vent shut valve is OK. Go
to step 30.
Turn the ignition switch OFF.
Disconnect the EVAP canister vent shut valve 2P
conneclor.
Check for continuity between EVAP canister vent
shut valve 2P connector terminal No. 2 and body
ground.
EVAP CANISTEB VENT SHUTVALVE 2P CONNECTOR
{LT GRN/REOI
\
25.
26.
21.
Page 387 of 1139
EVAP System
DTC Troubleshooting (cont'd)
DTC Pl457: EVAP Control System(EVAP Canister System)
Leakage
The fuel system is designed to allow specified
maximum vacuum and pressure conditions. Do not
deviate from the vacuum and pressure tests as
indicated in these procedures. Excessive pressure/
vacuum would damage the EVAP components or
cause eventual fuel tank system failure.
SpecialTools Required
Vacuum pump/gauge, 0-30 in.Hg A973X-041-XXXXX
This is a two-trip code. Once cleared, it cannot be
reproduced in one trip. Also, certain specific driving
and ambient conditions must occur before the ECfM will
complete the system checks, Additional test drives may
still not meet the specific conditions needed to16^r^.1' '^6 rh6 ^^.16
Follow these troubleshooting procedures carefully to
ensure the integrity of the system and to confirm the
cause of the problem or code.
NOTE: Fresh fuel has a higher volatility lhat creates
greater pressure/vacuum. The optimum condition for
testing is fresh fuel, and there must be less than a full
tank. lf possible, to assist in leak detection, add I gallon
of fresh fuel to the tank (as long as it will not fill the
tank), just before starting these procedures.
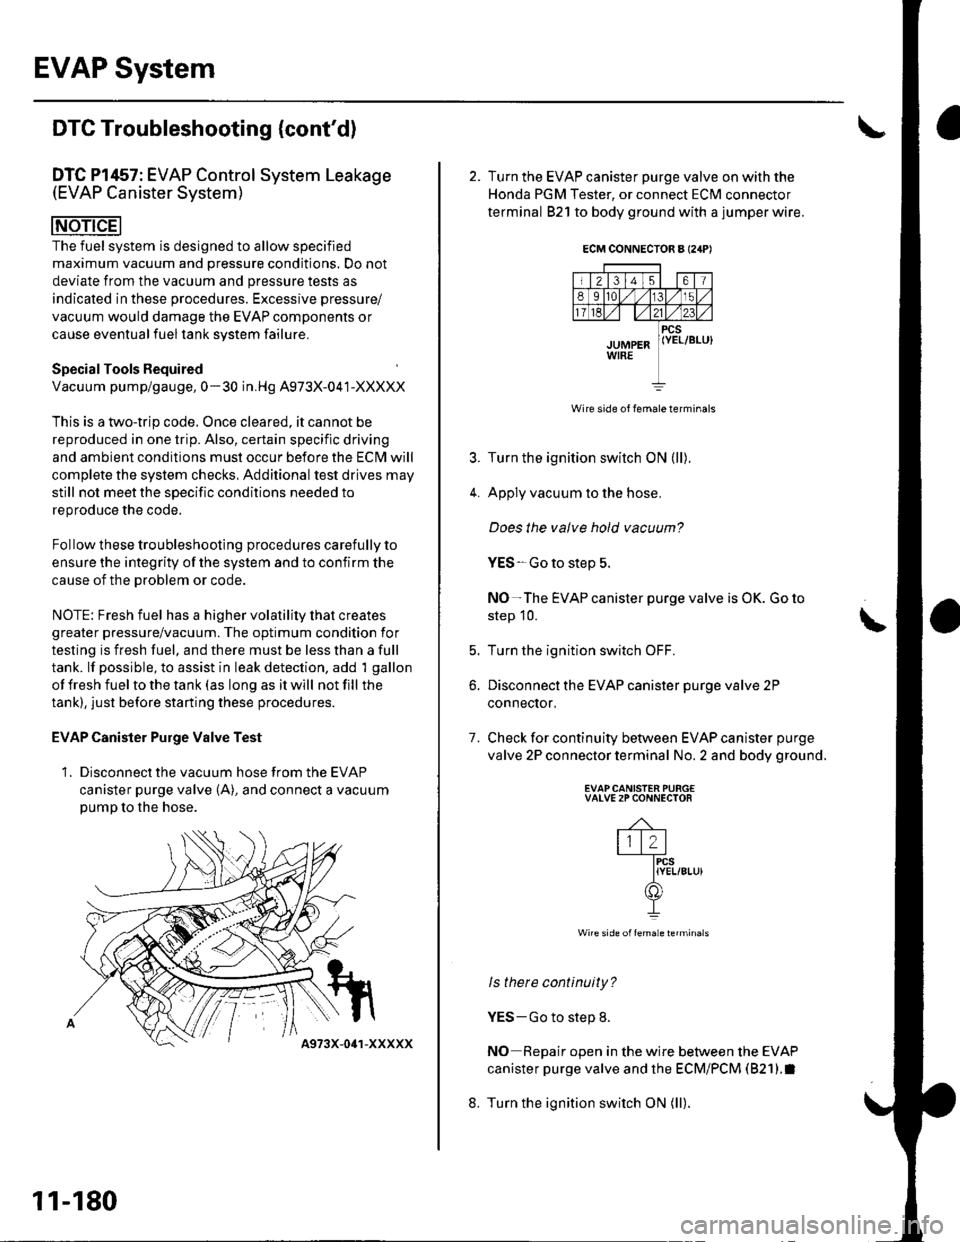
EVAP Canister Purge Valve Test
1. Disconnect the vacuum hose from the EVAP
canister purge valve (A), and connect a vacuumpump to the hose.
11-180
4973X-041-XXXXX
ECM CONNECTOR A I24P'
Wire side of lemale terminals
4.
7.
2. Turn the EVAP canister purge valve on with the
Honda PGM Tester, or connect ECM connector
terminal 821 to body ground with a jumper wire.
Turn the ignition switch ON (ll).
Apply vacuum to the hose.
Does the valve hold vacuum?
YES-Go to step 5.
NO-The EVAP canister purge valve is OK. Go to
step 10.
Turn the ignition switch OFF.
Disconnect the EVAP canister purge valve 2P
conneclor,
Check for continuity between EVAP canister purge
valve 2P connector terminal No. 2 and body ground.
EVAPCANISTEN PURG€VALVE 2P CONNECTOR
-4-
lll2l-fircs
IYEL/8Lu)(f])
I
Wire side offemale lerminals
ls there continuity?
YES-Go to step 8.
NO Repair open in the wire between the EVAP
canister purge valve and the ECM/PCM (821).I
Turn the ignition switch ON (ll).
t
b.
8.
Page 389 of 1139
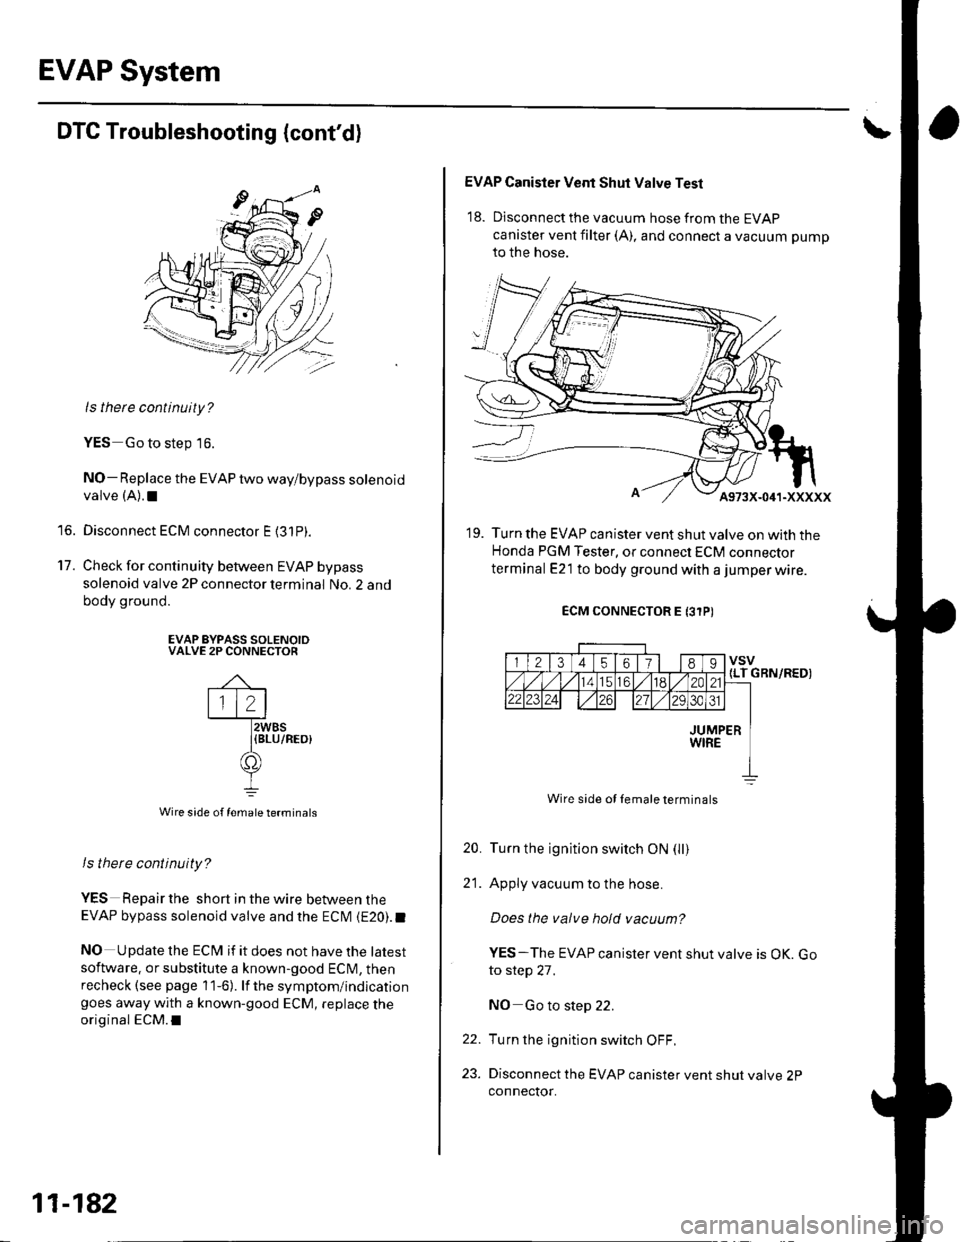
EVAP System
to.
't7.
DTC Troubleshooting (cont'd)
ls there continuity?
YES Go to step 16.
NO- Replace the EVAP two waylbypass solenoidvalve (A).1
Disconnect ECM connector E {31P).
Check for continuity between EVAP bypass
solenoid valve 2P connector terminal No. 2 and
body ground.
ls there continuity?
YES Repair the short in the wire between theEVAP bypass solenoid valve and the ECM {E20). f
NO Update the ECI\4 if it does not have the latest
software. or substitute a known-good EClvl, thenrecheck (see page 11-6). lf the symptom/indlcationgoes away with a known-good ECM, replace theoriginal ECM.I
EVAP BYPASS SOLENOIDVALVE 2P CONNECTOR
\,
lll2lI t-l2WBS
-[BLU/REo)())
I
Wire side of female terminals
11-182
EVAP Canisler Vent Shut Valve Test
18. Disconnect the vacuum hose from the EVAP
canister vent filter (A), and connect a vacuum pump
to the hose.
19. Turn the EVAP canister vent shut valve on with theHonda PGM Tester, or connect ECM connector
terminal E21 to body ground with a jumper wire.
ECM CONNECTOR E (3TP)
112134589vsv{LT (1/15tal/la2A21
z3lz4zil./m31
JUMPERWIRE
Wire side ol lemale terminals
Turn the ignition switch ON (ll)
Apply vacuum to the hose.
Does the valve hold vacuum?
YES-The EVAP canister vent shut valve is OK. Goto step 27.
NO Go to step 22.
Turn the ignition switch OFF.
Disconnect the EVAP canister vent shut valve 2Pconnector.
GBN/RED)
20.
21.
22.
23.
Page 391 of 1139
EVAP System
DTC Troubleshooting (cont'dl
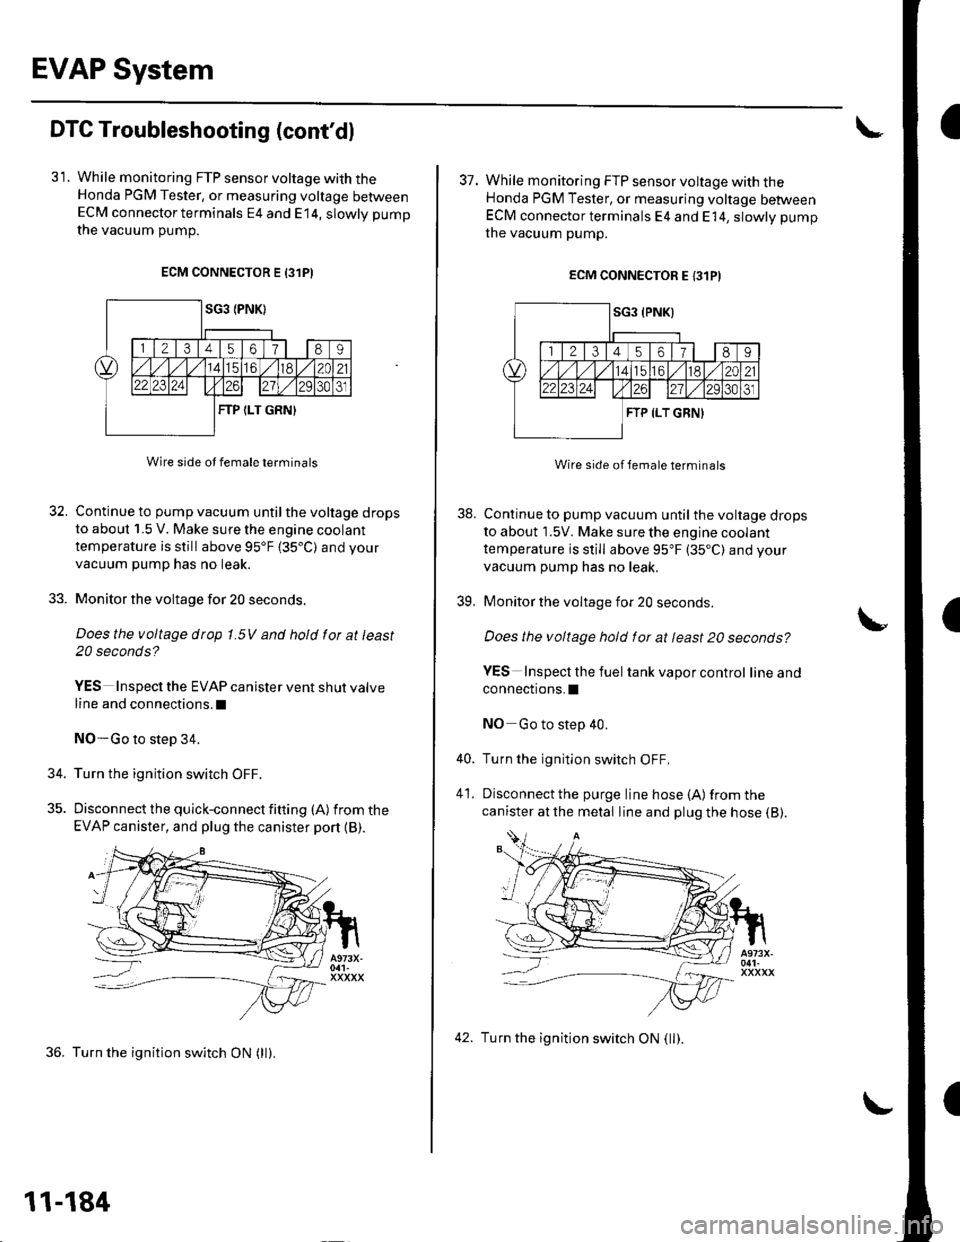
31. While monitoring FTP sensor voltage with theHonda PGM Tester, or measuring voltage betweenECM connector terminals E4 and E14, slowly pump
the vacuum oumD.
ECM CONNECTOR E 13lPI
Wire side ot female terminals
32. Continue to pump vacuum until the voltage drops
to about 1.5 V. Make sure the engine coolant
temperature is still above 95'F 135.C) and your
vacuum pump has no leak.
33. Monitor the voltage for 20 seconds.
Does the voltage drop 1.5V and hold for at least
20 seconds?
YES Inspect the EVAP canister vent shut valve
line and connections.l
NO-Go to step 34.
34. Turn the ignition switch OFF.
35. Discon nect the quick-con nect fitting (A) fromthe
EVAP canister, and plug the canister port {B).
36. Turn the ignition switch ON (ll).
11-184
42. Turn the ignition switch ON (ll).
I
38.
39.
37. While monitoring FTP sensor voltage with theHonda PGM Tester, or measuring voltage betweenECM connector terminals E4 and E 14, slowly pump
the vacuum pump.
ECM CONNECTOR E {31PI
Wire side of lemale terminals
Continue to pump vacuum until the voltage drops
to about 1.5V. Make sure the engine coolant
temperature is still above 95"F (35"C) and your
vacuum pump has no leak.
Monitor the voltage for 20 seconds
Does the voltage hold for at least 20 seconds?
YES Inspecl the fuel tank vapor control lineand
connections.I
NO Go to step 40.
Turn the ignition switch OFF.
Disconnect the purge line hose {A) from the
canister at the metal line and plug the hose (B).
40.
41.
Page 506 of 1139
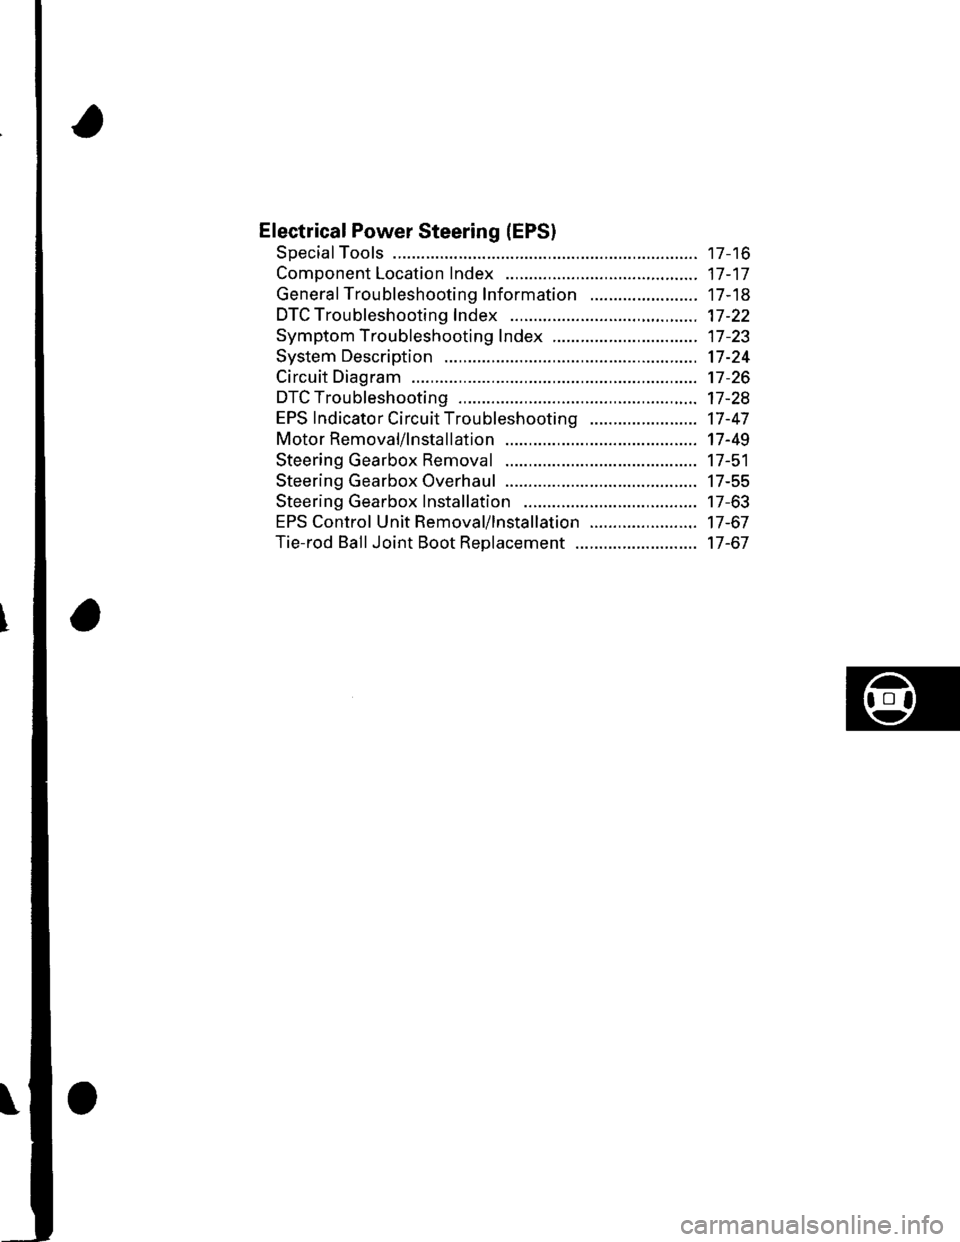
Electrical Power Steering (EPSI
SpecialTools ............. 17 -16
Component Location Index ......................................... 17-17
General Troubleshooting Information ....................... 17-18
DTC Troubleshooting Index .............. 17-22
Symptom Troubleshooting Index ............................... 17 -23
System Description ................. ........... 17-24
Circuit Diagram ......... 17-26
DTC Troubleshooting ............... .......... 17-28
EPS lndicator Circuit Troubleshooting ....................... 17-47
Motor Removal/lnstallation ............... 17-49
Steering Gearbox Removal ............... 17-51
Steering Gearbox Overhaul ............... 17-55
Steering Gearbox Installation ........... 17-63
EPS Control Unit Remova l/lnsta llation ....................... 17-67
Tie-rod Ball Joint Boot Replacement .......................... 17-67
Page 509 of 1139
EPS Components
aGeneral Troubleshooting Information
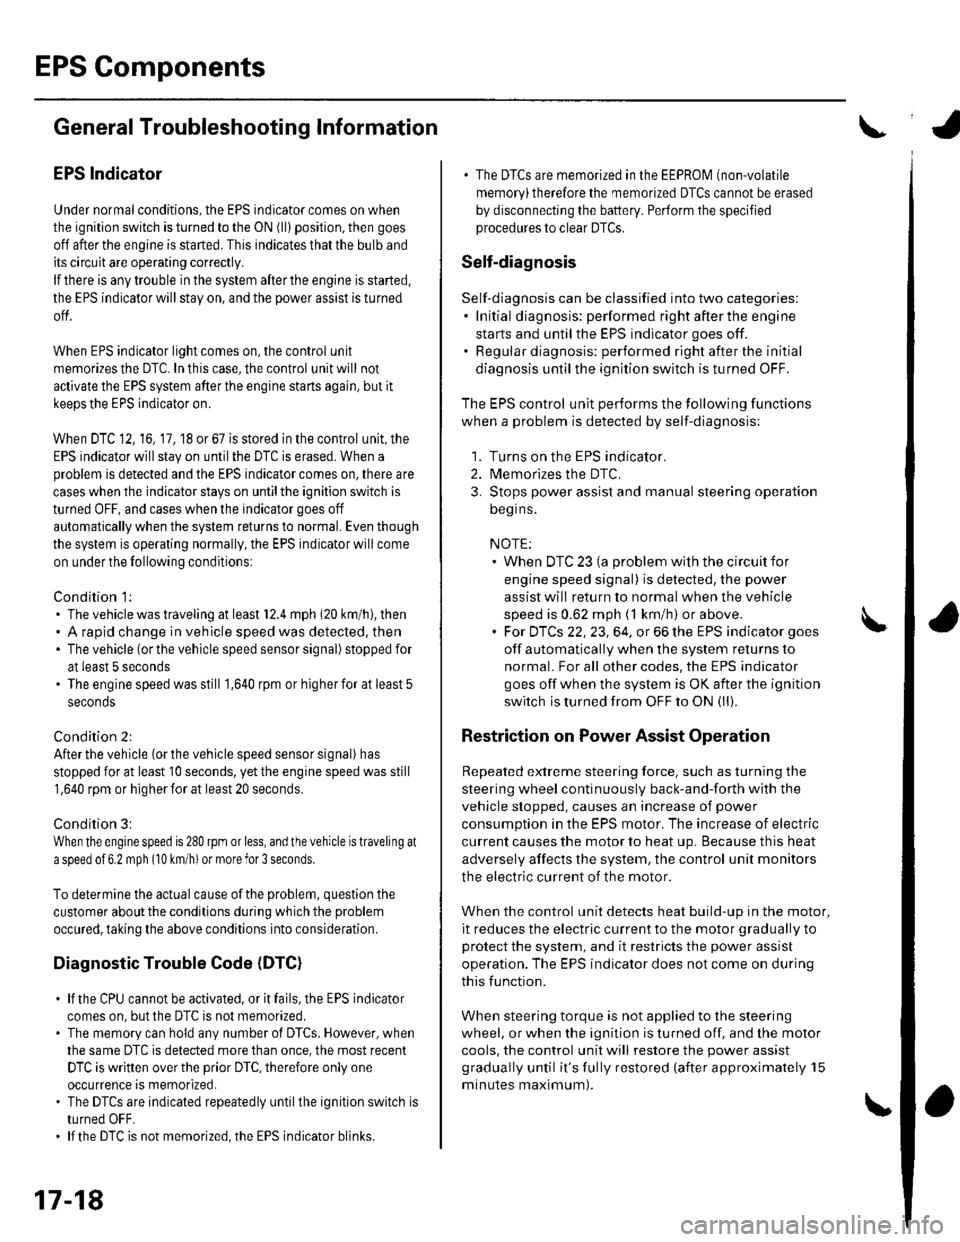
EPS Indicator
Under normal conditions, the EPS indicator comes on when
the ignitlon switch is turned to the ON (ll) position, then goes
off after the engine is started. This indicates that the bulb and
its circuit are operating correctly.
lf there is any trouble in the system after the engine is started,
the EPS indicator will stay on, and the power assist is turned
off.
When EPS indicator light comes on, the control unit
memorizes the DTC. In this case, the control unit will not
activate the EPS system after the engine starts again, but it
keeps the EPS indicator on.
When DTC 12, 16, 17, 18 or 67 is stored in the control unit, the
EPS indicator will stay on until the DTC is erased. When a
problem is detected and the EPS indicator comes on, there are
cases when the indicator stays on untilthe ignition switch is
turned 0FF, and cases when the indicator goes off
automatically when the system returns to normal. Even though
the system is operating normally, the EPS indicator will come
on under the following conditions:
Condition '1:
. The vehicle was traveling at least 12.4 mph (20 km/h), then. A rapid change in vehicle speed was detected, then. The vehicle (or the vehicle speed sensor signal) stopped for
at least 5 seconds. The engine speed was still 'l,640rpmorhigherforatleastS
seconds
Condition 2:
After the vehicle (or the vehicle speed sensor signal) has
stopped for at least 10 seconds, yet the engine speed was still
1,640 rpm or higherfor at least 20 seconds.
Condition 3:
When the engine speed is 280 rpm or less, and the vehicle is traveling at
a speed of 6,2 mph (10 km/h) or more for 3 seconds.
To determine the actual cause ofthe problem, question the
customer about the conditions during which the problem
occured, taking the above conditions into consideration.
Diagnostic Trouble Code (DTCI
. lf the CPU cannot be activated, or itfails,the EPS indicator
comes on, but the DTC is not memorized.. The memory can hold any number of DTCS. However, when
the same DTC is detected more than once, the most recent
DTC is written over the prior DTC, therefore only one
occurrence is memorized.. The DTCS are indicated repeatedly untilthe ignition switch is
turned OFF.. lf the DTC is not memorized,the EPS indicator blinks.
. The DTCS are memorized in the EEPRO| (non-volatile
memory) therefore the memorized DTCS cannot be erased
by disconnecting the battery. Perform the specified
procedures to clear DTCS.
Self-diagnosis
Self-diagnosis can be classified into two categories:.Initial diagnosis: performed right after the engine
starts and until the EPS indicator goes off.. Regular diagnosis: performed right after the initial
diagnosis until the ignition switch is turned OFF.
The EPS control unit performs the following functions
when a problem is detected by self-diagnosis;
'1. Turns on the EPS indicator.
2. Memorizes the DTC.
3. Stops power assist and manual steering operation
begrns.
NOTE:. When DTC 23 (a problem with the circuit for
engine speed signal) is detected, the power
assist will return to normal when the vehicle
speed is 0.62 mph (1 km/h) or above.. Fot DfCs 22,23, 64, or 66 the EPS indicator goes
off automatically when the system relurns to
normal. For all other codes, the EPS indicator
goes off when the system is OK after the ignition
switch is turned from OFF to ON (ll).
Restriction on Power Assist Operation
Repeated extreme steering force. such as turning the
steering wheel continuously back-and-forth with the
vehicle stopped, causes an increase of power
consumption in the EPS motor. The increase of electric
current causes the motor to heat up. Because this heat
adversely affects the system, the control unit monitors
the electric current of the motor.
When the control unit detects heat build-up in the motor,
it reduces the electric current to the motor gradually to
protect the system, and it restricts the power assist
operation. The EPS indicator does not come on during
this function.
When steering torque is not applied to the steering
wheel, or when the ignition is turned off, and the motor
cools, the control unit will restore the power assist
gradually until it's fully restored (after approximately 15
minutes maximum).
17-18
Page 510 of 1139
How to Troubleshoot EPS DTCs
The troubleshooting flowchart procedures assume that
the cause of the problem is still present and the EPS
indicator is still on, Following the flowchart when the
EPS indicator does not come on can result in incorrect
diagnosis.
The connector iliustrations show the female terminal
connectors with a single outline and the male terminal
connectors with a double outline.
1. Ouestion the customer about the conditions when
the problem occured, and try to reproduce the
same conditions for troubleshooting. Find out
when the EPS indicator came on, such as while
turning. afterturning, when the vehicle was at a
ce rta in speed, etc.
2. When the EPS indicator does not come on during
the test drive, but troubleshooting is done based on
the DTC, check for loose connectors, poor terminal
contact. etc in the affected circuit, before you start
troubleshooting.
3. After trou bleshooting, clear the DTC and test-drive
the vehicle. Be sure the EPS indicator does not
come on.
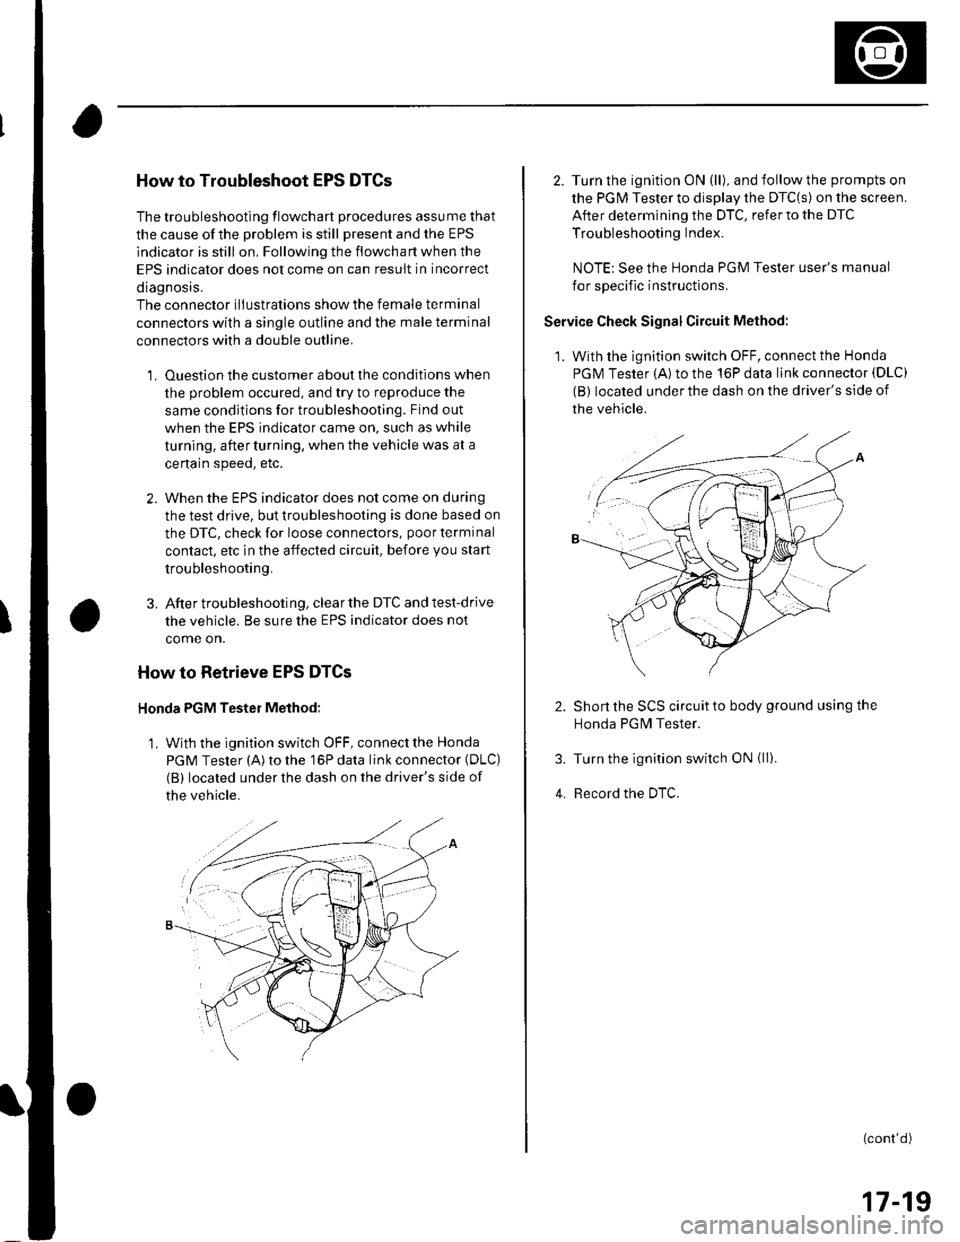
How to Retrieve EPS DTCs
Honda PGM Tester Method:
1, With the ignition switch OFF, connect the Honda
PGM Tester (A) to the 16P data link connector (DLC)
(B) located under the dash on the driver's side of
the vehicle.
2. Turn the ignition ON (ll), and follow the prompts on
the PGM Tester to display the DTC(s) on the screen.
After determining the DTC, refer to the DTC
Troubleshooting Index.
NOTE: See the Honda PGM Tester user's manual
for specific instructions.
Service Check Signal Circuit Method:
1. With the ignition switch OFF, connect the Honda
PGM Tester (A)to the 16P data link connector (DLC)
(B) located under the dash on the driver's side of
the vehicle.
Short the SCS circuit to body ground using the
Honda PGN4 Tester.
Turn the ignition switch ON {ll).
Record the DTC.
(cont'd)
17-19
Page 511 of 1139
EPS Components
General Troubleshooting Information (cont'dl
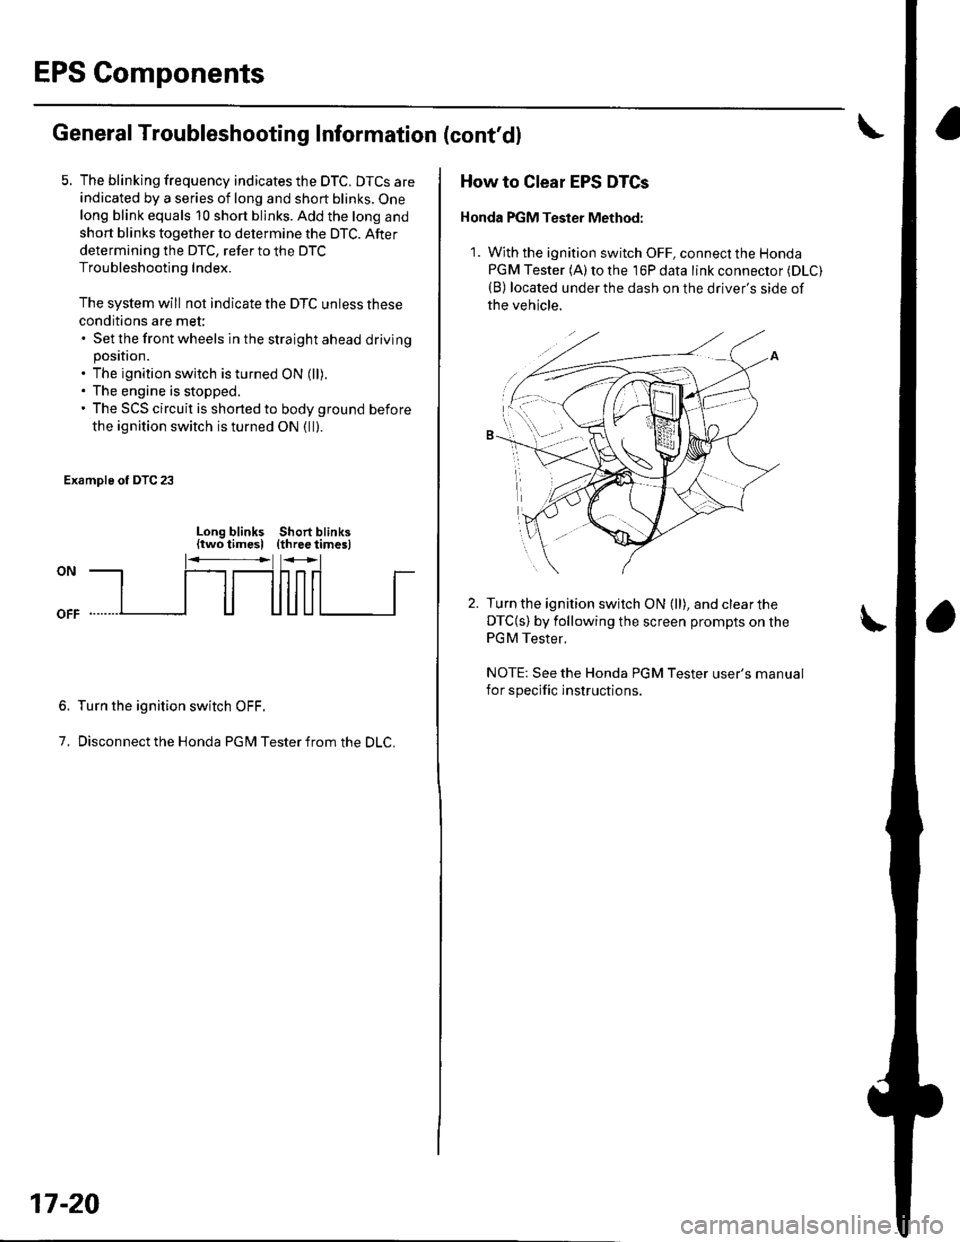
5. The blinking frequency indicates the DTC. DTCS are
indicated by a series of long and short blinks. One
long blink equals 10 short blinks. Add the long and
short blinks together to determine the DTC. After
determining the DTC, refer to the DTC
Troubleshooting Index.
The system will not indicate the DTC unless these
conditions are met:. Set the front wheels in the straight ahead drivingposition.. The ignition switch is turned ON (ll).. The engine is stopped.. The SCS circuit is shorted to body ground before
the ignition switch is turned ON (ll).
Example of DTC 23
Long blinks Short blinks(two times) (three timesl
6.
7.
Turn the ignition switch OFF.
Disconnect the Honda PGM Tester from the DLC.
17-20
How to Clear EPS DTCs
Honda PGM Tesler Method:
1. With the ignition switch OFF, connect the Honda
PGM Tester (A) to the 16P data link connector (DLC)
(B) located under the dash on the driver's side of
the vehicle.
Turn the ignition switch ON (ll), and clear the
DTC{s) by following the screen prompts on the
PGM Tester.
NOTE: See the Honda PGM Tester user's manual
for specific instructions.