fuse panel HONDA CIVIC 2002 7.G Workshop Manual
[x] Cancel search | Manufacturer: HONDA, Model Year: 2002, Model line: CIVIC, Model: HONDA CIVIC 2002 7.GPages: 1139, PDF Size: 28.19 MB
Page 211 of 1139
Fuel and Emissions Systems
General Troubleshooting Information (cont'dl
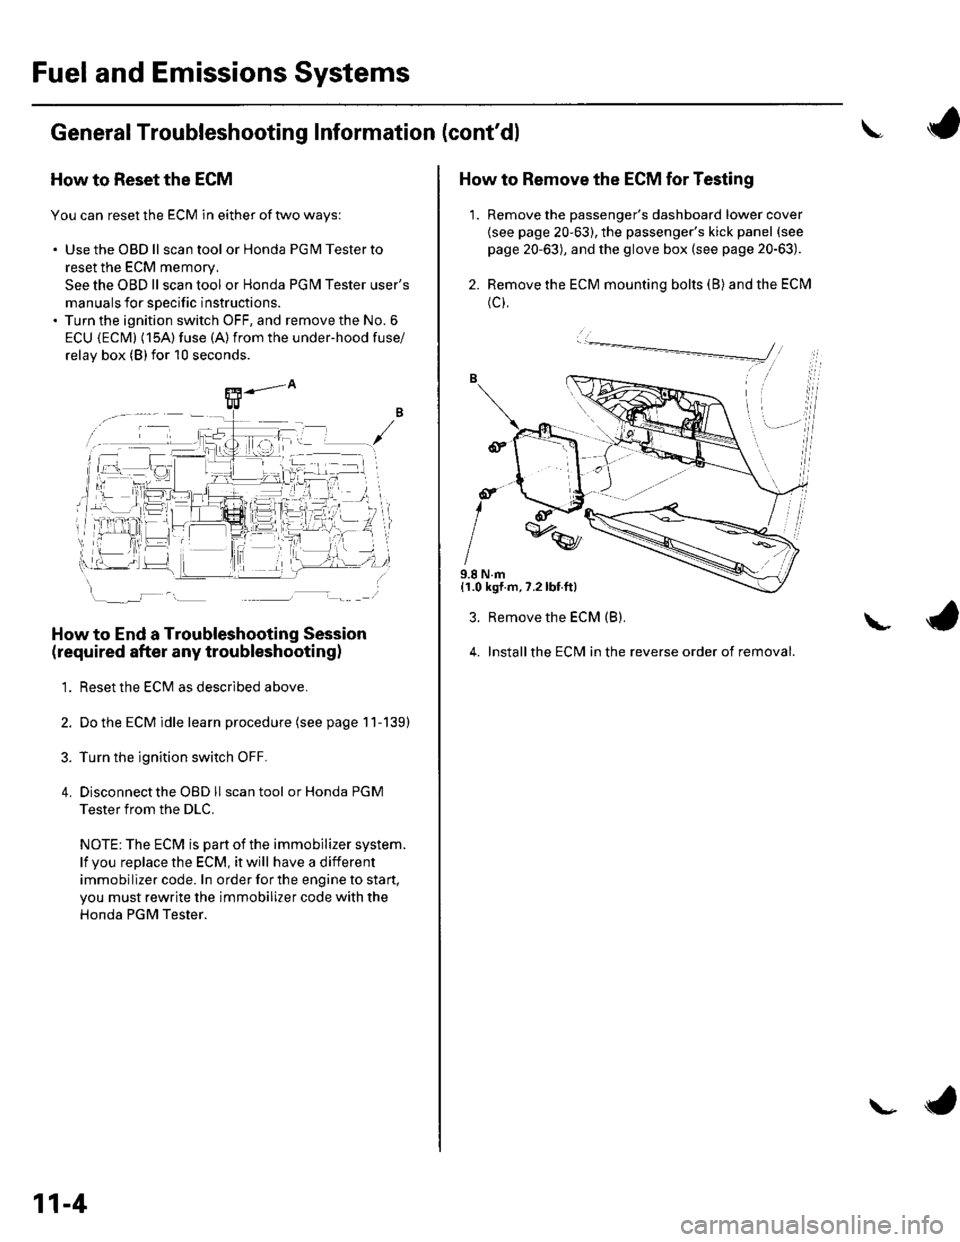
How to Reset the ECM
You can reset the ECM in either of two ways:
. Use the OBD ll scantool or Honda PGMTesterto
reset the ECM memory.
See the OBD ll scan tool or Honda PGI\4 Tester user's
manuals for specific instructions.' Turn the ignition switch OFF, and remove the No. 6
ECU {ECM} (15A) fuse (A)from the under-hood fuse/
relav box (Blfor 10 seconds.
How to End a Troubleshooting Session
(required after any troubleshootingl
1. Reset the ECM as described above.
2. Do the ECM idle learn procedure (see page 11-139)
3. Turn the ignition switch OFF.
4. Disconnectthe OBD ll scan tool or Honda PGM
Tester from the DLC.
NOTE: The ECM is part of the immobilizer system.
lf vou replace the ECM, it will have a different
immobilizer code. In order for the engine to start,
you must rewrite the immobilizer code with the
Honda PGM Tester.
11-4
\- ta
J
How to Remove the ECM for Testing
1. Remove the passenger's dashboard lower cover
{see page 20-63), the passenger's kick panel (see
page 20-63), and the glove box (see page 20-63).
2. Remove the ECM mounting bolts (B) and the ECM
(c),
9.8 N.m{1.0 kgf.m,7.2lbt.ft}
3. Remove the ECM (B).
4. Installthe ECM in the reverse order of removal.
L
Page 307 of 1139
PGM-FI System
25.
MIL Circuit Troubleshooting (cont'dl
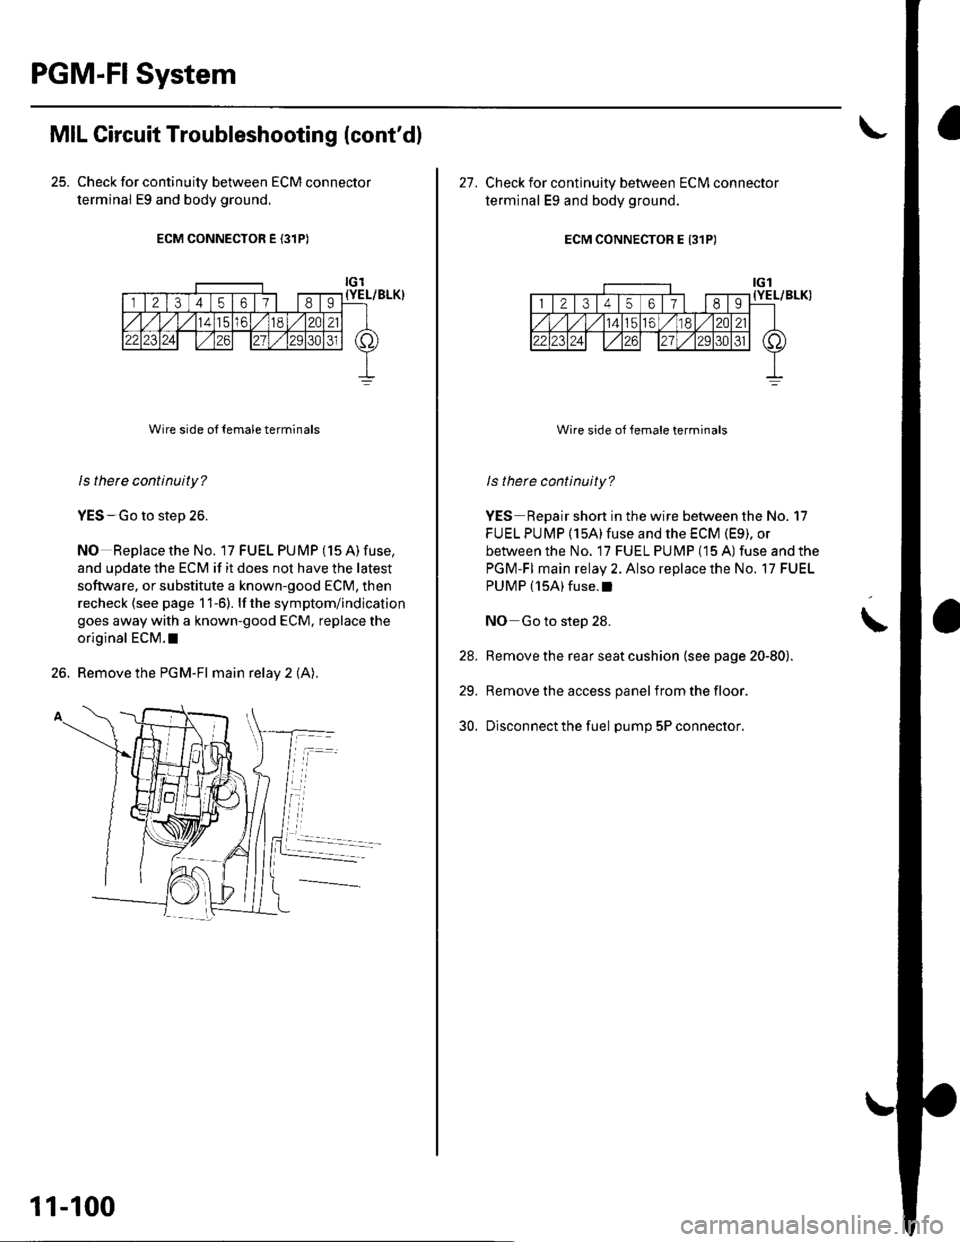
Check for continuity between ECM connector
terminal E9 and body ground.
ECM CONNECTOR E (31P)
Wire side o{ {emale terminals
ls therc continuity?
YES-Go to step 26.
NO Replace the No. lTFUELPUMP(15A)fuse,
and update the ECM if it does not have the latest
software. or substitute a known-good ECM, then
recheck (see page 1 1-6). lf the symptom/indication
goes away with a known-good ECM. replace the
original ECM.I
26. Remove the PGM-Fl main relay 2 (A).
11-100
27. Check for continuity between ECIVI connector
terminal Eg and body ground.
ECM CONNECTOR E 131P)
Wire side oI Jemale terminals
ls there continuity?
YES Repair short in the wire between the No. 17
FU EL PUMP (15A)fuse and the ECM (E9), or
between the No. 17 FUEL PU MP (15 A) fuse and the
PGM-FI main relay 2. Also replace the No. 17 FUEL
PUMP (15A)fuse.l
NO Go to step 28.
Remove the rear seat cushion (see page 20-80).
Remove the access panel from the floor.
Disconnect the fuel pump 5P connector.
\
28.
29.
30.
Page 363 of 1139
Fuel Supply System
Fuel Gauge Sending Unit Test
Special Tools Required
Fuel sender wrench 07XAA-001010A
NOTE; For the fuel gauge system circuit diagram, referto the Gauges Circuit Diagram (see page 22-58||.
1. Checkthe No. 10 fUETER {7.5A)fuse in the under-
dash fuse/relay box before testing.
2. Do the gauge drive circuit check (see page 22-56|l.
' lf the fuel gauge needle sweeps from minimuni
to maximum position and then returns to the
minimum position. the gauge is OK. Go to step 3.. lf the fuel gau ge need le does not sweep from
minimum to maximum position position and
then return to the minimum position, replace thegauge assembly and retest.
3. Turn the ignition switch OFF.
4. Remove the rear seat cushion {see page 20-80).
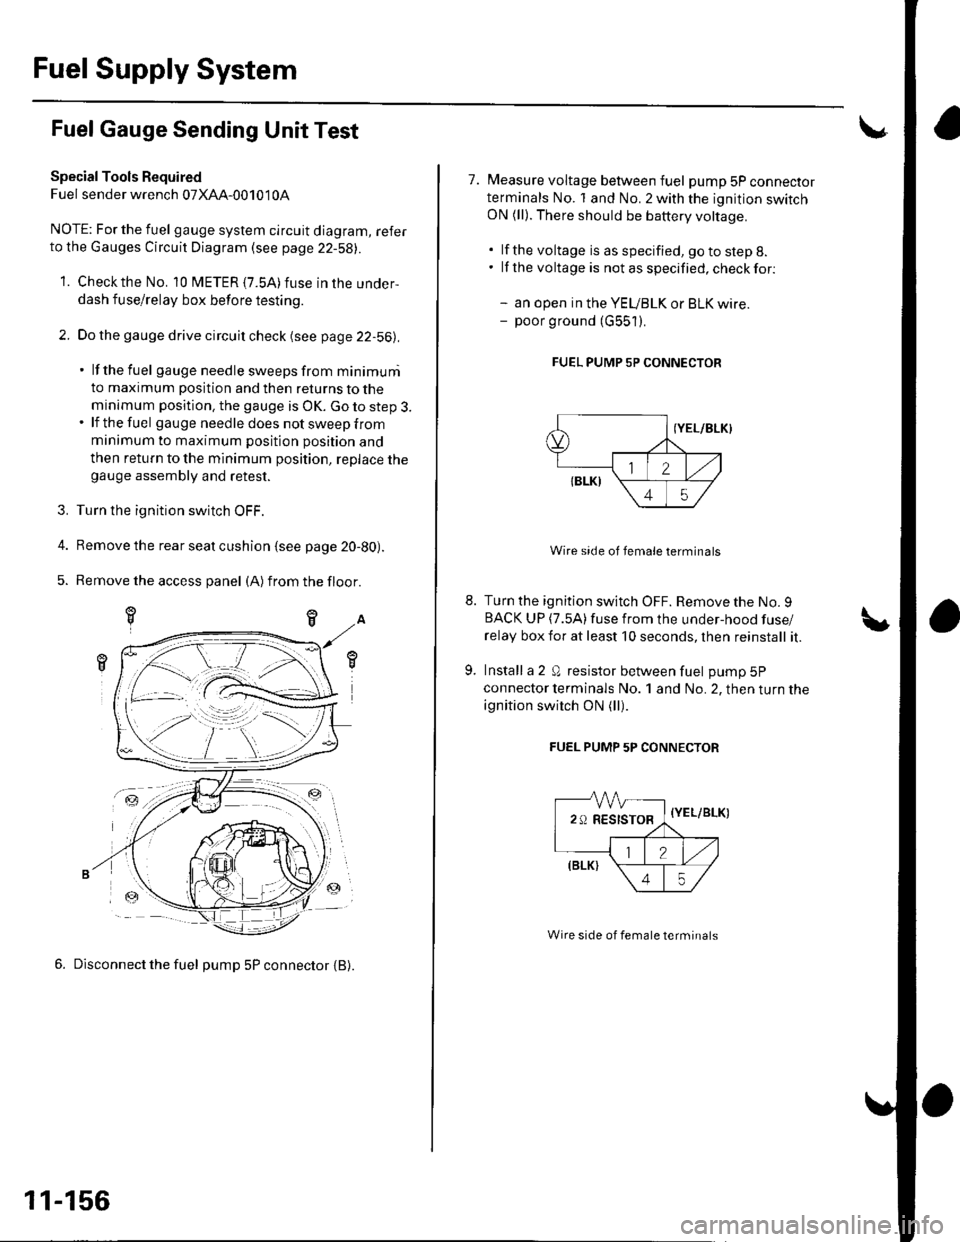
5. Remove the access panel (A)from the floor.
6. Disconnect the fuel pump 5P connector {B).
-ztr
11-156
7. Measure voltage between fuel pump 5P connectorterminals No. 1 and No. 2 with the ignition switchON (ll). There should be battery voltage.
. lf the voltage is as specified, go to step 8.. lf the voltage is notasspecified,checkfor:
- an open in the YEUBLK or BLK wire.- poor ground (G551).
FUEL PUMP 5P CONNECTOR
Wire side of female terminals
Turn the ignition switch OFF. Remove the No. 9BACK UP (7.5A)fuse from the under-hood fuse/
relay box for at least 10 seconds, lhen reinstall it.
Install a 2 Q resistor between fuel pump 5P
connector lerminals No. 1 and No. 2, then turn the
ignition switch ON (ll).
FUEL PUMP 5P CONNECTOR
-VVV-
29RESISTOR,
=-a
{Y
\
//,(elrt \
\45/
{YEL/BLK)
Wire side of female terminals
Page 690 of 1139
Moonroof
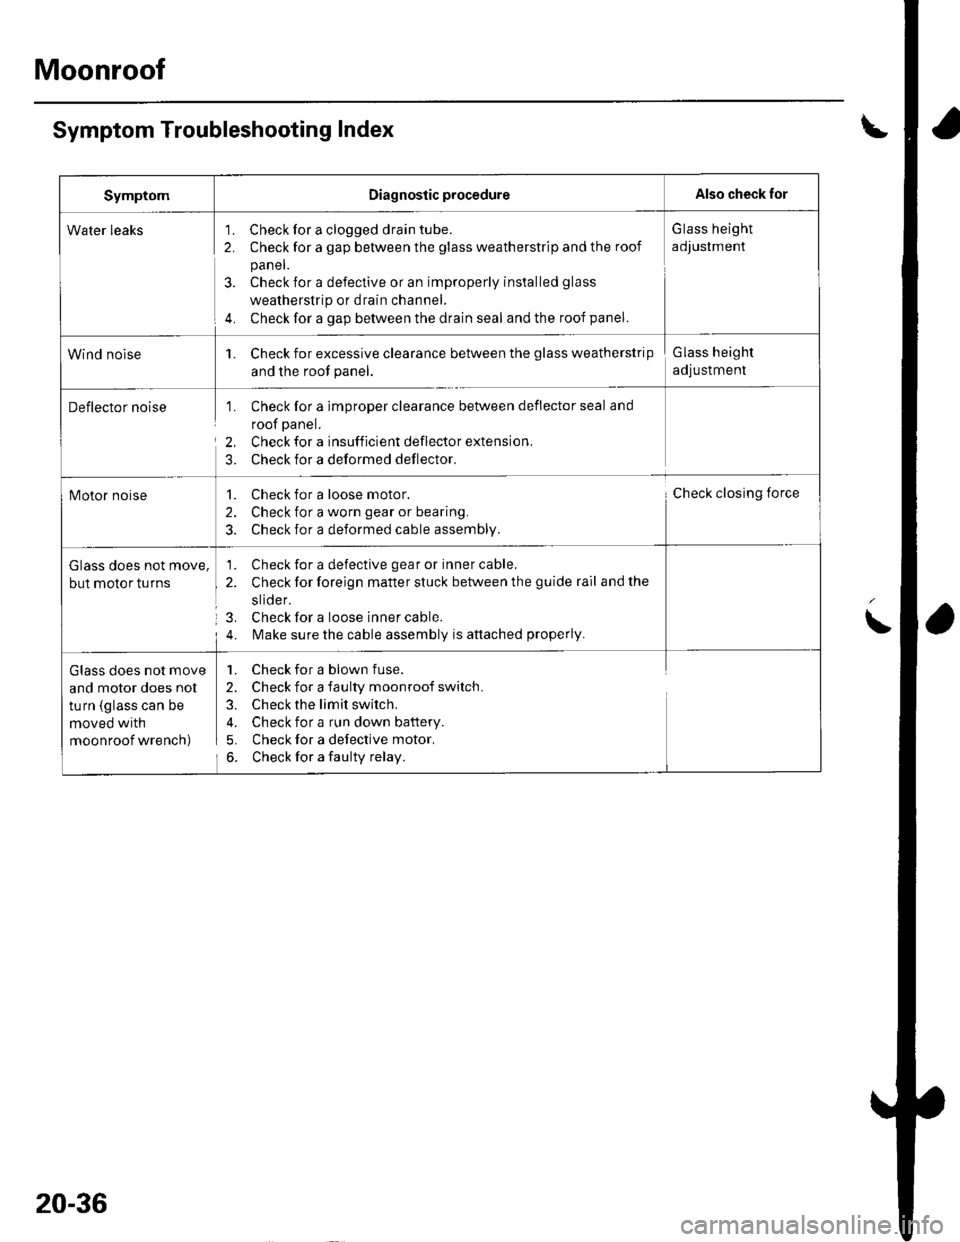
Symptom Troubleshooting Index
SymptomDiagnostic procedureAlso check for
Water leaks'1. Check for a clogged drain tube.
2. Check for a gap between the glass weatherstrip and the roof
panel.
3. Check for a defective or an improperly installed glass
weatherstrip or drain channel.
4. Check for a gap between the drain seal and the roof panel.
G lass height
adJustment
Wind nolse1. Check for excessive clearance between the glass weatherstrip
and the root panel.
Glass height
adjustment
Deflector noise1. Check for a imDrooer clearance between deflector seal and
roof panel.
2, Check for a insufficient deflector extension.
3. Check for a deformed deflector.
Motor noise1. Check for a loose motor.
2. Check for a worn gear or bearing.
3. Check for a deformed cable assembly.
Check closing force
Glass does not move,
but motor turns
1. Check for a defective gear or inner cable.
2. Check for foreign matter stuck between the guide rail and the
slide r.
3. Check for a loose inner cable.
4. l\,4ake sure the cable assembly is attached properly.
Glass does not move
and motor does nol
turn (glass can be
moved with
moonroof wrench)
1. Check for a blown fuse.
2. Check for a faulty moonroof switch.
3. Check the limit switch.
4. Check for a run down battery.
5. Check for a defective motor.
6. Check for a faulty relay.
20-36
Page 792 of 1139
1a
13.
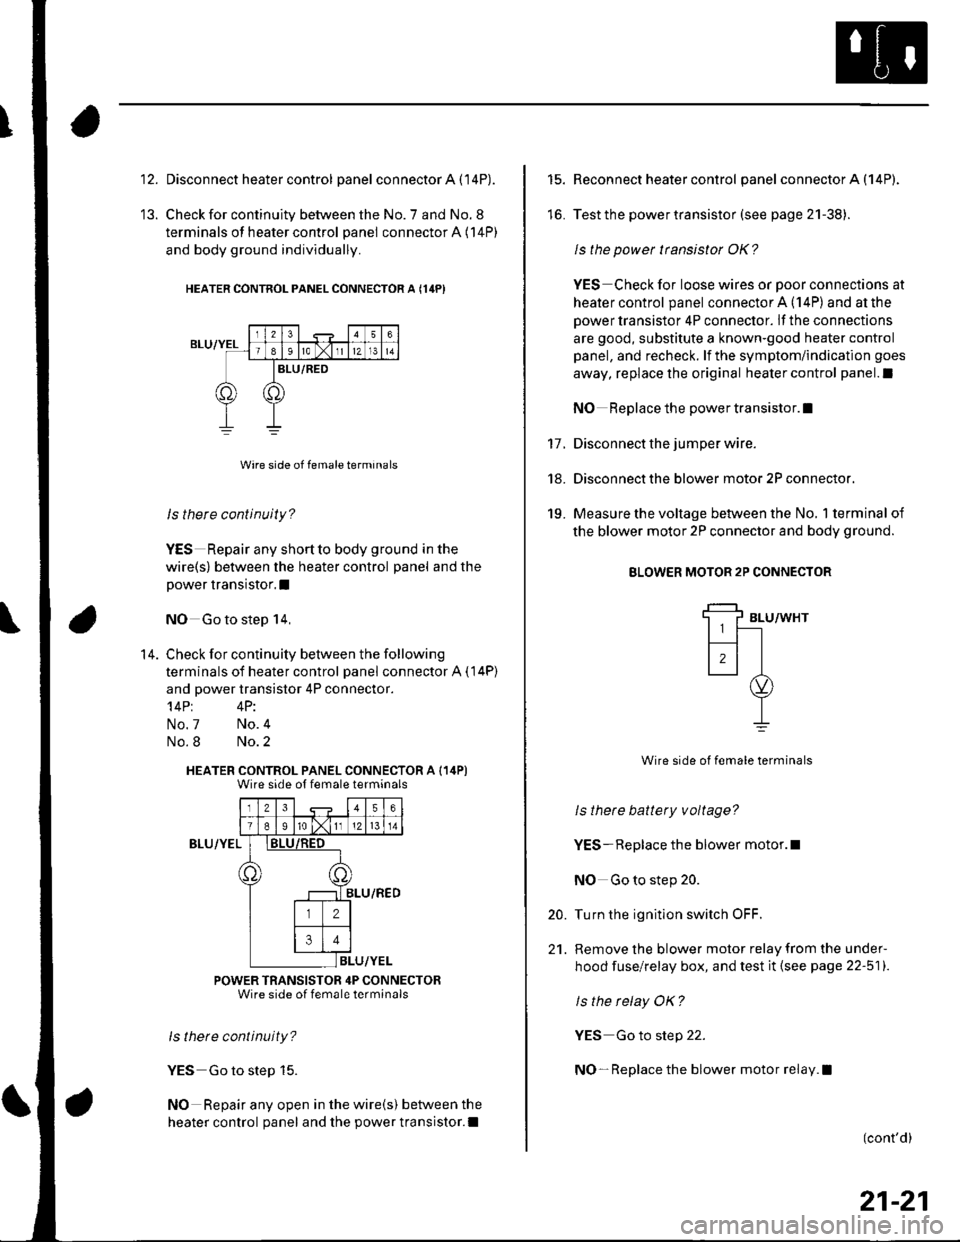
Disconnect heater control panel connector A (14P).
Check for continuity between the No. 7 and No. 8
terminals of heater control panel connector A (14P)
and body ground individually.
HEATER CONTNOL PANEL CONNECTOR A {14PI
ls there continuity?
YES Repair any shortto body ground in the
wire(s) between the heater control panel and the
power transistor.I
NO Go to step 14,
Check for continuity between the following
terminals of heater control panel connector A ( 14P)
and power transistor 4P connector.'l4Pt 4P:
No.7 No.4
No.8 No.2
HEATER CONTROL PANEL CONNECTOR A (14P)Wire side ot female terminals
Iz341516
T89ro lxlI12l 13 l 14
)8LU/RED
ILU/YEL
POWER TRANSISTOR 4P CONNECTORWire side of female terminals
ls thete continuity?
YES Go to step 15.
NO Repair any open in the wire(s) between the
heater control panel and the power transistor.l
14.
BLU/YEL
15.
lo.
17.
18.
19.
Reconnect heater control panel connector A (14P).
Test the power transistor (see page 21-38).
ls the power transistor OK?
YES Check for loose wires or poor connections at
heater control panel connector A (14P) and at the
power transistor 4P connector. lf the connections
are good, substitute a known-good heater control
panel, and recheck. lf the symptom/indication goes
away, replace the original heater control panel.l
NO Replace the power transistor.I
Disconnect the jumper wire.
Disconnect the blower motor 2P connector.
Measure the voltage between the No, 1 terminal of
the blower motor 2P connector and body ground.
BLOWER MOTOR 2P CONNECTOR
BLU/WHT
Wire side of female terminals
ls thete battery voltage?
YES- Replace the blower motor.l
NO Go to step 20.
Turn the ignition switch OFF.
Remove the blower motor relay from the under-
hood fuse/relay box, and test it (see page 22-511.
ls the relay OK?
YES Go to step 22.
NO- Replace the blower motor relay.l
20.
21.
(cont'd)
21-21
Page 796 of 1139
3.
Recirculation Control Motor Circuit Troubleshooting
1. Check the No. 14('10A)fuse inthe under-dashfuse/
relay box.
ls the f use OK?
YES Go to step 2.
NO- Replace the fuse, and recheck.l
2. Disconnect the recirculation control motor 5P
conneclor.
Turn the ignition switch ON (ll).
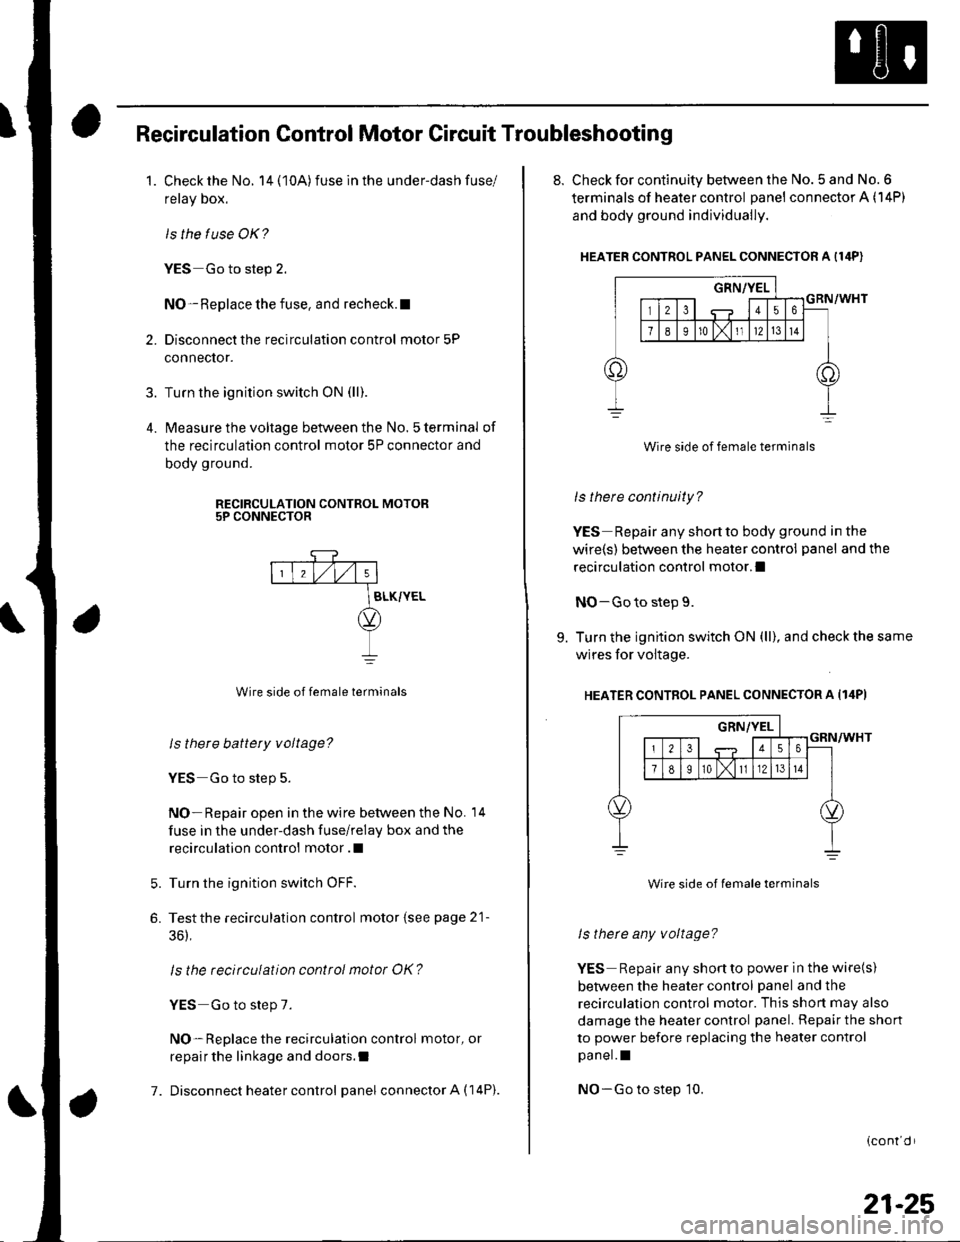
lvleasure the voltage between the No. 5 terminal of
the recirculation control motor 5P connector and
body ground.
RECIRCULATION CONTROL MOTOR5P CONNECTOR
7.
Wire side of female terminals
ls there battery voltage?
YES Go to step 5.
NO- Repair open in the wire between the No. 14
fuse in the under-dash fuse/relay box and the
recirculation control motor .l
Turn the ignition switch OFF.
Testthe recirculation control motor {see page 21-
36),
ls the recirculation control motor OK?
YES Go to step 7.
NO- Replace the recirculation control motor, or
repair the linkage and doors.I
Disconnect heater control panel connector A (14P).
5.
6.
8. Check for continuity between the No. 5 and No. 6
terminals of heater control panel connector A (14P)
and body ground individually.
HEATER CONTROL PANEL CONNECTOR A I14P)
Wire side of female terminals
ls there continuity?
YES Repair any shortto body ground in the
wire(s) between the heater control panel and the
recirculation control motor.l
NO-Go to step 9.
9. Turn the ignition switch ON (ll), and check the same
wires for voltage.
HEATER CONTROL PANEL CONNECTOR A Il4PI
Wire side of lemale terminals
ls therc any voltage?
YES Repair any shonto power in the wire(s)
between the heater control panel and the
recirculation control motor. This shon may also
damage the heater control panel. Repair the shon
to power before replacing the heater control
pa nel. I
NO-Go to step 10.
{cont d r
21-25
Page 798 of 1139
Heater Control Power and Ground Circuits Troubleshooting
1. Check the No.14 (10A)fuse in the under-dash
fuse/relay box.
ls the f use OK?
YES-Go to step 2.
NO-Replace the fuse, and recheck.l
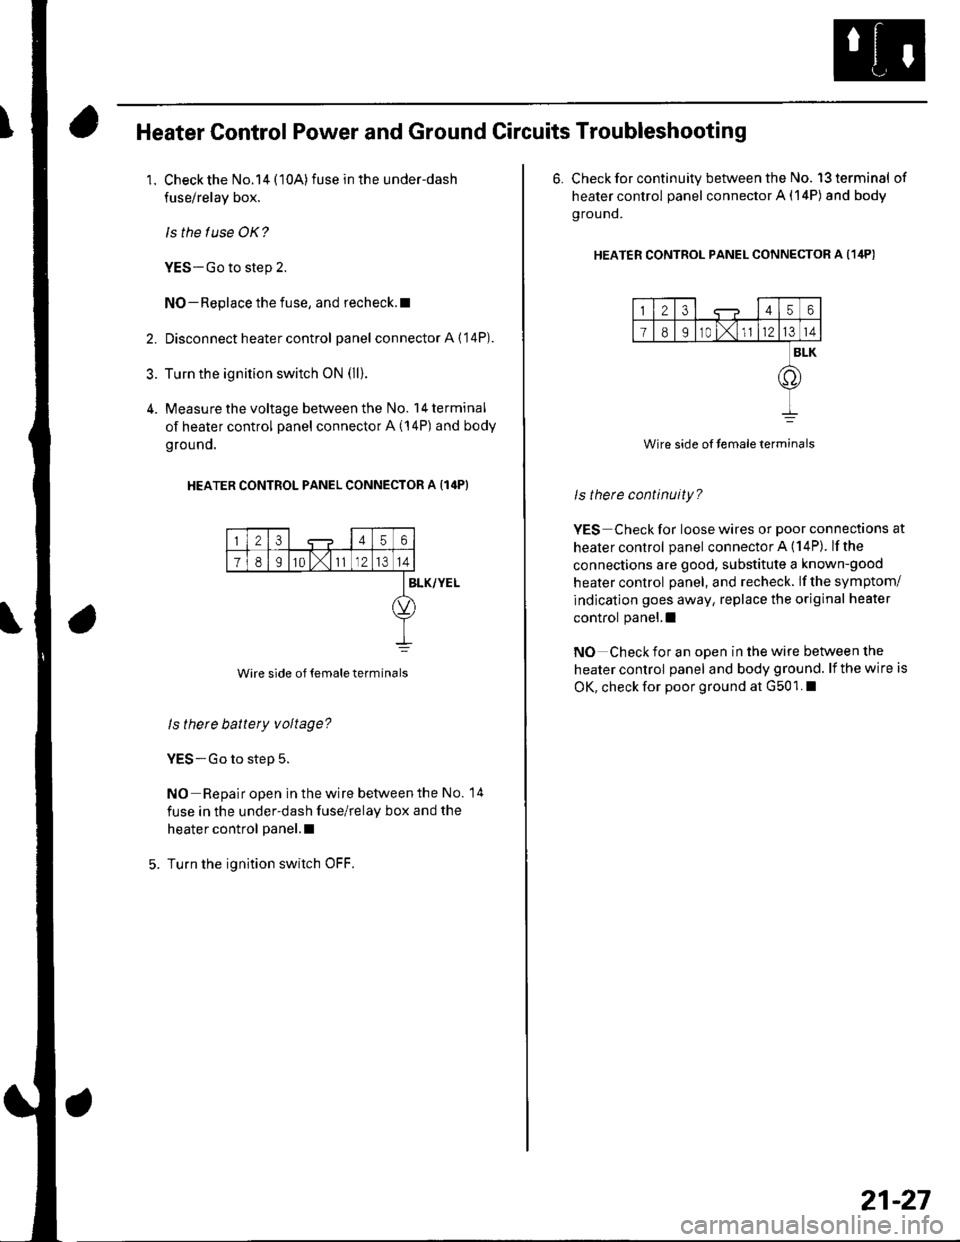
2. Disconnect heater control panel connectorA{'14P).
3. Turn the ignition switch oN (ll).
4. Measure the voltage between the No. l4terminal
of heater control panel connector A (14P) and body
grouno.
HEATER CONTROL PANEL CONNECTOR A {14P}
23456
78I10 l,111214
Wire side of temale terminals
BLK/YEL
ls there battery voltage?
YES-Go to step 5.
NO Repair open in the wire betvveen the No. 14
fuse in the under-dash fuse/relay box and the
heater control panel.l
Turn the ignition switch OFF.
6. Check for continuity between the No. l3terminal of
heater control panel connector A (14P) and body
g rou nd.
HEATER CONTRoL PANEL CONNEcToR A (1ilP)
123456
I89r0 t,1l1214
BLK
.o
Wire side of temaleterminals
ls therc continuity?
YES Check for loose wires or poor connections at
healer control panel connector A (14P). lfthe
connections are good, substitute a known-good
heater control panel, and recheck. lf the symptom/
indication goes away, replace the original heater
control panel.l
NO Check for an open in the wire between the
heater control panel and body ground. lf the wire is
OK, check for poor ground at G501. I
21-27
Page 804 of 1139
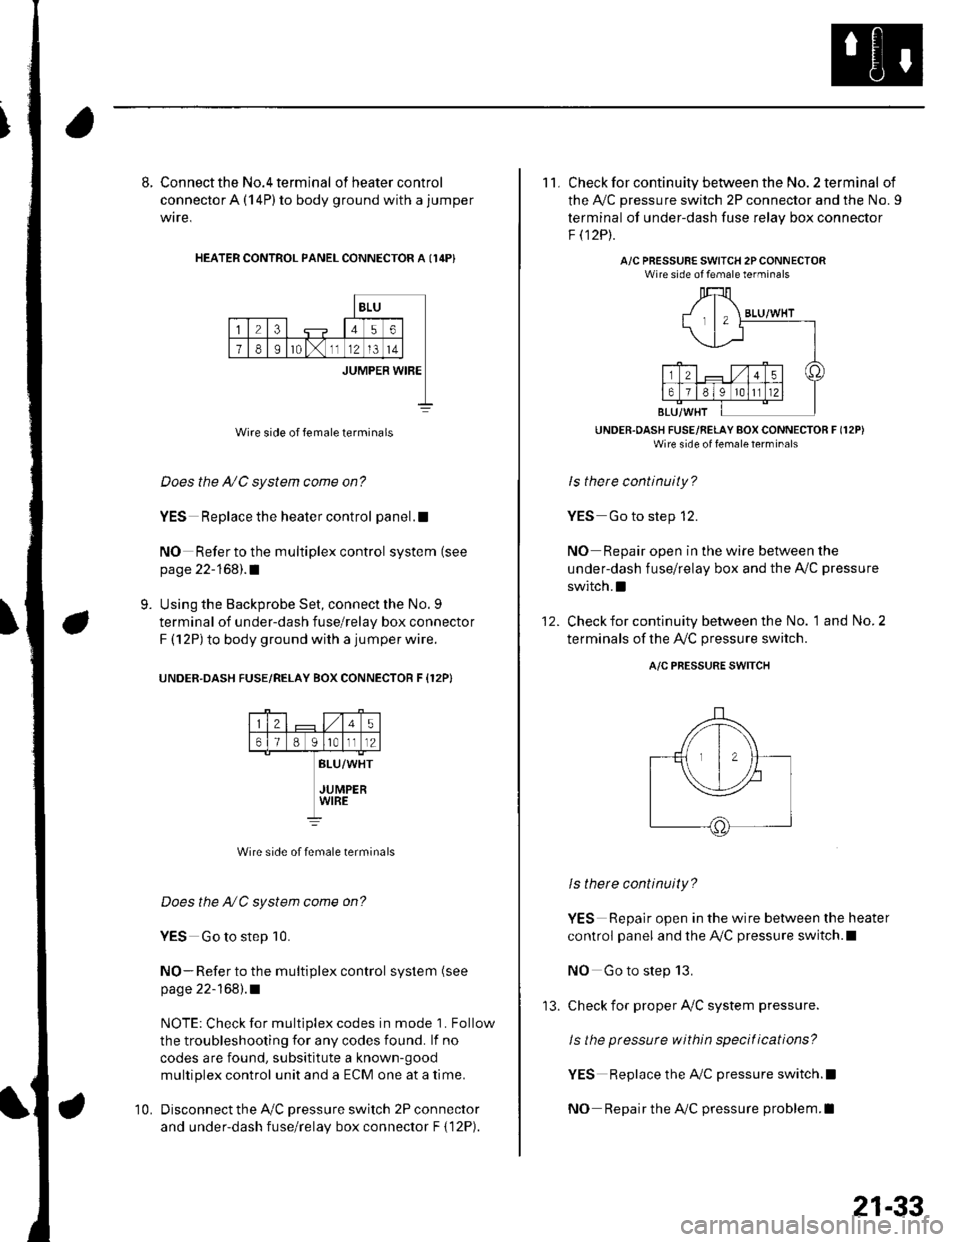
8. Connect the No.4 terminal ofheatercontrol
connector A (14P) to body ground with a jumper
wire,
HEATER CONTROL PANEL CONNECTOR A I14P}
BLU
23456
78Ir0lx1112l3t4
JUMPER WIBE
Wire side of female terminals
Does the A/C system come on?
YES Replace the heater control panel.!
NO Refer to the multiplex control system (see
page 22-168).1
Using the Backprobe Set, connect the No. 9
terminal of under-dash fuse/relay box connector
F (12P) to body ground with a jumper wire.
UNOER.DASH FUSE/RELAY BOX CONNECTOR F {12P}
9.
25
61B g lrotll2
BLU/WHT
JUMPERWIRE
Wire side of female terminals
Does the NC system come on?
YES Go to step 10.
NO- Refer to the multiplex control system (see
page 22-168).1
NOTE: Check for multiplex codes in mode '1. Follow
the troubleshooting {or any codes found. lf no
codes are found, subsititute a known-9ood
multiplex control unit and a ECM one at a time.
Disconnect the Ay'C pressure switch 2P connector
and under-dash fuse/relay box connector F { 12P).
10.
'13.
21-33
11. Check for continuity between the No. 2 terminal of
the A,/C pressure switch 2P connector and the No. 9
terminal of under-dash fuse relav box connector
F t12Pt.
A/C PRESSURE SWITCH 2PCONNECTORWire side of female terminals
UNDER.OASH FUSE/RELAY BOX CONNECTOR F (12P)
Wire side of fenale lerrrinal'
ls there continuity?
YES Go to step 12.
NO Repair open in the wire between the
under-dash fuse/relay box and the A,,/C pressure
switch.I
Check for continuity between the No. 1 and No. 2
terminals of the A,/C pressure switch.
12.
A/C PRESSURE SWITCH
ls there continuity?
YES Repair open in the wire between the heater
control panel and the A,/C pressure switch.l
NO Go to step 13.
check for proper Ay'C system pressure.
ls the pressure within specitications?
YES Replace the AilC pressure switch.l
NO Repair the AilC pressure problem.I
Page 857 of 1139
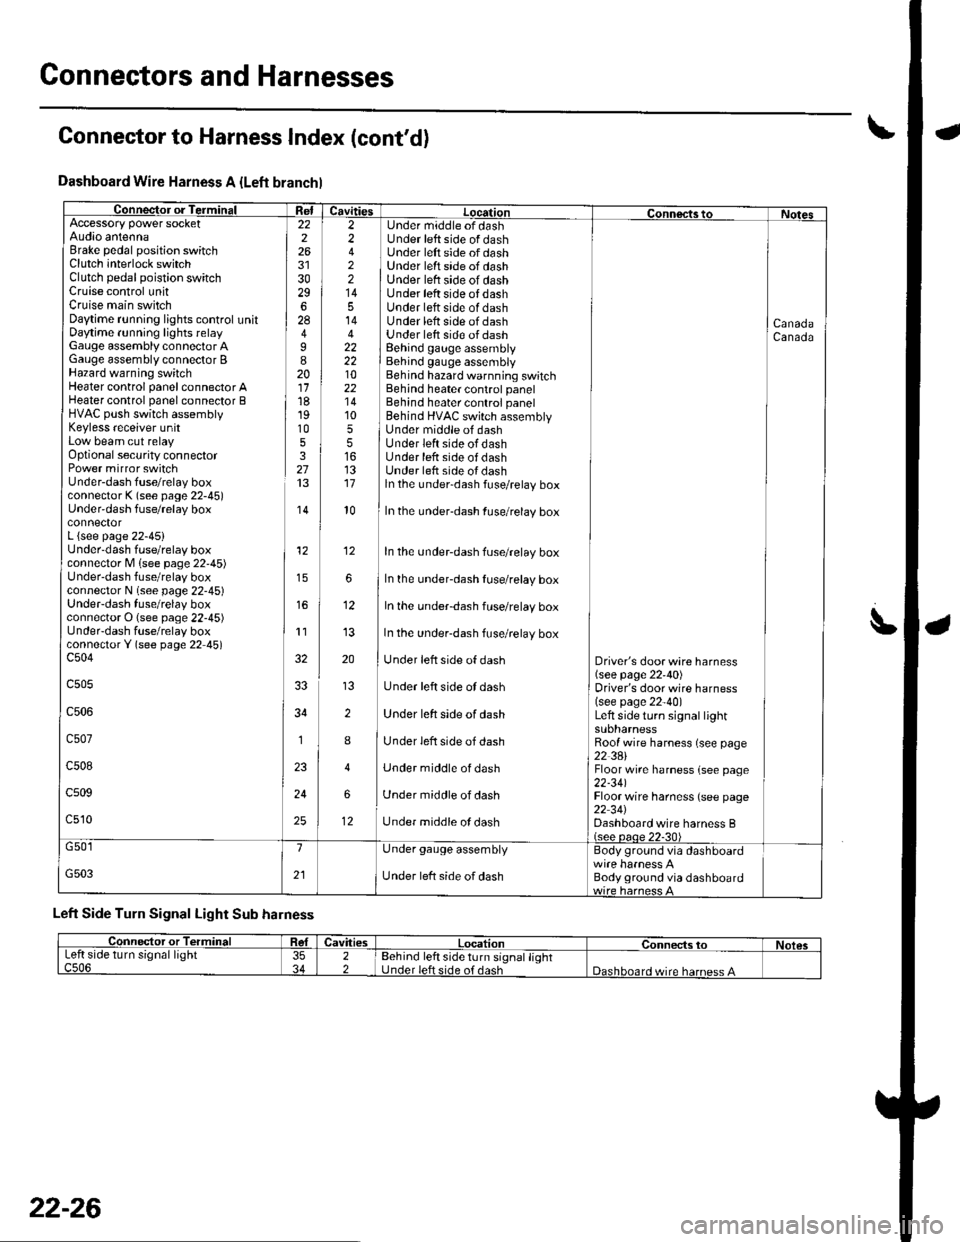
Connectors and Harnesses
Dashboard Wire Harness A {Left branchl
Connector or TerminalffiAccessory power socketAudio antennaBrake pedal position switchClutch interlock switchClutch pedal poistion switchCruise control unitCruise main switchDaytime r!nning lights control unitDaytime running lights relayGauge assembly connector AGauge assembly connector BHazard warning switchHeater control panel connector AHeater control panel connector BHVAC push switch assemblyKeyless receiver unitLow beam cut relayOptional security connectorPower mirror switchUnder-dash fuse/relay boxconnector K (see page 22-45)Under'dash fuse/relay box
L {see page 22-45}Underdash fuse/relay boxconnector M lsee page 22'45)Under-dash fuse/relay boxconnector N (see page 22-45)UndeFdash fuse/relay boxconnector O (see page 22-45)UndeFdash fuse/relay boxconnectorY (see page 22 45)c504
c505
c506
c507
c508
c509
c510
22226
3029628
I820111819105327
,I4
12
11
34
1
24
25
2 Under middle of dash2 Under left side of dash4 ] Under left side of dash2 ] Under left srde of dash2 | Under left side of dash14 I Under left side of dash5 Under left side of dash14 Under lett side of dash4 Under lett side of dash22 I Behind gauge assembly22 i Behind gauge assembly10 Behind hazard warnning switch22 Behind heater control panel'14 Behind heater control panel10 ] Behind HVAC switch assembly5 I Under middle of dash5 lUnderleftsideofdash16 Under lefr side of dash13 Under left side oI dash17 ln the under-dash fuse/relay box
CanadaCanada
l0In the under-dash fuse/relay box
In the undeFdash fuse/relay box
In the underdash fuse/relay box
In the under-dash fuse/relay box
In the under-dash fuse/relay box
Under left side of dash
Under left side ot dash
Under left side of dash
Under left side of dash
Under middle of dash
Under middle of dash
Under middle ol dash
Driver's door wire harness(see page 22'40)Driver's door wire harness(see page 22-40)Left side turo signal lightsuonarnessRoof wire harness (see page22 3AlFloor wire harness {see page22-341Floor wire harness (see page22 34JDashboard wire harness B(see oaoe 22-30)
12
12
G501
G503
1
21
Under gauge assembly
Under left side of dash
Body ground via dashboard
Body ground via dashboard
Left Side Turn Signal Light Sub harness
Connector to Harness Index (cont'd)
L
Connector or TerminalCavitiesLocationConnects toNolesLeft side turn signal lightc506353422Behind left side turn signal lightUnder left side of dashDashboard wire harness A
22-26
Page 878 of 1139
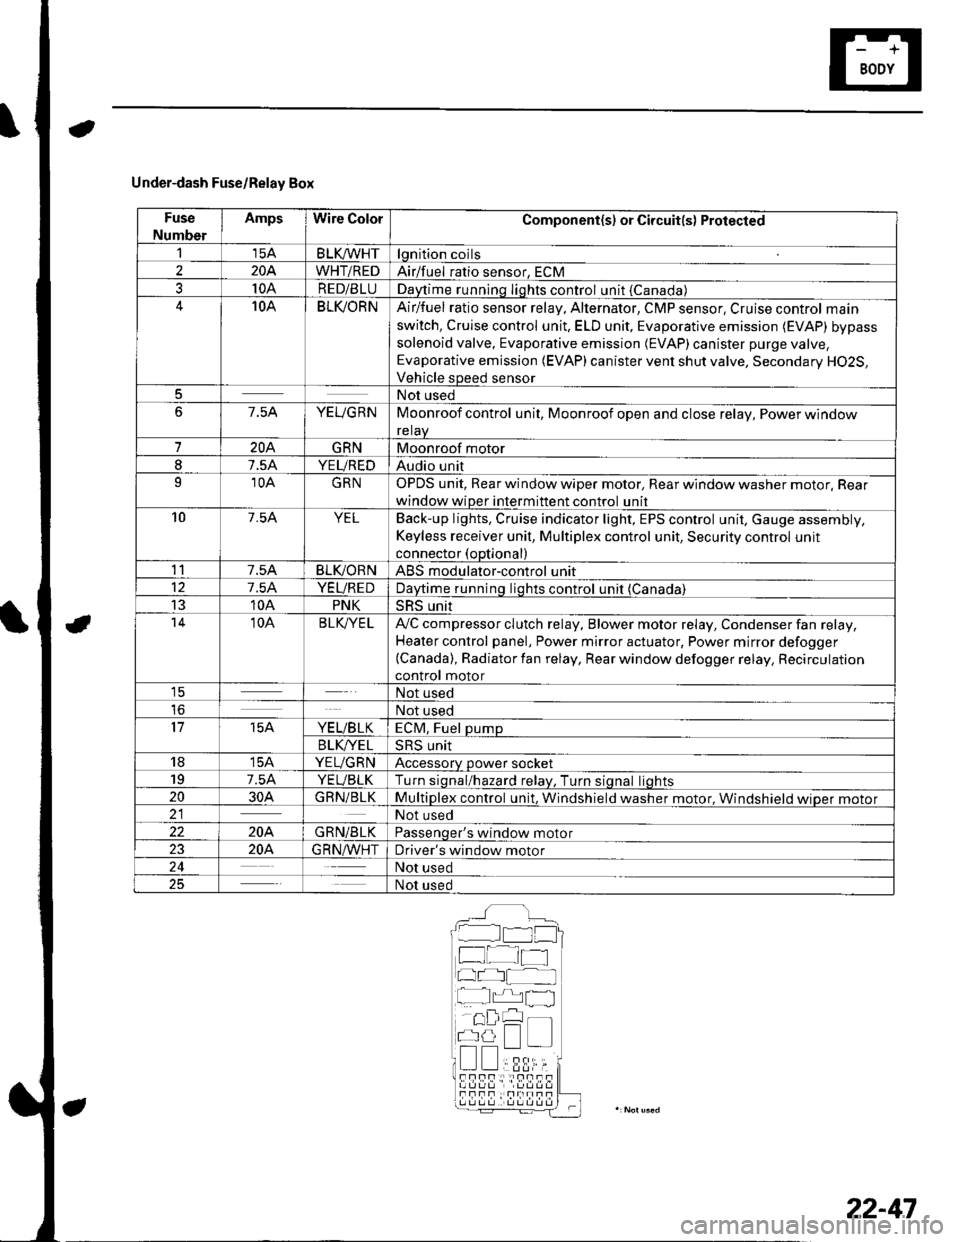
Under-dash Fuse/Relay Box
Fuse
Number
AmpsWire ColorComponent(s) or Circuit(s) Protected
115ABLKA/VHTlgnition coils
2204WHT/REDAirlfuel ratio sensor, ECM
310ARED/BLUDaytime running Iights control unit {Canada)10ABLI(ORNAir/fuel ratio sensor relay, Alternator, CMP sensor, Cruise control main
switch, Cruise control unit. ELD unit, Evaporative emission (EVAP) bypass
solenoid valve, Evaporative emission (EVAP)canister purge valve,
Evaporative emission (EVAP) canister vent shut valve, Secondary H02S,
Vehicle speed sensor
5Not used
67.5AYEUGRNMoonroof control unit, Moonroof open and close relay, Power window
relaV
7204GRNMoonroof motor
I7.5AYEUREDAudio unit
910AGRNOPDS unit, Rear window wiper motor, Rear window washer motor, Rear
window wiper intermittent control unit
107.54YELBack-up lights, Cruise indicator light, EPS control unit, Gauge assembly,
Keyless receiver unit, Multiplex control unit, Security control unit
connector (optional)
117.5ABLIVORNABS modulator-control unit
127.5AYEUREDDaytime runnino liohts control unit (Canada)
1310APNKSRS unit't410ABLK/YE LA,,/C compressor clutch relay, Blower motor relay, Condenser fan relay,
Heater control panel, Power mirror actuator, Power mirror defogger(Canada), Radiator fan relay, Rear window defogger relay, Recirculation
control motor1ENot used
loNot used
1715AYE L/B LKECM, Fuel pump
B LK/YE L>H> Unrr
1815AYEUGRNAccessory power socket
197.5AYEUBLKTurn siqnal/hazard relav, Turn siqnal liohts
2030AGRN/BLKMultiplex control unit, Windshield washer motor. Windshield wioer motor21Not used
22204GRN/BLKPassenqer's window motor
2320A.G R N,A/VHTDriver's window motor
24Not used
25Not used
__^:Hr tl_l
f at-t
at I
r^,rl fl
!!;r -
!339,i;s!!sf Fnf : |rnITf
22-47