ECT sensor HONDA CIVIC 2003 7.G Workshop Manual
[x] Cancel search | Manufacturer: HONDA, Model Year: 2003, Model line: CIVIC, Model: HONDA CIVIC 2003 7.GPages: 1139, PDF Size: 28.19 MB
Page 519 of 1139
EPS Components
DTC Troubleshooting
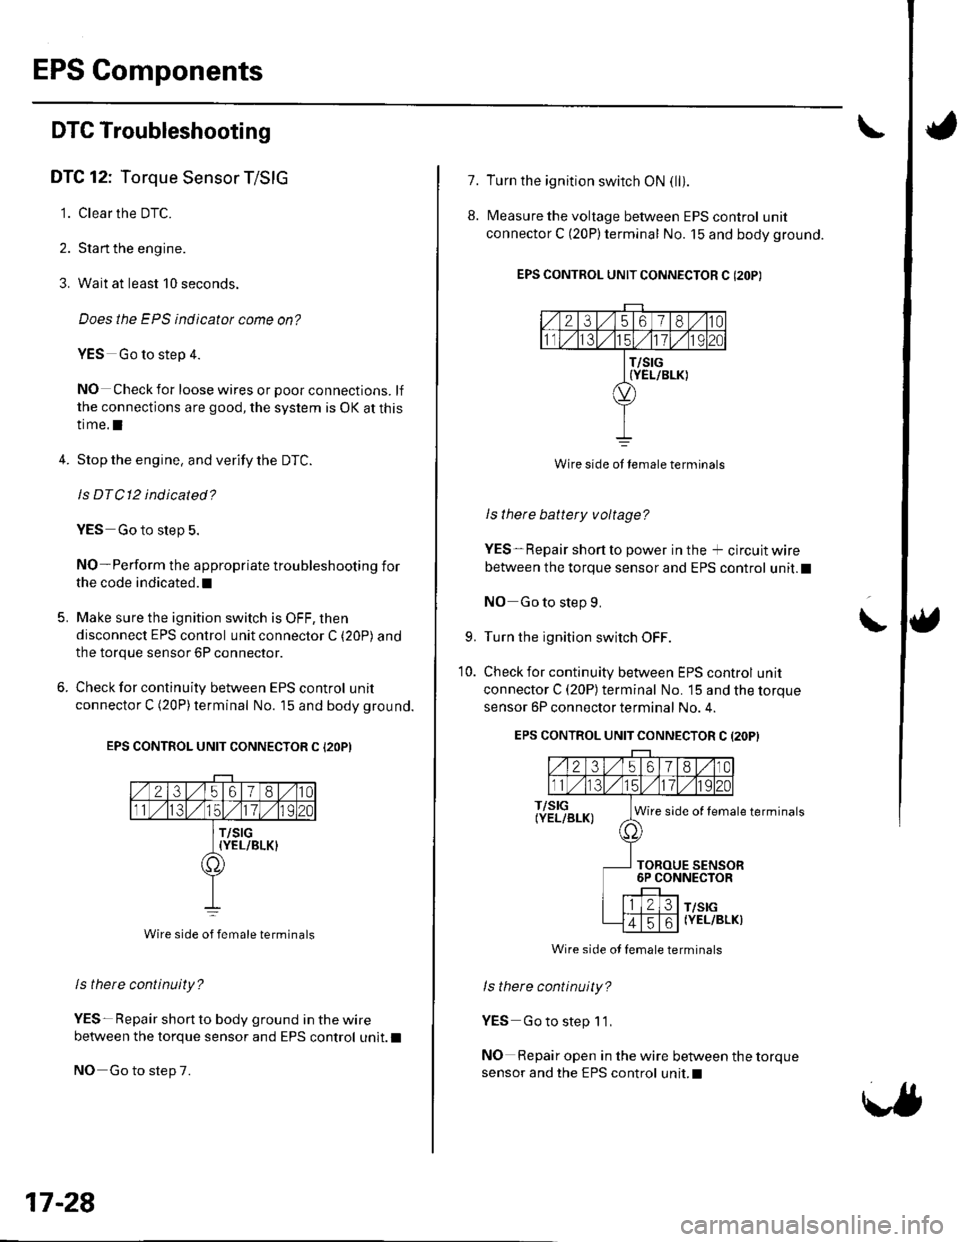
DTC 12: Torque Sensor T/SIG
1. Clear the DTC.
2. Stan the engine.
3. Wait at least 10 seconds.
Does the EPS indicatot come on?
YES Go to step 4.
NO Check for loose wires or poor connections. lf
the connections are good, the system is OK at this
time.l
4.Stop the engine, and verify the DTC.
ls DTC12 indicated?
YES Go to slep 5.
NO-Perform the appropriate troubleshooting for
the code indicated. t
Make sure the ignition switch is OFF, then
disconnect EPS control unit connector C (20P) and
the torque sensor 6P connector.
Check for continuity between EPS control unit
connector C (20P)terminal No. 15 and body ground.
EPS CONTROL UNIT CONNECTOR C {2OP)
Wire side of female terminals
ls there continuity?
YES- Repair short to body ground in the wire
between the torque sensor and EPS control unit.l
NO Go to step 7.
5.
17-28
1.
8.
Turn the ignition switch ON (ll).
Measure the voltage between EPS control unit
connector C (20P)terminal No. 15 and body ground.
EPS CONTROL UNIT CONNECTOR C (2OP)
2356180
T/SIG{YEL/BLK)
Wire side ot lemale terminals
I s there battery v oltage?
YES-Repair short to power in the + circuit wire
between the torque sensor and EPS control unit.l
NO Go to step 9.
Turn the ignition switch OFF.
Check for continuity between EPS control unit
connector C (20P) terminal No. 15 and the torque
sensor 6P connector terminal No. 4.
EPS CONTROL UNIT CONNECTOR C (2OPI
\9.
10.
T/SIG(YEL/BLK)Wire side of female terminals
TOROUE SENSOR6P CONNECTOR
T/SIG(YEL/BLK)
ls there continuity?
YES Go to step 1'1,
NO Repair open in the wire between the torque
sensor and the EPS control unit.I
Wire side ot female terminals
Page 520 of 1139
'I 1.Substitute a known-good EPS control unit, and
connect the all disconnected connectors.
Sta rt the engine.
Does the EPS indicator come on?
YES Go to step 13.
NO Check for loose EPS control unitconnectors. lf
necessary, replace the EPS control unit and
retest.l
Stop the engine, and verify the DTC.
ls DTCl2 indicated?
YES Check for loose torque sensor connectors.
lf necessary, substitute a known-good steering
gearbox and recheck.l
NO-Perform the appropriate troubleshooting for
the code indicated. !
12.
13.
DTC 16: Torque Sensor VT3 and W6
1. Clear the DTC.
2. Start the engine.
3. Wait at least 10 seconds.
Does the EPS indicator come on?
YES Go to step 4.
NO Check for loose wires or poor connnections. lf
the connections are good, the system is OK at this
time.l
4. Stop the engine, and verify the DTC.
ls DTC16 indicated?
YES-Go to step 5.
NO Perform the appropriate troubleshooting for
the code indicated. t
5. Make sure the ignition switch is OFF, then
disconnect EPS control unit connector C (20P) and
the torque sensor 6P connector.
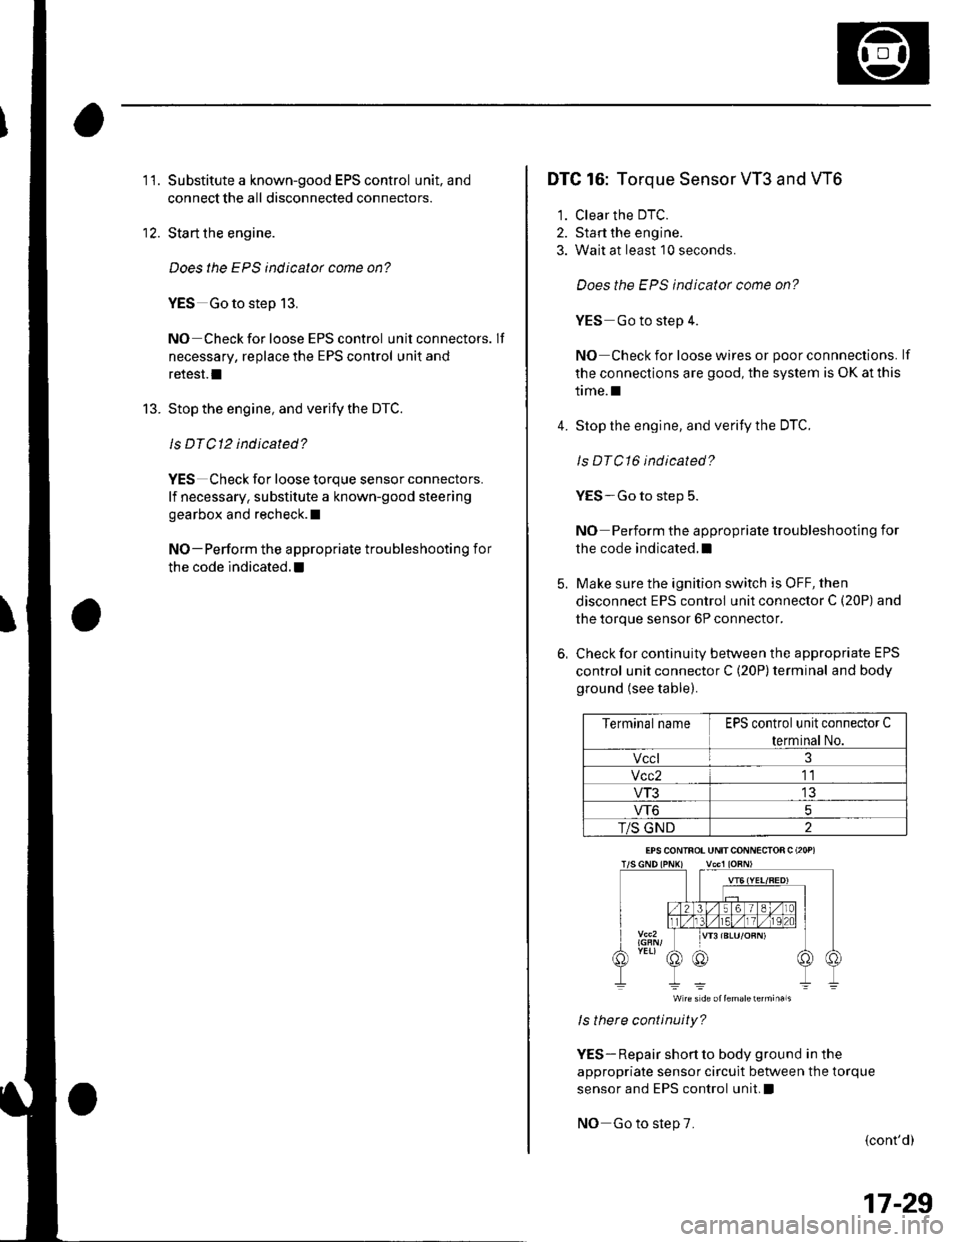
6, Check for continuity between the appropriate EPS
control unit connector C (20P) terminal and body
ground (see table).
Terminal nameEPS control unit connector C
terminal No.
Vccl3
Vcc211
VT313
VT65
T/S GND2
W re s d€ oltemalelermi.als
ls there continuity?
YES- Repair short to body ground in the
appropriate sensor circuit between the torque
sensor and EPS control unit, !
NO Go to step 7.
{cont'd)
EPS CONINOT UNITCONNECIOR C (2OP)
17-29
Page 521 of 1139
EPS Components
I
7.
8.
DTC Troubleshooting (cont'd)
Turn the ignition switch ON (ll).
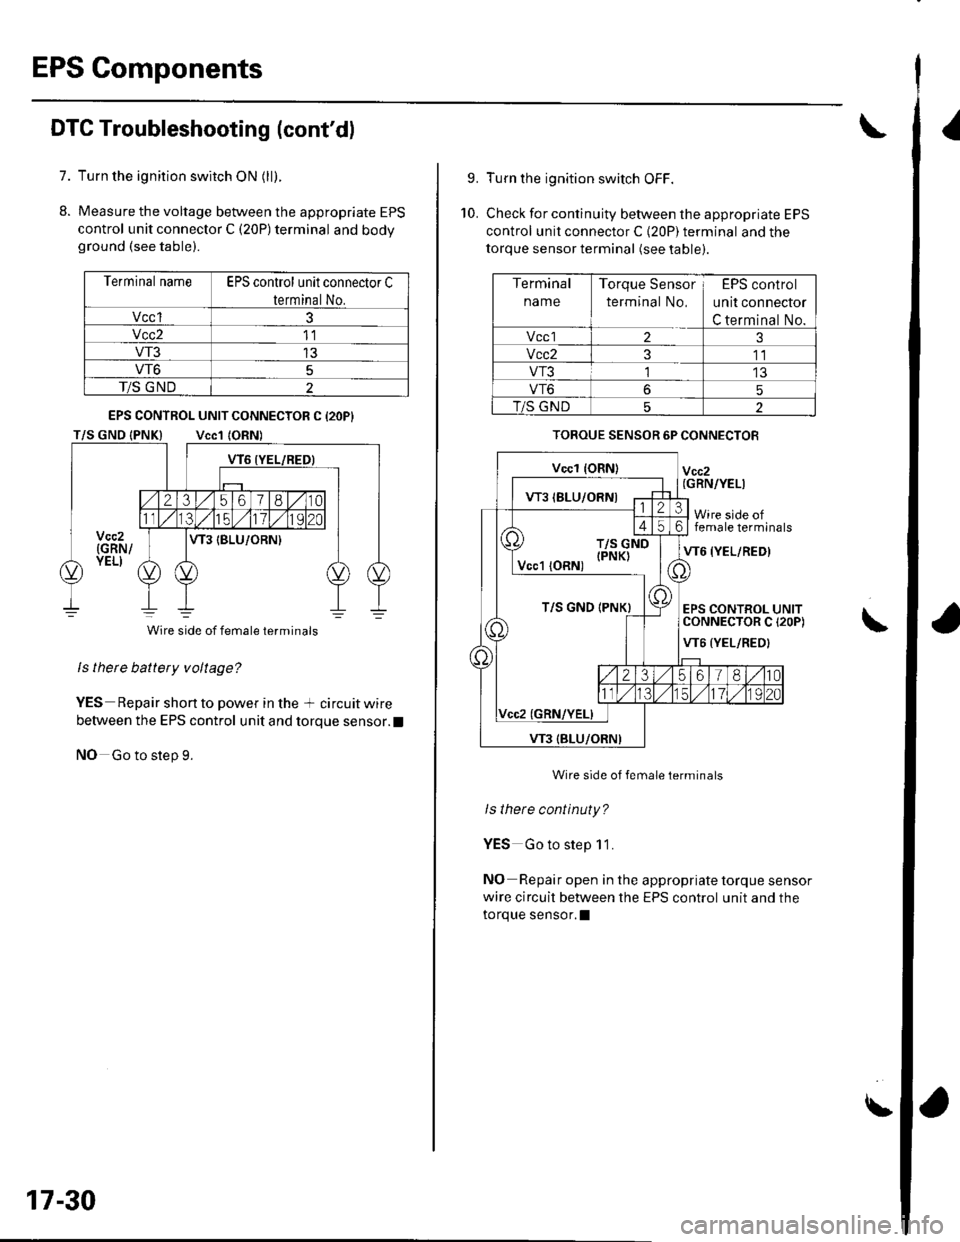
Measure the voltage between the appropriate EPS
control unit connector C (20P) terminal and bodyground (see table).
Terminal nameEPS control unit connector C
terminal No.
Vccl3
Vcc211
VT313
VT65
T/S GND2
ls thete battery voltage?
YES Repair shon to power in the + circuit wire
between the EPS control unit and torque sensor.l
NO Go to step 9.
EPS CONTROL UNIT CONNECTOR C {2OP}
Wire side of female terminals
17-30
9.
10.
Turn the ignition switch OFF.
Check for continuity between the appropriate EPS
control unit connector C {20P) terminal and the
torque sensor terminal (see table).
TOROUE SENSOR 6P CONNECTOR
Vccz(GRN/YELI
Wire side offemale terminals
VT6 {YEL/RED)
EPS CONTROL UNITCONNECTOR C I2OP)
VT6 {YEL/RED}
\
Wire side of female terminals
ls there continuty?
YES Go to step 11.
NO Repair open in the appropriate torque sensor
wire circuit between the EPS control unit and the
torque sensor.l
\
Terminal
name
Torque Sensor
terminal No,
EPS control
unit connector
C terminal No.
Vccl23
Vcc2311
VT3'l't3
VT665
T/S GND62
T/S GND {PNK)
Page 522 of 1139
11.
't2.
Substitute a known-good EPS control unit, and
reconnect the disconnected connectors.
Sta rt the engine.
Does the EPS indicator come on?
YES Go to step 13.
NO Check for loose or poor connections at the
EPS control unit and the torque sensor conneclors.
lf the connections are good, replace the EPS control
unit and recheck.I
Stop the engine, and verify the DTC.
ls DTC16 indicated?
YES Replace the steering gearbox and recheck.l
NO Perform the appropriate troubleshooting for
the code indicated.l
13.
DTC 17: Torque Sensor Vccl
DTC 18: Torque Sensor Vcc2
1. Clear the DTC.
2. Start the engine.
3. Wait at least 10 seconds.
4.
Does the EPS indicator come on?
YES Go to step 4.
NO Check for loose wires or poor connections. lf
the connections are good, the system is OK at this
time.I
Stop the engine, and verify the DTC.
Is DTCl7 or DTCl8 indicated?
YES Go to step 5.
NO Do the troubleshooting for the DTc
indicated.I
Make sure the ignition switch is OFF, then
disconnect EPS control unit connector C (20P) and
the torque sensor 6P connector.
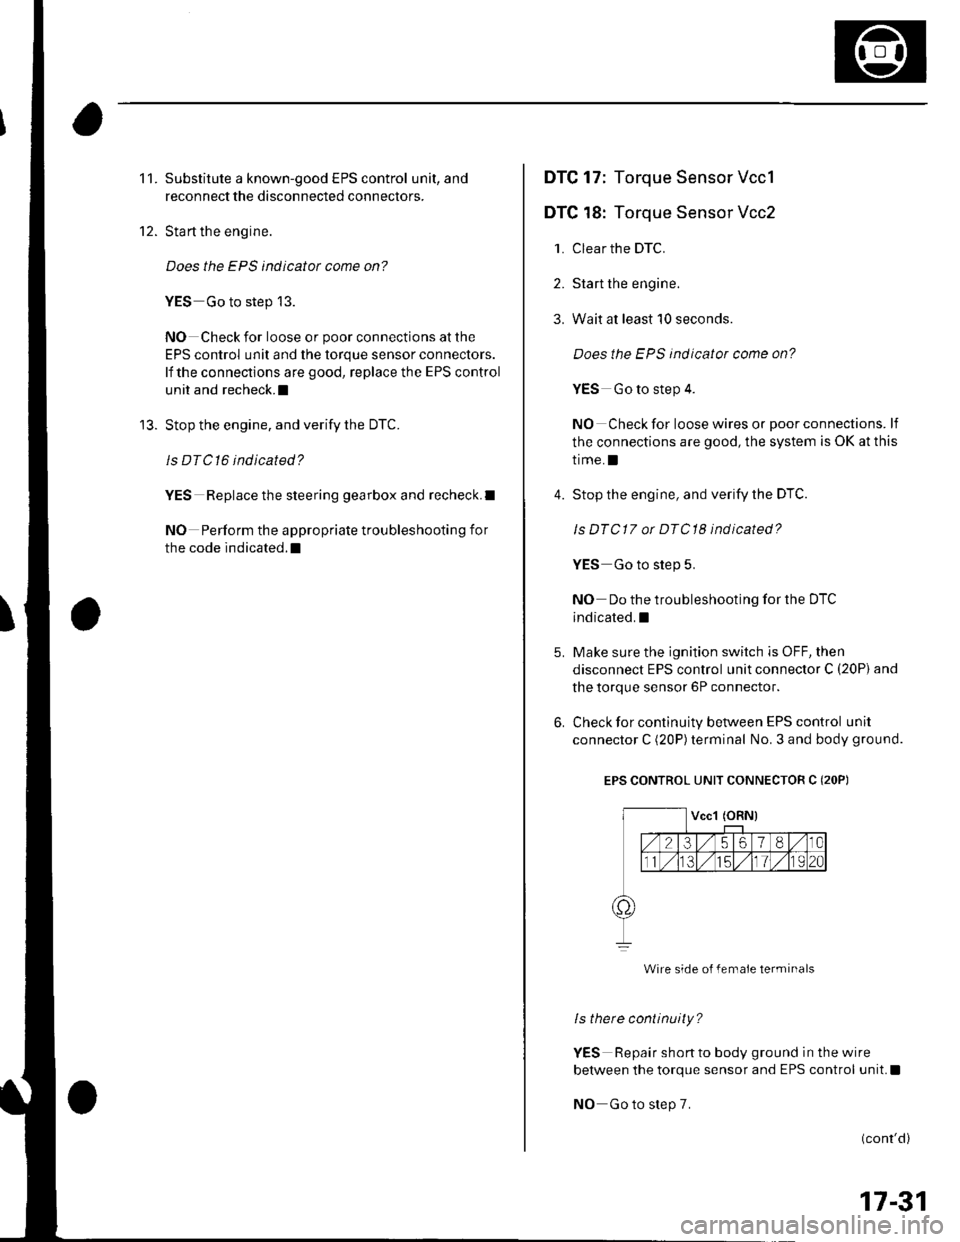
Check for continuity between EPS control unit
connector C (20P)terminal No. 3 and body ground.
EPS CONTROL UNIT CONNECTOR C (2OP)
Wire side o{ female terminals
ls there continuity?
YES Repair shon to body ground in the wire
between the torque sensor and EPS control unit.I
NO Go to step 7.
(cont'd)
17-31
Page 523 of 1139
EPS Components
DTC Troubleshooting (cont'dl
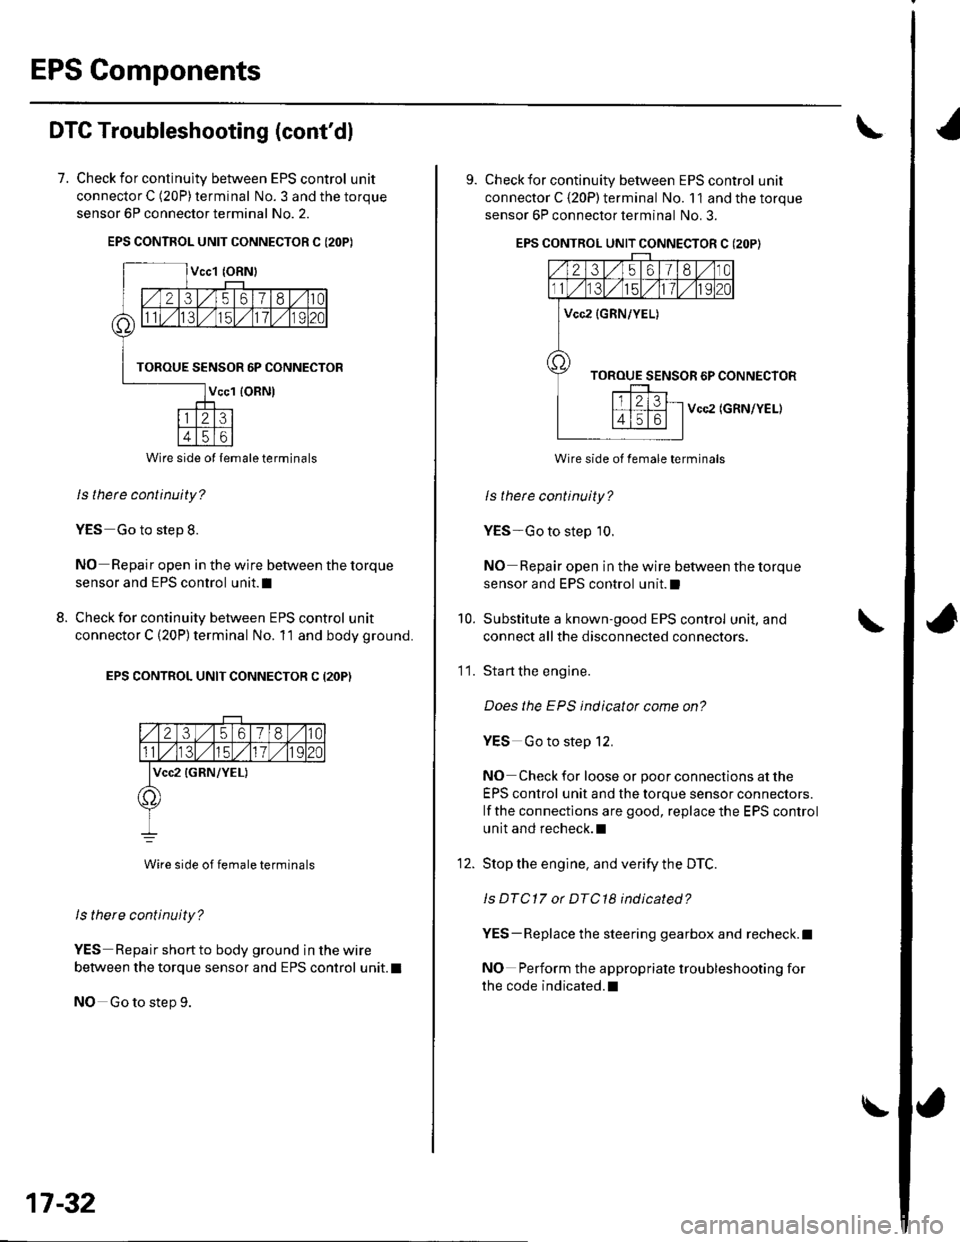
7. Check for continulty between EPS control unit
connector C (20P) terminal No. 3 and the torque
sensor 6P connector terminal No. 2.
EPS CONTROL UNIT CONNECTOR C I2OP)
ls thete continuity?
YES Go to step 8.
NO Repair open in the wire between the torque
sensor and EPS control unit.I
Check for continuity between EPS control unit
connector C (20P) terminal No. 11 and body ground.
EPS CONTROL UNIT CONNECTOR C (2OP)
2356180
lvcc2 {GRN/YEL)
Wire side of female terminals
ls there continuity?
YES Repair short to body ground in the wire
between the torque sensor and EPS control unit. t
NO Go to step 9.
8.
Wire side ol lemale terminals
17-32
\
9. Check for continuity between EPS control unit
connector C {20P) terminal No. 11 and the torque
sensor 6P connector terminal No. 3.
EPS CONTROL UNIT CONNECTOR C (2OP}
Vcc2 (GRN/YEL)
Wire side of female terminals
ls therc continuity?
YES-Go to step 10.
NO Repair open in the wire between the torque
sensor and EPS control unit.l
Substitute a known-good EPS control unit, and
connect all the disconnected connectors.
Sta rt the engine.
Does the EPS indicator come on?
YES Go to step 12.
NO Check for loose or poor connections at the
EPS control unit and the torque sensor connectors.
lf the connections are good, replace the EPS control
unit and recheck.l
Stop the engine, and verity the DTC.
ls DTC17 or DTC18 indicated?
YES-Replace the steering gearbox and recheck.l
NO Perform the appropriate troubleshooting for
the code indicated.l
10.
11.
12.
Page 524 of 1139
DTC 22: Vehicle Speed Sensor Signal
DTC 23: Engine Speed Signal
NOTE:. lf the MIL indicator is ON, troubleshoot the PGIVI-Fl
system first.. Even though the system is operating normally, the
EPS indicator will come on under the following
conditions.
- Condition 1:. The vehicle was traveling at least '12.4 mph(20 km/h), then. A rapld change in vehicle speed was detected,
then. The vehicle (or the vehicle speed sensor signal)
stopped for at least 5 seconds, and. The engine speed was still 1,640 rpm or higher for
at least 5 seconds- Condition 2:
After the vehicle (or the vehicle speed sensor
signal) has stopped for at least 10 seconds, yetthe
engine speed was still 1,640 rpm or higher for at
least 20 seconds.- Condition 3:
When the vehicle speed is 10 km/h (6.2 mph) or
above and the engine is running at 280 rpm or
below for 3 seconds.
1. Start the engine and check the tachometer.
ls the tachometer working correctly?
YES- Go to step 2.
NO-Go to step 9.
2. Test-drive the vehicle above 15 km/h {9.3 mph).
ls the speedometer working correctly?
YES Go to step 3.
NO-Perform the speedometer system
troubleshooting {see page 22-651.a
3.Block the rear wheels and raise the vehicle, and
make sure it is securely supported.
Turn the ignition switch ON (ll).
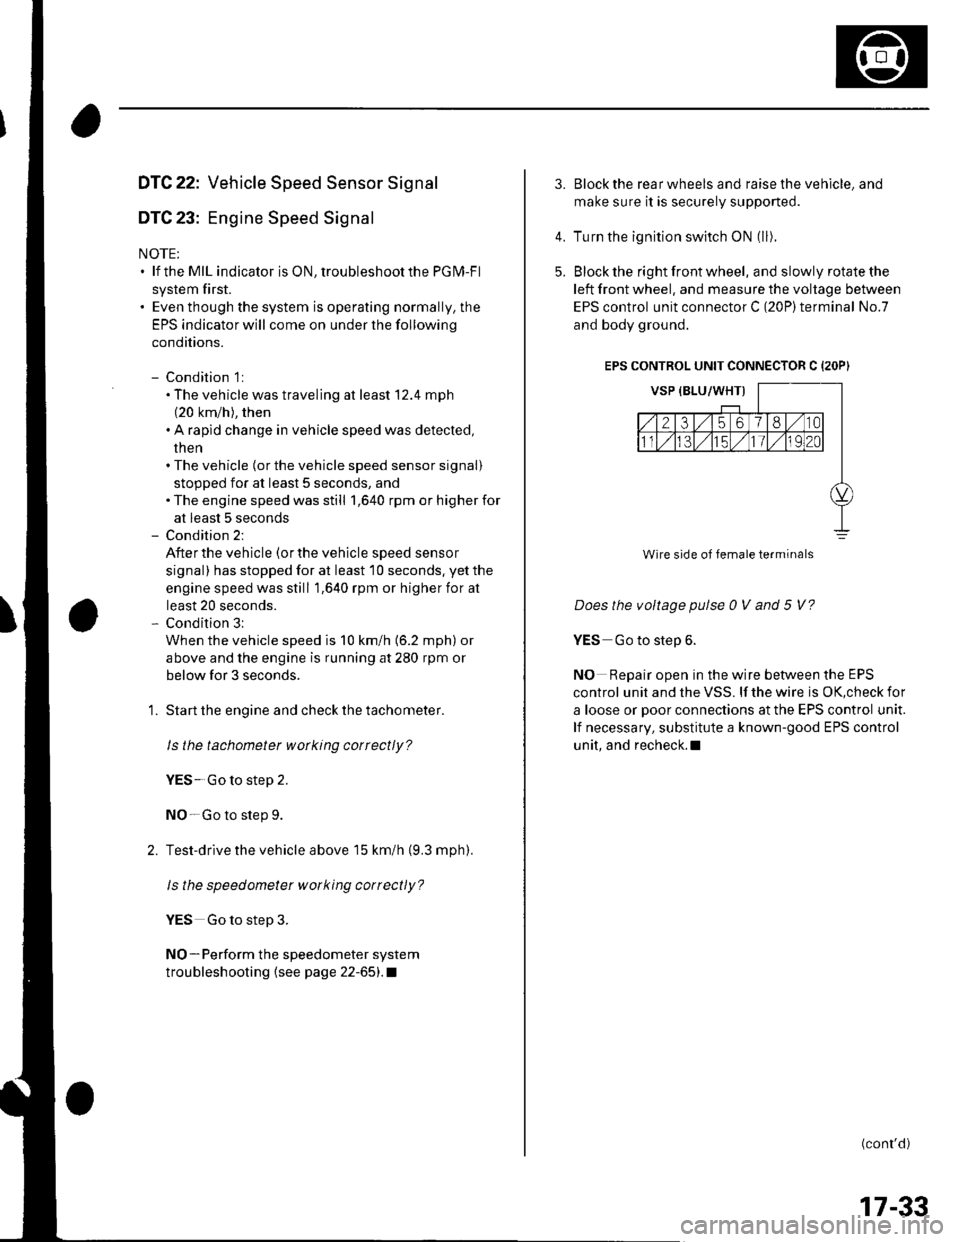
Block the right front wheel, and slowly rotate the
left front wheel, and measure the voltage between
EPS control unit connector C (20P)terminal No.7
and body ground.
EPS CONTROL UNIT CONNECTOR C {2OP)
Does the voltage pulse 0 V and 5 V?
YES Go to step 6.
NO Repair open in the wire between the EPS
control unit and the VSS. lf the wire is OK,check for
a loose or poor connections at the EPS control unit.
lf necessary, substitute a known-good EPS control
unit, and recheck.l
(conr'd)
4.
5.
Wire side of female terminals
17-33
Page 536 of 1139
DTC 66,68: EPS Control Unit lnternal Circuit
1. Clear the DTC.
2. Sta rt the engine.
3. Turn the steering wheel from lock-to-lock several
times, and wait 10 seconds or more.
Does the EPS indicator come on?
YES-Go to step 4.
NO-Check for loose wires or poor connections. lf
the connections are good. the system is OK at this
time.l
4. Stop the engine. and verify the DTC.
ls DTC 66 or 68 indicated?
YES-Check for loose or poor connections at the
EPS control unit. lf the conneclions are good,
substitute a known-good EPS control unit. lf the
symptom/indication goes away, replace the
original EPS control unit and recheck.I
NO Perform the appropriate troubleshooting for
the code indicated. t
DTC 67: Torque Sensor l/F Circuit
1. Clear the DTC.
2. Start the engine.
3. Turn the steering wheelfrom lock-to-lock several
times, and wait 10 seconds or more.
Does the EPS indicator come on?
YES-Go to step 4.
NO Check for loose wires or poor connections. lf the
connections are good, the system is OK at this time. !
4. Stop the engine, and verify the DTC.
ls DTC 67 indicated?
YES Check for loose or poor connections at the
EPS control unit. lf the connections are good,
substitute a known-good EPS control unit. lf the
symptom/indication goes away, replace the
original EPS control unit and recheck. !
NO-Perform the appropriate troubleshooting for
the code indicated.I
17-45
Page 571 of 1139
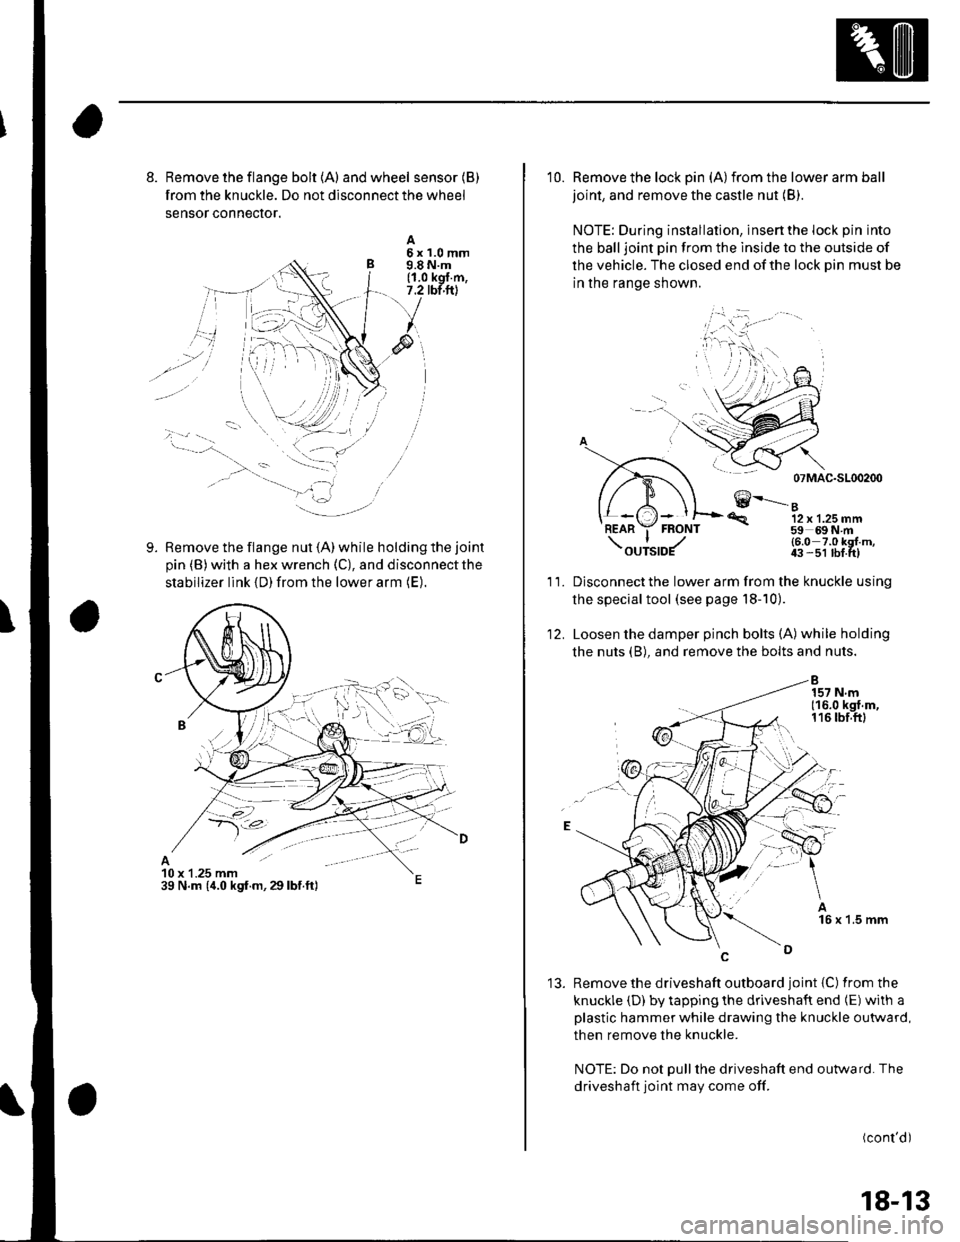
8. Remove the flange bolt {A) andwheel sensor(B)
from the knuckle. Do not disconnect the wheel
sensor conneclor.
Remove the flange nut (A) while holding the joint
pin (B) with a hex wrench (C), and disconnect the
stabilizer link {D) from the lower arm (E).
A5x1.0mm9.8 N.m(1.0 kgl.m,7.2 tbt.ftl
9.
10 x 1.25 mm39 N.m (,1.0 kgf.m,29lbf.ft)
10. Remove the lock pin (A)from the lower arm ball
joint, and remove the castle nut (B).
NOTE: During installation, insert the lock pin into
the balljoint pin from the lnside to the outside of
the vehicle. The closed end of the lock Din must be
in the range shown.
07 MAC-SL00200
€--....-"12 x 1.25 mm59 69N m
'R.
11.
12.
(6.0 7.0 kgl m,43 -51 lbf tt)
Disconnect the lower arm from the knuckle using
the special tool (see page l8-10).
Loosen the damper pinch bolts (A) while holding
the nuts (B), and remove the bolts and nuts.
'13. Remove the driveshaft outboard joint {C) fromthe
knuckle (D) by tapping the driveshaft end (E) with a
plastic hammer while drawing the knuckle outward,
then remove the knuckle.
NOTE: Do not Dull the driveshaft end outward. The
driveshaft joint may come off.
(cont'd)
18-13
Page 579 of 1139
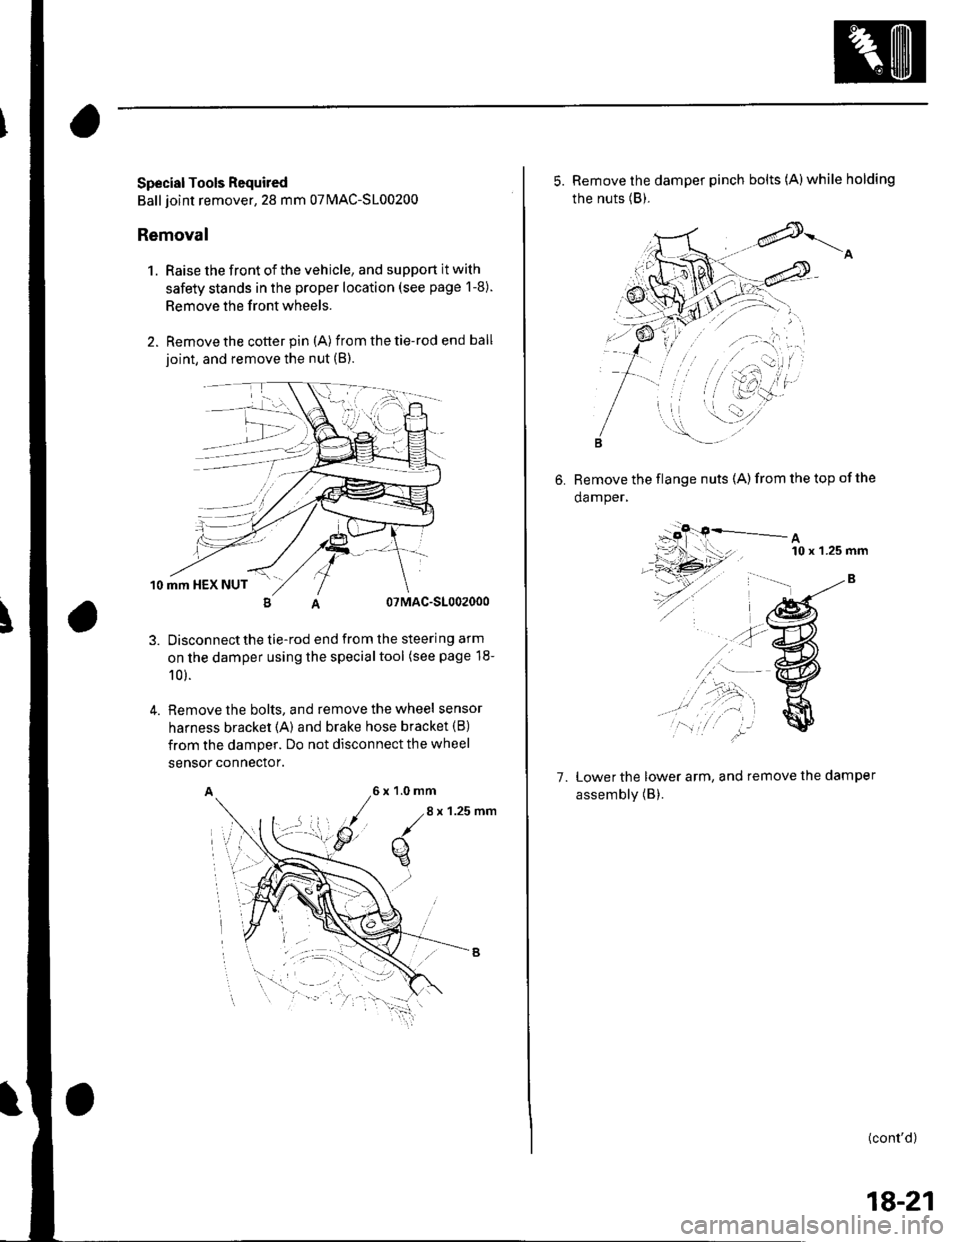
Special Tools Required
Ball joint remover,28 mm 07MAC-S100200
Removal
1. Raise the front of the vehicle, and support it with
safety stands in the proper location (see page 1-8).
Remove the front wheels.
Remove the cotter pin (A) from the tie-rod end ball
ioint, and remove the nut (B).
10 mm HEX NUT
07MAC-S1002000
Disconnectthe tie-rod end from the steering arm
on the damper using the specialtool (see page 18-
10 ).
Remove the bolts, and remove the wheel sensor
harness bracket {A) and brake hose bracket (B)
from the damper. Do not disconnect the wheel
4.
sensor connector.
A6x1.0mm
/.8
x 1.25 nm
q
5. Remove the damper pinch bolts (A)while holding
the nuts (B).
6. Remove the flange nuts (A)from the top ofthe
damper,
A10 x 'l.25 mm
7. Lower the lower arm, and remove the damper
assembly (B).
(cont'd)
18-21
Page 583 of 1139
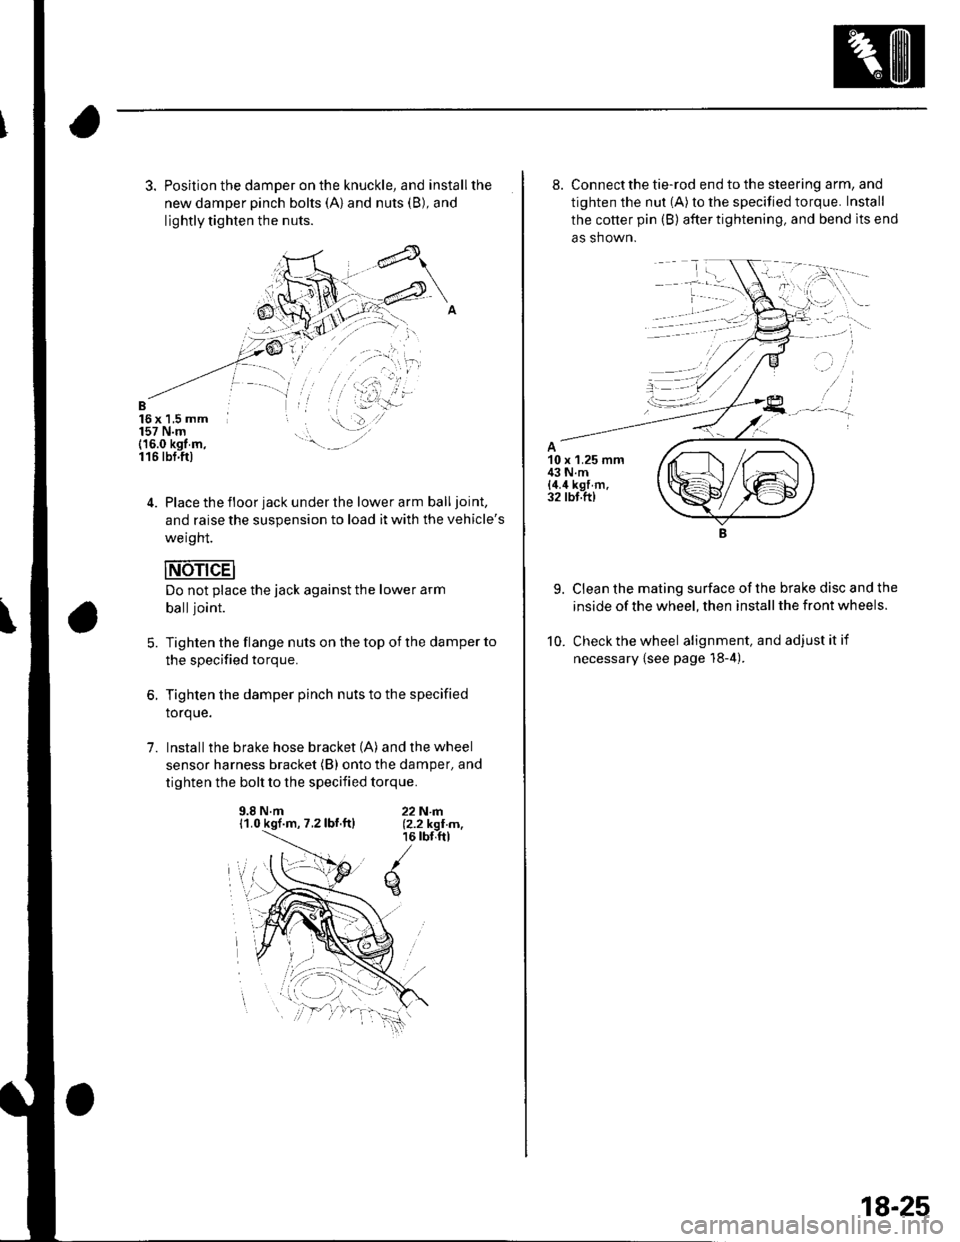
3. Position the damper on the knuckle, and installthe
new damper pinch bolts (A) and nuts (B), and
lightly tighten the nuts.
B16x 1,5 mm157 N.m(16.0 kgt m,116 tbt.ftl
4. Place the floor jack under the lower arm balljoint,
and raise the suspension to load it with the vehicle's
weight.
Do not place the jack against the lower arm
balljoint.
Tighten the flange nuts on the top of the damper to
the specified torque.
Tighten the damper pinch nuts to the specified
torque.
Install the brake hose bracket (A) and the wheel
sensor harness bracket (B) onto the damper, and
tighten the bolt to the specified torque.
5.
1.
9.8 N.m11.0 kgf.m, 7.2lbf.ftl22N|rl.12.2 kgI m,16 rbr,ftl
q
8. Connect the tie-rod end to the steering arm, and
tighten the nut (A) to the specified torque. Install
the cotter pin (B) after tightening, and bend lts end
as shown.
9. Clean the mating surface ofthe brake disc and the
inside of the wheel, then install the front wheels.
10. Check the wheel alignment, and adjustitif
necessary {see page 18-4).
18-25