HONDA CIVIC 2003 7.G Workshop Manual
Manufacturer: HONDA, Model Year: 2003, Model line: CIVIC, Model: HONDA CIVIC 2003 7.GPages: 1139, PDF Size: 28.19 MB
Page 121 of 1139
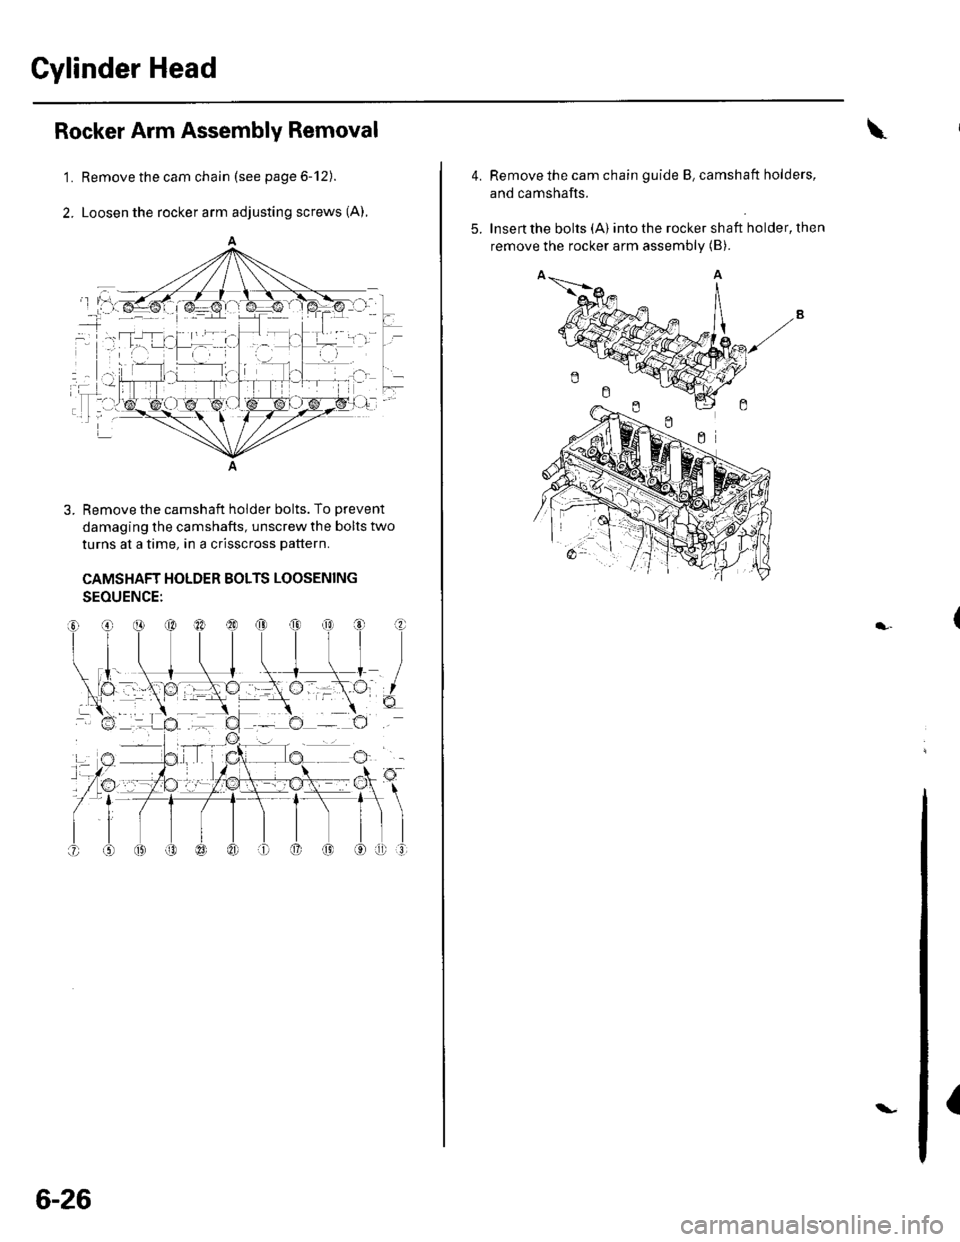
Cylinder Head
'1.
2.
Rocker Arm Assembly Removal
Remove the cam chain (see page 6-12).
Loosen the rocker arm adjusting screws (A),
A
3. Remove the camshaft holder bolts. To Drevent
damaging the camshafts, unscrew the bolts two
turns at a time, in a crisscross pattern.
CAMSHAFT HOLDER BOLTS LOOSENING
SEOUENCE:
6-26
\-
4.Remove the cam chain guide B, camshaft holders,
and camshafts.
Insert the bolts (A) Into the rocker shaft holder, then
remove the rocker arm assembly (B).5.
{
Page 122 of 1139
NOTE:
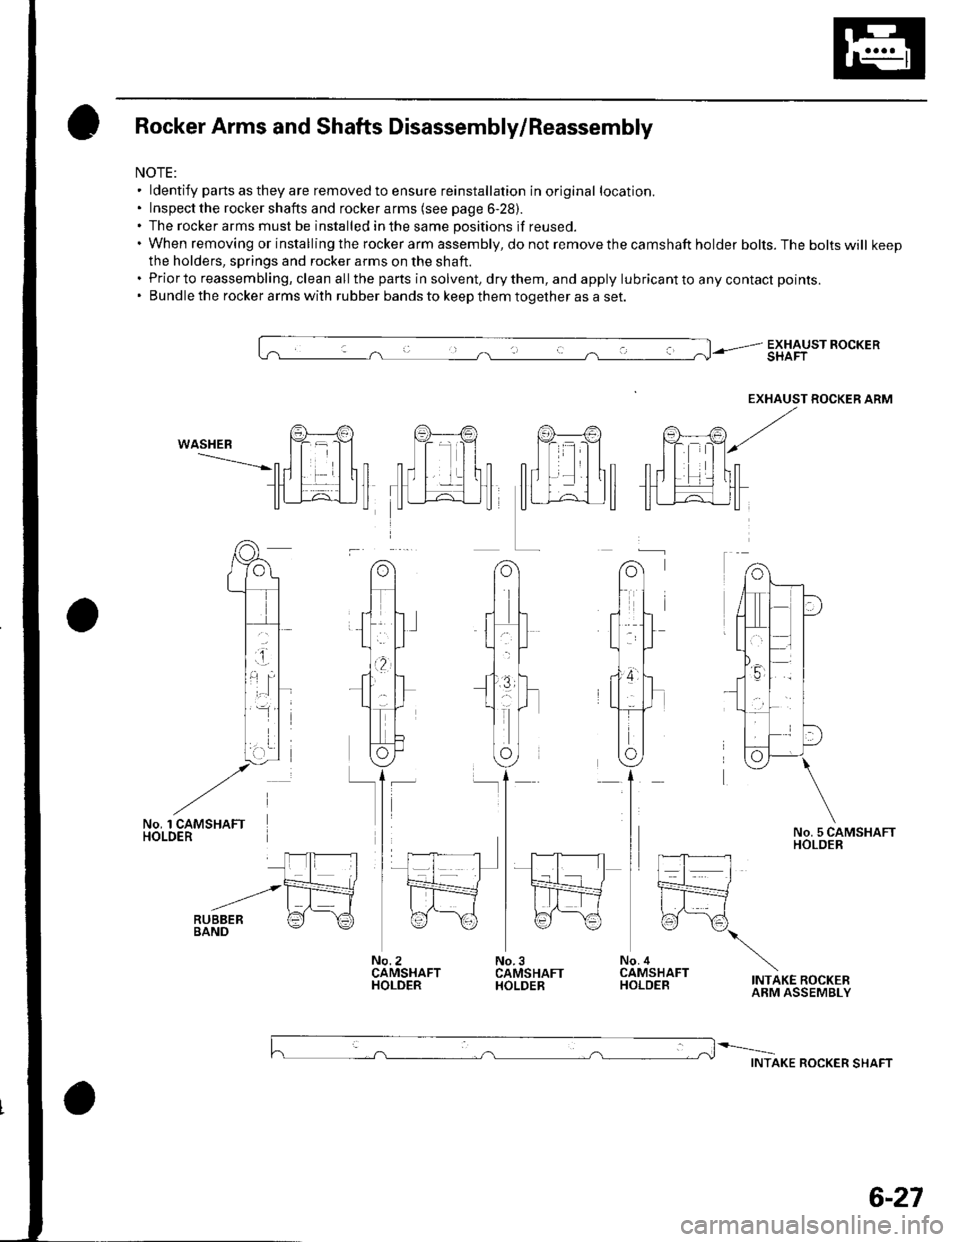
Rocker Arms and Shafts Disassembly/Reassembly
ldentify parts as they are removed to ensure reinstallation in original location.
Inspect the rocker shafts and rocker arms (see page 6-28).
The rocker arms must be installed in the same positions if reused.
When removing or installing the rocker arm assembly, do not remove the camshaft holder bolts. The bolts will keep
the holders, springs and rocker arms on the shaft.
Prior to reassembling, clean all the parts in solvent, dry them, and apply lubricant to any contact points.
Bundle the rocker arms with rubber bands to keeD them tooether as a set.
EXHAUST ROCKERSHAFT
EXHAUST ROCKER ARM
wASHEB Yr rY Y V
l I ltnrll lln
IJI_J;-L,JLI []1_L^|l]rffin ,ffif-
INTAKE ROCKERARM ASSEMBLY
INTAKE ROCKER SHAFT
'rl)
70)
.;...1
t:l P-l
,,_tl
o
,q
'l
o
6-27
Page 123 of 1139
Cylinder Head
1.
2.
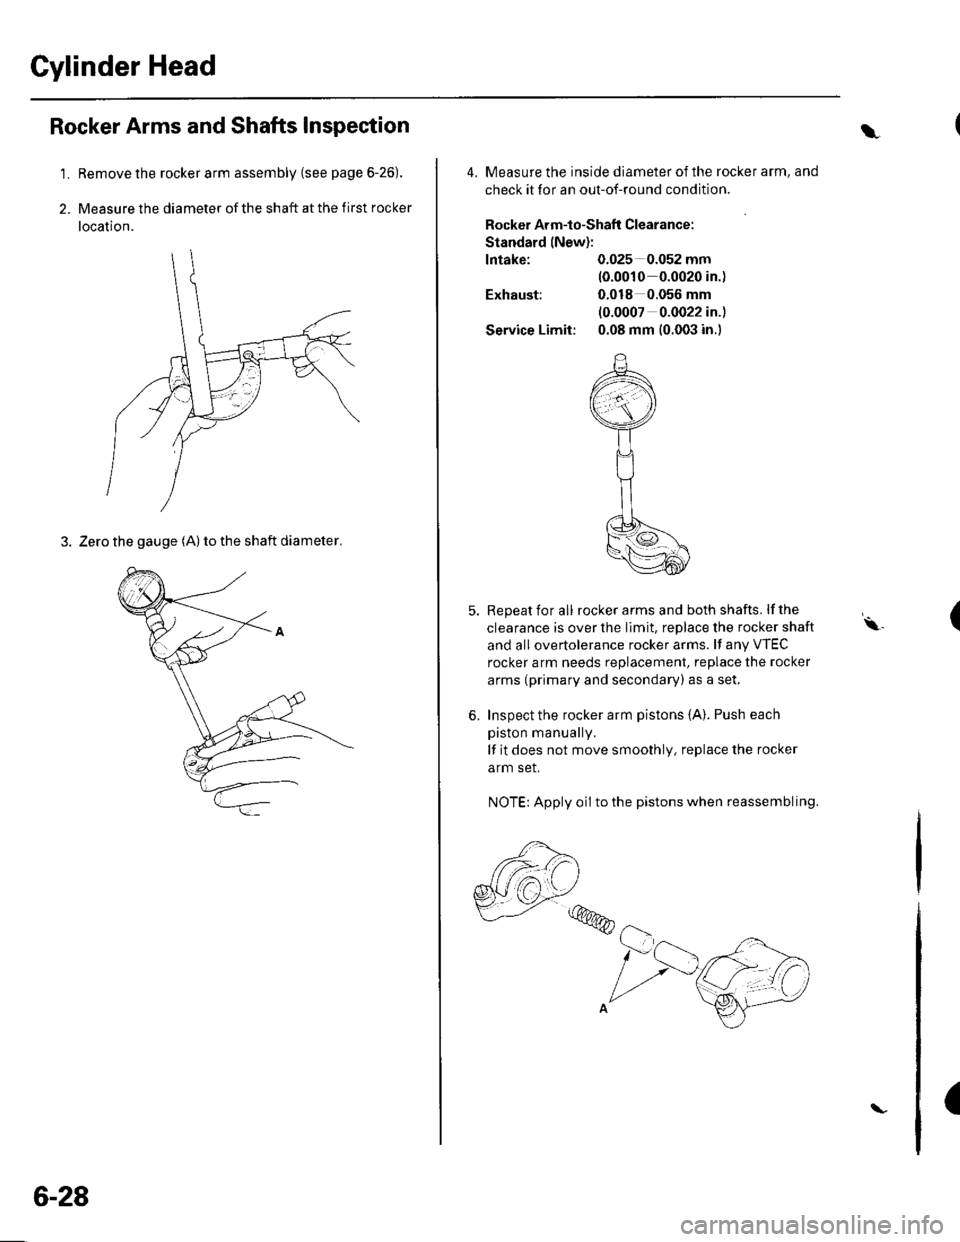
Rocker Arms and Shafts Inspection
Remove the rocker arm assembly (see page 6-26).
Measure the diameter of the shaft at the first rocker
location.
3. Zero the gauge (A) to the shaft diameter.
6-28
\
4. Measure the inside diameter ofthe rocker arm, and
check it for an out-of-round condition.
Rocker Arm-to-Shaflt Clearance:
Standard lNew):
lntake: 0.025 0.052 mm(0.0010 0.0020 in.)
Exhaust: 0.018 0.056 mm
(0.0007 0.0022 in.)
Service Limit: 0.08 mm (0.003 in.)
5. Repeat for all rockerarms and both shafts. lfthe
clearance is over the Ilmit. replace the rocker shaft
and all overtolerance rocker arms. lf any VTEC
rocker arm needs replacement, replace the rocker
arms (primary and secondary) as a set.
6. Inspect the rocker arm pistons {A}. Push each
piston manually.
lf it does not move smoothly, replace the rocker
arm set.
NOTE: Apply oil to the pistons when reassembling.
,,,@@
(\.
(
Page 124 of 1139
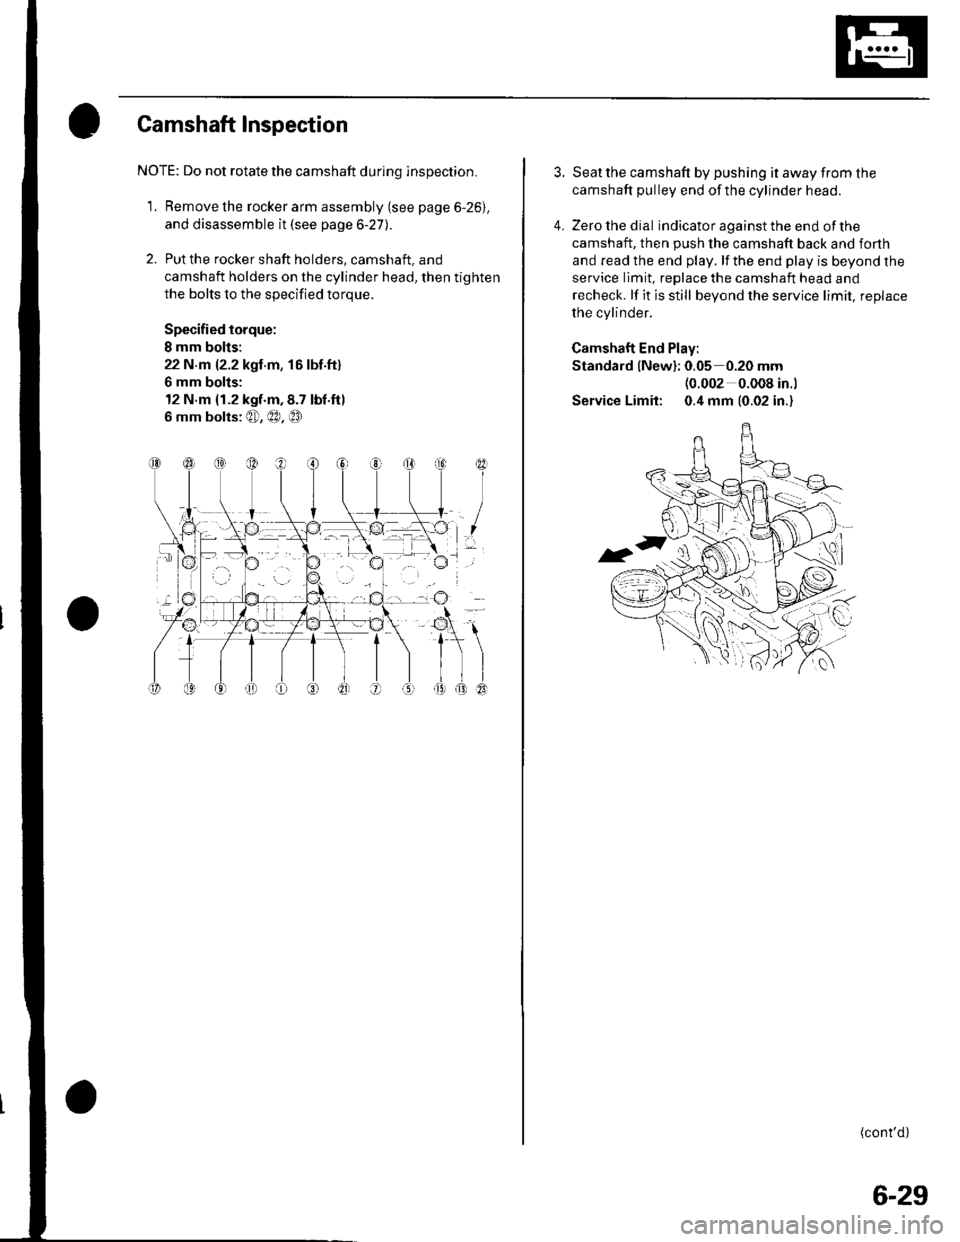
Gamshaft Inspection
NOTE: Do not rotate the camshaft during inspection.
1. Remove the rocker arm assembly (see page 6-26).
and disassemble it (see page 6-27).
2. Put the rocker shaft holders, camshaft, and
camshaft holders on the cylinder head, then tighten
the bolts to the specified torque.
Specified torque:
I mm bolis:
22 N.m {2.2 kgt m, 16lbf.ft}
6 mm bolts:
12 N.m {1.2 kgf.m,8.7 tbf.ftl
6 mm bolts: @, €0, @
I
I
3. Seat the camshaft by pushing it away from the
camshaft pulley end ofthe cylinder head.
4. Zero the dial indicator against the end of the
camshaft, then push the camshaft back and forth
and read the end play. lf the end play is beyond the
service limit, replace the camshaft head and
recheck. lf it is still beyond the service limit, replace
the cylinder.
Camshaft End Play:
Standard {New}: 0.05 0.20 mm(0.002 0.008 in.l
Service Limit: 0.4 mm (0.02 in.)
(cont'd)
6-29
Page 125 of 1139
Cylinder Head
Camshaft Inspection (cont'dl
1.
9.
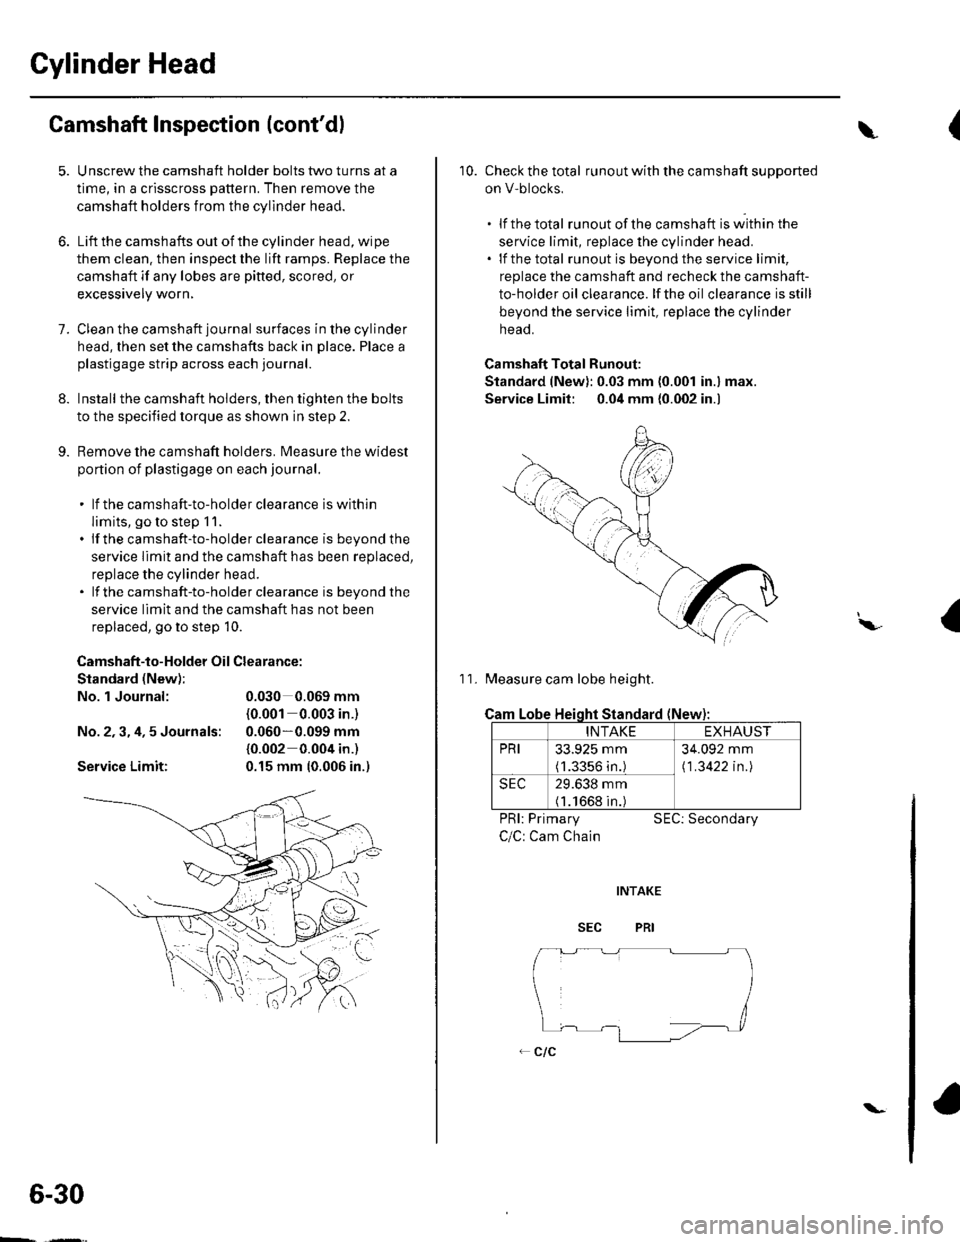
Unscrew the camshaft holder bolts two turns at a
time, in a crisscross pattern. Then remove the
camshaft holders from the cylinder head.
Lift the camshafts out of the cylinder head, wipe
them clean. then inspect the lift ramps. Replace the
camshaft if any lobes are pitted, scored, or
excessively worn,
Clean the camshaft journal surfaces in the cylinder
head, then set the camshafts back in place. Place a
plastigage strip across each journal.
Install the camshaft holders, then tighten the bolts
to the specified torque as shown in step 2.
Remove the camshaft holders. Measure the widest
portion of plastigage on each journal.
. lf the camshaft-to-holder clearance is within
limits, go to step 1 1.. lf the camshaft-to-holder clearance is beyond the
service limit and the camshaft has been replaced,
replace the cylinder head.. lf the camshaft-to-holder clearance is beyond the
service limit and the camshaft has not been
replaced, go to step 10.
Camshaft-to-Holder Oil Clearance:
Standard (New):
No. 1 Journal:
No.2,3,4,5 Journals:
Service Limit:
0.030 0.069 mm
{0.001 0.003 in-)
0.060*0.099 mm
{0.002 0.004 in.)
0.15 mm {0.006 in.)
6-30
\-
{\
10. Check the total runout with the camshaft supported
on V-blocks,
.lfthetotal runout of the camshaft is within the
service limit, replace the cylinder head.. lf the total runout is beyond the service limit,
replace the camshaft and recheck the camshaft-
to-holder oil clearance. lf the oil clearance is still
beyond the service limit, replace the cylinder
neao.
Camshaft Total Runout:
Standard (New): 0.03 mm (0.001 in.) max.
Service Limit: 0.04 mm {0.002 in.)
11. Measure cam lobe height.
Cam
PRI: Primary
C/C: Cam Chain
SEC: Secondary
I\,
Lobe Heioht Standard (New
INTAKEEXHAUST
PRI33.925 mm(1.3356 in.)
34.092 mm
\1 .3422 in.l
SEC29.638 mm(1.1668 in.)
Page 126 of 1139
Valves, Springs, and Valve Seals Removal
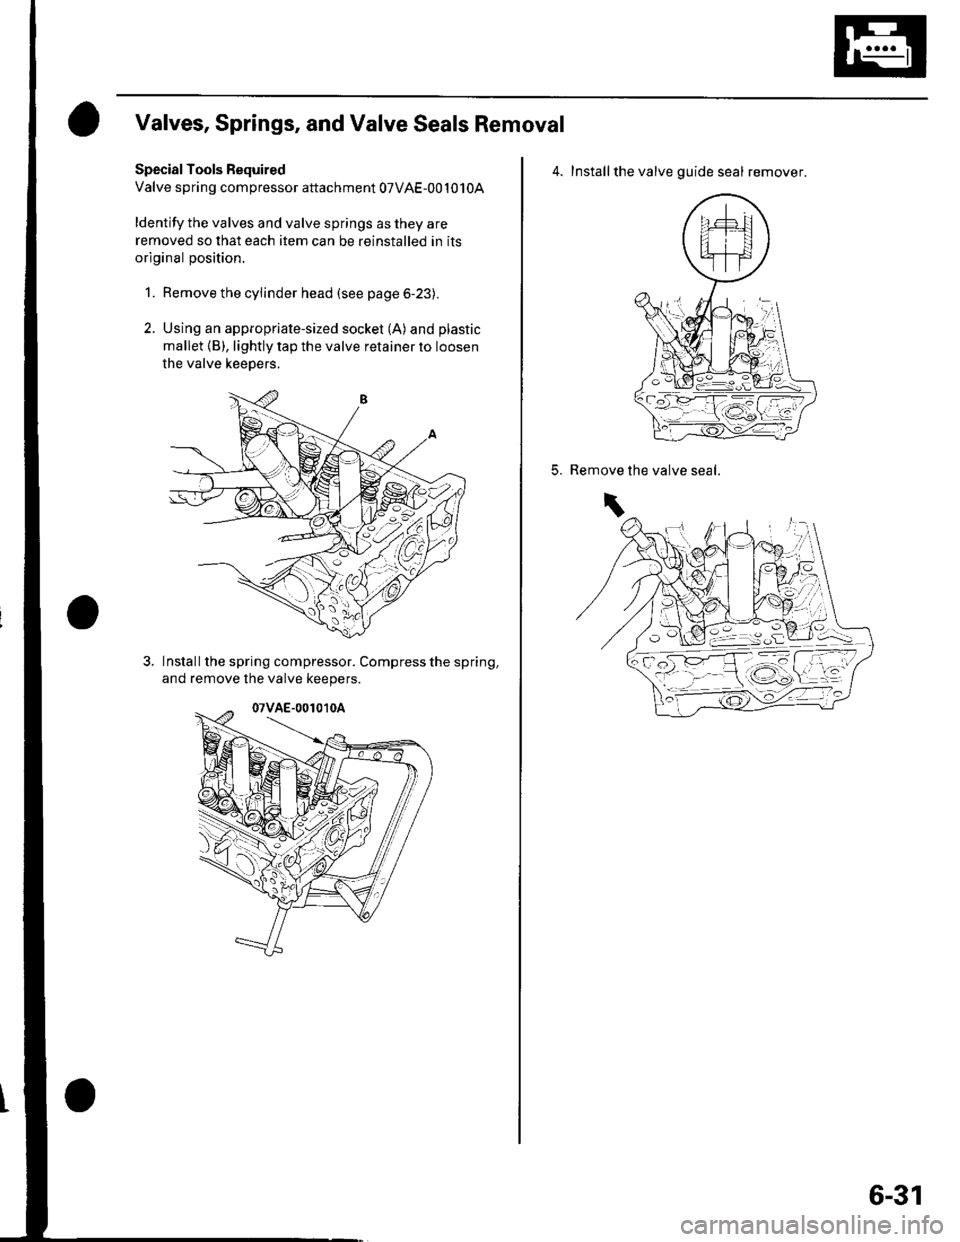
Special Tools Bequired
Valve spring compressor attachment 07VAE-001010A
ldentify the valves and valve springs as they are
removed so that each item can be reinstalled in its
original position.
1. Remove the cylinder head (see page 6-23).
2. Using an appropriate-sized socket (A) and plastic
mallet {B), lightly tap the valve retainer to loosen
the valve keepers.
Install the spring compressor. Compress the spring,
and remove lhe valve keepers.
4. Installthe valve guide seal remover.
5.the valve seal.Remove
\
6-31
Page 127 of 1139
Gylinder Head
Valve Inspection
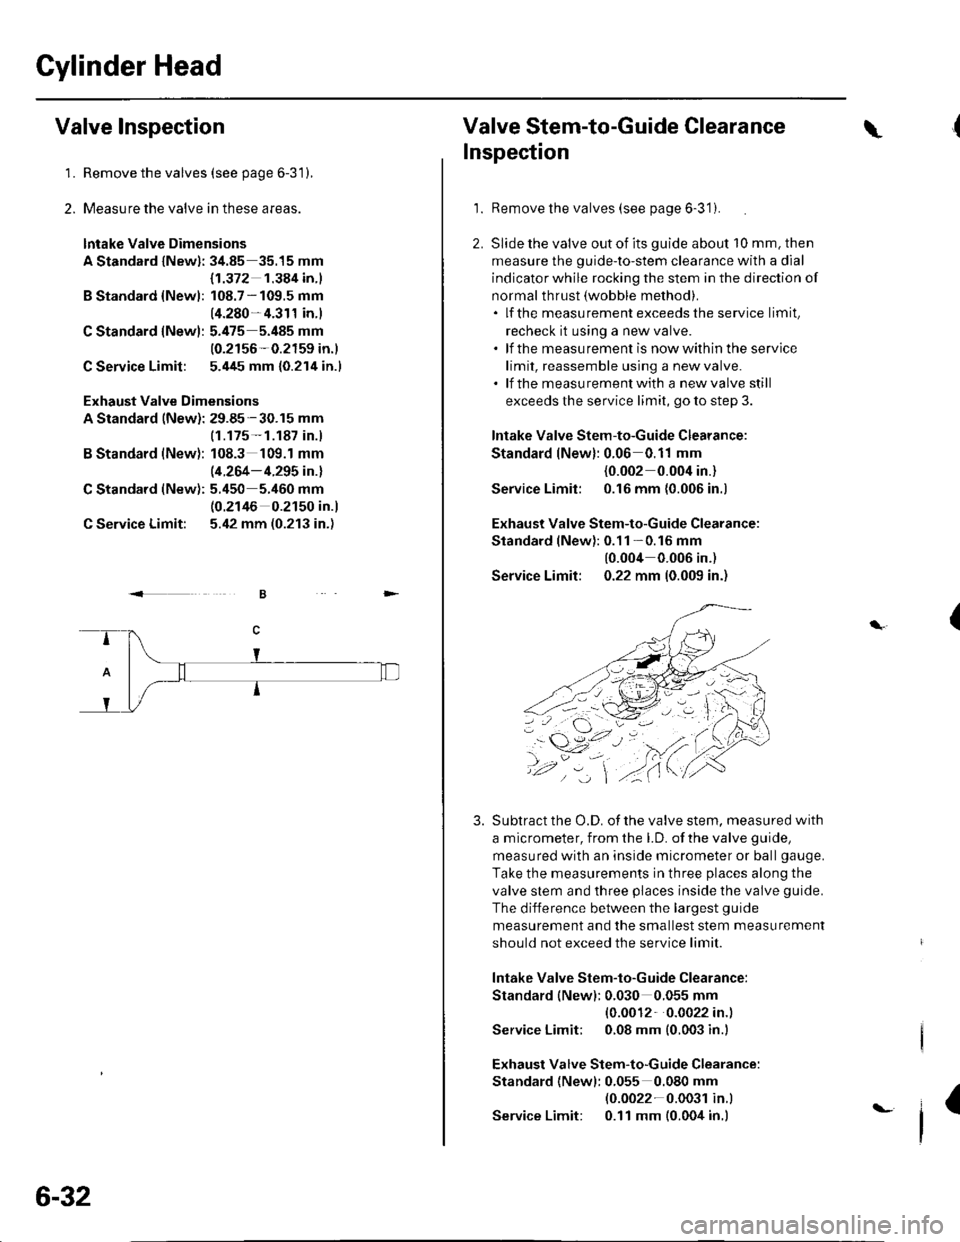
1.Remove the valves (see page 6-31),
Measure the valve in these areas.
lntake Valve Dimensions
A Standard lNewl: 34.85 35.15 mm
B Standard {Newl:
C Standard lNew):
C Service Limit:
B Standard (New):
C Standard (New):
C Service Limit:
Exhaust Valve Dimensions
A Standard (New): 29.85-30.15 mm
{1.372 1.384 in.l
108.7 - 109.5 mm
14.280- 4.311 in.)
5.475 5.485 mm
10.2156-0.2159 in.)
5.445 mm {0.214 in.l
(1.175- 1.187 in.)
108.3 109.1 mm
(4.264- 4.295 in.l
5.450 5.460 mm(0.2146 0.2150 in.)
5.42 mm (0.213 in.)
2.
.<
6-32
t-
Valve Stem-to-Guide Clearance\
Inspection
1.Remove the valves (see page 6-3'1).
Slide the valve out of its guide about 10 mm. then
measure the guide-to-stem clearance with a dial
indicator while rocking the stem in the direction of
normal thrust (wobble method).. lf the measurement exceedsthe service limit,
recheck it using a new valve.. lf the measurement is nowwithin the service
limit, reassemble using a new valve.. lf the measurementwith a newvalve still
exceeds the service limit, go to step 3.
lntake Valve Stem-to-Guide Clearance:
Standard lNew): 0.06 0.11 mm
{0.002 0.004 in.}
Service Limil: 0.16 mm {0.006 in.)
Exhaust Valve Stem-to-Guide Clearance:
Standard lNewl:0.11 -0.16 mm
10.004 0.006 in.)
Service Limit: 0.22 mm 10.009 in.)
Subtract the O.D. of the valve stem. measured with
a micrometer, from the LD. of the valve guide,
measured with an inside micrometer or ball gauge.
Take the measurements in three places along the
valve stem and three places inside the valve guide.
The difference between the largest guide
measurement and the smallest stem measurement
should not exceed the service limit
lntake Valve Stem-to-Guide Clearance:
Standard (New): 0.030 0.055 mm
{0.0012 0.0022 in.)
Service Limit; 0.08 mm (0.003 in.l
Exhaust Valve Stem-to-Guide Clearance:
Standard {Newl: 0.055 0.080 mm(0.0022-0.003r in.l
Service Limit: 0.11 mm (0.004 in.)
(
3.
4,.
I
Page 128 of 1139
Valve Guide Replacement
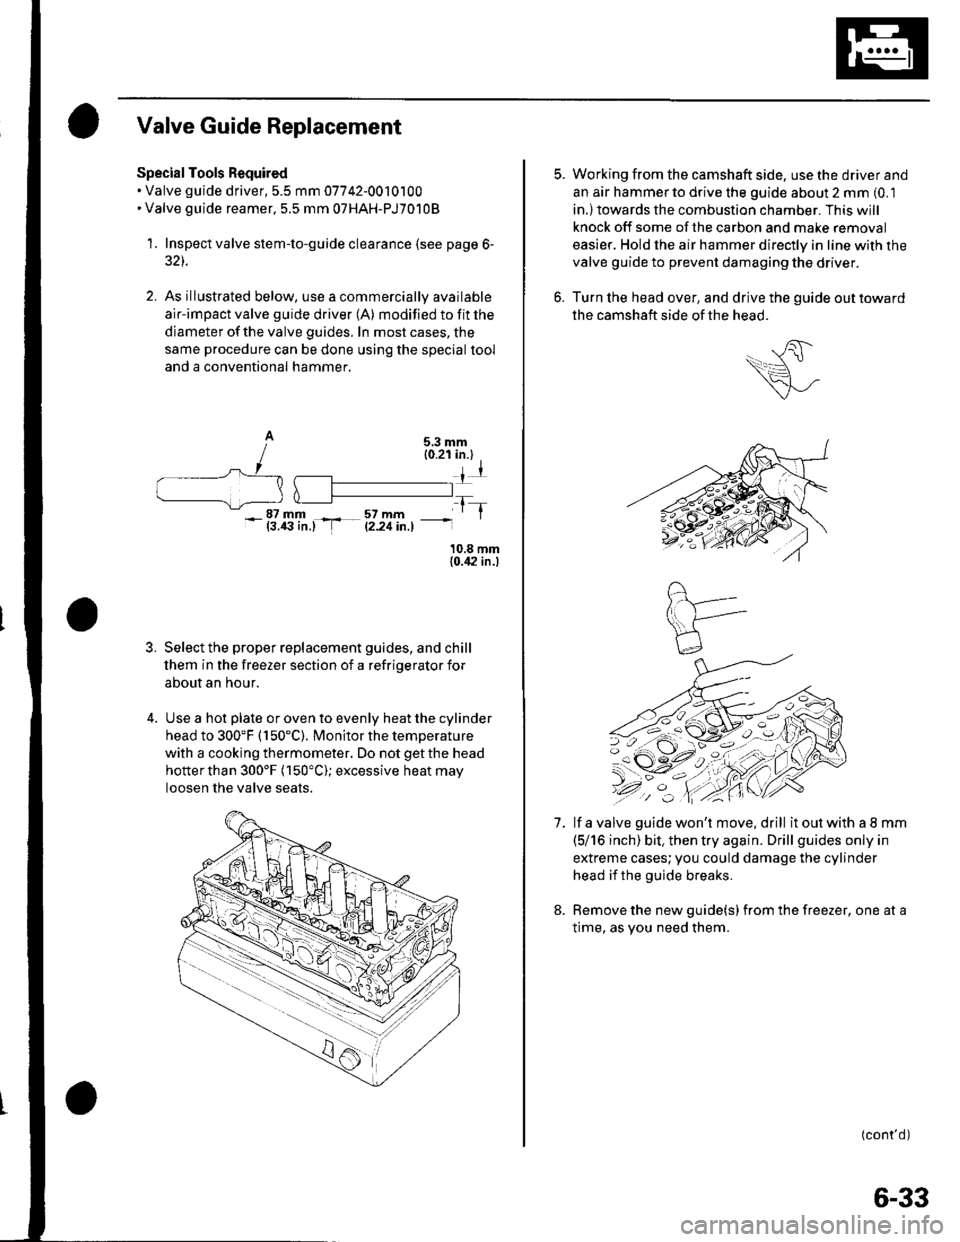
Special Tools Required. Valve guide driver, 5.5 mm 07742-0010100. Valve guide reamer, 5.5 mm 07HAH-PJ7o108
1.Inspect valve stem-to-guide clearance (see page 6-
32t.
As illustrated below, use a commercially available
air-impact valve guide driver (A) modified to fit the
diameter of the valve guides. In most cases, the
same procedure can be done using the special tool
and a conventional hammer.
10.8 mm{0.,|2 in.)
3. Select the proper replacement guides, and chill
lhem in the freezer section of a refriqerator for
about an hour.
4. Use a hot plate or oven to evenly heat the cylinder
head to 300'F (150"C). Monitor the temperature
with a cooking thermometer. Do not getthe head
hotterthan 300'F (150"C); excessive heat may
loosen the valve seats.
-_|Jfillr-.-4fi'11., -
tT
7.
Working from the camshaft side. use the driver and
an aar hammerto drive the guide about 2 mm (0.1
in.)towards the combustion chamber. This will
knock off some of the carbon and make removal
easier. Hold the air hammer directly in line with the
valve guide to prevent damaging the driver.
Turn lhe head over, and drive the guide out toward
the camshaft side of the head.
lf a valve guide won't move, drill it out with a I mm
(5/16 inch) bit. then try again. Drill guides only in
extreme cases;you could damage the cylinder
head if the guide breaks.
Remove the new guide(s) from the freezer, one at a
time, as vou need them.
(cont'd)
6-33
Page 129 of 1139
Cylinder Head
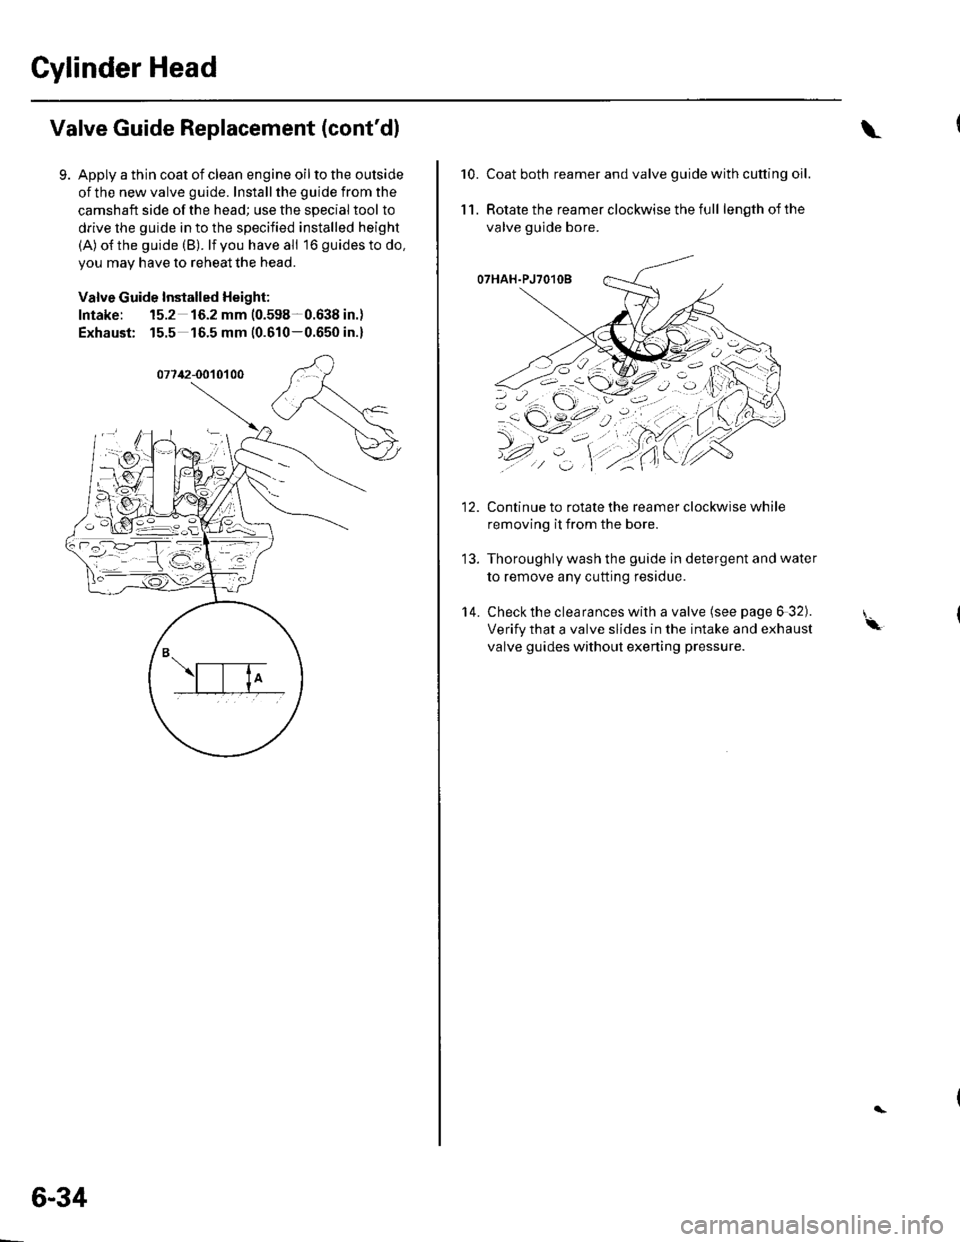
Valve Guide Replacement (cont'dl
Apply a thin coat of clean engine oil to the outside
of the new valve guide. Install the guide from the
camshaft side of the head; use the special tool to
drive the guide in to the specified installed height
(A) o{the guide (B). lf you have all 16 guidesto do,
you may have to reheat the head.
Valve Guide Installed Height:
Intake: 15.2 16.2 mm (0.598-0.638 in.)
Exhaust: 15.5 16.5 mm (0.610-0.650 in.)
6-34
\
10.Coat both reamer and valve guide with cutting oil.
Rotate the reamer clockwise the full length of the
valve guide bore.
O7HAH.PJ7O1OB
Continue to rotate the reamer clockwise while
removing it from the bore.
Thoroughly wash the guide in detergent and water
to remove any cutting residue.
Check the clearances with a valve (see page 6 32).
Verify that a valve slides in the intake and exhaust
valve guides without exening pressure.
11.
14.
'-\
Page 130 of 1139
Valve Seat Reconditioning
1. Inspect valve stem-to-guide clearance (see page 6-
32). lf the valve guides are worn, replace them (see
page 6-33) before cutting the valve seats.
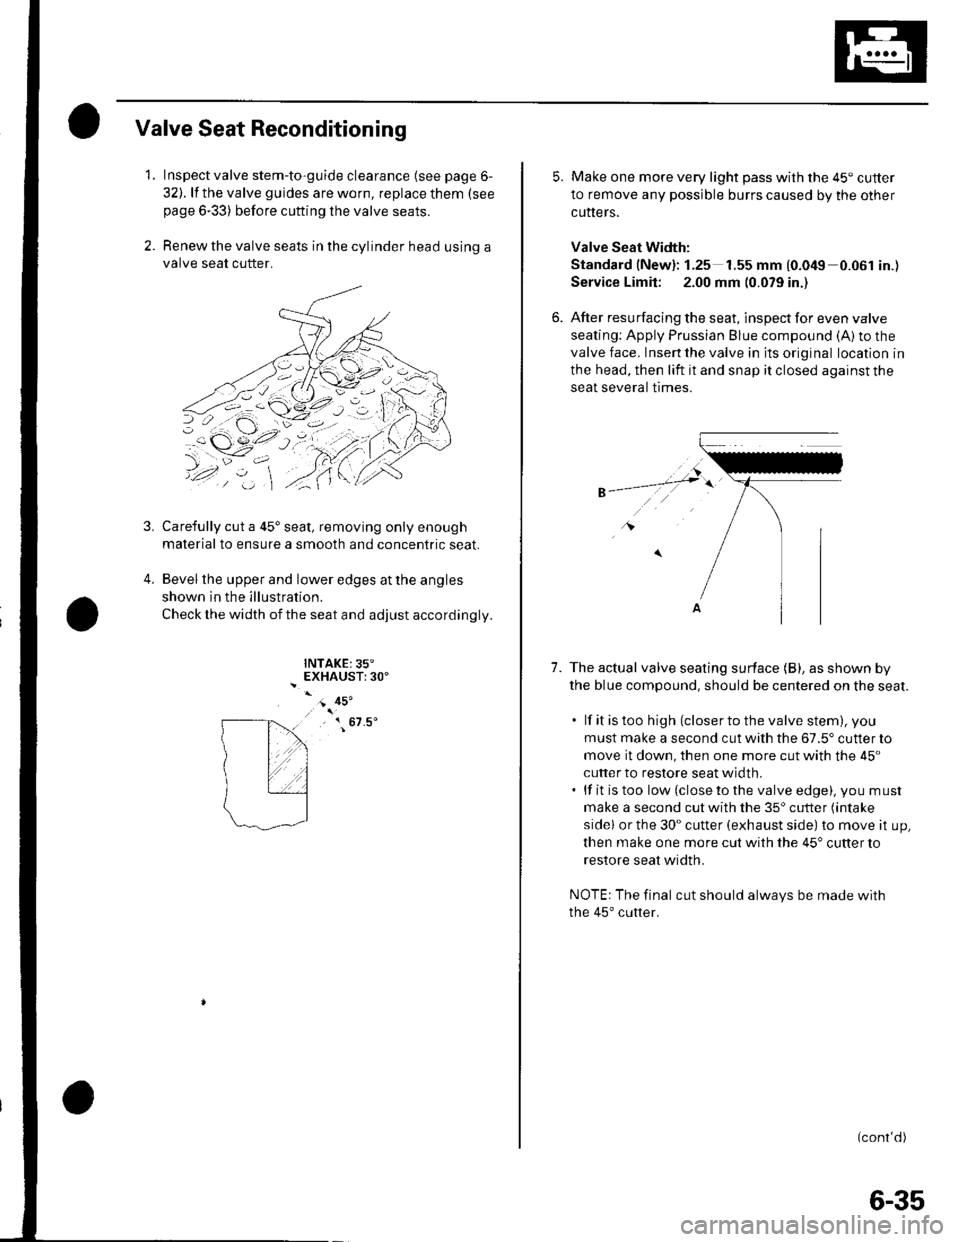
2. Renew the valve seats in the cylinder head using a
valve seat cutter.
Carefully cut a 45'seat, removing only enough
material to ensure a smooth and concentric seat.
Bevel the upper and lower edges at the angles
shown in the illustration.
Check the width of the seat and adjust accordingly.
INTAKE:35"EXHAUST:30'
3,
4.
- 45'
, { 67.5'
5. Make one more very light pass with the 45" cutter
to remove any possible burrs caused by the other
cutters.
Valve Seat Width:
Standard (New): 1.25 1.55 mm {0.049 0.061 in.)
Service Limit: 2.00 mm (0.079 in.)
6. After resurfacing the seat, inspect for even valve
seating: Apply Prussian Blue compound (A) to the
valve face. Insert the valve in its original location in
the head, then lift it and snap it closed against the
seat several trmes.
1.The actual valve seating surface (B), as shown by
the blue compound, should be centered on the seat.
. lf it is too high (closer to the valve stem), you
must make a second cut with the 67.5' cutter to
move it down, then one more cut with the 45"
cutter to restore seat width.. lf it is too low (close to the valve edge), you must
make a second cut with the 35'cutter (intake
sidel or the 30" cutter (exhaust side) to move it up,
then make one more cut with the 45" cutter to
restore seat width.
NOTE: The final cut should always be made with
the 45'cutter.
(cont'd)
6-35