HONDA CIVIC 2003 7.G Workshop Manual
Manufacturer: HONDA, Model Year: 2003, Model line: CIVIC, Model: HONDA CIVIC 2003 7.GPages: 1139, PDF Size: 28.19 MB
Page 131 of 1139
Cylinder Head
8.
Valve Seat Reconditioning (cont'dl
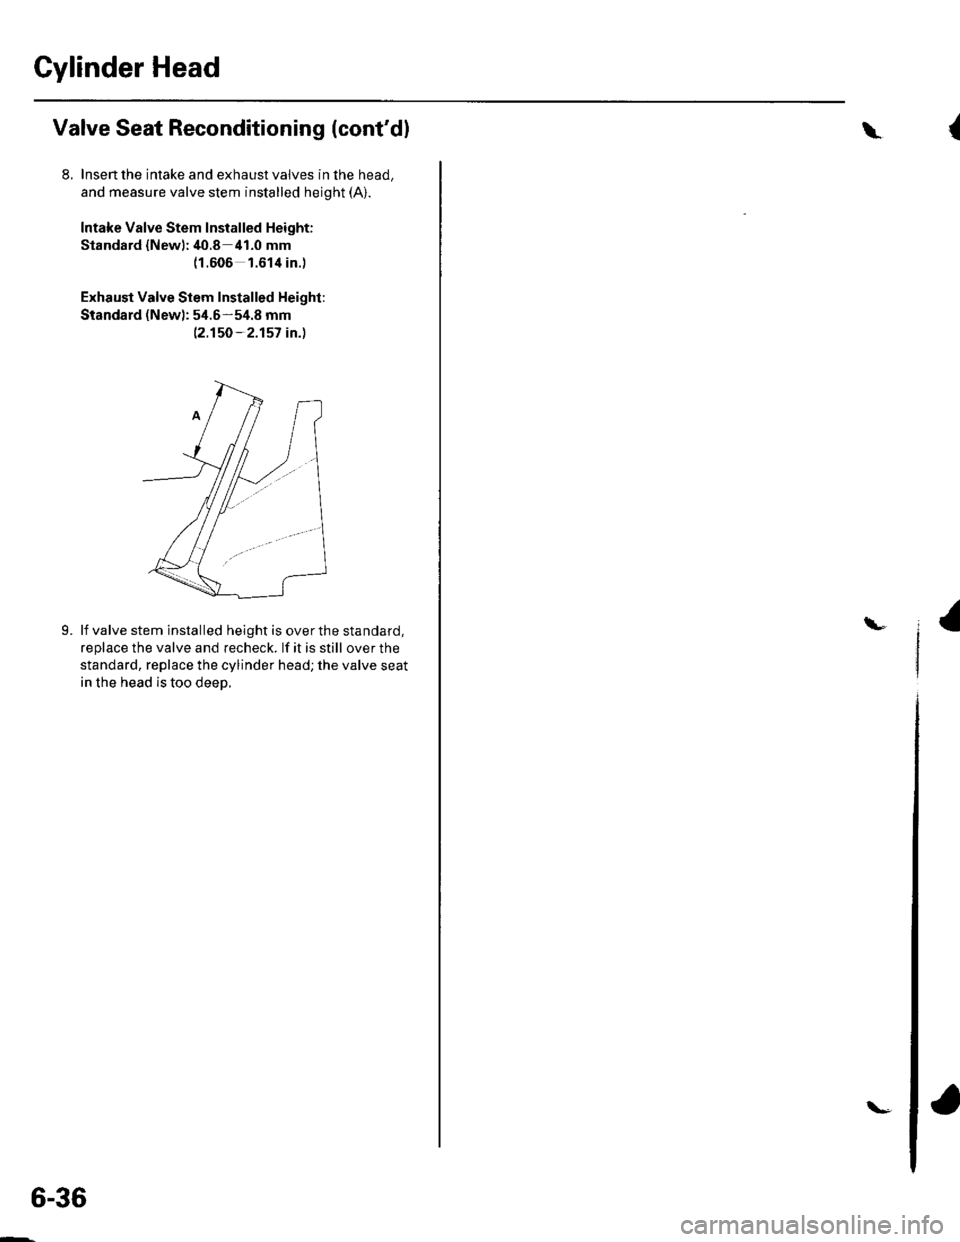
Insen the intake and exhaust valves in the head,
and measure valve stem installed height (A).
Intake Valve Stem Installed Height:
Standard {New):40.8 41.0 mm(1.606 1.614 in.)
Exhaust Valve Stem Installed Height:
Standard (New): 54.6-54.8 mm
|'2.150 -2.157 in.l
lf valve stem installed height is over the standard,
replace the valve and recheck. lf it is still over the
standard, replace the cylinder head; the valve seat
in the head is too deeD.
L
6-36
\-
(\
\-
Page 132 of 1139
Valves, Springs, and Valve Seals Installation
Special Tools Required
Valve spring compressor attachment 07VAE-00101 0A
1. Coat the valve stems with engine oil. lnstall the
valves in the valve guides.
2. Check that the valves move up and down smoothly.
Installthe spring seats on the cylinder head.
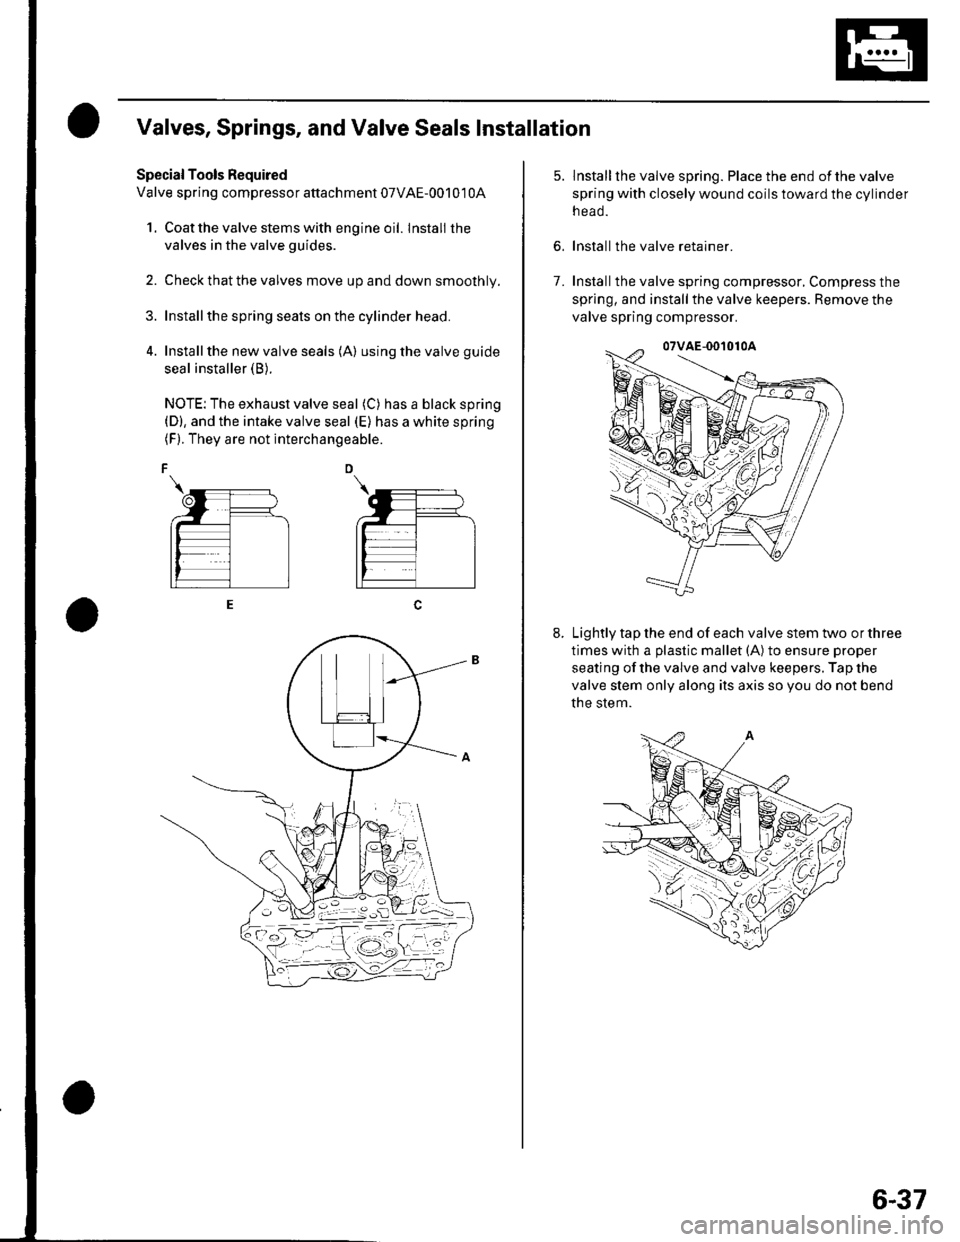
Install the new valve seals (A) using the valve guide
seal installer (B).
NOTE: The exhaust valve seal (C) has a black spring(D), and the intake valve seal (E) has a white spring(F). They are not interchangeable.
6.
lnstallthe valve spring. Place the end ofthe valve
spring with closely wound coils toward the cylinder
n eao.
Install the valve retainer.
Installthe valve spring compressor, Compress the
spring, and install the valve keepers. Remove the
valve spring compressor.
Lightly tap the end of each valve stem two or three
times with a plastic mallet (A) to ensure proper
seating of the valve and valve keepers. Tap the
valve stem only along its axis so you do not bend
the stem.
7.
6-37
Page 133 of 1139
Cylinder Head
Rocker Arm Assembly Installation
:,ean and dry the No. 5 rocker shaft holder mating
surfaces.
eeassemble the rocker arm assembly (see page 6-
21 t.
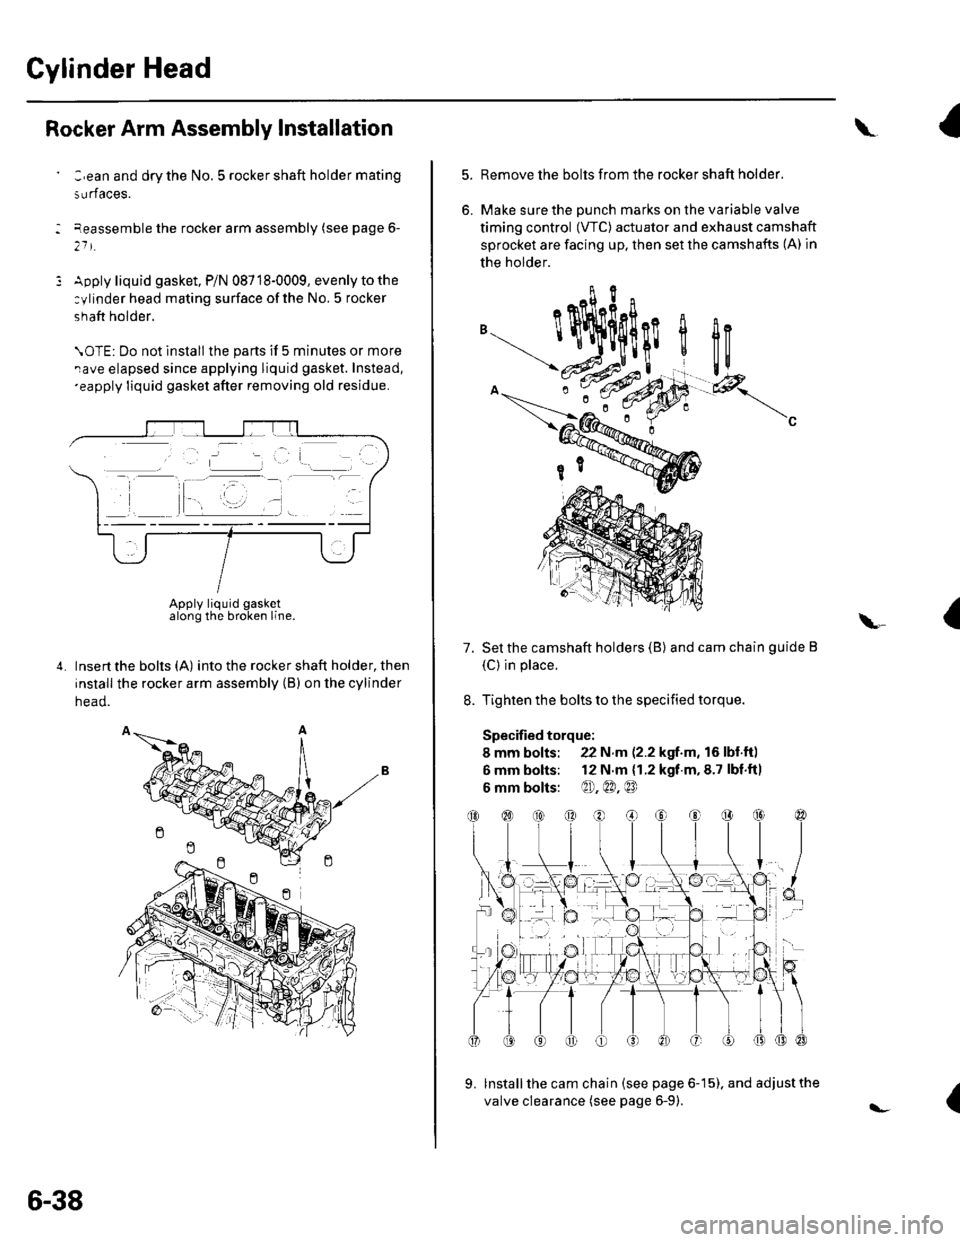
Apply liquid gasket, P/N 08718-0009, evenly to the
:ylinder head mating surface ofthe No. 5 rocker
shaft holder.
\OTE: Do not lnstall the parts if 5 minutes or more
rave elapsed since applying liquid gasket. Instead,'eapply liquid gasket after removing old residue.
Insert the bolts (A) into the rocker shaft holder, then
install the rocker arm assembly (B) on the cylinder
head.
Apply liquid gasketalong the broken line.
6-38
l-
\
5.
6.
Remove the bolts from the rocker shaft holder.
Make sure the DUnch marks on the variable valve
timing control (VTC) actuator and exhaust camshaft
sprocket are facing up. then set the camshafts (A) in
the holder.
Set the camshaft holders (B) and cam chain guide B
(C) in place.
Tighten the bolts to the specified torque.
Specified torque:
8 mm bolts: 22 N.m (2.2 kgf.m, 16 lbl.ft)
6 mm bolts: 12 N.m {1.2 kgf.m,8.7 lbf.fil
6 mm bolts: @),@.@
lnstall the cam chain (see page 6-15). and adjust the
valve clearance (see page 6-9).
I
flc
a\-
7.
{
Page 134 of 1139
Cylinder Head Installation
Install the cylinder head in the reverse order of
removat:
1. Clean the cylinder head and block surface.
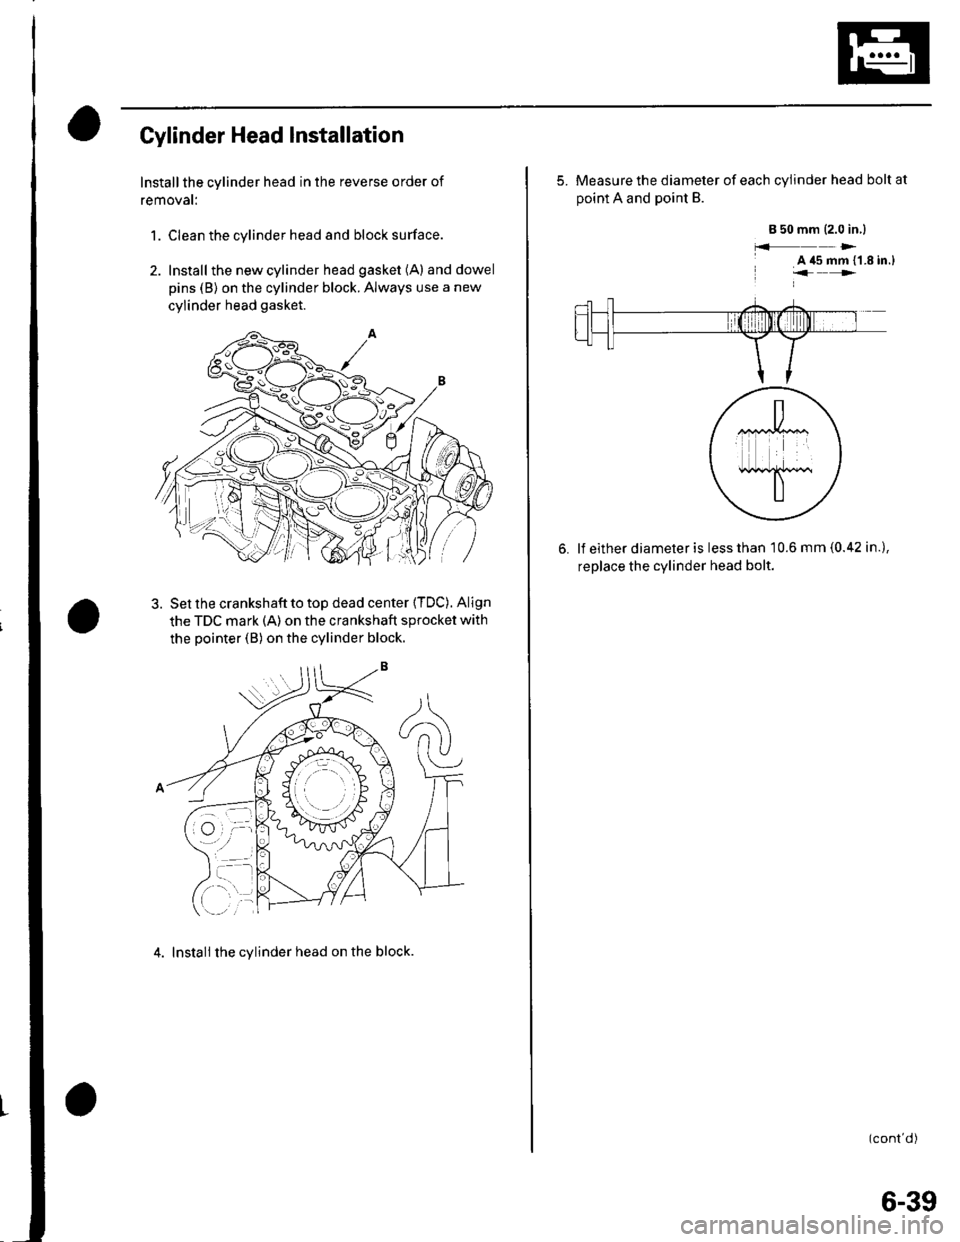
2. Install the new cylinder head gasket (A) anddowel
pins (B) on the cylinder block. Always use a new
cylinder head gasket.
Set the crankshaft to top dead center {TDC). Align
the TDC mark (A) on the crankshaft sprocket with
the pointer (B) on the cylinder block.
4. Install the cylinder head on the block.
5. Measure the diameter of each cylinder head bolt at
ooint A and Doint B.
a 50 mm (2.0 in.l
f.f )>-
A '15 mm {'1.8 in.)"<>.
lf either diameter is less than 10.6 mm {0.42 in.),
replace the cvlinder head bolt.
(cont d)
6-39
Page 135 of 1139
Cylinder Head
8.
Cylinder Head lnstallation (cont'd)
7.Apply engine oil to the bolt threads and under thebolt heads of all the cylinder head bolts.
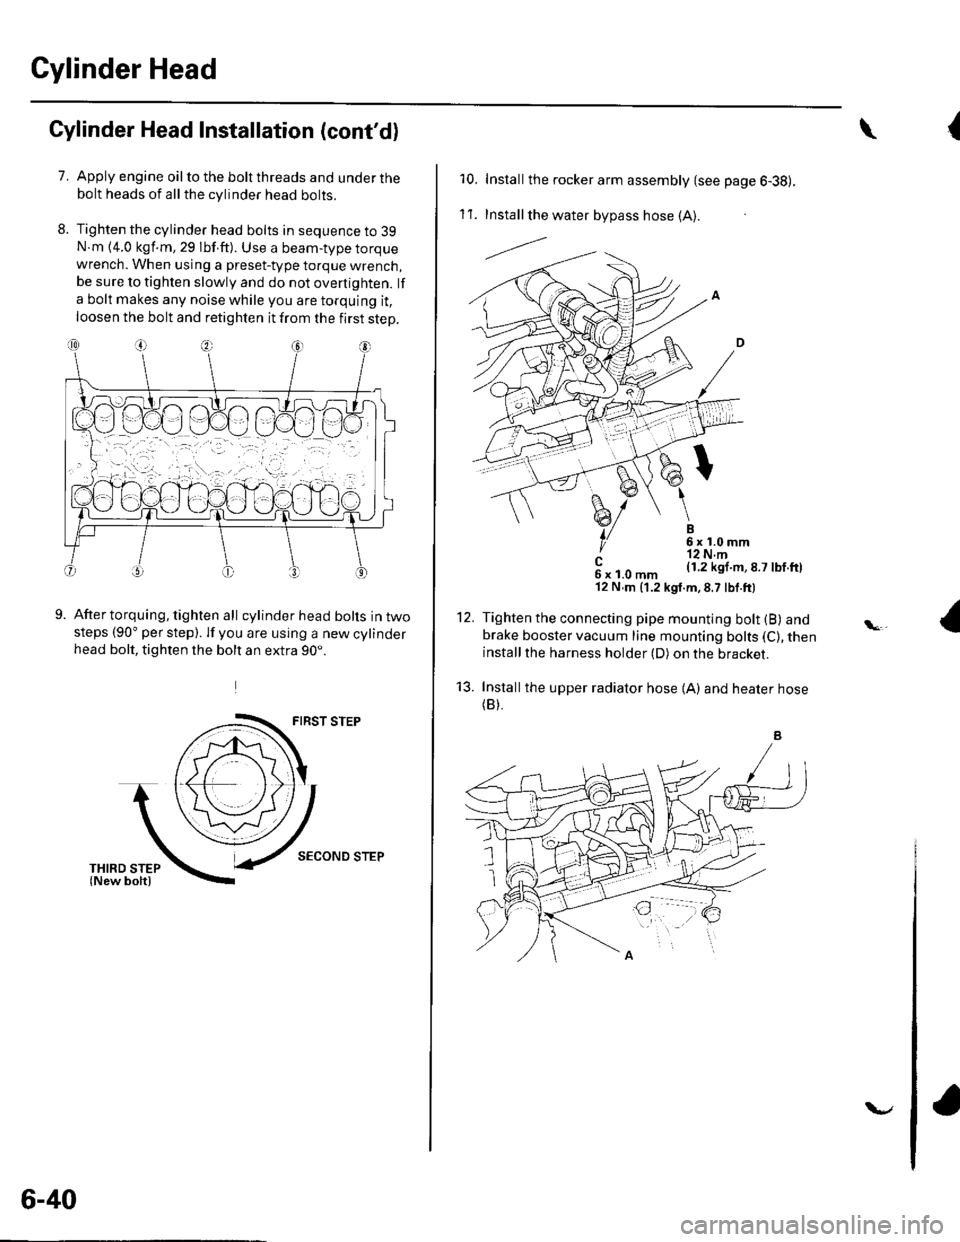
Tighten the cylinder head bolts in sequence to 39N.m {4.0 kgf.m, 29 lbf.ft). Use a beam-type torquewrench. When using a preset-type torque wrench,be sure to tighten slowly and do not overtighten. lf
a bolt makes any noise while you are torquing it,
loosen the bolt and retighten it from the first step.
9.After torquing, tighten all cylinder head bolts in twosteps (90" per step). lf you are using a new cylinderhead bolt, tighten the bolt an extra 90..
FIRST STEP
SECOND STEP
6-40
v
{\
10. Installthe rocker arm assembly {see page 6-38).
1't .Install the water bypass hose (A).
---l.-.
B6x1.0mm'r2 N.m(1.2 kgl.m,8.7 lbf.ftl
12.
't3.
c6xl.0mm'12 N,m (1.2 kgt.m,8.7 lbf.ft)
Tighten the connecting pipe mounting bolt (B) andbrake booster vacuum line mounting bolts (C), theninstallthe harness holder (D) on the bracket.
Installthe upper radiator hose {A) and heater hose(B).
Page 136 of 1139
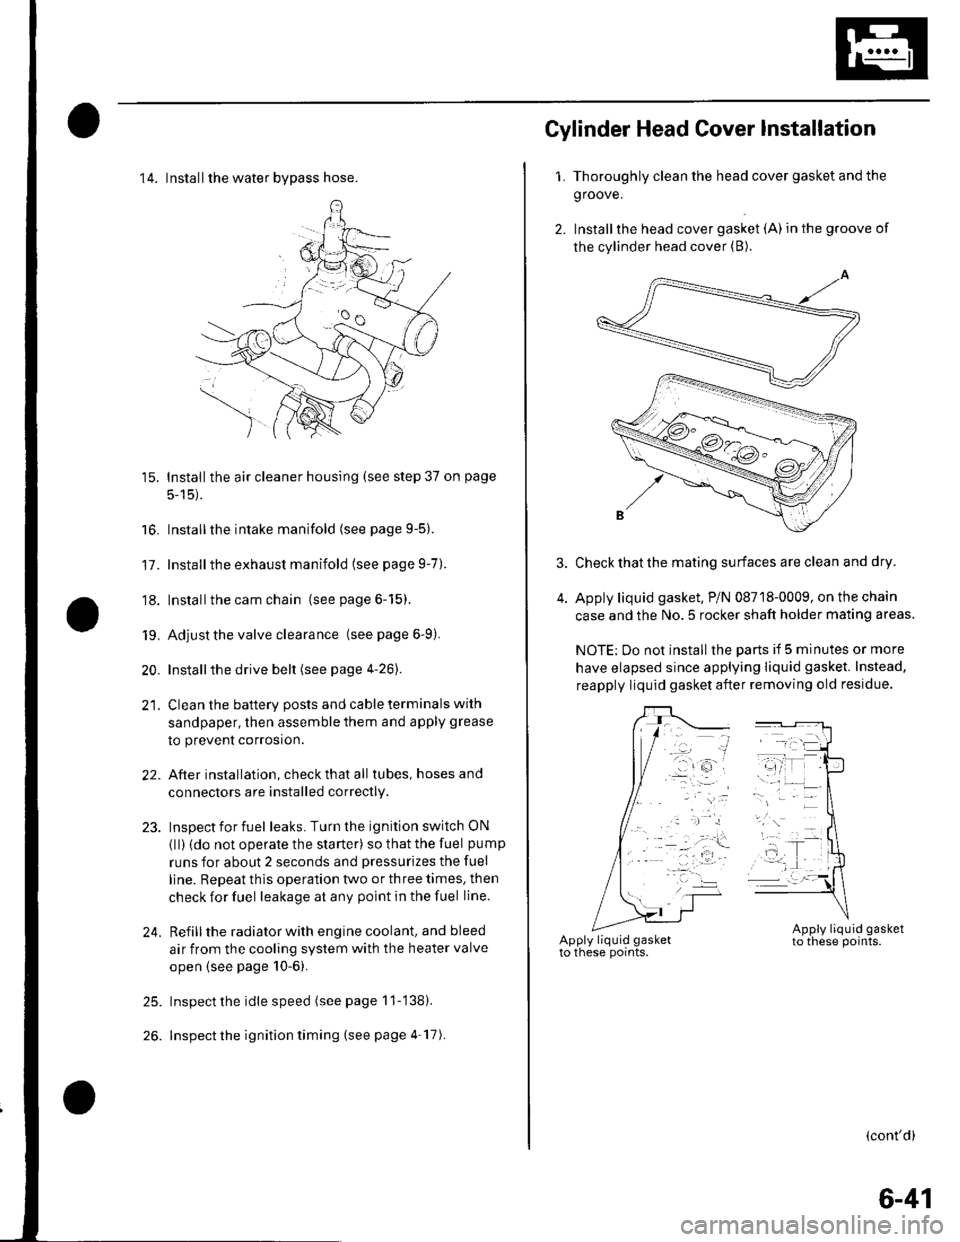
14. Installthe water bvpass hose.
15. Installthe air cleaner housing (see step 37 on page
5-15).
16. Installthe intake manifold (see page 9-5).
17. Installthe exhaust manifold (see page 9-7).
'18. Installthe cam chain (see page 6-15).
19. Adjust the valve clearance (seepage6-9).
20. Installthe drive belt (see page 4-26).
21. Clean the battery posts and cable terminals with
sandpaper, then assemble them and apply grease
to prevent corrosion.
22. After installation, checkthatall tubes, hosesand
connectors are installed correctly.
23. Inspectforfuel leaks. Turn the ignition switch ON
{ll) {do not operate the starter) so that the fuel pump
runs for about 2 seconds and pressurizes the fuel
line. Repeat thls operation two or three times, then
check for fuel leakage at any point in the fuel line.
24. Refillthe radiator with engine coolant, and bleed
air from the cooling system with the heater valve
open (see page 10-6).
25. Inspect the idle speed (see page 11-'138).
26. Inspect the ignition timing (see page 4-17).
Gylinder Head Cover lnstallation
1. Thoroughly clean the head cover gasket and the
groove.
2. Installthe head cover gasket (A) in the groove of
the cylinder head cover (B).
Check that the mating surfaces are clean and dry.
Apply liquid gasket. P/N 08718-0009, on the chain
case and the No.5 rocker shaft holder mating areas.
NOTE: Do not install the parts if 5 minutes or more
have elapsed since applying liquid gasket. Instead,
reapply liquid gasket after removing old residue.
(cont'd)
6-41
Page 137 of 1139

Gylinder Head
Cylinder Head Gover Installation (cont'd)
Set the spark plug seals (A) on the spark plug tubes.
Once the cylinder head cover (B) is on the cylinderhead, slide the cover slightly back and forth to seat
the head cover gasket.
Inspect the cover washers (C). Replace any washer
that is damaged or deteriorated.
6-42
7. Tighten the bolts in two or three steps. In the final
step, tighten all bolts, in sequence, to 9.8 N.m (1.0
kgf.m, 7.2 lbf.ft).
8. Install the dipstick (A) and breather hose iB).
\
\l'
Page 138 of 1139
9.
10.
Install the four ignition coils (see page 4-'18).
Check that all tubes, hoses, and connectors are
installed correctly.
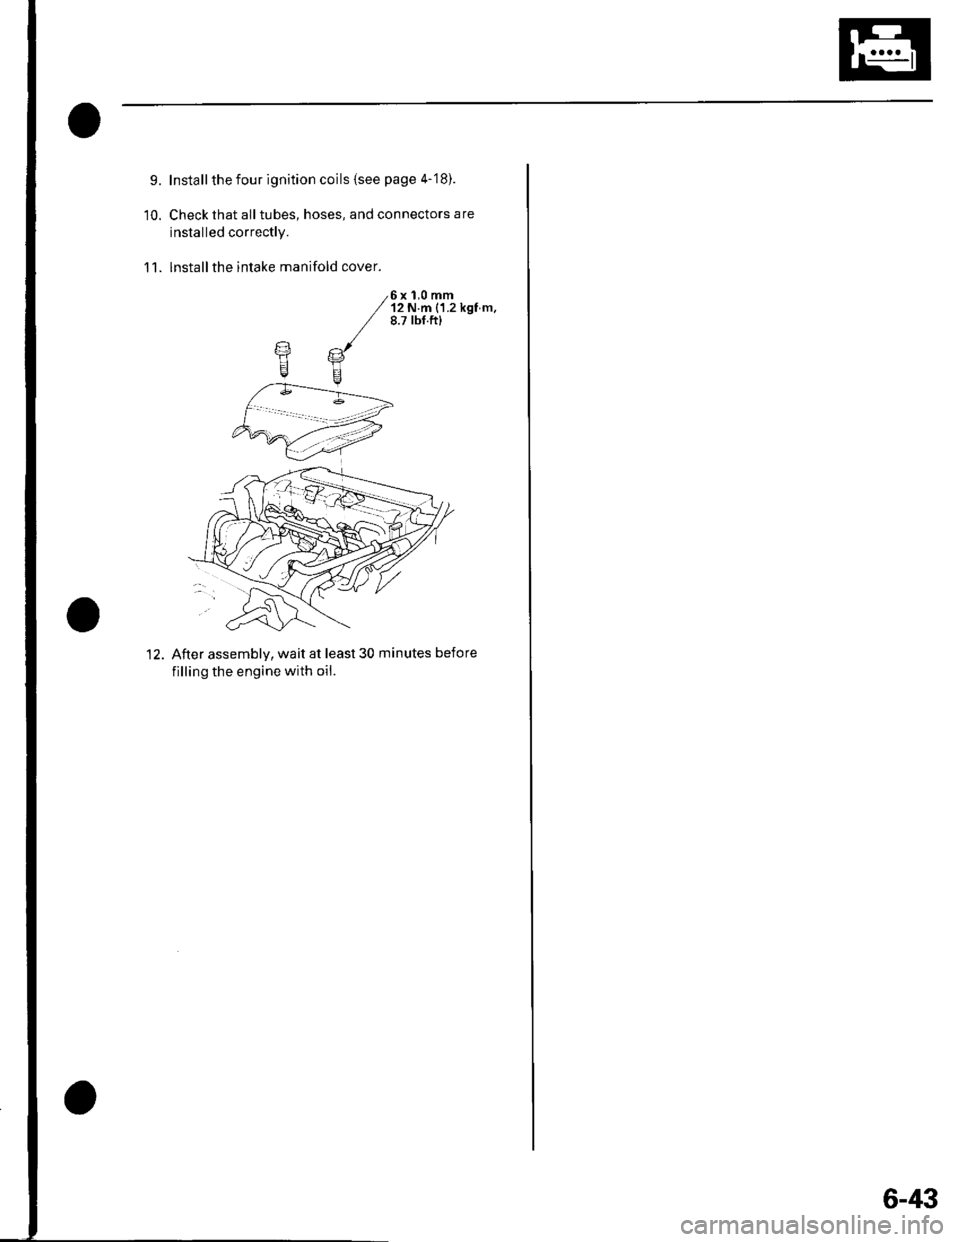
lnstallthe intake manifold cover.11.
6x 1,0 mm'12 N.m {1.2 kgf m.8.7 tbf.ftl
12. After assemblv, wait at least 30 minutes before
filling the engine with oil.
6-43
Page 139 of 1139
Engine Mechanical
Engine Block
Soecial Tools ............. 7 -2
Comoonent Location Index ......................................... 7-3
Connecting Rod and Crankshaft End Play
InsDection .............. 7-5
Crankshaft Main Bearing Replacement ...................... 7-6
Connecting Rod Bearing Replacement ...................... 7-8
Oil Pan Removal ....................... .......... 7-11
Crankshaft and Piston Removal ........ 7-12
Crankshaft Inspection ........................ 7-14
Block and Piston Insoection ........................................ 7-15
Cyfinder Honing ............ .".................... 7 -'17
Piston, Pin and Connecting Rod Replacement .......... 7-18
Piston Ring Replacement ................... 7 -21
Piston lnstallation .................... ........... 7-23
Connecting Rod Bolt Inspection .......' 7 -24
Crankshaft lnstallation .....................'. 7-24
Oil Pan lnstallation .................. ........... 7 -27
Transmission End Crankshaft Seal
lnstallation-ln Car ................... ........' 7 -28
Page 140 of 1139
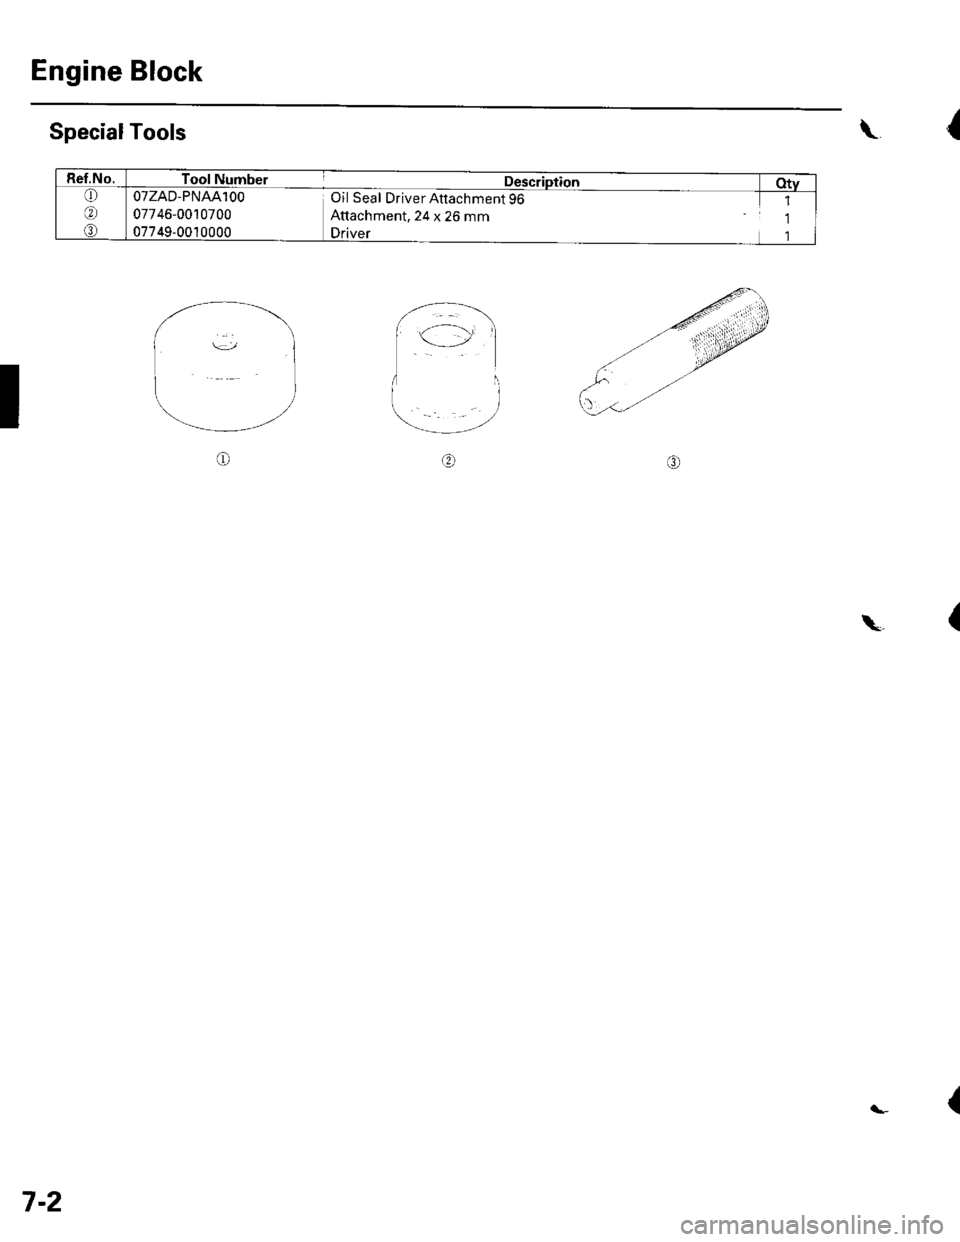
Engine Block
SpecialTools
I
{\
Ref.No.Tool Number
OTZAD-PNAAlOO
07746-0010700
07749,0010000
Description
Oil Seal Driver Attachment 96
Attachment, 24 x 26 mm
Driver
Oty
6
@
1
1
1
o
{\
{
7-2