ERS HONDA CIVIC 2003 7.G Workshop Manual
[x] Cancel search | Manufacturer: HONDA, Model Year: 2003, Model line: CIVIC, Model: HONDA CIVIC 2003 7.GPages: 1139, PDF Size: 28.19 MB
Page 509 of 1139
EPS Components
aGeneral Troubleshooting Information
EPS Indicator
Under normal conditions, the EPS indicator comes on when
the ignitlon switch is turned to the ON (ll) position, then goes
off after the engine is started. This indicates that the bulb and
its circuit are operating correctly.
lf there is any trouble in the system after the engine is started,
the EPS indicator will stay on, and the power assist is turned
off.
When EPS indicator light comes on, the control unit
memorizes the DTC. In this case, the control unit will not
activate the EPS system after the engine starts again, but it
keeps the EPS indicator on.
When DTC 12, 16, 17, 18 or 67 is stored in the control unit, the
EPS indicator will stay on until the DTC is erased. When a
problem is detected and the EPS indicator comes on, there are
cases when the indicator stays on untilthe ignition switch is
turned 0FF, and cases when the indicator goes off
automatically when the system returns to normal. Even though
the system is operating normally, the EPS indicator will come
on under the following conditions:
Condition '1:
. The vehicle was traveling at least 12.4 mph (20 km/h), then. A rapid change in vehicle speed was detected, then. The vehicle (or the vehicle speed sensor signal) stopped for
at least 5 seconds. The engine speed was still 'l,640rpmorhigherforatleastS
seconds
Condition 2:
After the vehicle (or the vehicle speed sensor signal) has
stopped for at least 10 seconds, yet the engine speed was still
1,640 rpm or higherfor at least 20 seconds.
Condition 3:
When the engine speed is 280 rpm or less, and the vehicle is traveling at
a speed of 6,2 mph (10 km/h) or more for 3 seconds.
To determine the actual cause ofthe problem, question the
customer about the conditions during which the problem
occured, taking the above conditions into consideration.
Diagnostic Trouble Code (DTCI
. lf the CPU cannot be activated, or itfails,the EPS indicator
comes on, but the DTC is not memorized.. The memory can hold any number of DTCS. However, when
the same DTC is detected more than once, the most recent
DTC is written over the prior DTC, therefore only one
occurrence is memorized.. The DTCS are indicated repeatedly untilthe ignition switch is
turned OFF.. lf the DTC is not memorized,the EPS indicator blinks.
. The DTCS are memorized in the EEPRO| (non-volatile
memory) therefore the memorized DTCS cannot be erased
by disconnecting the battery. Perform the specified
procedures to clear DTCS.
Self-diagnosis
Self-diagnosis can be classified into two categories:.Initial diagnosis: performed right after the engine
starts and until the EPS indicator goes off.. Regular diagnosis: performed right after the initial
diagnosis until the ignition switch is turned OFF.
The EPS control unit performs the following functions
when a problem is detected by self-diagnosis;
'1. Turns on the EPS indicator.
2. Memorizes the DTC.
3. Stops power assist and manual steering operation
begrns.
NOTE:. When DTC 23 (a problem with the circuit for
engine speed signal) is detected, the power
assist will return to normal when the vehicle
speed is 0.62 mph (1 km/h) or above.. Fot DfCs 22,23, 64, or 66 the EPS indicator goes
off automatically when the system relurns to
normal. For all other codes, the EPS indicator
goes off when the system is OK after the ignition
switch is turned from OFF to ON (ll).
Restriction on Power Assist Operation
Repeated extreme steering force. such as turning the
steering wheel continuously back-and-forth with the
vehicle stopped, causes an increase of power
consumption in the EPS motor. The increase of electric
current causes the motor to heat up. Because this heat
adversely affects the system, the control unit monitors
the electric current of the motor.
When the control unit detects heat build-up in the motor,
it reduces the electric current to the motor gradually to
protect the system, and it restricts the power assist
operation. The EPS indicator does not come on during
this function.
When steering torque is not applied to the steering
wheel, or when the ignition is turned off, and the motor
cools, the control unit will restore the power assist
gradually until it's fully restored (after approximately 15
minutes maximum).
17-18
Page 541 of 1139
EPS Components
(Motor RemovaUlnstallation (cont'dl
lnsiallation
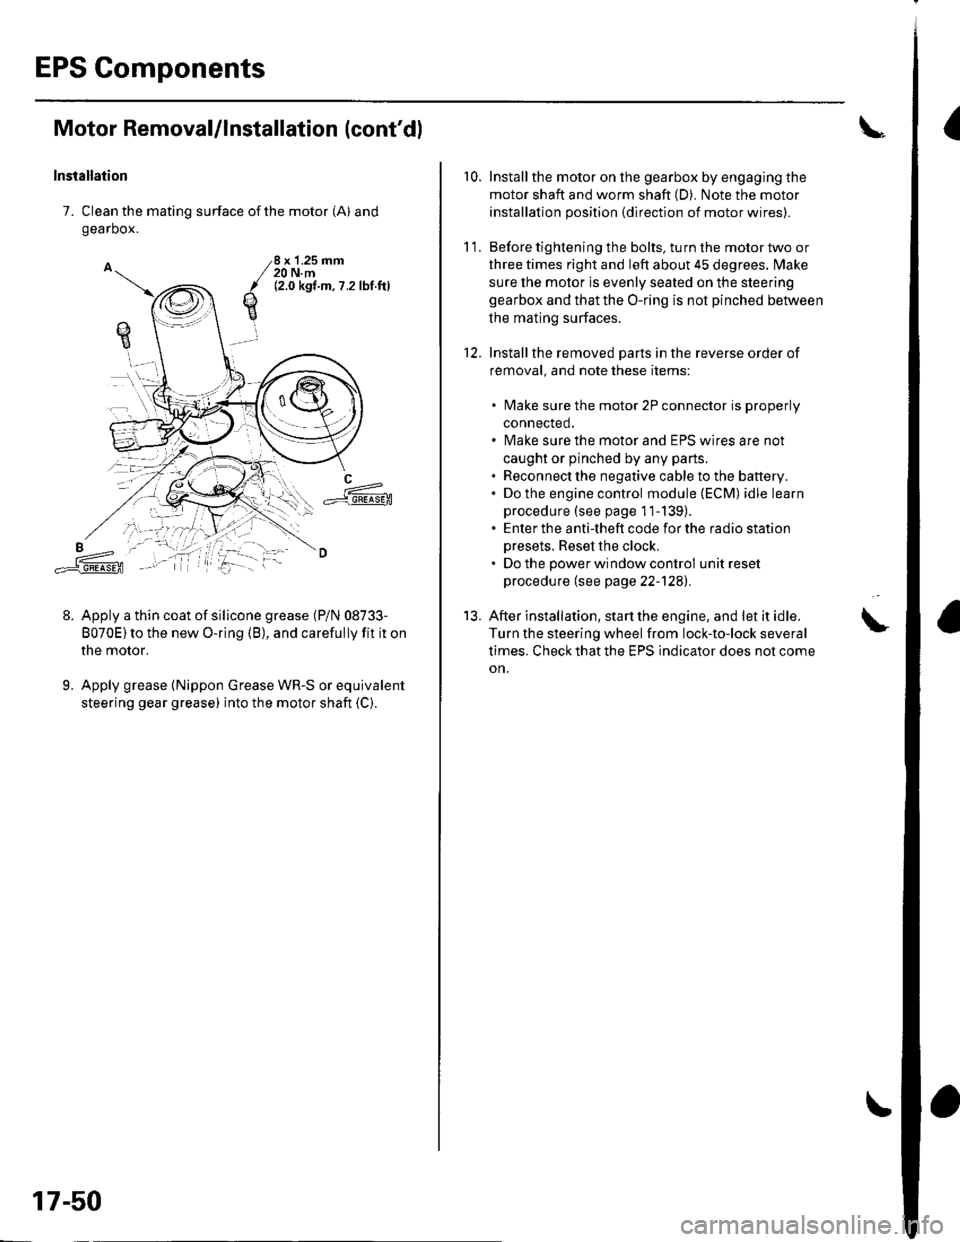
7. Clean the mating surface of the motor (A) and
gearbox.
Apply a thin coat of silicone grease (P/N 08733-
8070E)to the new O-ring (B), and carefully fit it on
the motor.
Apply grease {Nippon Grease WR-S or equivalent
steering gear grease) into the motor shaft (C).
qE
8 x '1.25 mm20 N.m12.0 kgt.m,7 .2lbl ftl
L==-c].E@
9.
17-50
r0.Install the motor on the gearbox by engaging the
motor shaft and worm shaft (D). Note the motor
installation position {direction of motor wires).
Before tightening the bolts, turn the motor two or
three times right and left about 45 degrees. lvlake
sure the motor is evenly seated on the steering
gearbox and that the O-ring is not pinched betlveen
the mating surfaces.
Installthe removed Darts in the reverse order of
removal. and note these items:
lvlake sure the motor 2P connector is properly
connected.
lvlake sure the motor and EPS wires are not
caught or pinched by any parts.
Reconnect the negative cable to the battery.
Do the engine control module (ECM) idle learn
procedure (see page 11-139).
Enter the anti-theft code for the radio station
Dresets. Reset the clock,
Do the oower window control unit reset
procedure (see page 22-1241.
After installation, start the engine, and let it idle.
Turn the steering wheel from lock-to-lock several
times. Check that the EPS indicator does not come
on.
11.
12.
13.
Page 547 of 1139
EPS Components
Steering Gearbox Overhaul (cont'dl
Special Tools Required. Locknut wrench 07ZAA-S5A0100. Pincers, Oetiker 1098 or equivalent, commercially
available.
NOTE:. Refer to the Exploded View as needed during thisprocedure.
. Do not allow dust, dirt, or other foreign materials toenter into the steering gearbox.
Eemoval
1, Remove the steering gearbox (see page 17-b1).
Disassembly
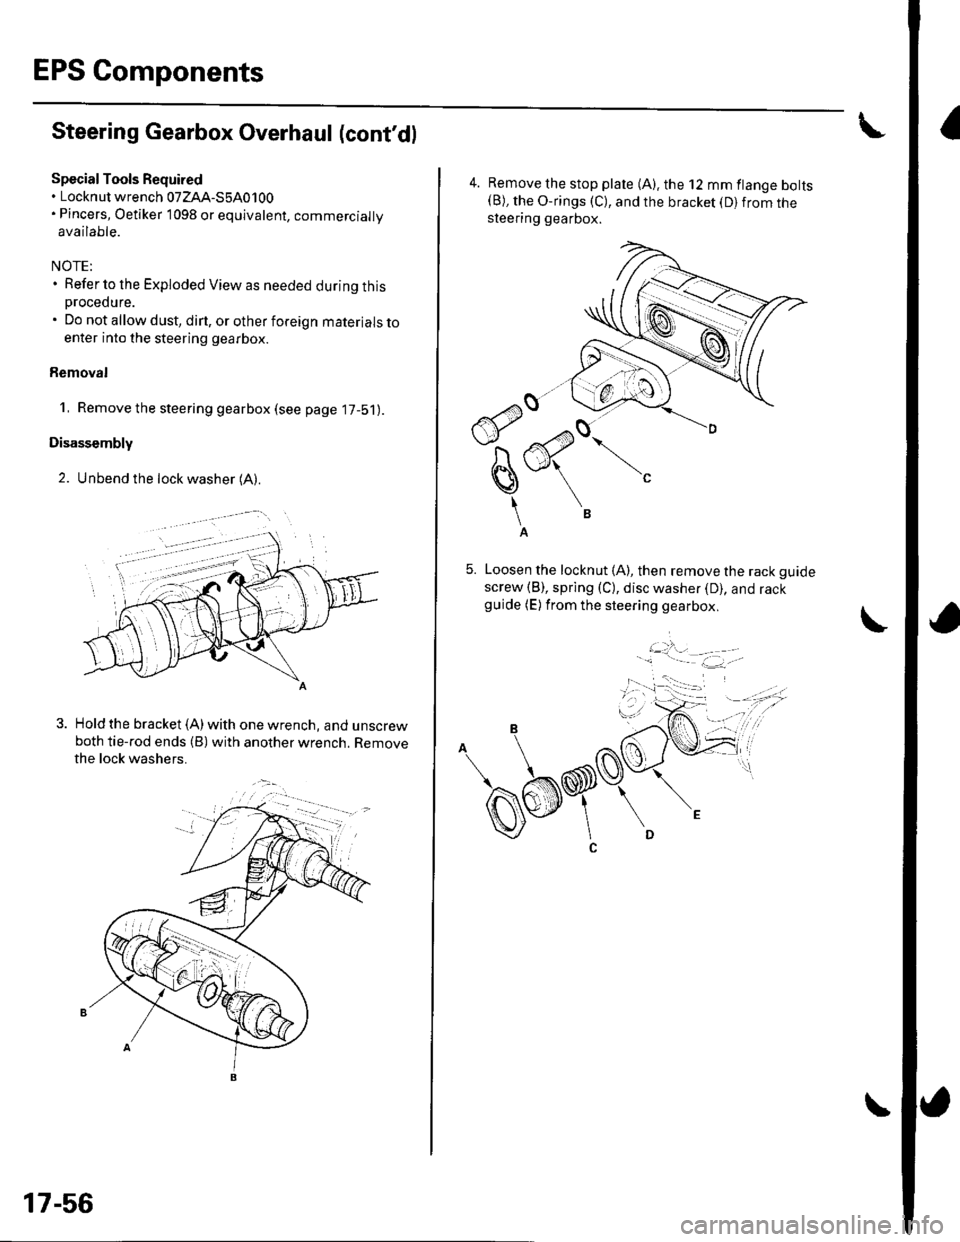
2. Unbend the lock washer (A).
. - -,'i.
Hold the bracket (A) with one wrencn, anq unscrewboth tie-rod ends (B) with another wrench. Removethe lock washers.
17-56
4. Remove the stop plate (A). the 12 mm flange bolts(B), the O-rings (C), and the bracket (D) from thesleering gearbox.
Loosen the locknut (A), then remove the rack guide
screw (B), sprlng (C), disc washer (D), and rackguide (E) from the steering gearbox.
i::..:4,. , -- -. - :.--. '
Page 548 of 1139
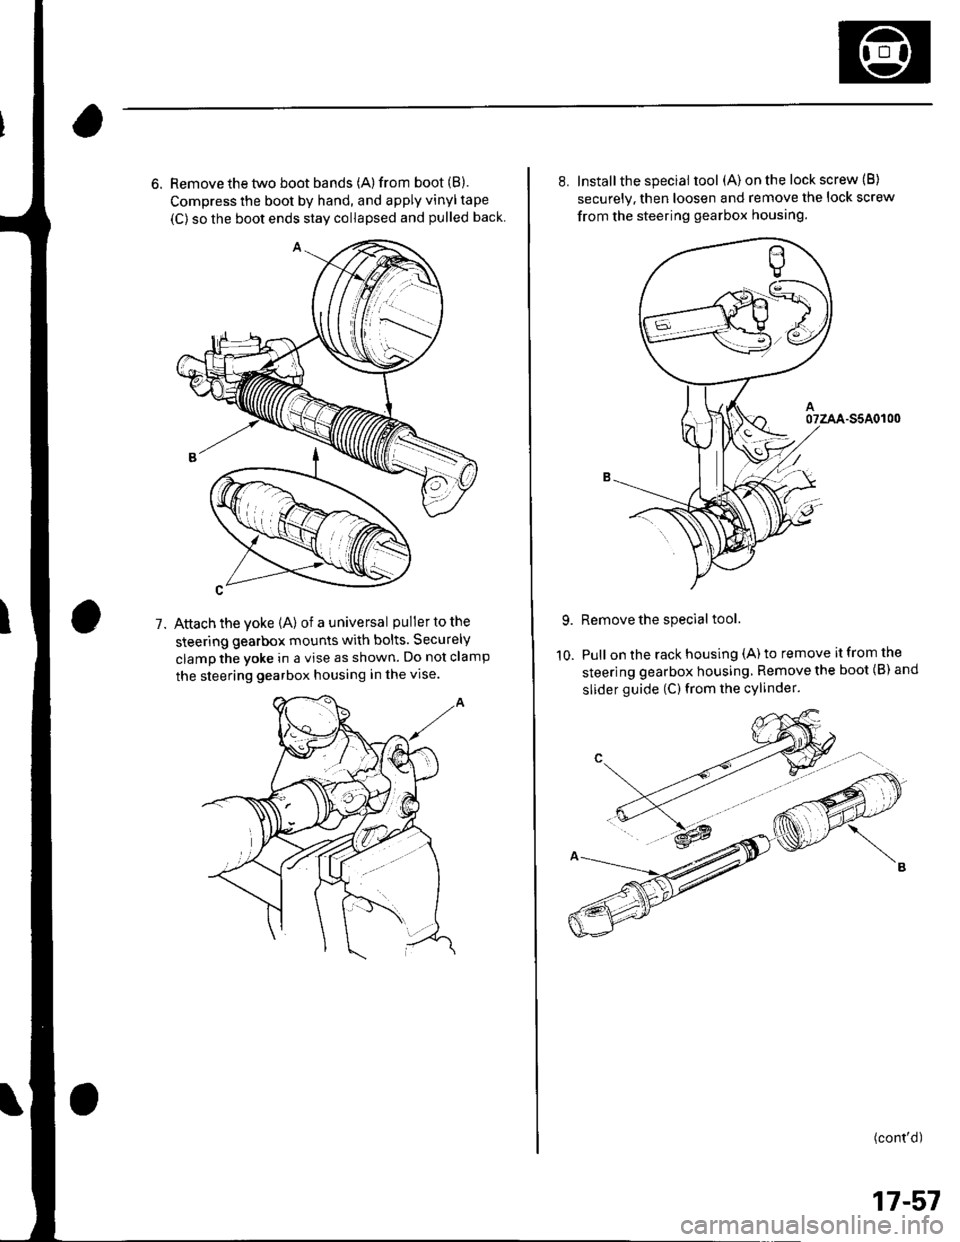
6. Remove the two boot bands (A) from boot (B).
Compress the boot by hand, and apply vinyl tape
(C) so the boot ends stay collapsed and pulled back
Attach the yoke (A) of a universal puller to the
steering gearbox mounts with bolts. Securely
clamp the yoke in a vise as shown. Do not clamp
the steering gearbox housing in the vise.
1.
10.
8. Installthe special tool (A) on the lock screw (B)
securely. then loosen and remove the lock screw
from the steering gearbox housing.
07zAA-S5A0r00
Remove the special tool.
Pull on the rack housing (A) to remove it from the
steering gearbox housing, Remove the boot {B) and
slider guide (C) from the cylinder.
(cont'd)
17-57
Page 549 of 1139
EPS Components
Steering Gearbox Overhaul (cont'd)
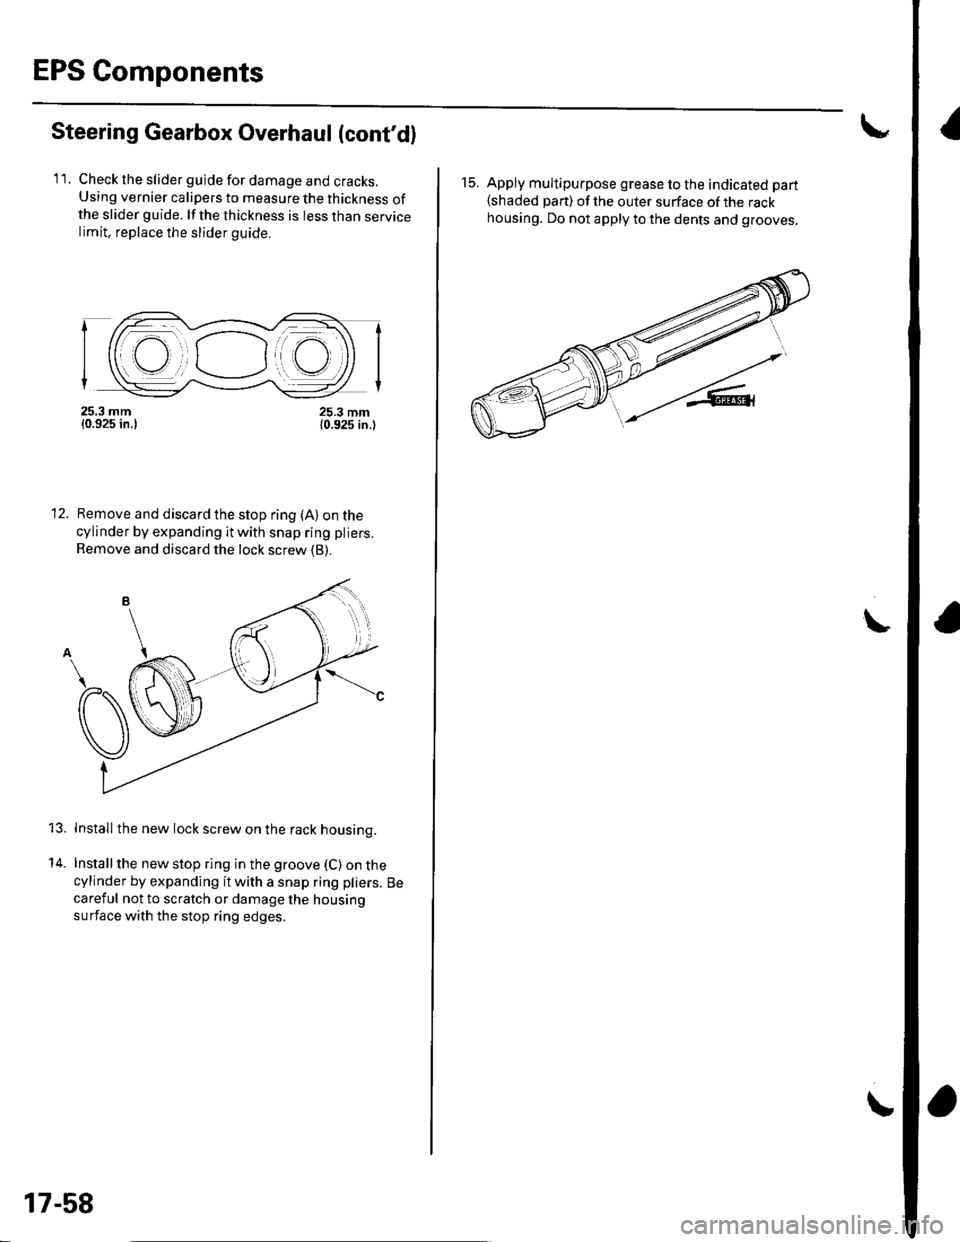
'll. Check the slider guide for damage and cracks.Using vernier calipers to measure the thickness ofthe slider guide. lf the thickness is less than servicelimit, replace the slider guide,
f Z,-----:-r-.--------.t.t'E-r
I (fr--', -.----
/i Il il ( t t , ,)))
|i@r
25.3 mm{0.925 in.}
Remove and discard the stop ring {A)on the
cylinder by expanding it with snap ring pliers.
Remove and discard the lock screw {B}.
13. Install the new lock screw on the rack housing.
14. Installthe new stop ring in the groove (C)on thecylinder by expanding it with a snap ring pliers. Becareful not to scratch or damage the housing
surface with the stop ring edges.
25.3 mm{0.925 in.l
12
17-58
15. Apply multipurpose grease to the indicated part
{shaded part) of the outer surface of the rackhousing. Do not apply to the dents and grooves.
\
I
Page 550 of 1139
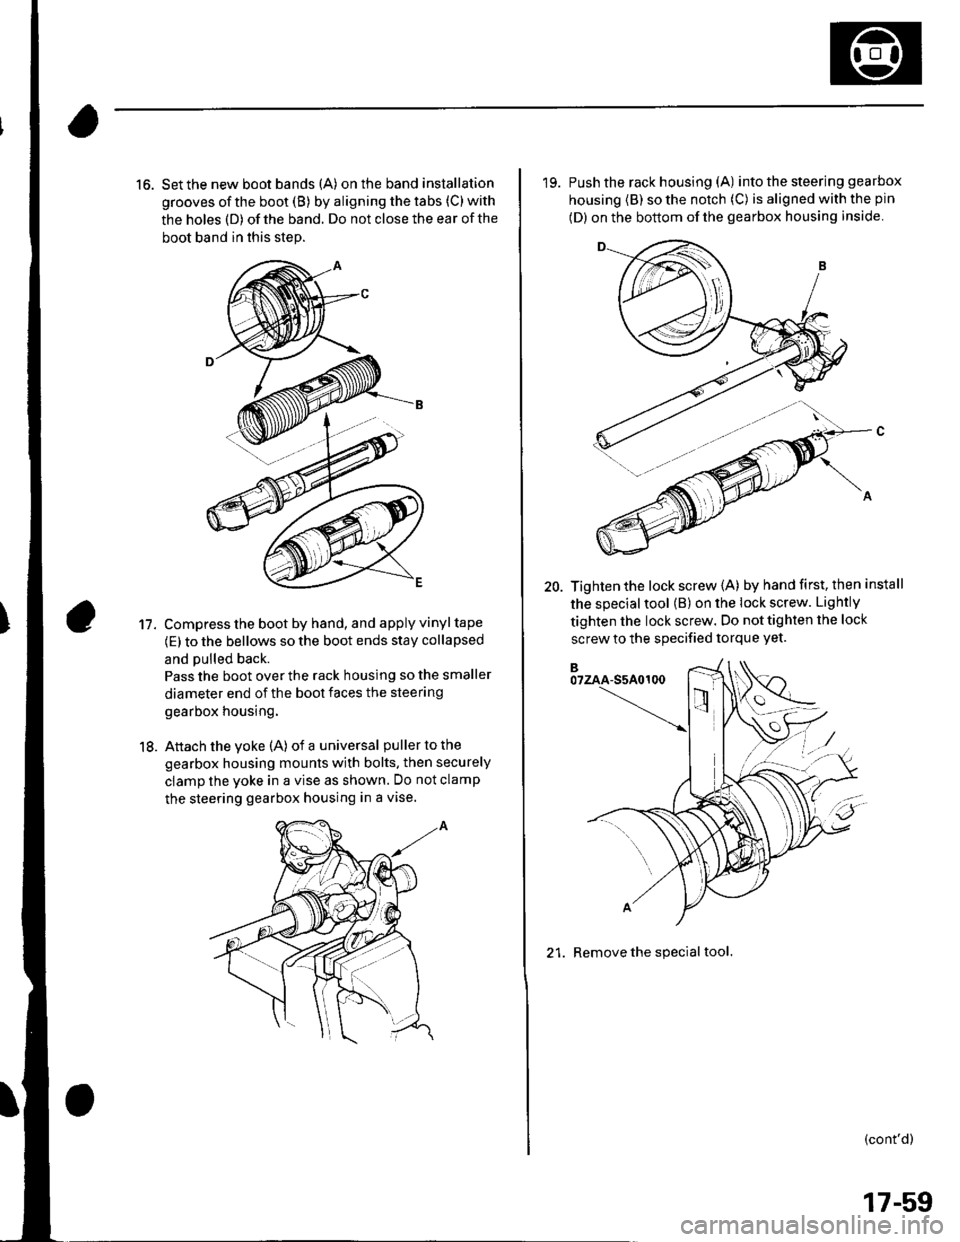
16. Set the new boot bands (A) on the band installation
grooves of the boot (B) by aligning the tabs (C) with
the holes (D) of the band. Do not close the ear of the
boot band in this step.
Compress the boot by hand, and apply vinyl tape
(E) to the bellows so the boot ends stay collapsed
and pulled back.
Pass the boot over the rack housing so the smaller
diameter end of the boot faces the steering
gearbox housing.
Attach the yoke (A) of a universal puller to the
gearbox housing mounts with bolts. then securely
clamp the yoke in a vise as shown. Do not clamp
the steering gearbox housing in a vise.
11.
18.
'19. Push the rack housing (A) into the steering gea rbox
housing (B) so the notch (C) is aligned with the pin
(D) on the bottom of the gearbox housing inside
20. Tighten the lock screw {A) by hand first, then install
the special tool (B) on the lock screw. Lightly
tighten the lock screw. Do not tighten the lock
screw to the specified torque Yet.
21. Remove the special tool.
(cont'd)
17-59
Page 552 of 1139
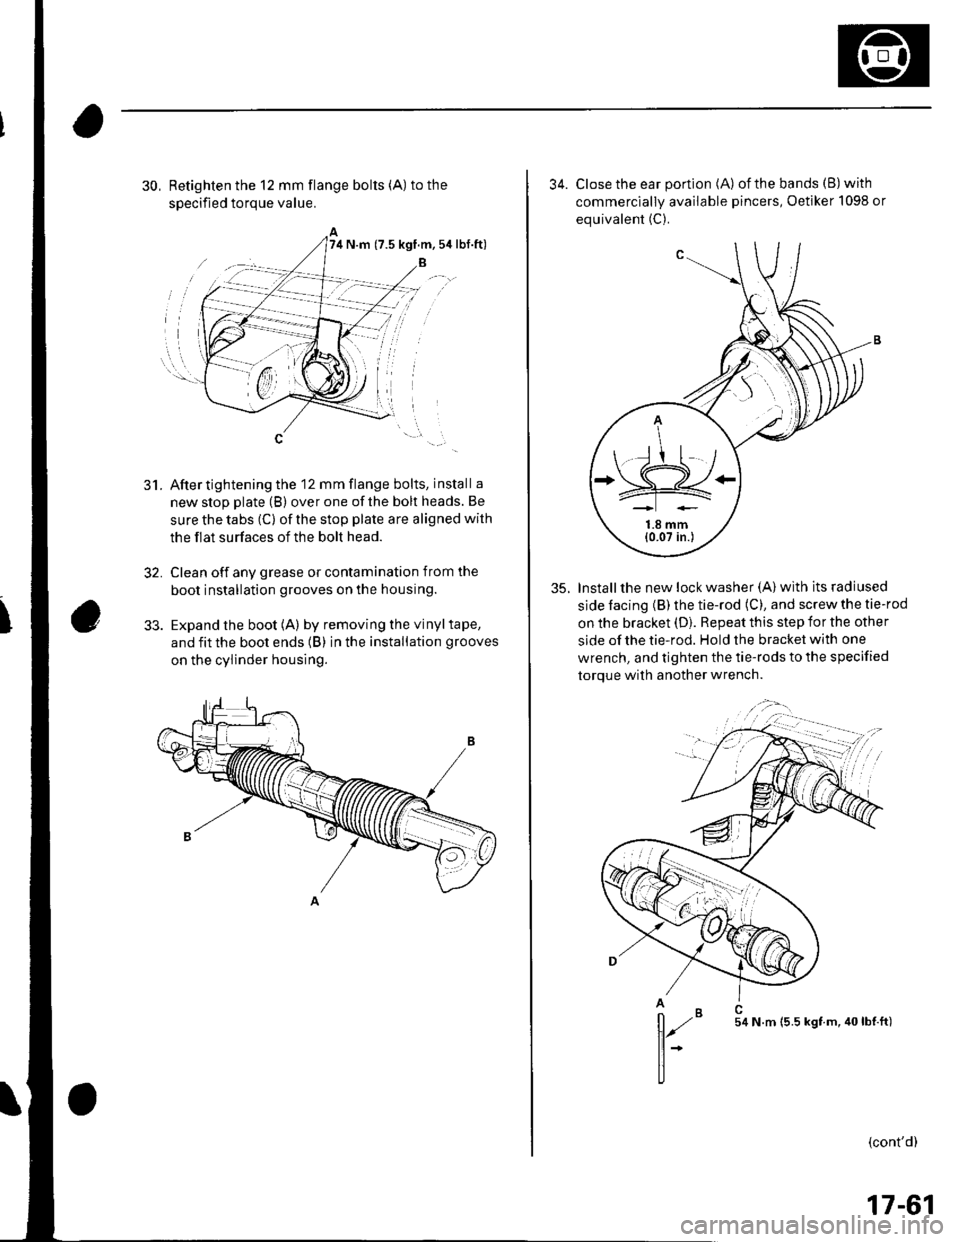
30, Retighten the 12 mm flange bolts (A) to the
soecified toroue value.
After tightening the 12 mm flange bolts, install a
new stop plate (B) over one of the bolt heads. Be
sure the tabs (C) of the stop plate are aligned with
the flat surfaces of the bolt head.
Clean off any grease or contamination from the
boot installation grooves on the housing.
Expand the boot (A) by removing the vinyltape,
and fit the boot ends (B) in the installation grooves
on the cylinder housing.
5t.
32,
74 N.m (7.5 kgf.m,5ir lbf.ft)
34. Close the ear portion (A) ofthe bands (B)with
commerciallv available pincers, Oetiker 1098 or
equivalent (C).
35. Installthe new lock washer (A) with its radiused
side facing (B) the tie-rod (C), and screw the tie-rod
on the bracket (D). Repeat this step for the other
side of the tie-rod. Hold the bracket with one
wrench, and tighten the tie-rods to the specified
torque with another wrench.
,,";=-...,.,
(cont'd)
*=,,',
17-61
Page 553 of 1139
EPS Components
Steering Gearbox Overhaul (cont'dl
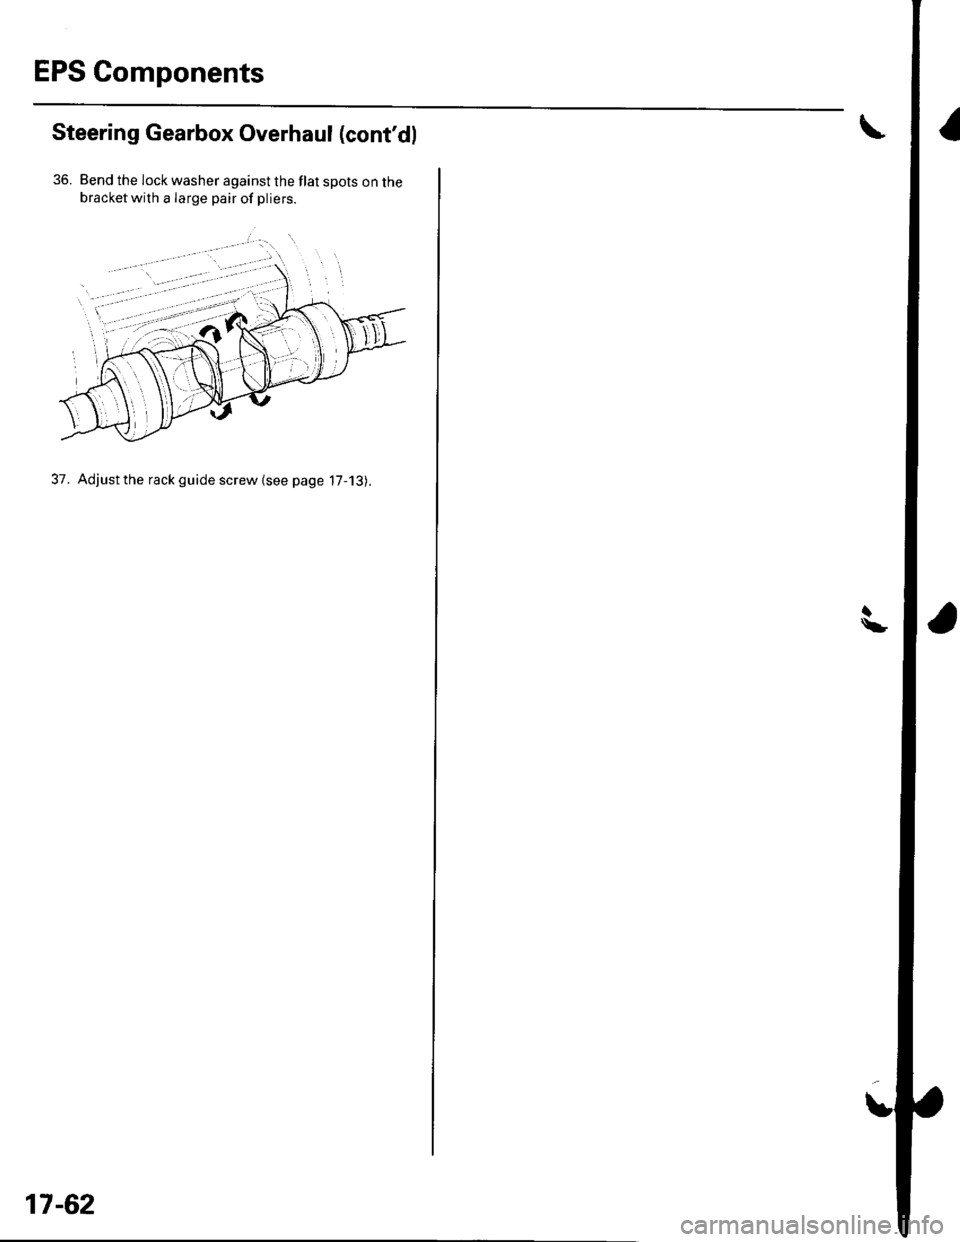
36. Bend the lock washer against the flat spots on thebracketwith a Iarge pair of pliers.
37. Adjust the rack guide screw {see page 17-13).
17-62
Page 558 of 1139
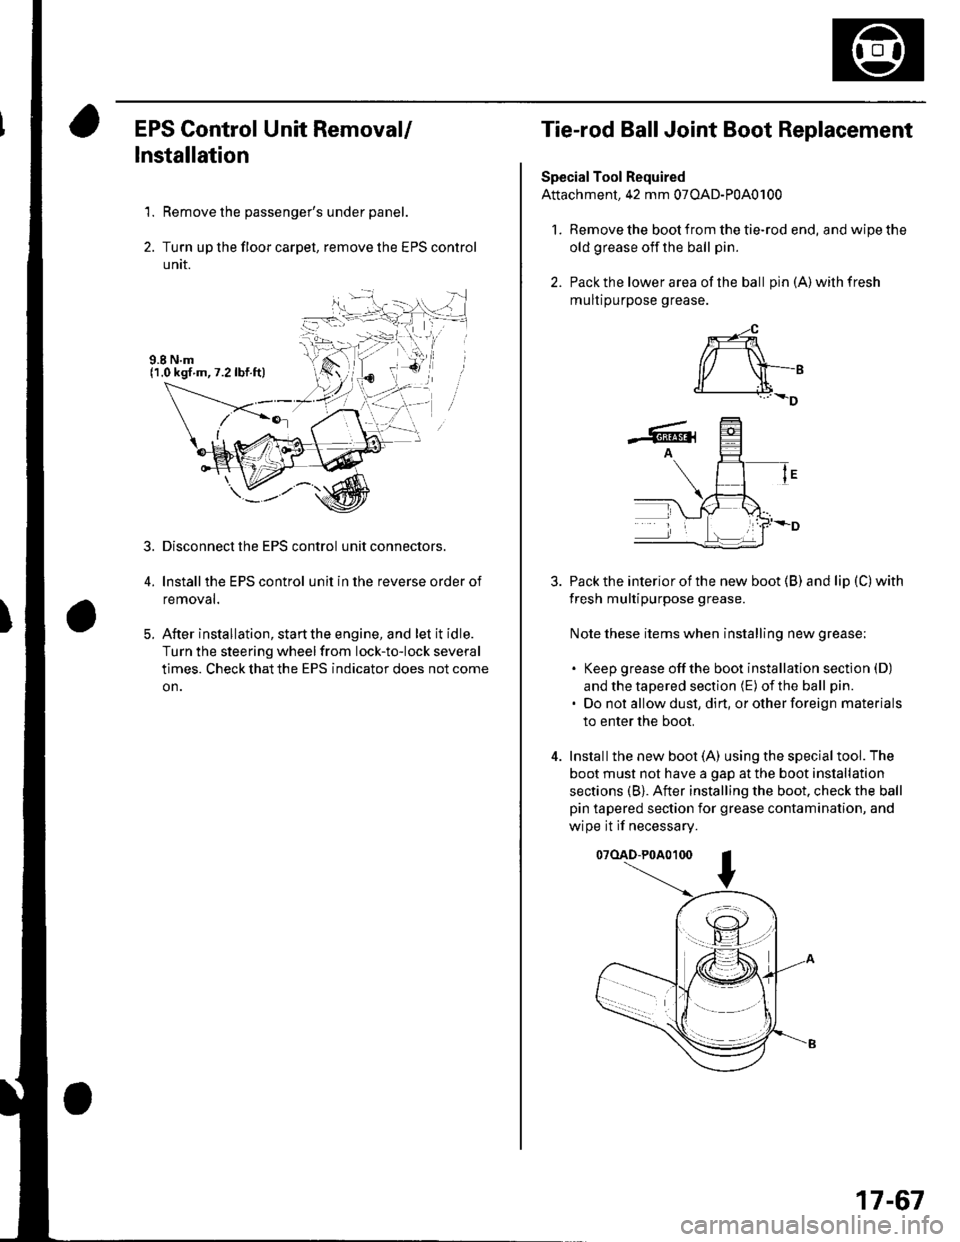
EPS Control Unit Removal/
Installation
1. Remove the passenger's under panel.
2. Turn up the floor carpel, remove lhe EPS control
untr.
Disconnect the EPS control unit connectors.
lnstallthe EPS control unit in the reverse order of
removal.
After installation, start the engine, and let it idle.
Turn the steering wheelfrom lock-to-lock several
times. Check that the EPS indicator does not come
on.
3.
E
Tie-rod Ball Joint Boot Replacement
Special Tool Required
Attachment, 42 mm 07OAD-P0A0100
l. Remove the boot from the tie-rod end, and wipe the
old grease off the ball pin.
2. Pack the lower area of the ball pin(A)wilhfresh
mulr purpose grease.
3. Pack the interior of the new boot (B) and lip (C) with
fresh multipurpose grease.
Note these items when installing new grease;
. Keep grease offthe boot installation section (D)
and the tapered section (E) of the ball pin.
. Do not allow dust, dirt, or other foreign materials
to enter the boot.
4. Installthe new boot (A) using the specialtool. The
boot must not have a gap at the boot installation
sections (B). After installing the boot. check the ball
pin tapered section for grease contamination, and
wipe it if necessary.
07(lAD-P0A0100
*-4
r/ \-,d______i.l+_D
-6rA
17-67
Page 573 of 1139
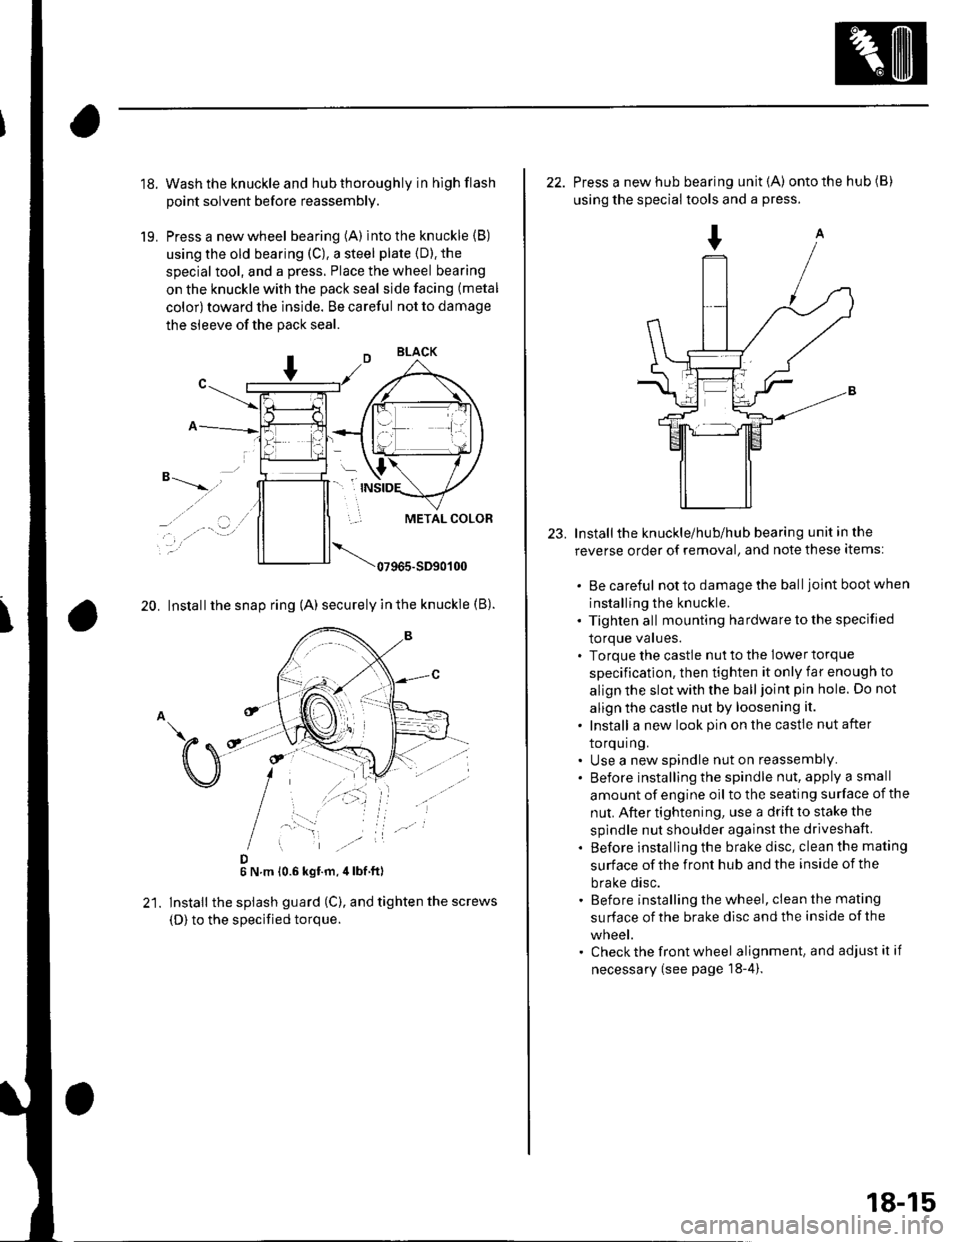
18.
19.
Wash the knuckle and hub thoroughly in hlgh flash
point solvent before reassembly.
Press a new wheel bearing (A) into the knuckle (B)
using the old bearing (C), a steel plate {D). the
special tool, and a press. Place the wheel bearing
on the knuckle with the pack seal side facing (metal
color) toward the inside. Be careful not to damage
the sleeve of the pack seal.
"-t-_"*,,''
_, .' . . a-�.) ../
..-.
20. Install the snap ring (A) securely in the knuckle (B).
D6 N.m 10.6 kgf.m,4lbf ft)
lnstall the splash guard (C), and tighten the screws
(D) to the specified torque.
23.
22. Press a new hub bearing unit {A) ontothehub(B)
using the special tools and a press.
Installthe knuckle/hub/hub bearing unit in the
reverse order of removal, and note these items:
. Be careful notto damagethe balljoint bootwhen
installing the knuckle.. Tighten all mounting hardware to the specified
lOrque values.. Torque the castle nut to the lower torque
specification, then tighten it only far enough to
align the slot with the ball joint pin hole. Do not
align the castle nut by loosening it.
. Install a new look pin on the castle nut after
torquing.. Use a new spindle nut on reassembly.. Before installing the spindle nut, apply a small
amount of engine oil to the seating surface of the
nut. After tightening, use a drift to stake the
spindle nut shoulder against the driveshaft.
. Before installlng the brake disc, clean the mating
surface of the front hub and the inside of the
brake disc.. Before installing the wheel, clean the mating
su rface of the brake disc and the inside of the
wneet.. Check the front wheel alignment, and adjust it if
necessary (see page 18-4).
18-15