srs HONDA CIVIC 2003 7.G Workshop Manual
[x] Cancel search | Manufacturer: HONDA, Model Year: 2003, Model line: CIVIC, Model: HONDA CIVIC 2003 7.GPages: 1139, PDF Size: 28.19 MB
Page 1121 of 1139
sRs
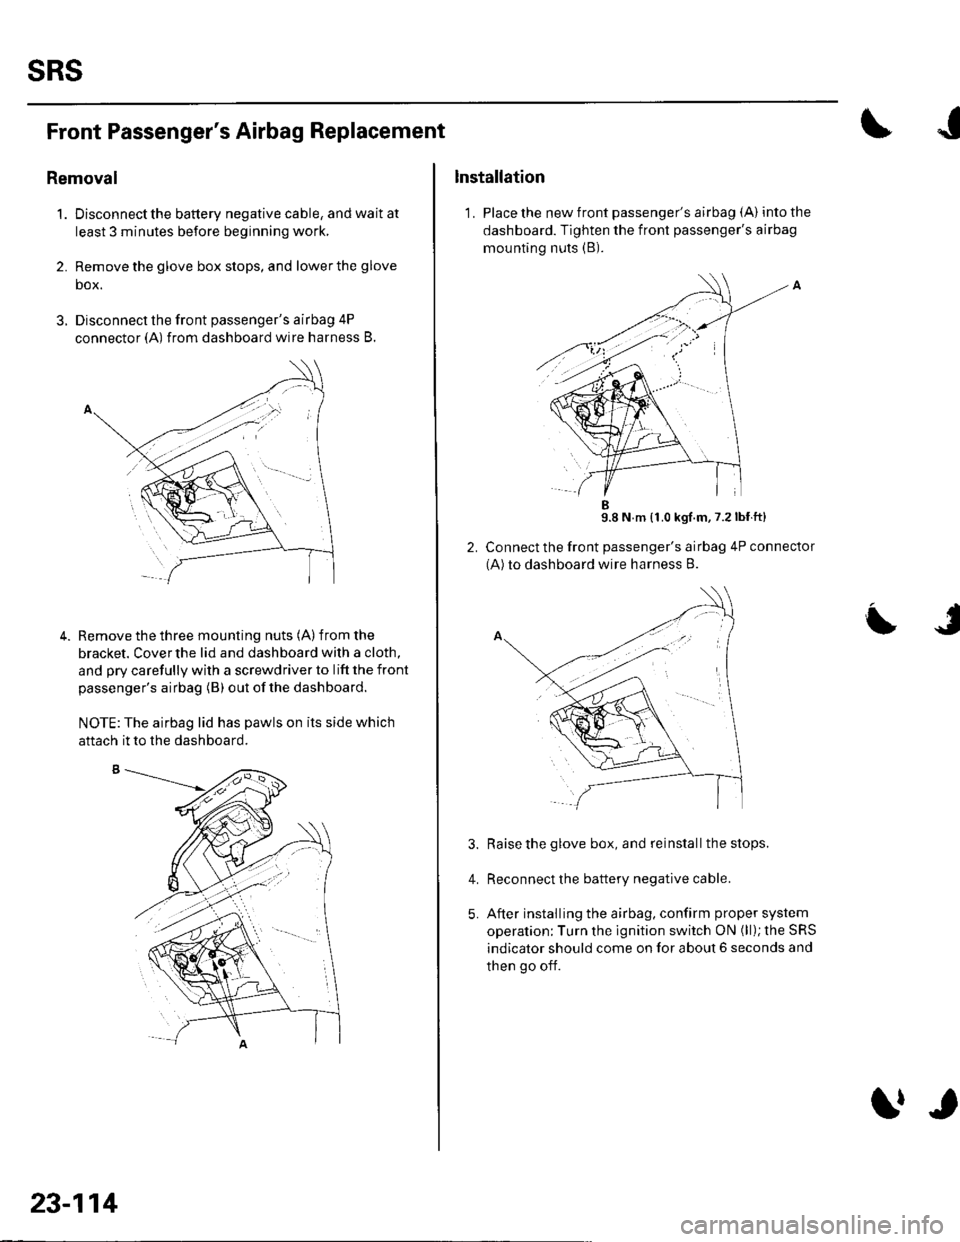
Front Passenger's Airbag Replacement
Removal
1. Disconnectthe battery negative cable, and wait at
least 3 minutes before beginning work,
2. Remove the glove box stops, and lower the glove
box.
3. Disconnect the front passenger's airbag 4P
connector (A) from dashboard wire harness B.
Remove the three mounting nuts (A) from the
bracket. Cover the lid and dashboard with a cloth,
and pry carefully with a screwdriver to lift the front
passenger's airbag (B) out ofthe dashboard.
NOTE:The airbag lid has pawls on its side which
4.
aftach it to the dashboard.
23-114
trr
Installation
1. Place the new front passenger's airbag (A) into the
dashboard. Tighten the front passenger's airbag
mounting nuts (B).
9.8 N m {1.0 kgf.m,7.2lbf ft}
Connect the front passenger's airbag 4P connector
(A)to dashboard wire harness B.
Raise the glove box, and reinstall the stops.
Reconnect the battery negative cable.
After installing the airbag, confirm proper system
operation; Turn the ignition switch ON (ll); the SRS
indicator should come on for about 6 seconds and
then go off.
L
4.
Page 1122 of 1139
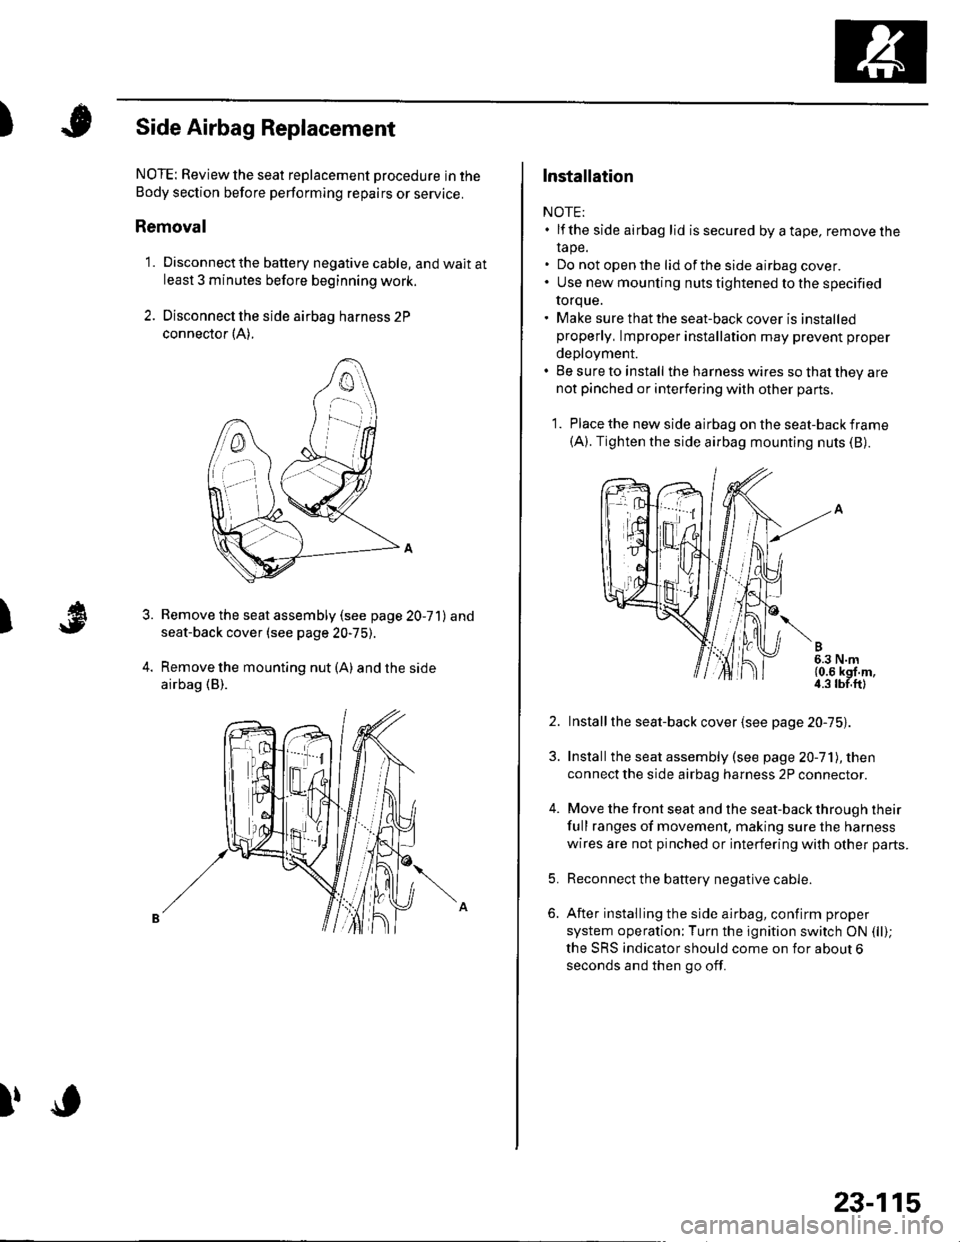
)Side Airbag Replacement
)
NOTE: Review the seat replacement pro6edure in the
Body section before pertorming repairs or service.
Removal
1. Disconnectthe battery negative cable, and wait atleast 3 minutes before beginning work.
2. Disconnect the side airbag harness 2P
connector {A).
Remove the seat assembly (see page 20-71) and
seat-back cover (see page 20-75).
Remove the mounting nut (A) and the side
airbag (B).
3.
l,o
23-115
Installation
NOTE:. lf the side airbag lid issecured byatape, removelhe
rape.. Do not open the lid of the side airbag cover.. Use new mounting nuts tightened to the specified
torque.. Make sure that the seat-back cover is installedproperly, lmproper installation may prevent proper
deployment.. Be sure to install the harness wires so that they arenot pinched or interfering with other parts.
1. Place the new side airbag on the seat-back frame(A). Tighten the side airbag mounting nuts (B).
2. Installthe seat-back cover {see page 20-75).
3. Installthe seat assembly (see page 20-71), then
connect the side airbag harness 2P connector.
4. Move the front seat and the seat-back through their
full ranges of movement, making sure the harness
wires are not pinched or interfering with other parts.
5. Reconnect the battery negative cable.
6. After installing the side airbag, confirm proper
system operation;Turn the ignition switch ON (ll);
the SRS indicator should come on for about 6
seconds and then go off.
Page 1123 of 1139
sRs
Airbag Disposal
Special Tool Required
Deployment tool 07HAz-SG00500
Before scrapping any airbags, side airbags, seat belt
tensioners, or seat belt buckle tensioners (including
those in a whole vehicle to be scrapped), the airbags,
side airbags, seat belt tensioners, or seat belt buckle
tensioners must be deployed. lf the vehicle is still within
the warranty period, the Honda District Service
Manager must give approval and/or special instruction
before deploying the airbags, side airbags, seat belt
tensioners, or seat belt buckle tensioners. Only after the
airbags, side airbags, seat belt tensioners, or seat belt
buckle tensioners have been deployed (as the result of
vehicle collision, for example), can they be scrapped.
lf the airbags, side airbags, seat belt tensioners, and
seat belt buckle tensioners appear intact (not deployed),
treat them with extreme caution. Follow this Drocedure.
Deploying Airbags in the Vehicle
lf an SRS equipped vehicle is to be entirely scrapped, its
airbags, side airbags. seat belt tensioners. and seat belt
buckle tensioners should be deoloved while still in the
vehicle. The airbags, side airbags, seat belttensioners,
and seat belt buckle tensioners should not be
considered as salvageable parts and should never be
installed in another vehicle.
1. Turn the ignition switch OFF, then disconnect the
battery negative cable, and wait at least 3 minutes.
2. Confirm that each airbag, side airbag, or seat belt
tensioner is securely mounted.
3. Conf irm that the specia I tool isfunctioning properly
by following the check procedure on the tool label.
23-116
$J
Driver's Airbag:
4. Remove the access panel f rom the steering wheel,
then disconnect the driver's airbag 4P connector
from the cable reel (see step 2 on page 23-21).
Front Passenger's Airbag:
5. Lowerthe glove box, then disconnectthe front
passenger's airbag 4P connector from dashboard
wire harness B (see step 3 on page 23-211.
Side Airbag:
6. Disconnect the side airbag 2P connectors from the
floor wire harness (see step 4 on page 23-211.
Seat belt tensioner:
7. Disconnect the seat belt tensioner 2P connectors
from the floor wire harness {see step 5 on page 23-
22). Pull the seat belt out all the way, and cut it off.
Seat belt buckle tensioner:
8, Disconnect the seat belt buckle tensioner 4P
connectors from the floor wire harness (see step 6
on page 23-221.
Page 1125 of 1139
sRs
Airbag Disposal (cont'dl
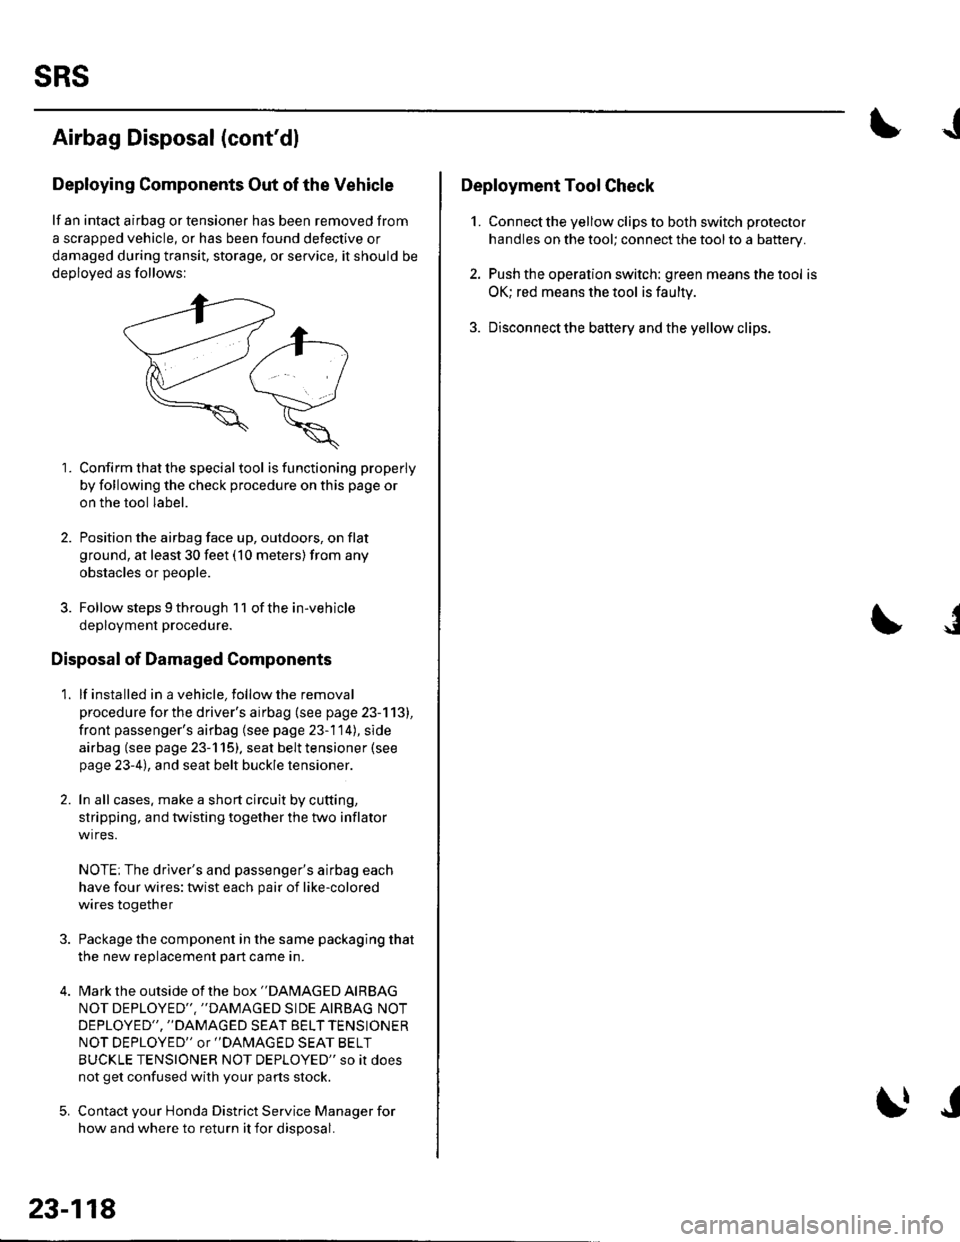
Deploying Components Out of the Vehicle
lf an intact airbag or tensioner has been removed from
a scrapped vehicle, or has been found defective or
damaged during transit, storage, or service, it should be
deoloved as follows:
1. Confirm that the special tool isfunctioning properly
by following the check procedure on this page or
on the tool label.
2. Position the airbag face up, outdoors, on flat
ground, at least 30 feet (10 meters) from any
obstacles or DeoDle.
3. Follow steps 9 through 1 1 of the in-vehicle
deployment procedure.
Disposal of Damaged Components
1. lf installed in a vehicle, follow the removal
procedure for the driver's airbag (see page 23-113),
front passenger's airbag (see page 23-114), side
airbag (see page 23-115). seat belt tensioner (see
page 23-4), and seat belt buckle tensioner.
2. In all cases. make a short circuit by cutting,
stripping, and twisting together the two inflator
wires.
NOTE; The driver's and passenger's airbag each
have four wires: twist each pair of like-colored
wires together
Package the component in the same packaging that
the new reolacement Dart came in.
Mark the outside of the box "DAMAGED AIRBAG
NOT DEPLOYED'" ''DAMAGED SIDE AIRBAG NOT
DEPLOYED", "DAMAGED SEAT BELT TENSIONER
NOT DEPLOYED" or "DAlvlAGED SEAT BELT
BUCKLE TENSIONER NOT DEPLOYED" so it does
not get confused with your parts stock.
Contact your Honda District Service Manager for
how and where to return it for disposal.
23-118
I|J
J
Deployment Tool Check
1. Connect the yellow clips to both switch protector
handles on the tool; connect the tool to a battery.
2. Push the operation switch: green means the tool is
OK; red means the tool is faulty
3. Disconnectthe battery and the yellow clips.
J
Page 1127 of 1139
sRs
Cable Reel Replacement (cont'd)
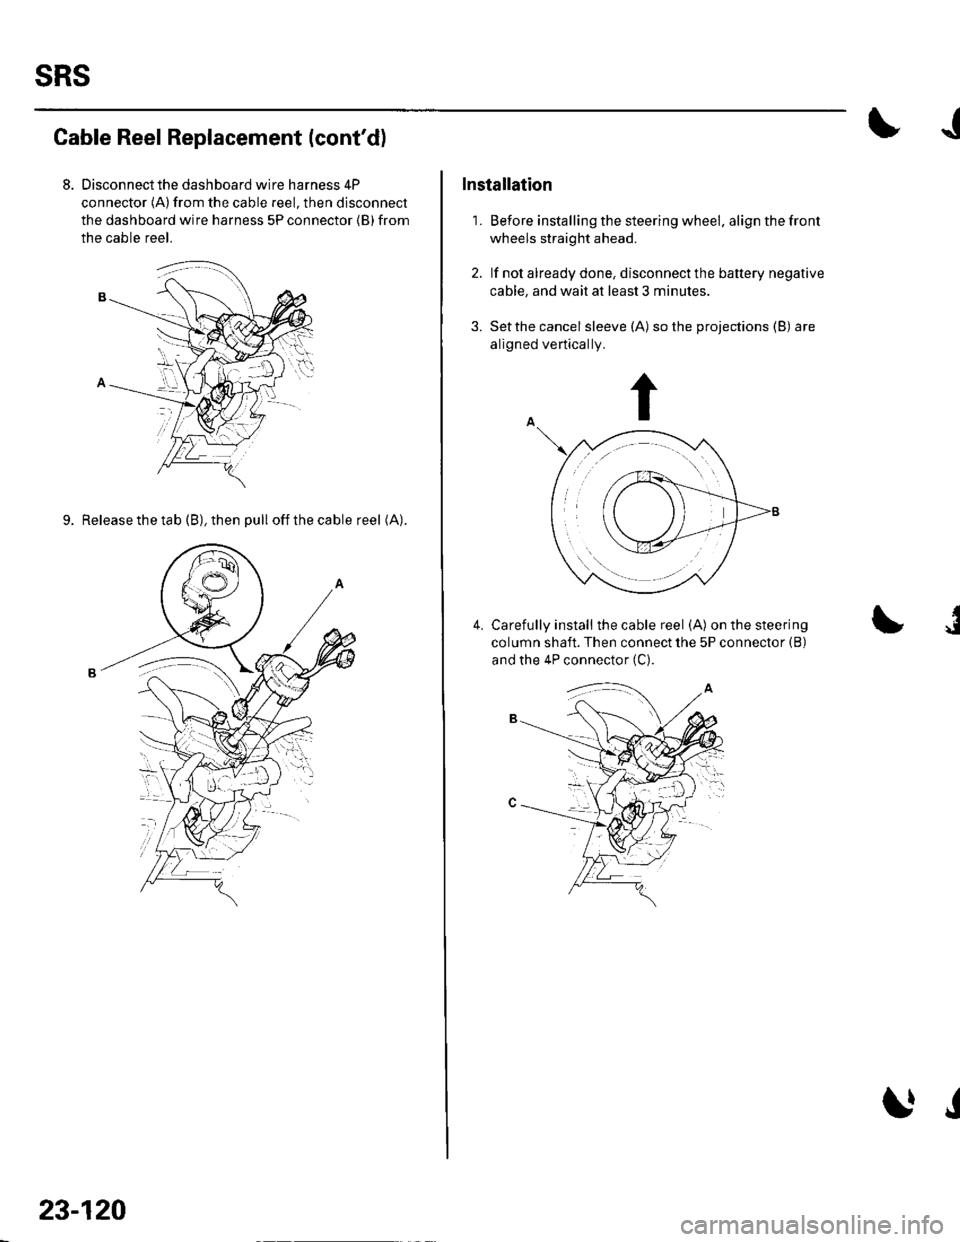
Disconnect the dashboard wire harness 4P
connector (A)from the cable reel, then disconnect
the dashboard wire harness 5P connector {B} from
the cable reel.
9. Release the tab (B), then pull offthecable reel (A).
23-120
J
Installation
1. Before installing the steering wheel. align the front
wheels straight ahead.
2. lf not already done, disconnect the battery negative
cable, and wait at least 3 minutes.
3. Setthe cancel sleeve (A) so the projections (B) are
aligned vertically.
Carefully install the cable reel (A) on the steering
column shaft. Then connect lhe 5P connector {B)
and the 4P connector (C).
I4.
J
Page 1128 of 1139
)
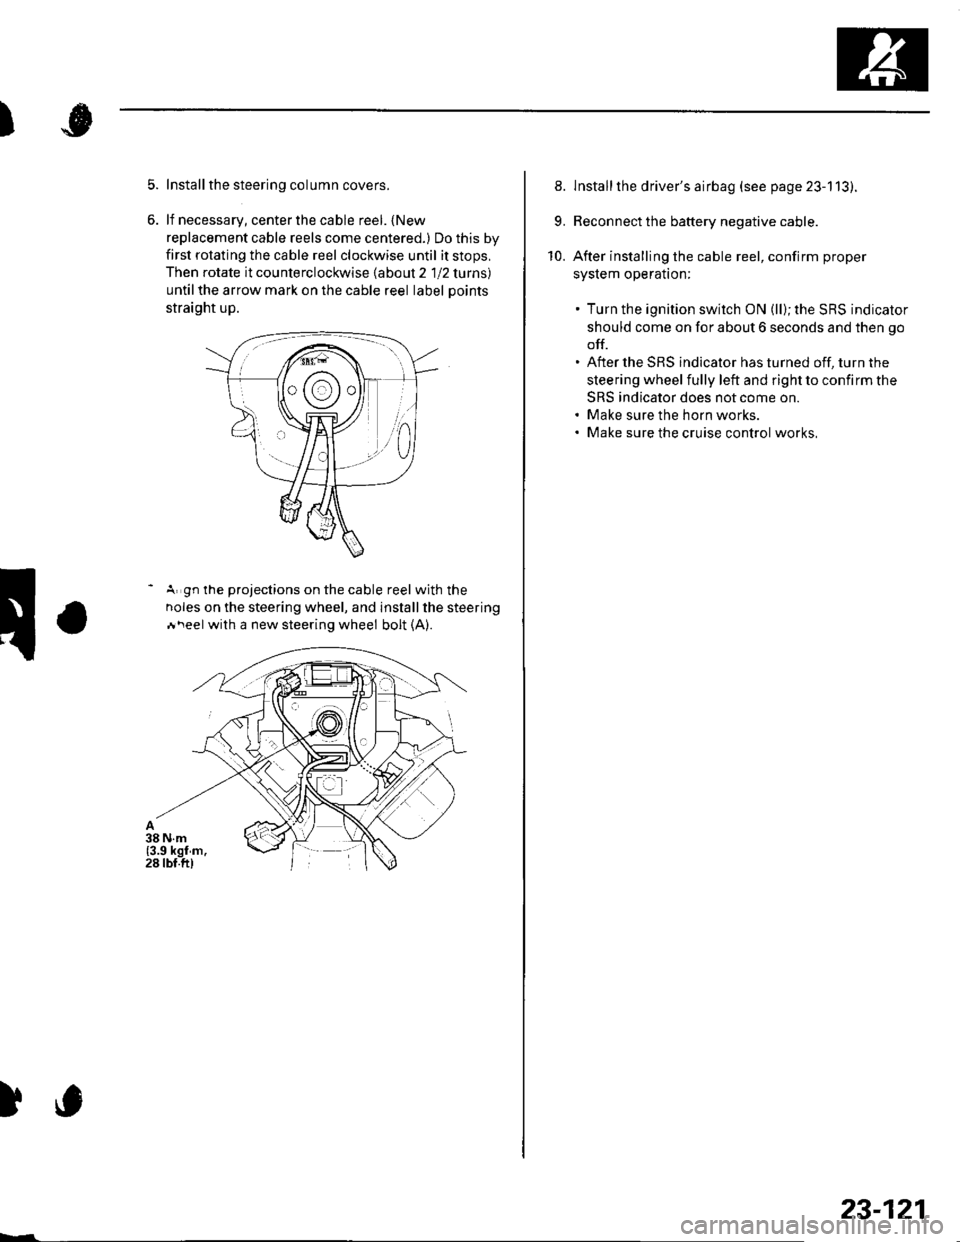
Install the steering column covers.
lf necessary, center the cable reel. {New
replacement cable reels come centered.) Do this by
first rotating the cable reel clockwise until it stops,
Then rotate it counterclockwise labout 2 1 12 lurns)
untilthe arrow mark on the cable reel label Doints
straight up.
- A gn the projections on the cable reel with the
noles on the steering wheel, and installthe steering
Ai\eel with a new steering wheel bolt (A).
)c
23-121
8. lnstallthe driver's airbag (see page 23-113).
9. Reconnect the battery negative cable.
10. After installing the cable reel, confirm proper
syslem operalton:
. Turn the ignition switch ON (ll); the SRS indicator
should come on for about 6 seconds and then go
off.. After the SRS indicator has turned off, turn the
steering wheel fully left and right to confirm the
SRS indicator does not come on.. Make sure the horn works.. Make sure the cruise control works,
Page 1129 of 1139
sRs
SRS Unit Replacement
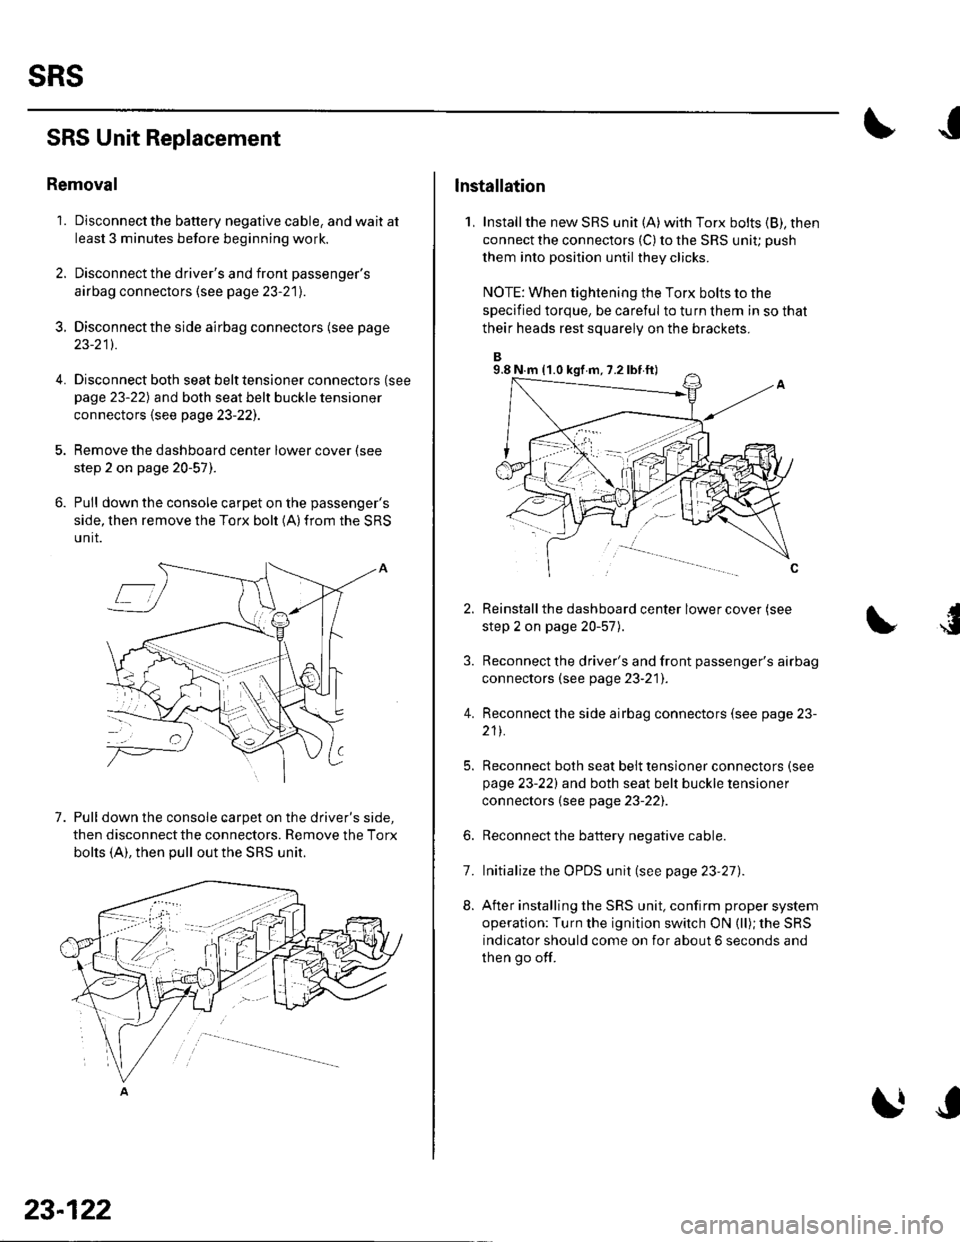
Removal
'1. Disconnect the battery negative cable, and wait at
least 3 minutes before beginning work.
2. Disconnect the driver's and front passenger's
airbag connectors (see page 23-21).
3. Disconnectthe side airbag connectors (see page
23-211.
4.Disconnect both seat belt tensioner connectors (see
page 23-22) and both seat belt buckle tensioner
connectors {see page 23-221.
Remove the dashboard center lower cover (see
step 2 on page 20-57).
Pull down the console carpet on the passenger's
side, then remove the Torx bolt (A)from the SRS
unit.
7. Pull down the console carpet on the driver's side,
then disconnect the connectors. Remove the Torx
bolts (A), then pull out the SRS unit.
23-122
lnstallation
1, Installthe new SRS unit (A)with Torx bolts (B), then
connect the connectors {C) to the SRS uniu push
them into position until they clicks.
NOTE: When tightening the Torx bolts to the
specified torque, be careful to turn them in so that
their heads rest squarely on the brackets.
Reinstall the dashboard center lower cover (see
step 2 on page 20-57).
Reconnect the driver's and front passenger's airbag
connectors (see page 23-21]'.
Reconnect the side airbag connectors (see page 23-
211.
Reconnect both seat belt tensioner connectors (see
page 23-221 and both seat belt buckle tensioner
connectors (see page 23-22).
Reconnect the battery negative cable.
Initialize the OPDS unit (see page 23'27).
After installing the SRS unit, confirm proper system
operation: Turn the ignition switch ON (ll); the SRS
indicator should come on for about 6 seconds and
then go off.
4.
6.
8.
7.
9.8 N.m (1.0 kgf m, 7.2 lbf ft)
Page 1130 of 1139
)
)
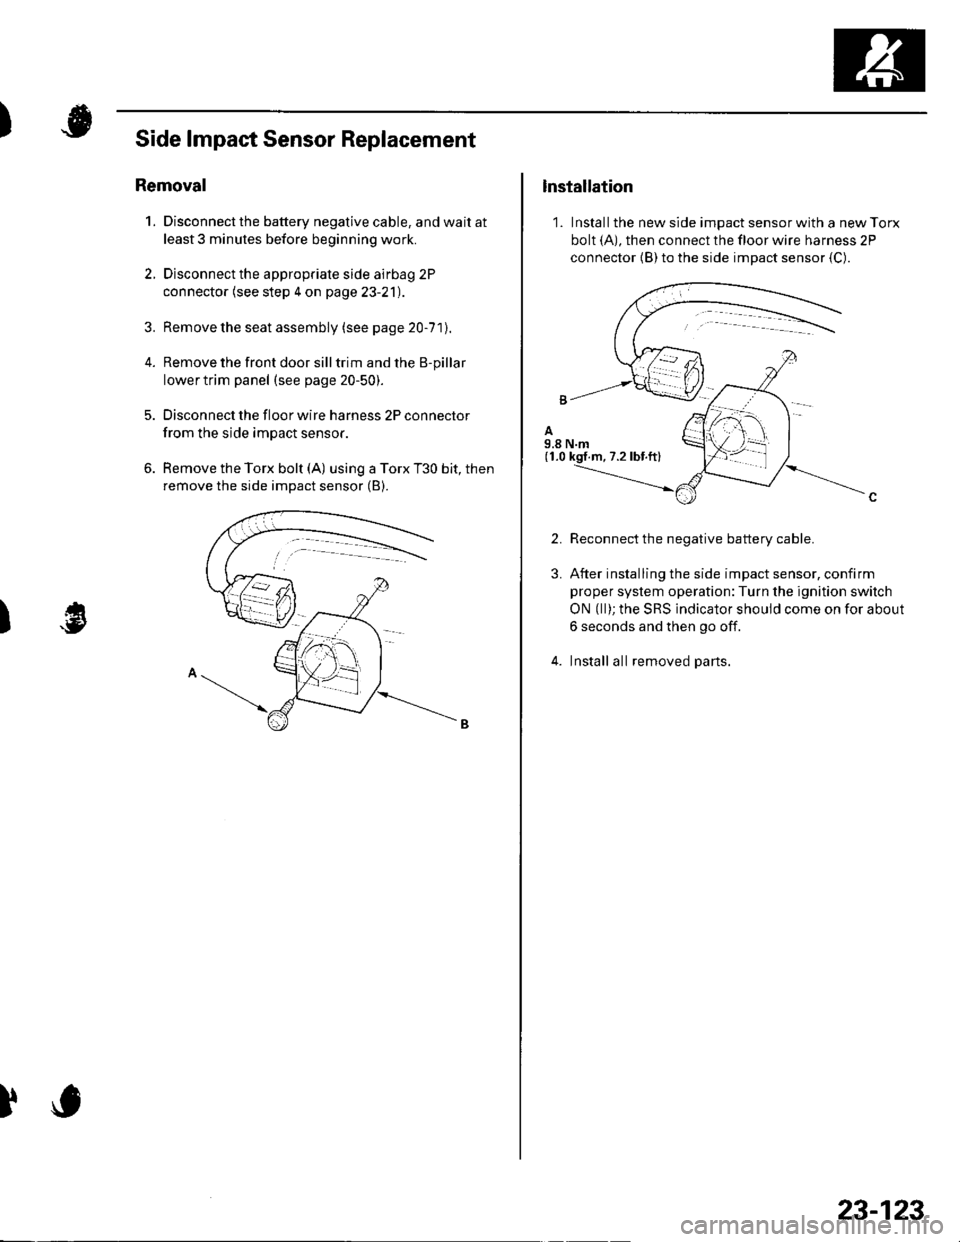
Side lmpact Sensor Replacement
Removal
1. Disconnect the battery negative cable, and wait at
least 3 minutes before beginning work.
2. Disconnect the appropriate side airbag 2P
connector (see step 4 on page 23-21).
3. Remove the seat assembly (see pa ge 20-71J.
4. Remove the front door silltrim and the B-pillar
lower trim panel (see page 20-50).
5. Disconnect the floor wire harness 2P connector
from the side impact sensor.
6. Remove the Torx bolt (A) using a Torx T30 bit, then
remove the side impact sensor (B).
)
lnstallation
1. Install the new side impact sensor with a new Torx
bolt (A), then connect the floor wire harness 2P
connector {B) to the side impact sensor {C).
2.
3.
Reconnect the negative battery cable.
After installing the side impact sensor, confirm
proper system operation:Turn the ignition switch
ON (ll); the SRS indicator should come on for about
6 seconds and then go off.
Install all removed parts.
23-123
Page 1131 of 1139
sRs
OPDS Unit Replacement
NOTE: Review the seat replacement procedures in the
body section before performing repairs or service.
Removal
1. Disconnect the battery negative cable. and wait at
least 3 minutes before beginning work.
2. Disconnect the passenger's side airbag harness 2P
connector (see step 4 on page 23-2'll.
3. Remove the front passenger's seat assembly (see
page 20-71)and seat-back cover (see page2O-15],.
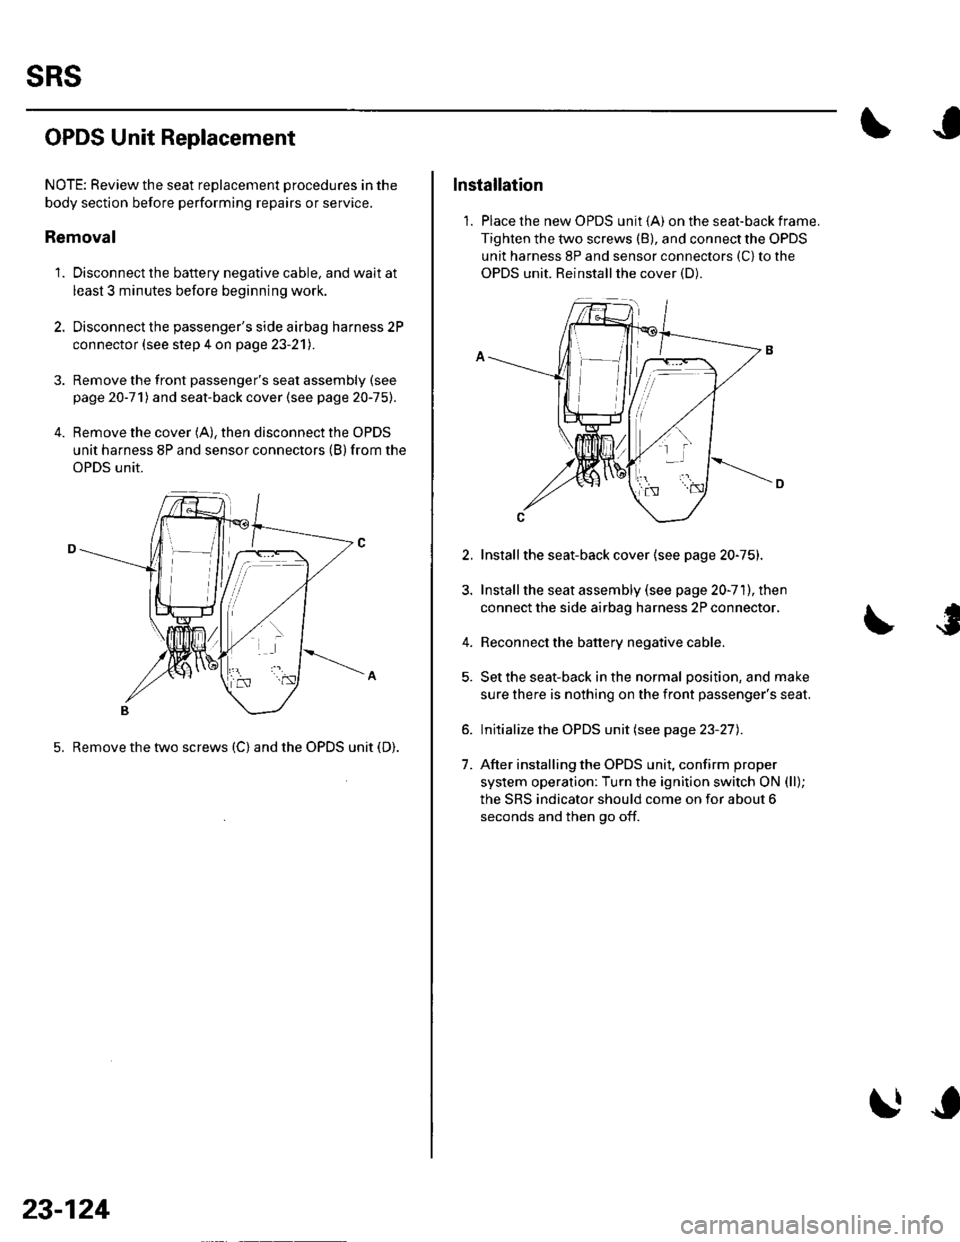
4. Remove the cover (A), then disconnect the OPDS
unit harness 8P and sensor connectors (B) from the
OPDS unit.
5. Remove the two screws (C) and the OPDS unit (D).
23-124
Installation
1. Place the new OPDS unit (A) on the seat-back frame.
Tighten the two screws (B), and connect the OPDS
unit harness 8P and sensor connectors (C) to the
OPDS unit. Reinstallthe cover (D).
2.
4.
1.
Installthe seat-back cover (see page 20-75).
Install the seat assembly (see page 20-71), then
connect the side airbag harness 2P connector,
Reconnect the battery negative cable.
Set the seat-back in the normal position, and make
sure there is nothing on the front passenger's seat.
Initialize the OPDS unit (see page 23-27).
After installing the OPDS unit, confirm proper
system operation: Turn the ignition switch ON (ll);
the SRS indicator should come on for about 6
seconds and then go off.
Page 1132 of 1139
)
1.
Front lmpact Sensor Replacement
Removal
Disconnect the battery negative cable. and wait at
least 3 minutes before beginning work.
Disconnect the driver's airbag 4P connector lsee
step 2 on page 23-21), the front passenger's airbag
4P connector (see step 3 on page 23-21), both seat
belt tensioner 2P connectors (see step 5 on page
23-221, and both seat belt buckle 4P connectors (see
step 6 on page 23-22).
Remove the front inner fender (see pag e 2O-1O21.
Disconnect the engine compartment wire harness
2P connector (A), and remove the two Torx bolts (B)
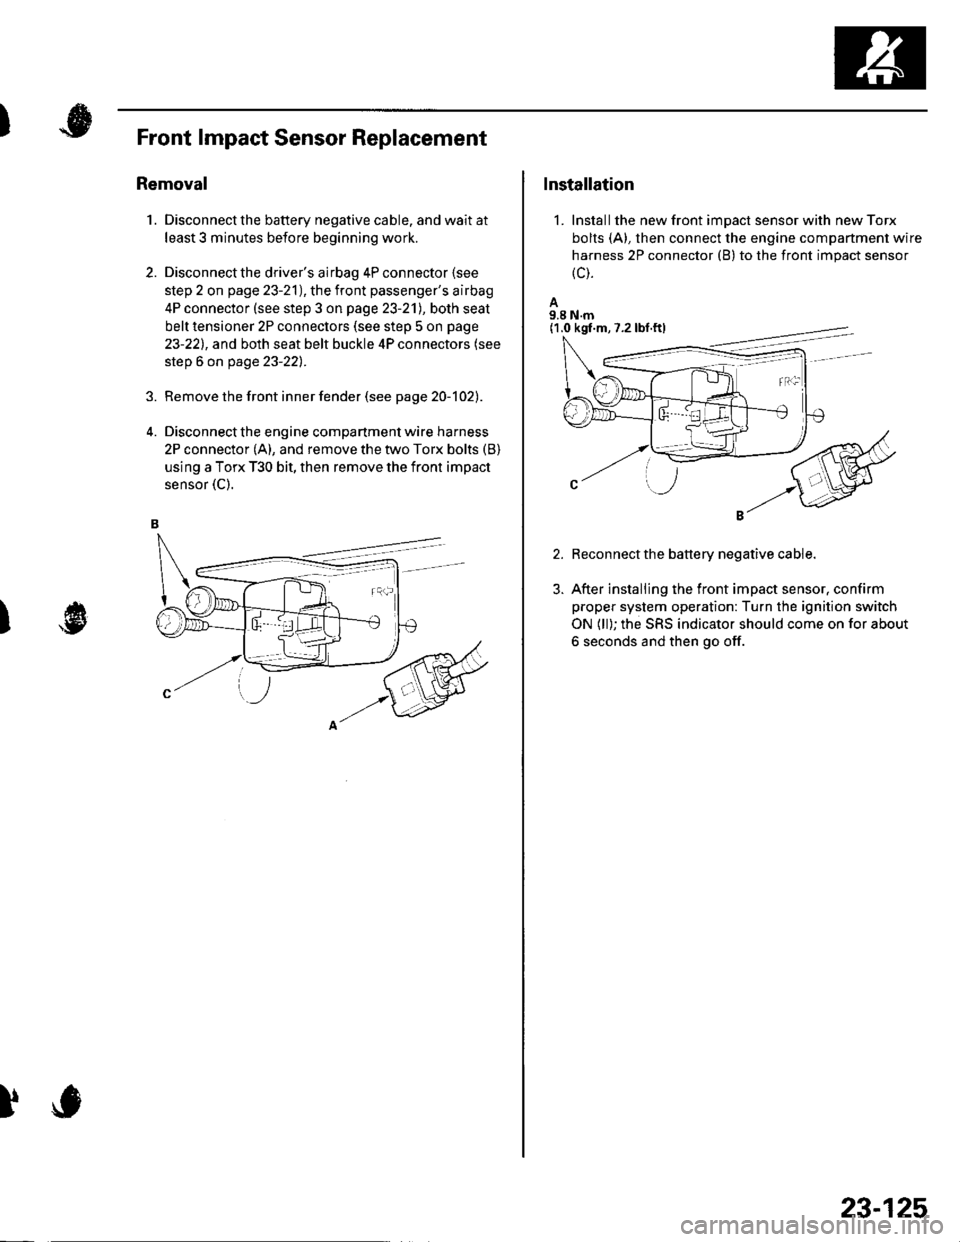
using a Torx T30 bit, then remove the front impact
sensor {C).
2.
)
)
Installation
1. Installthe new front impact sensor with new Torx
bolts (A), then connect the engine compartment wire
harness 2P connector (B) to the front impact sensor
{c).
A9.8 N.m
Reconnect the battery negative cable.
After installing the front impact sensor, confirm
proper system operation: Turn the ignition switch
ON (ll); the SRS indicator should come on for about
6 seconds and then go off.
(1.0 kgf.m,7.2lbf.ftl
23-125