srs HONDA CIVIC 2003 7.G User Guide
[x] Cancel search | Manufacturer: HONDA, Model Year: 2003, Model line: CIVIC, Model: HONDA CIVIC 2003 7.GPages: 1139, PDF Size: 28.19 MB
Page 727 of 1139
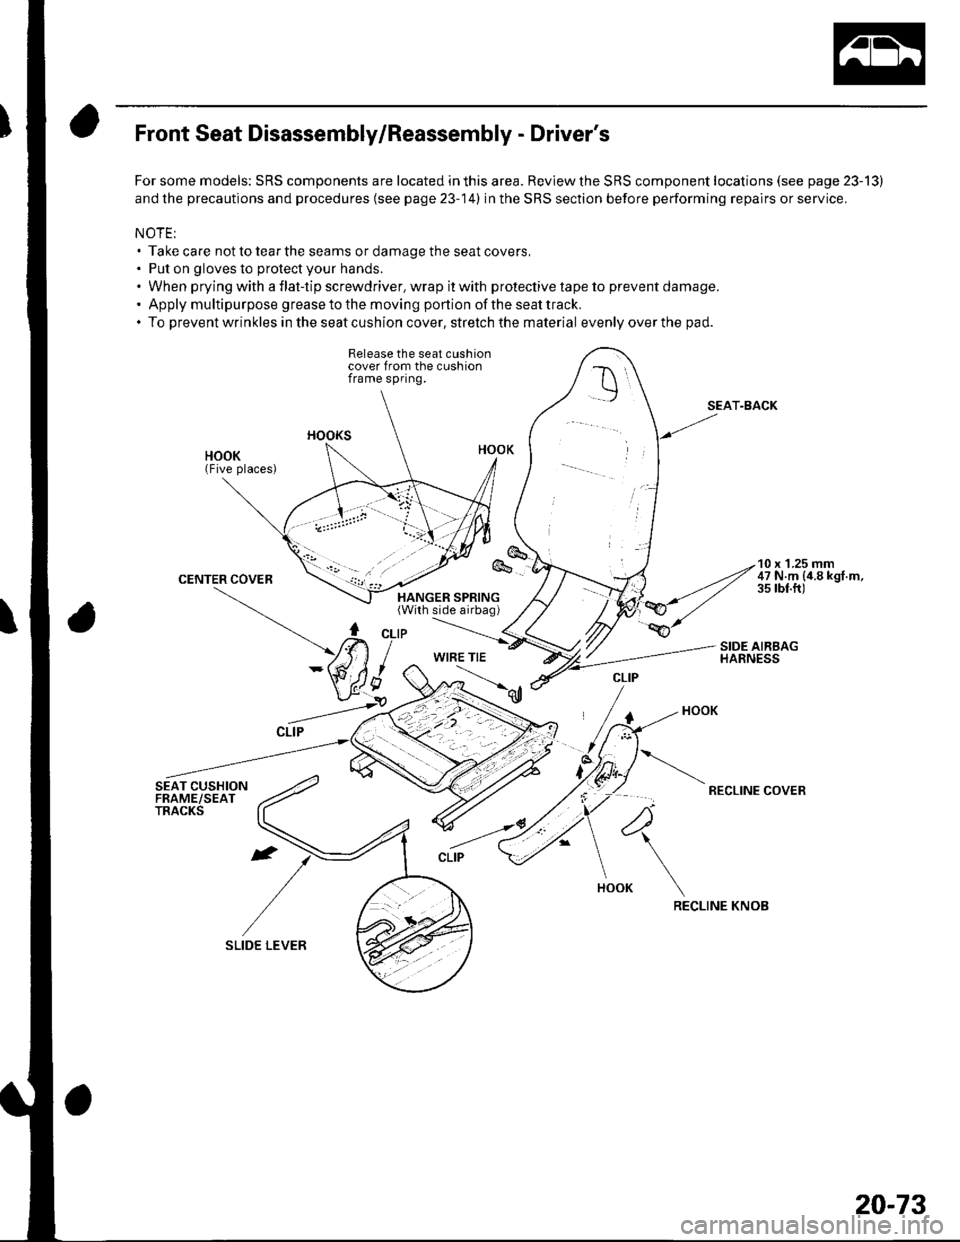
Front Seat Disassembly/Reassembly - Driver's
For some models: SRS components are located in this area. Review the SRS component locations (see page 23-13)
and the precautions and procedures (see page 23-14) in the SRS section before performing repairs or service.
NOTE:. Take care not to tear the seams or damage the seat covers,. Put on gloves to protect your hands.. When prying with a flat-tip screwdriver. wrap it with protective tape to prevent damage.' Apply multipurpose greasetothe moving portion of the seattrack.. To preventwrinkles in the seat cushion cover, stretch the material evenlyoverthe pad.
Release the seat cushioncover from the cushionframe spring.
SEAT-BACK
RECLINE COVER
RECLINE KNOB
10 x 'l.25 mm47 N.m {4.8 kgf.m,35 rbt.ft)
WIRE TIE
4
20-73
Page 728 of 1139
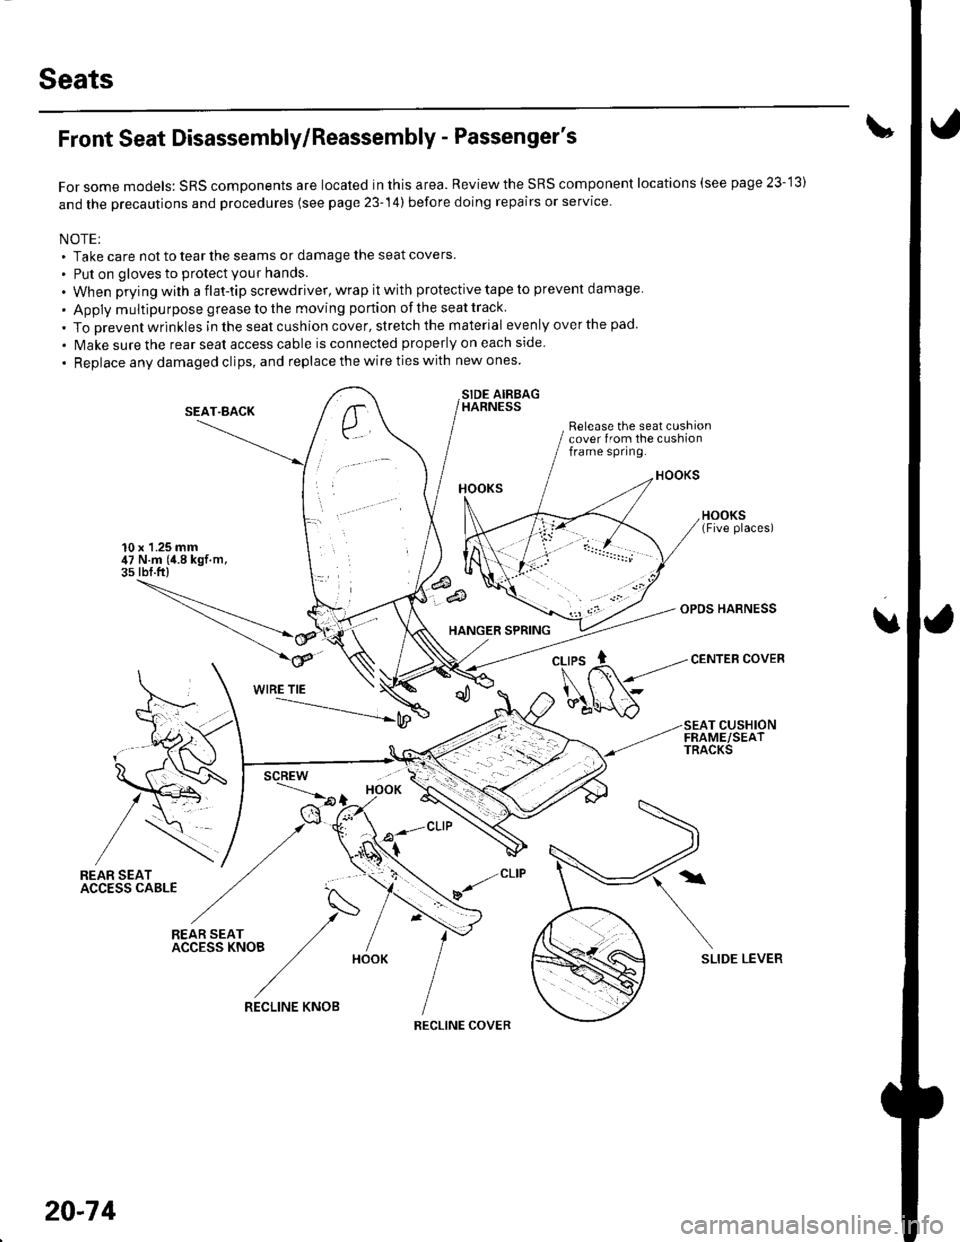
Seats
Front Seat Disassembly/Reassembly - Passenger's
For some models: SRS components are located in this area. Reviewthe SRS component locations (see page 23-'13)
and the precautions and procedures (see page 23-14) before doing repairs or service.
NOTE;. Take care not to tear the seams or damage the seat covers
. Put on gloves to protect your hands.
. When prying with a flat-tip screwdriver, wrap it with protective tape to prevent damage
. Apply multipu rpose grease to the moving portion of the seat track
. To Drevent wrinkles in the seat cushion cover, stretch the material evenly over the pad.
. lvlake sure the rear seat access cable is connected properly on each side
. Replace any damaged clips, and replace the wire ties with new ones
SIDE AIRBAGHARNESS
Release the seat cushioncover from the cushionframe spring.
10 x 1.25 mm47 N.m (4.8 kgf.m,3s rbf.ft)
SEAT"BACK
HANGER SPRING
OPDS HARNESS
CENTEB COVER
u
WIRE TIE
SEAT CUSHIONFRAME/SEATTRACKS
/REAR SEATACC€SS CABLE
N
*r(".o, /- IACCESSKNOB ,/ /
/HooK
SLIDE LEVER
,/CLIP
v/
20-74
RECLINE KNOB
RECLINE COVER
Page 729 of 1139
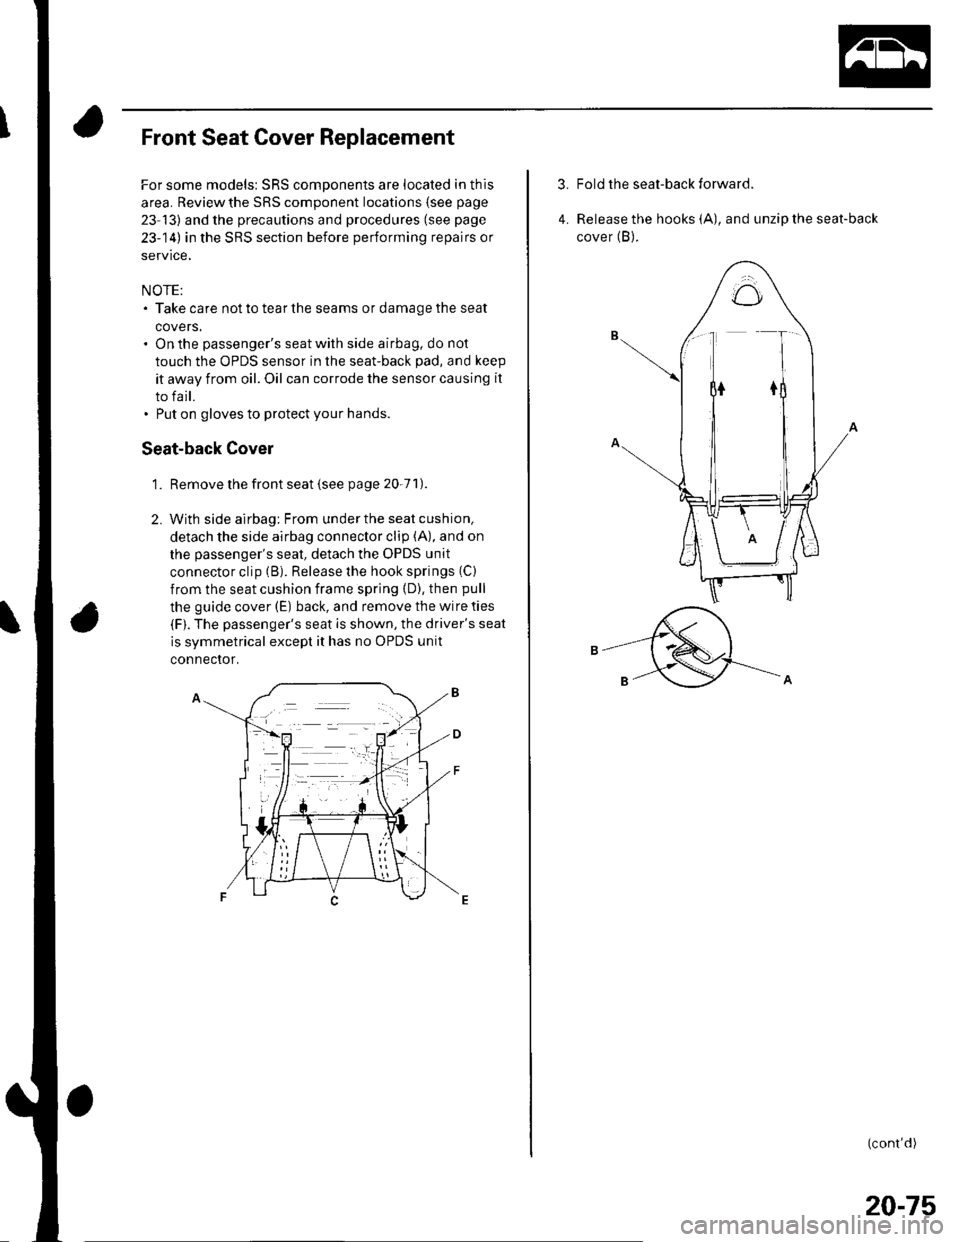
Front Seat Cover Replacement
For some models: SRS components are located in this
area. Review the SRS component locations (see page
23 13) and the precautions and procedures (see page
23-'14) in the SRS section before performing repairs or
service,
NOTE:. Take care not to tear the seams or damage the seat
covers,. On the passenger's seat with side airbag, do not
touch the OPDS sensor in the seat-back pad, and keep
it away from oil. Oil can corrode the sensor causing it
to fail.. Put on gloves to protect your hands.
Seat-back Cover
Remove the front seat isee page 20-71).
With side airbag: From under the seat cushion,
detach the side airbag connector clip (A), and on
the passenger's seat, detach the OPDS unit
connector clip (B). Release the hook springs (C)
from the seat cushion frame spring {D), then pull
the guide cover (E) back, and remove the wire ties
(F). The passenger's seat is shown, the driver's seat
is svmmetrical except it has no OPDS unit
connector.
'L
2.
3.Fold the seat-back forward.
Release the hooks (A), and unzip the seat-back
cover (B).4.
(cont'd)
20-75
Page 761 of 1139
2.
5.
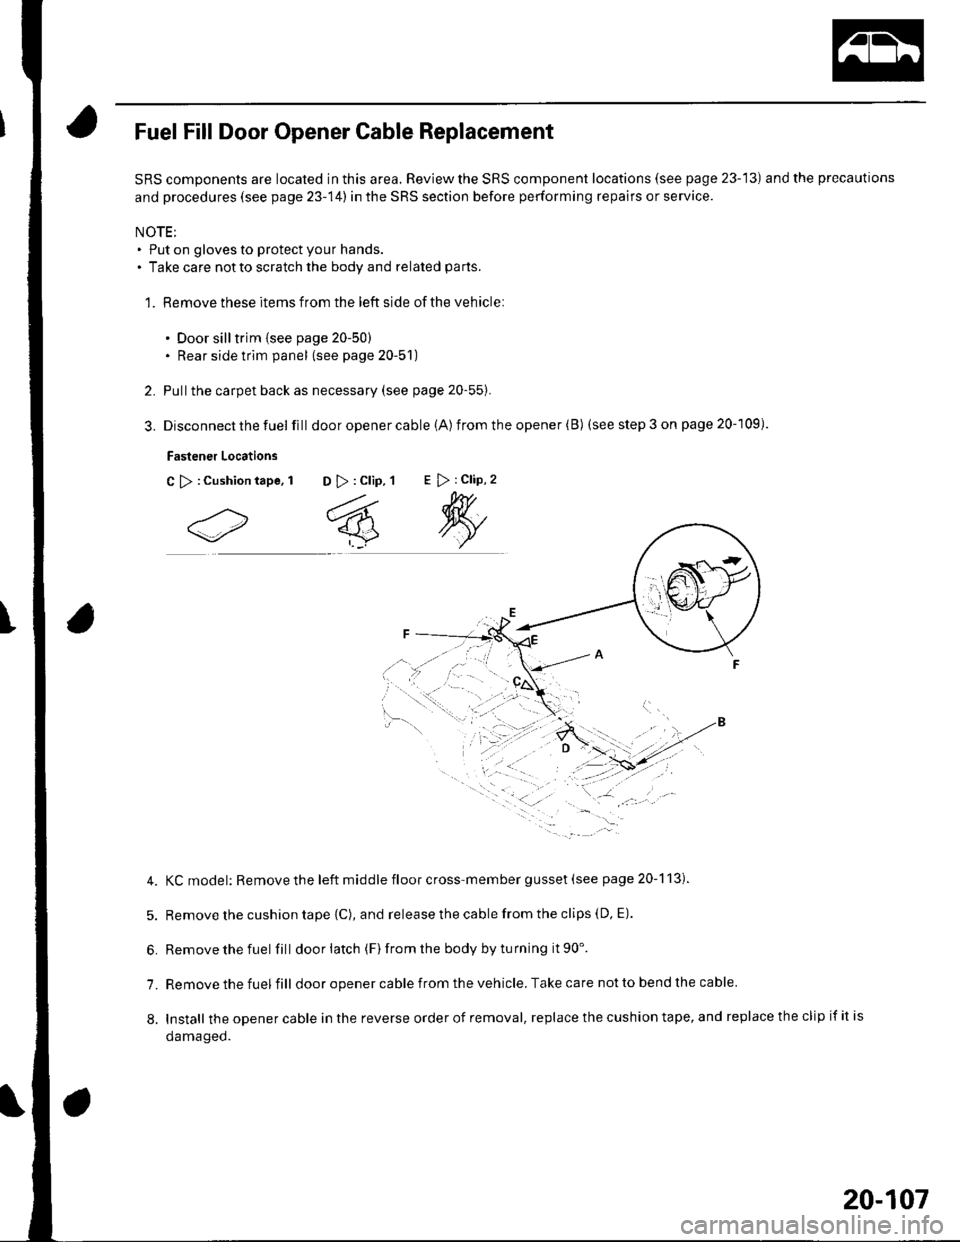
Fuel Fill Door Opener Cable Replacement
SRS components are located in this area. Review the SRS component locations (see page 23-13) and the precautions
and procedures (see page 23-14) in the SRS section before performing repairs or service.
NOTE;. Put on gloves to protect your hands.. Take care notto scratch the body and related parts.
1. Remove these items from the left side of the vehicle:
. Door silltrim {see page 20-50). Rear side trim panel (see page 20-51)
Pullthe carpet back as necessary (see page 20-55).
Disconnect the fuel fill door opener cable (A) from the opener (B) (see step 3 on page 20-109).
Fastener Locations
C >:Cushiontape, 1 D >: Clip, 1E > : Clip, 2
4. KCmodel: Removethe left middle floor cross-member gusset (see page 20-113).
5. Remove the cushion tape {C), and release the cable from the clips (D, E).
6. Removethefuel fill doorlatch (F)fromthe bodybyturning it90'.
7. Remove the fuel fill door opener cable from the vehicle. Take care not to bend the cable
8. Install theopenercableinthereverseorderofremoval,replacethecushiontape,andreplacetheclipifitis
oamageo.
20-107
Page 810 of 1139
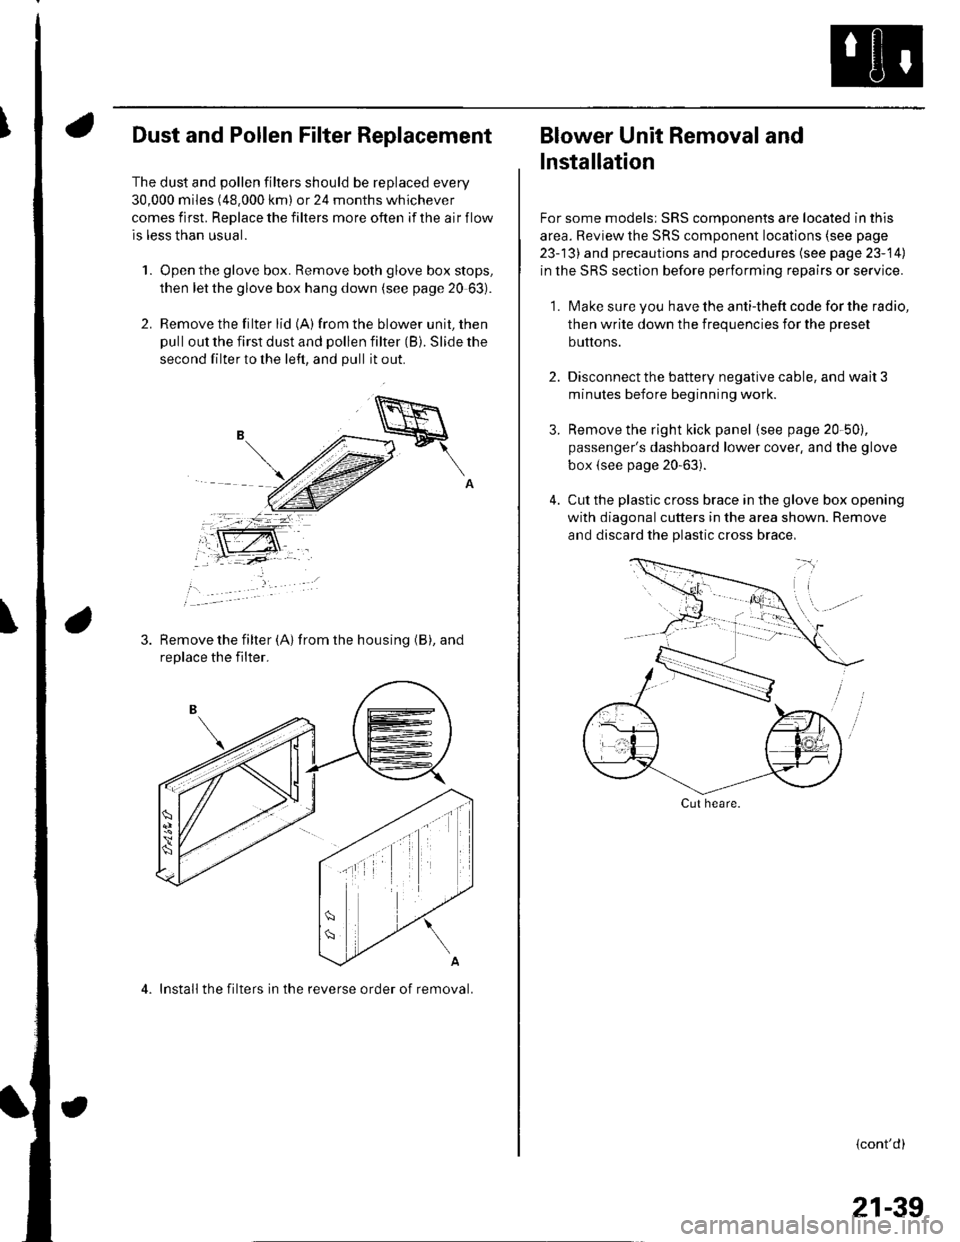
Dust and Pollen Filter Replacement
The dust and pollen filters should be replaced every
30,000 miles (48.000 km) or 24 months whichever
comes first. Replace the filters more often if the air flow
is less than usual.
1. Open the glove box. Remove both glove box stops,
then let the glove box hang down (see page 20 63).
2. Remove the filter lid (A)from the blower unit, then
pull out the first dust and pollen filter (B). Slide the
second filter to the left, and pull it out.
Remove the filter {A) from the housing (B), and
replace the filter.
4. Install the filters in the reverse order of removal.
Blower Unit Removal and
lnstallation
For some models: SRS components are located in this
area. Review the SRS component locations (see page
23-13) and precautions and procedures (see page 23-14)
in the SRS section before performing repairs or service.
1. Make sure you have the anti-theft code for the radio,
then write down the frequencies for the preset
buttons.
2. Disconnect the battery negative cable, and wait 3
minutes before beginning worK.
3. Remove the right kick panel (see page 20-50),
passenger's dashboard lower cover, and the glove
box {see page 20-63).
4. Cut the plastic cross brace in the glove box opening
with diagonal cutters in the area shown. Remove
and discard the plastic cross brace,
Cut heare.
{cont'd)
21-39
Page 814 of 1139
Heater Unit/Core Replacement
SRS components are located in this area. Review the
SRS component locations (see page 23'13), and
precautions and procedures (see page 23-14) in the SRS
section before performing repairs or service.
1. Make sure you have the anti-theft code forthe radio,
then write down the freouencies for the radio's
Dreset buttons.
4.
Disconnect the negative cable from the battery,
Disconnect the suction and receiver lines from the
evaporator core (see page 21-42).
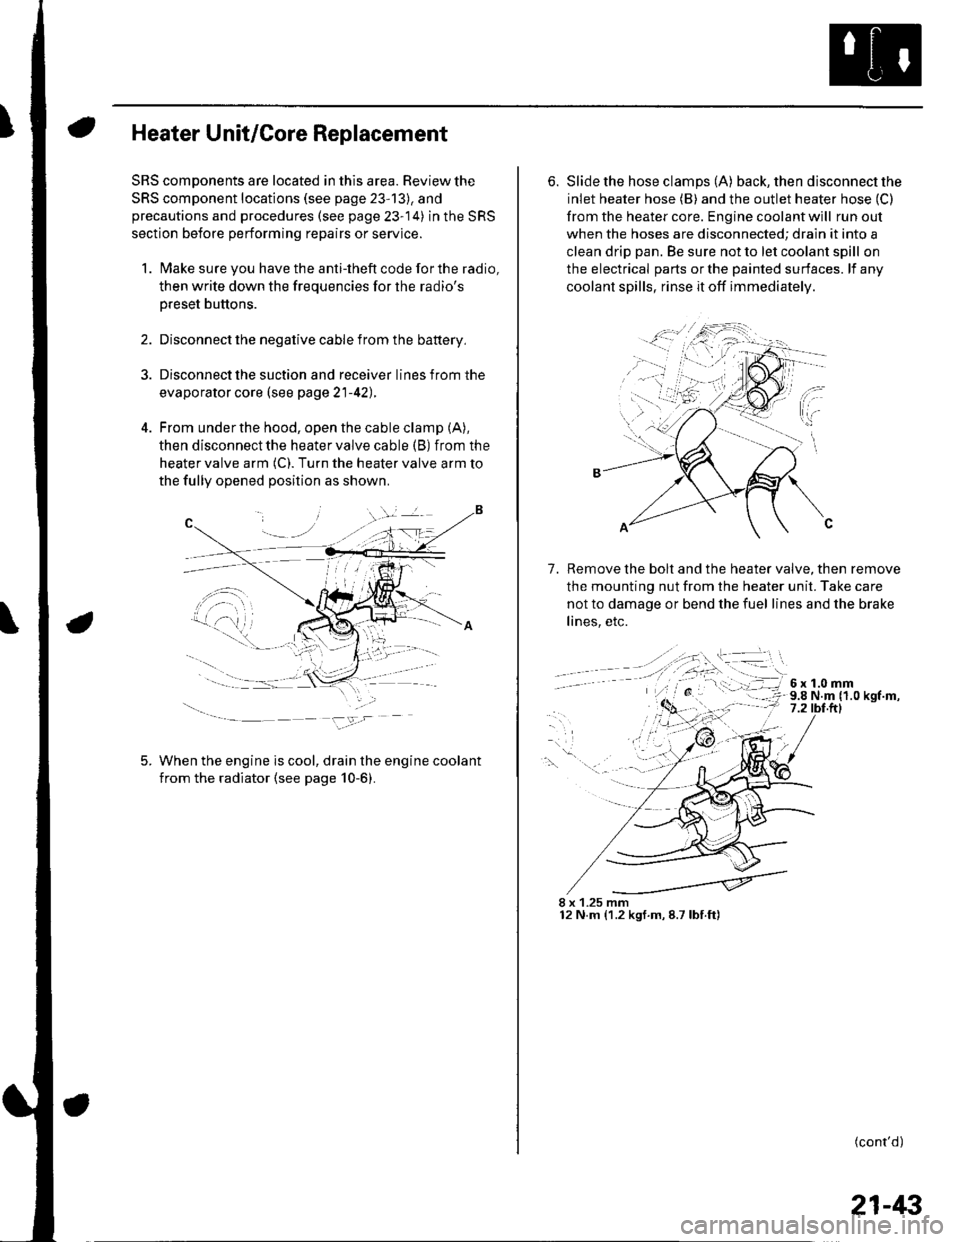
From under the hood, open the cable clamp (A),
then disconnect the heater valve cable (B) from the
heater valve arm (C). Turn the heater valve arm to
the fully opened position as shown
When the engine is cool, drain the engine coolant
from the radiator (see page 10-6).
6. Slide the hose clamps (A) back, the n d isconnect the
inlet heater hose (B) and the outlet heater hose (C)
from the heater core. Engine coolant will run out
when the hoses are disconnected; drain it into a
clean drip pan. Be sure not to let coolant spill on
the electrical parts or the painted surfaces. lf any
coolant spills, rinse it off immediately.
Remove the bolt and the heater valve, then remove
the mounting nut from the heater unit. Take care
not to damage or bend the fuel lines and the brake
lines, etc.
7.
8 x 1.25 mm12 N.m (1.2 kgf.m,8.7lbf.ft)
(cont'd)
21-43
Page 841 of 1139
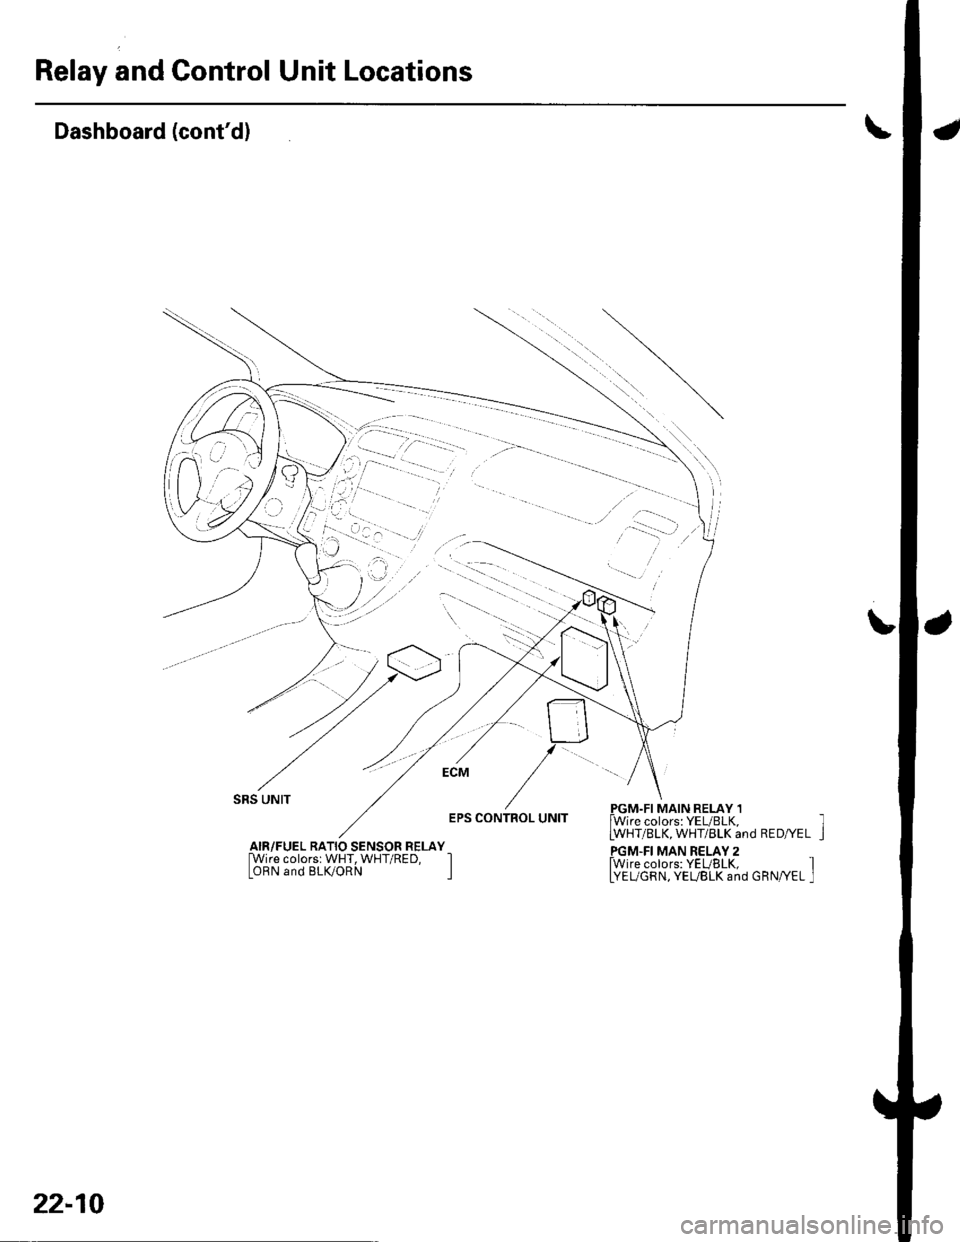
Relay and Control Unit Locations
a
\
Dashboard (cont'd)
L
SRS UNIT
EPS CONTROL UNITPGM.FI MAIN RELAY 1lWire colors: YEUBLK,LWHT/BLK, WHT/BLK and RED/YEL
PGM.FI MAN RELAY 2fwire colors: YEUBLK, ILYEUGRN, YEUBLK and GRN/YEL I
AIR/FUEL RATIO SENSOR RELAY[Wire colorsr WHT, WHT/RED, IOBN and BLK/ORN I
22-10
Page 861 of 1139
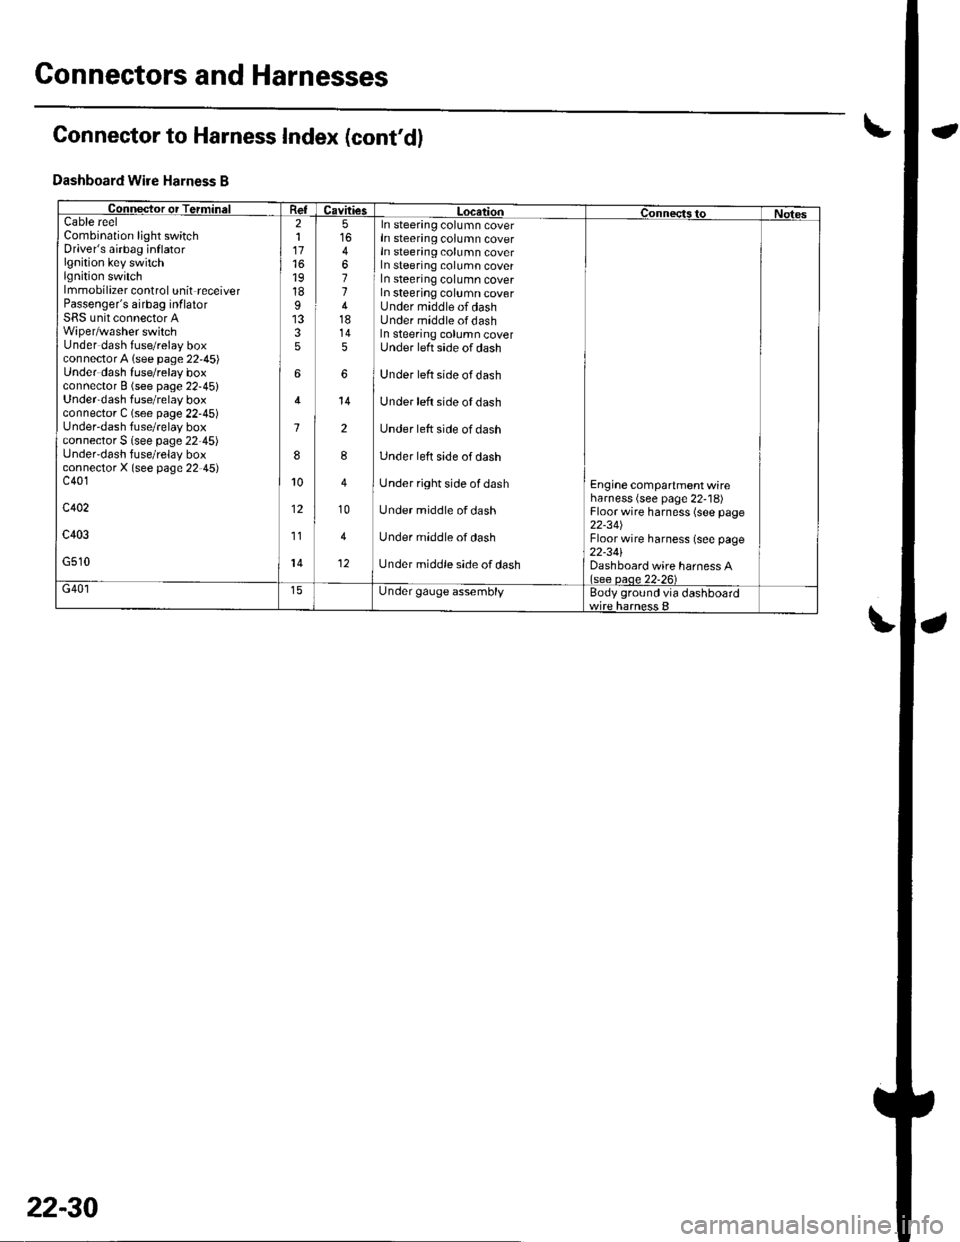
Connectors and Harnesses
Connector to Harness Index (cont'd)
Dashboard Wire Harness B
Collqctor or TerminalCavitiesLocatiol|ConnectstoNotesCableCombination light switchDriver's airbag inflatorlgnition key switchlgnition switchlmmobilizer control unit receiverPassenger's airbag inf latorSRS unit connector AWiper/washer switchUnder dash fuse/relay boxconnectorA lsee page 22,45)Under dash luse/relay boxconnector B (see page 22-45)Under'dash fuse/relay boxconnector C (see page 22-45)Under-dash fuse/relay boxconnector S lsee page 22-45)Under'dash fuse/relay boxconnectorX (see page 22 45)c401
c402
c403
G510
reel211716't9
18I
35
6
1
8
10
12
11
14
5
4
11418145
6
14
2
8
10
4
12
In steering column coverIn steering column coverIn steering column coverIn steering column coverIn steering column coverIn steering column coverUnder middle of dashUnder middle ofdashIn steering column coverUnder left side of dash
Under left side ofdash
Under left side of dash
Under lett side of dash
Under left side of dash
Under right side of dash
Under middle of dash
Under middle of dash
Under middle side of dash
Engine compartment wireharness (see page 22-'18)Floor wire harness (see page22-34JFloor wire harness (see page22-341Dashboard wire harness A(see oaoe 22-26)G40lUnder gauge assemblyBody ground via dashboard
22-30
Page 865 of 1139
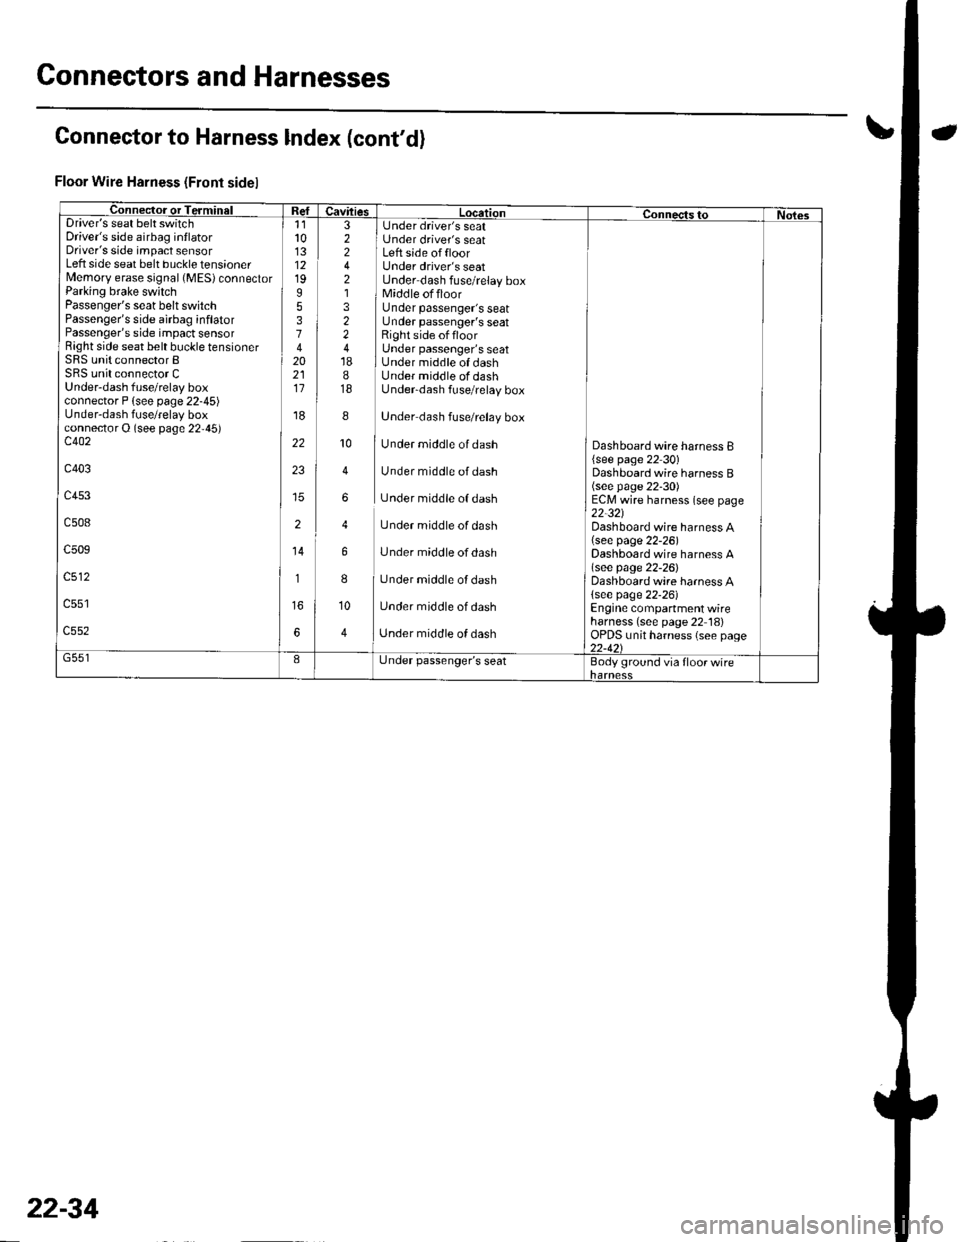
Connectors and Harnesses
Connector to Harness lndex (cont'd)
Floor Wire Harness (Front sidel
Connec-tor or TerminalI Refuavftres Location connects to Nol6sDriver's seat belt switchDriver's side airbag inflatorDriver's side impact sensorLeft side seat belt buckle tensionerMemory erase signal (MES) connectorParking brake switchPassenger's seat belt switchPassenger's side airbag inflatorPassenger's side impact sensorRight side seat belt buckle tensionerSRS unit connector BSRS unit connector CUnder-dash fuse/relay boxconnector P {see page 22-45)Under-dash fuse/relay boxconnector O (see page 22,45)c402
c403
c453
c508
c509
c512
11l013121995374202111
'r8
22
23
2
14
1
6
3 I Under driver's seat2 i Under driver's seat2 I Left side offloor4 Under driver's seat2 Under dash fuse/relay box1 1 Middle offloor3 Under passenger's seat2 Under passenger's seat2 Right side offloor4 Under passenger's seat18 I Under middle of dash8 Under middle of dash18 Underdash fuse/relay box
8
]
Under dash fuse/relay box
10
I
Under middle of dash
4 Under middle of dash
6 Under middle of dash
4 Under middle of dash
6 Under middle ofdash
8
I
Under middle of dash
10 Under middle of dash
4 ] Unaer middle of aasn
Dashboard wire harness B{see page 22 30)Dashboard wire harness B(see page 22-30)ECM wire harness (see page22-321Dashboard wire harness A(see page 22-26)Dashboard wire harness A\see page 22-26)Dashboard wire harness A{see page 22-26)Engine compartment wireharness (see page 22 18)OPDS unit harness (see page22-421G551IL,nder passenger's seatBody ground via floor wire
22-34
Page 878 of 1139
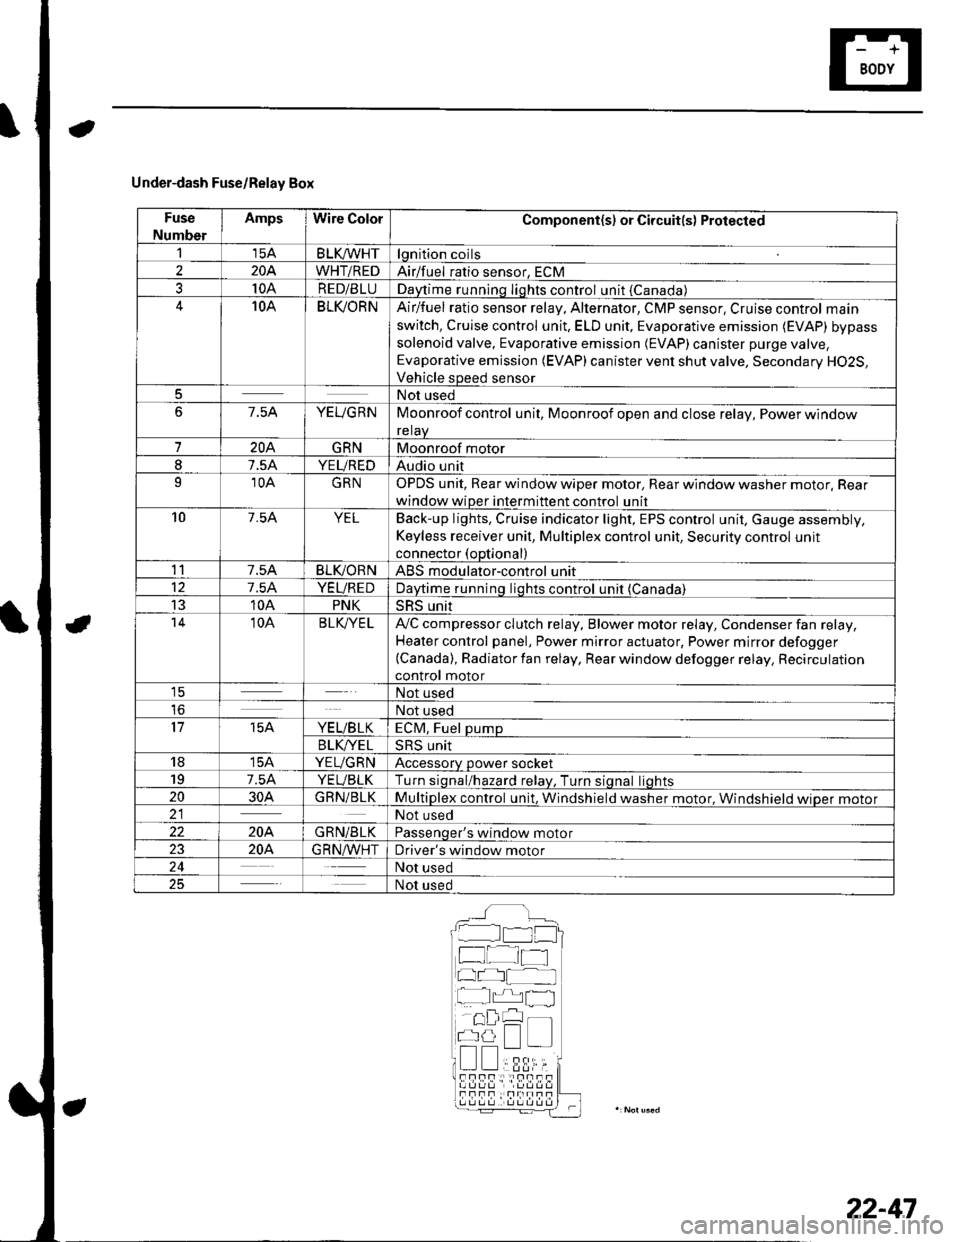
Under-dash Fuse/Relay Box
Fuse
Number
AmpsWire ColorComponent(s) or Circuit(s) Protected
115ABLKA/VHTlgnition coils
2204WHT/REDAirlfuel ratio sensor, ECM
310ARED/BLUDaytime running Iights control unit {Canada)10ABLI(ORNAir/fuel ratio sensor relay, Alternator, CMP sensor, Cruise control main
switch, Cruise control unit. ELD unit, Evaporative emission (EVAP) bypass
solenoid valve, Evaporative emission (EVAP)canister purge valve,
Evaporative emission (EVAP) canister vent shut valve, Secondary H02S,
Vehicle speed sensor
5Not used
67.5AYEUGRNMoonroof control unit, Moonroof open and close relay, Power window
relaV
7204GRNMoonroof motor
I7.5AYEUREDAudio unit
910AGRNOPDS unit, Rear window wiper motor, Rear window washer motor, Rear
window wiper intermittent control unit
107.54YELBack-up lights, Cruise indicator light, EPS control unit, Gauge assembly,
Keyless receiver unit, Multiplex control unit, Security control unit
connector (optional)
117.5ABLIVORNABS modulator-control unit
127.5AYEUREDDaytime runnino liohts control unit (Canada)
1310APNKSRS unit't410ABLK/YE LA,,/C compressor clutch relay, Blower motor relay, Condenser fan relay,
Heater control panel, Power mirror actuator, Power mirror defogger(Canada), Radiator fan relay, Rear window defogger relay, Recirculation
control motor1ENot used
loNot used
1715AYE L/B LKECM, Fuel pump
B LK/YE L>H> Unrr
1815AYEUGRNAccessory power socket
197.5AYEUBLKTurn siqnal/hazard relav, Turn siqnal liohts
2030AGRN/BLKMultiplex control unit, Windshield washer motor. Windshield wioer motor21Not used
22204GRN/BLKPassenqer's window motor
2320A.G R N,A/VHTDriver's window motor
24Not used
25Not used
__^:Hr tl_l
f at-t
at I
r^,rl fl
!!;r -
!339,i;s!!sf Fnf : |rnITf
22-47