light HONDA CIVIC 2003 7.G Owner's Manual
[x] Cancel search | Manufacturer: HONDA, Model Year: 2003, Model line: CIVIC, Model: HONDA CIVIC 2003 7.GPages: 1139, PDF Size: 28.19 MB
Page 300 of 1139
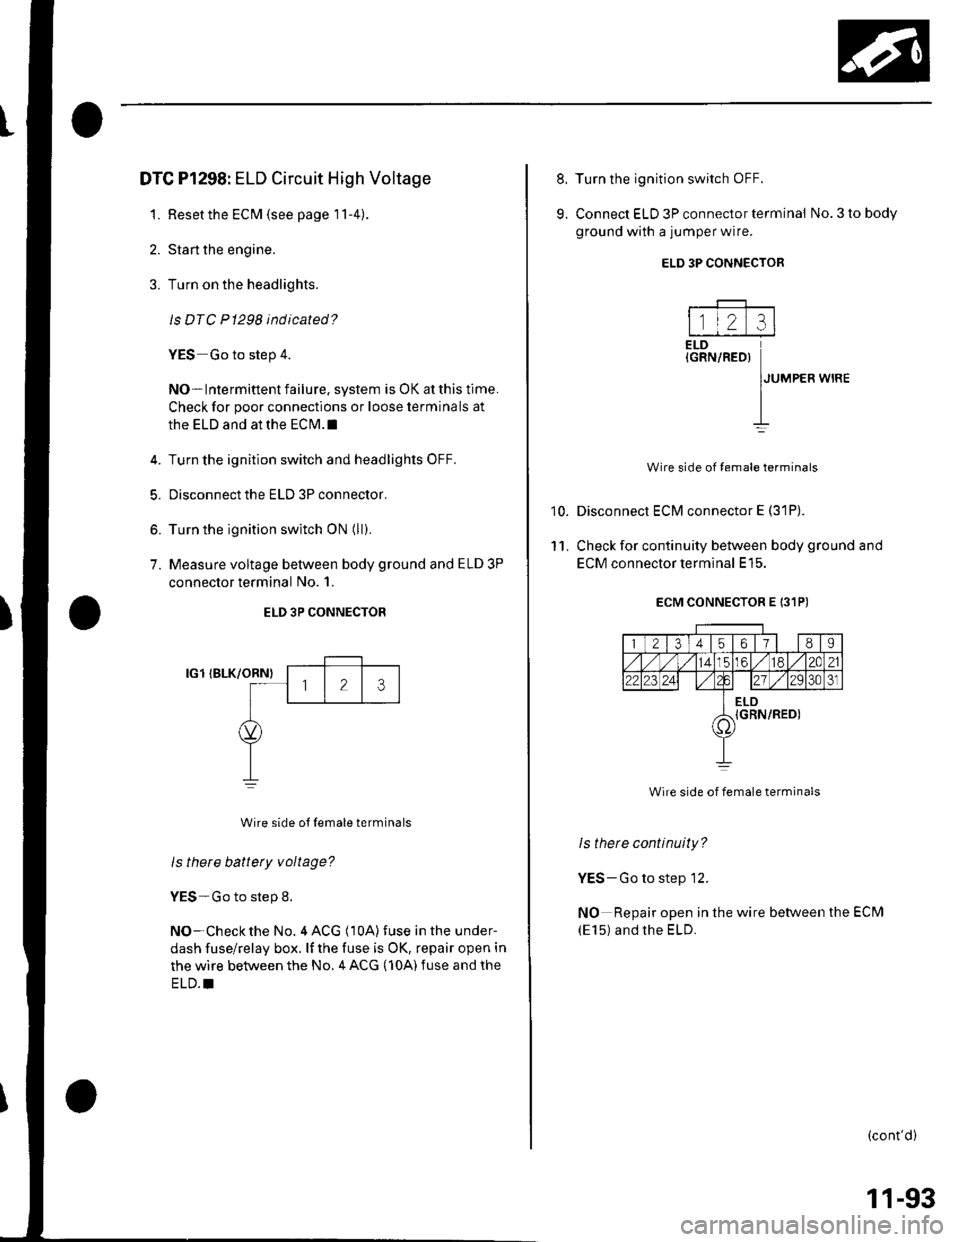
DTC Pl298: ELD Circuit High Voltage
1. Resetthe ECM (see page 11-4)
2. Stan the engine.
3. Turn on the headlights.
ls DTC P1298 indicated?
YES-Go to step 4.
NO- Intermittent failure. system is OK at this time.
Check for poor connections or loose terminals at
the ELD and at the ECM.I
4. Turn the ignition switch and headlights OFF.
5. Disconnectthe ELD 3P connector.
6. Turn the ignition switch ON (ll).
7. Measure voltage between body ground and ELD 3P
connector terminal No. 1.
ELD 3P CONNECTOR
IG1 IBLK/ORNI
Wire side ot {emale terminals
ls there battery voltage?
YES-Go to step 8.
NO-Checkthe No. 4 ACG (10A)fuse in the under-
dash fuse/relay box. lf the fuse is OK, repair open in
the wire between the No. 4 ACG (10A) fuse and the
ELD.I
8.
9.
10.
11.
Turn the ignition switch OFF.
Connect ELD 3P connector terminal No. 3 to body
ground with a jumper wire.
Disconnect ECM connector E (31P).
Check for continuity between body ground and
ECM connector terminal E15.
ECM CONNECTOR E 131PI
1 21345ot/II
14LC6l/ 182C21
22123 2421 ./2Q30J
ELDIGRN/RED)i1'
Wire side of female terminals
Is thete continuity?
YES-Go to step 12.
NO Repair open in the wire between the ECM
(E15) and the ELD.
(cont'd)
ELD 3P CONNECTOR
---F-------
l1l2 :rlELD(GRN/RED)
IJUMPER wrRE
II
Wire side of temale terminals
11-93
Page 301 of 1139
PGM-FI System
DTC Troubleshooting (cont'dl
12, Check for continuity between ELD 3P connector
terminal No.2 and body ground.
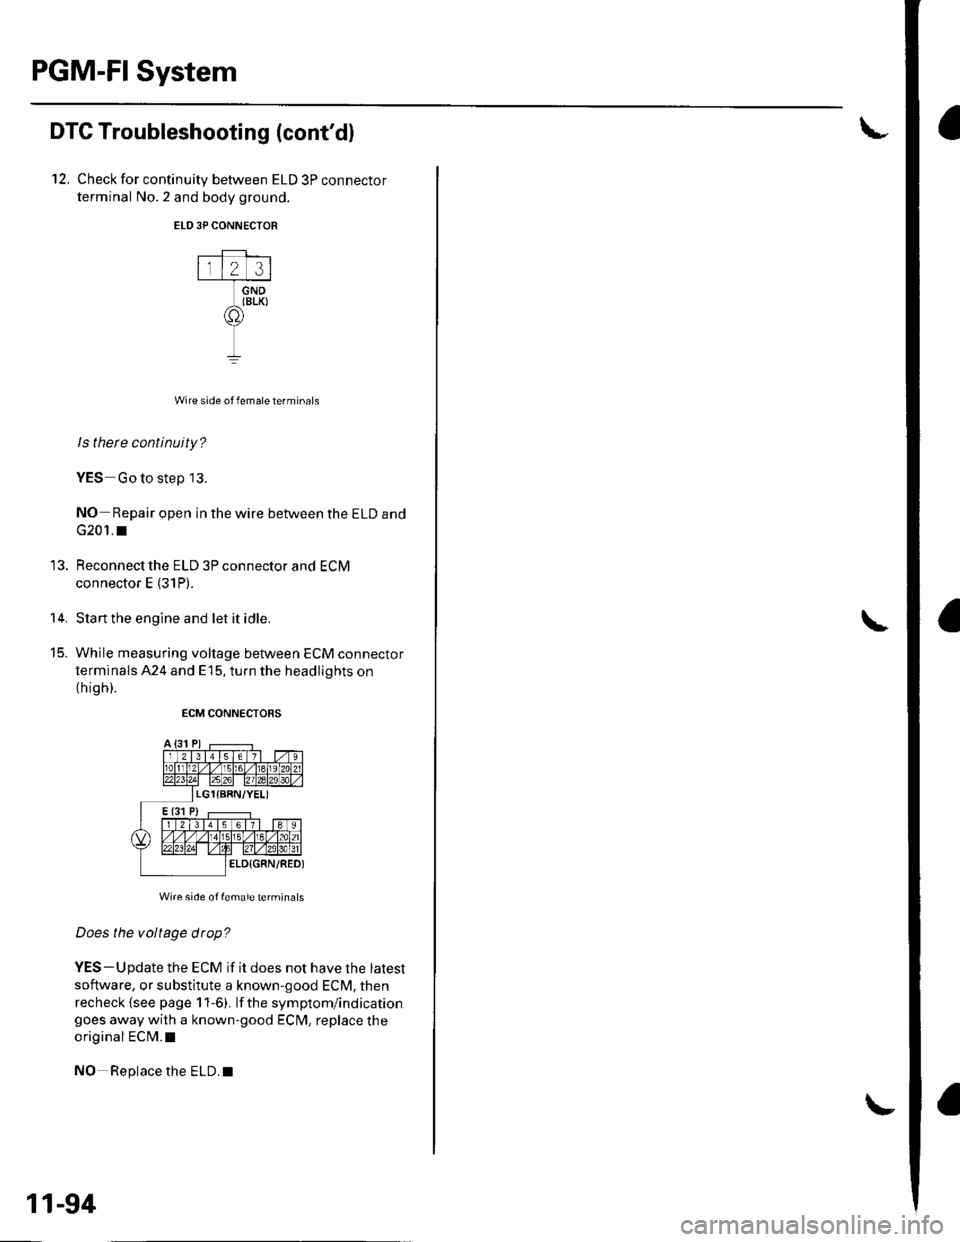
ELD3P CONNECTOR
Wire side of female terminals
ls there continuity?
YES Go to step 13.
NO- Repair open in the wire between the ELD and
G201. I
Reconnect the ELD 3P connector and ECM
connector E (31P).
Start the engine and let it idle.
While measuring voltage between ECM connector
terminals 424 and E15, turn the headlights on
th igh).
ECM CONNECTORS
Wi.e side of female terminals
Does the voltage drop?
YES-Update the ECM if it does not have the latest
software, or substitute a known-good ECM, then
recheck {see page 1 1-6). lf the symptom/indicationgoes away with a known-good ECM, replace the
original ECM.I
NO Replace the ELD.I
14.
t5_
11-94
Page 304 of 1139
MIL Circuit Troubleshooting
1. Connect an OBD ll scan tool/Honda PGM Tester
(see page 11-3).
2. Turn the ignition switch ON (ll) and read the OBD ll
scan tool/Honda PGM Tester.
Does the OBD ll scan tool/Honda PGM Tester
communicate with the ECM?
YES Go to step 3.
NO Go to troubleshooting " DLC Circuit
Troubleshooting" (see page 11-109).
3. Check the OBD ll scan tool/Honda PGM Testerfor
DTCs.
Are any DTCs ind icated?
YES Go to the DTC Troubleshooting Index.
NO-Go to step 4.
4. Turn the ignition switch OFF.
5. Turn the ignition switch ON (ll)and watch the
lMalfunction Indicator Lamp (MlL).
Does the MIL come on and stay on for more than
20 seconds aftet turning the ignition switch
oN (tr)?
YES lf the MIL always comes on and stays on, go
to step 76. But if the lMlL sometimes works
normally, first check for these problems.
. An intermittent short in the wire between the
ECIM (E29) and the data link connector (DLC).
. An intermittent short in the wire between the
ECM (E31) and the gauge assembly.
NO lf the MIL is always off, go to step 6. But if the
lvllL sometimes works normally, first check for
these problems.
. A loose No. 10 METER (7.5A) fuse in the under
dash fuse/relay box.. A loose No. 20 lG (40A) (Canada: 50A)Iuse in the
under-hood fuse/relay box.. A ioose No. 6 ECU (ECM) (15A) fuse in the under-
hood fuse/relay box.
. A loose No. 17 FUEL PUMP (15A)fuse in the
under-dash fuse/relay box.. A poor connection at ECM terminal E31.. An intermittent open in the GRN/ORN wire
between the ECM (E31) and the gauge assembly.. An intermittent short in the wire between the
ECM (A21) and the manifold absolute pressure
(MAP) sensor.. An intermittent short in the wire between the
ECI\4 (A20) and the throttle posilion (TPi sensor.. An intermittent short in the wire between the
ECM (E5) and the fuel tank pressure (FTP) sensor.
6. Turn the ignition switch OFF.
7. Turn the ignition switch ON (ll).
ls the low oil pressure light on?
YES Go to step 10.
NO-Go to step 8.
8. Inspectthe No. 10 l\4ETER (7.5A)fuse inthe under-
dash fuse/relay box.
ls the luse OK?
YES Go to step L
NO Repair shon in the wire between No. 10
METER (7.5A)fuse and the gauge assembly. Also
replacethe No. 10 METER {7.5A) fuse.l
9. Inspect the No. 20 lG1 (40A) (Canada: 50A) fuse in
the under-hood fuse/relay box.
ls the f use OK?
YES Repair open in the wire between the No. 20
lG (40A) {Canadar 50A)fuse and the gauge
assembly. lf the wire is OK, test the ignition switch
{see page 22 53).
NO Repair short in the wire between No. 20 lG
(40A) lCanada: 50A)fuse and the under'dash fusel
relay box. Also replace the No.20 lG (40Ai
(Canada: 50A) fuse.I
(conr'd)
11-97
Page 326 of 1139
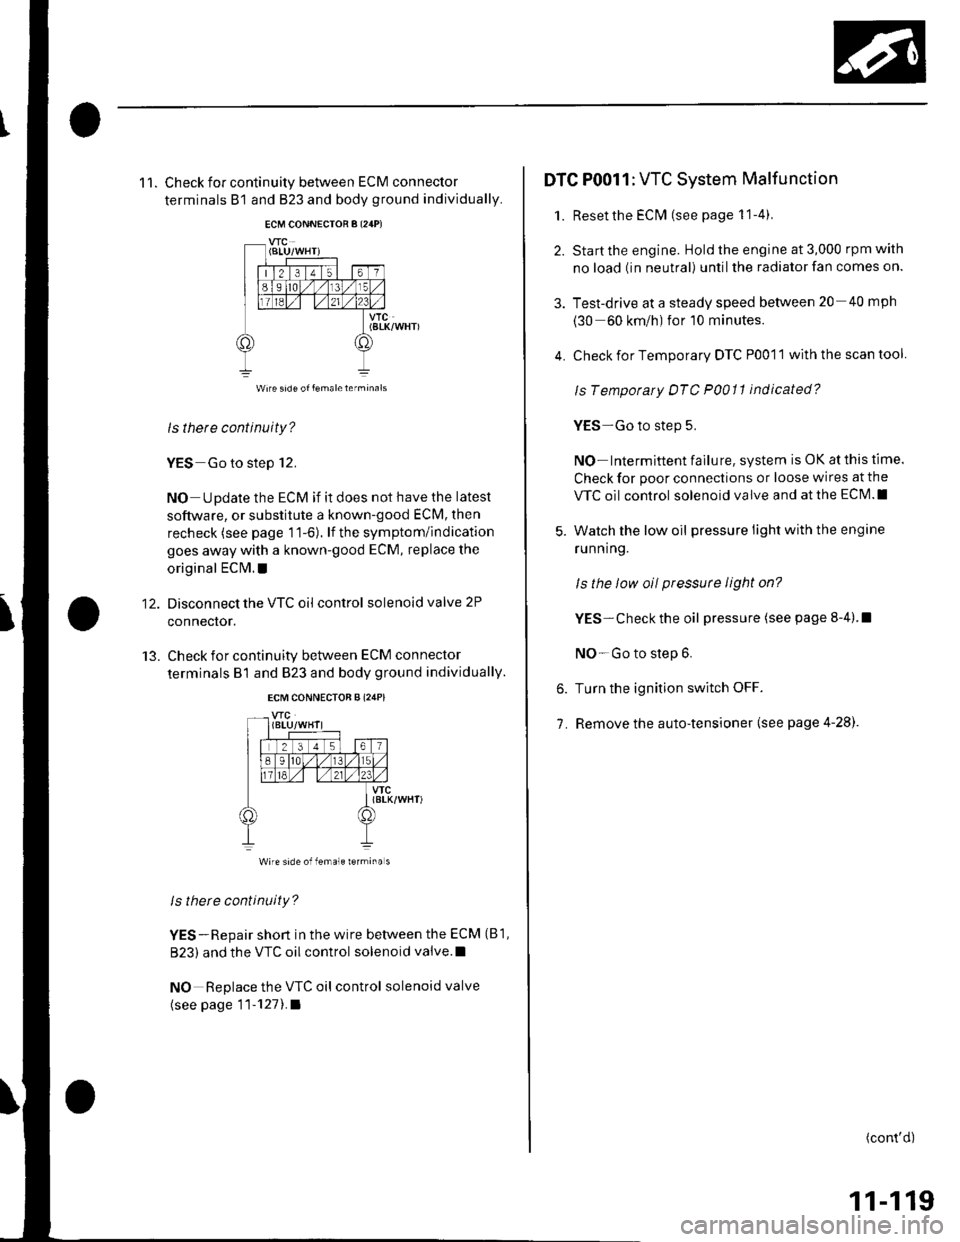
11. Check for continuity between ECM connector
terminals B1 and B23 and body ground individually.
VTC(BtK/WHT)
ls there continuity?
YES Go to step 12.
NO Update the ECM if it does not have the latest
software, or substitute a known-good ECM, then
recheck (see page 11-6). lf the symptom/indication
goes away with a known-good ECM, replace the
original EClvl. !
Disconnect the VTC oil control solenoid valve 2P
connector.
Check for continuity between ECM connector
terminals B1 and 823 and body ground individually.
12.
13.
vfc(8LK/WHT)
Wire side of female rermina s
ls there continuity?
YES-Repair short in the wire between the ECM (B1,
B23) and the VTC oil control solenoid valve.l
NO Replace the VTC oil control solenoid valve
(see page 11-1211.a
4.
DTC P0011: VTC System Malfunction
1. Reset the EClvl (see page 1 1-4).
2. Start the engine. Hold the engine at 3,000 rpm with
no load (in neutral) until the radiator fan comes on.
3. Test-drive at a steady speed between 20 40 mph
(30 60 km/h) for 10 minutes.
Check for Temporary DTC P0011 with the scan tool
ls Tempotaty DTC P0011 indicated?
YES-Go to step 5.
NO- Intermittent failu re, system is OK at this time.
Check for poor connections or loose wires at the
VTC oil control solenoid valve and at the ECM.I
Watch the low oil pressure light with the engine
ru n n ing.
ls the low oil pressute light on?
YES- Check the oil pressure (see page 8-4).I
NO-Go to step 6.
Turn the ignition switch OFF.
Remove the auto-tensioner (see page 4-28).
6.
7.
(cont'd)
11-119
Page 337 of 1139
ldle Control System
DTC Troubleshooting
DTC P0505: ldle Control System Malfunction
NOTE: lf DTC P1519 is stored atthe same time as DTC
P0505, troubleshoot DTC P1519 first, then recheck for
DTC P0505.
1. Start the engine. Hold the engine at 3,000 rpm with
no load (in neutral) until the radiator fan comes on,
then let it idle,
2. Checkthe engine speed at idle with no,load
conditions: headlights, blower fan, rear defogger,
radiator fan, and air conditioner off.
Is the engine running at 750t50 rpm?
YES - Intermittent failure, system is OK at this
trme.I
NO lf the idle speed is less than 700 rpm, go to
step 3; if it's 800 rpm or higher, go to step 4.
3. Disconnect the idle air control {lAC) valve3P
connector.
Does the engine speed increase or fluctuate?
YES- Check the idle speed {see page 1 1-138). lf the
idle will not adjust properly, clean the passage in
the throttle body, and then adjust the idle. I
NO- Replace the IAC valve.I
4. Turn the ignition switch OFF.
5. Remove the intake air duct from the throttle body.
6. Start the engine, and let it idle.
11-130
(
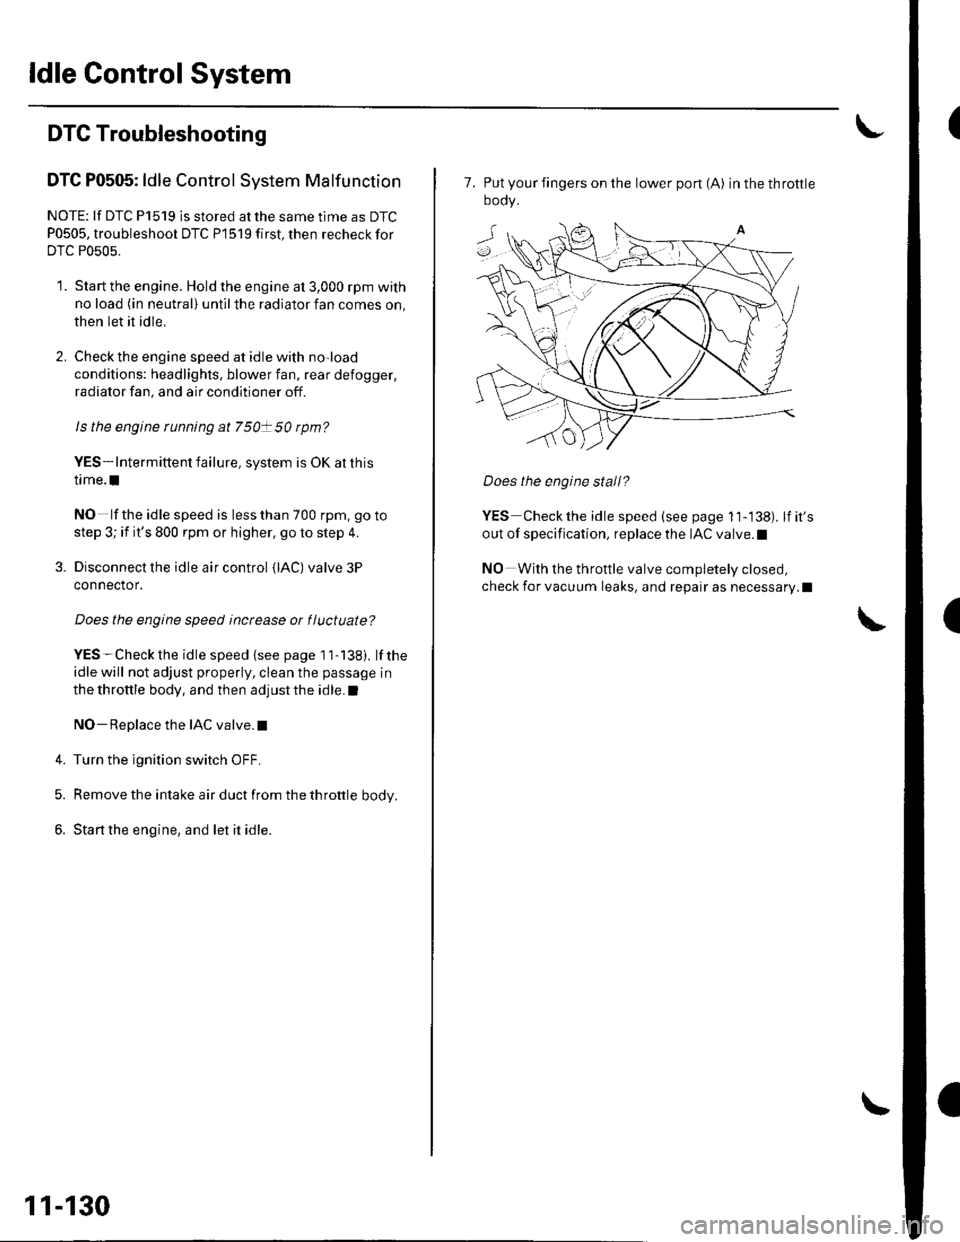
7. Put your fingers on the lower pon (A) inthethrottle
oooy.
Does the engine stall?
YES Checkthe idle speed (see page 11-138). lfit's
out of specification, replace the IAC valve.l
NO With the throttle valve completely closed,
check for vacuum leaks, and repair as necessary.l
Page 341 of 1139
ldle Gontrol System
't.
Alternator FR Signal Circuit Troubleshooting
Disconnect the alternator 4P connector from the
alternalor.
Turn the ignition switch ON {ll).
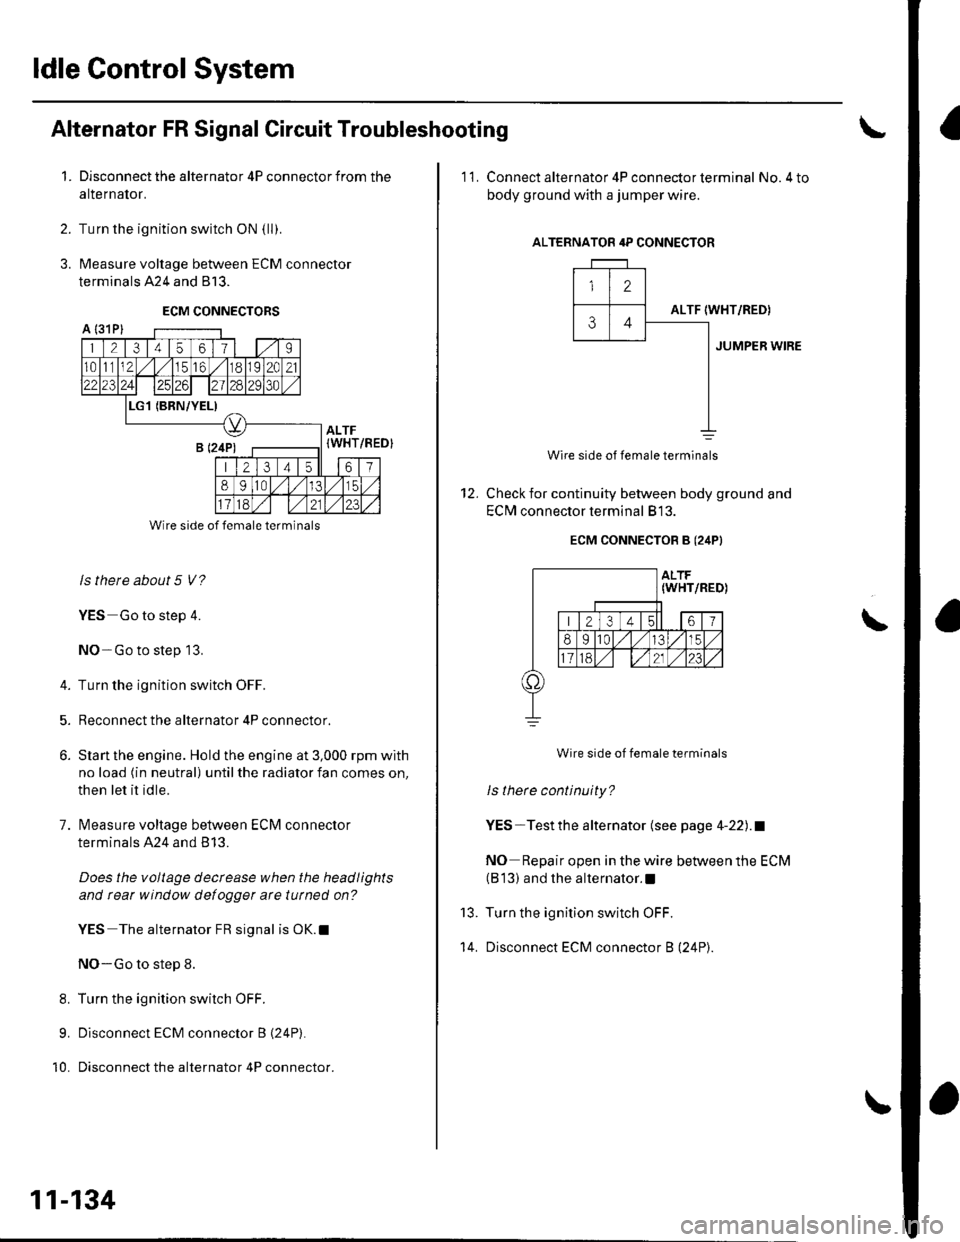
Measure voltage between ECM connector
terminals 424 and 813.
ECM CONNECTORS
2.
3.
A l31Pl
1 21345611 | 1.,'I
1011112,/56,/r8119l2C21
2312428129130
L(BRN/YEL)
ALTF(WHT
213 4t561
89ltal,/l/15
Wire side of female terminals
ls there about 5 V?
YES Go to step 4.
NO-Go to step 13.
4. Turn the ignition switch OFF.
5. Reconnect the alternator 4P connector.
6. Slan the engine. Hold the engine at 3,000 rpm with
no load (in neutral) until the radiator fan comes on,
then let it idle.
7. lvleasure voltage between ECM connector
terminals A24 and B 13.
Does the voltage decrease when the headlights
and rear window defogger arc tutned on?
YES The alternator FR signal is OK.l
NO-Go to step 8.
8. Turn the ignition switch OFF.
9. Disconnect ECM connector B (24P).
10. Disconnect the alternator 4P connector.
/REDI
11-134
'11. Connect alternator 4P con necto r term inal No.4 to
body ground with a jumper wire.
ALTERNATOR 4P CONNECTOR
12
ALTF34IWHT/RED)
JUMPER WIRE
12.
Wire side of female terminals
Check for continuity between body ground and
EClvl connector terminal 813.
ECM CONNECTOB B (24PI
Wire side of female terminals
ls there continuity?
YES-Testthe alternator (see page 4-22).1
NO Repair open in the wire between the ECM(B 13) and the alternator.l
Turn the ignition switch OFF.
Disconnect ECM connector B (24P).
\
13.
't 4.
Page 344 of 1139
Brake Pedal Position Switch Signal Circuit Troubleshooting
1. Check the brake lights.
Are the brake lights on without pressing the brakepedal?
YES Inspectthe brake pedal position switch(see page 19-6).I
NO Go to step 2.
2. Press the brake pedal.
Do the brake lights come on?
YES-Go to step 3.
NO Go to step 4.
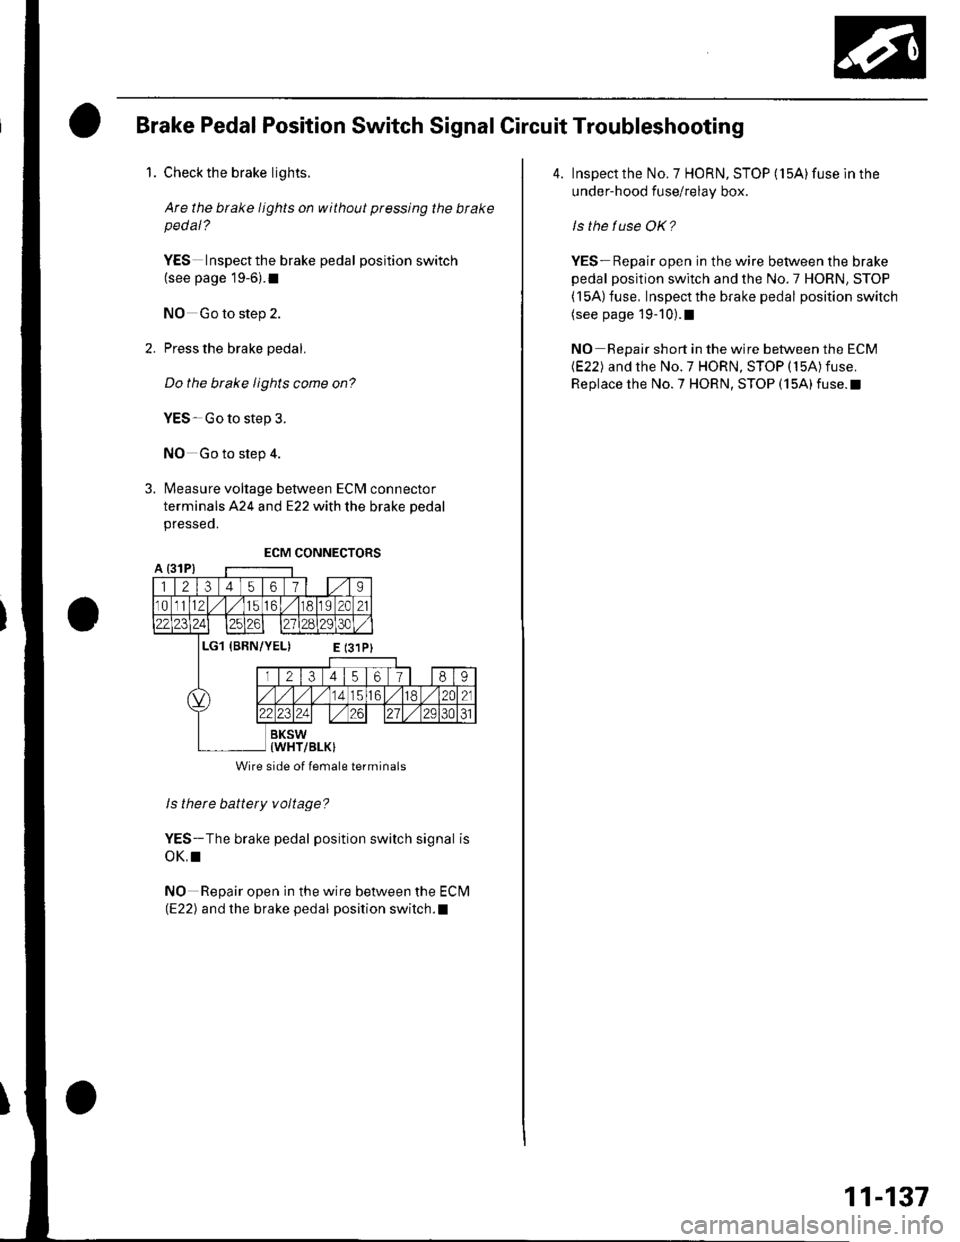
3. Measure voltage between ECM connector
terminals A24 and E22 with the brake pedal
presseo.
ls there battery voltage?
YES-The brake pedal position switch signal is
oK,I
NO Repair open in the wire between the Eclvl(E22) and the brake pedal position switch.l
Wire side of lemale terminals
4. Inspect the No. 7 HORN, STOP (15A) fuse ln the
under-hood fuse/relay box.
ls the tuse OK?
YES- Repair open in the wire between the brake
pedal position switch and the No.7 HORN, STOP( l5A) fuse, Inspect the brake pedal position switch(see page 19-10).1
NO Repair short in the wire between the ECM(E22) and the No.7 HORN, STOP (15A)fuse.
Replace the No.7 HORN, STOP (15A)fuse.t
11-137
Page 345 of 1139
ldle Control System
ldle Speed lnspection
NOTE:' Leave the idle air control (lAC) valve connecled.. Before checking the idle speed, check these items:- The malfunction indicator lamp (MlL) has not been
reported on.- lgnition timing- Spark plugs- Air cleaner- PCV system. Pullthe parking brake lever up. Start the engine, and
make sure the headlights are off.
1. Disconnect the evaporative emission (EVAP)
canister purge valve 2P connector.
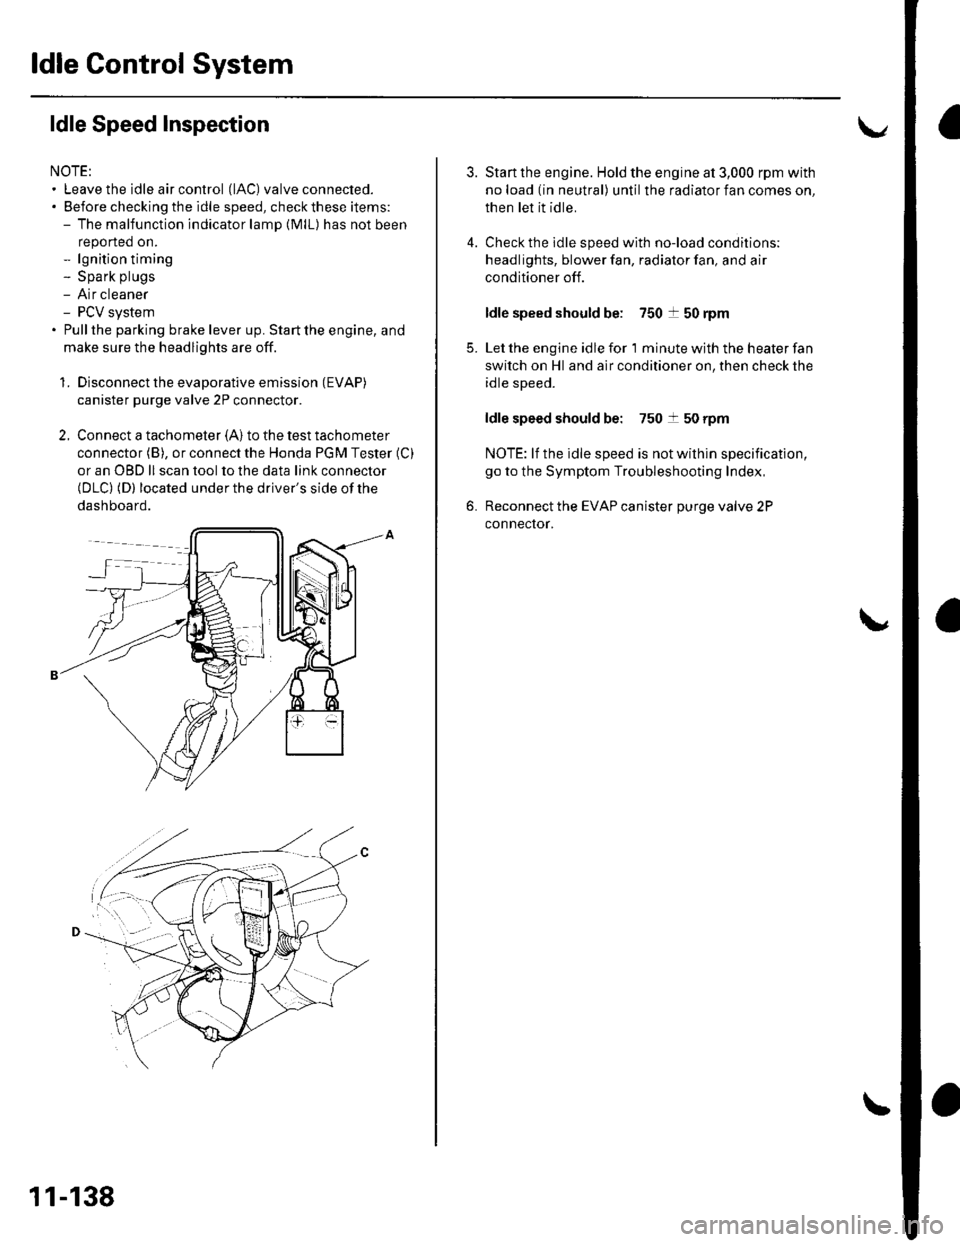
2. Connect a tachometer (A)to the test tachometer
connector (B), or connect the Honda PGM Tester (C)
or an OBD ll scan tool to the data link connector(DLC) (D) located under the driver's side of the
dashboard.
11-138
4.
3.
5.
6.
Start the engine. Hold the engine at 3,000 rpm with
no load (in neutral) until the radiator fan comes on,
then let it idle.
Check the idle speed with no-load conditions;
headlights, blower fan, radiator fan, and air
conditioner off.
ldle speed should be: 750 t 50 rpm
Let the engine idle for 1 minute with the heater fan
switch on Hl and air conditioner on, then check the
idle speed.
ldle speed should be: 750 t 50 rpm
NOTE: lf the idle speed is not wilhin specification,
go to the Symptom Troubleshooting Index,
Reconnect the EVAP canister purge valve 2P
connector.
Page 376 of 1139
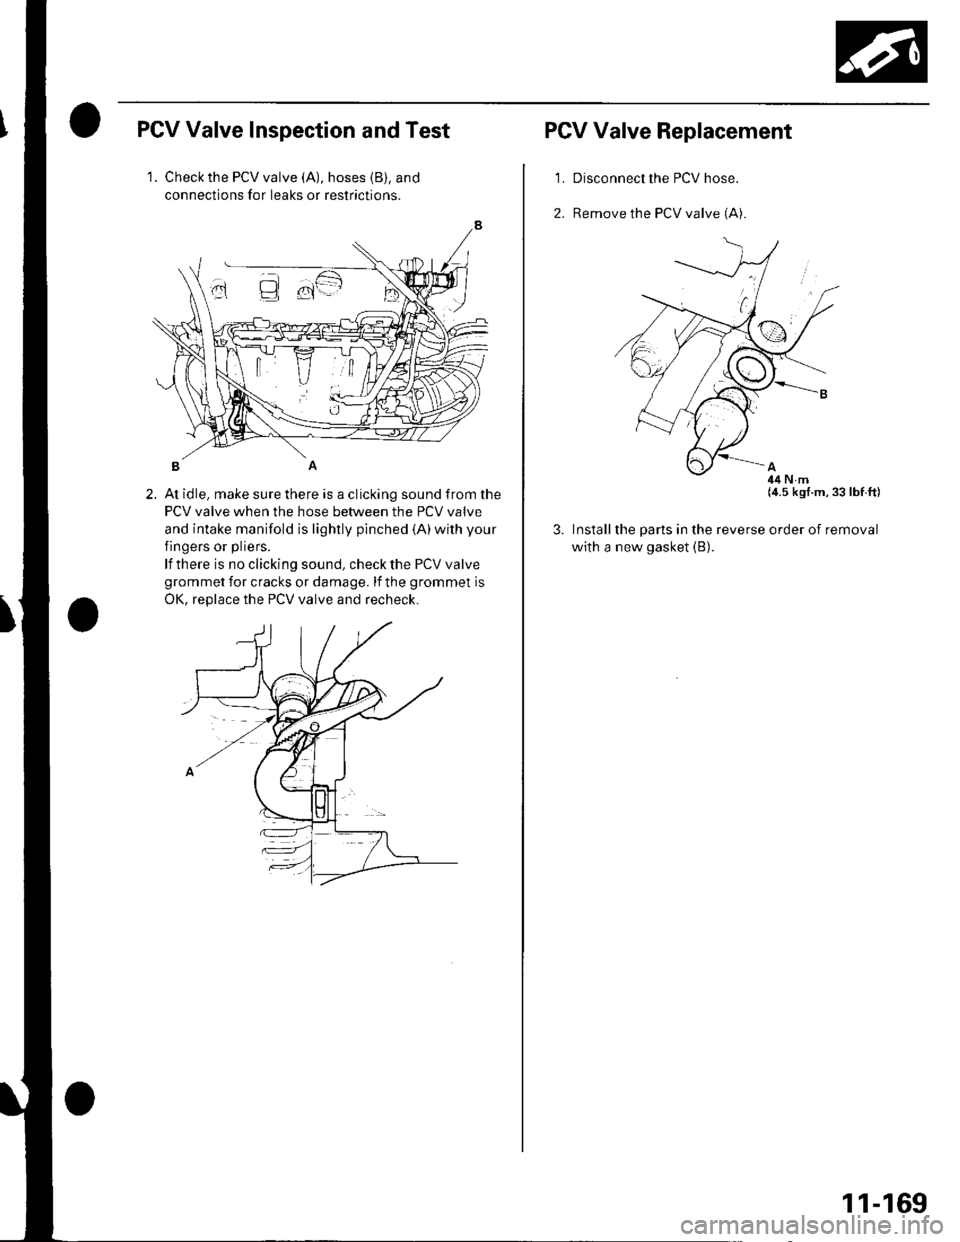
PCV Valve Inspection and Test
2.
1. Check the PCV valve (A), hoses {B), and
connections for leaks or restrictions.
At idle, make sure there is a clicking sound from the
PCV valve when the hose between the PCV valve
and intake manifold is lightly pinched {A)with your
fingers or pliers.
lf there is no clicking sound, check the PCV valve
grommet for cracks or damage. lf the grommet is
OK. reDlace the PCV valve and recheck.
PCV Valve Replacement
'LDisconnect the PCV hose.
Remove the PCV valve (A).
3. Install
with a
(4.5 kgf.m,33 lbf.ft)
the parts in the reverse order of removal
new gasket (B).
11-169
Page 382 of 1139
DTC Pl456: EVAP Control(Fuel Tank Svstem)
System Leakage
The fuel system is designed to allow specified
maximum vacuum and pressure conditions. Do not
deviate from the vacuum and pressure tests as
indicated in these procedures. Excessive pressure/
vacuum would damage the EVAP components or cause
eventual fuel tank failure.
Special Tools Required
Vacuum Pump/Gauge, 0-30 in. Hg A973X-041-XXXXX
This is a two-trip code. Once cleared, it cannot be
reproduced in one trip. Also, cenain specific driving
and ambient conditions must occur before the ECM will
complete the system checks. Additional test drives may
still not meet the specific conditions needed to
reproduce the code.
Follow these troubleshooting procedures carefully to
ensure the integrity of the system and to confirm the
cause of the problem or code.
NOTE: Fresh fuel has a higher volatility that createsgreater pressure/vacuum. The optimum condltlon for
testing is fresh fuel, and must be less than a full tank. lf
possible, to assist in leak detection, add 1 gallon of
fresh fuel to the tank (as long as it will not fill the tank).just before starting these procedures.
Fuel Fill Cap Check
1. Check the fuel fill cap (the cap must say "lf not
tightened 3 clicks check engine light may come
on" ).
ls the proper luel till cap installed and properly
tightened?
YES Go to step 2.
NO- Replace or tighten the cap.I
2. Check the fuel fill cap seal.
ls the tuel fill cap seal missing or damaged?
YES- Replace the fuel fill cap.I
NO The fuelfill cap is OK. Go to step 3.
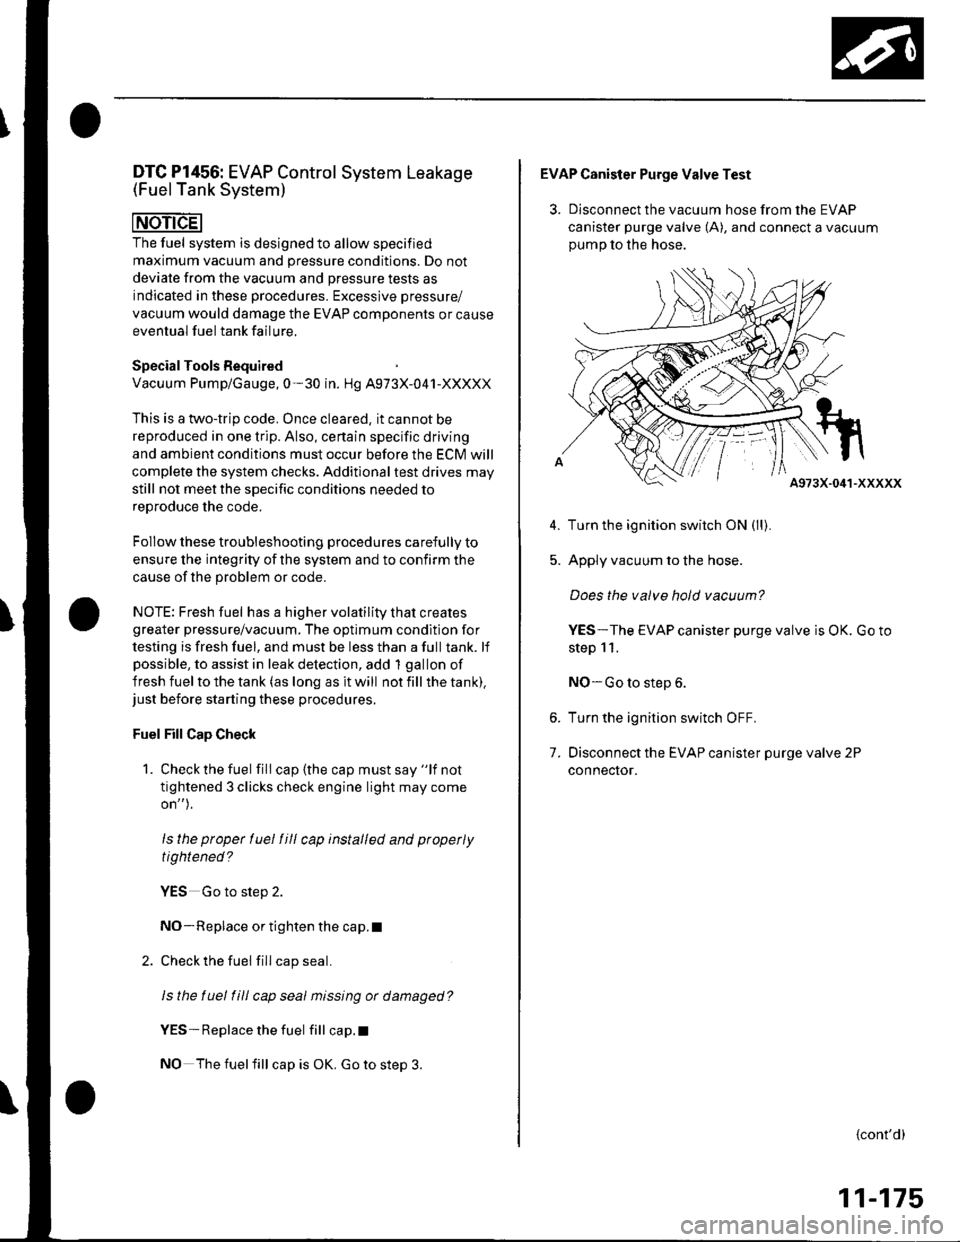
EVAP Canister Purge Valve Test
3. Disconnect the vacuum hose from the EVAP
canister purge valve (A), and connect a vacuum
oumo to the hose.
A973X-041-XXXXX
Turn the ignition switch ON (ll).
Apply vacuum to the hose.
Does the valve hold vacuum?
YES-The EVAP canister purge valve is OK. Go to
step 11.
NO-Go to step 6.
Turn the ignition switch OFF.
Disconnect the EVAP canister purge valve 2P
connecror.
5.
7.
{cont'd)
11-175