switch HONDA CIVIC 2003 7.G Workshop Manual
[x] Cancel search | Manufacturer: HONDA, Model Year: 2003, Model line: CIVIC, Model: HONDA CIVIC 2003 7.GPages: 1139, PDF Size: 28.19 MB
Page 976 of 1139
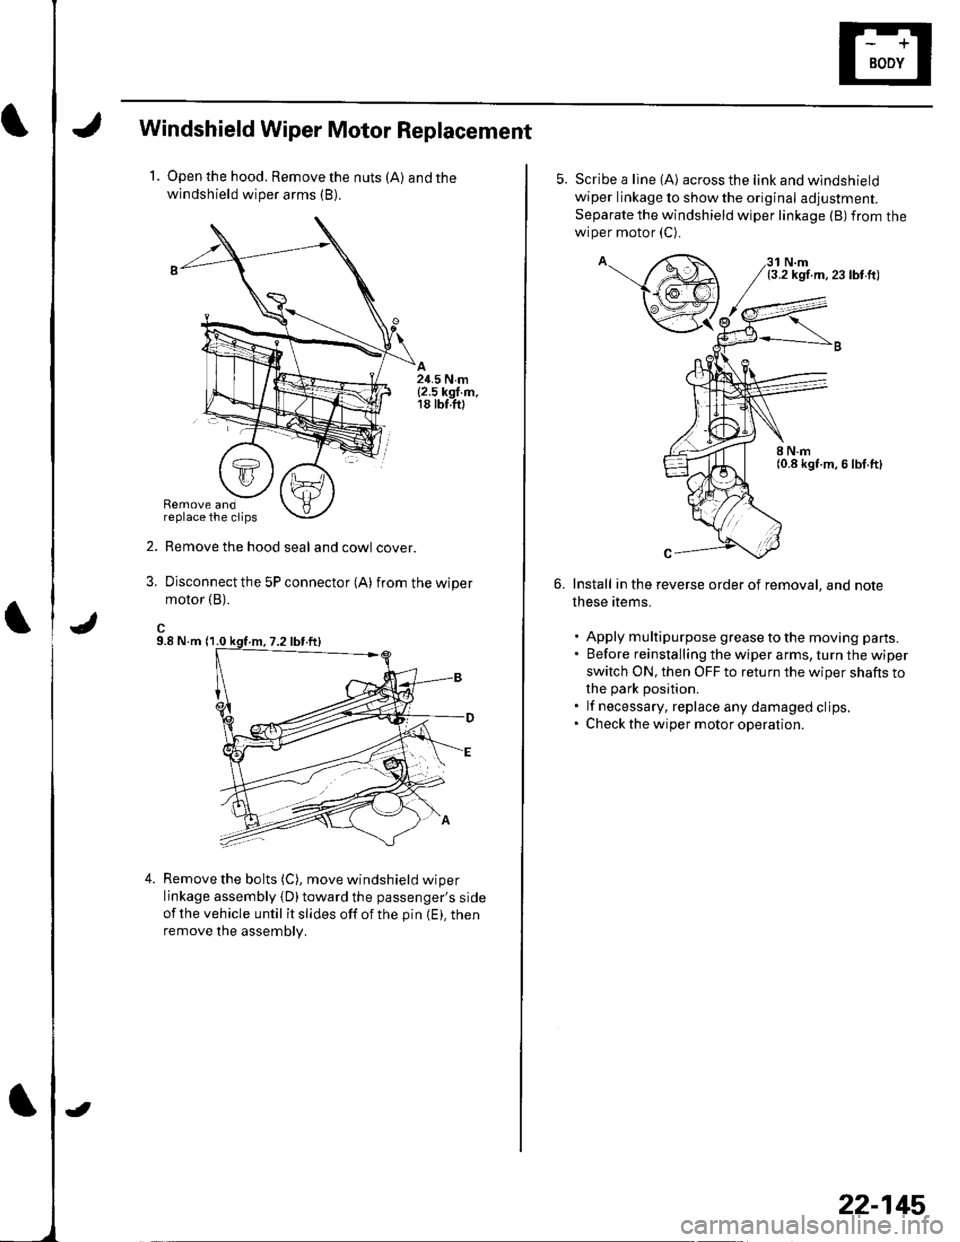
Windshield Wiper Motor Replacement
1.Open the hood. Remove the nuts (A) and the
windshield wiper arms (B).
Remove the hood seal and cowl cover.
Djsconnect the 5P connector (A) from the wiper
motor (B).
9.8 N.m (1.0
Remove the bolts (C), move windshield wiper
linkage assembly {D)toward the passenger's side
of the vehicle until it slides off of the pin (E), then
remove the assembly.
5. Scribe a line (A) across the link and wlndshield
wiper linkage to show the original adjustment.
Separate the windshield wiper linkage (B) from the
wiper motor (C).
N.m(3.2 ksf.m, 23 lbt.ft)
Install in the reverse order of removal, and note
lhese items.
Apply multipurpose grease to the moving parts.
Before reinstalling the wiper arms, turn the wiper
switch ON, then OFF to return the wiper shafts tothe oark oosition.
lf necessary, replace any damaged clips,
Check the wioer motor oDeration.
22-145
Page 977 of 1139
Wipers/Washers
Rear Window Wiper Motor
Replacement
1.
B
Open the hatch, and remove the hatch trim panel
(see page 20-53).
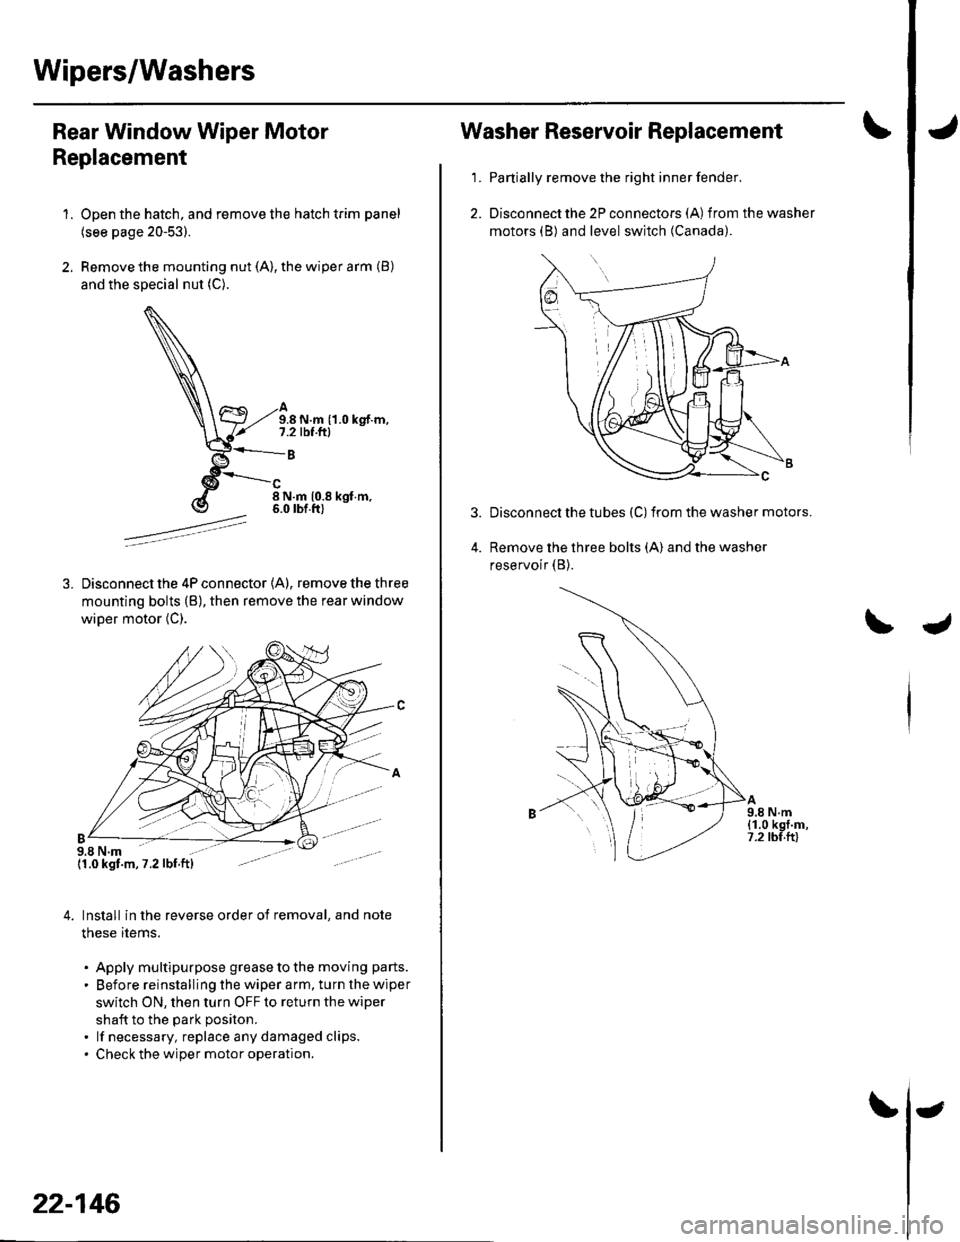
Remove the mounting nut (A), the wiper arm (B)
and the special nut (C).
A9.8 N.m {1.0 kgf.m,7.2 rbf.ftl
B
8 N.m 10.8 kgt.m,6.0 rbf.ft)
Disconnect the 4P connector {A), remove the three
mounting bolts (B), then remove the rear window
wiDer motor (C).
9.8 N.m{1.0 kgt.m,7.2lbf ftl
4,Install in the reverse order oI removal, and note
these items.
Apply multipurpose grease to the moving parts.
Before reinstalling the wiper arm, turn the wiper
switch ON, then turn OFF to return the wiper
shaft to the Dark oositon.
lf necessary, replace any damaged clips.
Check the wiDer motor operation.
22-146
-
Washer Reservoir Replacement
1.Partially remove the right inner fender.
Disconnect the 2P connectors (A) irom the washer
motors (B) and level switch (Canada).
3.Disconnecl the tubes (C) from the washer motors.
Remove the three bolts (A) and the washer
reservoir (B).
A9.8 N.m(1.0 kgt.m,7.2 tbf.tt)
Page 980 of 1139
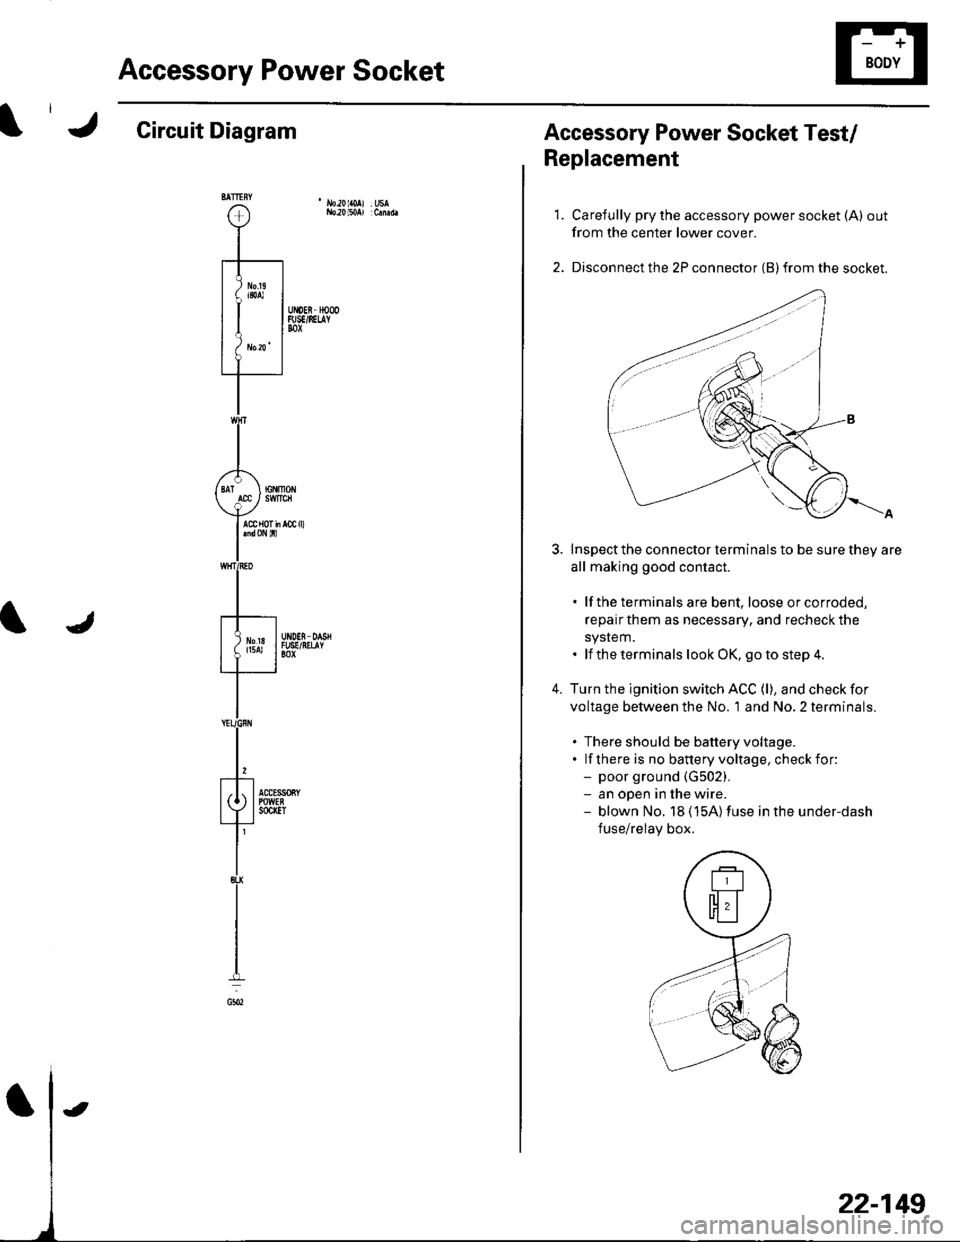
Accessory Power Socket
Circuit Diagram
22-149
Accessory Power Socket Test/
Replacement
1.
4.
Carefully pry the accessory power socket (A) out
from the center lower cover.
Disconnect the 2P connector (B) from the socket.
Inspect the connector terminals to be sure they are
all making good contact.
. lf the terminals are bent, loose orcorroded,
repairthem as necessary, and recheck the
system.. lf the terminals look OK, go to step 4.
Turn the ignition switch ACC (l), and check for
voltage between the No. 'l and No. 2 terminals.
. There should be battery voltage.. lf there is no banery voltage, checkfor:- poor ground {G502).- an open in the wire.- blown No. 18 (15A)fuse in the under-dash
fuse/relay box.
Page 981 of 1139
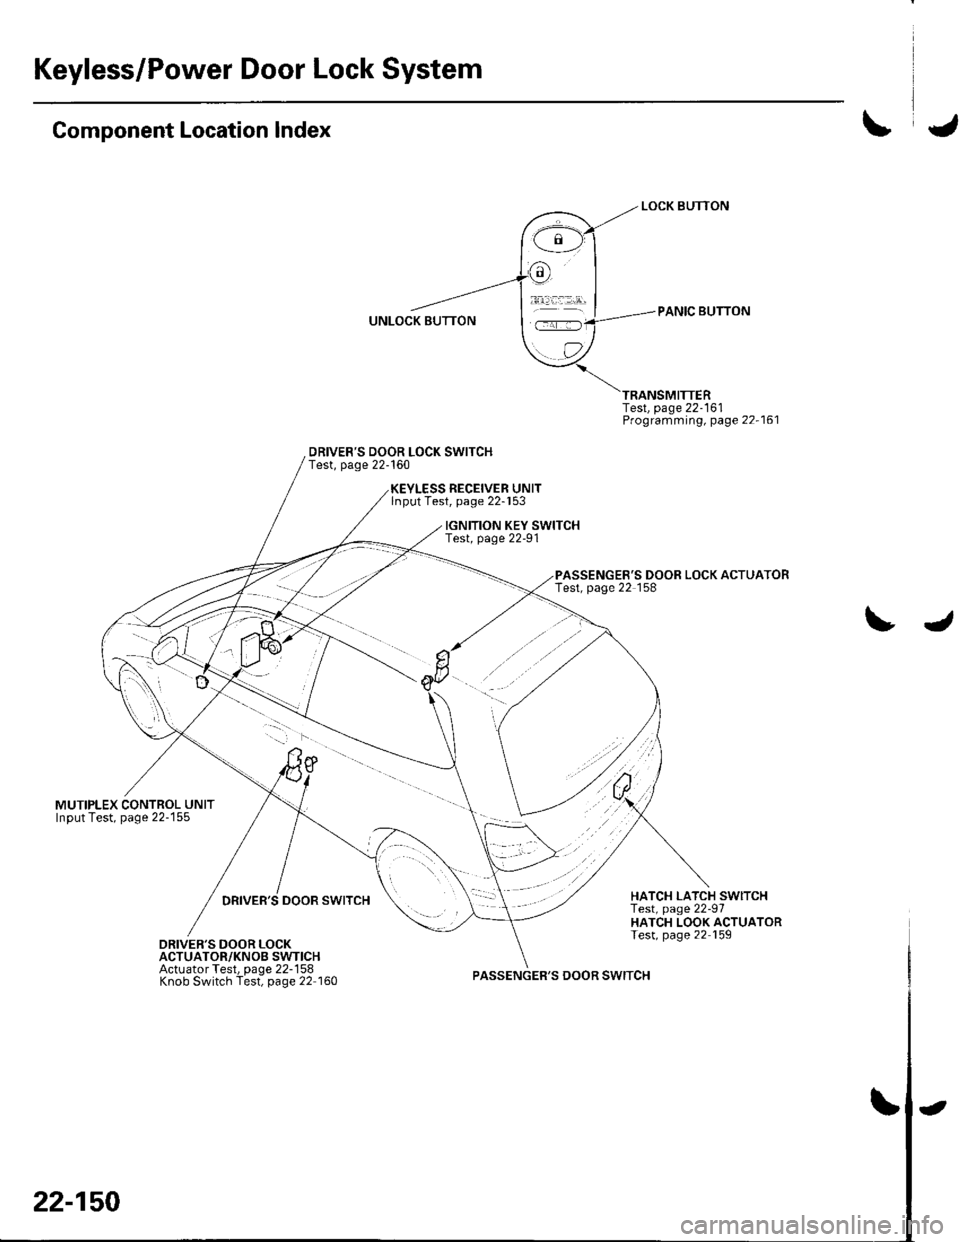
Keyless/Power Door Lock System
Component Location Index
MUTIPLEX CONTROL UNITInput Test, page 22-155
DRIVER'S DOOR LOCK SWITCHTest, page 22-160
Test, page 22-161Programming, page 22-161
PASSENGER'S DOOR LOCK ACTUATORTest, page 22 158
RECEIVER UNITlnput Test, page 22-153
IGNITION KEY SWITCHTest, page 22-91
DRIVER'S DOOR SWITCHHATCH LATCH SWITCHTest, page 22-97HATCH LOOK ACTUATORTest, page 22 159DRIVER'S DOOR LOCKACTUATOR/KNOB SWTICHActuator Test, page 22-158Knob Switch Test, page 22 160PASSENGER'S DOOR SWITCH
22-150
-
Page 983 of 1139
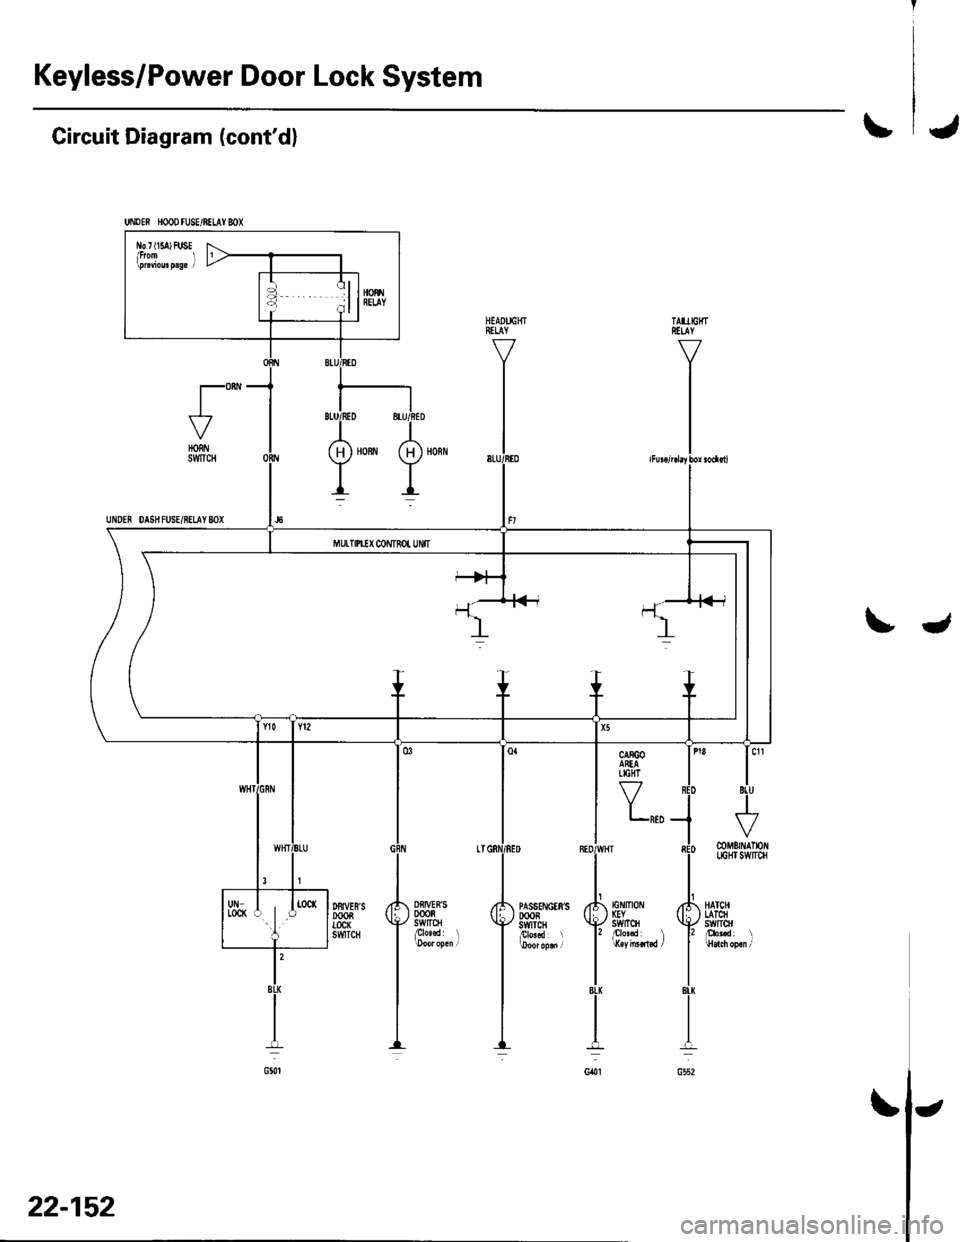
Keyless/Power Door Lock System
UNDEN HOOD FU8E/BELAY MX
l\b r t15a) FUSE
Circuit Diagram (cont'dl\J
t"-HORNSWTCH
UNDEN DAS}I FUSE/8ELAY 8OX
tJ
Y,,,
Df,IVEB'S0008swtrcHplo'.d l
DFIVES'SDOOBTOCK6WTCH
tG tltot IGYstvrTcH
mMErNAlloflLIGHI SWITCH
HATCHLATCHswlrol
22-152
\
Page 985 of 1139
Keyless/Power Door Lock System
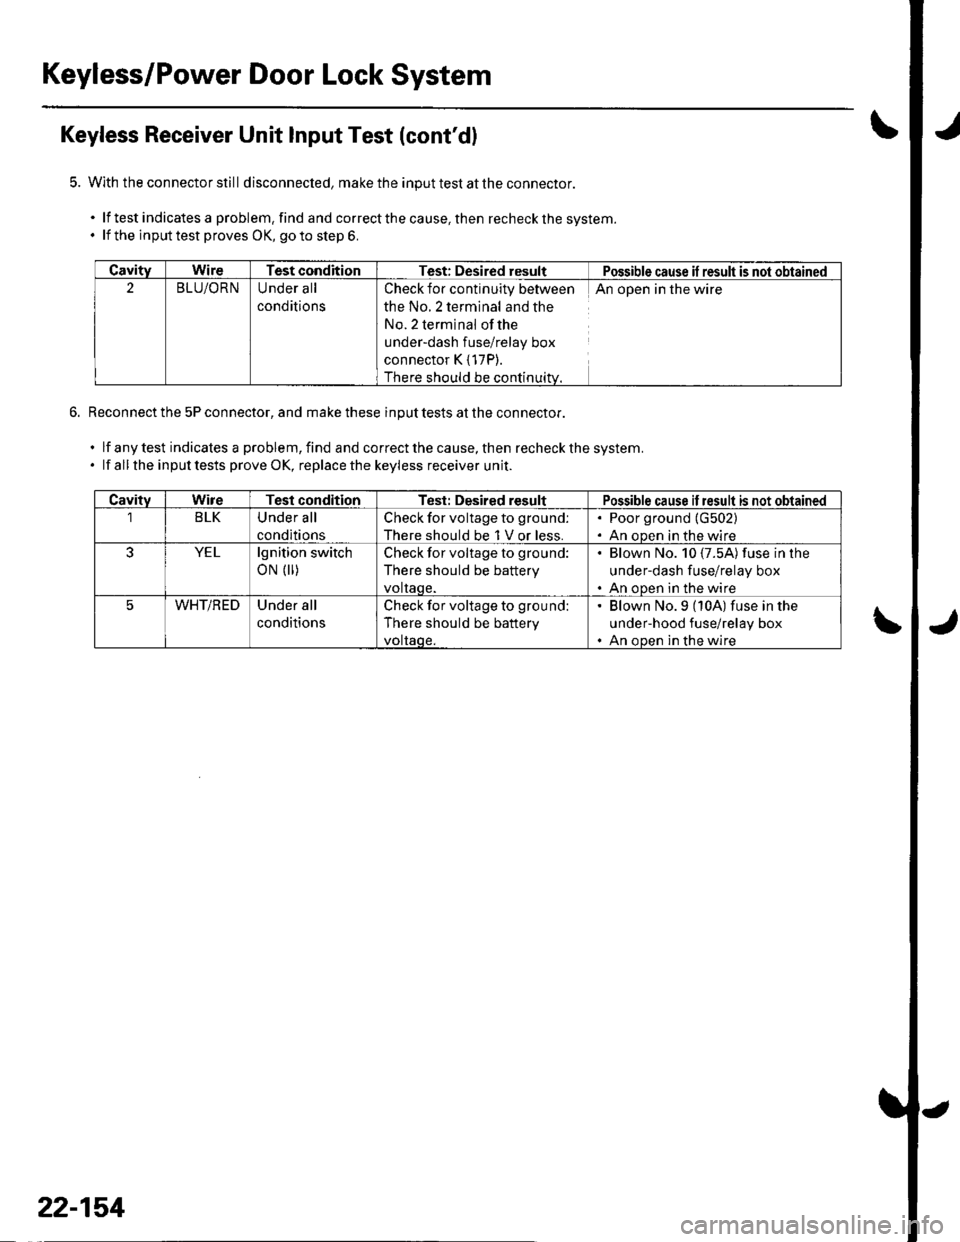
Keyless Receiver Unit Input Test (cont'dl
With the connector still disconnecled, make the input test at the connector.
.lftestindicatesaproblem,findandcorrectthecause,thenrecheckthesystem.
. lf the inputtest proves OK, goto step 6.
Reconnect the 5P connector, and make these input tests at the connector.
.lfanytestindicalesaproblem,findandcorrectthecause,thenrecheckthesystem.
. lf all the inputtests prove OK, replacethe keyless receiver unit.
CavityWireTest conditionTest: Desired resultPossible cause il result is not obtained
2BLU/ORNUnder all
conditions
Check for continuity between
the No.2 terminal and the
No. 2 terminal ofthe
under-dash fuse/relay box
connector K { 17P).
There should be continuitv.
An open in the wire
CavitvWireTest conditionTest: Desired resultPossible cause if result is not obtained
1BLKUnder all
conditions
Check for voltage to ground:
There should be 1 V or less.
. Poor ground (G502)
. An oDen in the wire
YELlgnition switch
oN (||)Check for voltage to ground:
There should be battery
voltaqe.
Blown No. 10 {7.5A) fuse in lhe
under-dash fuse/relay box
An ooen in the wire
WHT/REDUnder all
conditions
Check for voltage to ground:
There should be battery
voltaqe.
' Blown No.9 (10A) fuse in the
under-hood fuse/relay box. An ooen in the wire
22-154
Page 987 of 1139
Keyless/Power Door Lock System
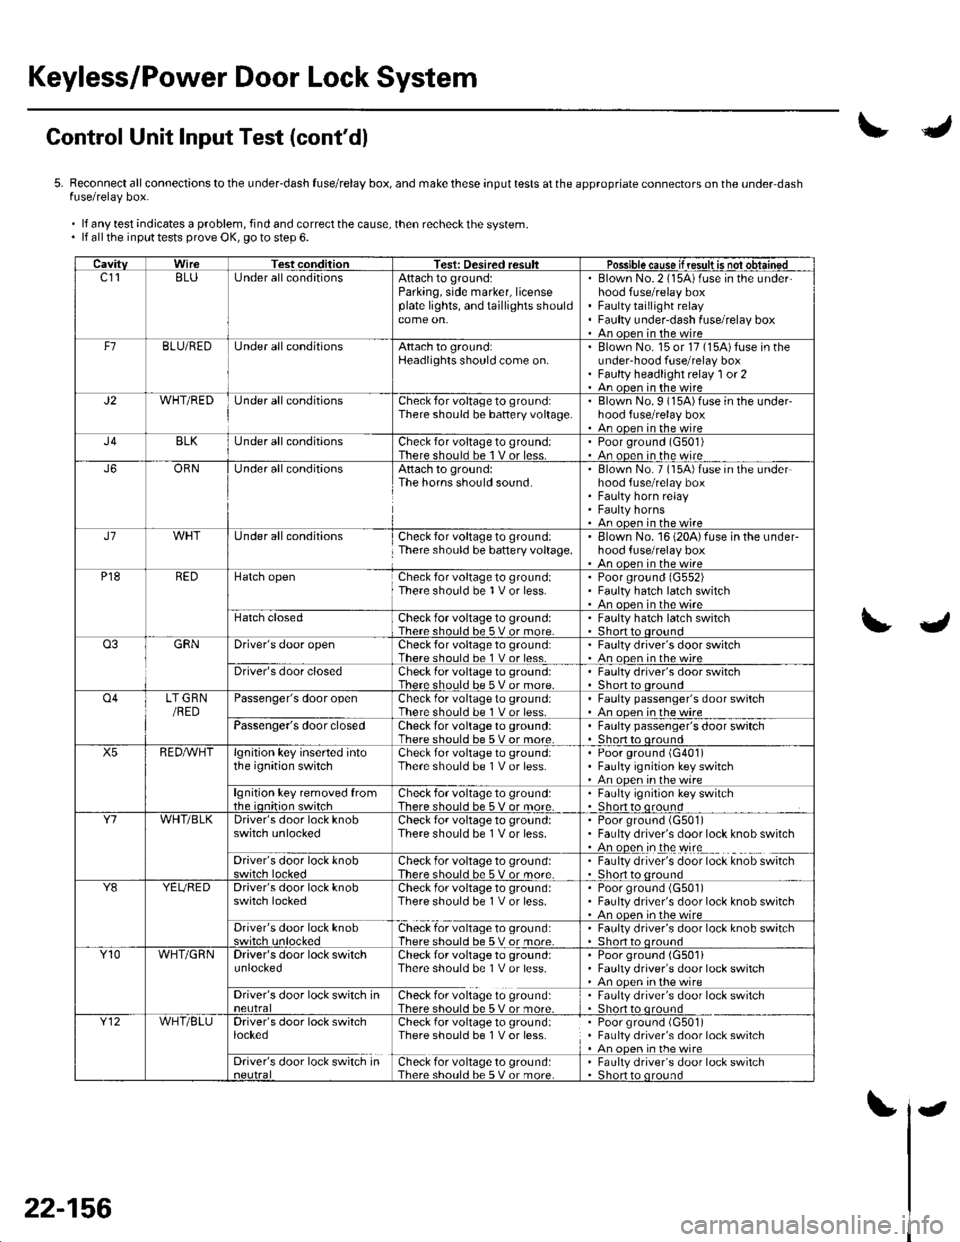
Control Unit Input Test (cont'dl
5. Reconnect all connections to the underdash fuse/relay box, and make these input tests at the appropriate connectors on the under-dashfuse/relay box.
'lfanytestindicatesaproblem,findandcorrectthecause,thenrecheckthesystem.. lf all the inputtests prove OK, goto step 6.
CavitvWireTest conditionTest: Desired resultPossible ca use if result is notobtainedc1'l8LUUnder all conditionsAftach to ground:Parking, side marker, licenseplate lights, and tajllights shouldcome on.
Blown No.2 (15A)fuse in the underhood fuse/relay boxFaulty taillight relayFaulty under-dash fuse/relay boxAn onen in rhc wireBLU/BEOUnder all conditionsAttach to ground:Headlights should come on.Blown No. 15 or 17 (15A)fuse in theunderhood fuse/relay boxFaulty headlight relay '1 or 2An ooen in the wireJ2WHT/REDUnder all conditionsCheck for voltage to ground:There should be battery voltage.Blown No.9 (15A)fuse in the under-hood fuse/relay boxAn oncn in thc wircBLKUnder all conditaonsCheck for voltage to ground:Thcre shouln hc 1 V or lpqsPoor ground (G501)An ooen in the wireJ6OBNUnder allconditionsAttach to ground:The horns should sound.Blown No. 7 (15A)fuse in the underhood fuse/relay boxFaulty horn relayFaulty hornsAn 6nen in rhe wireJ7Under all conditionsCheck for voltage to ground:There should be battery voltage.Elown No. 16 (20A)fuse in the underhood fuse/relay boxAn oocn in ihc wi.cP18BEDHatch openCheck for voltage to ground:There should be 1 V or less.Poor ground (G552)Faulty hatch latch switchAn oncn in rhc wirFHatch closedCheck for voltage to groundlThere shoul.l he 5 V or moreFaulty hatch latch switch
GBNDriver's door openCheck for voltage to g.ound:There should be 1 V or less. Faulty driver's door switch. An ooen in the wireDriver's door closedCheck for voltage to ground:There should be 5 V or more.Faulty driver's door switchShort to oroundo4LT GRN/REDPassenger's door openCheck for voltage to ground:There should be 1 V or less.Faulty passenger's door switchAn ooen inthewirePassenger's door closedCheck for voltage to groundlThere should be sVor more
. Faulty passenger's door switch. Short to oroundX5REDAVHTlgnition key inserted intothe ignition swhchCheck for voltage to ground:There should be 1 V or less.Poor ground {G401)Faulty ignition key switchAn ooen inthewirelgnition key removed fromrhe ionition switchCheck for voltage to ground:There should be 5 V or more.Faulty ignition key switchShort to oroundY1WHT/BLKDriver's door lock knobswitch unlockedCheck for voltage to groundlThere should be 1 V or less.Poorground (G50'l)Faulty driver's door lock knob switchAn open in the wireDriver's door lock knobCheck for voltage to groundlIhere should be 5 V or more.Faulty driver's door lock knob switchShort to oroundY8YEUREDDriver's door lock knobswitch lockedCheck for voltage to groundlThere should be 1 V or less.Poorground (G50'l)Faulty driver's door lock knob switchAn oncn inihewireDriver's door lock knobswitch unlockedCheck for voltage to ground:There should be 5Vor more' Faulty driver's door lock knob sw;tch. Shorr to oroundY10WHT/GRNDrtver's door lock switchunlockedCheck for voltage to groundlThere should be 1 V or less.Poorground (G501iFaulty driver's door lock switchAn ooen in the wireDriver's door lock switch inCheck for voltage to ground:Therc shorl.l be 5V or m6rpFaulty driver's door lock switchShort to o rolrndY12WHT/BLUDriver's door lock switchlockedCheck for voltage to ground:There should be 'l V or less.Poor ground (G501)Faulty driver's door lock switchAn oDen in the wireDriver's door lock switch inCheck tor voltage to ground:There should be 5Vor moreFaulty driver's door lock switch
22-156
J
Page 991 of 1139
Keyless/Power Door Lock System
1.
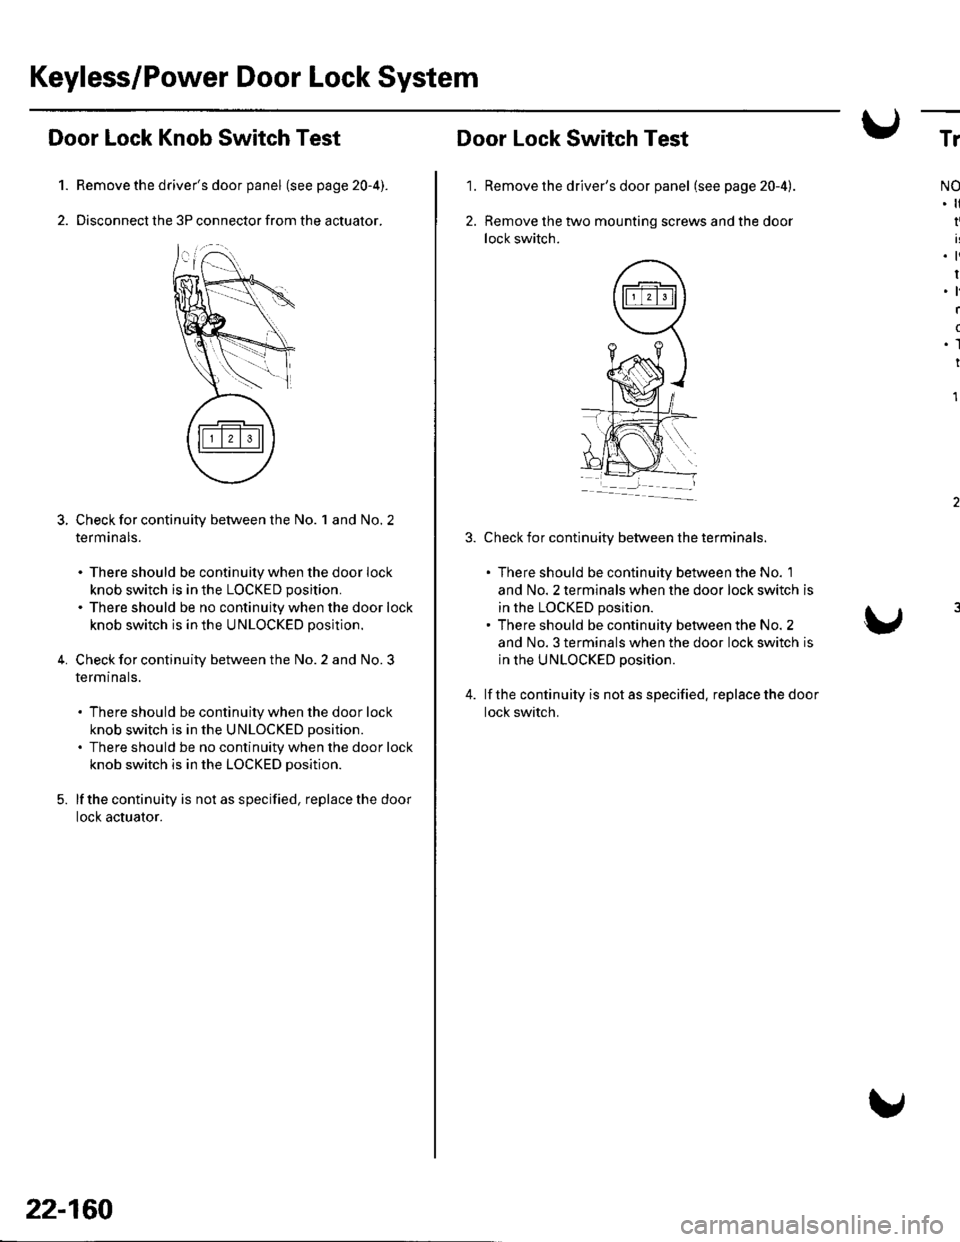
Door Lock Knob Switch Test
Remove the driver's door panel (see page 20-4).
Disconnect the 3P connector from the actuator.
Check for continuity between the No. 1 and No. 2
term ana ls.
. There should be continuity when the door lock
knob switch is in the LOCKED position.
. There should be no continuity when the door lock
knob switch is in the UNLOCKED position.
Check for continuity between the No. 2 and No. 3
termtnals.
. There should be continuity when the door lock
knob switch is in the UNLOCKED position.
. There should be no continuity when the door lock
knob switch is in the LOCKED position.
lf the continuity is not as specified, replace the door
locl( actuator.
5.
22-160
'1.
Door Lock Switch Test
Remove the driver's door panel (see page 20-4).
Remove the two mounting screws and the door
lock switch.
Check for continuity between the terminals.
. There should be continuity between the No. 1
and No. 2 terminals when the door lock switch is
in the LOCKED position.. There should be continuity between the No. 2
and No. 3 terminals when the door lock switch is
in the UNLOCKED position.
lf the continuity is not as specified. replace the door
lock switch.
Tr
NO
I
.ti
I.l
I
(
.1
I
1
Page 992 of 1139
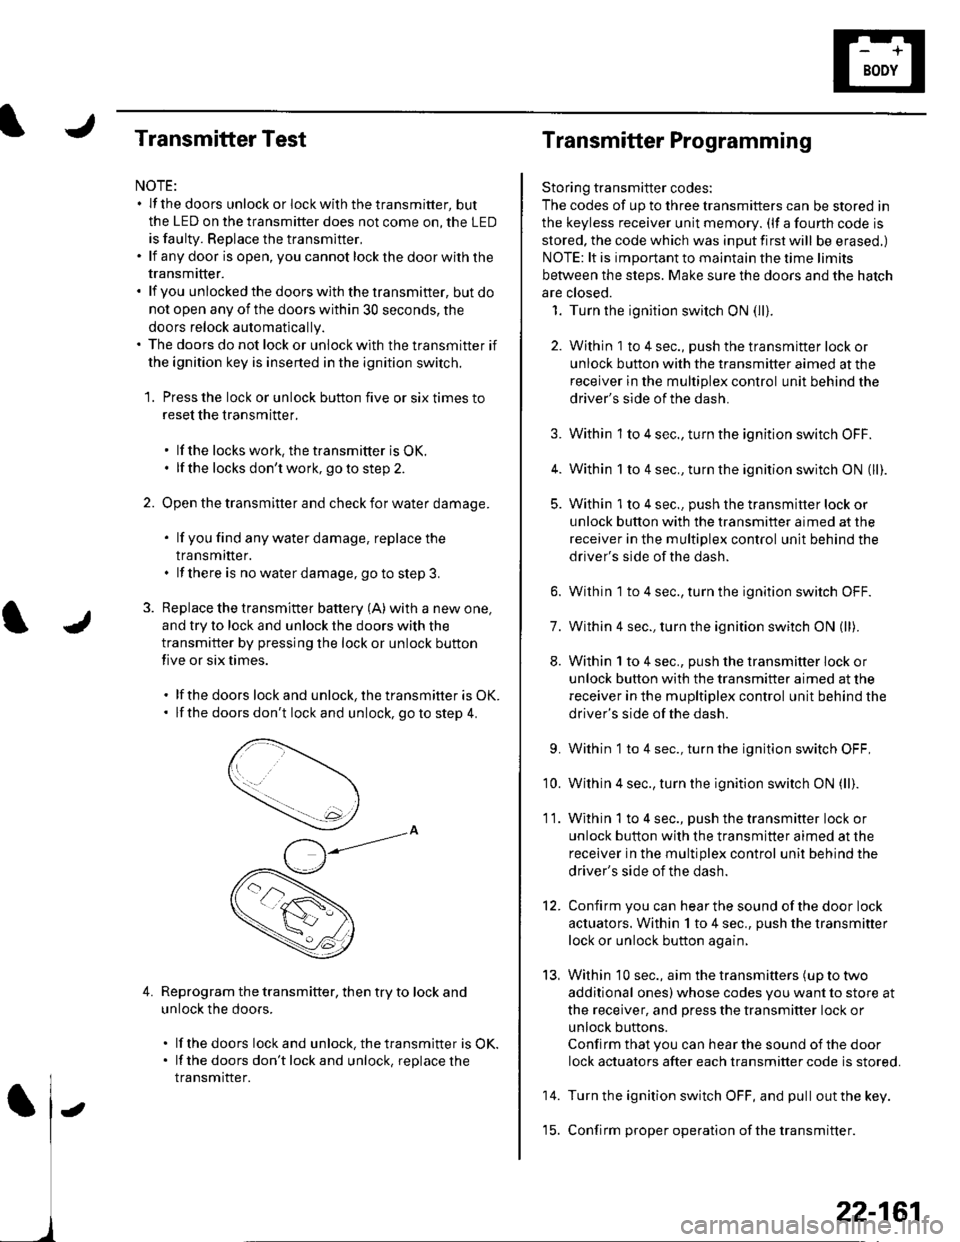
Transmitter Test
NOTE:. lf the doors unlockorlockwiththetransmitter, but
the LED on the transmitter does not come on, the LED
is faulty. Replace the transmitter,. lf anydoor isopen, you cannotlockthedoorwiththe
transmrtter.. lf you unlocked the doors with the transmitter, but do
not open any of the doors within 30 seconds, the
doors relock automatically.. The doors do not lock or unlock with the transmitter if
the ignition key is inserted in the ignition switch.
1. Press the lock or unlock button five or six times to
reset the transmitter.
. lf the locks work, the transmitter is OK.. lf the locks don't work, go to step 2.
2. Open the transmitter and check for water damage.
. lf you find any water damage, replace the
transmrtter.. lf there is no waterdamage, go to step 3.
3. Replace the transmitter battery (A) with a new one,
and try to lock and unlock the doors with the
transmitter by pressing the lock or unlock button
five or six times.
. lf the doors lock and unlock, the transmifter is OK.. lf the doors don't lock and unlock, go to step 4.
Reprogram the transmitter, then try to lock and
unlock the doors.
. lf thedoors lockand unlock.thetransmitter is OK.. lf the doors don'tlockand unlock, replacethe
transmitter.
4.
Transmitter Programming
Storing transmitter codes:
The codes of up to three transmitters can be stored in
the keyless receiver unit memory. (lf a fourth code is
stored. the code which was input first will be erased.)
NOTE: lt is important to maintain the time limits
between the steps. Make sure the doors and the hatch
are closed.
1. Turn the ignition switch ON (lli.
2. Within 1 to 4 sec., push the transmitter lock or
unlock button with the transmitter aimed at the
receiver in the multiplex control unit behind the
driver's side of the dash.
3. Within 1 to 4 sec., turn the ignition switch OFF.
4. Within 1 to 4 sec., turn the ignition switch ON (ll).
5. Within 'l to 4 sec., push the transmitter lock or
unlock button with the transmitter aimed at the
receiver in the multiplex control unit behind the
driver's side of the dash.
6. Within 1 to 4 sec., turn the ignition switch OFF.
7. Within 4 sec., turn the ignition switch ON (ll).
8. Within 1 to 4 sec., push the transmitter lock or
unlock button with the transmifter aimed at the
receiver in the mupltiplex control unit behind the
driver's side of the dash.
9. Within 1 to 4 sec., turn the ignition switch OFF,
'10. Within 4 sec., turn the ignition switch ON (ll).
11. Within 1 to 4 sec., push the transmitter lock or
unlock button with the transmitter aimed at the
receiver in the multiplex control unit behind the
driver's side of the dash.
12. Confirm you can hearthe sound ofthe door lock
actuators. Within 1 to 4 sec., push the transmitter
lock or unlock button again,
13, Within 10 sec., aim the transmitters (up to two
additional ones) whose codes you want to store at
the receiver, and press the transmitter lock or
unlock buttons.
Confirm that you can hear the sound of the door
lock actuators after each transmitter code is stored.
14. Turn the ignition switch OFF, and pull out the key.
'15. Confirm proper operation ofthe transmitter.
22-161
Page 994 of 1139
System Description
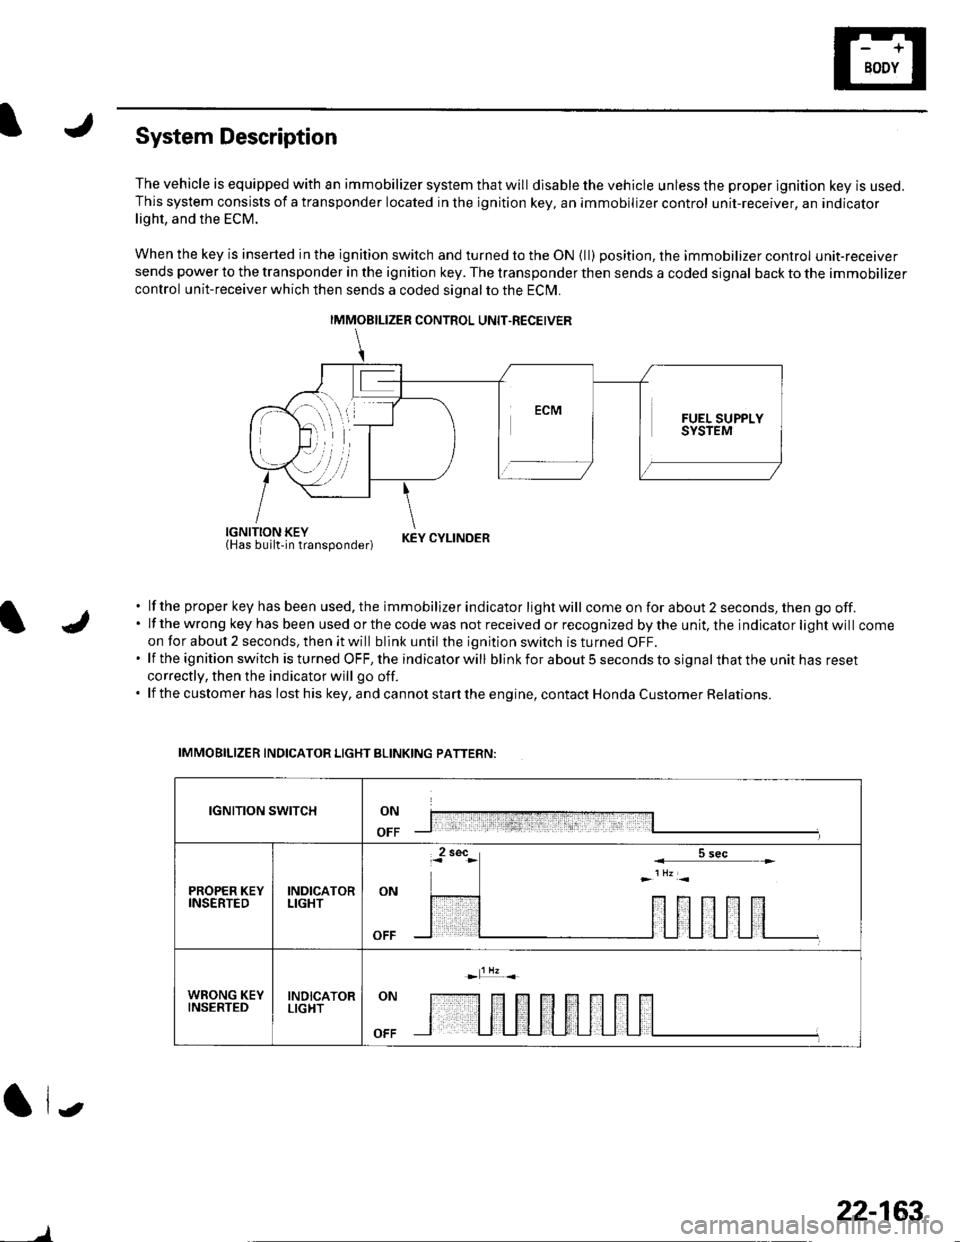
The vehicle is equipped with an immobilizer system that will disable the vehicle unless the proper ignition key is used.This system consists of a transponder located in the ignition key, an immobilizer control unit-receiver, an indicatorlight, and the ECM.
When the key is inserted in the ignition switch and turned to the ON {ll) position, the immobilizer control unit-receiversends power to the transponder in the ignition key. The transponder then sends a coded signal back to the immobilizer
control unit-receiver which then sends a coded signal to the ECI\4.
iEl'JUiliii'tlun"oona"|.r KEYCYLTNDER
lf the proper key has been used, the immobilizer indicator light will come on for about 2 seconds, then go off.lf the wrong key has been used or the code was not received or recognized by the unit, the indicator light will comeon for about 2 seconds, then it will blink until the ignition switch is turned OFF.lf the ignition switch is turned OFF, the indicator will blink for about 5 seconds to signal that the unit has reset
correctly, then the indicator will go off.
lf the customer has lost his key, and cannot start the engine, contact Honda Customer Relations.
IMMOBILIZER INDICATOR LIGHT BLINKING PATTERN:
IGNITION SWITCHON
OFF
PROPER KEYINSERTEDINDICATORLIGHTON
WRONG KEYINSERTEDINDICATORLIGHTON
OFF
(| i.,
IMMOBILIZER CONTROL UNIT.RECEIVER
)
22-163