Wheel bearing HONDA CIVIC 2003 7.G Workshop Manual
[x] Cancel search | Manufacturer: HONDA, Model Year: 2003, Model line: CIVIC, Model: HONDA CIVIC 2003 7.GPages: 1139, PDF Size: 28.19 MB
Page 21 of 1139
Y
2-9
o
o
a
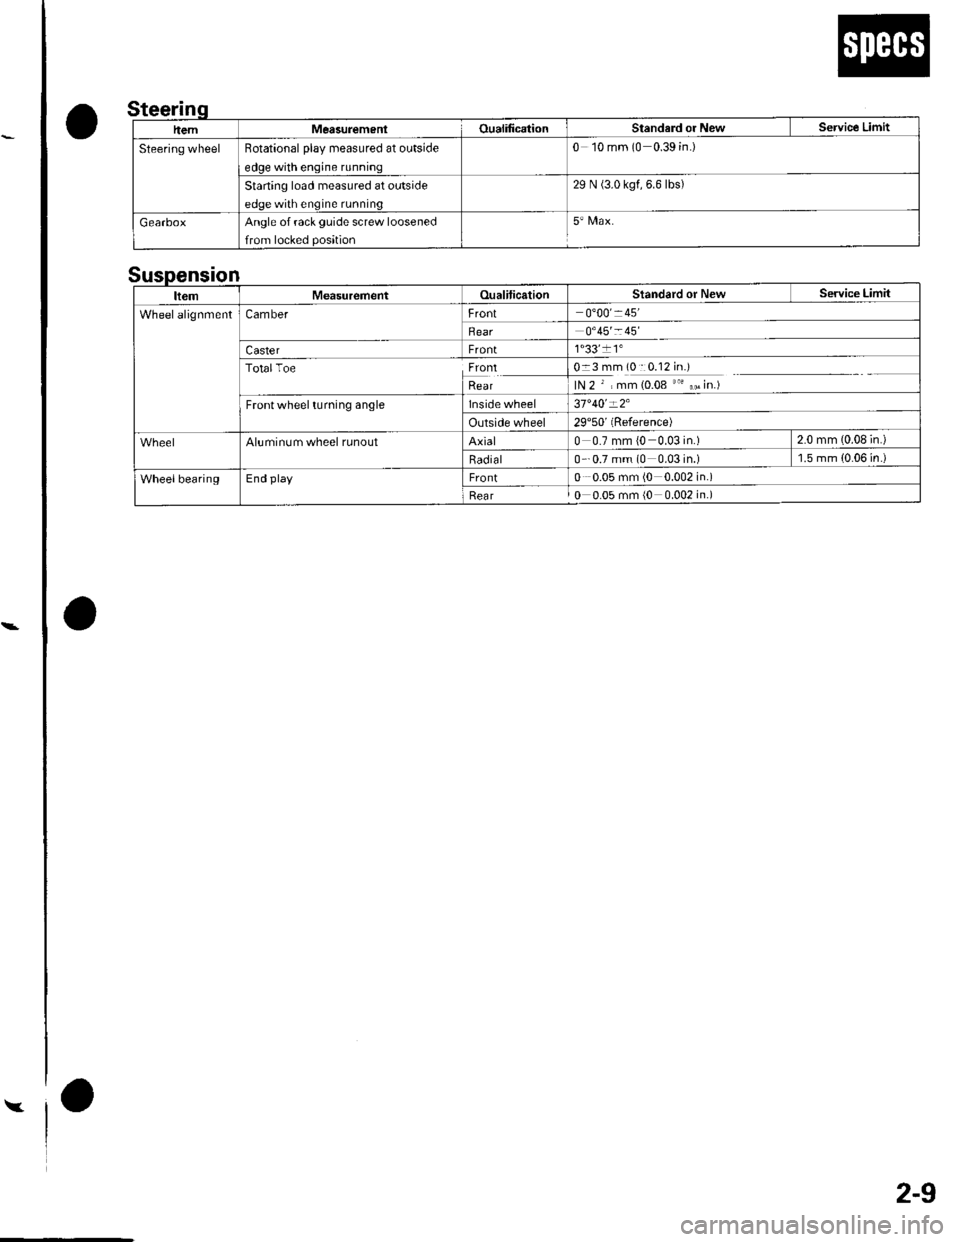
0 10 mm (0 0.39 in.)Rotational olav measured at outside
29 N (3.0 kgf.6.6lbs)Starting load measured at outside
Angle of rack guide screw loosened
n
ItemMeasurementOualiticationStandard or New Service Limit
WheelalignmentCamberFront0'00' 45'
Rear0'45'- 45
CasterFront1"33'�11"
TotalToelryttRear
0-3 mm (0::0.12 in.)
lN 2 ' , mm (0.08 "' ,, in.)
Frontwheel turning anglelnside wheel37'40'-2'
Outside wheel29'50'(Reference)
Aluminum wheel runoutAxial0 0.7 mm (0 0.03 in.) 2.0 mm (0.08 in.)
Radial0 - 0.7 mm (0 0.03in.) l.5mm{0.06in.)
WheelbearingEnd playFront0 0.05 mm (0 0.002 in.)
Rear0 0.05 mm (0 0.002 in.)
Page 141 of 1139
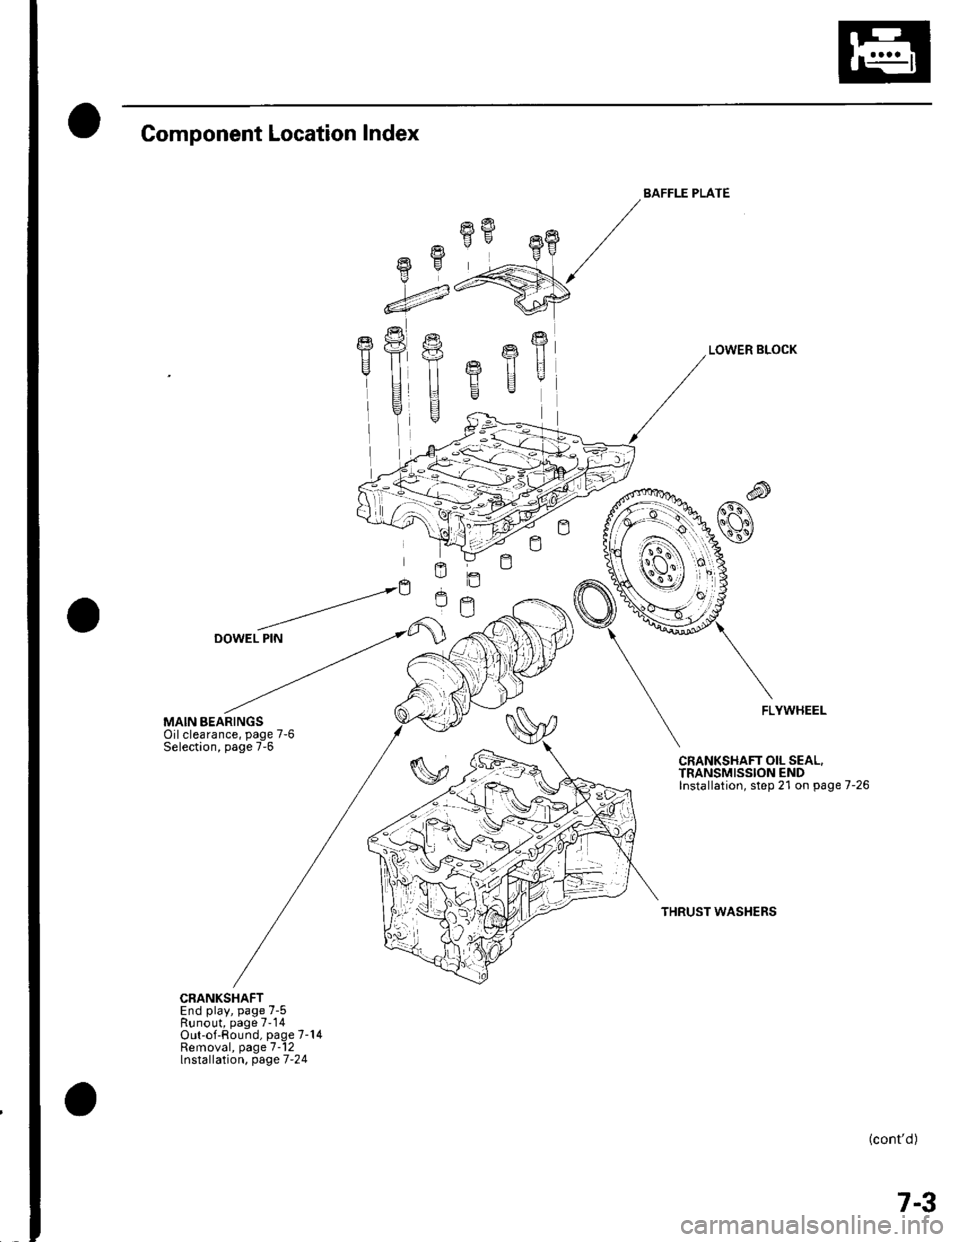
Component Location Index
MAIN BEARINGSOilclearance, page 7-6Selection, page 7-6
CRANKSHAFTEnd play, page 7-5Runout, page 7-14Out-of-Round, page 7-14Removal, page 7-12lnstallation, page 7-24
fifr"8
-4
E
I
BAFFLE PLATE
LOWER BLOCK
FLYWHEEL
CRANKSHAFT OIL SEAL.TRANSMISSION ENDInstallation, step 21 on page 7-26
THRUST WASHERS
(cont'd)
7-3
Page 145 of 1139
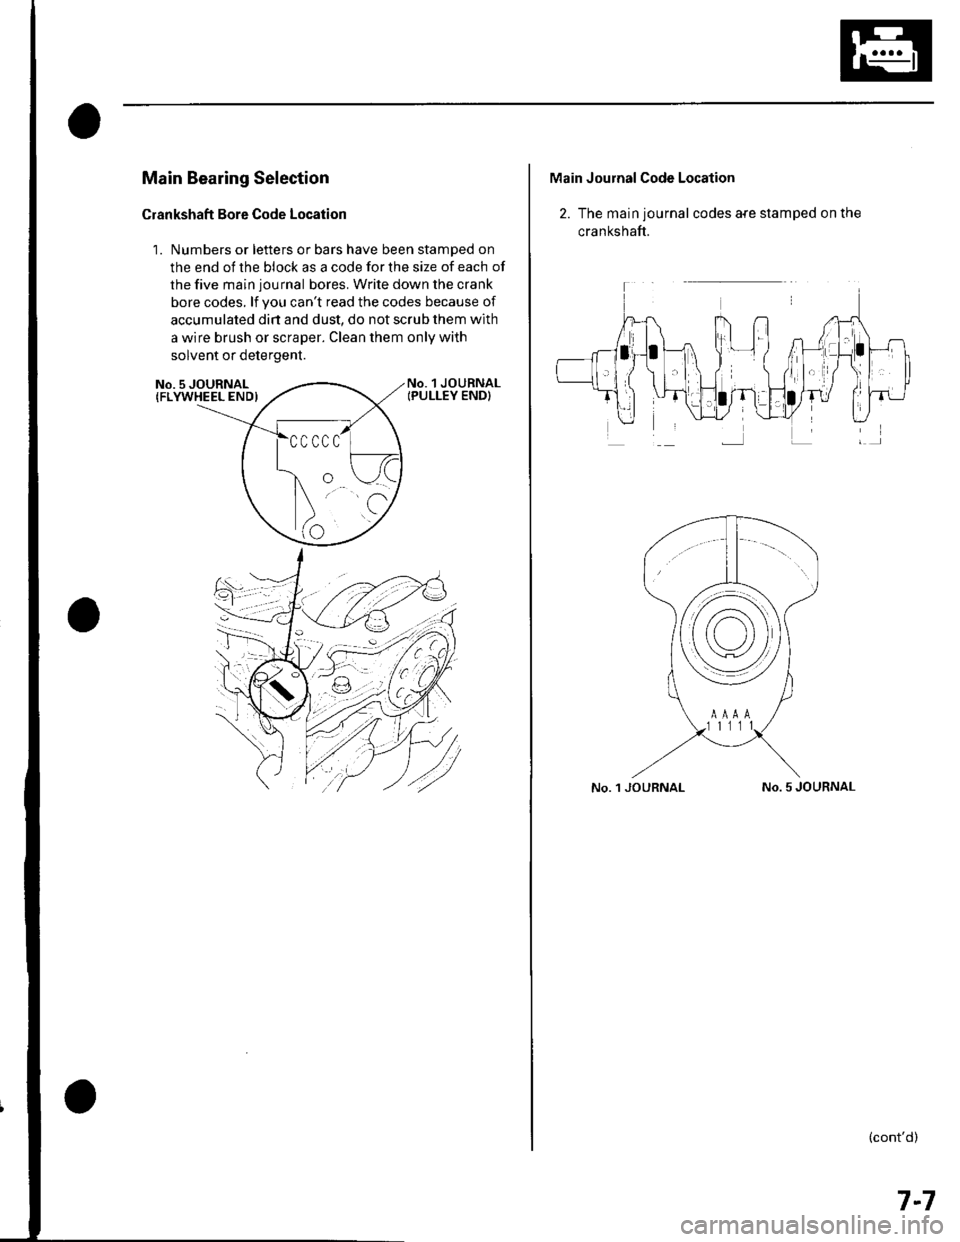
Main Bearing Selection
Crankshaft Bore Code Location
1. Numbers or letters or bars have been stamped on
the end of the block as a code for the size of each of
the five main journal bores. Write down the crank
bore codes. lf you can't read the codes because of
accumulated dirt and dust, do not scrub them with
a wire brush or scraper. Clean them only with
solvent or detergent.
No. 1 JOURNALIPULLEY END}No. 5 JOURNAL{FLYWHEEL END)
Main Journal Code Location
2. The main journal codes a{e stamped on the
cra n kshaft.
No. 1 JOURNALNo. 5 JOURNAL
(cont'd)
7-7
Page 400 of 1139
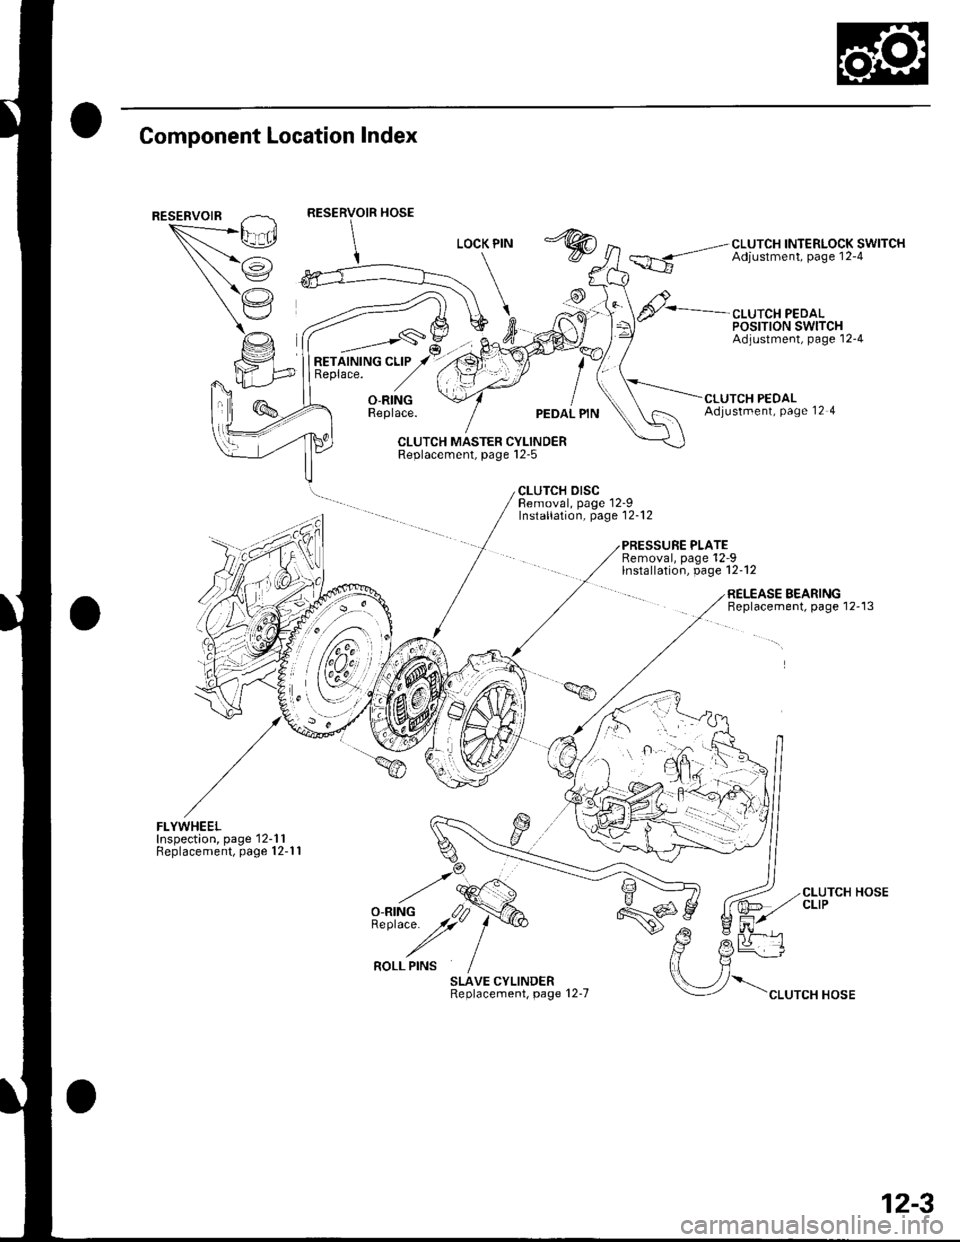
Component Location Index
""*--/\,L_.Ei
/i
(,'.'
CLUTCH INTERLOCK SWITCHAdjustment, page 12-4
CLUTCH PEDALPOSTTTON SWITCHAdjustment, page'12-4
RETAINING CLIPReplace.
_,___-,-s\
O-RINGReplace.UTCH PEDALAdjustment, Page 12 4
CLUTCH MASTER CYLINDERReplacement, page l2-5
CLUTCH DISCBemoval, page 12-9Installation, page'12-12
PRESSURE PLATERemoval, page'12-9lnstallation, page 12-12
FLYWHEELInspection, page'12-1 1Replacement, page 12-1 1
SLAVE CYLINDERReplacement, page 12-7
RELEASE BEARINGBeplacement, page 12-13
\".rr"*"o*
CLUTCH HOSECLIP
12-3
Page 559 of 1139
Suspension
Front and Rear Suspension
SpecialTools ............. 18-2
Component Location Index ......................................... 18-3
Wheel Alignment ..................... ........... 18-4
Wheel Bearing End Play Inspection ............................ 18-8
Wheel Runout Inspection .................. 18-9
Ball Joint Removal ... 18-10
Front Suspension
Kn uckle/H u bAVheel Bearing Replacement
Ball Joint Boot Reolacement ..................
Stabilizer Bar Rep|acement ....................
Stabilizer Link Removal/lnstallation
LowerArm Removal/lnstallation ...............
Damper/Spring Replacement
Rear Suspension
Hub Bearing Unit Replacement .....................
Knuckle Reolacement
Stabilizer Bar Replacement ....................
Stabilizer Link Removal/lnstallation ..........................
Upper Arm Removal/lnstallation ...............
Trailing Arm Removal/lnstallation
Damper/Spring Replacement
18-1 1
18-16
18-17
18-18
18-19
18-20
18-26
18-28
18-30
18-31
18-32
18-33
18-34
Page 561 of 1139
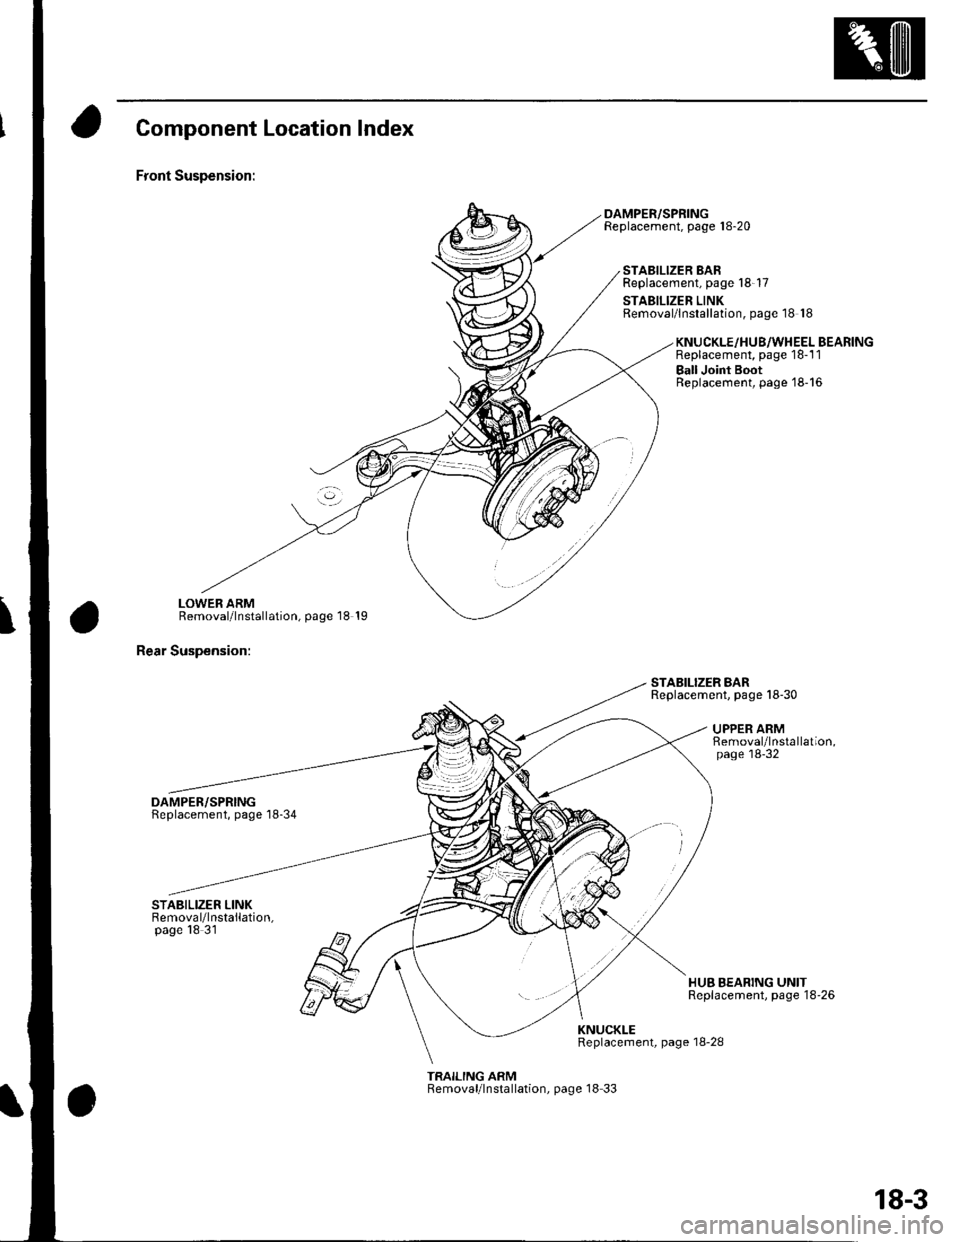
Component Location Index
Front Suspension:
LOWEB ARMRemoval/lnstallation, page 18 19
Rear Suspension:
DAMPER/SPRINGReplacement, page'18-34
DAMPER/SPRINGReplacement, page 18-20
STABILIZER BARReplacement, page 18-17
STABILIZER LINKRemoval/lnstallation, page 18 18
STABILIZER BARReplacement. page 18-30
KNUCKLE/HU8/WHEEL BEARINGReplacement, page 18-1 1
Ball Joint BootReplacement, page'18-16
UPPER ARMRemoval/lnstallation,page'18-32
HUB BEARING UNITReplacement, page 18'26
KNUCKLEReplacement, page 18-28
TRAILING ARMRemoval/lnstallation, page 18 33
18-3
Page 566 of 1139
Front and Rear Suspension
Wheel Alignment (cont'dl
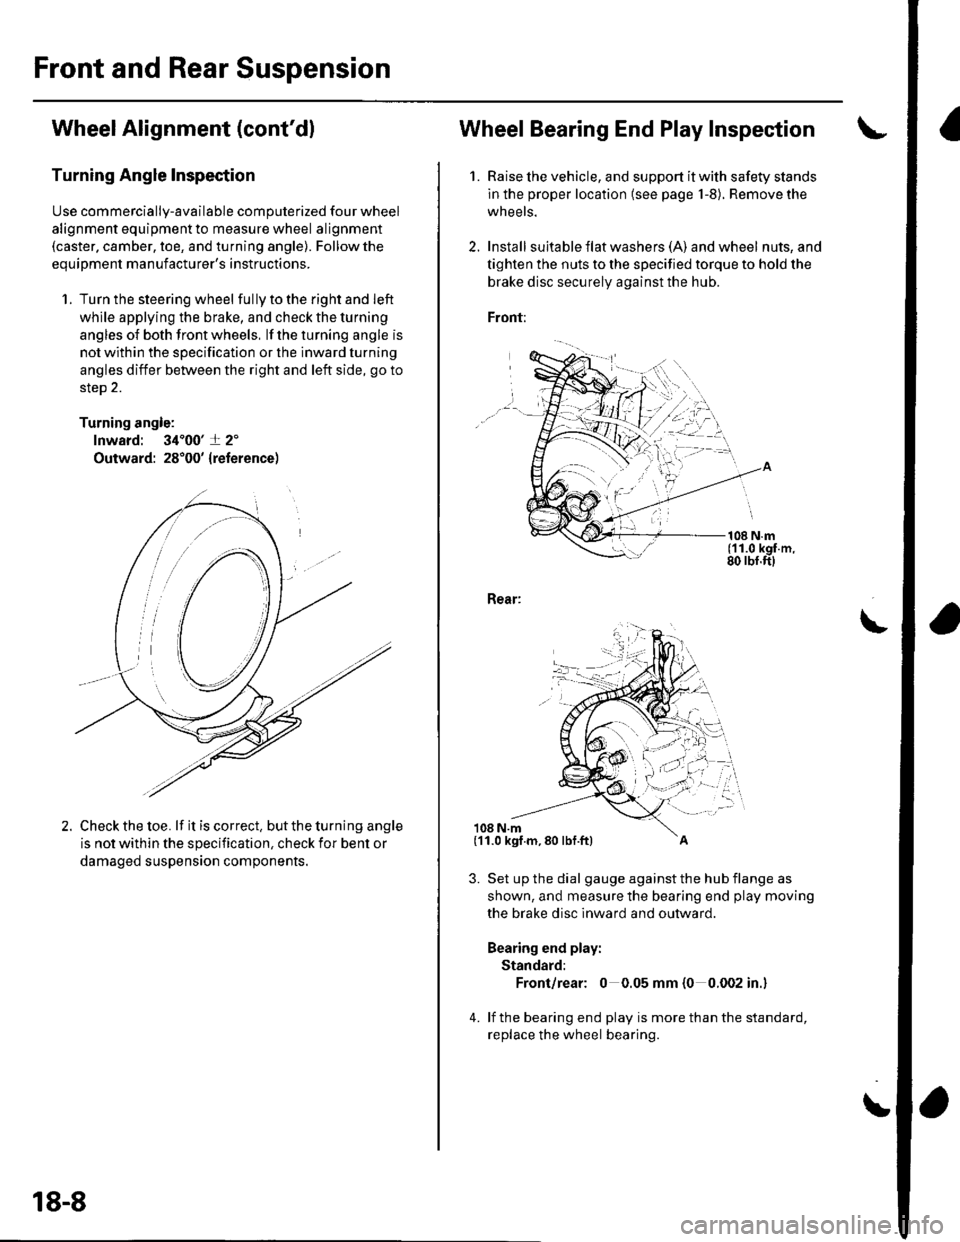
Turning Angle Inspection
Use commercially-available computerized four wheel
alignment equipment to measure wheel alignment(caster. camber, toe, and turning angle). Followthe
equiDment manufacturer's instructions.
1. Turn the steering wheel fullytotherightandleft
while applying the brake, and check the turning
angles of both front wheels, lf the turning angle is
not within the specification or the inward turning
angles differ between the right and left side, go to
steD 2.
Turning angle:
lnward: 34'00'+ 2'
Outward: 28'00' {reference)
Check the toe. lf it is correct, but the turning angle
is not within the specification, check ior bent or
damaged suspension components,
18-8
Wheel Bearing End Play Inspec'tion
1. Raise lhe vehicle, and support it with safety stands
in the proper location (see page 1-8). Remove the
wheels.
2. Install suita ble f lat washe rs (A) and wheel nuts, and
tighten the nuts to the specified torque to hold the
brake disc securely against the hub.
Front:
108 N.m(11.0 kgf.m,80 rbf.ft)
Rear:
108 N.m
3. Set up the dial gauge against the hub flange as
shown, and measure the bearing end play moving
the brake disc inward and outward.
Bearing end play:
Standard:
Front/rear: 0 0.05 mm {0 0.002 in.}
4. lf the bearing end play is more than the standard,
replace the wheel bearing.
\
(11.0 kgf.m,80 lbf.ft)
Page 567 of 1139
Wheel Runout Inspection
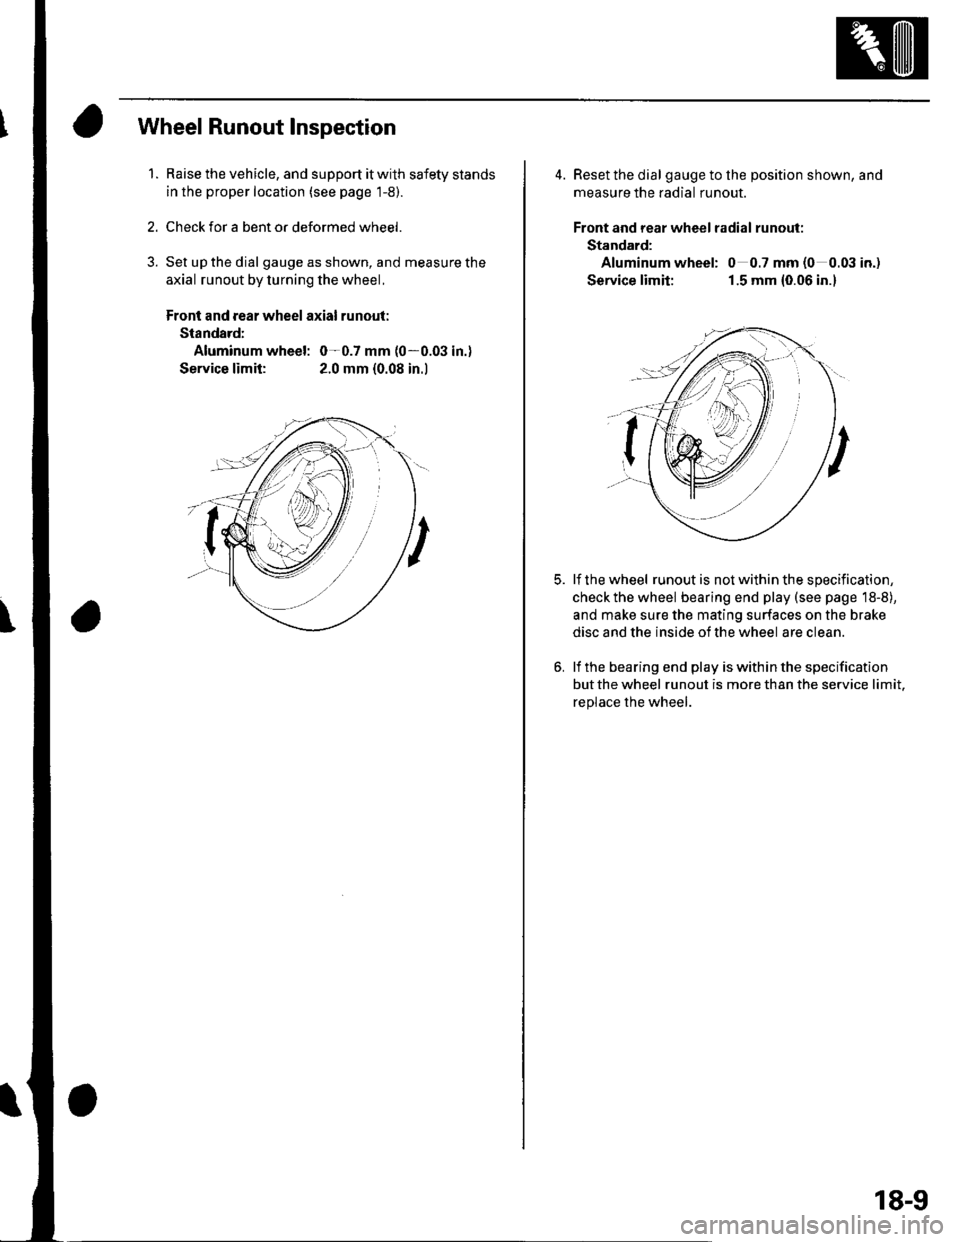
1.Raise the vehicle, and support it with safety stands
in the proper location (see page 1-5,.
Check for a bent or deformed wheel.
Set up the dial gauge as shown, and measure the
axial runout by turning the wheel.
Front and rear wheel axial runout:
Standard:
Aluminum wheel: 0-0.7 mm (0-0.03 in.)
Service limit: 2.0 mm {0.08 in.l
4. Reset the dial gaugetothe position shown, and
measure the radial runout.
Front and rear wheel radial runout:
Standard:
Aluminum wheel: 0 0.7 mm (0 0.03 io.)
Service limit: 1.5 mm {0.06 in.}
lf the wheel runout is not within the specification,
checkthe wheel bearing end play (see page 18-8),
and make sure the mating surfaces on the brake
disc and the inside of the wheel are clean.
lf the bearing end play is within the specification
but the wheel runout is more than the service limit.
replace the wheel.
18-9
Page 569 of 1139
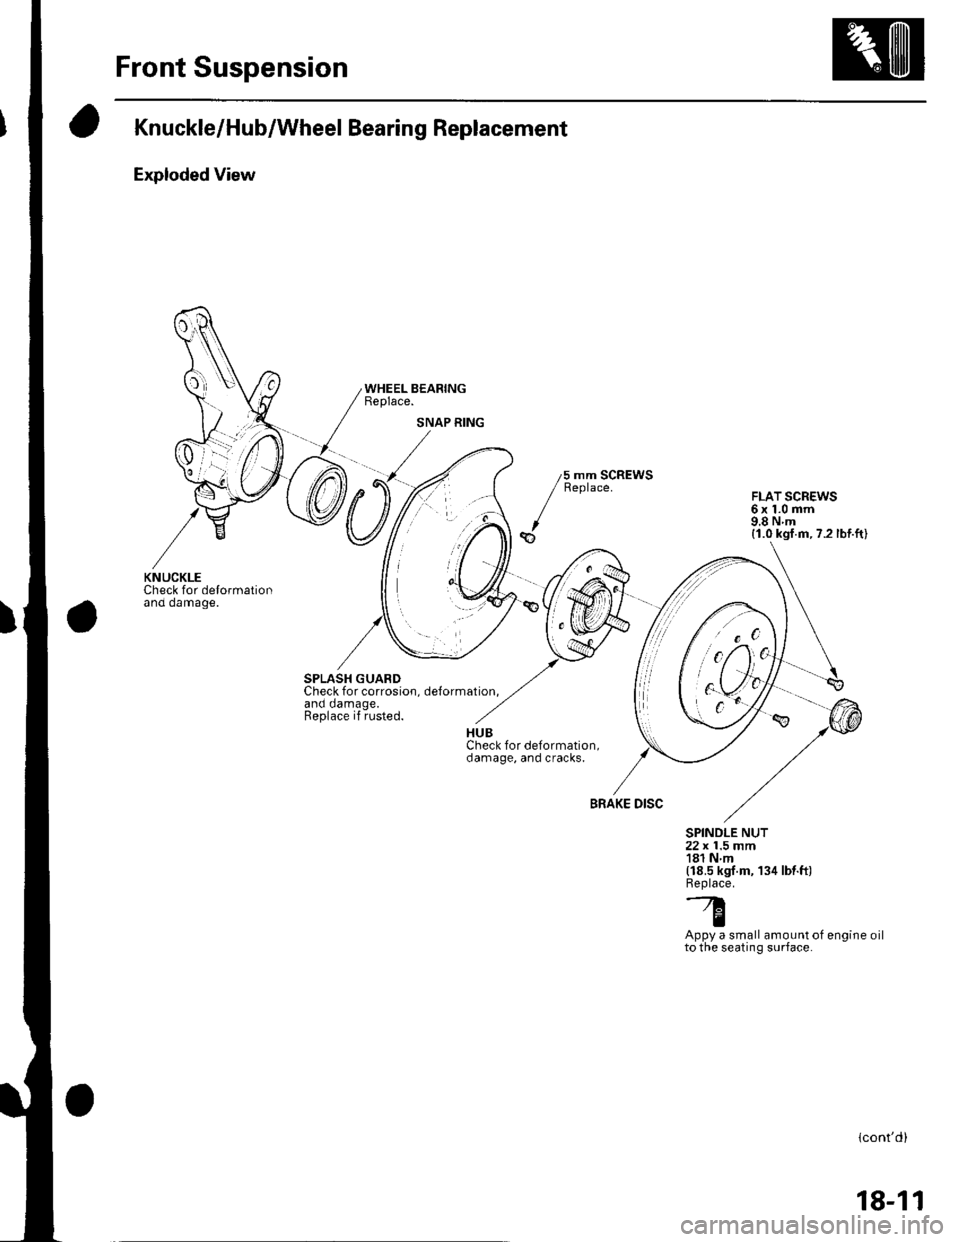
Front Suspension
Knuckle/Hub/Wheel Bearing Replacement
Exploded View
Check for delormationano oamage.
SPLASH GUARDCheck for corrosion. delormation.and damage.Replace if rusted.
WHEEL BEARINGReplace.
5 mm SCREWSReplace.FLAT SCREWS6x1.0mm9.8Nm(1.0 kgf.m,7.2 lbf.ft)
BRAKE DISC
SPINDLE NUT22 x 1.5 mm181 Nm(18.5 kgf.m, 134 lbt.ft)Replace.'--7.l'tq
IAppy a small amount of engine oilto the seating surface.
lcont'd)
SNAP RING
KNUCKLE
18-11
Page 570 of 1139
Front Suspension
Knuckle/Hub/Wheel Bearing Replacement {cont'dl
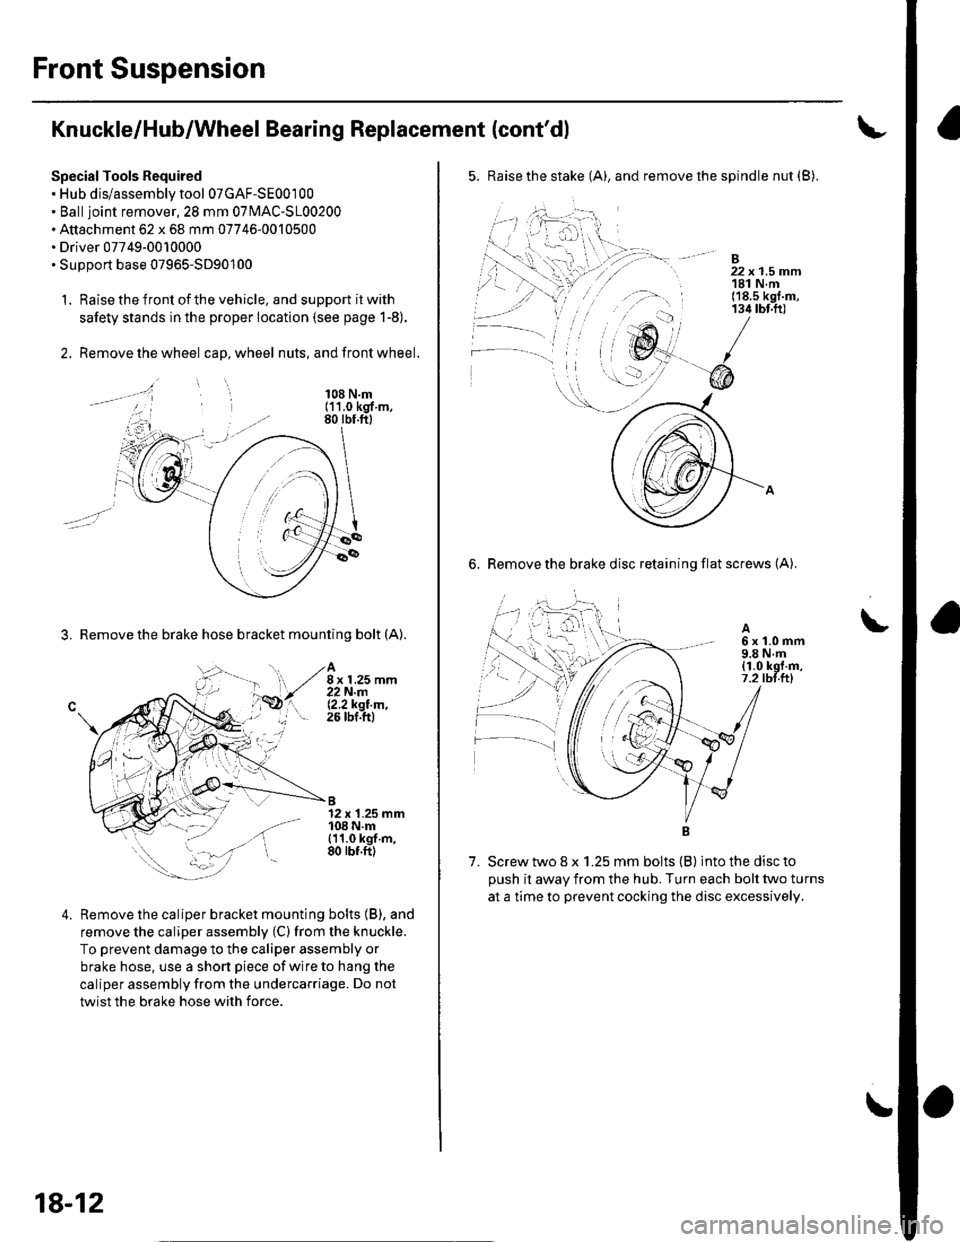
Special Tools Required. Hub dis/assembly tool 07GAF-SE00100. Balljoint remover,2S mm 0TlvlAC-S100200. Attachment 62 x 68 mm 07746-0010500. Driver 07749-0010000. SuDDort base 07965-5D90'100
1. Raise the front of the vehicle, and support it with
safety stands in the proper location (see page 1-8).
2. Remove the wheel cap, wheel nuts, and front wheel.
3. Remove the brake hose bracket mounting bolt (A).
108 N.m(11.0 kgf m,80 rbf.ftl
A8 x 1.25 mm22N.m12.2ksl.m,26 tbf.ftl
B12 x 1.25 mm108 N.m{11.0 kgf.m,80 rbf.ftl
4.Remove the caliper bracket mounting bolts (B), and
remove the caliper assembly (C) from the knuckle.
To prevent damage to the caliper assembly or
brake hose, use a short piece of wire to hang the
caliper assembly from the undercarriage. Do not
twist the brake hose with force.
18-12
5. Raise the stake (A), and remove the spindle nut (B).
-B
' 22x1.5mm, 181 N.m('18.s kgf.m,134 tbt.ft)
6. Remove the brake disc retaining flat screws (A).
A6x1.0mm9.8 N.m{1.0 kgt.m,7.2 tbl.ttl
7. Screw two 8 x 1.25 mm bolts (B) into the disc to
oush it awav from the hub. Turn each bolt two turns
at a time to prevent cocking the disc excessively,
\
\