buttons HONDA CIVIC 2016 10.G Quick Guide
[x] Cancel search | Manufacturer: HONDA, Model Year: 2016, Model line: CIVIC, Model: HONDA CIVIC 2016 10.GPages: 82, PDF Size: 5.52 MB
Page 4 of 82
| 1
VISUAL INDEX
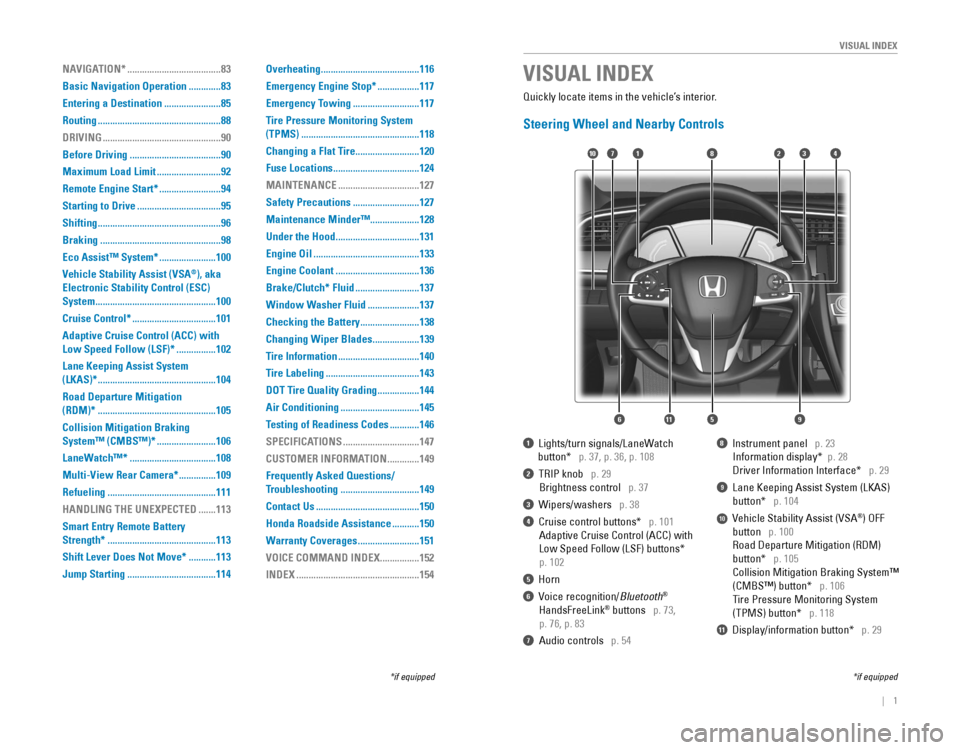
1 Lights/turn signals/LaneWatch
button* p. 37, p. 36, p. 108
2 TrIP knob p. 29
Brightness control p. 37
3 Wipers/washers p. 38
4 Cruise control buttons* p. 101
Adaptive Cruise Control (ACC) with
Low Speed Follow (LSF) buttons*
p. 102
5 Horn
6 voice recognition/Bluetooth®
HandsFreeLink® buttons p. 73,
p. 76, p. 83
7 Audio controls p. 54
8 Instrument panel p. 23
Information display* p. 28
Driver Information Interface* p. 29
9 Lane Keeping Assist System (LKAS)
button* p. 104
10 vehicle Stability Assist (vSA®) oFF
button p. 100
road Departure Mitigation (rDM)
button* p. 105
Collision Mitigation Braking System™
(CMBS™) button* p. 106
Tire Pressure Monitoring System
(TPMS) button* p. 118
11 Display/information button* p. 29
VISUAL INDEX
*if equipped*if equipped
Quickly locate items in the vehicle’s interior.
Steering Wheel and Nearby Controls
2
5
71310
6
48
911
NAVIGATION* ......................................83
Basic Navigation Operation
.............83
Entering a Destination
.......................85
Routing
..................................................88
DRIVING
................................................90
Before Driving
.....................................90
Maximum Load Limit
..........................92
Remote Engine Start*
.........................94
Starting to Drive
..................................95
Shifting
..................................................96
Braking
.................................................98
Eco Assist™ System*
.......................100
Vehicle Stability Assist (VSA
®), aka
Electronic Stability Control (ESC)
System
.................................................100
Cruise Control*
..................................101
Adaptive Cruise Control (ACC) with
Low Speed Follow (LSF)* ................102
Lane Keeping Assist System
(LKAS)*
................................................104
Road Departure Mitigation
(RDM)*
................................................105
Collision Mitigation Braking
System™ (CMBS™)*
........................106
LaneWatch™*
...................................108
Multi-View Rear Camera*
...............109
Refueling
............................................111
HANDLING THE UNEXPECTED
.......113
Smart Entry Remote Battery
Strength*
............................................113
Shift Lever Does Not Move*
...........113
Jump Starting
....................................114 Overheating
........................................116
Emergency Engine Stop*
.................117
Emergency Towing
...........................117
Tire Pressure Monitoring System
(TPMS)
................................................118
Changing a Flat Tire
..........................120
Fuse Locations
...................................124
MAINTENANCE
.................................127
Safety Precautions
...........................127
Maintenance Minder™ ....................128
Under the Hood
..................................131
Engine Oil
...........................................133
Engine Coolant
..................................136
Brake/Clutch* Fluid
..........................137
Window Washer Fluid
.....................137
Checking the Battery
........................138
Changing Wiper Blades
...................139
Tire Information
.................................140
Tire Labeling
......................................143
DOT Tire Quality Grading
.................144
Air Conditioning
................................145
Testing of Readiness Codes
............146
SPECIFICATIONS
...............................147
CUSTOMER INFORMATION
.............149
Frequently Asked Questions/
Troubleshooting
................................149
Contact Us
..........................................150
Honda Roadside Assistance
...........150
Warranty Coverages
.........................151
VOICE COMMAND INDEX
................152
INDEX
..................................................154
Page 5 of 82
2 || 3
S
AFETYVISUAL INDEX
Dashboard, Ceiling, and Other Controls
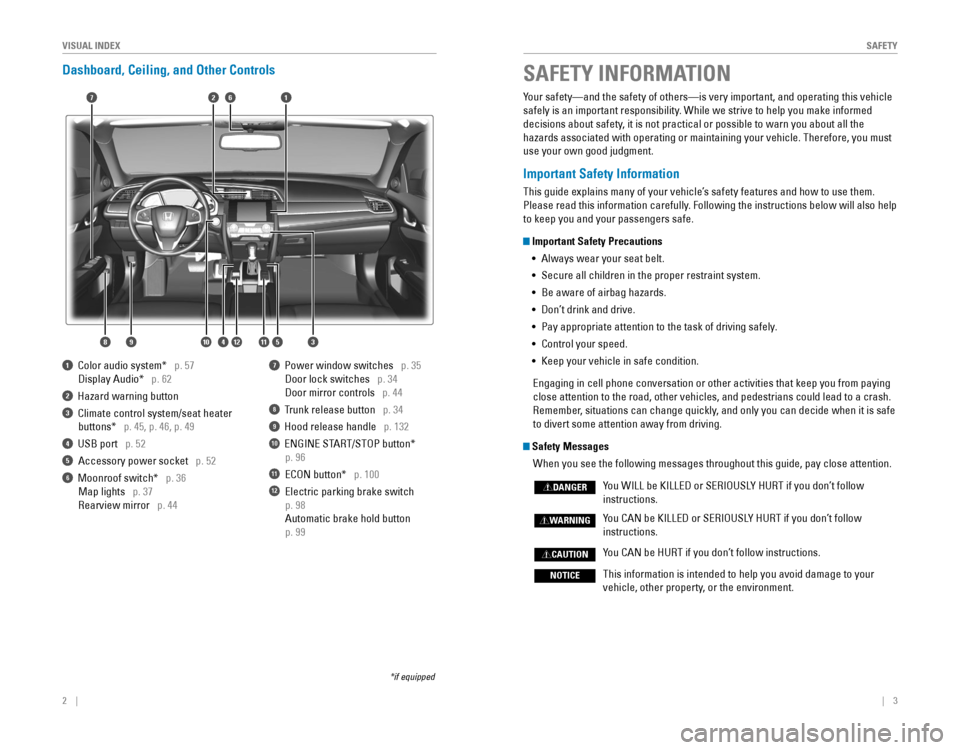
1 Color audio system* p. 57
Display Audio* p. 62
2 Hazard warning button
3 Climate control system/seat heater
buttons* p. 45, p. 46, p. 49
4 USB port p. 52
Accessory power socket p. 52
6 Moonroof switch* p. 36
Map lights p. 37
rearview mirror p. 44
7 Power window switches p. 35
Door lock switches p. 34
Door mirror controls p. 44
8 Trunk release button p. 34
9 Hood release handle p. 132
10 eNGINe STArT/SToP button*
p. 96
11 eCoN button* p. 100
12 electric parking brake switch
p. 98
Automatic brake hold button
p. 99
*if equipped
SAFETY INFORMATION
2
3
71
8
6
4
Your safety—and the safety of others—is very important, and operati\
ng this vehicle
safely is an important responsibility. While we strive to help you make informed
decisions about safety, it is not practical or possible to warn you about all the
hazards associated with operating or maintaining your vehicle. Therefore\
, you must
use your own good judgment.
Important Safety Information
This guide explains many of your vehicle’s safety features and how to use them.
Please read this information carefully. Following the instructions below will also help
to keep you and your passengers safe.
Important Safety Precautions
• Always wear your seat belt.
• Secure all children in the proper restraint system.
• Be aware of airbag hazards.
• Don’t drink and drive.
• Pay appropriate attention to the task of driving safely.
• Control your speed.
• Keep your vehicle in safe condition.
engaging in cell phone conversation or other activities that keep you fro\
m paying
close attention to the road, other vehicles, and pedestrians could lead \
to a crash.
remember, situations can change quickly, and only you can decide when it is safe
to divert some attention away from driving.
Safety Messages
When you see the following messages throughout this guide, pay close att\
ention.
You WILL be KILLeD or SerIoUSLY HUrT if you don’t follow
instructions.
You CAN be KILLeD or SerIoUSLY HUrT if you don’t follow
instructions.
You CAN be HUrT if you don’t follow instructions.
This information is intended to help you avoid damage to your
vehicle, other property, or the environment.
DANGER
WARNING
CAUTION
NOTICE
5
59101112
Page 26 of 82
44 || 45
V
EHICLE CONTROLSVEHICLE CONTROLS
Adjusting the Mirrors
Adjust the angle of the mirrors for the best visibility when you are sit\
ting in the
correct driving position.
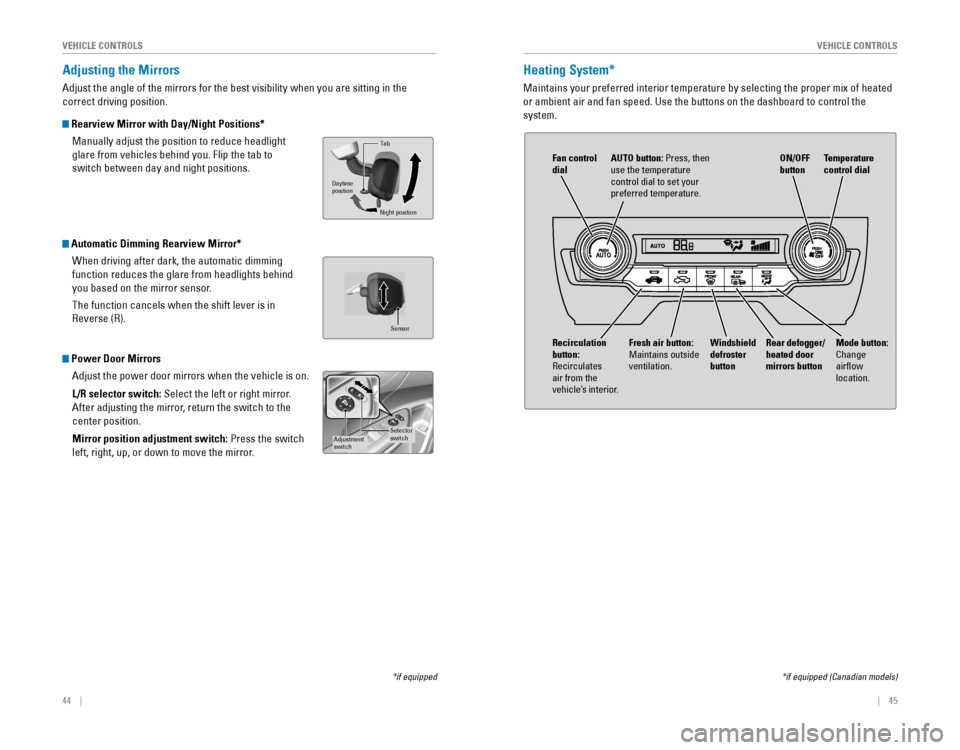
Rearview Mirror with Day/Night Positions*
Manually adjust the position to reduce headlight
glare from vehicles behind you. Flip the tab to
switch between day and night positions.
Automatic Dimming Rearview Mirror*When driving after dark, the automatic dimming
function reduces the glare from headlights behind
you based on the mirror sensor.
The function cancels when the shift lever is in
reverse (r).
Power Door MirrorsAdjust the power door mirrors when the vehicle is on.
L/R selector switch: Select the left or right mirror.
After adjusting the mirror, return the switch to the
center position.
Mirror position adjustment switch: Press the switch
left, right, up, or down to move the mirror.
Tab
Daytime
position
Night position
*if equipped
Selector
switchAdjustment
switch
Sensor
Heating System*
Maintains your preferred interior temperature by selecting the proper mi\
x of heated
or ambient air and fan speed. Use the buttons on the dashboard to contro\
l the
system.
*if equipped (Canadian models)
Fan control
dial AUTO button: Press, then
use the temperature
control dial to set your
preferred temperature.
Windshield
defroster
button Temperature
control dial
Fresh air button:
Maintains outside
ventilation. Rear defogger/
heated door
mirrors button
Mode button:
Change
airflow
location.Recirculation
button:
recirculates air from the
vehicle’s interior. ON/OFF
button
Page 27 of 82
46 || 47
V
EHICLE CONTROLSVEHICLE CONTROLS
Climate Control System*
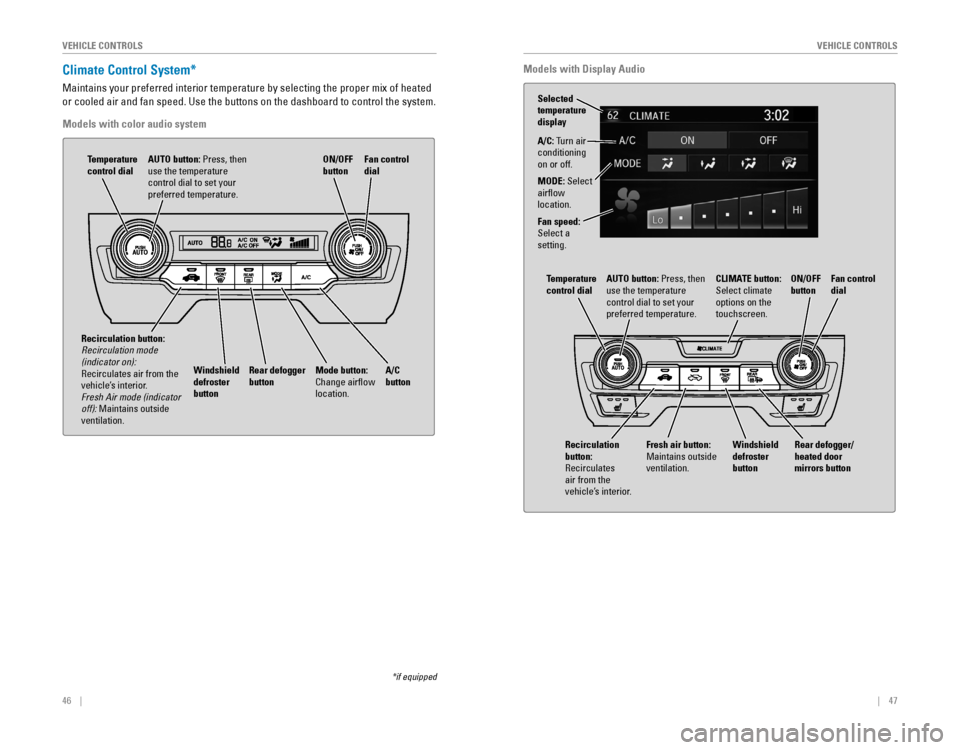
Maintains your preferred interior temperature by selecting the proper mi\
x of heated
or cooled air and fan speed. Use the buttons on the dashboard to control\
the system.
Models with color audio system
*if equipped
AUTO button: Press, then
use the temperature
control dial to set your
preferred temperature.
Temperature
control dial
A/C
button
Fan control
dial
Recirculation button:
Recirculation mode (indicator on): recirculates air from the vehicle’s interior. Fresh Air mode (indicator off): Maintains outside
ventilation. Rear defogger
button
Windshield
defroster
button ON/OFF
button
Mode button:
Change airflow
location.
Models with Display Audio
A/C: Turn air
conditioning
on or off.
MODE: Select
airflow
location.
Fan speed:
Select a
setting.
AUTO button: Press, then
use the temperature
control dial to set your
preferred temperature.
Temperature
control dial
Fan control
dial
Rear defogger/
heated door
mirrors button
Windshield
defroster
button ON/OFF
buttonCLIMATE button:
Select climate
options on the
touchscreen.
Fresh air button:
Maintains outside
ventilation.
Recirculation
button:
recirculates air from the
vehicle’s interior.
Selected
temperature
display
Page 31 of 82
54 || 55
AUDIO AND CONNECTIVITY
AUDIO AND CONNECTIVITY
Steering Wheel Controls
You can operate certain functions of the audio system using the steering \
wheel
controls.
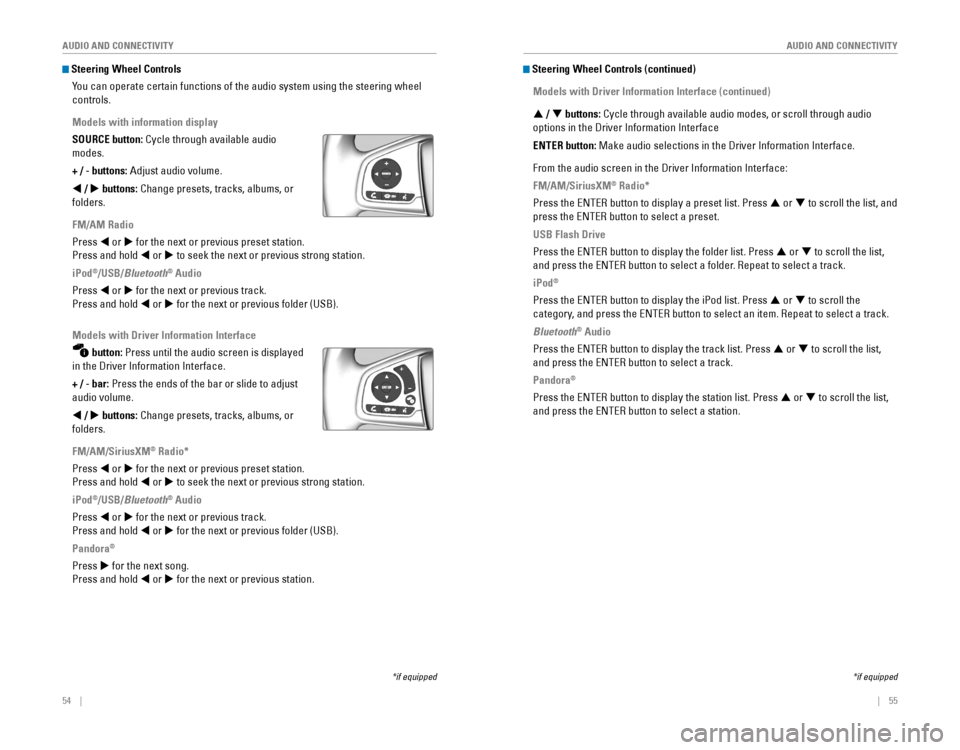
Models with information display
SOURCE button: Cycle through available audio
modes.
+ / - buttons: Adjust audio volume.
t / u buttons: Change presets, tracks, albums, or
folders.
FM/AM Radio
Press t or u for the next or previous preset station.
Press and hold t or u to seek the next or previous strong station.
iPod
®/USB/Bluetooth® Audio
Press t or u for the next or previous track.
Press and hold t or u for the next or previous folder (USB).
Models with Driver Information Interface
button: Press until the audio screen is displayed
in the Driver Information Interface.
+ / - bar: Press the ends of the bar or slide to adjust
audio volume.
t / u buttons: Change presets, tracks, albums, or
folders.
FM/AM/SiriusXM
® Radio*
Press t or u for the next or previous preset station.
Press and hold t or u to seek the next or previous strong station.
iPod
®/USB/Bluetooth® Audio
Press t or u for the next or previous track.
Press and hold t or u for the next or previous folder (USB).
Pandora
®
Press u for the next song.
Press and hold t or u for the next or previous station.
*if equipped
Steering Wheel Controls (continued)
Models with Driver Information Interface (continued)
p / q buttons: Cycle through available audio modes, or scroll through audio
options in the Driver Information Interface
ENTER button: Make audio selections in the Driver Information Interface.
From the audio screen in the Driver Information Interface:
FM/AM/SiriusXM
® Radio*
Press the eNTer button to display a preset list. Press p or q to scroll the list, and
press the eNTer button to select a preset.
USB Flash Drive
Press the eNTer button to display the folder list. Press p or q to scroll the list,
and press the eNTer button to select a folder. repeat to select a track.
iPod®
Press the eNTer button to display the iPod list. Press p or q to scroll the
category, and press the eNTer button to select an item. repeat to select a track.
Bluetooth® Audio
Press the eNTer button to display the track list. Press p or q to scroll the list,
and press the eNTer button to select a track.
Pandora®
Press the eNTer button to display the station list. Press p or q to scroll the list,
and press the eNTer button to select a station.
*if equipped
Page 32 of 82
56 || 57
AUDIO AND CONNECTIVITY
AUDIO AND CONNECTIVITY
Adjusting the Sound
Adjust various sound settings.
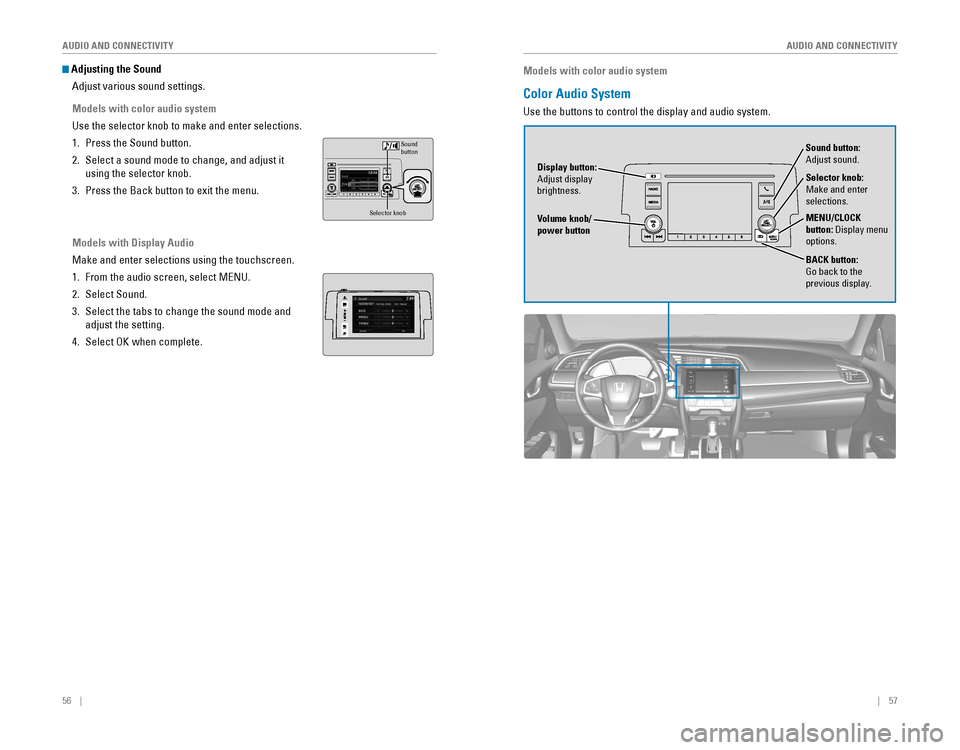
Models with color audio system
Use the selector knob to make and enter selections.
1. Press the Sound button.
2. Select a sound mode to change, and adjust it
using the selector knob.
3. Press the Back button to exit the menu.
Models with Display Audio
Make and enter selections using the touchscreen.
1. From the audio screen, select MeNU.
2. Select Sound.
3. Select the tabs to change the sound mode and
adjust the setting.
4. Select oK when complete.
VO LHOME
MENUBACK
AUDIO
Selector kno b
Sound
button
Models with color audio system
Color Audio System
Use the buttons to control the display and audio system.
Selector knob:
Make and enter
selections.
Volume knob/
power button MENU/CLOCK
button: Display menu
options.
BACK button:
Go back to the
previous display.
Display button:
Adjust display
brightness. Sound button:
Adjust sound.
Page 33 of 82
58 || 59
AUDIO AND CONNECTIVITY
AUDIO AND CONNECTIVITY
Models with color audio system
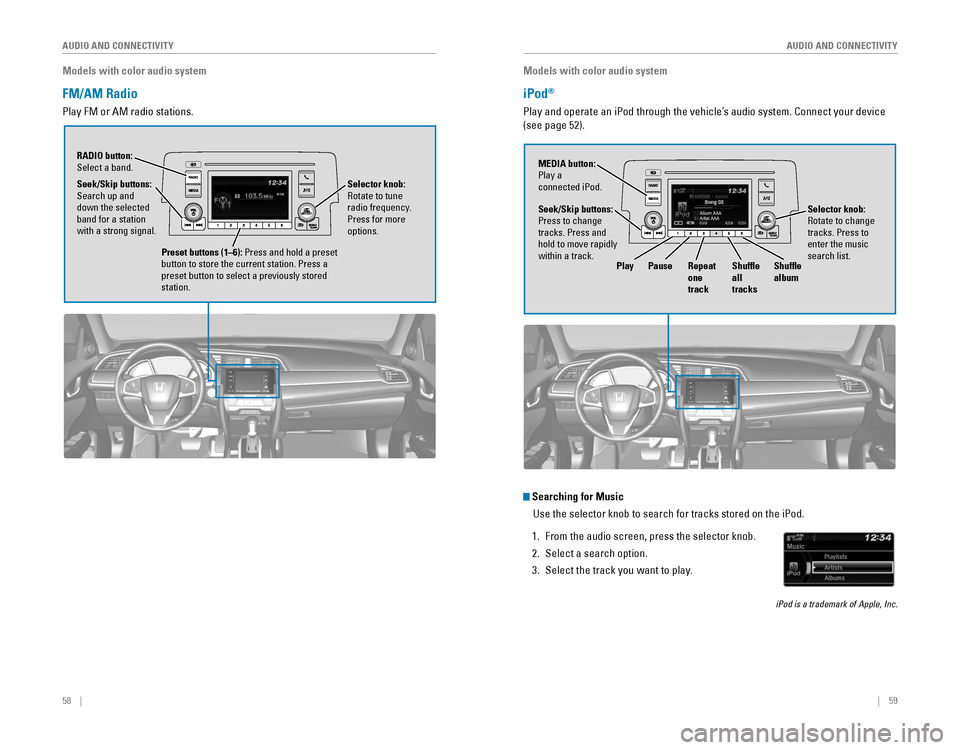
FM/AM Radio
Play FM or AM radio stations.
RADIO button: Select a band.
Preset buttons (1–6): Press and hold a preset
button to store the current station. Press a
preset button to select a previously stored
station.
Seek/Skip buttons:
Search up and
down the selected
band for a station
with a strong signal.
Selector knob:
rotate to tune radio frequency.
Press for more
options.
Models with color audio system
iPod®
Play and operate an iPod through the vehicle’s audio system. Connect your device
(see page 52).
Searching for Music
Use the selector knob to search for tracks stored on the iPod.
1. From the audio screen, press the selector knob.
2. Select a search option.
3. Select the track you want to play.
iPod is a trademark of Apple, Inc.
Seek/Skip buttons:
Press to change
tracks. Press and
hold to move rapidly
within a track. MEDIA button:
Play a
connected iPod.
Selector knob: rotate to change tracks. Press to
enter the music
search list.
PlayPause Repeat
one
track Shuffle
all
tracksShuffle
album
Page 34 of 82
60 || 61
AUDIO AND CONNECTIVITY
AUDIO AND CONNECTIVITY
Models with color audio system
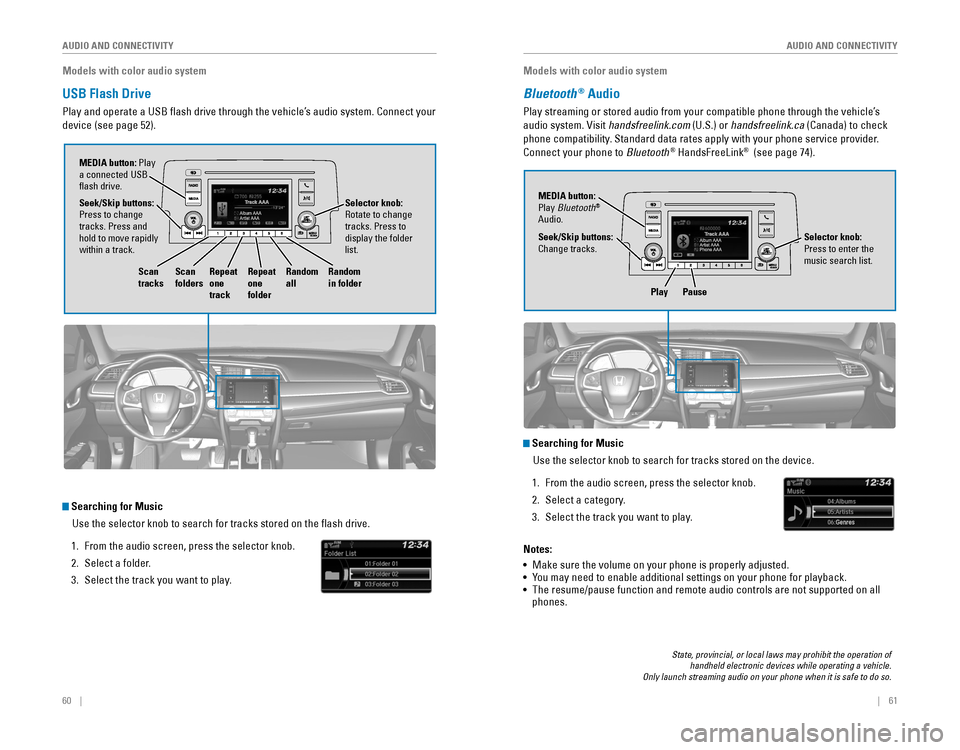
USB Flash Drive
Play and operate a USB flash drive through the vehicle’s audio system. Connect your
device (see page 52).
Searching for Music
Use the selector knob to search for tracks stored on the flash drive.
1. From the audio screen, press the selector knob.
2. Select a folder.
3. Select the track you want to play.
Selector knob: rotate to change tracks. Press to
display the folder
list.
MEDIA button: Play
a connected USB
flash drive.
Seek/Skip buttons:
Press to change
tracks. Press and
hold to move rapidly
within a track.
Scan
tracks Scan
foldersRepeat
one
track Repeat
one
folderRandom
all
Random
in folder
Models with color audio system
Bluetooth® Audio
Play streaming or stored audio from your compatible phone through the ve\
hicle’s
audio system. visit handsfreelink.com (U.S.) or handsfreelink.ca (Canada) to check
phone compatibility. Standard data rates apply with your phone service provider.
Connect your phone to Bluetooth
® HandsFreeLink® (see page 74).
Play Pause
State, provincial, or local laws may prohibit the operation of handheld electronic devices while operating a vehicle. Only launch streaming audio on your phone when it is safe to do so.
Searching for Music
Use the selector knob to search for tracks stored on the device.
1. From the audio screen, press the selector knob.
2. Select a category.
3. Select the track you want to play.
Notes:
• Make sure the volume on your phone is properly adjusted.
• You may need to enable additional settings on your phone for playback.
• The resume/pause function and remote audio controls are not supported on\
all
phones.
Seek/Skip buttons:
Change tracks. MEDIA button:
Play Bluetooth
®
Audio.
Selector knob:
Press to enter the
music search list.
Page 42 of 82
76 || 77
Models with Display Audio
Basic HFL Operation
Make and receive phone calls using the vehicle’s audio system, without handling
your phone. visit handsfreelink.com (U.S.) or handsfreelink.ca (Canada) to check
phone compatibility.
To reduce the potential for driver distraction, certain manual functions \
may be
inoperable or grayed out while the vehicle is moving. Stop or pull over \
to perform
the function. Voice commands are also available.
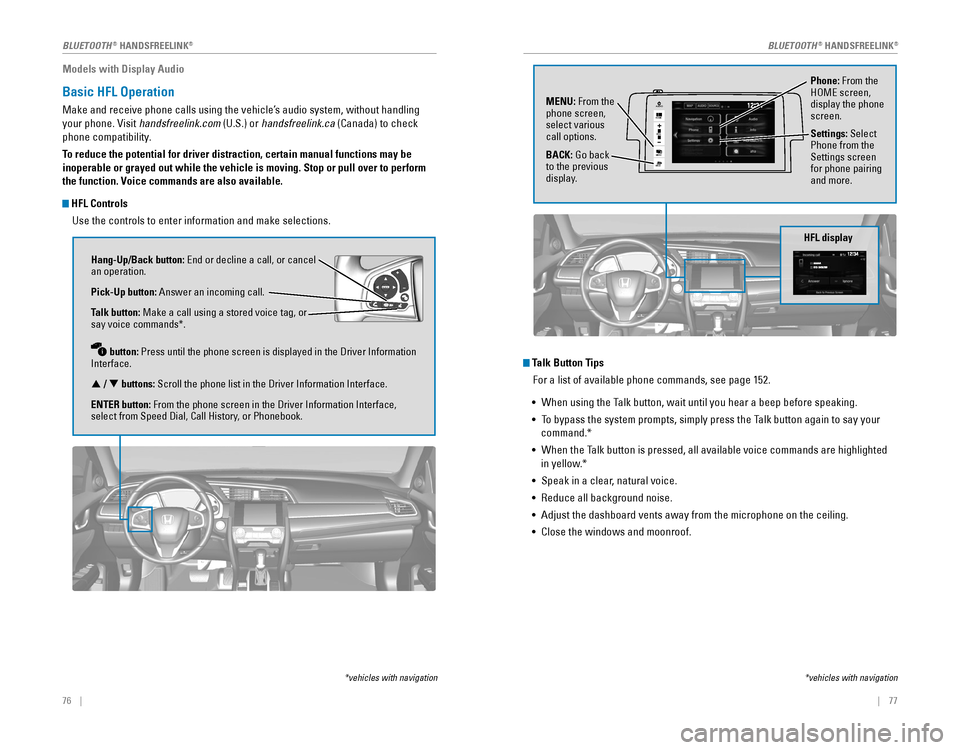
HFL Controls
Use the controls to enter information and make selections.
Hang-Up/Back button: end or decline a call, or cancel an operation.
Pick-Up button: Answer an incoming call.
Talk button: Make a call using a stored voice tag, or
say voice commands*.
button: Press until the phone screen is displayed in the Driver Information
Interface.
p / q buttons: Scroll the phone list in the Driver Information Interface.
ENTER button: From the phone screen in the Driver Information Interface,
select from Speed Dial, Call History, or Phonebook.
*vehicles with navigation
Talk Button Tips For a list of available phone commands, see page 152.
• When using the Talk button, wait until you hear a beep before speaking.
• To bypass the system prompts, simply press the Talk button again to say your
command.*
• When the Talk button is pressed, all available voice commands are highlighted
in yellow.*
• Speak in a clear, natural voice.
•
reduce all background noise.
• Adjust the dashboard vents away from the microphone on the ceiling.
• Close the windows and moonroof.
Phone: From the HoMe screen, display the phone
screen.
MENU: From the
phone screen,
select various
call options.
BACK: Go back
to the previous
display. Settings: Select
Phone from the
Settings screen
for phone pairing
and more.
*vehicles with navigation
HFL display
VO
L
HOME
MENUBACK
AUDIO
BLUETOOTH® HANDSFreeLINK®BLUETOOTH® HANDSFreeLINK®
Page 63 of 82
118 || 119
HANDLING THE UNEXPECTED
HANDLING THE UNEXPECTED
Tire Pressure Monitoring System (TPMS)
Monitors the tire pressure while you are driving. If your vehicle’s tire pressure
becomes significantly low, the low tire pressure indicator comes on and a message
appears on the display. Available on U.S. models only.
What to Do
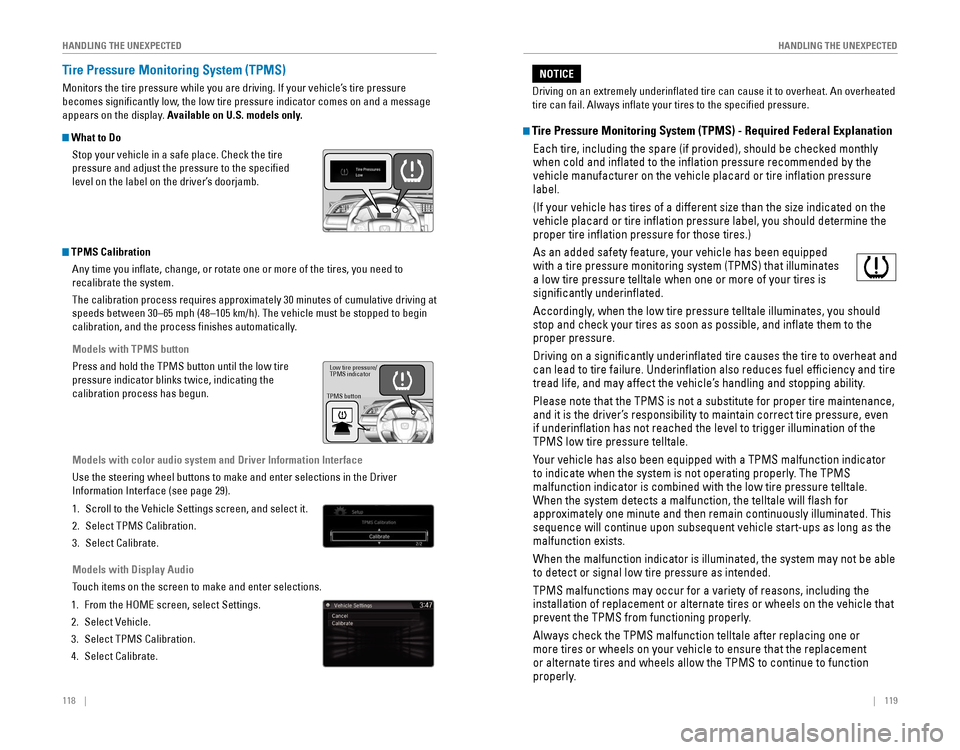
Stop your vehicle in a safe place. Check the tire
pressure and adjust the pressure to the specified
level on the label on the driver’s doorjamb.
TPMS CalibrationAny time you inflate, change, or rotate one or more of the tires, you \
need to
recalibrate the system.
The calibration process requires approximately 30 minutes of cumulative driving at
speeds between 30–65 mph (48–105 km/h). The vehicle must be stop\
ped to begin
calibration, and the process finishes automatically.
Models with TPMS button
Press and hold the TPMS button until the low tire
pressure indicator blinks twice, indicating the
calibration process has begun.
Models with color audio system and Driver Information Interface
Use the steering wheel buttons to make and enter selections in the Drive\
r
Information Interface (see page 29).
1. Scroll to the vehicle Settings screen, and select it.
2. Select TPMS Calibration.
3. Select Calibrate.
Models with Display Audio
Touch items on the screen to make and enter selections.
1. From the HoMe screen, select Settings.
2. Select vehicle.
3. Select TPMS Calibration.
4. Select Calibrate.
TPMS button Low tire pressure/
TPMS indicator
Tire Pressure Monitoring System (TPMS) - Required Federal Explanation
each tire, including the spare (if provided), should be checked monthly\
when cold and inflated to the inflation pressure recommended by the \
vehicle manufacturer on the vehicle placard or tire inflation pressure\
label.
(If your vehicle has tires of a different size than the size indicated \
on the
vehicle placard or tire inflation pressure label, you should determine\
the
proper tire inflation pressure for those tires.)
As an added safety feature, your vehicle has been equipped
with a tire pressure monitoring system (TPMS) that illuminates
a low tire pressure telltale when one or more of your tires is
significantly underinflated.
Accordingly, when the low tire pressure telltale illuminates, you should
stop and check your tires as soon as possible, and inflate them to the\
proper pressure.
Driving on a significantly underinflated tire causes the tire to ove\
rheat and
can lead to tire failure. Underinflation also reduces fuel efficienc\
y and tire
tread life, and may affect the vehicle’s handling and stopping ability.
Please note that the TPMS is not a substitute for proper tire maintenanc\
e,
and it is the driver’s responsibility to maintain correct tire pressure, even
if underinflation has not reached the level to trigger illumination of\
the
TPMS low tire pressure telltale.
Your vehicle has also been equipped with a TPMS malfunction indicator
to indicate when the system is not operating properly. The TPMS
malfunction indicator is combined with the low tire pressure telltale.
When the system detects a malfunction, the telltale will flash for
approximately one minute and then remain continuously illuminated. This \
sequence will continue upon subsequent vehicle start-ups as long as the \
malfunction exists.
When the malfunction indicator is illuminated, the system may not be abl\
e
to detect or signal low tire pressure as intended.
TPMS malfunctions may occur for a variety of reasons, including the
installation of replacement or alternate tires or wheels on the vehicle \
that
prevent the TPMS from functioning properly.
Always check the TPMS malfunction telltale after replacing one or
more tires or wheels on your vehicle to ensure that the replacement
or alternate tires and wheels allow the TPMS to continue to function
properly.
Driving on an extremely underinflated tire can cause it to overheat. A\
n overheated
tire can fail. Always inflate your tires to the specified pressure.
NOTICE