HONDA CIVIC 2022 Owners Manual
Manufacturer: HONDA, Model Year: 2022, Model line: CIVIC, Model: HONDA CIVIC 2022Pages: 700, PDF Size: 13.98 MB
Page 591 of 700
590
uuMaintenance MinderTMuTo Use Maintenance MinderTM
Maintenance
*1 : Models with A-type meter
*2 : Models with B-type meter
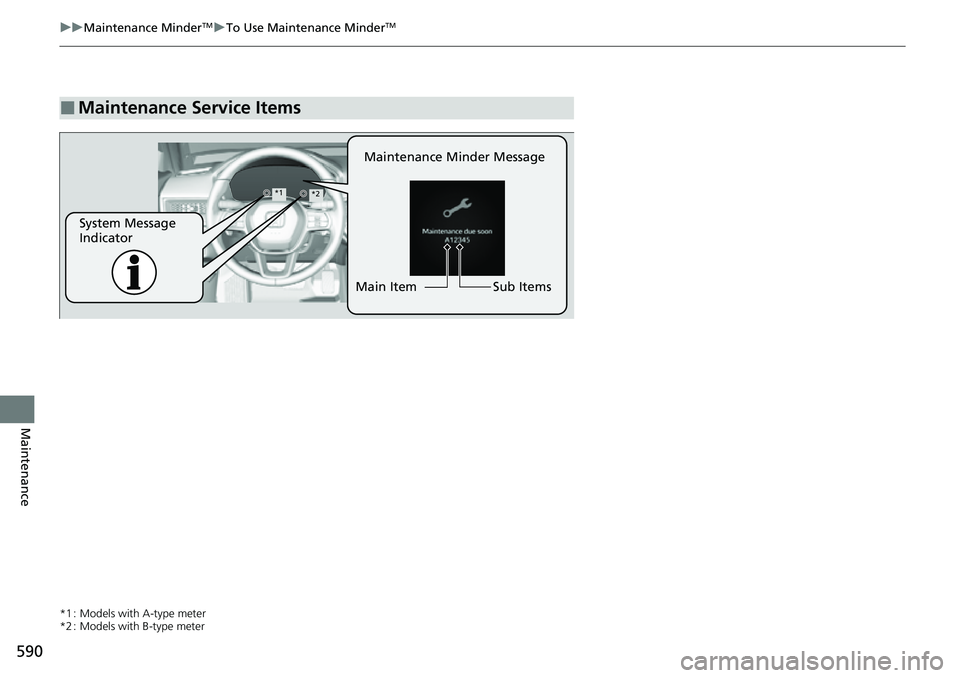
■Maintenance Service Items
Maintenance Minder Message
System Message
Indicator Sub Items
Main Item
*1*2
Page 592 of 700
591
uuMaintenance MinderTMuTo Use Maintenance MinderTM
Continued
Maintenance
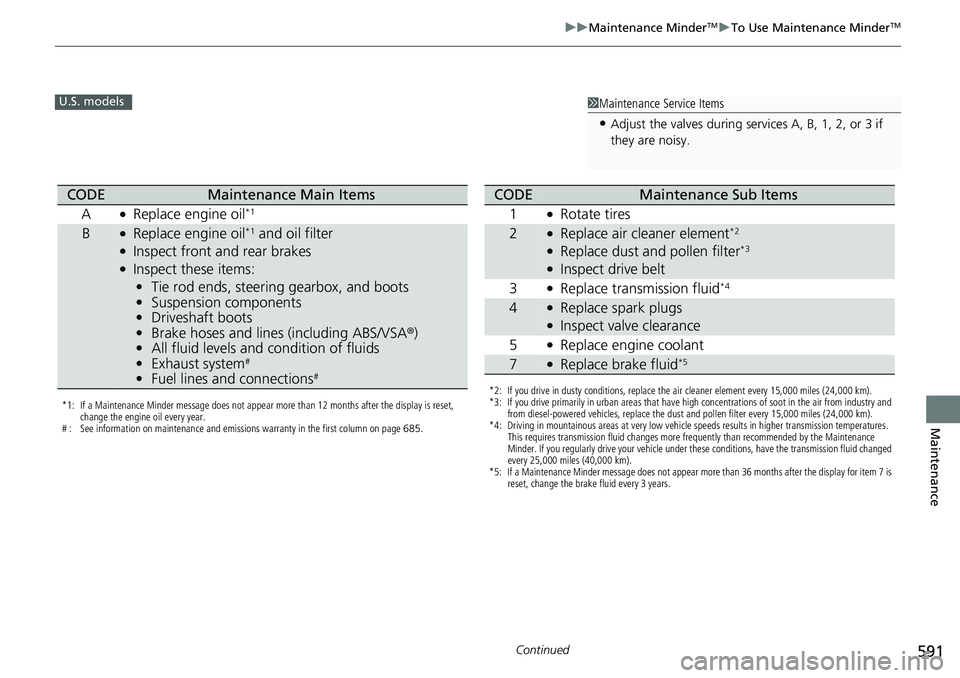
1Maintenance Service Items
•Adjust the valves during services A, B, 1, 2, or 3 if
they are noisy.
U.S. models
*1: If a Maintenance Minder message does not appear more than 12 months after the display is reset,
change the engine oil every year.
# : See information on maintenance and emissions warranty in the first column on page 685.
CODEMaintenance Main Items
A
●Replace engine oil*1
B●Replace engine oil*1 and oil filter●Inspect front and rear brakes●Inspect these items: • Tie rod ends, steering gearbox, and boots
• Suspension components
• Driveshaft boots
• Brake hoses and lines (including ABS/VSA®)
• All fluid levels and condition of fluids
• Exhaust system
#
•Fuel lines and connections#*2: If you drive in dusty conditions, replace the air cleaner element every 15,000 miles (24,000 km).
*3: If you drive primarily in urban areas that have high concentrations of soot in the air from industry and
from diesel-powered vehicles, replace the dust and pollen filter every 15,000 miles (24,000 km).
*4: Driving in mountainous areas at very low vehicle speeds results in higher transmission temperatures. This requires transmission fluid changes more frequently than recommended by the Maintenance
Minder. If you regularly drive your vehicle under these conditions, have the transmission fluid changed
every 25,000 miles (40,000 km).
*5: If a Maintenance Minder message does not appear more than 36 months after the display for item 7 is reset, change the brake fluid every 3 years.
CODEMaintenance Sub Items
1
●Rotate tires
2●Replace air cleaner element*2
●Replace dust and pollen filter*3
●Inspect drive belt
3
●Replace transmission fluid*4
4●Replace spark plugs●Inspect valve clearance
5
●Replace engine coolant
7●Replace brake fluid*5
Page 593 of 700
592
uuMaintenance MinderTMuTo Use Maintenance MinderTM
Maintenance
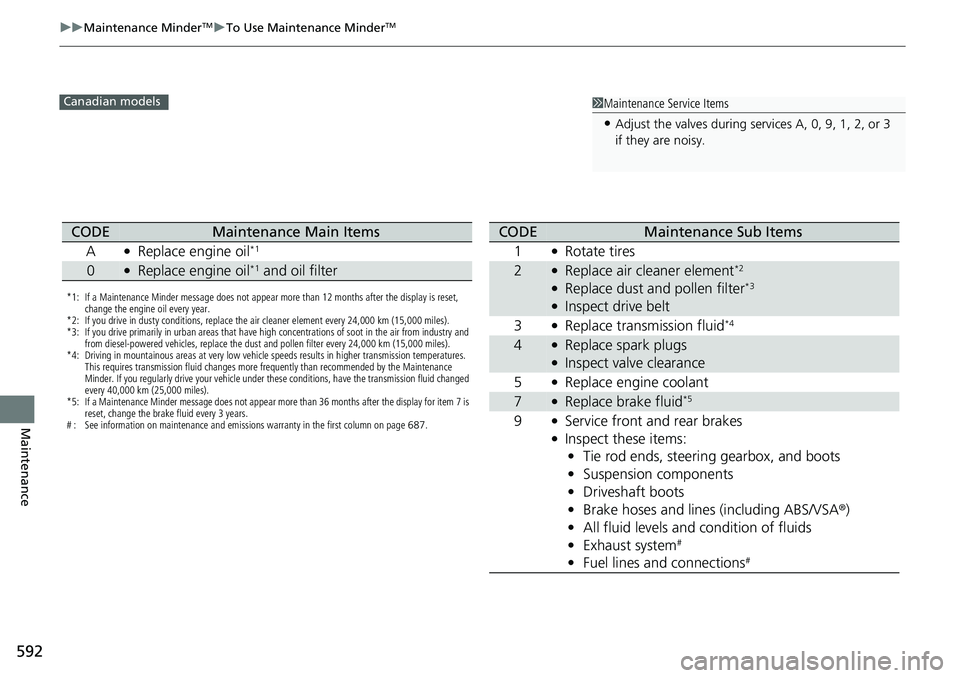
1Maintenance Service Items
•Adjust the valves during services A, 0, 9, 1, 2, or 3
if they are noisy.
Canadian models
*1: If a Maintenance Minder message does not appear more than 12 months after the display is reset,
change the engine oil every year.
*2: If you drive in dusty conditions, replace the air cleaner element every 24,000 km (15,000 miles).
*3: If you drive primarily in urban areas that have high concentrations of soot in the air from industry and from diesel-powered vehicles, replace the dust and pollen filter every 24,000 km (15,000 miles).
*4: Driving in mountainous areas at very low vehicle speeds results in higher transmission temperatures. This requires transmission fluid changes more frequently than recommended by the Maintenance
Minder. If you regularly drive your vehicle under these conditions, have the transmission fluid changed
every 40,000 km (25,000 miles).
*5: If a Maintenance Minder message does not appear more than 36 months after the display for item 7 is reset, change the brake fluid every 3 years.
# : See information on maintenance and emissions warranty in the first column on page 687.
CODEMaintenance Main Items
A
●Replace engine oil*1
0●Replace engine oil*1 and oil filter
CODEMaintenance Sub Items
1
●Rotate tires
2●Replace air cleaner element*2
●Replace dust and pollen filter*3
●Inspect drive belt
3
●Replace transmission fluid*4
4●Replace spark plugs●Inspect valve clearance
5
●Replace engine coolant
7●Replace brake fluid*5
9●Service front and rear brakes●Inspect these items: • Tie rod ends, steering gearbox, and boots
• Suspension components
• Driveshaft boots
• Brake hoses and lines (including ABS/VSA ®)
• All fluid levels and condition of fluids
• Exhaust system
#
•Fuel lines and connections#
Page 594 of 700
Continued593
uuMaintenance MinderTMuTo Use Maintenance MinderTM
Maintenance
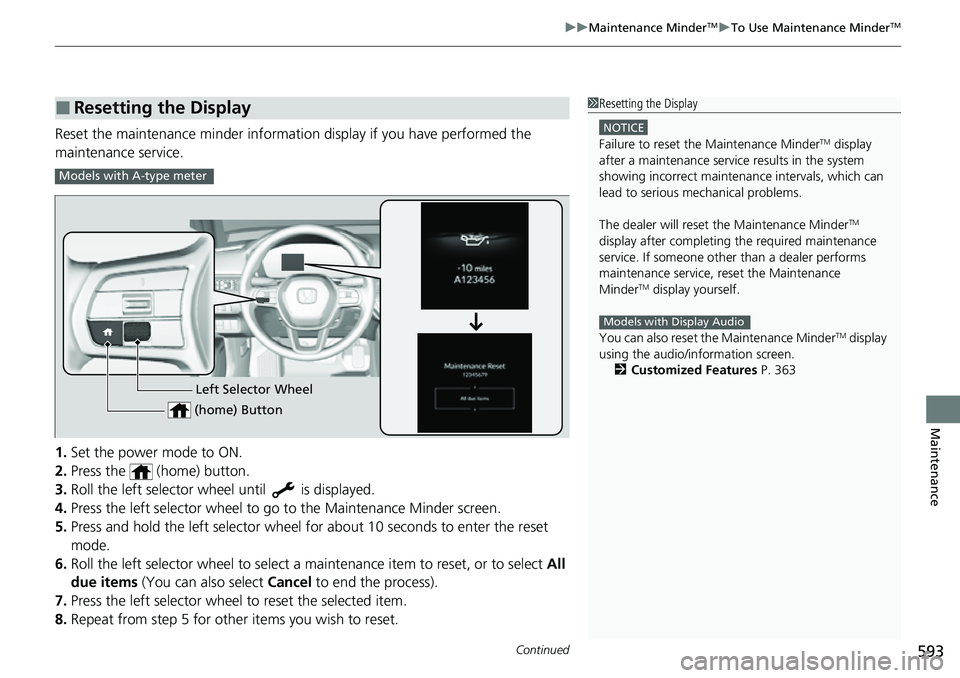
Reset the maintenance minder information display if you have performed the
maintenance service.
1. Set the power mode to ON.
2. Press the (home) button.
3. Roll the left selector wheel until is displayed.
4. Press the left selector wheel to go to the Maintenance Minder screen.
5. Press and hold the left selector wheel for about 10 seconds to enter the reset
mode.
6. Roll the left selector wheel to select a ma intenance item to reset, or to select All
due items (You can also select Cancel to end the process).
7. Press the left selector wheel to reset the selected item.
8. Repeat from step 5 for other items you wish to reset.
■Resetting the Display1Resetting the Display
NOTICE
Failure to reset the Maintenance MinderTM display
after a maintenance servic e results in the system
showing incorrect maintenance intervals, which can
lead to serious mechanical problems.
The dealer will reset the Maintenance Minder
TM
display after completing th e required maintenance
service. If someone other than a dealer performs
maintenance service, reset the Maintenance
Minder
TM display yourself.
You can also reset the Maintenance Minder
TM display
using the audio/information screen.
2 Customized Features P. 363
Models with Display Audio
Models with A-type meter
Left Selector Wheel
(home) Button
Page 595 of 700
594
uuMaintenance MinderTMuTo Use Maintenance MinderTM
Maintenance
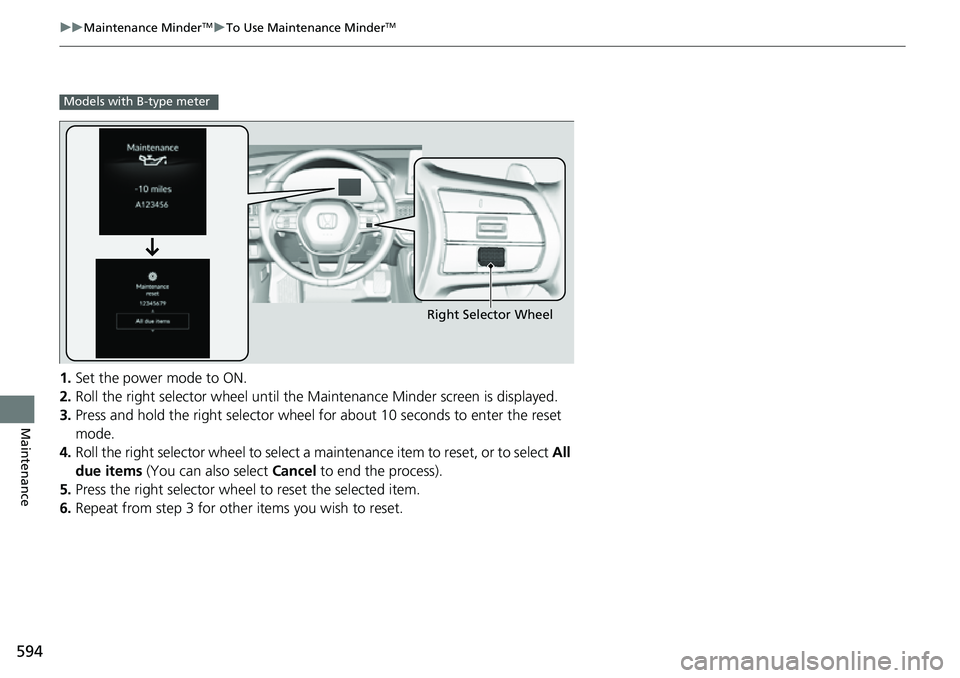
1. Set the power mode to ON.
2. Roll the right selector wheel until the Maintenance Minder screen is displayed.
3. Press and hold the right selector wheel for about 10 seconds to enter the reset
mode.
4. Roll the right selector wheel to select a maintenance item to reset, or to select All
due items (You can also select Cancel to end the process).
5. Press the right selector wheel to reset the selected item.
6. Repeat from step 3 for other items you wish to reset.
Models with B-type meter
Right Selector Wheel
Page 596 of 700
595Continued
Maintenance
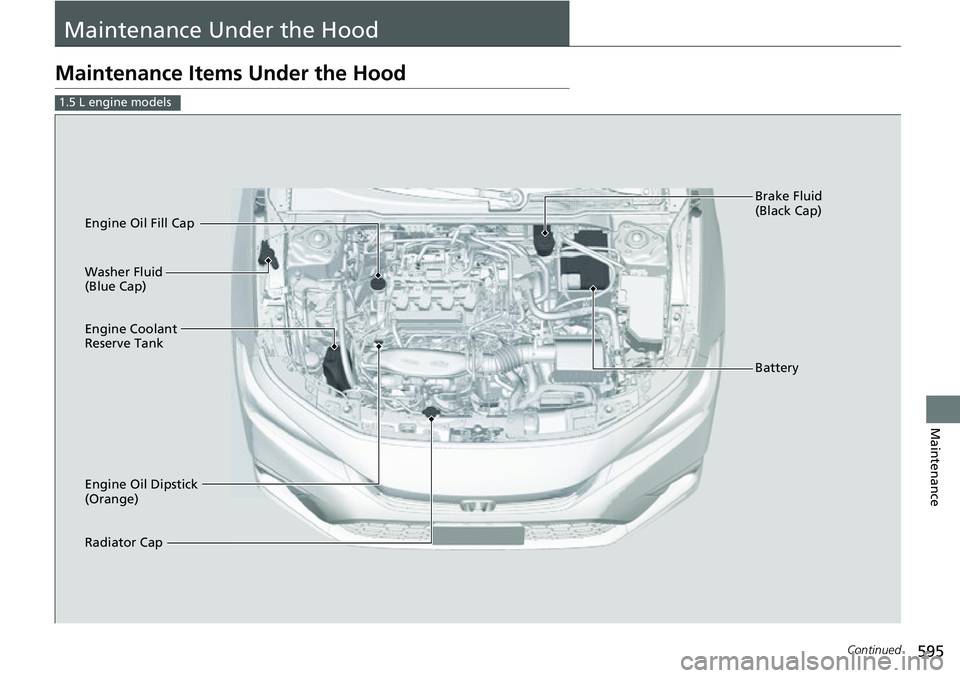
Maintenance Under the Hood
Maintenance Items Under the Hood
1.5 L engine models
Brake Fluid
(Black Cap)
Radiator Cap Washer Fluid
(Blue Cap)
Engine Oil Dipstick
(Orange) Engine Oil Fill Cap Battery
Engine Coolant
Reserve Tank
Page 597 of 700
596
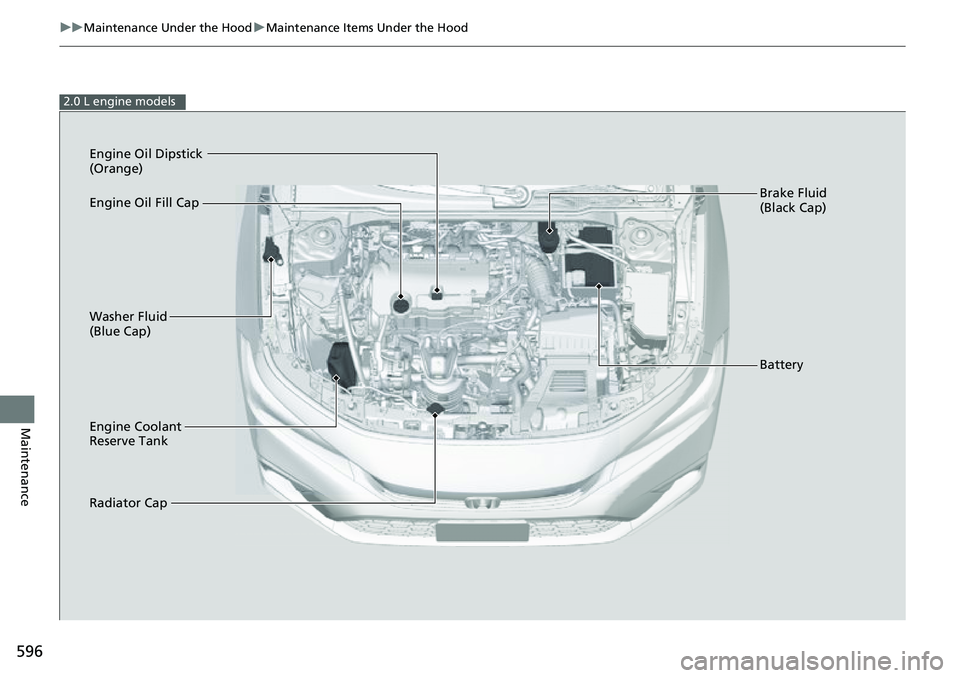
uuMaintenance Under the Hood uMaintenance Items Under the Hood
Maintenance
2.0 L engine models
Brake Fluid
(Black Cap)
Washer Fluid
(Blue Cap) Engine Oil Dipstick
(Orange)
Battery
Radiator Cap
Engine Coolant
Reserve Tank Engine Oil Fill Cap
Page 598 of 700
597
uuMaintenance Under the Hood uOpening the Hood
Maintenance
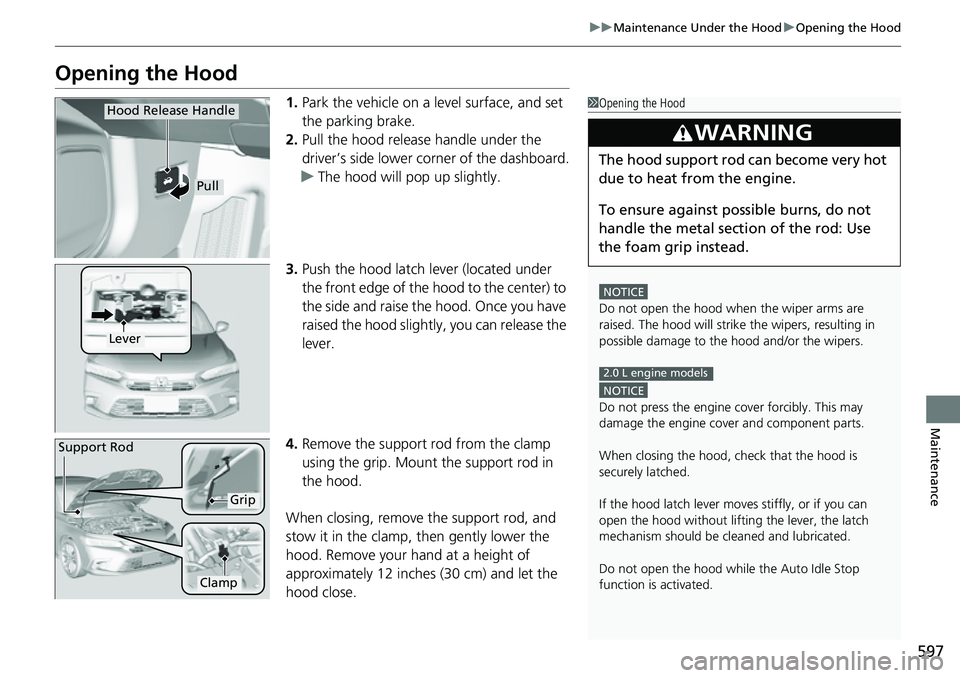
Opening the Hood
1. Park the vehicle on a level surface, and set
the parking brake.
2. Pull the hood release handle under the
driver’s side lower corner of the dashboard.
u The hood will pop up slightly.
3. Push the hood latch lever (located under
the front edge of the hood to the center) to
the side and raise the hood. Once you have
raised the hood slightly, you can release the
lever.
4. Remove the support rod from the clamp
using the grip. Mount the support rod in
the hood.
When closing, remove the support rod, and
stow it in the clamp, then gently lower the
hood. Remove your hand at a height of
approximately 12 inches (30 cm) and let the
hood close.1 Opening the Hood
NOTICE
Do not open the hood when the wiper arms are
raised. The hood will strike the wipers, resulting in
possible damage to the hood and/or the wipers.
NOTICE
Do not press the engine cover forcibly. This may
damage the engine cover and component parts.
When closing the hood, check that the hood is
securely latched.
If the hood latch lever moves stiffly, or if you can
open the hood without lifti ng the lever, the latch
mechanism should be cl eaned and lubricated.
Do not open the hood while the Auto Idle Stop
function is activated.
3WARNING
The hood support rod can become very hot
due to heat fr om the engine.
To ensure against po ssible burns, do not
handle the metal section of the rod: Use
the foam grip instead.
2.0 L engine models
Hood Release Handle
Pull
Lever
Support Rod
Grip
Clamp
Page 599 of 700
598
uuMaintenance Under the Hood uRecommended Engine Oil
Maintenance
Recommended Engine Oil
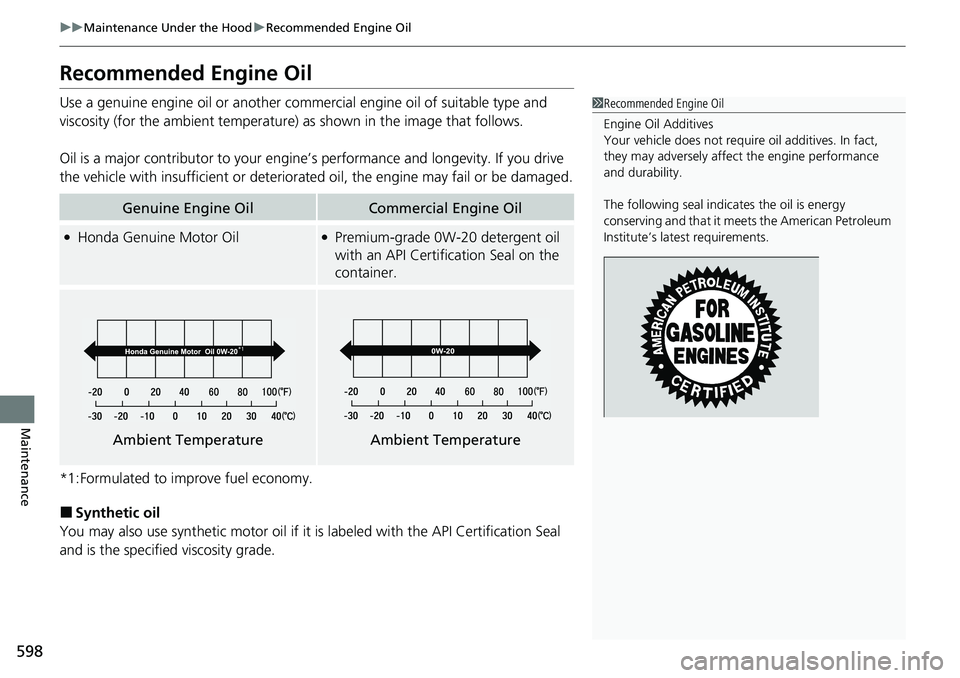
Use a genuine engine oil or another commercial engine oil of suitable type and
viscosity (for the ambient temperature) as shown in the image that follows.
Oil is a major contributor to your engine ’s performance and longevity. If you drive
the vehicle with insufficient or deteriorat ed oil, the engine may fail or be damaged.
*1:Formulated to improve fuel economy.
■Synthetic oil
You may also use synthetic motor oil if it is labeled with the API Certification Seal
and is the specified viscosity grade.
Genuine Engine OilCommercial Engine Oil
●Honda Genuine Motor Oil●Premium-grade 0W-20 detergent oil
with an API Certification Seal on the
container.
1 Recommended Engine Oil
Engine Oil Additives
Your vehicle does not require oil additives. In fact,
they may adversely affect the engine performance
and durability.
The following seal indicates the oil is energy
conserving and that it meets the American Petroleum
Institute’s late st requirements.
Ambient TemperatureAmbient Temperature
Page 600 of 700
599
uuMaintenance Under the Hood uOil Check
Continued
Maintenance
Oil Check
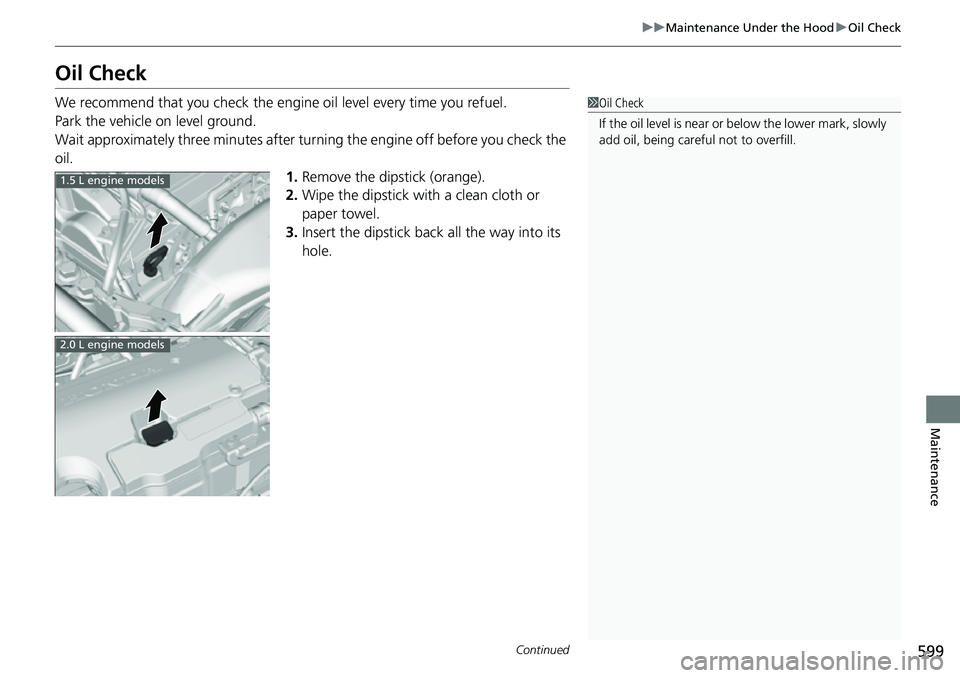
We recommend that you check the engine oil level every time you refuel.
Park the vehicle on level ground.
Wait approximately three minutes after turn ing the engine off before you check the
oil. 1.Remove the dipstick (orange).
2. Wipe the dipstick with a clean cloth or
paper towel.
3. Insert the dipstick back all the way into its
hole.1Oil Check
If the oil level is near or below the lower mark, slowly
add oil, being carefu l not to overfill.
1.5 L engine models
2.0 L engine models