ECO mode HONDA CIVIC COUPE 1998 Owners Manual
[x] Cancel search | Manufacturer: HONDA, Model Year: 1998, Model line: CIVIC COUPE, Model: HONDA CIVIC COUPE 1998Pages: 251, PDF Size: 2.04 MB
Page 26 of 251
Protecting Children
3. The child seat should fit the vehicle seating position (or
positions) where it will be used.
Due to variations in the design of child seats, vehicle seats, and seat
belts, all child seats will not fit all
vehicle seating positions.
However, Honda is confident that
one or more child seat models can fit
and be properly installed in all
recommended seating positions in
your vehicle.
Whenever possible, we recommend
that parents test a child seat in the specific vehicle seating position (or
positions) where they intend to use
the seat before making a purchase. If a previously purchased child seat
does not fit, you may need to buy a
different one that will fit.
Driver and Passenger SafetyMain Menu Table of Contents s t
Page 29 of 251
Protecting Children
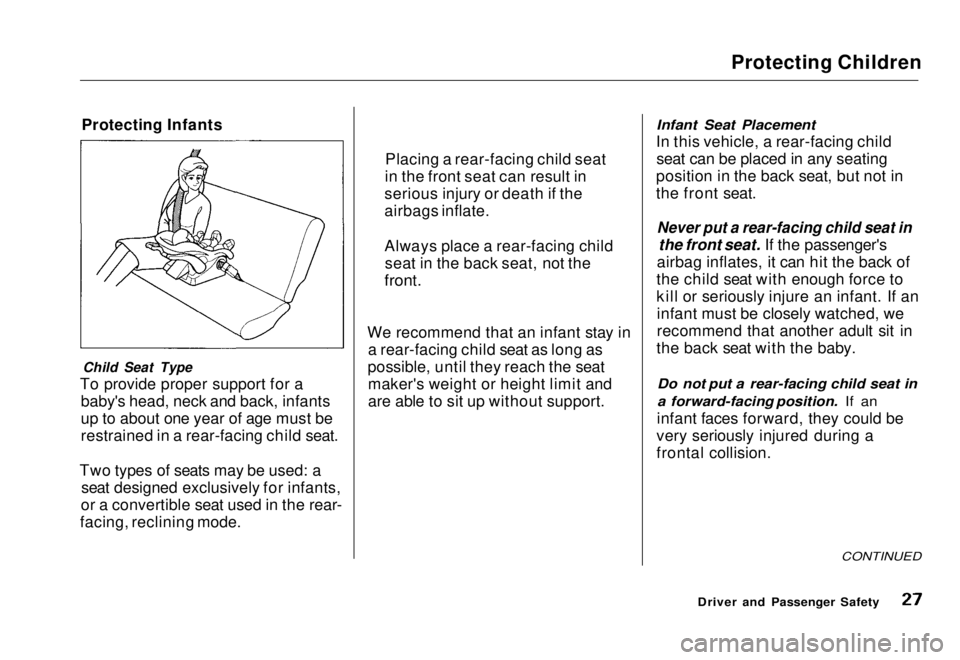
Protecting Infants
Child Seat Type
To provide proper support for a baby's head, neck and back, infants
up to about one year of age must be
restrained in a rear-facing child seat.
Two types of seats may be used: a seat designed exclusively for infants,
or a convertible seat used in the rear-
facing, reclining mode. We recommend that an infant stay in
a rear-facing child seat as long as
possible, until they reach the seat maker's weight or height limit and
are able to sit up without support.
Infant Seat Placement
In this vehicle, a rear-facing child seat can be placed in any seating
position in the back seat, but not in
the front seat.
Never put a rear-facing child seat in
the front seat. If the passenger's
airbag inflates, it can hit the back of
the child seat with enough force to
kill or seriously injure an infant. If an infant must be closely watched, we
recommend that another adult sit in
the back seat with the baby.
Do not put a rear-facing child seat in
a forward-facing position. If an
infant faces forward, they could be
very seriously injured during a
frontal collision.
CONTINUED
Driver and Passenger Safety
Placing a rear-facing child seat
in the front seat can result in
serious injury or death if the
airbags inflate.
Always place a rear-facing child seat in the back seat, not the
front.Main Menu Table of Contents s t
Page 50 of 251
Safety Labels
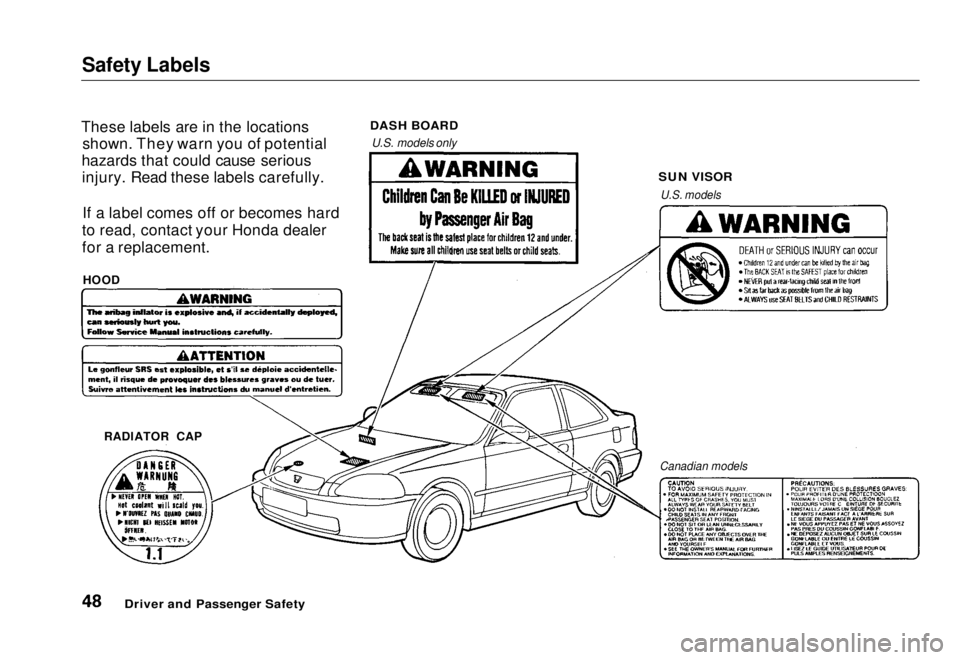
These labels are in the locations shown. They warn you of potential
hazards that could cause serious injury. Read these labels carefully.
If a label comes off or becomes hard
to read, contact your Honda dealer
for a replacement.
DASH BOARD
U.S. models only
SUN VISOR
U.S. models
RADIATOR CAP
HOOD
Canadian models
Driver and Passenger SafetyMain Menu Table of Contents s t
Page 54 of 251
Indicator Lights
* Differences in the indicators for Canadian models are noted in the text.
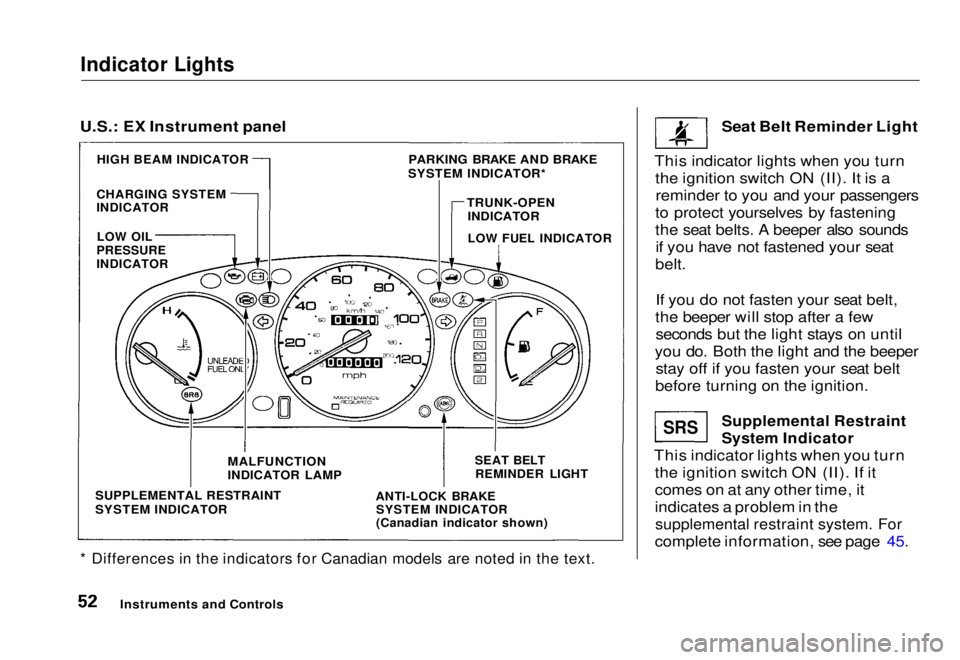
Seat Belt Reminder Light
This indicator lights when you turn the ignition switch ON (II). It is areminder to you and your passengers
to protect yourselves by fastening
the seat belts. A beeper also sounds if you have not fastened your seat
belt.
If you do not fasten your seat belt,
the beeper will stop after a few seconds but the light stays on until
you do. Both the light and the beeper stay off if you fasten your seat belt
before turning on the ignition.
Supplemental Restraint
System Indicator
This indicator lights when you turn the ignition switch ON (II). If it
comes on at any other time, it
indicates a problem in the
supplemental restraint system. For
complete information, see page 45.
Instruments and Controls
SRS
U.S.: EX Instrument panel
PARKING BRAKE AND BRAKE
SYSTEM INDICATOR*
HIGH BEAM INDICATOR
CHARGING SYSTEM
INDICATOR
TRUNK-OPEN
INDICATOR
LOW FUEL INDICATOR
LOW OIL
PRESSURE
INDICATOR
SUPPLEMENTAL RESTRAINT
SYSTEM INDICATOR
MALFUNCTION
INDICATOR LAMP
ANTI-LOCK BRAKE
SYSTEM INDICATOR
(Canadian indicator shown)
SEAT BELT
REMINDER LIGHTMain Menu Table of Contents s t
Page 55 of 251
Indicator Lights
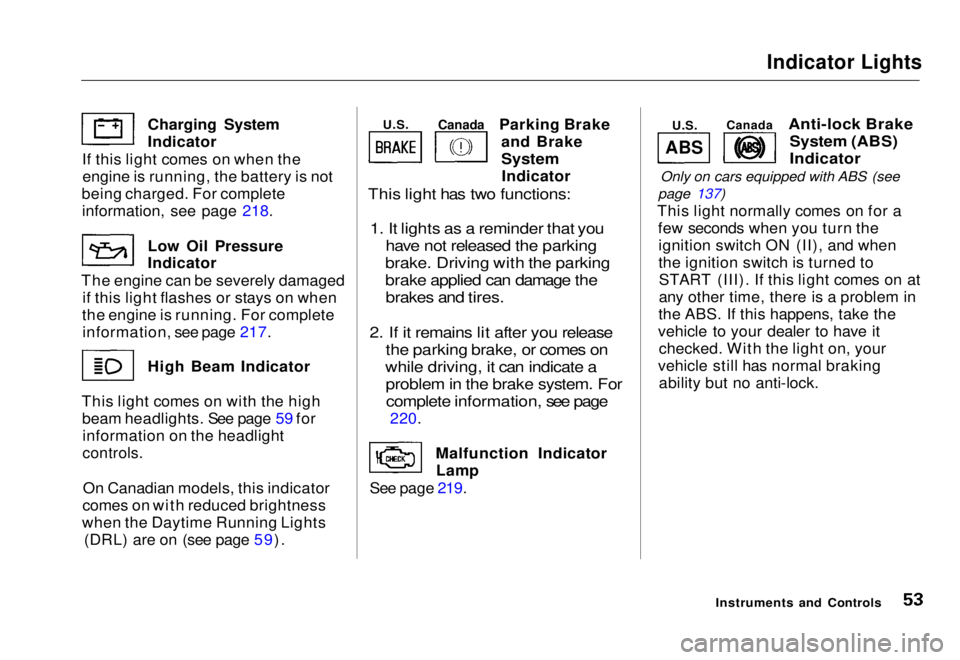
Parking Brake and Brake
System
Indicator
This light has two functions:
1. It lights as a reminder that you have not released the parking
brake. Driving with the parking
brake applied can damage the brakes and tires.
2. If it remains lit after you release the parking brake, or comes on
while driving, it can indicate a problem in the brake system. Forcomplete information, see page
220.
Malfunction Indicator Lamp
See page 219.
Anti-lock Brake
System (ABS)
Indicator
Only on cars equipped with ABS (see
page 137)
This light normally comes on for a few seconds when you turn theignition switch ON (II), and when
the ignition switch is turned toSTART (III). If this light comes on at
any other time, there is a problem in
the ABS. If this happens, take the
vehicle to your dealer to have it checked. With the light on, your
vehicle still has normal braking ability but no anti-lock.
Instruments and Controls
Charging System Indicator
If this light comes on when the engine is running, the battery is not
being charged. For complete
information
,
see page 218.
Low Oil
Pressure
Indicator
The engine can be severely damaged if this light flashes or stays on when
the engine is running. For complete information, see page 217. High Beam Indicator
This light comes on with the high beam headlights. See page 59 forinformation on the headlight
controls.
On Canadian models, this indicator
comes on with reduced brightness
when the Daytime Running Lights (DRL) are on (see page 59).
ABS
U.S.
Canada
U.S.
CanadaMain Menu Table of Contents s t
Page 63 of 251
Controls Near the Steering Wheel
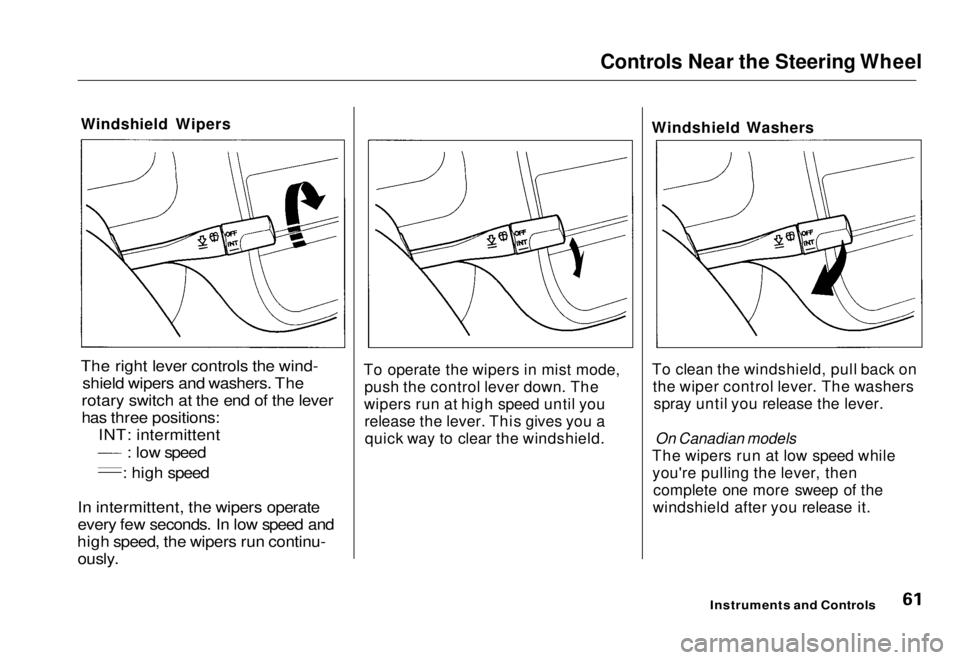
Windshield Wipers
The right lever controls the wind- shield wipers and washers. The
rotary switch at the end of the lever
has three positions: INT: intermittent
: low speed : high speed
In intermittent, the wipers operate
every few seconds. In low speed and
high speed, the wipers run continu-
ously.
To operate the wipers in mist mode,
push the control lever down. The
wipers run at high speed until you release the lever. This gives you aquick way to clear the windshield. Windshield Washers
To clean the windshield, pull back on the wiper control lever. The washersspray until you release the lever.
On Canadian models
The wipers run at low speed while you're pulling the lever, then complete one more sweep of the
windshield after you release it.
Instruments and ControlsMain Menu Table of Contents s t
Page 66 of 251
Steering Wheel Controls
Cruise Control On EX model in the U.S., and Si model
in Canada
Cruise control allows you to maintain
a set speed above 25 mph (40 km/h)
without keeping your foot on the accelerator pedal. It should be used
for cruising on straight, open highways. It is not recommended for
conditions such as city driving,
winding roads, slippery roads, heavy rain, or bad weather. You should
have full control of the vehicle under
those conditions. The cruise control, as it operates,
moves the accelerator pedal. You can
damage your vehicle's accelerator mechanism by resting your foot underthe pedal and blocking the movement.
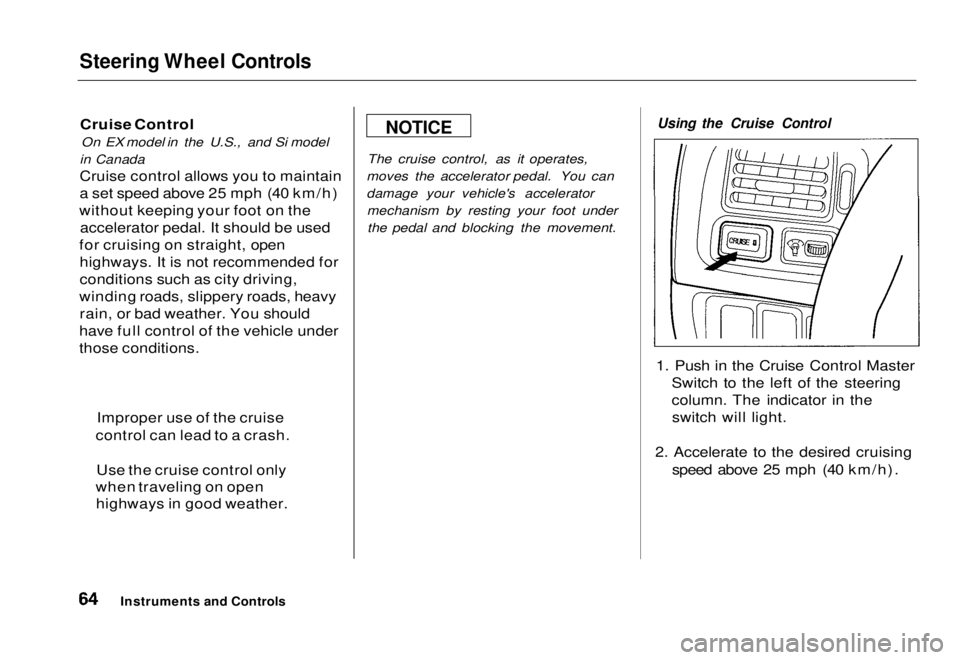
Using the Cruise Control
1. Push in the Cruise Control Master Switch to the left of the steering
column. The indicator in theswitch will light.
2. Accelerate to the desired cruising speed above 25 mph (40 km/h).
Instruments and Controls
NOTICE
Improper use of the cruise
control can lead to a crash.
Use the cruise control only
when traveling on open highways in good weather.Main Menu Table of Contents s t
Page 72 of 251
Keys and Locks
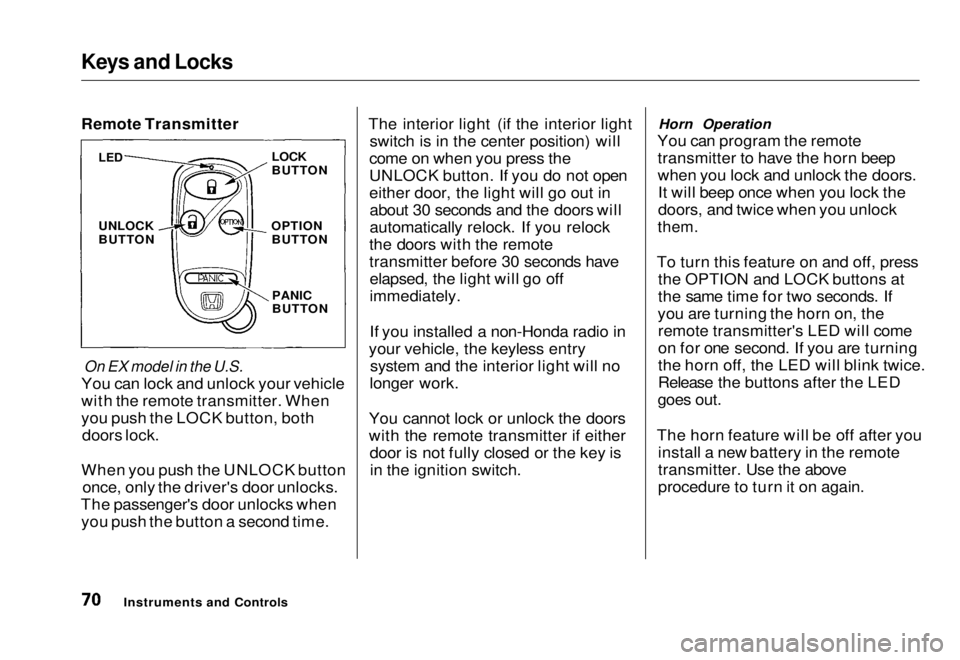
Remote Transmitter
On EX model in the U.S.
You can lock and unlock your vehicle
with the remote transmitter. When
you push the LOCK button, both doors lock.
When you push the UNLOCK button once, only the driver's door unlocks.
The passenger's door unlocks when you push the button a second time. The interior light (if the interior light
switch is in the center position) will
come on when you press the
UNLOCK button. If you do not open
either door, the light will go out in about 30 seconds and the doors will
automatically relock. If you relock
the doors with the remote
transmitter before 30 seconds have elapsed, the light will go off
immediately.
If you installed a non-Honda radio in
your vehicle, the keyless entry system and the interior light will no
longer work.
You cannot lock or unlock the doors
with the remote transmitter if either door is not fully closed or the key isin the ignition switch. Horn Operation
You can program the remote transmitter to have the horn beep
when you lock and unlock the doors.It will beep once when you lock the
doors, and twice when you unlock
them.
To turn this feature on and off, press the OPTION and LOCK buttons at
the same time for two seconds. If
you are turning the horn on, the remote transmitter's LED will come
on for one second. If you are turning
the horn off, the LED will blink twice.
Release the buttons after the LED
goes out.
The horn feature will be off after you install a new battery in the remote
transmitter. Use the above
procedure to turn it on again.
Instruments and Controls
LED
UNLOCK
BUTTON
LOCK
BUTTON
OPTION BUTTON
PANIC
BUTTONMain Menu Table of Contents s t
Page 73 of 251
Keys and Locks
Panic Mode
Panic mode allows you to remotely
sound your vehicle's horn to attract
attention. To activate this mode,
press and hold the PANIC button for
about one second. Your vehicle's
horn will beep for about 30 seconds.
To cancel PANIC mode before 30 seconds, press any button on the
remote transmitter. You can also
turn the ignition switch to
ACCESSORY (I) or ON (II).
Panic mode will not activate if the
ignition switch is in ACCESSORY (I)or ON (II).
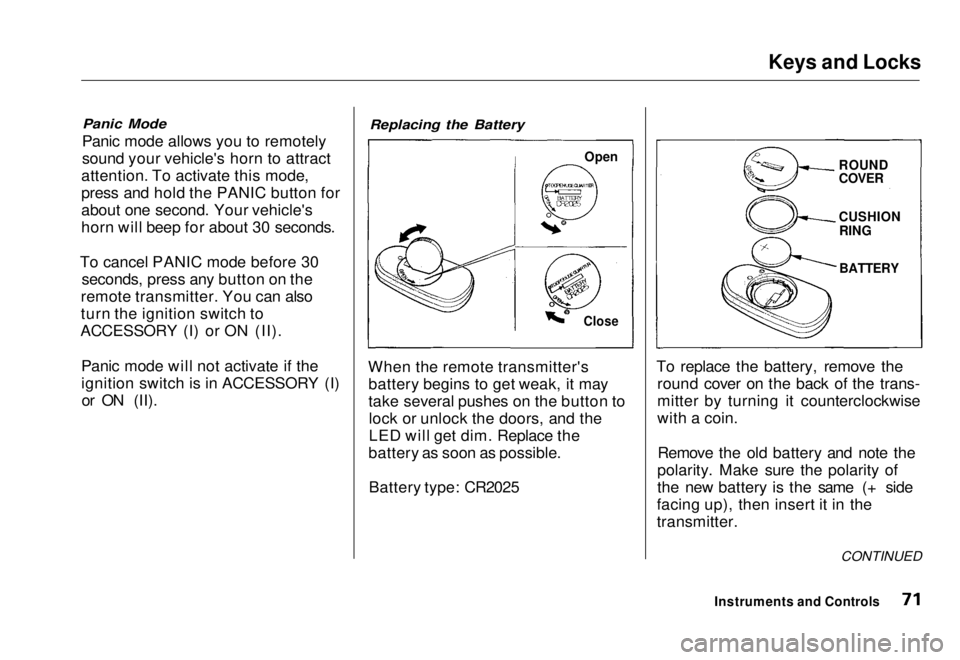
Replacing the Battery
When the remote transmitter's battery begins to get weak, it may
take several pushes on the button tolock or unlock the doors, and the
LED will get dim. Replace the
battery as soon as possible.
Battery type: CR2025 To replace the battery, remove the
round cover on the back of the trans-
mitter by turning it counterclockwise
with a coin.
Remove the old battery and note the
polarity. Make sure the polarity of
the new battery is the same (+ side
facing up), then insert it in the
transmitter.
Instruments and Controls
Open
Close
ROUND
COVER
CUSHION
RING
BATTERY
CONTINUEDMain Menu Table of Contents s t
Page 98 of 251
Audio System
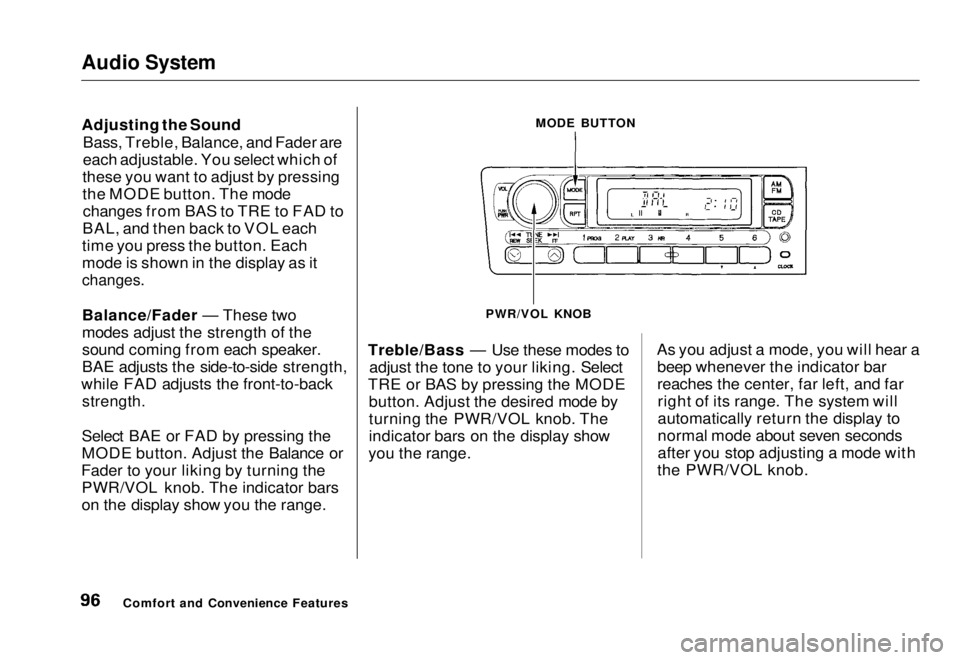
Adjusting the Sound
Bass, Treble, Balance, and Fader are
each adjustable. You select which of
these you want to adjust by pressing
the MODE button. The mode changes from BAS to TRE to FAD to
BAL, and then back to VOL each
time you press the button. Each
mode is shown in the display as it
changes.
Balance/Fader — These two
modes adjust the strength of the
sound coming from each speaker.
BAE adjusts the side-to-side strength,
while FAD adjusts the front-to-back
strength.
Select BAE or FAD by pressing the
MODE button. Adjust the Balance or
Fader to your liking by turning the PWR/VOL knob. The indicator bars
on the display show you the range. Treble/Bass — Use these modes to
adjust the tone to your liking. Select
TRE or BAS by pressing the MODE button. Adjust the desired mode by
turning the PWR/VOL knob. The
indicator bars on the display show
you the range. As you adjust a mode, you will hear a
beep whenever the indicator bar
reaches the center, far left, and farright of its range. The system will
automatically return the display to
normal mode about seven seconds
after you stop adjusting a mode with
the PWR/VOL knob.
Comfort and Convenience Features MODE BUTTON
PWR/VOL KNOBMain Menu Table of Contents s t