ABS HONDA CIVIC COUPE 1998 Owners Manual
[x] Cancel search | Manufacturer: HONDA, Model Year: 1998, Model line: CIVIC COUPE, Model: HONDA CIVIC COUPE 1998Pages: 251, PDF Size: 2.04 MB
Page 7 of 251
Your Vehicle's Safety Features
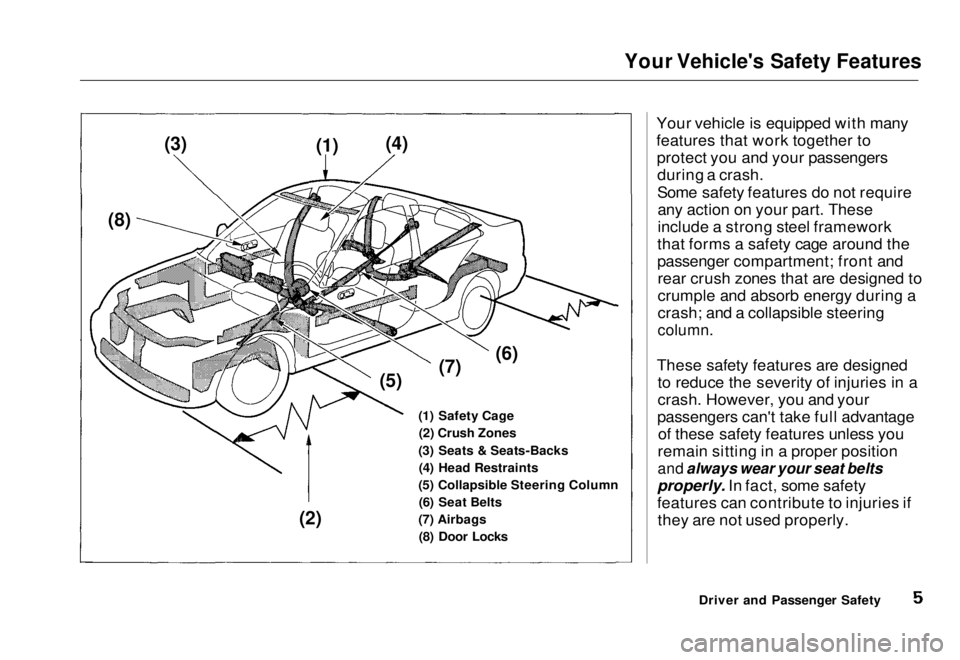
Your vehicle is equipped with many
features that work together toprotect you and your passengersduring a crash.
Some safety features do not requireany action on your part. These
include a strong steel framework
that forms a safety cage around the
passenger compartment; front and rear crush zones that are designed to
crumple and absorb energy during a
crash; and a collapsible steering
column.
These safety features are designed to reduce the severity of injuries in a
crash. However, you and your
passengers can't take full advantage of these safety features unless you
remain sitting in a proper position
and always wear your seat belts
properly. In fact, some safety
features can contribute to injuries if they are not used properly.
Driver and Passenger Safety
(3)
(1)(4)
(8)
(5)(7)
(6)
(1) Safety Cage (2) Crush Zones
(3) Seats & Seats-Backs (4) Head Restraints
(5) Collapsible Steering Column (6) Seat Belts
(7) Airbags (8) Door Locks
(2)Main Menu Table of Contents s t
Page 10 of 251

Your Vehicle's Safety Features
Seats & Seat-Backs
Your vehicle seats are designed to
keep you in a comfortable, upright
position so you can take full advantage of the protection offered
by seat belts and the seats' energy
absorbing materials.
How you adjust your seats and seat-
backs can also affect your safety. For example, sitting too close to the
steering wheel or dashboard
increases your risk of being injured
by striking the inside of the vehicle or being injured by an inflating
airbag.
Reclining a seat-back too far makes
your seat belt less effective and increases your chance of sliding
under the seat belt and being seriously injured in a crash. What you should do: Move the front
seats as far back as practical, and
keep adjustable seat-backs in an upright position whenever the
vehicle is moving.
Head Restraints
Head restraints can help protect you
from whiplash and other injuries. Formaximum protection, the back of
your head should rest against the center of the head restraint.
Driver and Passenger SafetyMain Menu Table of Contents s t
Page 55 of 251
Indicator Lights
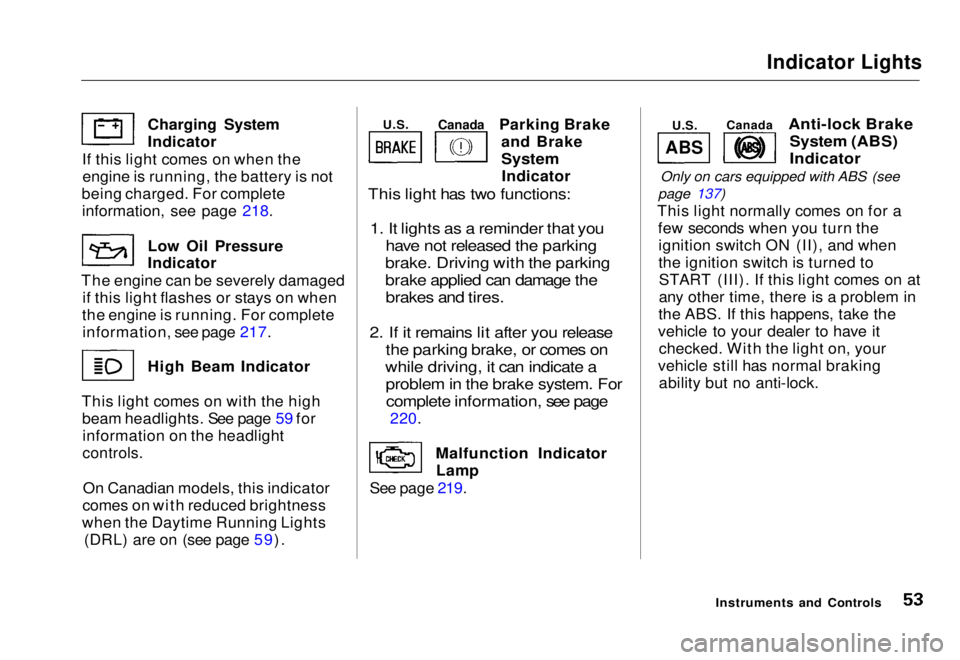
Parking Brake and Brake
System
Indicator
This light has two functions:
1. It lights as a reminder that you have not released the parking
brake. Driving with the parking
brake applied can damage the brakes and tires.
2. If it remains lit after you release the parking brake, or comes on
while driving, it can indicate a problem in the brake system. Forcomplete information, see page
220.
Malfunction Indicator Lamp
See page 219.
Anti-lock Brake
System (ABS)
Indicator
Only on cars equipped with ABS (see
page 137)
This light normally comes on for a few seconds when you turn theignition switch ON (II), and when
the ignition switch is turned toSTART (III). If this light comes on at
any other time, there is a problem in
the ABS. If this happens, take the
vehicle to your dealer to have it checked. With the light on, your
vehicle still has normal braking ability but no anti-lock.
Instruments and Controls
Charging System Indicator
If this light comes on when the engine is running, the battery is not
being charged. For complete
information
,
see page 218.
Low Oil
Pressure
Indicator
The engine can be severely damaged if this light flashes or stays on when
the engine is running. For complete information, see page 217. High Beam Indicator
This light comes on with the high beam headlights. See page 59 forinformation on the headlight
controls.
On Canadian models, this indicator
comes on with reduced brightness
when the Daytime Running Lights (DRL) are on (see page 59).
ABS
U.S.
Canada
U.S.
CanadaMain Menu Table of Contents s t
Page 121 of 251

Driving
This section gives you tips on starting the engine under various
conditions, and how to operate the 5-speed manual and automatic
transmissions. It also includes impor-
tant information on parking your
vehicle, and the braking system. Preparing to Drive......................... 120
Starting the Engine........................ 121 Starting in Cold Weatherat High Altitude ..................... 121
5-speed Manual Transmission..... 122 Recommended Shift Points...... 122
Maximum Allowable Speeds.... 123
Automatic Transmission............... 124 Shift Lever Position Indicator.. 124
Shift Lever Positions................. 125
Maximum Allowable Speeds.... 127
Shift Lock Release..................... 128
Continuously Variable Transmission (CVT)............. 129
Parking............................................ 133 Parking Tips............................... 133
The Braking System...................... 134 Brake Wear Indicators.............. 134Brake System Design................ 135
Anti-lock Brakes........................ 135
Important SafetyReminders.......................... 136
ABS Indicator......................... 137
Driving in Bad Weather................ 138
Towing a Trailer............................ 139
DrivingMain Menu s t
Page 137 of 251
The Braking System
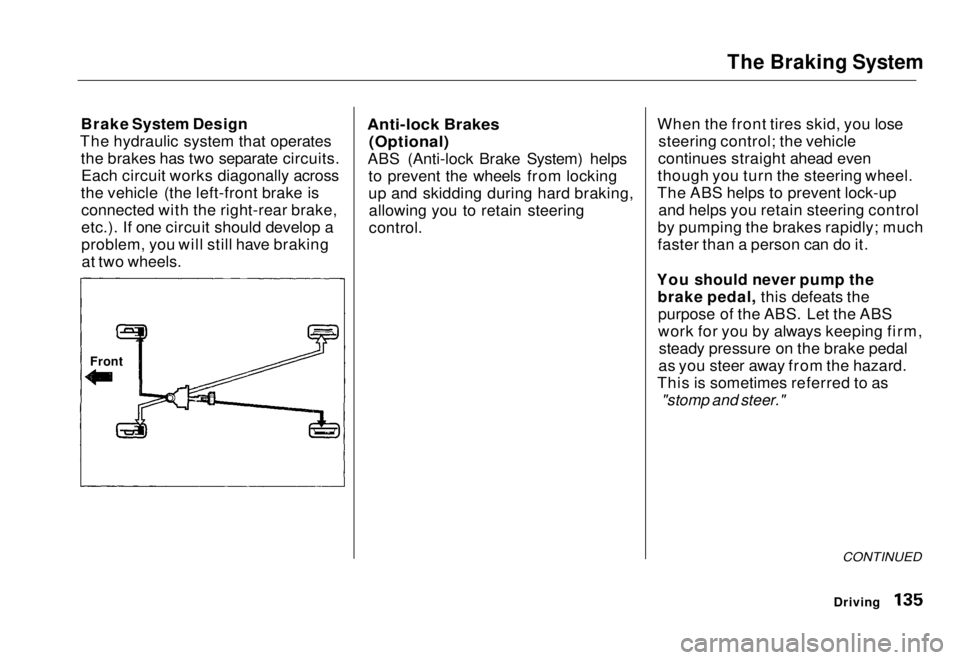
Brake System Design
The hydraulic system that operates the brakes has two separate circuits.Each circuit works diagonally across
the vehicle (the left-front brake is connected with the right-rear brake,
etc.). If one circuit should develop a
problem, you will still have brakingat two wheels.
Anti-lock Brakes
(Optional)
ABS (Anti-lock Brake System) helps to prevent the wheels from locking
up and skidding during hard braking,allowing you to retain steering
control. When the front tires skid, you lose
steering control; the vehicle
continues straight ahead even
though you turn the steering wheel.
The ABS helps to prevent lock-up and helps you retain steering control
by pumping the brakes rapidly; much
faster than a person can do it.
You should never pump the brake pedal, this defeats thepurpose of the ABS. Let the ABS
work for you by always keeping firm, steady pressure on the brake pedal
as you steer away from the hazard.
This is sometimes referred to as
"stomp and steer."
CONTINUED
Driving
FrontMain Menu Table of Contents s t
Page 138 of 251

The Braking System
You will feel a pulsation in the brakepedal when the ABS activates, and
you may hear some noise. This is normal, it is the ABS rapidly
pumping the brakes.
Activation varies with the amount of traction your tires have. On drypavement, you will need to press on
the brake pedal very hard before you activate the ABS. However, you may
feel the ABS activate immediately if
you are trying to stop on snow or ice.
Important Safety Reminders
ABS does not reduce the time or distance it takes to stop the
vehicle, it only helps with steering control during braking. You shouldalways maintain a safe following
distance from other vehicles.
ABS will not prevent a skid that results from changing direction
abruptly, such as trying to take acorner too fast or making a sudden
lane change. Always drive at a safe,
prudent speed for the road and
weather conditions.
ABS cannot prevent a loss of stability. Always steer moderately
when you are braking hard. Severe or sharp steering wheel movement
can still cause your vehicle to veer
into oncoming traffic or off the road. A vehicle with ABS may require a
longer distance to stop on loose or
uneven surfaces, such as gravel orsnow, than a vehicle without anti-
lock. Slow down and allow a greater distance between vehicles under
those conditions.
DrivingMain Menu Table of Contents s t
Page 139 of 251
The Braking System
ABS Indicator
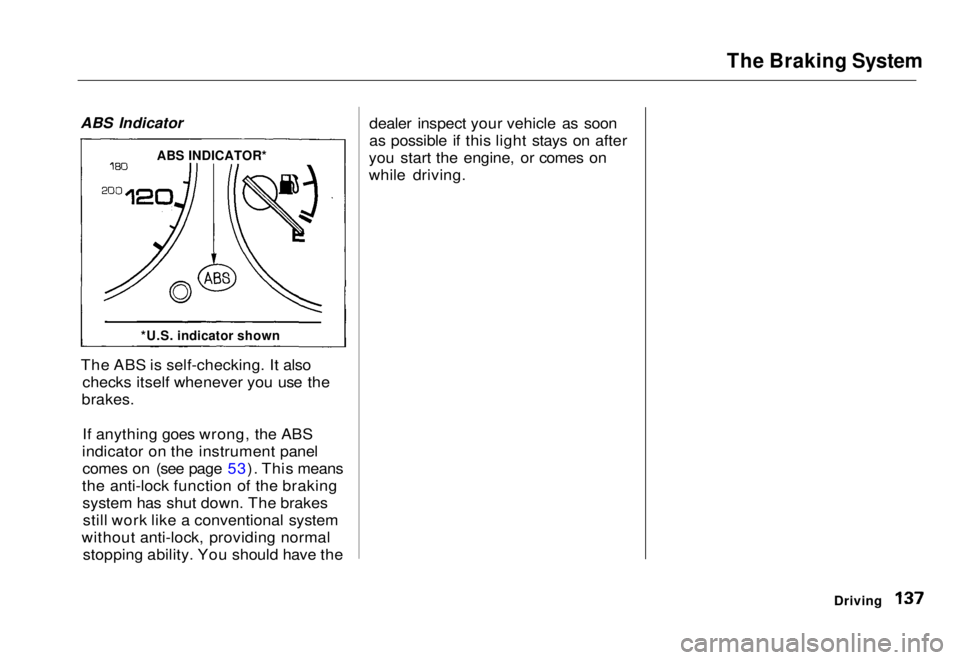
The ABS is self-checking. It also checks itself whenever you use the
brakes.
If anything goes wrong, the ABS
indicator on the instrument panel comes on (see page 53). This means
the anti-lock function of the braking system has shut down. The brakesstill work like a conventional system
without anti-lock, providing normal stopping ability. You should have the dealer inspect your vehicle as soon
as possible if this light stays on after
you start the engine, or comes on
while driving.
Driving
ABS INDICATOR*
*U.S. indicator shownMain Menu Table of Contents s t
Page 171 of 251
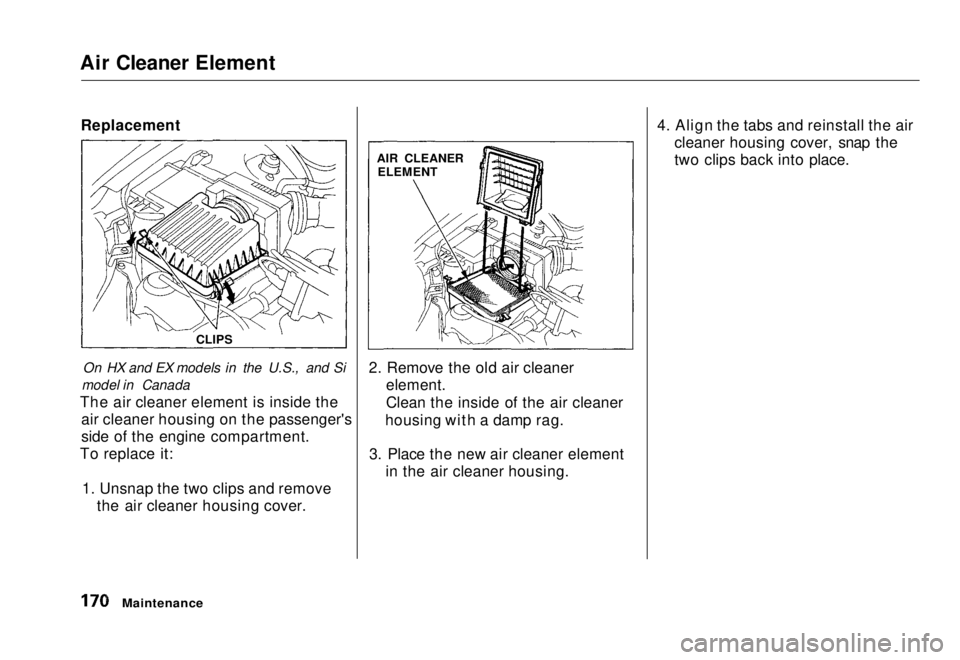
Air Cleaner Element
Replacement
On HX and EX models in the U.S., and Si
model in Canada
The air cleaner element is inside the air cleaner housing on the passenger's
side of the engine compartment.
To replace it:
1. Unsnap the two clips and remove the air cleaner housing cover. 2. Remove the old air cleaner
element.
Clean the inside of the air cleaner
housing with a damp rag.
3. Place the new air cleaner element in the air cleaner housing. 4. Align the tabs and reinstall the air
cleaner housing cover, snap the
two clips back into place.
Maintenance
CLIPS
AIR CLEANER
ELEMENTMain Menu Table of Contents s t
Page 177 of 251
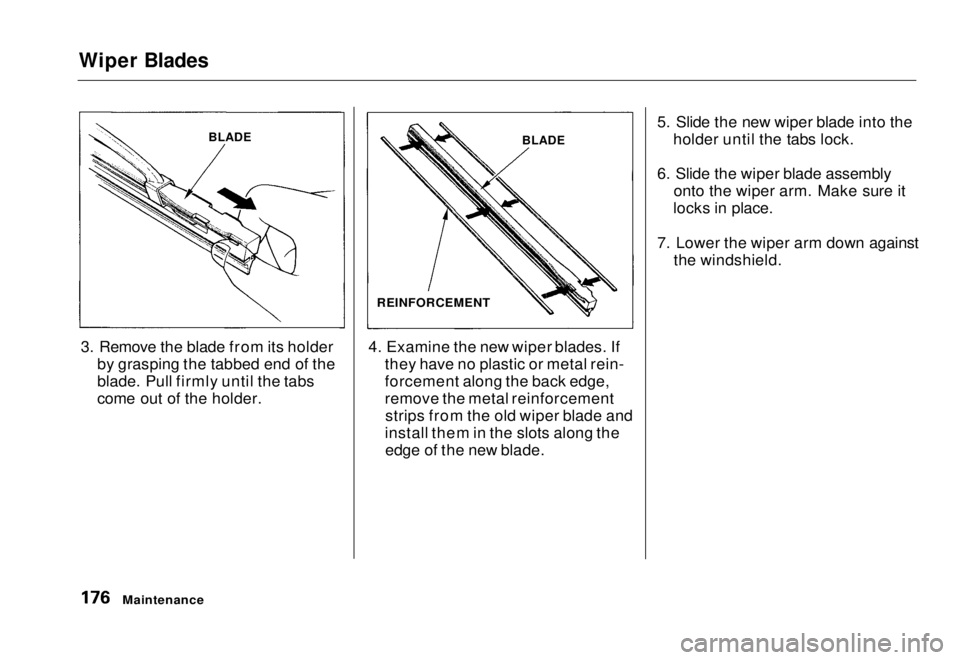
Wiper Blades
3. Remove the blade from its holder by grasping the tabbed end of the
blade. Pull firmly until the tabs
come out of the holder. 4. Examine the new wiper blades. If
they have no plastic or metal rein-
forcement along the back edge,
remove the metal reinforcementstrips from the old wiper blade and
install them in the slots along the edge of the new blade. 5. Slide the new wiper blade into the
holder until the tabs lock.
6. Slide the wiper blade assembly onto the wiper arm. Make sure it
locks in place.
7. Lower the wiper arm down against the windshield.
Maintenance
BLADE
BLADE
REINFORCEMENTMain Menu Table of Contents s t
Page 184 of 251

Tires
Replacing Tires and Wheels
The tires that came with your vehicle were selected to match the performance capabilities of the
vehicle while providing the best combination of handling, ride
comfort, and long life. You should
replace them with radial tires of thesame size, load range, speed rating,
and maximum cold tire pressure
rating (as shown on the tire's sidewall). Mixing radial and bias-ply
tires on your vehicle can reduce its
braking ability, traction, and steering
accuracy.
It is best to replace all four tires at
the same time. If that is not possible
or necessary, then replace the two
front tires or the two rear tires as a
pair. Replacing just one tire can seriously affect your vehicle's han-
dling.
The ABS works by comparing the
speed of the wheels. When replacing
tires, use the same size originally supplied with the vehicle. Tire size
and construction can affect wheel speed and may cause the system to
work inconsistently.
If you ever need to replace a wheel,
make sure the wheel's specifications
match those of the original wheel
that came on your vehicle. Re-
placement wheels are available at
your Honda dealer.
Maintenance
Installing improper tires on your
vehicle can affect handling and
stability. This can cause a crash in which you can be seriously
hurt or killed.
Always use the size and type of
tires recommended in this owner's manual.Main Menu Table of Contents s t