CD changer HONDA CIVIC COUPE 1999 Owners Manual
[x] Cancel search | Manufacturer: HONDA, Model Year: 1999, Model line: CIVIC COUPE, Model: HONDA CIVIC COUPE 1999Pages: 269, PDF Size: 2.42 MB
Page 88 of 269
Comfort and Convenience Features
The heating and air conditioning*
systems in your Honda provide a
comfortable driving environment in
all weather conditions.
The standard audio system has
many features. This section de-
scribes those features and how to
use them. (If you selected an optional audio system, refer to the
operating instructions that came
with it.)
* Air conditioning is standard on the
EX and Si models in the U.S. and on
SiR model in Canada. It is optional on
other models.
Heating and Cooling........................ 88
What Each Control Does............ 88How to Use the System............... 90
To Turn Everything Off ............. 95
Audio System................................... 96 Operating the Radio.................... 96
Adjusting the Sound.................... 98 Digital Clock................................. 99Operating the Optional CD Player/Changer.............. 100
CD Changer Error Indications.............................. 102
AM/FM/CD Audio System..... 103 Operating the Radio.................. 104
Adjusting the Sound.................. 107 Digital Clock............................... 108
Operating the CD Player.......... 109
Protecting Compact Discs........ 112 CD Changer Error Indications.............................. 114
Operating the Cassette Player...................................... 115
Theft Protection........................ 119 Radio Frequencies..................... 120
Radio Reception......................... 120
Comfort and Convenience FeaturesMain Menu s t
Page 101 of 269
Audio System
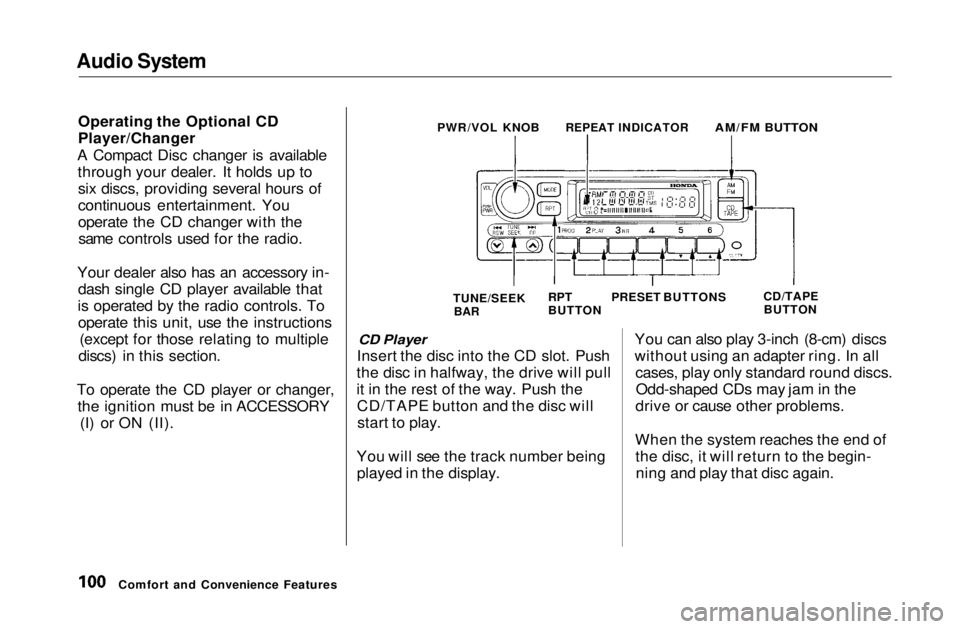
Operating the Optional CD
Player/Changer
A Compact Disc changer is available through your dealer. It holds up tosix discs, providing several hours of
continuous entertainment. You
operate the CD changer with thesame controls used for the radio.
Your dealer also has an accessory in- dash single CD player available that
is operated by the radio controls. To operate this unit, use the instructions (except for those relating to multiple
discs) in this section.
To operate the CD player or changer, the ignition must be in ACCESSORY (I) or ON (II).
CD Player
Insert the disc into the CD slot. Push
the disc in halfway, the drive will pull
it in the rest of the way. Push the CD/TAPE button and the disc willstart to play.
You will see the track number being played in the display. You can also play 3-inch (8-cm) discs
without using an adapter ring. In all
cases, play only standard round discs.Odd-shaped CDs may jam in the
drive or cause other problems.
When the system reaches the end of the disc, it will return to the begin-ning and play that disc again.
Comfort and Convenience Features PWR/VOL KNOB
REPEAT INDICATOR
AM/FM BUTTON
TUNE/SEEK
BAR
RPT
BUTTON
PRESET BUTTONS
CD/TAPE
BUTTONMain Menu Table of Contents s t
Page 102 of 269
Audio System
Press the EJECT button to remove
the disc from the player.
If you eject the disc, but do not
remove it from the slot, the system
will automatically reload the disc after 15 seconds and put the CD
player in pause mode. To begin
playing the disc, press the CD button.
CD Changer
Using the instructions that came
with the changer, load the desired CDs in the magazine, and load the
magazine in the changer. Play only standard round discs. Odd-shaped
CDs may jam in the drive or cause
other problems.
Press the CD/TAPE button. You willsee "CD" in the display. The system
will start to play the first track of the
first disc. When that disc ends, the next disc in the magazine is loaded
and played. After the last disc
finishes, the system returns to disc 1. To select a different disc, press the
appropriate preset button (1 — 6). If
you select an empty slot in the magazine, the changer will, after
finding that slot empty, try to load the CD in the next slot. This
continues until it finds a CD to load
and play.
CD Player and Changer
You can use the TUNE/SEEK bar to select tracks within a disc. If you
press and release the TUNE/SEEK
bar, the system will move to the
beginning of a track. Press the side to move to the beginning
of the next track, and the side
to move to the beginning of the
current track.
If you press and hold the TUNE/SEEK bar, you will hear a beep and
the system will continue to move
across tracks. Release the bar when
you think it has reached the desired
place on the disc. REPEAT — When you activate the
Repeat feature by pressing the RPT
button, the system continuously
replays the current track. You will
see RPT in the display as a reminder.
Press the RPT button again to turn it
off.
To take the system out of CD mode, press the AM/FM button or insert acassette in the player. If a tape is
already in the cassette player, press
the CD/TAPE button. When you
return to CD mode, play will contin-
ue at the same point that it left off.
If you turn the system off while a CD is playing, either with the PWR/VOL
knob or the ignition switch, play will continue at the same point when you
turn it back on.
Comfort and Convenience FeaturesMain Menu Table of Contents s t
Page 103 of 269
Audio System
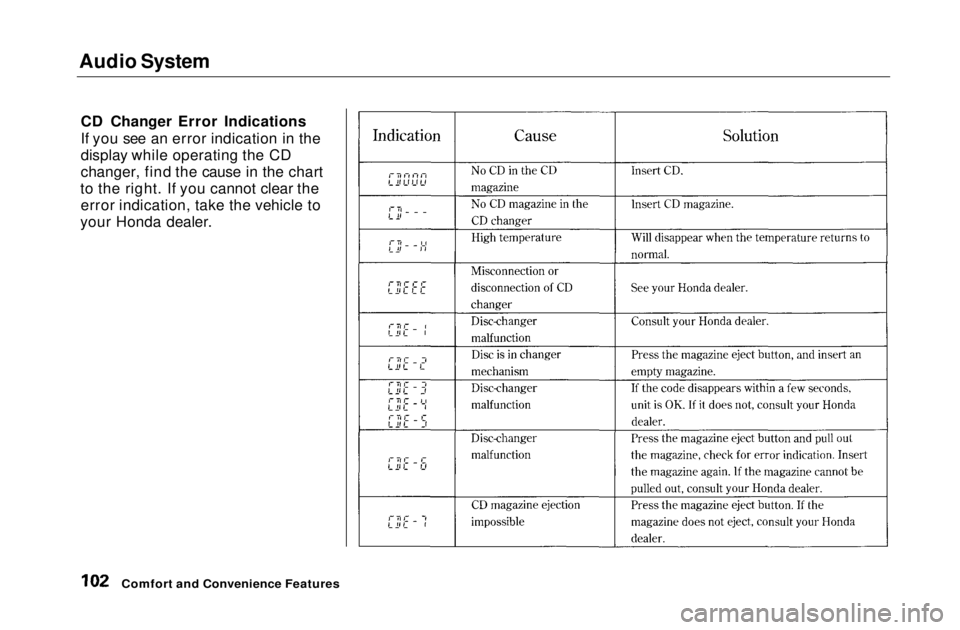
CD Changer Error Indications
If you see an error indication in the
display while operating the CD
changer, find the cause in the chart
to the right. If you cannot clear the error indication, take the vehicle to
your Honda dealer.
Comfort and Convenience FeaturesMain Menu Table of Contents s t
Page 109 of 269
Audio System
Audio System Lighting
You can use the instrument panelbrightness control dial to adjust the il-
lumination of the audio system (see
page 62). The audio system
illuminates when the parking lightsare on, even if the radio is turned off.
Digital Clock
The display of your audio system usually shows the time when the
ignition switch is in ACCESSORY (I)or ON (II). It shows operation mode
of radio, CD player, or optional CD
changer/cassette player when you
operate them, and goes back to the
time display after five seconds.
The display also goes back to the time display two seconds after you
turn the volume knob to adjust the
volume.
If an error occurs while operating
the CD player or optional CD changer, the display will show the
error code and will not switch to the time display until the error is
corrected (see page 133 and 134).
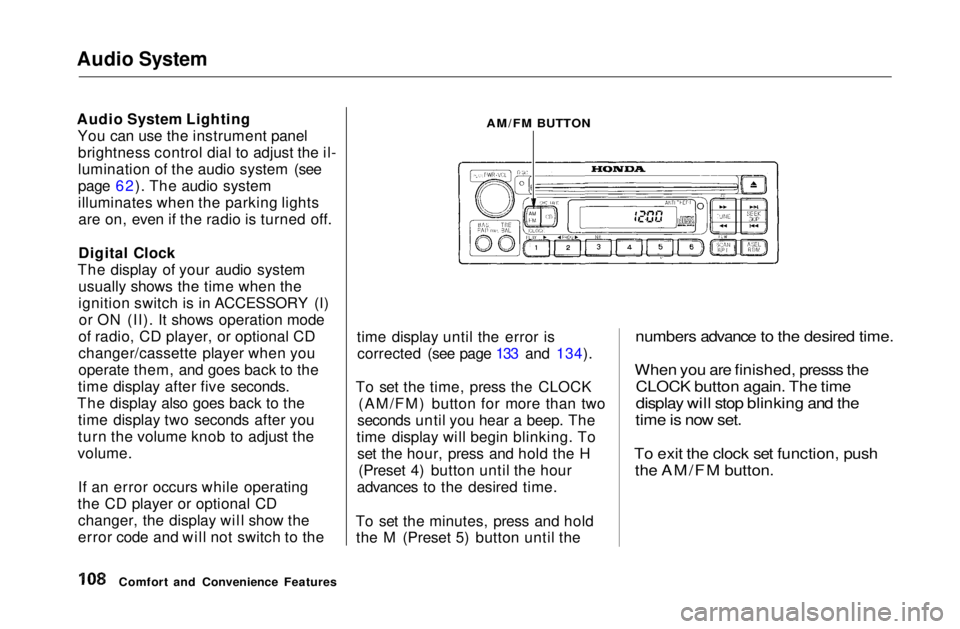
To set the time, press the CLOCK (AM/FM) button for more than two
seconds until you hear a beep. The
time display will begin blinking. To set the hour, press and hold the H (Preset 4) button until the hour
advances to the desired time.
To set the minutes, press and hold the M (Preset 5) button until the
numbers advance to the desired time.
When you are finished, presss the
CLOCK button again. The time
display will stop blinking and the
time is now set.
To exit the clock set function, push
the AM/FM button.
Comfort and Convenience Features
AM/FM BUTTONMain Menu Table of Contents s t
Page 111 of 269
Audio System
If you turn the system off while a CD
is playing, either with the PWR/VOL
knob or by turning off the ignition,
the disc will stay in the drive. When
you turn the system back on, the CD will begin playing where it left off.
Press the eject button to remove thedisc from the drive.
If you eject the disc, but do not
remove it from the slot, the system
will automatically reload the disc after 15 seconds and put the CD
player in pause mode. To begin
playing the disc, press the CD button. You can use the TUNE and SEEK/
SKIP bars while a disc is playing toselect passages and changers tracks.
To move rapidly within a track, press and hold the TUNE bar. Press the side to move forward. You will
see CUE in the display. Press the side to move backward. You
will see REW displayed. Release the bar when the system reaches the
point you want. Each time you press the side of
the SEEK/SKIP bar, the system skips forward to the beginning of the next track. Press the side to
skip backward to the beginning of
the current track. Press it again to skip to the beginning of the previous
track.
REPEAT — To activate the Repeat
feature, press and release the RPT
button. You will see RPT in the display. The system continuously replays the current track. Press the
RPT button again to turn it off.
RANDOM PLAY — This feature,
when activated, plays the tracks on the CD in random order, rather than
in the order they are recorded on theCD. To activate Random Play, press
and release the A. SEL/RDM button.
You will see RDM in the display. The system will then select and play
tracks randomly. This continues
until you deactivate Random Play by
pressing A. SEL/RDM again.
If the system is in Repeat mode, you
must turn it off by pressing RPT
button before selecting Random Play.
Comfort and Convenience FeaturesMain Menu Table of Contents s t
Page 112 of 269
Audio System
Operating the CD Changer
(Optional)
A Compact Disc changer is available for your vehicle. It holds up to six discs, providing several hours of
continuous entertainment. You
operate this CD changer with the
same controls used for the in-dash
CD player.
Load the desired CD's in the
magazine and load the magazine in
the changer according to the instructions that came with the unit.
Play only standard round discs. Odd-shaped CDs may jam in the drive or
cause other problems.
To select the CD changer, press the CD button. The disc and track
numbers will be displayed. To select a different disc, press the
appropriate preset button (1 — 6). If
you select an empty slot in the magazine, the changer will, after
finding that slot empty, try to load
the CD in the next slot. Thiscontinues until it finds a CD to load
and play.
If you load a CD in the in-dash player
while the changer is playing a CD, the system will stop the changer and
begin playing the in-dash CD. To select the changer again, press the
CD button. Play will begin where it
left off. Use the CD button to switch
between the player and the changer.
If you eject the in-dash CD while it is
playing, the system will automatically switch to the CD changer and begin
play where it left off. If there are no CDs in the changer, the display will
flash. You will have to select another mode (AM or FM) with the button. When you switch back to CD mode,
the system selects the same unit (in-dash or changer) that was playing
when you switched out of CD mode.
To use the SKIP, REPEAT, and RANDOM functions, refer to the in-
dash player operating instructions.
Comfort and Convenience FeaturesMain Menu Table of Contents s t
Page 115 of 269
Audio System
CD Changer Error Indications
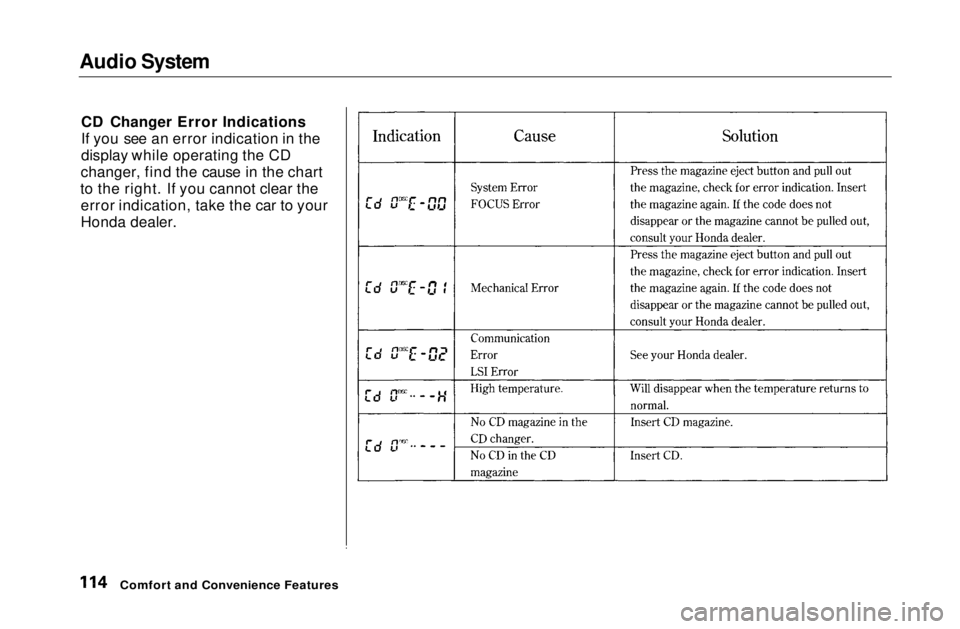
If you see an error indication in the
display while operating the CD
changer, find the cause in the chart
to the right. If you cannot clear the error indication, take the car to your
Honda dealer.
Comfort and Convenience FeaturesMain Menu Table of Contents s t
Page 261 of 269
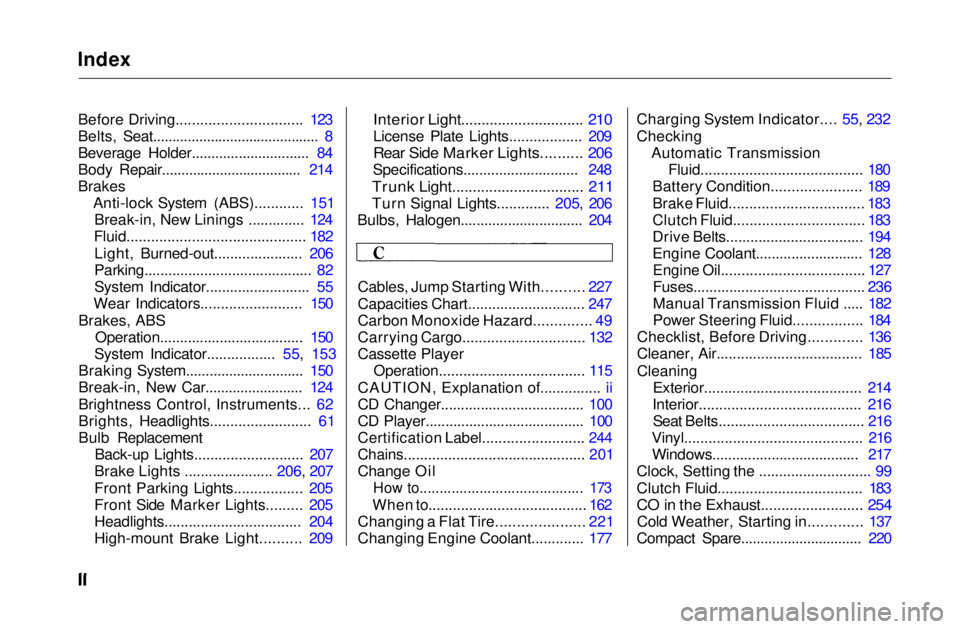
Index
Before Driving............................... 123
Belts, Seat........................................... 8
Beverage Holder.............................. 84
Body Repair.................................... 214
Brakes Anti-lock System (ABS)............ 151Break-in, New Linings .............. 124
Fluid............................................ 182
Light, Burned-out...................... 206
Parking.......................................... 82
System Indicator.......................... 55
Wear Indicators......................... 150
Brakes, ABS Operation.................................... 150
System Indicator................. 55, 153
Braking System.............................. 150
Break-in, New Car......................... 124
Brightness Control, Instruments... 62
Brights, Headlights......................... 61
Bulb Replacement Back-up Lights........................... 207
Brake Lights ...................... 206, 207
Front Parking Lights................. 205
Front Side Marker Lights......... 205
Headlights.................................. 204
High-mount Brake Light.......... 209
Interior Light.............................. 210
License Plate Lights.................. 209
Rear Side Marker Lights.......... 206
Specifications............................. 248
Trunk Light................................ 211
Turn Signal Lights............. 205, 206
Bulbs, Halogen............................... 204
Cables, Jump Starting With.......... 227
Capacities Chart............................. 247
Carbon Monoxide Hazard.............. 49
Carrying Cargo.............................. 132
Cassette Player
Operation.................................... 115
CAUTION, Explanation of............... ii
CD Changer.................................... 100
CD Player........................................ 100
Certification Label......................... 244
Chains............................................. 201
Change Oil
How to......................................... 173
When to....................................... 162
Changing a Flat Tire..................... 221
Changing Engine Coolant............. 177 Charging System Indicator.... 55, 232
Checking
Automatic Transmission
Fluid........................................ 180
Battery Condition...................... 189
Brake Fluid................................. 183
Clutch Fluid................................ 183
Drive Belts.................................. 194
Engine Coolant........................... 128
Engine Oil................................... 127
Fuses........................................... 236
Manual Transmission Fluid ..... 182
Power Steering Fluid................. 184
Checklist, Before Driving............. 136
Cleaner, Air.................................... 185
Cleaning Exterior....................................... 214
Interior........................................ 216 Seat Belts.................................... 216
Vinyl............................................ 216 Windows..................................... 217
Clock, Setting the ............................ 99
Clutch Fluid.................................... 183
CO in the Exhaust......................... 254
Cold Weather, Starting in............. 137
Compact Spare............................... 220Main Menu s t